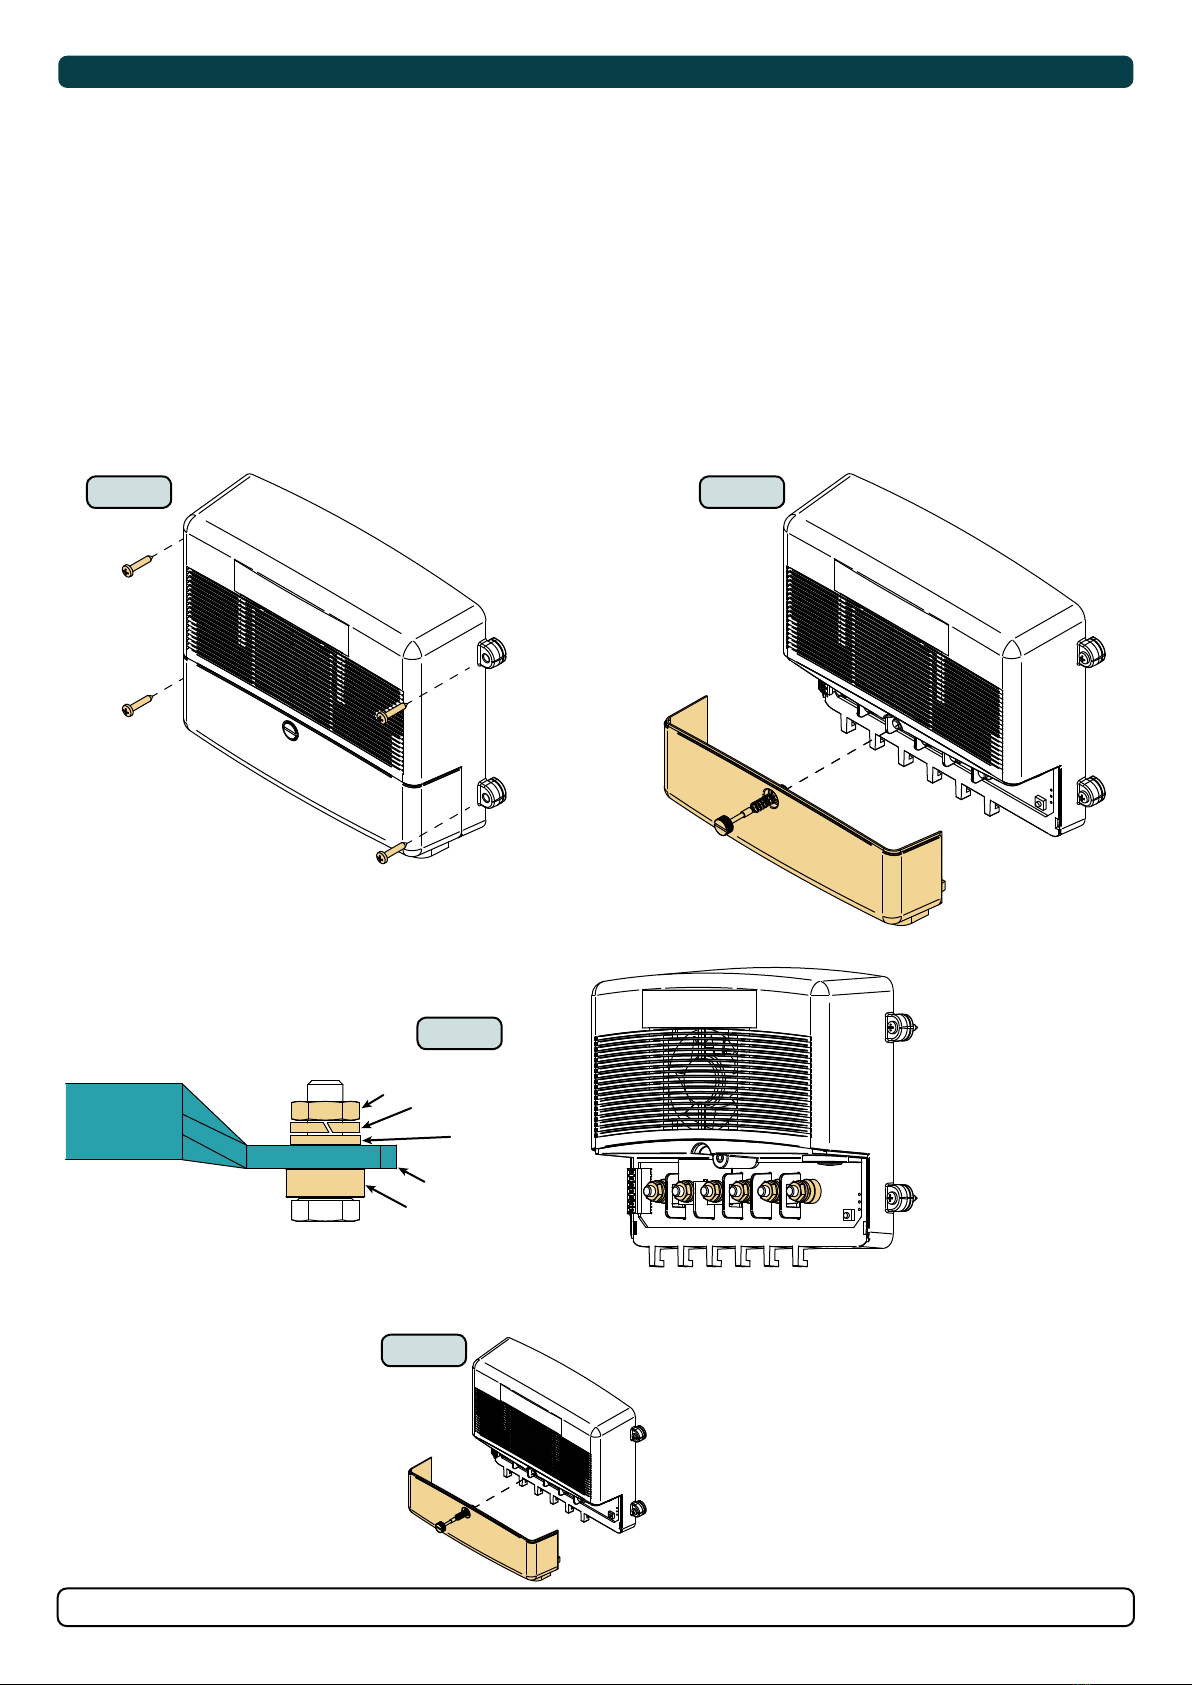
Sleipner ECU User manual

User Manual
SLEIPNER AS
P.O. Box 519
N-1612 Fredrikstad
Norway
www.sleipnergroup.com
DOCUMENT ID:
REVISION:
DATE:
LANGUAGE:
To download your language go to www.sleipnergroup.com
14 7 3
8
Keep this
manual onboard!
2 0 21
Including Installation For
External Control Unit
ECU
EN
U M
I M

214 7 3 82 0 21
-
ESI
DECLARATION OF CONFORMITY
Sleipner Motor AS
P.O. Box 519, Arne Svendsensgt. 6-8
N-1612 Fredrikstad, Norway
Declare that this product with accompanying standard control systems complies with the
essential health and safety requirements according to:
DIRECTIVE 2013/53/EU
DIRECTIVE 2014/30/EU
DIRECTIVE 2014/35/EU
MC_0020
Contents
Considerations and Precautions ........................................... 3
Features .................................................................................. 4
Operations................................................................................. 4
Technical Specications ............................................................ 4
Operations................................................................................. 5
Conguring Windlass Type........................................................ 6
Fault codes................................................................................ 6
Troubleshooting......................................................................... 7
Installation Guide
Measurements ......................................................................... 9
ECU Installation ..................................................................... 10
Visual Wiring Diagram ..................................................... 11 - 12
Spare Parts............................................................................. 13
Product Templates and Additional Resources ................... 13
Warranty Statement............................................................... 13
Products
SM903807 | ESI-1 - External Signal Interface

3
14 7 3 82 0 21
-
ESI
DECLARATION OF CONFORMITY
Sleipner Motor AS
P.O. Box 519, Arne Svendsensgt. 6-8
N-1612 Fredrikstad, Norway
Declare that this product with accompanying standard control systems complies with the
essential health and safety requirements according to:
DIRECTIVE 2013/53/EU
DIRECTIVE 2014/30/EU
DIRECTIVE 2014/35/EU
MC_0020
Contents
• Always keep the boat’s motor running when operating the windlass.
• Always turn off the power to the windlass when it is not operated.
• The anchor must always be secured with security line when windlass is not in use.
• While dropping anchor, do not push the “UP” button until the anchor is resting at the seabed.
• Windlass and accessories must be installed and used in a manner that will not cause damage or injury.
• Personnel qualifi ed for high current installations must carry out or check the installation.
• Do not mount any windlass parts in hazardous environments (I.e. flammable fumes or gasses).
• The control unit is NOT protected from water ingress, it must be installed in a dry area and not exposed for
water.
MC_0403
Considerations and Precautions
RESPONSIBILITY OF INSTALLER
The installer must read this document to ensure necessary familiarity with the product before installation.
Instructions in this document cannot be guaranteed to comply with all international and national regulations. It is the responsibility
of the installer to follow all applicable international and national regulations when installing Sleipner products.
The recommendations given in this document are guidelines ONLY, and Sleipner strongly recommends that advice is obtained from
a person familiar with the particular vessel and applicable regulations.
This document contains general installation instructions intended to support experienced installers. If you are not skilled in this
type of work, please contact a professional installer for assistance.
If required by local regulation, electrical work must be done by a licensed professional.
Health and safety procedures must be followed during installation.
Faulty installation of Sleipner products will render all warranties given by Sleipner Motor AS. MC_0038
IMPORTANT NOTICE S-LINK™ SYSTEM
When installing an S-Link™ system DO NOT connect any other control equipment directly to the S-Link™ bus except original Sleipner S-Link™
products. Connecting third-party equipment must always be connected through a Sleipner-supplied interface product. Any attempt to directly
control or connect into the S-Link™ control system without a designated or approved interface will render all warranties and responsibilities
of all connected Sleipner products. If you are interfacing the S-Link™ bus by agreement with Sleipner through a designated Sleipner supplied
interface, you are required to install at least one original Sleipner control panel to enable efficient troubleshooting if necessary.
MC_0265

414 7 3 82 0 21
-
ESI
Description Value
Supply 8-31 VDC/ max 7 Watts
Operating temperature –20°C to +70°C [–4°F to +158°F]
Storage temperature –40°C to +85°C [–40°F to +176°F]
IP Rating IP20
Weight 800 g [1.8 lb]
Maximum motor current 350A
Terminal connections control/ endstop 0.2 to 1.5 mm² [16 to 24 AWG] Cage clamp
Terminal connections motor/ battery M6 bolt terminals
MC_0400
Technical Specifi cations
Side-Power Windlass Control Unit is designed to control the Side-Power Mini, Midi and Maxi windlasses. These windlasses are equipped with a “Free
fall” system allowing the anchor rope to wind out freely for a quick anchor drop and easy mooring bow/stern against peer or land. The free fall is
initiated by pushing the “Down” bottom on your panel or remote control. The anchor weight and fi tting of the anchor bracket must be selected so the
anchor will drop/fall out when released.
The Side-Power Windlass Control Unit is compatible with SidePower panels and remote control systems. Special care have been taken to simplify
intstallation, improve usability and the inherent features of this control unit. Additionally this controller has a range of new security features. Still, be
aware that anchor loads may be very high, this equipment must be operated wisely, and only by responsible crew knowing how the system works.
• Automatic detection of 12V or 24V system.
• Programmable windlass type (Mini/Midi/Maxi/Maxi Chain)
• LEDs Power for program/failure/end stop indication.
• PWM speed control.
• Over-current limiting and motor overheat protecting algorithm protects motor from damage. Note that there is no physical temperature sensor in the
motor.
• Motor Soft Start.
• Reduced speed and force limit after fi rst end stop detection.
• Two end stop points can be detected (detected by metal wire spun around the rope at user selected positions). Maxi Chain windlass does not include
the end stop function.
• Power relays disconnect motor power when the windlass is not in use or if a fault has been detected.
• Delayed start on operation “OUT” to safeguard against unwanted operation.
• Physically separated terminals reduce risk of short circuits
IMPORTANT
This manual contains information you need to know before installing the windlass. Please read it carefully.
• Keep your distance to the windlass, the rope, anchor and anchor brackets during operation.
• Keep the rope/chain under observation during anchor handling.
• Make sure anyone using the windlass knows how to operate it.
• Be aware when the anchor are raised as it can bring unwanted debris up from the bottom, potentially damaging your boat.
• If the windlass is straining as the anchor are raised, stop for a few seconds and let the boat pic up momentum before continuing
the raise.
• If the anchor is stuck, release some rope/chain and attach it to a cleat before using the boat to pull the anchor free. The windlass
is not designed for loads beyond the specifi ed pull capabilities.
• The anchor must always be secured to the boat while sailing. Use the security line or other means to prevent unintentional
anchor drop.
• Turn off the power to the windlass when not in use.
• Children must not operate the windlass.
• Careless use can cause damage or injury!
• Make sure to have good battery capacity, and keep the engine running windlass operation.
• Sleipner Motor AS is not responsible for injury caused by the use of our windlass systems.
MC_0402
Features
MC_0402
Operations

5
14 7 3 82 0 21
-
ESI
Side-Power Windlass Control Unit is designed to control the Side-Power Mini, Midi and Maxi windlasses. These windlasses are equipped with a “Free
fall” system allowing the anchor rope to wind out freely for a quick anchor drop and easy mooring bow/stern against peer or land. The free fall is
initiated by pushing the “Down” bottom on your panel or remote control. The anchor weight and fi tting of the anchor bracket must be selected so the
anchor will drop/fall out when released.
The Side-Power Windlass Control Unit is compatible with SidePower panels and remote control systems. Special care have been taken to simplify
intstallation, improve usability and the inherent features of this control unit. Additionally this controller has a range of new security features. Still, be
aware that anchor loads may be very high, this equipment must be operated wisely, and only by responsible crew knowing how the system works.
• Automatic detection of 12V or 24V system.
• Programmable windlass type (Mini/Midi/Maxi/Maxi Chain)
• LEDs Power for program/failure/end stop indication.
• PWM speed control.
• Over-current limiting and motor overheat protecting algorithm protects motor from damage. Note that there is no physical temperature sensor in the
motor.
• Motor Soft Start.
• Reduced speed and force limit after fi rst end stop detection.
• Two end stop points can be detected (detected by metal wire spun around the rope at user selected positions). Maxi Chain windlass does not include
the end stop function.
• Power relays disconnect motor power when the windlass is not in use or if a fault has been detected.
• Delayed start on operation “OUT” to safeguard against unwanted operation.
• Physically separated terminals reduce risk of short circuits
IMPORTANT
This manual contains information you need to know before installing the windlass. Please read it carefully.
• Keep your distance to the windlass, the rope, anchor and anchor brackets during operation.
• Keep the rope/chain under observation during anchor handling.
• Make sure anyone using the windlass knows how to operate it.
• Be aware when the anchor are raised as it can bring unwanted debris up from the bottom, potentially damaging your boat.
• If the windlass is straining as the anchor are raised, stop for a few seconds and let the boat pic up momentum before continuing
the raise.
• If the anchor is stuck, release some rope/chain and attach it to a cleat before using the boat to pull the anchor free. The windlass
is not designed for loads beyond the specifi ed pull capabilities.
• The anchor must always be secured to the boat while sailing. Use the security line or other means to prevent unintentional
anchor drop.
• Turn off the power to the windlass when not in use.
• Children must not operate the windlass.
• Careless use can cause damage or injury!
• Make sure to have good battery capacity, and keep the engine running windlass operation.
• Sleipner Motor AS is not responsible for injury caused by the use of our windlass systems.
MC_0402
Features
MC_0402
Operations
OPERATIONS AND FUNCTIONS OF THE WINDLASS CONTROL UNIT 150800 Form is covering both chain and rope
windlasses. Where there is a difference
this is described
Operation/operation
Down = Out and Up
= Inn
Incident Description Comment Limitation
Main power to the
windlass control unit is
turned on
Check powerup. Fan runs 1 sec. Possibly,
previously selected windlass mode will still be
enabled. Error codes reset.
Normal situation by anchoring for transit or
departure after anchoring.
Note! Windlass control unit do not
"remember" where anchor is located,
after beeing unpowered. Can also be
used for troubleshooting.
Since windlass control unit do not
remember where the anchor is located,
will a normal "inn"/pulling of anchor run
not be possible after powerup.
"Out" is pressed. Or "out"
is pressed and held
Rope windlass: Freefall activated (you can hear
the windlass motor run for 1 sec). Motor stops
after 1 sec whether "out" held in. Chain windlass:
"Out" is held as long as you wants to run out
anchor.
Rope is released and anchor can drop to the
bottom. When the anchor reaches the bottom,
the rope is still disengaged. The function is
completed profundity of 'out' button is pressed
or held down.
Anchor can be dropped at the desired
position, and the boat can sail to fi nal
position before freefall deactivates
by pressing "up". NB! Depending on
the anchor dip angle of the bracket,
can some installations require help to
release the anchor.
"Do not press ""up"" before anchor has
reached the bottom.
NB! Motor always has a straight flow shift
resting time of 1 second."
"inn" is pressed briefly Anchor pulled slightly in. Rope is no longer
disengaged.
Used to adjust the anchor or to lock the rope. If you want to "attach" anchor, rope
should be attached to the boat
(Mooring line or similar.)
Caution! When setting anchor, it may be
diffi cult to control applied load. Low drift
when releasing the rope (boat and rope
is not in line) can also cause heavy loads
on the anchor rollers and fastenings. Use
a suitable mounting point on the boat.
Especially under rough conditions.
"inn" is pressed and held The windlass starts pulling the anchor The windlass goes from 0-100% speed in 3 sec
and continues untill the button is released or
fi rst end stop is activated.
Pull Speed: 20-25 m / min depending
on load
Long and heavy run on motor or short
nearly blocked run can cause the
protection device to stop the windlass.
Other recorded errors can also cause
stops. (Error Codes is shown under the
cover on the control unit, see manual for
more information).
First end stop is detected
(NB end stop detected
during run)
Windlass stop Windlass stops. From this point the anchor can
be released again or pulled up (windlass will
be running at reduced speed if you continue
running towards second end top)
In most cases place the end stop to
anchor aprox 1 meter below the water
surface. Then you can carefully pull
inn the anchor in order to "wash" the
anchor before it is pulled into inner
position
Continue pulling inn: Maximum allowed
power consumtion is limited to protect
fi ttings, brackets, platform and windlass.
Second end stop is
detected (NB end stop
detected during run)
Windlass stop From this point it is only possible to drop
anchor if the main power is cut. (Control unit
is reset)
This end stop should be positioned so
the anchor reaches correct position in
the bracket and the rope is tight.
Not possible to pull inn.
Double-tap, with hold on
second press 2
(2) Up slowly / anchor inn
(1) Normal inn
Windlass runs with 40% speed (approximately
8 m / min)
This is the only way to pull up the
rope/anchor directly after powerup.
(Unpowered after overnight)
Reduced power consumtion. Maximum
running time on reduced speed = 30sec.
(1)Firmware version 1.007
(2)Firmware version 1.008
MC_0401
Operations

614 7 3 82 0 21
-
ESI
1. Press and hold “Confi g” button for 3 seconds, until Power and Fault LED starts blinking.
2. Press “Confi g” button to cycle through types, until the Mode LEDs show the correct pattern.
3. The controller returns to normal operation after 3 seconds of inactivity
4. Verify that the pattern shown is correct. This description can also be found on the back of the terminal covers
NOT SET
Press and hold “Confi g” button for 3 seconds, until Power and Fault LED starts blinking.
MINI ROPE
Confi guration set for using a MINI windlass utilising a rope anchor lead.
MIDI ROPE
Confi guration set for using a MIDI windlass utilising a rope anchor lead.
MAXI ROPE
Confi guration set for using a MAXI windlass utilising a rope anchor lead.
MAXI CHAIN
Confi guration set for using a MAXI windlass utilising a chain anchor lead.
..................
MHPP ROPE
Confi guration set for using a MHPP (Midi Hard Pull Parking) windlass utilising a rope anchor lead. This confi guration allows for increased pull after the
fi rst end stop. This is designed for installations that require a higher pull than normal to bring the anchor into its parked position.
“Fault” LED is lit:
The last fault condition detected by the controller is indicated by the “Mode” LEDs, visible when the terminal cover is removed. Some faults will inhibit
operation, while others allow continued use. See Troubleshooting table.
MC_0405
MC_0405
Confi guring Windlass Type
Fault Codes
If not required the MHPP confi guration can damage the windlass system.

7
14 7 3 82 0 21
-
ESI
FAULT SYMPTOM FAULT CODES/STATUS SOLUTION
Windlass does not operate "Power" LED not lit Check:
Main switch/breaker is engaged.
Check battery fuses.
Visually inspect cables and verify that terminals are tight.
Measure battery voltage.
"Power" LED lit Turn on panel / remote control (see user manual)
See below:
Windlass does not operate after
installation
“Controller Overload” Current limitation has triggered.
If motor is not turning and you can hear a relay inside the controller clicking
in and out when you try to operate the windlass, check wiring A1, A2, D1 &
D2 between motor and controller.
Windlass only runs for 0,5 seconds
when pressing "IN"
None Check control panel connections. Signals for "IN" and "OUT" might be
swapped.
When pressing "OUT" free fall is not
engaged.
Or: When pressing "IN", motor is
running but gypsy is not turning
None Swap motor cables D1 and D2 on the control unit
Windlass has poor performance “Low voltage” Voltage has dropped below 9V
Check batteries.
None Measure battery voltage while operating the windlass. I voltage measure
below 11V/22V, allow batteries to charge.
If the battery voltage is acceptable, measure voltage on the motor terminals,
cable voltage drop should be less than 1V when motor is running.
Windlass releases anchor, but do not
wind in
None Check that end stop sensor is not active (Indicated by "End Stop" LED on
control unit or LED built into the sensor.)
Check sensor connections on the control unit.
Sensor LED should not be lit if no metal object is present in front of it.
Windlass wind past endstop None Check that the end stop wire wound around the rope is intact. Pull the rope
with end stop wire over the end stop sensor and verify that («End Stop» LED
light up)
Adjust sensor closer to the rope if neccesary.
Windlass releases anchor, but stops
immediatly when pressing "IN"
None or “Low voltage” If the battery is in poor condition it might measure 12/24V when windlass is
not in use and still experince a signifi cant voltage drop when the motor starts
(such voltage dips might be diffcult to measure) This type of voltage drops
can lead to false triggering of the end stop sensor.
Windlass stops during operation “Motor Overload” Current limitation has triggered.
This means that the windlass is overloaded. Try again with reduced load.
If this fault is triggered while the windlass is lightly loaded, it might indicate
a mechanical failure.
“Controller Overtemp” The control unit temperature sensor is too warm.
Let the controller cool down, and try again.
“Motor Overtemp” The motor is too hot.
The windlass controller calculates motor temperature depending on load an
run time.
Let the windlass cool down.
“Controller Overload” This fault indicates that the internal protection of the contrroller has trig-
gered. This can be caused by exccessive surrounding temperature and high
load
“Runtime Exceeded” Signal "OUT" or "IN" have been continuous for more than 5 minutes. This is a
protection against possible faulty control signals. Re-activation is possible.
Abnormal noise during operation The windlass must be serviced.
Windlass operates, but rope is not
wound in
The rope can slip in the gypsy if the windlass is mounted incorrectly.
Anchor is not released The anchor might not release from the bracket if mounted incorrectly.
IMPORTANT
Main switch/ braker must be disconnected whenever working on the windlass mechanical parts
IMPORTANT
If the windlass still does not work normally after you have tried these procedures, the
fault is in the windlass itself. Contact your nearest dealer.
MC_0401
Troubleshooting

814 7 3 82 0 21
-
ESI
SLEIPNER AS
P.O. Box 519
N-1612 Fredrikstad
Norway
www.sleipnergroup.com
DOCUMENT ID:
REVISION:
DATE:
LANGUAGE:
Installation Guide

9
14 7 3 82 0 21
-
ESI
Measurement
code Measurement description mm inch
L ESI Length 190 7.48
+L Additional ESI Length 212 8.35
H ESI Height 167 6.6
W ESI Width 59 2.3
+W Additional ESI Width 5 0.2
(a) Distance of attachment holes (width) 200 7.87
(b) Distance of attachment holes (height) 95 3.74
ECU
MC_0399
Measurements
MG_0330
W
(a)
(b)
L
+L
H
+W

10 14 7 3 82 0 21
-
ESI
Pre Installation check.
- The unit is not water resiststant and must be placed in a dry area close to the windlass motor.
- Use ring termianls of good quality with the correct size for the selected battery cables. Bolt hole shuld be 6mm.
- The control unit must be mounted with the the cables protruding downwards.
1. Mount the ECU to a dry surface area. Ensure attached cables will protrud downwards.(NB: The unit has mounts that ensures space between the
unit and it’s mounting surface. This to avoid condensation to enter the unit. It also ensures proper ventilation of the enclosure.)
2. Remove the cable cover plate.
3. Attached cables. Pay attention to assemble the terminal spacers and washers in the correct order. Tighten the teminals to maximum 8 Nm.
4. Remount the cable cover plate.
MC_0404
ECU Installtion
MG_0471
1 2
3
4
Nut
Spring washer
Cover plate
Cover plate
Washer
Cable lug
Spacer

11
14 7 3 82 0 21
-
ESI
Pre Installation check.
- The unit is not water resiststant and must be placed in a dry area close to the windlass motor.
- Use ring termianls of good quality with the correct size for the selected battery cables. Bolt hole shuld be 6mm.
- The control unit must be mounted with the the cables protruding downwards.
1. Mount the ECU to a dry surface area. Ensure attached cables will protrud downwards.(NB: The unit has mounts that ensures space between the
unit and it’s mounting surface. This to avoid condensation to enter the unit. It also ensures proper ventilation of the enclosure.)
2. Remove the cable cover plate.
3. Attached cables. Pay attention to assemble the terminal spacers and washers in the correct order. Tighten the teminals to maximum 8 Nm.
4. Remount the cable cover plate.
MC_0404
ECU Installtion
MG_0404
To change motor direcon:
Change cables D1 and D2 in control box
Mini/Midi
(Altern. control panel) Control panel or Control panel
86-00002
86-08950
86-08955
Opt.
Side-power
remote
receiver
br
bk
150810
Control box
cong
B
Connecn to control box
(without Sidepower control cable) :
white to terminal N
green to terminal OUT
brown to terminal V+
4-lead
Sidepower
control cable
Connecn to control box :
Black to terminal V-
Blue to terminal N
Grey to terminal OUT
Red to terminal V+
Main circuit
breaker/fuse
A
+
Baery
-
AUX
BAT
C
Autostop
sensor (opt.) Motor
Cable size A,B and C :
f total length
A+B+C <10m : 25mm2
A+B+C >10m : 35mm2
B+ A1 A2 D1 D2 B-
150800
Visual Wiring Diagram

12 14 7 3 82 0 21
-
ESI
MG_0403
Control box
150800
B+ A1 A2 D1 D2 B-
br
bk
cong
150810
B
AUX
Main circuit
breaker/fuse
BAT
A
+ D E F
Bery
-
C
A2 A1
D2 D1
Autostop Sensor
(Not applicable for chain) Motor
Maxi
To change motor direcon:
Change cables D1 and D2 on motor
Cable size A,B,C,D,E and F :
f total length
A+B+C+D+E+F <6m : 25mm2
A+B+C+D+E+F=6-16m : 35mm2
A+B+C+D+E+F>16m : 50mm2
(Altern. control panel) Control panel
or
Control panel
86-00002 86-08950 86-08955
Opt.
Side-power
remote
receiver
4-lead
Sidepower
control cable
Connecn to control box
(without Sidepower control cable) :
white to terminal N
green to terminal OUT
brown to terminal V+
Connecn to control box :
Black to terminal V-
Blue to terminal N
Grey to terminal OUT
Red to terminal V+
Visual Wiring Diagram
Connecting the motor and battery cables on Maxi
- Connect the four motor cables to the Terminals masked A1/A2/D1/D2.
- Connect supply cable from battery negative to the Terminal marked B-.
- Connect supply cable from breaker/fuse to the Terminal marked B+. Connect beaker/fuse to battery main switch.
- Tighten all terminals properly, with a maximum torque of 5Nm. Over-tightening may damage the terminals.
- Leave breaker/fuse disconnected until the installation is completed.
IMPORTANT
If motor runs in the wrong direction, swap cable D1 and D2 on the control unit.

13
14 7 3 82 0 21
-
ESI
MG_0403
Control box
150800
B+ A1 A2 D1 D2 B-
br
bk
cong
150810
B
AUX
Main circuit
breaker/fuse
BAT
A
+ D E F
Bery
-
C
A2 A1
D2 D1
Autostop Sensor
(Not applicable for chain) Motor
Maxi
To change motor direcon:
Change cables D1 and D2 on motor
Cable size A,B,C,D,E and F :
f total length
A+B+C+D+E+F <6m : 25mm2
A+B+C+D+E+F=6-16m : 35mm2
A+B+C+D+E+F>16m : 50mm2
(Altern. control panel) Control panel
or
Control panel
86-00002 86-08950 86-08955
Opt.
Side-power
remote
receiver
4-lead
Sidepower
control cable
Connecn to control box
(without Sidepower control cable) :
white to terminal N
green to terminal OUT
brown to terminal V+
Connecn to control box :
Black to terminal V-
Blue to terminal N
Grey to terminal OUT
Red to terminal V+
Visual Wiring Diagram
Connecting the motor and battery cables on Maxi
- Connect the four motor cables to the Terminals masked A1/A2/D1/D2.
- Connect supply cable from battery negative to the Terminal marked B-.
- Connect supply cable from breaker/fuse to the Terminal marked B+. Connect beaker/fuse to battery main switch.
- Tighten all terminals properly, with a maximum torque of 5Nm. Over-tightening may damage the terminals.
- Leave breaker/fuse disconnected until the installation is completed.
IMPORTANT
If motor runs in the wrong direction, swap cable D1 and D2 on the control unit.
1. Sleipner Motor AS (The “Warrantor”) warrants that the equipment (parts, materials and embedded software of products) manufactured by the
Warrantor is free from defects in workmanship and materials for the purpose for which the equipment is intended and under normal use and
service (the “Warranty”).
2. This Warranty is in effect for two years (Leisure Use) or one year (Commercial and other Non-leisure Use) from the date of purchase by the end
user (for demonstration vessels, the dealer is deemed as end user).
3. This Warranty is transferable and covers the equipment for the specified warranty period.
4. The warranty does not apply to defects or damages caused by faulty installation or hook-up, abuse or misuse of the equipment including exposure
to excessive heat, salt or fresh water spray, or water immersion except for equipment specifically designed as waterproof.
5. In case the equipment seems to be defective, the warranty holder (the “Claimant”) must do the following to make a claim:
(a) Contact the dealer or service centre where the equipment was purchased and make the claim. Alternatively, the Claimant can make the
claim to a dealer or service centre found at www.sleipnergroup.com. The Claimant must present a detailed written statement of the nature
and circumstances of the defect, to the best of the Claimant’s knowledge, including product identifi cation and serial nbr., the date and place of
purchase and the name and address of the installer. Proof of purchase date should be included with the claim, to verify that the warranty period
has not expired;
(b) Make the equipment available for troubleshooting and repair, with direct and workable access, including dismantling of furnishings or similar,
if any, either at the premises of the Warrantor or an authorised service representative approved by the Warrantor. Equipment can only be returned
to the Warrantor or an authorised service representative for repair following a pre-approval by the Warrantor’s Help Desk and if so, with the Return
Authorisation Number visible postage/shipping prepaid and at the expense of the Claimant.
6. Examination and handling of the warranty claim:
(a) If upon the Warrantor’s or authorised service Representative’s examination, the defect is determined to result from defective material or
workmanship in the warranty period, the equipment will be repaired or replaced at the Warrantor’s option without charge, and returned to the
Purchaser at the Warrantor’s expense. If, on the other hand, the claim is determined to result from circumstances such as described in section 4
above or a result of wear and tear exceeding that for which the equipment is intended (e.g. commercial use of equipment intended for leisure use),
the costs for the troubleshooting and repair shall be borne by the Claimant;
(b) No refund of the purchase price will be granted to the Claimant, unless the Warrantor is unable to remedy the defect after having a reasonable
number of opportunities to do so. In the event that attempts to remedy the defect have failed, the Claimant may claim a refund of the purchase
price, provided that the Claimant submits a statement in writing from a professional boating equipment supplier that the installation instructions of
the Installation and Operation Manual have been complied with and that the defect remains.
7. Warranty service shall be performed only by the Warrantor, or an authorised service representative, and any attempt to remedy the defect by
anyone else shall render this warranty void.
8. No other warranty is given beyond those described above, implied or otherwise, including any implied warranty of merchantability, fitness for a
particular purpose other than the purpose for which the equipment is intended, and any other obligations on the part of the Warrantor or its
employees and representatives.
9. There shall be no responsibility or liability whatsoever on the part of the Warrantor or its employees and representatives based on this Warranty
for injury to any person or persons, or damage to property, loss of income or profit, or any other incidental, consequential or resulting damage
or cost claimed to have been incurred through the use or sale of the equipment, including any possible failure or malfunction of the equipment or
damages arising from collision with other vessels or objects.
10. This warranty gives you specific legal rights, and you may also have other rights which vary from country to country.
At Sleipner we continually reinvest to develop and offer the latest technology in marine advancements. To see the many unique designs we have
patented visit our website www.sleipnergroup.com/patents
Find your local professional dealer from our certifi ed
worldwide network for expert service and support.
visit our website www.sleipnergroup.com/support
For additional supporting documentation, we advise you
to visit our website www.sleipnergroup.com and fi nd your
Sleipner product.
Service and Support
Product Spare Parts and Additional Resources
Warranty statement
Patents
MC_0024
MC_0024
MC_0024
MC_0024

14 14 7 3 82 0 21
-
ESI
..................................................................................................................................................................................................................................................
..................................................................................................................................................................................................................................................
..................................................................................................................................................................................................................................................
..................................................................................................................................................................................................................................................
..................................................................................................................................................................................................................................................
..................................................................................................................................................................................................................................................
..................................................................................................................................................................................................................................................
..................................................................................................................................................................................................................................................
..................................................................................................................................................................................................................................................
..................................................................................................................................................................................................................................................
..................................................................................................................................................................................................................................................
..................................................................................................................................................................................................................................................
..................................................................................................................................................................................................................................................
..................................................................................................................................................................................................................................................
..................................................................................................................................................................................................................................................
..................................................................................................................................................................................................................................................
..................................................................................................................................................................................................................................................
..................................................................................................................................................................................................................................................
..................................................................................................................................................................................................................................................
..................................................................................................................................................................................................................................................
..................................................................................................................................................................................................................................................
..................................................................................................................................................................................................................................................
..................................................................................................................................................................................................................................................
..................................................................................................................................................................................................................................................
..................................................................................................................................................................................................................................................
..................................................................................................................................................................................................................................................
..................................................................................................................................................................................................................................................
..................................................................................................................................................................................................................................................
..................................................................................................................................................................................................................................................
..................................................................................................................................................................................................................................................
..................................................................................................................................................................................................................................................
..................................................................................................................................................................................................................................................
MC_0037
Notes
..................................................................................................................................................................................................................................................
..................................................................................................................................................................................................................................................
..................................................................................................................................................................................................................................................
..................................................................................................................................................................................................................................................
..................................................................................................................................................................................................................................................
..................................................................................................................................................................................................................................................
..................................................................................................................................................................................................................................................
..................................................................................................................................................................................................................................................
..................................................................................................................................................................................................................................................
..................................................................................................................................................................................................................................................
..................................................................................................................................................................................................................................................
..................................................................................................................................................................................................................................................
..................................................................................................................................................................................................................................................
..................................................................................................................................................................................................................................................
..................................................................................................................................................................................................................................................
..................................................................................................................................................................................................................................................
..................................................................................................................................................................................................................................................
..................................................................................................................................................................................................................................................
..................................................................................................................................................................................................................................................
..................................................................................................................................................................................................................................................
..................................................................................................................................................................................................................................................
..................................................................................................................................................................................................................................................
..................................................................................................................................................................................................................................................
..................................................................................................................................................................................................................................................
..................................................................................................................................................................................................................................................
..................................................................................................................................................................................................................................................
..................................................................................................................................................................................................................................................
..................................................................................................................................................................................................................................................
..................................................................................................................................................................................................................................................
..................................................................................................................................................................................................................................................
..................................................................................................................................................................................................................................................
..................................................................................................................................................................................................................................................
MC_0037
Notes

15
14 7 3 82 0 21
-
ESI
..................................................................................................................................................................................................................................................
..................................................................................................................................................................................................................................................
..................................................................................................................................................................................................................................................
..................................................................................................................................................................................................................................................
..................................................................................................................................................................................................................................................
..................................................................................................................................................................................................................................................
..................................................................................................................................................................................................................................................
..................................................................................................................................................................................................................................................
..................................................................................................................................................................................................................................................
..................................................................................................................................................................................................................................................
..................................................................................................................................................................................................................................................
..................................................................................................................................................................................................................................................
..................................................................................................................................................................................................................................................
..................................................................................................................................................................................................................................................
..................................................................................................................................................................................................................................................
..................................................................................................................................................................................................................................................
..................................................................................................................................................................................................................................................
..................................................................................................................................................................................................................................................
..................................................................................................................................................................................................................................................
..................................................................................................................................................................................................................................................
..................................................................................................................................................................................................................................................
..................................................................................................................................................................................................................................................
..................................................................................................................................................................................................................................................
..................................................................................................................................................................................................................................................
..................................................................................................................................................................................................................................................
..................................................................................................................................................................................................................................................
..................................................................................................................................................................................................................................................
..................................................................................................................................................................................................................................................
..................................................................................................................................................................................................................................................
..................................................................................................................................................................................................................................................
..................................................................................................................................................................................................................................................
..................................................................................................................................................................................................................................................
MC_0037
Notes

MC_0030
© Copyright Sleipner Motor AS, 2021
The information given in the document
was correct at the time it was published.
However, Sleipner Motor AS can not
accept liability for any inaccuracies or
omissions it may contain. Continuous
product improvement may change the
product specifi cations without notice.
Therefore, Sleipner Motor AS can not
accept liability for any possible
differences between product and
document.
Register your product and learn more
at www.sleipnergroup.com
Made in Norway
SLEIPNER AS
P.O. Box 519
N-1612 Fredrikstad
Norway
www.sleipnergroup.com
This manual suits for next models
2
Table of contents
Other Sleipner Control Unit manuals
Popular Control Unit manuals by other brands

DMX4ALL
DMX4ALL DMX-Universal-Demux user manual

Victaulic
Victaulic FireLock 756 Series Installation, Maintenance, and Testing Manual

Texas Instruments
Texas Instruments TPS2480 EVM user guide

Endress+Hauser
Endress+Hauser TMD1000 TMD1 operating instructions

Lutron Electronics
Lutron Electronics Vive DFCSJ-OEM-OCC quick start guide

Bronpi
Bronpi KIT-2 Installation, operating and servicing instructions