Slime 40065 User manual

PART# 40065 | REV120622ART
ATTENTION! READ ALL INSTRUCTIONS CAREFULLY
FAILURE TO FOLLOW WARNING INSTRUCTIONS CAN RESULT IN FIRE,
PERSONAL INJURY OR PROPERTY DAMAGE.
ALL
PURPOSE
TIRE INFLATOR
HIGH VOLUME
AIR HOSE
ON/OFF SWITCH
• Toggle between high pressure
and high volume inflation
TWIST-TO-CONNECT
HIGH PRESSURE AIR HOSE
DUAL POWER SOURCE
• Plugs into 12V power outlet
• Plugs into 120V wall outlet
INFLATABLES |BALLS
INTEGRATED
CORD MANAGEMENT
HOSE
STORAGE
DIAL GAUGE
• 0 - 60 PSI / 0 - 4 BAR
QUICK GRAB
HANDLE
MOUNTING
BRACKETS
• Mounting screws and
anchors included
AIR ADAPTER
STORAGE
MULTIPLE AIR
ADAPTERS

Ensure that the vehicle is outside, or in an open, well-ventilated area and NOT INSIDE
A CONFINED AREA, SUCH AS A GARAGE as bodily injury or asphyxiation resulting in
death could occur. Always operate the inflator in a well-ventilated area free of combustible
materials, gasoline, or solvent vapors. Always set parking/emergency brake and ensure
vehicle is in Park (or neutral if equipped with manual transmission).
CAUTION: HOT • DO NOT HOLD IN HAND WHILE OPERATING.
NOTICE: ENGINE SHOULD BE RUNNING WHILE USING THIS INFLATOR.
It is recommended that you operate your inflator with your vehicle’s engine running
to achieve the optimal inflator performance. Never start a vehicle with the inflator
plugged into the DC 12 Volt power socket.
• Do not aempt to disassemble inator.
• No user serviceable parts inside. The only user serviceable part is the replaceable fuse.
• Keep inator out of reach of children.
• Place inator on a hard, clean surface.
• Ensure air hose chuck touches the core of the valve stem for proper ination.
• DO NOT use inator continuously for more than 10 minutes. Allow unit to cool approximately 25 minutes
between uses. Do not leave inator unaended.
• ALWAYS use a pressure gauge to check tire pressure. DO NOT over-inate.
• So inatables (i.e. ras, balls, etc.) may not have recommended pressure markings. Be careful not to
inate items beyond their capacity.
• While operating, never block the inator input or output.
• For use with 120 volt wall outlet or 12 volt DC power outlets rated 15 amps or higher. Do not use with
older 8 amp cigaree lighter receptacles.
• This appliance has a polarized plug (one blade is wider than the other). This plug will t in a polarized
outlet only one way. If the plug does not t fully in the outlet, reverse the plug. If it still does not t,
contact a qualied electrician to install the proper outlet. Do not change the plug in any way.
VEHICLE EXHAUST WITHOUT PROPER VENTILATION IS EXTREMELY
DANGEROUS. ALWAYS ALLOW FOR PROPER VENTILATION.

TIRE INFLATION TIME 6 minutes**
MATTRESS INFLATION TIME 3 minutes*
HIGH PRESSURE (TIRE) CFM 0.58 CFM (16.4 LPM) @ 0 PSI/BAR
HIGH VOLUME (RAFT) CFM 1.2 CFM (34 LPM) @ 0 PSI/BAR
DIAL GAUGE PSI 0-60, BAR 0-4
12V POWER CORD LENGTH 10.3 . (3.15 m)
120V POWER CORD LENGTH 6 . (1.82 m)
HIGH PRESSURE HOSE LENGTH 24 in. (61.0 cm)
HIGH VOLUME HOSE LENGTH 11.5 in. (29.2 cm)
POWER SOURCE 12V accessory power outlet
120V wall outlet
TECH SPECS
* (Twin air maress) ** (0-35 PSI, Standard Tire: P195/65 R15)

INFLATE TIRES
1. Screw air hose connector onto tire's valve stem.
2. Plug power cord into 12 volt accessory power outlet or into a 120 volt wall outlet.
3. Toggle ON/OFF switch up to the single line to turn on inflator. Once desired pressure is
reached, toggle ON/OFF switch again to center circle to turn off inflator. Unplug power
cord and remove all connections.
*NOTE: Correct tire pressure can be found in vehicle owner's manual or on driver's side
door jamb.
NOTE: Engine should be running while using this inflator. See Warning Section for further
details.
INFLATE RAFTS AND MATTRESSES
The raft air pump is used for inflatables only (more specifically high volume/low pressure
applications) and cannot be used for tires and balls, which require higher pressure.
1. If desired, attach the inflation adapter (connected to the air hose) to the high volume air
hose.
2. Connect high volume air hose to the inflate portal (on the left) on the front of the inflator.
Insert opposite end into the inflatable's air inlet.
3. Plug power cord into 12 volt accessory power outlet or into a 120 volt wall outlet.
4. Toggle ON/OFF switch down to the double line to turn on inflator. Once desired pressure
is reached, toggle ON/OFF switch again to center circle to turn off inflator. Unplug power
cord and remove all connections.

WALL MOUNTING / STORAGE INSTRUCTIONS
Your inflator has built-in features for conveniently wall mounting the unit FOR STORAGE ONLY.
Remove inflator from wall mount and place on a hard clean surface before operating. Use the
included hardware to wall-mount the unit. Take extra care to ensure there is no wiring, plumbing,
or other objects located within the wall behind your chosen mounting location. Manufacturer is
not responsible for any damage or losses incurred from complications in wall-mounting.
For Drywall mounting:
1. Make a mark for two vertical mounting locations on wall 3⅞" / 98 mm apart.
2. Using ¼" drill bit, drill holes at the marked locations.
3. Using a hammer, tap in the wall anchors until flush with the wall
4. Using a screwdriver or screw gun, install the screws into the wall anchors, leaving
approximately ⅜" protruding from the wall.
5. Hang the inflator on the screws using the recesses located on the back of the inflator.

Inflator does not turn on:
1. Check the fuse. It may have blown:
•12V fuse is located in the plug adapter. To replace,
unscrew the tip, remove fuse, and inspect. If necessary,
replace fuse with 15A, 250V (5mm×20mm).
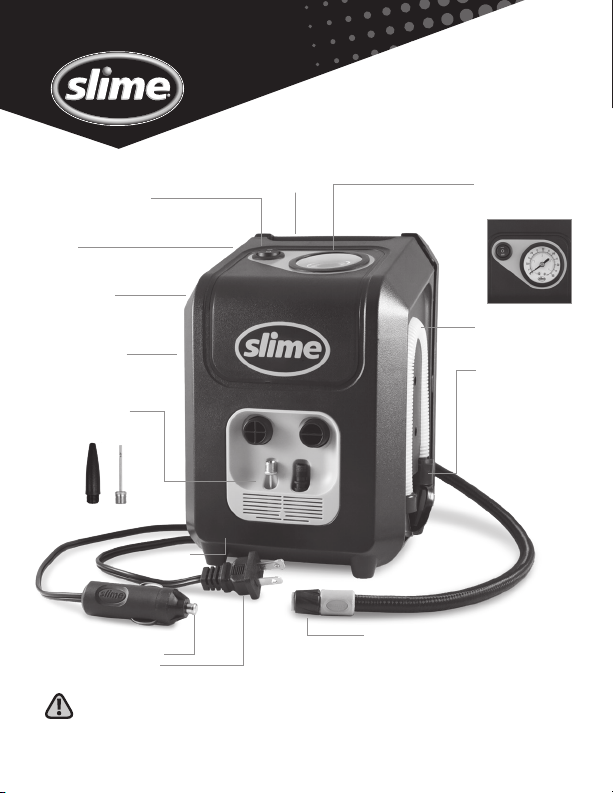
•120V fuse is located on the side of the cord storage. Unscrew
fuse cap, remove fuse and inspect. If necessary, replace fuse
with 2A, 250V (5mm x 20mm).
2. Check vehicle's power outlet fuse; it should be a minimum of 15
amps.
3. Check receptacle and plug terminals for dirt (particularly
tobacco). Use a non-conductive probe (not fingers or metal) to
dislodge and remove debris.
4. Push the power plug firmly into the receptacle and twist it back and forth.
Inflator runs but does not inflate:
1. Be sure the air hose connector is tightly screwed onto the valve stem.
2. Check tire for leaks. Check hose for breaks and leaks at fittings.
3. Be sure you are using the correct toggle setting on the ON/OFF switch for high pressure
(tires) or high volume (rafts) inflation.
Inflator runs slowly:
1. The inflator may have overheated from excessive use. Shut it off and allow it to cool for 25
minutes.
2. The voltage may be too low. Check the condition of your vehicle's battery.
NOTE: If tire is totally deflated, it is possible that the tire could separate from the rim allowing
air to leak out when trying to inflate. In the event this occurs, it may be necessary to jack up the
tire prior to inflation.
Dispose of this product at an e-waste recycling collection point or facility.
Do not place in the trash or standard recycling receptacle.
TIRE INFLATOR: 120VAC, 60HZ, 1.4A OR 12VDC, 9A, ON OFF: 4 MIN/20MIN,
MAX RATED PRESSURE: 60PSI, ON/OFF: 4 MIN/20MIN
MATTRESS INFLATOR: 120VAC, 60HZ, 0.5A OR 12VDC, 3A, ON/OFF: 4MIN/20MIN
TROUBLESHOOTING
FOR WARRANTY INFORMATION GO TO: WWW.SLIME.COM / WARRANTY
QUESTIONS OR COMMENTS:
Call (888)457-5463 or visit www.slime.com
ITW Global Tire Repair • 125 Venture Drive, Suite 210, San Luis Obispo, CA 93401 USA
Slime®is a trademark of Illinois Tool Works, Inc., registered in the U.S. and other countries.

ESPACIO PARA
ENROLLAR EL CABLE
¡ATENCIÓN! LEA TODAS LAS INSTRUCCIONES CON ATENCIÓN
SI NO SIGUE LAS INSTRUCCIONES DE ADVERTENCIA, PUEDE CAUSAR INCENDIO,
LESIONES A PERSONAS O DAÑOS MATERIALES.
ADAPTORES
DE AIRE
ALL
PURPOSE
TIRE INFLATOR
MANGUERA DE
AIRE DE ALTO
VOLUMEN
INTERRUPTOR DE
ENCENDIDO/ APAGADO
• Alternar entre alta presión e inflación
de alto volumen
FUENTE DE ENERGÍA DUAL
• Se conecta a una toma de corriente de 12V
• Se conecta a una toma de corriente de pared de 120V
ALMACÉN PARA
MANGUERA
ALMACENAMIENTO
DEL ADAPTADOR
DE AIRE
ADAPTADORES
DE AIRE
MÚLTIPLE
MANIJA DE
AGARRE RÁPIDO MEDIDOR DE RELOJ
• 0 - 60 PSI / 0-4 BAR
SOPORTE DE
MONTAJES
• Almacena fácilmente en
el garaje
MANGUERA DE AIRE DE
CONEXIÓN RÁPIDA

EL ESCAPE DEL VEHÍCULO SIN LA VENTILACIÓN ADECUADA
ESEXTREMADAMENTEPELIGROSO.PERMITASIEMPREUNA
VENTILACIÓNADECUADA.
Asegúrese de que el vehículo esté al aire libre o en un área abierta y bien ventilada y NO DENTRO DE UN
ÁREA CERRADA, COMO UN GARAJE, ya que podrían producirse lesiones o asfixia con resultado de muerte.
Siempre opere el inflador en un área bien ventilada libre de materiales combustibles, gasolina o vapores
de solventes. Siempre coloque el freno de mano/emergencia y asegúrese de que el vehículo esté en Punto
Muerto (o neutral si está equipado con transmisión manual).
PRECAUCIÓN: CALIENTE • NO SOSTENER EN LA MANO DURANTE LA OPERACIÓN
AVISO: EL MOTOR DEBE ESTAR FUNCIONANDO MIENTRAS UTILIZA ESTE INFLADOR
Se recomienda que opere su inflador con el motor de su vehículo en marcha para lograr un
rendimiento óptimo. Nunca arranque un vehículo con el inflador enchufado a la toma de corriente
de 12 volts.
• No intente desarmar el inador.
• No hay piezas reparables por el usuario en el interior. La única pieza reparable por el usuario es el fusible
reemplazable.
• Mantenga el inador fuera del alcance de los niños.
• Coloque el inador sobre una supercie dura y limpia.
• Asegúrese que la nariz de la manguera de aire toque el núcleo del vástago de la válvula para inarlo
correctamente.
• NO use el inador continuamente por más de 10 minutos. Deje que la unidad se enfríe durante
aproximadamente 25 minutos entre usos. No deje el compresor desatendido.
• Utilice SIEMPRE un manómetro para comprobar la presión de los neumáticos. NO ine demasiado.
• Es posible que los inables blandos (es decir, balsas, pelotas, etc.) no tengan las marcas de presión
recomendadas. Tenga cuidado de no inar los artículos más allá de su capacidad.
• Durante el funcionamiento, nunca bloquee la entrada o salida del inador.
• Para uso con tomacorrientes de pared de 120 voltios o tomacorrientes de CC de 12 voltios de 15
amperios o más. No lo use con receptáculos de encendedor de cigarrillos de 8 amperios más antiguos.
• Este aparato tiene un enchufe polarizado (una clavija es más ancha que la otra). Este enchufe encajará
en un tomacorriente polarizado de una sola manera. Si el enchufe no encaja completamente en el
tomacorriente, invertir el enchufe. Si aún no encaja, comuníquese con un electricista calicado para
instalar el tomacorriente adecuado. No cambie el enchufe de ninguna manera.

ESPECIFICACIONES TÉCNICAS
TIEMPO DE INFLADO DE LLANTAS 6 minutes**
TIEMPO DE INFLADO DEL COLCHÓN3 minutes*
ALTA VOLUMEN (LLANTAS) PCM 0.58 CFM (16.4 LPM) @ 0 PSI/BAR
ALTA PRESIÓN (COLCHÓN) PCM 1.2 CFM (34 LPM) @ 0 PSI/BAR
MEDIDOR DE RELOJ PSI 0-60, BAR 0-4
12V LONGITUD DEL CORDÓN DE
CORRIENTE
10.3 . (3.15 m)
120V LONGITUD DEL CORDÓN DE
CORRIENTE
6 . (1.82 m)
LONGITUD DE LA MANGUERA DE
ALTA PRESIÓN
24 in. (61.0 cm)
LONGITUD DE LA MANGUERA DE
ALTO VOLUMEN
11.5 in. (29.2 cm)
FUENTE DE ENERGÍA Toma de corriente para accesorio
de 12 volitios | Conector de pared a 120V
* (Colchón de aire doble) **(0-35 PSI, Tamaño de Llanta estandar: P195/65 R15)

1. Screw air hose connector onto tire's valve stem.
2. Enchufe el cable de alimentación en un tomacorriente auxiliar de 12 voltios o en un
tomacorriente de pared de 120 voltios.
3. Mueva el interruptor ON/OFF hasta la línea única para encender el inflador. Una vez que
la presión deseada esalcanzado, cambie el interruptor ON/OFF nuevamente al círculo
central para apagar el inflador. Desconecte la energíacable y retire todas las conexiones.
*NOTA: La presión de la llanta adecuada se encuentra en el manual del propietario del vehículo
o en el panel de la puerta del lado del conductor.
INFLE LAS LLANTAS
NOTA: El motor debe estar funcionando mientras usa este inflador. Consulte la
sección de advertencia para obtener más detalles.
BALSAS INFLABLES Y COLCHÓNES
La bomba de aire de balsa se usa solo para inflables (más específicamente, aplicaciones de
alto volumen/baja presión) y no se puede usar para llantas y pelotas, que requieren una presión
más alta.
1. Conecte el adaptador de inflado deseado (conectado a la manguera de aire) a la
manguera de aire de alto volumen.
2. Conecte la manguera de aire de alto volumen al portal de inflado (on the left) de alto
volumen en la parte delantera del inflador. inserte el extremo opuesto en la entrada de
aire del inflable.
3. Enchufe el cable de alimentación en un tomacorriente auxiliar de 12 voltios o en un
tomacorriente de pared de 120 voltios.
4. Mueva el interruptor ON/OFF hasta la línea única para encender el inflador. Una vez que
la presión deseada esalcanzado, cambie el interruptor ON/OFF nuevamente al círculo
central para apagar el inflador. Desconecte la energíacable y retire todas las conexiones.

MONTAJE EN PARED / INSTRUCCIONES DE ALMACENAJE
Su compresor está fabricado convenientemente para poder fijarlo a la pared para
ALMACENAJE SOLAMENTE. Retire el inflador del soporte de pared y colóquelo sobre una
superficie dura y limpia antes de operarlo. Usar el hardware incluido para montar la unidad en
la pared. Tenga mucho cuidado para asegurarse de que no haya cableado,plomería u otros
objetos ubicados dentro de la pared detrás de la ubicación de montaje elegida. El fabricante
no sera responsable de ningún daño o pérdida generada al intentar montar el equipo en la
pared.
Para Montaje en pared:
1. Haga una marca para dos ubicaciones de montaje en la pared con una separación de 3⅞”
/ 98 mm.
2. Utilice taladro con broca de¼” en los espacios marcados.
3. Utilice el martillo para introducir los taquetes
4. Utilice un desarmador manual o eléctrico e instale la tornillería en los taquetes dejando la
cabeza por fuera de la pared unos ⅜” aproximadamente.
5. Cuelgue el compresor en los tornillos salientes utilizando los huecos traseros del equipo.

El inflador no enciende:
1. Revise el fusible, pudo haberse disparado:
• El fusible de 12v está localizado en el adaptador del conector.
Destornille y remueva el fusible para inspeccionarlo. En caso
de ser necesario reemplace con uno de 15A 250V (5mm x
20mm).
• El fusible de 120V está ubicado en el costado del
almacenamiento del cable. Destornillar la tapa del fusible,
retire el fusible e inspeccione. Si es necesario, reemplace el
fusible con uno de 2A, 250V (5mm x 20mm).
2. Compruebe el fusible de la toma de corriente del vehículo; debe ser un mínimo de 15 amperios.
3. Revise si hay suciedad, especialmente tabaco, en la toma y en las terminales del enchufe. Use
una sonda no conductora, no sus dedos o metales, para aflojar y remover residuos.
4. Empuje con firmeza el enchufe en la toma y gírelo de atrás hacia adelante.
El inflador funciona pero no infla:
1. Asegúrese de que el conector de la manguera esté atornillado firmemente en el vástago de la
válvula.
2. Verifique que la llanta no tenga fugas. Revise que la manguera no tenga grietas ni fugas en las
conexiones.
3. Asegúrese de que está utilizando la configuración de alternancia correcta en el interruptor de
ENCENDIDO/APAGADO para inflado de alta presión (llantas) o alto volumen (balsas).
El inflador funciona lentamente:
1. El inflador puede estar sobrecalentado debido a uso excesivo. Apáguelo y espere 25 minutos
para que se enfríe.
2. El voltaje puede ser demasiado bajo. Revise la condición de la batería de su vehículo.
NOTA: Si la llanta está totalmente desinflada, es posible que esté separada del aro y éste permite
que el aire se escape cuando trata de inflarla. Si ocurre esta situación, puede ser necesario levantar
la llanta con un gato para inflarla.
Deshágase de este producto en un punto de recogida de reciclaje de residuos electrónicos o
instalación. No coloque en la basura o recipiente de reciclaje estándar.
INFLADOR DE LLANTAS: 120VAC, 60HZ, 1.4A O 12VDC, 9A, ON OFF: 4 MIN/20MIN,
PRESIÓN NOMINAL MÁXIMA: 60PSI, ON/OFF: 4 MIN/20MIN
INFLADOR DE COLCHONES: 120VAC, 60HZ, 0.5A OR 12VDC, 3A, ON/OFF: 4 MIN/20MIN
SOLUCIÓN DE PROBLEMAS
PARA INFORMACIÓN DE GARANTÍA: WWW.SLIME.COM/WARRANTY
PREGUNTAS O COMENTARIOS: Llamar al +1-888-457-5463 o visitar www.slime.com
ITW Global Tire Repair • 125 Venture Drive, Suite 210, San Luis Obispo, CA 93401 USA
Slime® es una marca registrada de Illinois Tool Works, Inc., registrada en Estados Unidos y en otros
países.
Other manuals for 40065
1
Table of contents
Languages:
Other Slime Power Tools manuals

Slime
Slime MOTO SPAIR User manual

Slime
Slime 40059 User manual

Slime
Slime 70005 User manual

Slime
Slime 50139 User manual

Slime
Slime 40059 User manual

Slime
Slime Pro Power 40030 User manual

Slime
Slime 40038 User manual

Slime
Slime 40031 User manual

Slime
Slime 40060 User manual

Slime
Slime Expert Heavy-Duty Tire Inflator User manual
Popular Power Tools manuals by other brands

Milwaukee
Milwaukee Kango 840M Service & repair manual

Makita
Makita DHR280 instruction manual

EINHELL
EINHELL TE-CD 12/1 3X-Li Original operating instructions

Porter-Cable
Porter-Cable 343 instruction manual

WAGNER
WAGNER HT1000 Translation of the original operating instructions

Makita
Makita N1923B instruction manual