Slime 40057 User manual

PART# 40057 | REV031618ART
CARS • TRUCKS • BIKES • INFLATABLES
ATTENTION! READ ALL INSTRUCTIONS CAREFULLY
FAILURE TO FOLLOW WARNING INSTRUCTIONS CAN RESULT IN FIRE,
PERSONAL INJURY OR PROPERTY DAMAGE.

DIGITAL GAUGE
• 0-99 PSI range
MANAGEABLE HOSE
• 12 in. (30cm) hose with
easy clip storage
TRIGGER LOCK
BALLS INFLATABLES
INFLATE RIGHT™
TECHNOLOGY
• Inflator automatically shuts off when
the set pressure level is achieved
AIR ADAPTER STORAGE
• Inflatables adapters snap-in-place
for easy access
BATTERY LEVEL INDICATOR/
WAKE BUTTON
RECHARGEABLE BATTERY
• Lithium Ion
DEVICE CHARGING USB
(Cable not included)
TECH SPECS
IDEAL USES
TIRE INFLATION TIME
CUBIC INCHES PER MIN.
AIR HOSE LENGTH
POWER SOURCE
DIGITAL GAUGE
* (0-35 PSI, Standard Tire: P195/65 R15)
Tires, inflatables, sports balls
6 min*
1000 CIM (16.4L/min)
1 ft. (0.3m)
Lithium ion battery
0-99PSI Backlit
BATTERY LIFE INDICATOR LIGHTS
• Four lights = fully charged battery
BATTERY RECHARGE
POWER PORT
(Cable included)

CAUTION:
1. DO NOT run vehicle while inflator is operating. Please make sure emergency
brake is set and car is in park.
2. DO NOT use inflator continuously for more than 10 minutes. Allow unit to cool
approximately 25 minutes between uses. Do not leave inflator unattended.
3. ALWAYS use a pressure gauge to check actual tire pressure. DO NOT OVERINFLATE!
4. Read all instructions thoroughly before use. Failure to follow warning instructions
can result in fire, injury to persons or property damage.
5. Keep inflator out of reach of children.
321
4
INFLATE TIRES
Push the Battery
Level Indicator / Wake
Button to initiate
power.
Place connector on
air valve stem and
push down, then close
thumb latch connector
to secure to valve.
Turn inflator on by
depressing the trigger.
Push the trigger lock** to the middle position, and
depress and hold the trigger button and Inflate
tire to manufacturer’s recommended air pressure.
* When proper pressure is reached, release the
trigger to stop operation of the inflator.
The inflator automatically shuts off after 2 minutes
if left unused.
*NOTE: Correct tire pressure can be found in vehicle
owner’s manual or on driver’s side door jamb.
** See TRIGGER LOCK POSITIONS on next page.

INFLATE RIGHT™ TECHNOLOGY INSTRUCTIONS:
1. Hold the + or – button for approximately 2 seconds until the display flashes. Set the
required pressure using the + or – buttons, then wait 3 seconds. The display will show
the pressure value to which the tire will be inflated. (Continuously pressing the “+”
or “-“ button will enter into “Fast setting mode”, increasing or decreasing the rate of
target pressure at an increased speed.)
2. Depress and hold the trigger for the inflator to start.
a. The inflator is also equipped with a trigger lock, allowing the user to lock it to prevent
accidental start, or lock it in the “on” position to allow the inflator to be used without manually
depressing the trigger to inflate. The lock has three positions; pushed all the way to the left is
lock (no inflation). In the middle or center position, the trigger is free to engage / disengage.
In the far right position, the trigger will be locked in the on position. To lock the inflator in the
“on” position, depress the trigger and push the lock to the furthest right position. The inflator
will still turn off automatically when desired pressure is reached.
3. When the pressure gauge reaches the pre-set value, the inflator will automatically stop
inflation. Once desired tire pressure is reached, disconnect the air hose.
TRIGGER POSITIONS
LOCKED OFF
Left position “Locked-off”: by default, the control
button will be “Locked-off”; in this position the
inflator will not run.
LOCKED OFF
MANUAL
LOCKED ON
MANUAL
Center position “manual”: squeeze the trigger
button to begin inflation. Inflation will stop
when the trigger is released.
LOCKED ON
Right position “Locked-on”: place control button
in the center position and squeeze the trigger to
start inflation. While trigger is being squeezed,
slide the control button to the furthest right
position. The inflator will now run without
holding the trigger.

BATTERY
The battery will come with a minimal charge. It will be necessary to charge the
battery prior to initial use. Recharge after each use to prevent compromised battery life.
NOTE: It takes 4 hours to fully charge your battery from a 2.1A USB outlet.
The unit should be charged every 4 months to keep the battery at peak performance.
USB adapter block not included. Any phone/tablet block charger will work. Do not
charge unit via computer USB port.
BATTERY DISPOSAL: This product contains a rechargeable sealed lithium-ion
battery. The environmental laws in some areas require retailers to accept returns of
rechargeable batteries for proper disposal. Check the city/county/state/federal laws
before disposing this product.
To unlock the air chuck valve, pull handle upward, then
place in adapter and pull down to lock adapter in.
BATTERY REMOVAL
Slide the green button
downward to unlock battery.
12
Slide the battery off of the
bottom of the inflator.
USING THE ADAPTERS
PULL UP TO
UNLOCK
PUSH DOWN
TO LOCK

TROUBLESHOOTING
Inflator fails to power on:
• Ensure the battery has a charge. You can check the charge level of the battery by
pressing the green button on the Lithium-Ion battery pack.
• Make sure the battery pack is completely inserted onto the inflator base. You will
hear a “click” when it is properly inserted.
Inflator does not start:
• The Inflate-Right™ pressure may be set at/or below the desired pressure. Reset.
Inflator runs but does not inflate:
• Be sure the connector is fully secured on the tire valve.
• Check tire for leaks, and check hose for breaks and leaks at fittings.
Inflator runs slowly:
• Possibly overheated from excessive use. Shut it off and allow to cool for 25 minutes.
NOTE: If tire is totally deflated, it is possible that the tire could separate from
the rim allowing air to leak out when trying to inflate. In the event this situation
occurs, you will have to jack up the tire prior to inflation.
WARRANTY: For the period of one year from date of purchase, manufacturer guarantees that this Product will meet the
specifications when used as directed. Manufacturer’s sole liability and Customer’s sole remedy under any warranty
claim is limited to Manufacturer’s coupon upon return of proof of purchase.
QUESTIONS OR COMMENTS:
Call (888)457-5463 or visit www.slime.com
ITW Global Tire Repair • 125 Venture Drive, Suite 210, San Luis Obispo, CA 93401 USA
Slime® is a trademark of Illinois Tool Works, Inc., registered in the U.S. and other countries.

AUTOMÓVILES • CAMIONES • BICICLETAS • INFLABLES
¡ATENCIÓN! LEA TODAS LAS INSTRUCCIONES CON ATENCIÓN
SI NO SIGUE LAS INSTRUCCIONES DE ADVERTENCIA, PUEDE CAUSAR
INCENDIO, LESIONES A PERSONAS O DAÑOS MATERIALES.

PELOTAS INFLABLES
ESPECIFICACIONES
TÉCNICAS
USO IDEAL
TIEMPO PARA INFLAR LA LLANTA
PULGADAS CÚBICAS POR MINUTO
LONGITUD DE LA MAGUERA DE AIRE
FUENTE DE ENERGÍA
MEDIDOR DIGITAL
Llantas, inflables, camiones
6 min*
1000 CIM (16.4L/min)
1 ft. (0.3m)
Pila de ion de litio
0-99PSI Iluminacíon Posterior
* (0-35 PSI, llanta estándar de coche: 195/65 R15)
MEDIDOR DIGITAL
• 0-99 PSI
MANGUERA FÁCIL DE
MANEJAR
• Manguera de 12 pulgadas
(30 cm) que se almacena
con un sujetador “easyclip”
COMPARTIMIENTOS DE
ALMACÉN
• Para maguera de aire y
adaptadores de inflables
PILA RECARGABLE
• De ion de litio
USB PARA CARGAR
EL APARATO
(No se incluye el cable)
TECNOLOGÍA INFLATE RIGHT™
• El inflador se apaga automáticamente
cuando se alcanza el nivel de presión
establecido
SEGURGO PARA
EL DISPARADOR
INDICADOR DEL NIVEL DE
LA PILA/BOTÓN DE INICIO
LUCES INDICADORAS LA VIDA
ÚTIL DE LA PILA
• Cuatro luces = pila con carga completa
PUERTO ELÉCTRICO PARA
RECARGA DE LA BATERÍA
(Cable incluido)

COMPARTIMIENTOS DE
ALMACÉN
• Para maguera de aire y
adaptadores de inflables
PRECAUCIÓN:
1. NO operar el vehículo mientras el inflador está funcionando. Es posible que deba estar
en posición de “accesorio” o “encendido”. Cerciorarse de que el freno de emergencia
esté activado y de que el coche esté en posición de estacionamiento.
2. NO usar el inflador de forma continua durante más de 10 minutos. Dejar que la unidad
se enfríe unos 25 minutos entre usos. No dejar el inflador sin supervisión.
3. SIEMPRE usar un medidor de presión para comprobar la presión real de la llanta. ¡NO
INFLAR EN EXCESO!
4. Leer todas las instrucciones detenidamente antes del uso. No seguir las instrucciones
de advertencia puede resultar en un incendio, lesiones o daños a la propiedad.
5. Para uso con salidas eléctricas de 12 voltios CC de 15 amperios de tensión nominal o más.
No utilizar con receptáculos antiguos de 8 amperios de encendedores de cigarrillos.
6. Mantener fuera del alcance de los niños.
CÓMO INFLAR LAS LLANTAS
321
4
Presione el botón indicador
del nivel de la pila/botón de
inicio para encenderlo.
Coloque el conector sobre el
vástago de la válvula de aire
y presione hacia abajo, luego
cierre el pestillo con el pulgar
para sujetar la válvula.
Encienda el inflador
presionando el disparador.
Presione el seguro del disparador hasta la posición del medio y
oprima y sostenga el botón del disparador para inflar la llanta
hasta la presión de aire recomendada por el fabricante. *Cuando
alcance la presión adecuada, suelte el disparador para suspender
la operación del inflador.
El inflador se apaga automáticamente después de 2 minutos
cuando no se está usando.
*NOTA: La presión correcta de las llantas se puede encontrar en
el manual del propietario del vehículo o al interior de la puerta
del lado del conductor.
** Ver las POSICIONES DEL SEGURO DEL GATILLO en la página siguiente.

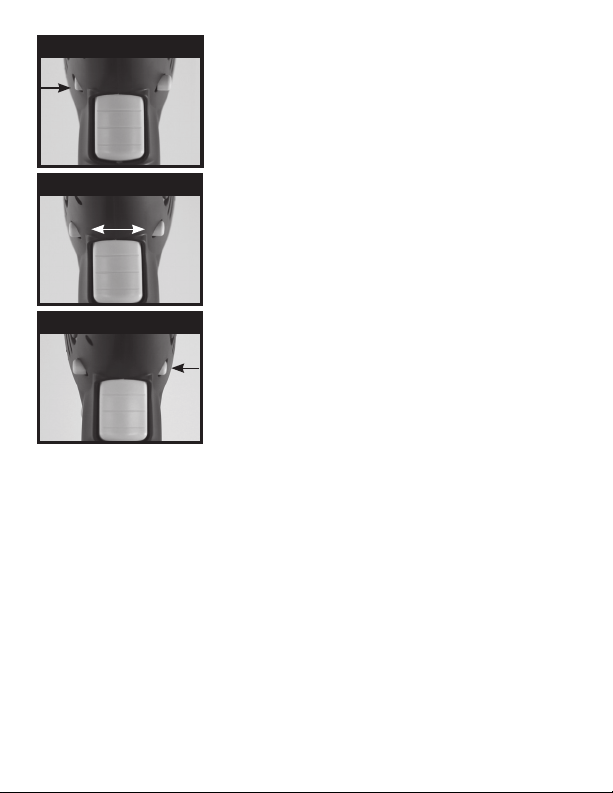
POSICIONES DEL GATILLO
CON SEGURO Y APAGADO
Posición a la izquierda “Con seguro y apagado”:
por defecto, el botón de control se encuentra en
la posición “Con seguro y apagado” en la que el
inflador no funciona.
CON SEGURO Y APAGADO
MANUAL
CON SEGURO Y ENCENDIDO
MANUAL
Posición central “manual”: oprima el botón del
gatillo para empezar a inflar. La inflación se
suspende al liberar el gatillo.
CON SEGURO Y ENCENDIDO
Posición a la derecha “Con seguro y encendido”:
coloque el botón de control en la posición
central y oprima el gatillo para empezar a inflar.
Mientras esté oprimiendo el gatillo, deslice
el botón de control hacia la posición más a la
derecha. El inflador ahora funciona sin tener que
sostener el gatillo.
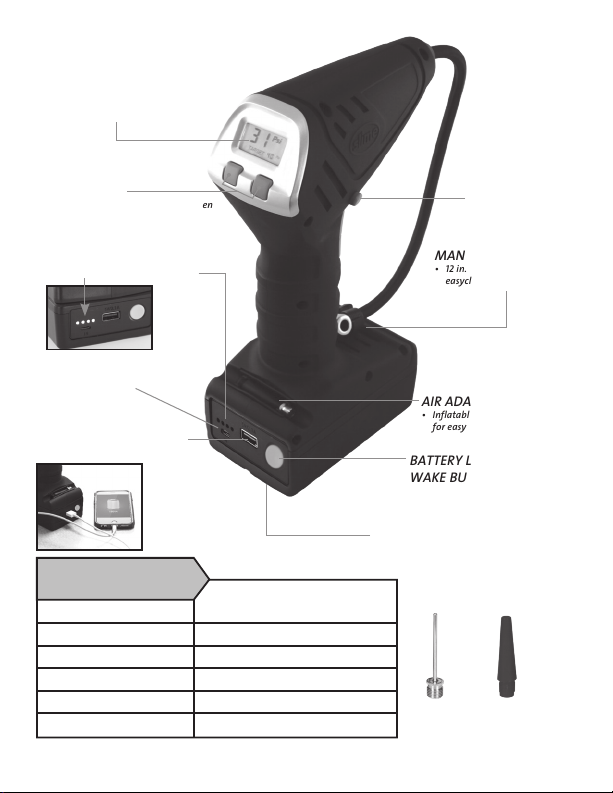
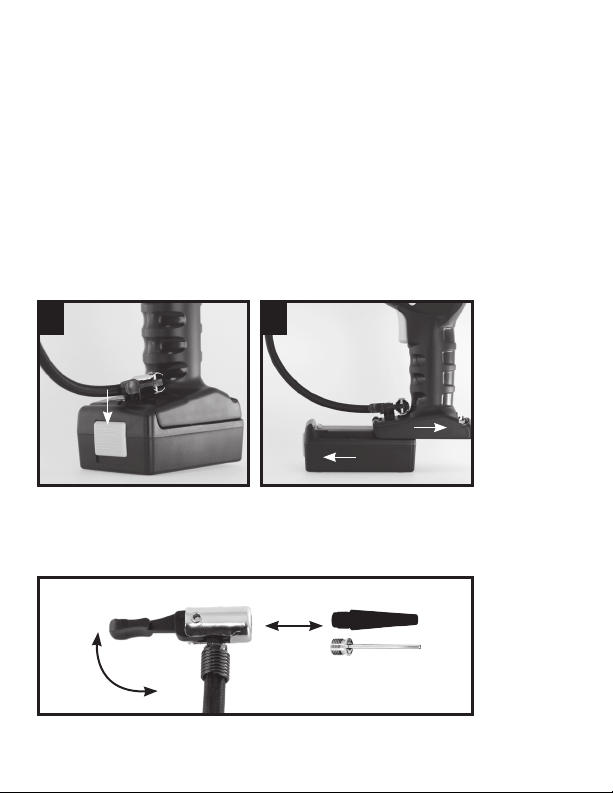
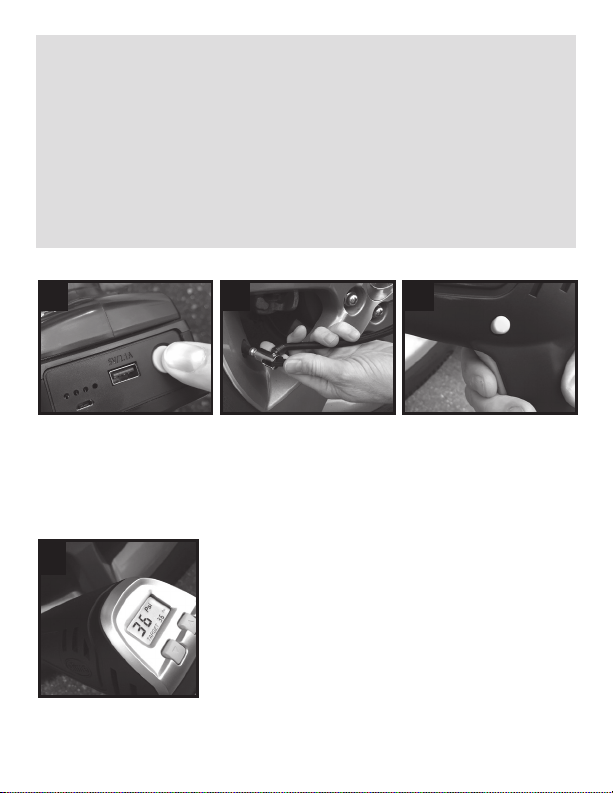
INSTRUCCIONES SOBRE LA TECNOLOGÍA INFLATE RIGHT™:
1. Oprima el botón + o - durante unos 2 segundos hasta que la pantalla parpadee. Configure la presión
necesaria con los botones + o -, luego espere 3 segundos. La pantalla indicará el valor de presión
al que inflará la llanta. (Si el botón “+” o “-” se presiona continuamente, empieza el “Modo de
configuración rápida”, que aumenta o reduce la presión deseada a una velocidad más rápida).
2. Oprima y sostenga el disparador para que el inflador empiece a funcionar.
a. El inflador también cuenta con un seguro para el disparador, lo que permite que el usuario
pueda
asegurarlo y así evitar que empiece a funcionar por accidente, o asegurarlo en la posición de encendido
para permitir el uso del inflador sin tener que oprimir el disparador manualmente para inflar. El seguro
tiene tres posiciones; cuando se empuja por completo hacia la izquierda, se asegura (no infla). En
la posición del medio o del centro, el disparador puede engranar o desengranar. En la posición por
completo hacia la derecha, el disparador queda asegurado en la posición de encendido. Para asegurar
el inflador en la posición de encendido, oprima el disparador y empuje el seguro hasta la posición más
hacia la derecha. El inflador se apaga automáticamente cuando se alcance la presión deseada.
3.
Cuando el indicador de presión alcanza la presión configurada, el inflador deja de inflar automáticamente.
Cuando haya alcanzado la presión deseada en la llanta, desconecte la manguera de aire.

PILA
La pila tiene un mínimo de carga. Será necesario cargar la pila antes de usarlo por
primera vez. Volver a cargar después de cada uso para no comprometer la operación de
la pila.
IMPORTANTE: Demora 4 horas cargar la pila por completo con un tomacorrientes
USB 2.1A. El aparato se debe cargar cada 4 meses para mantener la pila en su
rendimiento máximo. No se incluye el bloque adaptador para el USB. Cualquier
cargador tipo bloque para teléfono o tableta funciona. No cargue el aparato a través
del puerto USB de una computadora.
CÓMO DESECHAR LA PILA: Este producto contiene una pila recargable de ion de litio
sellada. Las leyes sobre el medio ambiente en ciertos lugares exigen que las tiendas
acepten pilas recargables usadas para desecharlas de la manera adecuada. Consulte las
leyes municipales/del condado/estatales/federales antes de desechar este producto.
Libere la válvula Air Chuck, tire de la manija hacia arriba, introduzca el
adaptador y empuje hacia abajo para asegurarlo.
CÓMO RETIRAR LA PILA
Deslice el botón verde hacia
abajo para liberar la pila.
12
Deslice la pila para sacarla de
la parte inferior del inflador.
CÓMO USAR LOS ADAPTADORES
TIRE HACIA
ARRIBA PARA
LIBERAR
EMPUJE HACIA
ABAJO PARA
ASEGURAR

SOLUCIÓN DE PROBLEMAS:
El inflador no enciende:
• Asegúrese de que la pila tenga carga. Puede verificar el nivel de carga de la pila si
presiona el botón verde en la pila de ion de litio.
• Asegúrese de que la pila quede bien insertada dentro de la base del inflador.
Escuchará un sonido cuando haya quedado bien sentada.
El inflador no funciona:
• La presión Inflate-Right™ puede estar configurada a la presión deseada o por
debajo de la misma. Se debe reconfigurar.
El inflador funciona, pero no infla:
• Asegúrese de que el conector esté bien asentado sobre la válvula de la llanta.
• Verifique que la llanta no tenga fugas, verifique que la manquera no tenga quiebres
o fugas en las juntas.
El inflador funciona muy despacio:
• Tal vez se ha sobrecalentado debido al uso excesivo. Apáguelo y permita que se enfríe
durante 25 minutos.
IMPORTANTE: Si la llanta está desinflada por completo, es posible que se separe
del rin y permita el escape de aire mientras se está tratando de inflar. En este caso,
deberá usar un gato para levantar la llanta antes de inflarla.
GARANTÍA: Por el periodo de un año desde la fecha de compra, el fabricante garantiza que este producto cumplirá las
especificaciones si se usa de acuerdo con las instrucciones. La única responsabilidad del fabricante y la única solución
para el cliente bajo cualquier reclamación de garantía se limita a un cupón del fabricante para el reemplazo del
producto cuando se haya devuelto el artículo con el comprobante de compra.
PREGUNTAS O COMENTARIOS: Llamar al (888)457-5463 o visitar www.slime.com
ITW Global Tire Repair • 125 Venture Drive, Suite 210, San Luis Obispo, CA 93401 USA
Slime® es una marca registrada de Illinois Tool Works, Inc., registrada en Estados Unidos y en otros países.
Table of contents
Languages:
Other Slime Power Tools manuals

Slime
Slime 70005 User manual

Slime
Slime 40052 User manual

Slime
Slime 40030 User manual

Slime
Slime 40047 User manual

Slime
Slime 40038 User manual

Slime
Slime 40046 User manual

Slime
Slime ELITE HEAVY DUTY TIRE INFLATOR User manual

Slime
Slime 40031 User manual

Slime
Slime 40050 User manual

Slime
Slime DUAL POWER 40052 User manual