Slootsmid SZB STANDARD User manual

Slootsmid Mesttechniek B.V.
KORENBREE 40-A | 7271 LH| BORCULO
User guide
SZB STANDARD AND SZB PROFI

1
FOREWORD
Congratulations! You are now the owner of a Slootsmid SZB slurry injector. We believe that you
made a good choice by buying a Slootsmid fertilizer. We are confident that you will be with this slurry
injector, under normal use and well maintained, a satisfied user for many years.
Before you start using your slurry injector, we advise you to carefully read these instructions.
Because we cannot guarantee any operating errors or improper use.
The manufacturer will strive for improving their products and reserves the right to make changes
without any obligations to previously supplied machines
All figures, dimensions and weights appearing in this manual are subject to change without notice.
Images and data are as accurate as possible, but by alterations not binding.
Slootsmid Mesttechniek B.V.
Korenbree 40-A
7271 LH Borculo (the Netherlands)
Telephone: +31 (0)545-745 090
Internet: www.slootsmid.com

2
EC-DECLARATION OF CONFORMITY FOR
MACHINERY
Machinery Directive 2006/42/EG, Annex II.1.B
Manufacturer : Slootsmid Mesttechniek B.V.
Address : Korenbree 40-A, 7271 LH, Borculo (the Netherlands.)
Certify that:
The Slootsmid SZB slurry injector,
Serial number : ________________________________*
Year : ________________________________*
Delivery date : ________________________________*
Meets the requirements of the Machinery Directive ( Directive 2006/42 / EC , as amended ) ; Annex
VII, Part B
Borculo., The : _______________________________*
M.A.C.B. Schaepman
Directeur Slootsmid B.V.
* Fill upon delivery.

3
Index
1. INTRODUCTION ............................................................................................................................................ 4
1.1 DISCLAIMER...................................................................................................................................................... 4
1.2 GENERAL.......................................................................................................................................................... 4
1.4 TERMS OF GUARANTEE........................................................................................................................................ 4
1.5 CHECK AT RECEIVE.............................................................................................................................................. 5
1.6 ORDERING SPARE PARTS...................................................................................................................................... 5
2. SAFETY .........................................................................................................................................................6
2.1 GENERAL SAFETY RULES....................................................................................................................................... 6
2.2 PERSONAL SAFETY .............................................................................................................................................. 6
2.3 SAFETY PRECAUTIONS RELATED TO THE COMBINATION OF TRACTOR,SLURRY TANKER AND MACHINE. .................................. 6
2.4 SAFETY INSTRUCTIONS REGARDING TO MACHINE OPERATIONS..................................................................................... 7
2.5 SAFETY REGULATIONS RELATED TO MAINTENANCE. ................................................................................................... 7
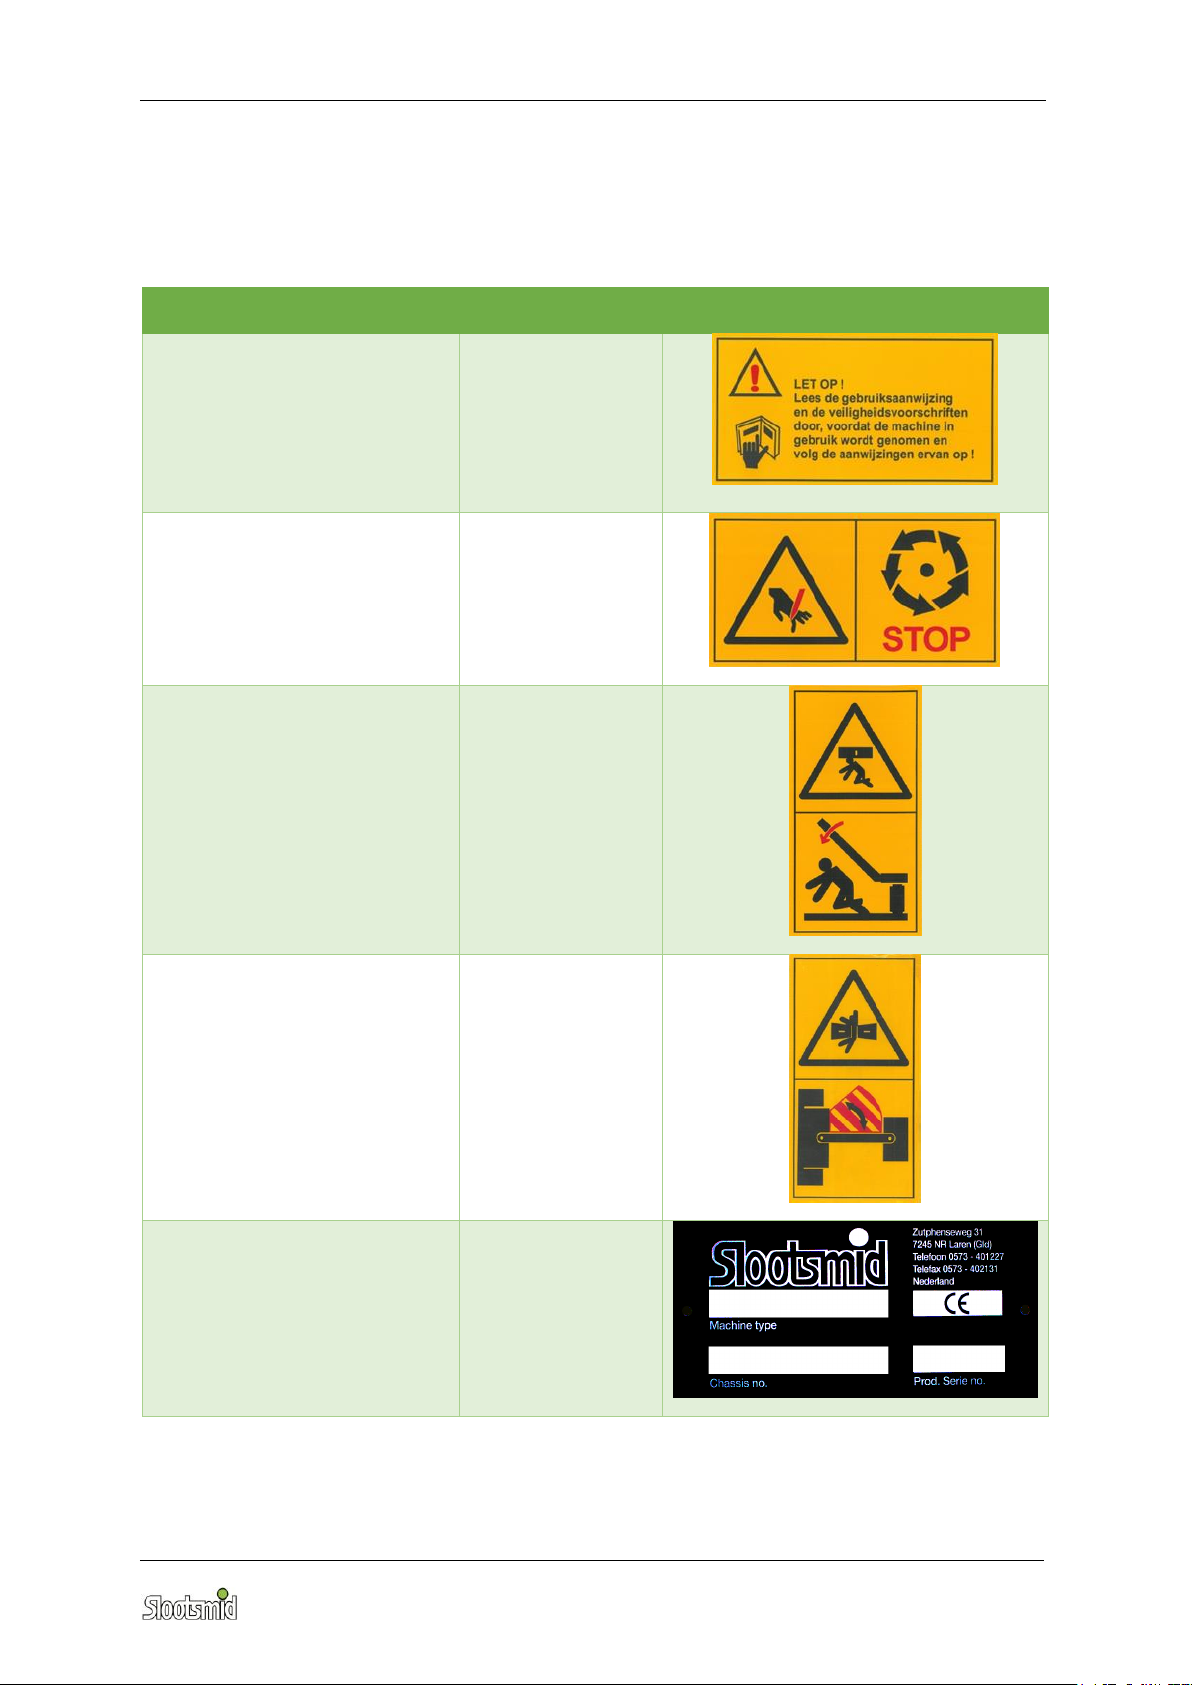
2.6 SAFETY STICKERS................................................................................................................................................ 8
2.7 PLACE FROM SAFETY STICKERS ON THE MACHINE. ..................................................................................................... 9
3. DESCRIPTION.............................................................................................................................................. 10
3.1 SZB SLURRY INJECTOR....................................................................................................................................... 10
3.2 DRIVE ............................................................................................................................................................ 10
3.3 OPERATION .................................................................................................................................................... 10
3.4 PRODUCT IDENTIFICATION ................................................................................................................................. 11
4. MACHINE ATTACH AND DETACH ................................................................................................................ 13
4.1 ATTACHING AFTER A TANKER OR SELF-PROPELLED MACHINE...................................................................................... 13
5. UTILIZE ....................................................................................................................................................... 15
5.1 WORKING WITH THE SLURRY INJECTOR ................................................................................................................. 15
6. ADJUSTING THE SLURRY INJECTOR............................................................................................................. 16
6.1 MECHANICAL GROUND PRESSURE ADJUSTMENT (STANDARD).................................................................................... 16
6.2 HYDRAULIC GROUND PRESSURE ADJUSTMENT (OPTIONAL)........................................................................................ 16
6.3 MECHANICAL COULTER CLOSURE......................................................................................................................... 17
6.4 HYDRAULIC COULTER CLOSING ............................................................................................................................ 17
6.5 SETTING THE SPEED OF UNFOLDING THE ARMS. ...................................................................................................... 18
6. MAINTENANCE........................................................................................................................................... 20
6.1 LUBRICATION MAP ........................................................................................................................................... 21
7. DISTRIBUTOR.............................................................................................................................................. 23
8. FAILURE...................................................................................................................................................... 24
9. TECHNICAL DATA........................................................................................................................................ 25
CONTACT........................................................................................................................................................ 28

4
1. INTRODUCTION
1.1 Disclaimer
All rights reserved. No part of this publication may be manifested in any way, duplicated or modified
without the prior written consent of Slootsmid Mesttechniek B.V. Slootsmid reserves the rights to
adjust parts without prior notice. The contents of this manual can also be changed at any time. This
manual is based and covers the currently manufactured models and regulations.
Slootsmid accepts no liability for any damages arising from the use of this manual in relation to any
goods delivered or possibly to deliver machines, except in the case of intent or gross negligence on
the part of Slootsmid. For further information about the use of this manual, or repair of Slootsmid
machines. You can contact the technical service from Slootsmid or the official Slootsmid distributor.
The composition and accuracy of this manual take all care. Slootsmid however, is not liable for any
errors and omissions for the use of this manual. With doubts about the correctness or completeness
of this manual please contact Slootsmid B.V.
1.2 General
You are now the owner of a Slootsmid slurry injector. This manual gives instruction concerning
operations, use, maintenance, faults and safety of the machine. The manual is part of the machine
and should always be available. If the machine change ownership, this manual must accompany the
machine. Everyone involved in the start-up, operation, maintenance and troubleshooting should
have read and understood this manual, particularly the safety instructions. Images in this manual
could, depending on the model, be slightly different.
To prevent operating errors and for trouble-free operation of the machine, the instructions should
always be available to the operator. For any questions, please contact your dealer or the
manufacturer. The address contained elsewhere in this manual.
1.3 Scope of application
This machine is designed for normal agricultural work. This machine must be used exclusively for the
fertilization with liquid manure on grassland. The machine should be used in combination with a
slurry tanker or tractor equipped with a solid and correct linkage.
The slurry tanker must be constructed sufficiently strong to carry the extra load. Slootsmid
Mesttechniek B.V. is not liable for any damages to the slurry tanker and / or tractor.
The machine may only be operated and maintained by trained people, respecting local laws, safety
and environmental regulations.
1.4 Terms of guarantee
We guarantee after the delivery date 6 months warranty on proper operation of this machine, if
maintained and used in accordance with the provisions made in this manual.
The guarantee covers those defects, which are caused by material or manufacturing defects and is
limited to the supply of parts under guarantee: at the sole discretion of Slootsmid Mesttechniek B.V.
The warranty is void if the delivery date expired since more than six months. Also, improper use,
improper or inadequate maintenance and faulty repairs or changes invalidate all warranty claims.
Warranty must be requested through a completely filled form.

5
1.5 Check at receive
Check the shipment by receive and make sure it is in accordance with what was ordered by you and
check the machine for completeness and damage. Do not use the machine if it is damaged, please
contact your Slootsmid dealer or forwarding company.
1.6 Ordering spare parts
For a correct and rapid processing for the supply of spare parts. We ask you to give up the numbers
on the type plate when you order the spare parts.
Spare parts can be ordered at your dealer or Slootmid Mesttechniek B.V.

6
2. SAFETY
The safety stickers affixed to the machine or tanker give regarding a safe operation very important
instructions.
Following these instructions is very important and is for your own safety.
2.1 General safety rules
•Use the machine only for work for which it was designed. In cases of doubt or indistinctness
always consult your Slootsmid dealer.
•Replace safety symbols / icons and/or information labels if they are unreadable by exactly
the same models, available at your Slootsmid dealer.
•Make sure you are familiar with all functions of the machine before you start working with
the machine.
•Check the machine on safety before each use. Relating to accident prevention.
•Work only with the machine if the protection is complete, intact and in functional state. The
protection prevents access to hazardous areas and are provided for your own safety and that
of others. Therefore, always keep the protection in optimal condition.
•Repair functional damage immediately, before working with the machine.
•Detach the machine on a flat surface. Avoid at all times that the machine can turn over or roll
away.
•Place the dust caps after disconnecting the hydraulic hoses.
•Protect the machine against sparks from welding or grinding work.
•Follow the inspection and maintenance regulations.
•When the tractor is stationary. The machine must be in idle mode. I.e. unfolded and not
lifted. The ball valve at the hydraulic block must be closed.
•The pressure relief valve must never be adjusted, consult your dealer.
2.2 Personal safety
•The user of the machine must be aware of the locally applicable safety requirements.
•The use is only permitted by qualified personnel.
•Avoid an unhealthy posture. This can lead to physical symptoms.
•Beware of grasping danger of loose clothing or jewellery and danger of getting squeezed by
wearing rings.
•Beware of possible danger of falling while working on the machine.
2.3 Safety precautions related to the combination of tractor, slurry
tanker and machine.
•Do not use the machine for purposes other than which it is intended.
•When driving on public roads the legal traffic regulations must be followed.
•Connect the hydraulic hoses and electrical wires so that they cannot make unwanted
movements during transport and use or prevent desired functions.
•Read for the safety precautions of the slurry tanker the manual of the tanker carefully and
act to this precautions.
•Adjust the speed and driving style, to local conditions, terrain and situation.
•Keep the width and weight of the machine in mind while taking turns.

7
•Keep the width and weight of the machine in mind by driving on a slope or incline.
•When driving on a slope notice the stability and the potential risk of tipping the machine.
•Make sure there are no people or animals between the tractor and machine.
2.4 Safety instructions regarding to machine operations.
•Ensure you have no one, standing on, under or on the machine or is residing in the
immediate surroundings of the machine, such as:
a. the machine is put in work
b. the machine is operated
c. the machine is stationary and has not yet been put out of work.
•The machine may only be operated by one person.
•Please note, that while working with the machine nobody is standing or walking on or in the
scope of the machine.
•When working with the machine ensure nobody is standing on the machine.
•Avoid stress and work structured.
•Do not operate the machine if you are tired.
•Use only genuine Slootsmid attachments and make sure they are installed properly.
•Ensure that no body parts are on or between moving parts. It is a risk that parts of the body
shall be crushed or cut off.
•Stop immediately if the machine produces strange noises or exhibiting abnormal behaviour.
•Stop immediately if the machine is leaking oil. Under pressure escaping oil may penetrate the
skin what could lead to blood poisoning or even till dead. Consult a doctor immediately if
someone is injected with oil.
2.5 Safety regulations related to maintenance.
•Wear personal protective equipment during maintenance.
•Make sure that the machine is at all times protected against accidental operation during
maintenance and repair work. Take the drive off, relieves the hydraulic, remove the ignition
key from the tractor and eventual switch the control box out.
•Ensure when you are opening the distributor that there is no manure pressure present. This
can be achieved by lower the machine unfolded, so that the coulter valves open.
•Watch your fingers when working at the distributor.
•Make sure the machine cannot fall or roll away.
•Spare parts to replace damaged or worn machine parts must meet the manufacturer’s
specification. The use of original parts is guaranteed. Parts which do not meet the
manufacturer’s specification could jeopardize the proper functioning of the machine and the
safety of persons.
•Damaged parts must be replaced immediately.
•Hydraulic hoses should be replaced at least once every 6 years. When a hydraulic hose is
damaged (if the thread inserts are visible) the hose must be replaced immediately.
•Make sure the power from the electrical system is off and cannot be switched on during
maintenance ,unless power is required for troubleshooting.
•Used oil and any spillage of oil must be collected and disposed in an environmental method.
•Products that are consumed during the work process must be processed in such a manner
the environmental is minimal loaded.

8
2.6 Safety stickers
The safety stickers affixed to the machine or tanker give regarding a safe operation very important
instructions. Following these instructions is very important and is for your own safety. Damaged labels
must be replaced!
Meaning
Position
Sticker
Read before use first the
instruction manual and safety
rules and follow the
instructions.
A
Caution when working on the
distributor. Put the distributor
stop. Beware of cutting danger.
B
Beware for falling parts and
clamping danger.
C
Caution clamping danger
D
Type plate
E

9
2.7 Place from safety stickers on the machine.
*Sticker C may be disposed at the bottom side, so that it is visible in the folded position.
C*
C*
D
E
D
A
B

10
3. Description
3.1 SZB slurry injector
The machine is designed for the normal agricultural work. The machine must only be used for
injecting liquid manure on grassland. The SZB slurry injector must be mounted behind a slurry tanker
or tractor with a correct and proper linkage.
A proper linkage means that it is heavy enough to lift the machine and there are plenty of hydraulic
connections to operate all functions from the tractor cab.
The build of the SZB slurry injector is as follows. The injector is through the middle frame attached to
the lifting frame of the slurry injector. The elements are attached to the mid-frame and the arms. The
arms can be folded out with the help of the main cylinders so that the machine can reach its fully
working width. The SZB Profi is equipped with an automatic unfold security. This means when the
machine unfolds the hooks of the security will automatically go up so the arms can be unfolded.
When folding the arms, the hooks of the unfold security locks automatically. At the SZB Standard the
unfold security should be done manually by means of a pin-hole connection. In addition to
transportation there must be applied a disc security. This must be done manually with the standard
SZB series (hydraulic optional) and at the SZB Profi the disc protection will be removed and placed
automatically.
The distributor ensures an equal distribution of the manure to the elements. The elements ensure
that, when properly adjusted, the manure neatly in the, made by the coulter and disc, slit be
deposited. In addition, all elements are provided with automatic shut-off valves in order to prevent
the dripping of manure.
3.2 Drive
The machine is hydraulic and optionally electrically powered by the tractor. The distributor is driven
by a hydraulic motor. All other functions are done by using cylinders.
3.3 Operation
The operation is controlled from the cab of the tractor. The operation can be done by using tractor
hydraulics or with an electrical control box. The functions that must be controlled include:
•Lifting and lowering slurry injector.
•Folding and unfolding slurry injector. (Unfold and disc security, will enter into force
automatically at the Profi serie. At the standard series the disc and unfold security must be
activated manually. (hydraulic is optional)
•If the rubber slurry outlets are hydraulic closed.
•Distributor
Not every injector is mounted behind a Slootsmid slurry tanker. There are many possible controls
and control boxes. This will not be treated further here, we refer to the manual of the slurry tanker.

11
1. Mid-frame
2. Folding arms
3. Disc security
4. Support wheel
5. Hydraulic motor
distributor
6. Connection supply
hose.
7. Distributor
8. Pin-hole connection
unfold security
9. Fold cylinder
10. Pin-hole connection
unfold security
11. Light beam
12. Element
3.4 Product identification
SZB Standard
7
6
5
4
3
1
3
4
12
8
9
10
11
9
8
2
2

12
1. Mid-frame
2. Disc security
3. Folding arms
4. Collapsible end piece (SZB 865
,940 and 1010)
5. Fold cylinder
6. Distributor
7. Element
8. Fold cylinder end piece
9. Hydraulic unfold security
10. Light beam
SZB Profi
6
2
5
4
1
2
4
5
8
10
9
8
7
3
3

13
4. Machine attach and detach
In the case of a vacuum tank mount the dosing set on the divider and the fine pressure regulator on
the pump, in order to keep the pressure in the tank steady.
4.1 Attaching after a tanker or self-propelled machine.
Make sure that the slurry injector is standing stable.
1. Attach the SZB slurry injector with the three-point or four-point connection to the tank or
tractor. In case of a three-point connection should it be done in the same manner as when
you attach a machine in the three-point linkage of a tractor. So first you attach the slurry
injector to the lifting arms and then attach the top link to the machine. PAY ATTENTION TO
YOUR SAFETY!!
Between tank / tractor and injector is often little space: make sure there can no dangerous
situations arise. In case of a four point hitch, first attach the linking arms and then attach the
top links at the bottom side.
WATCH OUT! Mount the pins always with grease.
READ ALSO TO THE INSTRUCTION MANUAL OF THE LINKAGE OR SLURRY TANKER
2. Connect the lift arms in the correct hole of the fertiliser. Pay attention to transport height:
max. 4 meters and ground clearance.
3. Adjust the fertilizer such that it hangs in lifted position as close to the rear wall of the tank.
(Watch out !! Fertiliser must not come into contact with the slurry tanker)Make sure the
injector, seen from the side, in the working position is horizontal. This can be achieved by
twisting the top link (s) further in or out. You must ensure that the top link after adjustment
is properly secured.
4. Tighten the chain between the lifting frame and lift arms so that the chains in lifted position
are tighten.
5. Disconnect the manure hose 4 "or 5" between distributor and tanker. Make sure that the
hose is long enough to follow the movements of the distributor. (Pay attention to your own
safety.)
6. Check if the injector is well secured.
Quick hitch frame
The SZB slurry injector can be provided with a quick hitch frame. This quick hitch frame is intended to
quickly attach and detach the slurry injector. The quick hitch frame can first be attached at the
linkage of the tractor and then be attached to the slurry injector.

14
4.2 Connecting the hydraulics
Connect the hoses from the hydraulic operation using the quick connect fittings to the connector
plate of the tanker or tractor:
•3x hoses distributor (Leak pipe must be connector on the pressure free return, otherwise the
warranty on the hydraulic motor will void!)
•2x hoses folding and unfolding.
•2x hoses hydraulic valves for the slurry outlets, if present.
For the Profi series, you can keep the order of the connection board below.
Connection board hydraulics from the Profi series.
Note: Operate the control functions only from the control position of the tractor.
4.3 Connecting the electrical system.
the slurry tank or tractor must be equipped with a 7-pin connection for the light beam of the SZB
slurry injector.
4.4 Check for use
For a safe working with the machine. The following checks should be carried out every time before
use:
•Check the lightening.
•Check whether the disc shielding (if present) works well.
•Check the securing and tight chains.
•Check the frame and elements for damage.
If something does not work first fix the malfunctions before you start using the machine.
4.5 Machine detach.
When disconnecting you should proceed as follows
•Put the machine on a flat, paved surface. Make sure the machine cannot tip or roll away. Use
the supplied stands.
•Unfold the arms of the slurry injector. Watch out!! Make sure that nobody is within the
unfold range of the machine.
•Disconnect hydraulics, hose between tanker and distributor, 7-pin connector and three or
four point linkage or quick hitch frame.

15
5. Utilize
5.1 Working with the slurry injector
1. Start fertilizing. Be assured that nobody is in the immediate surroundings of the slurry
injector.
2. Unlock the unfold security manually or it automatically unlocks.
3. Unfold the arms of the slurry injector.
4. Put all driving the linkage to "lower" and leave the linkage to "lower" stand. Make sure the
valves of the slurry outlets are open enough.
5. Start the manure supply, consult the manual of your slurry tank.
6. The distributor must be horizontal in the working position. This is to adjust by means of the
top linkage.
7. The fold arms must be horizontal in working position. At the SZB profi this can be adjusted by
adapting the stop blocks under the hinges and rotating the ball joints of the folding cylinders.
8. At the SZB standard there is no possibility to adjust the working position.
Standing folding arms horizontal is OK
9. Stop fertilizing (closes the manure supply). Put all driving the linkage to "lift" and put the
hitch control in the neutral position when the injector is fully lifted.
10. Lift the injector always at the maximum lift position.
11. Fold the machine.
12. During transport on public roads the linkage must be locked so that it cannot lower.
13. NEVER DRIVE BACKWARDS WHEN THE SLURRY INJECTOR IS IN WORK MODE.

16
6. Adjusting the slurry injector
6.1 Mechanical ground pressure adjustment (standard)
Adjust spring pressure to mechanical ground pressure. By moving the spring in the direction shown,
the ground pressure will be adjust.
Mechanical ground pressure
6.2 Hydraulic ground pressure adjustment (optional)
Setting the ground pressure is divided into 3 sections (left, center and right). By opening the ball
valve of the desired section you can increase or decrease the pressure with the build-up hand pump.
(For the pre-set value, see the belonging pressure gauge.)
After setting the desired pressure closing the valve again! By opening several sections simultaneously
they can be set at exactly the same value.
Hydraulic ground pressure setting.
Higher ground pressure

17
6.3 Mechanical coulter closure.
The SZB Profi and SZB Standard versions comes standard with mechanical coulter closing. When the
working position is reached, the valves will be opened automatically. When lifting the machine, the
rubber slurry outlets will be automatically closed by the steel wire.
Mechanical coulter closure
6.4 Hydraulic coulter closing
Optionally the SZB slurry injector can be equipped with hydraulic coulter closure.
Hydraulic coulter closure.

18
6.5 Setting the speed of unfolding the arms.
The speed of the fold and unfolding can be set. Left and right cylinder must be set separately.
Adjustment of the cartridges is a very precise work. Inquire at your dealer or Slootsmid for the
proper adjustment.
Setting the fold and unfolding speed.
Red arrow is speed unfolding, blue arrow is speed folding. Screw in the cartridges is more throttling.
The unfolding speed is set ex-works.
It is also possible for setting the sequence of the locking hooks.
Setting sequence locking hooks, this is set at the factory.
Setting the unfolding of the 2nd arm by the SZB 870 Profi, SZB 940 Profi and SZB 1010 Profi. These
arms must be throttled so far that they do not conflict with each other. (first arm 1 should be a lot
unfolding before the unfolding of arm 2 starts) Further, the speed can be set as required. Folding up
arm 2 does not need to be set. Left and right cylinder adjusted separately.

19
Adjusting 2nd arm unfolding, screwing the cartridge in is more throttling.
This manual suits for next models
1
Table of contents
Popular Laboratory Equipment manuals by other brands

Bürkle
Bürkle StopCock Directions for use

Thermo Scientific
Thermo Scientific Finnpipette Novus Instructions for use

SciCan
SciCan statim 5000 G4 Operator's manual

Biosan
Biosan Vortex MSV-3500 Service manual

AS
AS M0026 user manual

NEW BRUNSWICK SCIENTIFIC
NEW BRUNSWICK SCIENTIFIC C2 Classic Guide to operations