SM Pro Audio V-MACHINE User manual

V-Machine – Quick Start Guide
2 | V-Machine – Quick Start Guide
Introduction
Thank you for purchasing the V‐Machine. You now own an extraordinary product that oers
stand-alone playback of VST (Virtual Studio Technology) plug‐ins originally designed for
operation on the Windows operating system.
We urge you to read the full PDF manual included on the CD from start to nish in addition to this
quick start guide as some of the concepts of the V‐Machine require detailed explanation.
Congratulations on the purchase of your new V-Machine. We know it helps you make some great
music!
V-Machine Features
The Hardware:
Features:
• External hardware host for Windows plugins (VST instruments and eects)
• Low latency real-time audio performance
• Presets can contain plug-in chains, layers, and zone splits
• Intuitive Keypad button user interface
• Extensive third party MIDI controller support
• LCD Panel
• Sturdy compact chassis
Technical specications:
• 1 Ghz CPU • 1G IDE ash disk
• 512 MB RAM • HD audio codec
Connections:
• Audio Line Out (2 x TS 6.35mm): Line level -10dB
• Audio Line Input (1 x 3.5mm stereo mini jack): Line Level -10dB
• Headphone output (3.5mm stereo)
• 2 x USB (Host) for connection of USB peripherals
• 1 x USB (Slave) for connection to host computer
• 1 x MIDI Input (5-pin female DIN)
• 1 x Kensington® Security Slot
• DC IN : 12V 2A external 110-240V 50/60Hz plug-pack
The VFX Application facilitates:
Features:
• The creation of Preset sounds incorporating plug-in chaining, layering, keyboard mapping,
and mixing
• The auditioning of Presets on the host computer
• Interaction with the VST GUI
• File management of Banks, Presets
• Conguration of Global System Settings
• The synchronization of settings to the V-Machine
V-Machine – Quick Start Guide | 3
What’s in the Box?
• SM Pro Audio V-Machine
• Power supply
• This quick start guide
• USB cable
• Getting started CD – VFX application, Operation manual (PDF) and FREE plug-ins.
About this Quick Start Guide
This Guide covers:
• Overview of the V-Machine
• How to connect the V-Machine
• Basic operation of the V-Machine
• Installation of the VFX Application Software
• Overview of the VFX Application Software
• Connecting the V-Machine to your computer
• Installation of plug-ins
• Synchronization of the V-Machine
• Additional information and support
Overview
Front:
Back:
12
3
4
5
1
2
3
4
5
123
4
5678
1
2
3
4
5
6
7
8
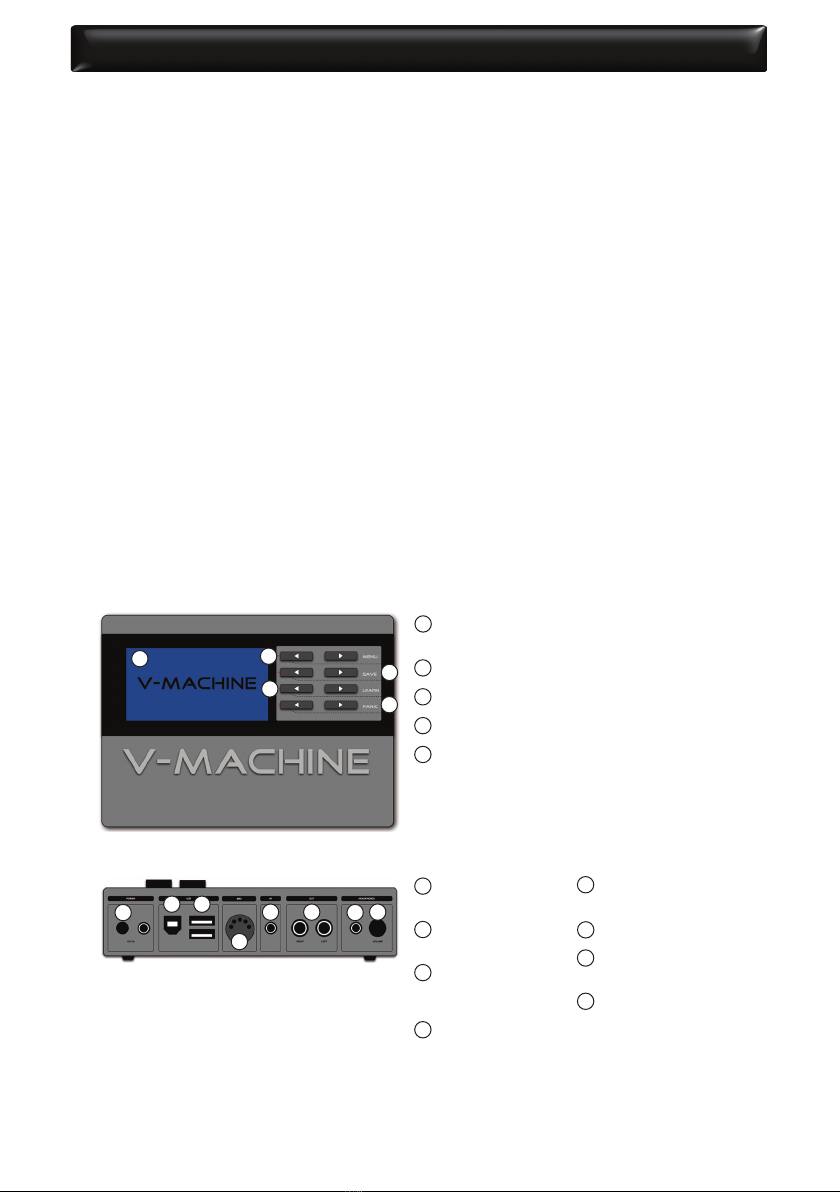
LCD Panel:
The panel has four rows which display the Bank name,
Preset name, selected parameter and parameter value
Bank buttons:
Browse Banks (left = previous, right = next)
Preset buttons:
Browse Presets (left = previous, right = next)
Parameter buttons:
Select parameters (left = previous, right = next)
Parameter value buttons:
Adjust current parameter value (left = down, right = up)
Power Switch
Switches the V-Machine
on and o
USB to Host
Port to connect the V-Ma-
chine with the PC
USB Port
Two ports to connect
mass storage devices
and/or MIDI controllers
MIDI In
Port for MIDI controllers
Audio In
Connection of audio input
signal
Audio Outs
Main stereo output signal
Headphone Out
Port to connect head-
phones
Headphone Volume
Rotary headphone ampli-
er volume control
* Note: Dened below are the dual press keypad selection functions.
• 1st row: Enters the Global System Settings
• 2nd row: Saves the current preset
• 3rd row: Activates the MIDI learn function
• 4th row: Activates the MIDI panic function

V-Machine – Quick Start Guide
4 |
How to connect the V-Machine
* It should be pointed out, that extreme output volumes may damage your ears and/or your head-
phone units. Turn down the LEVEL controls before you switch on the unit.

V-Machine – Quick Start Guide | 5
Basic Operation of the V-Machine
1. Connect the outputs on the rear panel of the V-Machine with your powered speakers, amplier,
or mixer. You can also use the headphone amplier provided.
2. Connect a MIDI controller to the MIDI in port or a USB port on the rear of the V-Machine.
3. Connect the included plugpack to the V-Machine and mains power.
4. Depress the power button on the rear panel and wait while the V-Machine initializes.
5.TheV-Machines front panel displays 4 lines of text: Selected Bank, Selected Preset within the selected
Bank, Selected plug-in parameter within the selected Preset, and the Selected parameter value.
6. Navigate the Banks and Presets using the keypad button interface while monitoring the LCD Panel.
7. Play your MIDI controller and enjoy playing your Presets!
8. Global System Settings and other functions are accessed by pressing two buttons simultaneously.
Refer to the operational manual for further details.
* Note: See “Connecting the V-Machine with the Computer“ to install plug-ins on the V-Machine.
Installation of the VFX Application Software
The V‐Machine is a stand‐alone unit designed to operate without the requirement of PC/Mac com-
puter for performance. However, the full power of the unit is only realised when congured for
use by the VFX Application software.
Requirements:
Windows based PC
Minimal: Pentium 1 GHz / Athlon XP 1.33 GHz, 512 MB of RAM, Windows XP / Vista or later.
Suggested: Pentium 2.4 GHz / Athlon XP 2.4 GHz, 1 GB of RAM, Windows XP / Vista or later.
Intel based Mac
Minimal: Any Intel based Mac
Suggested: 1.66 GHz Intel Core Duo processor, 1 GB of RAM, Mac OS X 10.4.4 or later.
How to install:
Windows
• Insert the Getting Started CD into your computers CD drive
• Run the ‘VFXWebSetup.exe’download wizard
• The wizard automatically downloads the most up to date version of the VFX Application and
prompts for user for conrmation during the installation process on your computer
• After installation is complete the VFX Application is available for use from the Start Menu‐>All
Programs‐>VFX‐>VFX Application
Mac
• Insert the Getting Started CD into your computers CD drive
• Run the ‘Download VMACHINE for Mac’download wizard
• The wizard directs your web browser to the SM Pro Audio website where you can download the
most up to date version of the VFX Application
• The Mac VFX Application is downloaded in .dmg disk image le format
• Double click the .dmg le to mount the image and follow the installation instructions provided
* Note: It is also possible to simply download the latest version of the VFX Application from the SM Pro
Audio website at any time.
V-Machine – Quick Start Guide
6 |
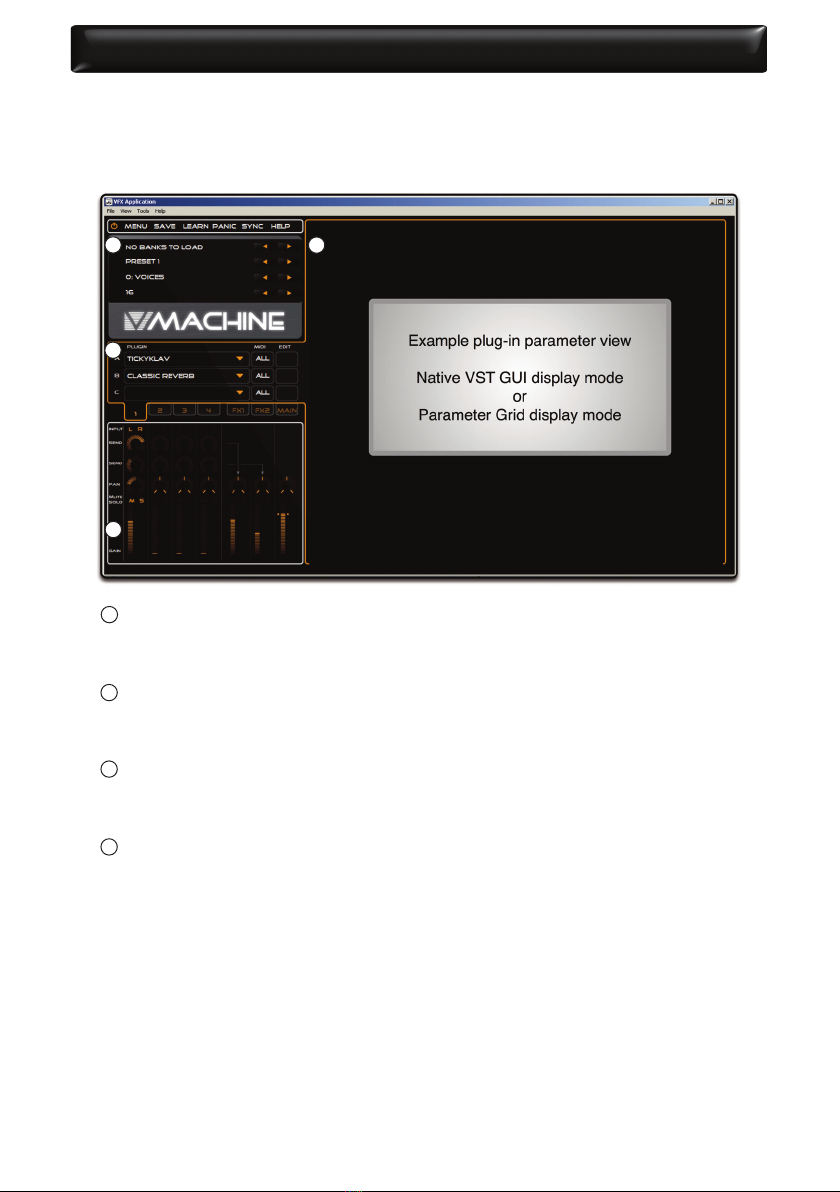
Overview of the VFX Application Software
The VFX Application GUI has an intuitive four (4) Pane layout design
1
2
3
4
1
2
3
4
V‐Machine Pane
Represents a virtual V‐Machine. The clickable keypad interface responds just as the hardware
version.
Plug‐in Pane
A tab layout structure oers quick access to all Plug‐in Slots in the current Presets mixer con-
guration.
Mixer Pane
The Mixer Pane oers quick access to traditional mixer channel operations such as gain, pan,
mute, and solo, etc.
Parameter Pane
This Pane displays the currently selected VST plug‐ins parameters in either Native VST GUI
mode or Parameter Grid mode.

V-Machine – Quick Start Guide | 7
Connecting the V-Machine with your computer
1. Install the VFX Application from the Getting Stared CD onto your computer.
2. Connect a MIDI Keyboard to the V-Machine.
3. Connect the V-Machine to your computer using the included USB Cable.
4. Power on the V-Machine.
3. Launch the VFX Application.
4. The VFX Application detects that the V-Machine is connected and displays the V-Machine Pane,
Plugin Pane, Mixer Pane and the Parameter Pane.
6. Use the VFX Application to install plug-ins, create Banks and Presets, and audition sounds.
7. Synchronize the V-Machine with the VFX Application conguration as desired.
Installation of plug-ins
Plug‐in installation wizard
The VFX Application includes a plug-in installation wizard designed to assist you in installing a
range of plug-ins on your V-Machine and computer. The wizard prompts you for user feedback
and conrmation during the step-by-step installation process. Typically, plug-in .dll les are trans-
ferred to the appropriate folder along with any support and sample les.
* Note: Some plug‐ins have complex installation methods that may not yet be incorporated in the VFX
plug‐in installation wizard. Plug‐ins with specic authorisation requirements will be catered for on a
case‐by‐case basis and added to the wizard over time. Updates will be available on www.smproaudio.com.
Installing Windows VST“.dll” plug‐in les manually on the computer
Many plug-ins can be installed on your computer by copying the raw VST .dll le to a newly created
folder in the following location‘My Documents\VFX Plug-ins’. The folder name should be the same
as the plug-in name.
Installing plug‐ins on the V‐Machine without the VFX Application
The V-Machine will recognize certain raw VST .dll les when loaded onto theV-Machine. This method
will not work with all plug-ins as some plug-ins have much more complex installation requirements.
Synchronization of the V‐Machine
Sync via USB cable
Pressing the SYNC icon in the VFX Application activates synchronization.
Load/Save to Stick synchronization method
The Load/Save to Stick synchronization method involves mounting a compatible USB memory
stick (Thumb drive) into an available USB connector slot on your computer. Once mounted, you
can select the ‘Load from Stick’ or‘Save to Stick’ from the File drop down menu as desired.
The V-Machine hardware features a le management utility that can be accessed via the Global
System Settings Menu. It is possible to perform‘Load from Stick’ and‘Save to Stick’function when
a USB Memory stick is connected to V-Machine.
For more detailed information on the SM Pro Audio V-Machine hardware, the VFX Application Soft-
ware, and warranty issues, please consult the User Manual contained on the V-Machine CD.
SM Pro Audio Worldwide:
W25, Roberna Business Park
26-28 Roberna St
Moorabbin
Melbourne, Victoria 3189
Australia
Tel: +61 3 9555 8081
Fax: +61 3 9555 8083
Technical Support:
E-mail: [email protected]
Sales:
E-mail: sales@smproaudio.com
Internet:
www.smproaudio.com
SM Pro Audio Europe:
tt audio GmbH
Alfred-Krupp-Str. 5
48291 Telgte
Germany
Tel: +49 (0) 2504 8888 78-0
Fax: +49 (0) 2504 8888 78-7
Technical Support:
E-mail: [email protected]
Sales:
E-mail: info@ttaudio.net
Internet:
www.smproaudio.de
ALL RIGHTS RESERVED © 2008 SM Pro Audio
Whilst every eort has been made to ensure the information provided is accurate at the time of writing,
SM Pro Audio may update the contents of this manual at any time without prior notice. SM Pro Audio is
not liable for any incorrect information contained in this manual and extends no liabilities in regard to this
manual other than those required by local law.
V‐Machine and Powered by VFX are trademarks of VFX Systems Pty Ltd, Australia.
ASIO and VST are trademarks of Steinberg Soft‐ und Hardware GmbH.
Windows is a registered trademark of Microsoft Corporation in the United States and other countries.
Mac, Mac OS and Macintosh are trademarks of Apple Inc.
The Kensington lock is a registered trademark of Kensington.
Other company and product names may be trademarks of their respective owners.
Other manuals for V-MACHINE
3
Table of contents
Other SM Pro Audio Media Player manuals


