SM Pro Audio V-MACHINE User manual


V-Machine Operating Manual – Foreword
2|
1. Foreword
1.1. Thank you
Congratulations on purchasing the SM Pro
Audio V-Machine. You now own an extraor-
dinary product that oers stand‐alone play-
back of VST (Virtual Studio Technology)
plug‐ins originally designed for operation
on the Windows operating system.
We urge you to read this manual from start
to finish as some of the concepts of the
V‐Machine require detailed explanation.
We hope you enjoy making music on the V‐Machine!
SM Pro Audio
1.2. Important Notes:
Every eort has been made to ensure all information provided in this manual
is accurate at the time of writing.
SM Pro Audio is not liable for any incorrect information contained in this ma-
nual and extends no liabilities in regard to this manual other than those requi-
red by local law.
SM Pro Audio may update the contents of this manual at any time without
prior notice.The latest version of this manual is available from the SM Pro Audio
website at all times.
http://www.smproaudio.com
1.3. V‐Machine Team
SM Pro Audio would like to thank our V‐Machine project partners VFX Systems
Pty Ltd and Grey Innovation Pty Ltd.
A very big thank you goes out to everyone involved in the V‐Machine project:
Bill Barsby, Joe Berg, Samuel Bolton, Tim Buckley, Vin Curigliano, John Fuller,
Denis Greco, Jeerson Harcourt, Peter Howard, Patrick Jose, Brett Kingman, Mar-
cin Koczy, Dr Von K, Mandie Lammens, Leo Lau, David Lim, Rohan Mansell, Ste-
phen Marshall, Kade Miller, Owen Neeson, Sam O'Connor, Danny Olesh, Peter
Schlossnagel, Cory Seligman, Mathew Skinner, Mike Smith, Chris Steller, Stuart
Summerville, Danusia Szafranski, Tamer Terzi, Sandra Terzi, Felix Thiang, Vincent
Thiang, Tony Tran, Rowan Vince, Nicola Wong,Yingying Zhang, Stephanie Zhang.

V-Machine Operating Manual – Content |3
Contents
1. Foreword .................................................................................................... 2
1.1. Thank you ........................................................................................................................................................... 2
1.2. Important Notes: ............................................................................................................................................. 2
1.3. V‐Machine Team .............................................................................................................................................. 2
2. What Is The V‐Machine? ............................................................................ 7
2.1. What can you do with a V‐Machine? ........................................................................................................ 7
2.2. Who can benet from using a V‐Machine? ............................................................................................ 7
3. System Requirements ............................................................................... 7
3.1. Intel based Mac ................................................................................................................................................ 8
3.2. Windows based PC ......................................................................................................................................... 8
3.3. Windows based VST plug‐ins..................................................................................................................... 8
4. What Comes In The Box ............................................................................ 8
5. Overview And Concepts ........................................................................... 9
5.1. The VFX Platform ............................................................................................................................................ 11
5.2. About Windows VSTi/VST plug‐ins .......................................................................................................... 11
5.2.1. VSTi plug‐ins .......................................................................................................................................... 12
5.2.2. VST plug‐ins ........................................................................................................................................... 12
5.2.3. VST plug‐in hosts ................................................................................................................................. 12
5.3. Plug‐in considerations and limitations .................................................................................................. 12
5.4. V‐Machine additional Preset parameters .............................................................................................. 13
5.5. Master and Persistent based memory states ....................................................................................... 13
5.5.1. Master Saved State .............................................................................................................................. 13
5.5.2. Persistent Saved State ........................................................................................................................ 13
6. Freedom Comes With Responsibility! ..................................................... 13
6.1. Building your own sounds – Main considerations.............................................................................. 14
6.1.1. Excessive gain staging resulting in digital clipping ................................................................ 14
6.1.2. Use the presets wisely ....................................................................................................................... 15
6.2. Managing resources ..................................................................................................................................... 15
6.2.1. CPU considerations ............................................................................................................................. 15
6.2.2. Optimising presets .............................................................................................................................. 15
7. Auditioning A Sound ............................................................................... 16
8. V‐Machine Internal Architecture ............................................................ 16
8.1. VFX hardware host rmware concepts .............................................................................................. 16
8.2. Banks and presets ........................................................................................................................................ 16
8.2.1. Banks ........................................................................................................................................................ 17
8.2.2. Presets ...................................................................................................................................................... 17
8.3. Plug‐in slots ..................................................................................................................................................... 18
8.4. Audio routing ................................................................................................................................................. 18

V-Machine Operating Manual – Content
4|
8.5. MIDI Routing .................................................................................................................................................. 19
8.6. .VFX les ........................................................................................................................................................... 19
9. V‐Machine Hardware & Connections ..................................................... 21
9.1. Hardware introduction .............................................................................................................................. 21
9.2. Top panel ......................................................................................................................................................... 21
9.2.1. Keypad button user interface ......................................................................................................... 22
9.2.2. LCD panel ............................................................................................................................................... 22
9.3. Rear panel connections .............................................................................................................................. 23
9.3.1. Power connector ................................................................................................................................. 23
9.3.2. Power button ........................................................................................................................................ 24
9.3.3. USB Slave connector .......................................................................................................................... 24
9.3.4. USB Host connectors .......................................................................................................................... 24
9.3.5. MIDI input ............................................................................................................................................... 24
9.3.6. Audio input ............................................................................................................................................ 24
9.3.7. Audio outputs ....................................................................................................................................... 24
9.3.8. Headphone amplier output........................................................................................................... 24
9.3.9. Headphone rotary volume control ............................................................................................... 25
9.4. Kensington Security Slot ........................................................................................................................... 25
10. Turning On And Navigating The V‐Machine ....................................... 25
10.1. Power up the V‐Machine .......................................................................................................................... 25
10.2. Single keypad navigation ......................................................................................................................... 26
10.2.1. Bank navigation Next/Previous ................................................................................................... 26
10.2.2. Preset navigation Next/Previous ................................................................................................. 26
10.2.3. Parameter navigation Next/Previous ........................................................................................ 27
10.2.4. Value adjustment Next/Previous ................................................................................................ 27
10.3. Dual keypad combo selection functions .......................................................................................... 27
10.3.1. Global System Settings MENU ..................................................................................................... 27
10.3.2. Save command .................................................................................................................................. 28
10.3.3. Learn command ................................................................................................................................ 28
10.3.4. Panic command ................................................................................................................................. 29
11. V‐Machine Specic Plug‐In Parameters ............................................... 29
11.1. Patch Parameter .......................................................................................................................................... 29
11.2. Audio Buer Parameter ............................................................................................................................ 29
11.3. Persistent State Parameter ...................................................................................................................... 30
11.4. Consume Program Change Parameter ............................................................................................... 31
11.5. Navigating Banks and Presets from an external MIDI device ..................................................... 31
11.6. Mixer conguration specic additional parameters ...................................................................... 31
12. The VFX Application .............................................................................. 32
12.1. Application concepts ................................................................................................................................. 32
12.2. First steps ....................................................................................................................................................... 33
12.2.1. Installation of the VFX Application for the Windows operating system ...................... 33
12.2.2. Installation of the VFX Application for the Mac operating system ................................. 33
12.2.3. Conguring the VFX Application preferences ....................................................................... 34
12.3. Installing plug‐ins on the computer ..................................................................................................... 34
12.3.1. Plug‐in installation wizard ............................................................................................................. 34
12.3.2. Installing Windows VST “.dll” plug‐in les manually on the computer ...................... 35

V-Machine Operating Manual – Content |5
12.3.3. Installing plug‐ins on the V‐Machine without the VFX Application ............................... 35
12.4. VFX Application layout and design ...................................................................................................... 35
12.5. V‐Machine Pane ........................................................................................................................................... 35
12.5.1. Standard keypad browsing ........................................................................................................... 36
12.5.2. Power down icon .............................................................................................................................. 36
12.5.3. Menu icon ............................................................................................................................................ 36
12.5.4. Save icon .............................................................................................................................................. 37
12.5.5. Learn icon ............................................................................................................................................ 37
12.5.6. Panic icon.............................................................................................................................................. 37
12.5.7. Sync icon .............................................................................................................................................. 38
12.5.8. Help icon .............................................................................................................................................. 38
12.6. Plug‐in Pane .................................................................................................................................................. 38
12.6.1. Channel Plug‐in Slot ........................................................................................................................ 39
12.6.2. Popup Plug‐in Selector ................................................................................................................... 39
12.6.3. Plug‐in MIDI Channel Selector ..................................................................................................... 39
12.6.4. Plug‐in Slot Edit Menu .................................................................................................................... 39
12.6.5. Mixer Channel, FX Send, and Main Output Selector tabs .................................................. 40
12.7. Mixer Pane ..................................................................................................................................................... 40
12.7.1. Channel Gain ...................................................................................................................................... 40
12.7.2. Channel Pan ........................................................................................................................................ 41
12.7.3. Channel Mute ..................................................................................................................................... 41
12.7.4. Channel Solo ....................................................................................................................................... 41
12.7.5. FX Sends 1 & 2 ....................................................................................................................... 41
12.7.6. L&R audio input selector ............................................................................................................... 42
12.7.7. FX 1 & 2 return channels .............................................................................................................. 42
12.7.8. Main stereo output channel ......................................................................................................... 42
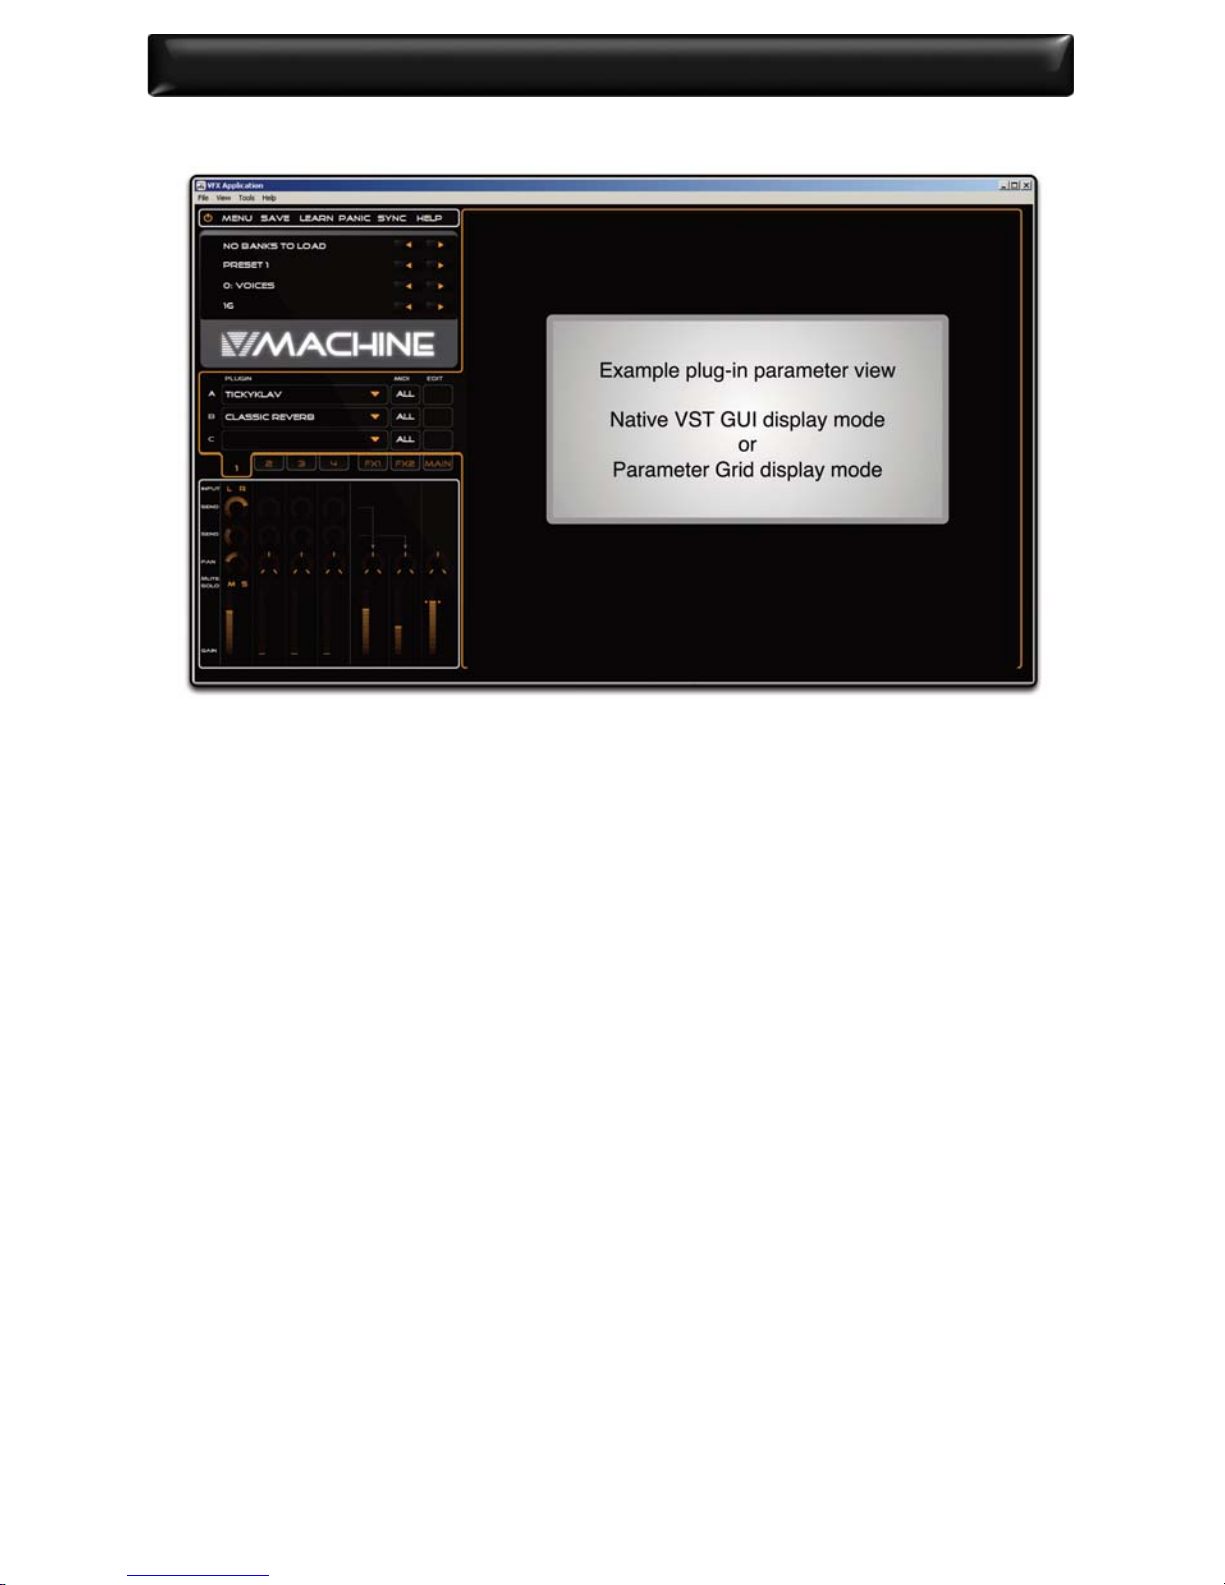
12.8. Parameter Pane ............................................................................................................................................ 43
12.9. VFX Application le management ........................................................................................................ 43
12.9.1. Loading, saving, and renaming Bank les ............................................................................... 43
12.9.2. Loading, saving and renaming Presets ..................................................................................... 44
12.10. Synchronization of the V‐Machine ................................................................................................... 44
12.10.1. Sync via USB cable ......................................................................................................................... 44
12.10.2. Load/Save to Stick synchronization method ....................................................................... 44
12.11. Uninstalling the VFX Application ........................................................................................................ 45
13. Walk Through Usage Examples ............................................................ 45
13.1. User without VFX Application software .............................................................................................. 45
13.2. New User installs VFX Application ........................................................................................................ 46
14. V‐Machine Hardware – Firmware Updates .......................................... 47
14.1. What is rmware? ........................................................................................................................................ 47
14.2. How to update the V‐Machine rmware ............................................................................................ 47
14.2.1. USB Memory Stick rmware update utility method ............................................................ 47
14.2.2. Direct computer rmware update utility method ................................................................ 47
15. VFX Application – Software Updates ................................................... 48
15.1. VFX Application updates .......................................................................................................................... 48
16. Limitations ............................................................................................. 48

V-Machine Operating Manual – Content
6|
17. Safety And Care Of Your V‐Machine .................................................... 48
17.1. Safety instructions ...................................................................................................................................... 48
17.2. Temperature operation ............................................................................................................................. 49
18. Specications ......................................................................................... 49
19. Warranty ................................................................................................. 49
20. Trademarks ............................................................................................ 50
21. FCC And CE Regulation .......................................................................... 50
22. Correspondence ..................................................................................... 51
Figures:
Figure 1: Standard LCD display view ....................................................................................................................... 9
Figure 2: Operational overview ............................................................................................................................... 10
Figure 3: VFX Application .......................................................................................................................................... 11
Figure 4: Bank and Preset structural hierarchy ................................................................................................... 17
Figure 5: Mixer architecture – Audio and MIDI routing ..................................................................................... 20
Figure 6: Front panel .................................................................................................................................................. 21
Figure 7: Button interface ......................................................................................................................................... 22
Figure 8: LCD Display ................................................................................................................................................. 22
Figure 9: Rear panel connections ............................................................................................................................ 23
Figure 10: Standard LCD display view ................................................................................................................... 26
Figure 11: Bank navigation ...................................................................................................................................... 26
Figure 12: Preset navigation .................................................................................................................................... 26
Figure 13: Parameter navigation ............................................................................................................................ 27
Figure 14: Value adjustment .................................................................................................................................... 27
Figure 15: Global Menu keypad combo ................................................................................................................ 27
Figure 16: Save command keypad combo ........................................................................................................... 28
Figure 17: Learn command keypad combo ......................................................................................................... 28
Figure 18: Panic command keypad combo .......................................................................................................... 29
Figure 19: Persistent State Parameter .................................................................................................................... 30
Figure 20: VFX Application user process ................................................................................................................ 32
Figure 21: V-Machine Pane ....................................................................................................................................... 36
Figure 22: Plugin Pane ............................................................................................................................................... 38
Figure 23: Mixer Pane ................................................................................................................................................. 40

V-Machine Operating Manual – What Is The V-Machine? |7
2. What Is The V‐Machine?
The V‐Machine is a purpose built stand‐alone VST/VSTi plug‐in player.
Based on the recently developed Powered by VFX embedded technology plat-
form, the V-Machine is an extremely versatile musical instrument. By its very
nature it can adapt with the push of button and transform from a classic synth
into a soaring string section.
Traditional synthesizers, samplers and sound modules are great, however
many of today’s software instruments have much more to oer. The sonic pos-
sibilities are endless with literally hundreds of commercial and free VST instru-
ments widely available.
The V‐Machine lets you harness the exibility of software in a reliable purpose
built hardware unit. It represents the best of software and hardware combined.
2.1. What can you do with a V‐Machine?
TheV‐Machine is an extremely versatile instrument that can be used in many ways.
The V‐Machine can be used:
• As a synthesizer
• As a sample playback module
• As an outboard eects unit
• To play virtual instruments live with a keyboard controller
• To ooad some of the work your computer performs when using virtual in-
struments in the studio
• To pre‐load plug‐ins into Banks and Presets for live performances
• To create unique sounds using plug‐in chains, splits, and layers
• To connect MIDI controllers and bring plug‐in technology to real hardware
2.2. Who can benet from using a V‐Machine?
The V‐Machine benets all types of users; from DJ’s wanting trigger synths and
samples live, to a piano bar pianist wanting to perform with some of the
greatest piano samples ever recorded.
Keyboard players – Musicians – Studio Engineers – Live Engineers – Producers
– Students – Teachers – Guitarists – and more.
3. System Requirements
The V‐Machine is a stand‐alone unit designed to operate without the require-
ment of PC/Mac computer. However, the full potential of the unit is only reali-

V-Machine Operating Manual –What Comes In The Box
8|
sed when connected to a computer and congured for use by the VFX Appli-
cation software.
The VFX Application has the following requirements:
3.1. Intel based Mac
Minimal: Any Intel based Mac
Suggested: 1.66 GHz Intel Core Duo processor, 1 GB of RAM, Mac OS X 10.4.4
or later.
3.2. Windows based PC
Minimal: Pentium 1GHz / Athlon XP 1.33 GHz, 512 MB of RAM, Windows XP /
Vista or later.
Suggested: Pentium 2.4 GHz / Athlon XP 2.4 GHz, 1 GB of RAM, Windows XP /
Vista or later.
3.3. Windows based VST plug‐ins
The V‐Machine hardware oers support for a range of VST plug‐ins program-
med to originally operate on the Windows operating system. VST plug‐ins pro-
grammed specically for the Mac are not supported.
The good news is, the Mac compatible version of the included VFX Application
oers built in support for VST plug‐ins originally programmed for use on the
Windows operating system.
VST and VSTi plug‐ins are readily available from a variety of sources. Commer-
cial plug‐ins are available from music stores and often directly from the devel-
opers websites. Thousands of free plug‐ins are also available for download
directly from the many VST resource and community based websites on the
internet.
4. What Comes In The Box
• V‐Machine
• Power supply
• Quick start guide
• USB cable
• Getting started CD – VFX application, Operation manual (PDF), and a range
of free plugins to get started.

V-Machine Operating Manual – Overview And Concepts |9
5. Overview And Concepts
The V‐Machine is a music synthesiser and eects unit. It has been designed to
receive MIDI data from external MIDI controllers (e.g. a MIDI keyboard control-
ler) and audio from a line level input source. Processed audio signal can be sent
to headphones, an amplier, a mixing desk, or similar.
The V‐Machine does not implement any particular audio synthesis algorithm.
Instead it acts as a host for a range of Windows VST and VSTi plug‐ins. Individual
plug‐ins hosted on the V-Machine implement their own particular synthesis al-
gorithms.
Figure 2 shows an overview of how the V‐Machine is used.
• Load VST plug‐ins into the VFX Application on a Mac or PC
• Use the VFX Application to create Banks of Presets. Each Preset consists of a
particular conguration of one or more VST plug‐ins.
• Use the VFX Application to copy these congured Banks to the V‐Machine via a
USB Cable or a USB Stick. Alternatively, you can copy compatible VST Plug‐in
.DLL les directly to a USB Stick and from there to the V‐Machine without
using the VFX Application.
• The V‐Machine is connected to one or more MIDI controllers. MIDI messages
from the controllers are sent to the VST plug‐ins. The VST plug‐ins resulting
audio is sent to both the headphone and stereo outputs.
The V‐Machines front panel displays 4 lines of text:
• The currently selected Bank
• The currently selected Preset within the selected Bank
• The currently selected plug‐in parameter within the selected Preset
• The currently selected parameter value
Special Notes:
1. Previous/Next interface keypads adjacent to each line of text allow the corresponding item
to be navigated or adjusted.
2. Dual press keypad functions (pressing two buttons at the same time) are designed to enter
the Global System Settings menu.
Figure 1: Standard LCD
display view

V-Machine Operating Manual – Overview And Concepts
10|
Figure 2: Operational overview
V-Machine Operating Manual – Overview And Concepts |11
Figure 3: VFX Application
5.1. The VFX Platform
The V‐Machine runs on the Powered by VFX platform developed by VFX Systems
Pty Ltd, Melbourne Australia.
The Powered by VFX platform is a software framework designed to provide ro-
bust audio media support in embedded devices.
Built on a modern operating system core, the Powered by VFX platform is a de-
dicated lightweight solution oering extremely low overheads in comparison
to traditional computer based solutions. The result is a robust powerful plat-
form well suited for the high performance requirements of low latency audio
hardware devices.
Built in support for leading audio processing technologies such as Steinberg’s
renowned VST (Virtual Studio Technology) plug‐in format means dedicated
hardware units can take advantage of the benets of computer audio plug‐in
technology.
Expect to see the Powered by VFX platform bring powerful audio processing
capabilities to mixers, keyboards, and guitar products in the future.
5.2. About Windows VSTi/VST plug‐ins
Steinberg GmbH shook up the audio industry when they released their now
famous Virtual Studio Technology (VST) interface back in 1996. Studio pro-
duction changed forever as professional results were suddenly available on a
standard PC or Mac based computer system.

V-Machine Operating Manual – Overview And Concepts
12|
Designed to integrate virtual instruments and eect processors into a digital
audio environment, the VST format has quickly became the most widely adop-
ted audio plug‐in standard.
5.2.1. VSTi plug‐ins
VST instruments (known as VSTi’s) are typically virtual synthesizers or sampler
units. They are triggered by MIDI controllers or sequencer devices and generate
audio in real time. Plug‐in parameters can often be assigned to external con-
trollers eectively delivering a real hardware instrument experience.
VST instrument emulations are available for just about every known instrument.
There are instruments for pianos, drums, strings, and everything through to
classic synthesizers.
5.2.2. VST plug‐ins
A VST plug‐in contains computer code that provides instructions to process
audio in real time. Typically a VST plug‐in is inserted in a digital audio signal
path to process audio as per the specied plug‐in purpose.
There are many VST plug‐in equivalents that emulate famous audio eect hard-
ware devices in addition to a huge selection of interesting eects that have
never before been possible.
Some common plug‐ins oerings provide audio processing eects such as
compression, reverb, and equalization.
5.2.3. VST plug‐in hosts
VST instruments and eects are loaded and used within a VST Host. A VST host
is usually a software application. In this case however, the VST Host is the V‐Ma-
chine hardware device.
5.3. Plug‐in considerations and limitations
Thousands of commercially developed and Freeware VST plug‐ins are available
today. As is to be expected, the quality of plug‐ins varies considerably from ex-
cellent to not so professional.
You will notice when testing plug‐ins you may experience a great sounding
highly featured plug‐in that runs extremely eciently on the V‐Machine, and
then wonder why a lesser featured plug‐in seems to place excessive demands
on the CPU. The answer usually comes down to whether or not the developer
has written quality‐optimized code.
Only testing of each plug‐in will determine how suitable it may be for your
creative demands on the V‐Machine.
The V‐Machine is based on a custom operating system. The VST plug‐ins that
the V‐Machine recognizes are generally intended to run on Microsoft’s Wind-

V-Machine Operating Manual – Freedom Comes With Responsibility! |13
ows operating system. As such, some VST plug‐ins may not function correctly
or at all on the V‐Machine.
* Note: It is our intention over time to compile and maintain a certied V‐Machine
plug‐in compatibility list on the SM Pro Audio website. Please check our website
(www.smproaudio.com) for updates.
5.4. V‐Machine additional Preset parameters
The V‐Machine adds a few additional parameters to each plug‐ins normal pa-
rameter list. This is to facilitate special features tailored to the V‐Machines hard-
ware operation.
For more information see section 11 V‐Machine specic plug‐in parameters.
5.5. Master and Persistent based memory states
The V‐Machine has two memory states for individual Presets.
5.5.1. Master Saved State
The V‐Machine Master Saved State refers to a Presets permanent saved state
as written into non‐volatile memory. When the V‐Machine is turned on, Presets
are loaded with parameter values presented in their Master Saved State.
For more information on how to save a Presets Master Saved State refer to section 10.3.2
Save command.
5.5.2. Persistent Saved State
The V‐Machine has provision to retain a Presets state during individual perfor-
mance sessions. This option is accessed via a parameter known as the Persis-
tent State Parameter.
The Persistent State Parameter is useful for conguring the Preset to either re-
tain edits made to plug‐in parameters during a performance session or to re-
vert to the Master Saved State each time the Preset is selected.
For more information see section 11 V‐Machine specic plug‐in parameters.
6. Freedom Comes With Responsibility!
The V‐Machine is an extremely exible device. As such we urge you to under-
stand how creating a preset sound without due consideration of the possible
pitfalls can lead to unexpected results.
Just as a master builder with a lot of experience will often build a masterpiece,
a less experienced builder may take some time to achieve similar results. This

V-Machine Operating Manual – Freedom Comes With Responsibility!
14|
analogy is also true when creating preset sounds for use on the V‐Machine.
With patience and experience you will learn how to get the most out of the
V‐Machine.
Please read this manual to understand the some of the concepts you need to
be aware of when creating your presets. Consideration should be given to
things such as the impact of CPU intensive plug‐ins, whether you need to ad-
just buer setting per sound for latency renement, and keeping gain structu-
res under control so your preset does not over load the V‐Machine’s DAC
(digital audio converter).
The V‐Machine and the VFX application are the tools, what you do with them
is up to you!
6.1. Building your own sounds – Main considerations
6.1.1. Excessive gain staging resulting in digital clipping
Digital clipping sounds terrible and is denitely something to be avoided. Pre-
set sounds created without proper gain staging consideration can result in di-
gital clipping in the V-Machines output converters.
Gain staging is the art of setting multiple gain controls in the signal path to
achieve the cleanest possible resulting signal. Too much gain in the signal path
prior to conversion at the DAC (Digital Audio converter) results in digital clipping.
Possible gain stages in signal path when creating Presets in the VFX Application:
• Plug‐in output gain settings (plug‐ins can clip within themselves, check the
plug‐in GUI)
• VFX application Individual channel Gain controls
• VFX application FX 1&2 Bus Gain controls
• VFX application Main channel Gain control
Adding plug‐ins in chains and layers can often build up excessive gain in the
overall preset thus overdriving the V‐Machine’s DAC.
Set your levels according to the maximum velocity you will be playing the pre-
set sound from your MIDI keyboard. This allows for dynamic playing without
clipping.
Quick Tip: Put a limiter plug‐in on the master output channel!
6.1.2. Use the presets wisely
Try to use presets as much as possible rather than building up layers of sounds
in the Mixer. This is a powerful way to get the most out of the V‐Machine. You
can quickly toggle between sounds whilst keeping the CPU and latency per-

V-Machine Operating Manual – Freedom Comes With Responsibility! |15
formance under control.The more you load into a single preset the more likely
you are to reach the CPU performance ceiling.
6.2. Managing resources
6.2.1. CPU considerations
The V‐Machines rmware is purpose built for high performance operation and
optimized to ensure most CPU cycles are dedicated to processing audio. Ho-
wever, just like any standard computer, there is a performance ceiling where
the processor will have reached its maximum performance capability.
The performance ceiling of the V‐Machine with regard to CPU power is depen-
dant on many factors. It is only by using the V‐Machine you will learn to ap-
preciate how to obtain the best possible performance results. The main thing
to remember at all times is that any active feature/function consumes CPU cal-
culation power.
6.2.2. Optimising presets
Some of the following tips are worth considering to help make the best use of
the V‐Machine’s CPU:
• Be mindful that all Gain adjustment calculations consume CPU cycles. As such,
if you can set mixer faders to zero dB eciencies can be made. It can be use-
ful to keep the master fader at zero dB and adjust the channel volumes ac-
cordingly to reduce gain calculations.
• Adjust each Presets Audio Buer Parameter to achieve the best balance of
performance latency and CPU usage. The Audio Buer Parameter setting can
be congured on a per Preset basis. See section 11.2 for more information.
• Setting Pan settings hard left, hard right, or absolute centre in the Mixer re-
duces the quantity of stereo eld calculations demanded of the CPU.
• Select a mono input if appropriate. There is no need to process a stereo input
signal for a mono source such as an electric or bass guitar.
• If you only want to run a single plug‐in in a particular Preset, it is advisable to
load the plug‐in into Plug‐in Slot A in channel 1 of the Mixer. The V‐Machine
recognises this state and passes audio directly though the Mixer enabling
eciencies.
• Utilize FX sends rather than inserting a dedicated eect plug‐in on each chan-
nel. This way you can share the eect resource between multiple channels.
• Setting an audio channels FX send parameter to set to zero will not use any
CPU resources. As such, if a plug‐in is using very small amounts of a particular
shared eect in the FX bus it may be advisable to switch it o entirely!
• Switch o plug‐ins that you can hardly hear. They are using up precious re-
sources!

V-Machine Operating Manual – Auditioning A Sound
16|
• Shorten the length of release tails for VSTi’s if at all possible. Long release tails
can build up polyphony (the number of notes playing simultaneously) during
performances placing a burden on the CPU. Release tails can often be redu-
ced without being detrimental to performances.
• Reduce plug‐in polyphony if supported by the plug‐in. Many VSTi plug‐ins
oer the ability to reduce polyphony. Every extra note consumes CPU cycles.
• Every single feature you turn on and o impacts CPU performance. Think e-
cient and program wisely!
7. Auditioning A Sound
For those who have read the manual to this point and cannot wait to get
started, please refer to the printed quick start guide included with your V‐Ma-
chine. The quick start guide outlines the basics to get you up and running with-
out delay.
8. V‐Machine Internal Architecture
8.1. VFX hardware host rmware concepts
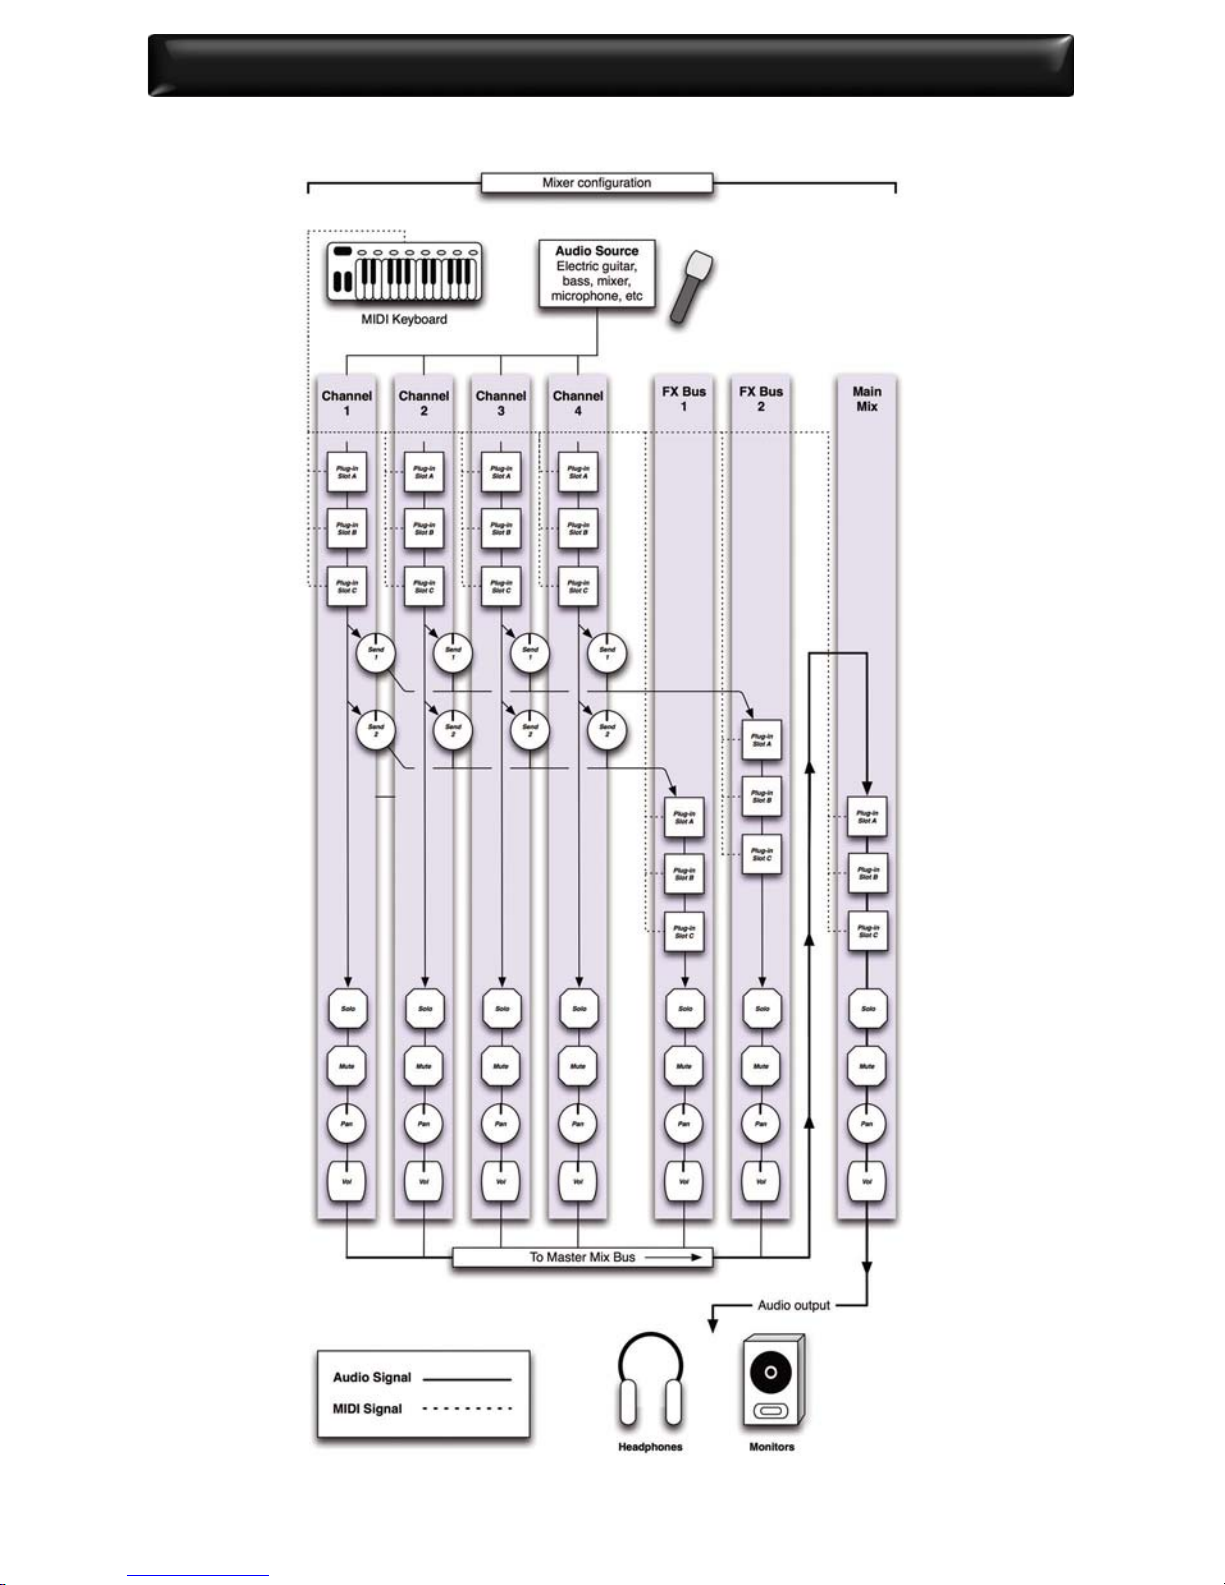
The V‐Machine audio architecture is designed around a exible four (4) channel
mixer concept. Each mixer channel can be congured to host three (3) plug‐ins
and oers a dedicated volume, pan, mute, solo, and two eects sends. Com-
plex sound creations can be made by mixing layers of plug‐in instruments to-
gether, adding eects, and routing the result to the main stereo output. Each
of the two eects returns and the master output oers 3 plug‐in slots for a total
of 21 plug‐in slots per individual mixer setup. Mixer setups are saved as user
presets, and can be arranged into banks for quick navigation and access when
loaded to the V‐Machine.
8.2. Banks and presets
All V‐Machine sounds and setups can be arranged in user denable Banks and
Presets. This allows for simple navigation and organisation of your sounds.

V-Machine Operating Manual – V‐Machine Internal Architecture |17
8.2.1. Banks
Banks are collections of Presets. It is entirely up to you how you prefer to cate-
gorize your sounds. Some users may wish to organise similar types of sounds
together in a Bank while others may wish to create a bank of sounds that are
used in a particular performance.
Each Bank can store 127 Preset congurations.
Example 1 – You may prefer to keep your piano Preset sounds in a Bank named
“Pianos” and all your bass Preset sounds in a Bank named“Basses”.
Example 2 – You may prefer to organise Preset sounds into Banks according to
a particular performance. Your performance may be the keyboard part of a
song performed by your band requiring three dierent Preset sounds. If you
store the three Preset sounds together in a Bank named “Song 1”, you can ac-
cess them quickly as needed during your performance. Then simply move to
the next Bank (possible Song 2) for the next performance.
Banks can be loaded, saved, and renamed from within the VFX application.
8.2.2. Presets
Presets are your individual performance sounds.They are essentially saved mixer
conguration states. A saved mixer conguration includes all information rela-
ting to audio and MIDI routing, selected plug‐ins, and mixer settings such as
channel volumes, pan settings, and so forth.
Figure 4: Bank and Preset structural hierarchy

V-Machine Operating Manual – V‐Machine Internal Architecture
18|
Preset sounds can be loaded, saved, and renamed from within the VFX application.
8.3. Plug‐in slots
A Plug‐in Slot is a position in the V‐Machine’s internal audio signal path whe-
reby you can load a VSTi or VST plug‐in.
VSTi instrument plug‐ins can be loaded into the rst Plug‐in Slot (plug‐in slot
A) in each mixer channel. All other Plug‐in Slots are designed to accommodate
VST eect plug‐ins.
Plug‐in Slots are available in three areas of the V‐Machine’s hardware mixer
design:
• 3 x Plug‐in Slots for each Mixer channel (1 x VSTi, 2 x VST)
• 3 x Plug‐in Slots for each FX return channel (3 x VST)
• 3 x Plug‐in Slots for the Main output channel (3 x VST)
The architecture of the V‐Machine’s mix engine allows for a total of 21 Plug‐in
Slots per individual Preset (mixer conguration).
The V‐Machine’s internal mixer architecture is designed for maximum exibility.
It is not meant to indicate the maximum CPU performance ceiling of the V‐Ma-
chine. In practice, the total amount plug‐ins that can be loaded into an indivi-
dual Preset mixer conguration with acceptable performance results depends
entirely on the CPU requirement of each chosen plugin.
For a diagram outlining the internal mixer architecture see Figure 5: Mixer architecture.
8.4. Audio routing
The audio routing architecture of the V‐Machine is based around a simple
four‐channel Mixer design incorporating two (2) FX return channels and a Main
output.
Audio signal for each channel is either generated by a VSTi instrument plug‐in
or received at the V‐Machine’s analog audio hardware input.
Audio enters each and passes through three (3) VST Plug‐in Slots. Audio is pas-
sed from one plug‐in to the next in series. This allows you to chain plug‐ins as
desired. If the Plug‐in Slot is empty, the audio will pass directly to the next stage
of the Mixer.
Audio signal can be routed to one of two (2) FX buses for further processing.
All Mixer channels and FX buses are summed together and directed to the
Main output channel.
For a diagram outlining the internal mixer architecture see Figure 5: Mixer architecture.

V-Machine Operating Manual – V‐Machine Internal Architecture |19
8.5. MIDI Routing
MIDI data enters the V‐Machine via either the 5‐pin standard MIDI input or USB
connector on the rear panel.
MIDI can be routed to each of the 21 Plug‐in Slots in the V‐Machine’s Mixer ar-
chitecture.
Configuration of the MIDI routing is performed within the VFX application.
This offers a simple interface to assist in the configuration of MIDI channel
assignment and the “MIDI learn” plug‐in parameter function. MIDI learn al-
lows you to assign individual plug‐in parameters to external hardware con-
trol devices.
8.6. .VFX les
The le extension “.VFX” identies les used by the V‐Machine and VFX Appli-
cation.
Files using the .VFX format are used for storing Bank and Preset conguration
information.
V-Machine Operating Manual – V‐Machine Internal Architecture
20|
Figure 5: Mixer architecture – Audio and MIDI routing
Other manuals for V-MACHINE
3
Table of contents
Other SM Pro Audio Media Player manuals


