SM CV650 User manual

SM CV650 Illuminated Trolley Mirror User Guide
Congratulations on purchasing the CV650 Trolley Mirror, which is designed to offer you years of reliable, operational service.
The high performance, energy efficient, multi COB LED Light Bar, delivers up to 650 lumens @ 0.5 metres, ensuring maximum
illumination of those hard to access areas, but the unit can of course also be used without switching the Light Bar on.
This rugged unit combines reliable high-quality performance and operator convenience, to minimise user fatigue, even during
lengthy periods of continuous operation.
For long term investment protection, most major components are available to purchase as spares and are designed to
facilitate quick and easy user installation in the field with standard hand tools (spanner and screwdriver type).
Side View
with a maximum height of just 95mm, the ultra-low profile of the unit
ensures its practical and effective use, even under low vehicles or structures
Top View
Underside View

Using your Trolley Mirror
Checking the Battery Status and Battery Maintenance;
(please see the supplied TRACER “Safety Precautions” and “Power Pack” booklets for full
specification and information)
Before using your Trolley Mirror, check that the battery is charged by depressing the
Battery indicator button on the Battery Box on the underside of the unit, and checking
the indicator lights showing in the battery check window.
(Note: the battery status can be checked at any time, but the illuminator should be
switched off for 2 minutes prior to checking to ensure an accurate reading).
Key to light display;
Green lights
showing
Red lights
showing
Battery Charge
Status
Action Required
3 2 75-100% Ready for use
2 2 50 - 75% Ready for use
1 2 20 - 50% Ready for use
0 2 10 - 20% Recharge battery ASAP.
0 1 less than 10% Battery is about to electronically switch off to prevent over discharge.
Recharge ASAP.
0 0 Empty URGENT Action Required; Recharge battery within 12 hours to avoid
permanent damage.
Note: The Battery should be recharged at least once every 6 months using the supplied TRACER Rapid Battery Charger.
Charging / Recharging the Battery
; (note; use only the TRACER Rapid Battery Charger supplied with the unit)
The LiPo (Lithium Polymer) battery, is supplied partially charged and it is
recommended that it be fully charged before being put to initial
operational use. It can be recharged at any time, or at any battery
status level, using the TRACER mains charger unit supplied, which
should take less than 2.5 hours even where a full recharge is needed.
As with all rechargeable batteries, the battery will ultimately require
replacement after being subjected to multiple recharging cycles. The
TRACER battery used in this device has an estimated minimum 300
cycle lifespan. (Replacing the battery is a quick and simple task. see;
“Replacing the Battery” for an easy follow guide).
Unlocking the Handle for operational use
;
Depress the lock button and slide the “T” section of the handle out to release the handle loop fixing from the Carry Retaining
Tab on the Base Plate. Continue sliding the handle out until the lock button clicks into the hole at the fully extended position.
Then swing the handle through 270 degrees and turn the trolley over for use.
release the Lock Button and
slide out the “T” Bar Handle
the handle is released from the
Carry Retaining Tab as it extends
the Lock Button locates into the
fully extended position slot
To collapse the unit ready to carry or transport, simply reverse the above process, ensuring that as you slide the handle into
the closed position, the handle loop locates onto the Carry Retaining Tab.

Using the LED illuminator lamp
;
The powerful LED Light Bar is powered on and off via the weather
protected On/Off switch located on the side of the battery box which is
bolted to the underside of the Trolley base plate unit.
As the energy efficient COB LED light strip draws a low level of power
from the battery, a fully charged battery will provide up to 9 hours
continuous operation of the lamp, making it feasible to leave the lamp
permanently illuminated during busy periods of use.
Although the unit can be used without using the lamp, even on a bright
sunny day the lamp will help significantly by reducing the sharp contrast
at the areas to be inspected.
LED On / Off Switch
Replacing the Battery
; (Replacement Battery & Charger sets are available from Insight Security).
1. Place the Trolley Mirror onto a flat surface, mirror side down.
2. Undo and remove the 3 Nyloc Nuts securing the Battery Box to the underside of the unit and carefully lift the battery
box away (note: an internal cable will limit movement of the box, but you do not need to disconnect the in-line
socket and plug connection) – see fig.1 below.
3. Lift the battery up from the exposed side, to release it from the retaining springs – see fig.2 below.
4. Unplug the Power Cable and Charging Cable from the front of the battery – see fig.3 below.
5. Insert the new battery in place and reconnect the Power Cable and Charging Cable.
6. Check that the in-line socket and plug connection is still fully connected (i.e. has not been disturbed while removing
the battery box) – see fig.1, then reposition the box over the studs on the underside of the unit.
7. Check that the cable with the in-line connector is positioned in the space behind the battery in the battery box (see
fig 1 below), then drop the box onto the studs and resecure in position with new M5 Nyloc Nuts.
(note: Nyloc Nuts are designed to protect against nuts vibrating loose in use. For maximum performance, they should
be replaced after each release).
Fig.1 Fig.2 Fig.3
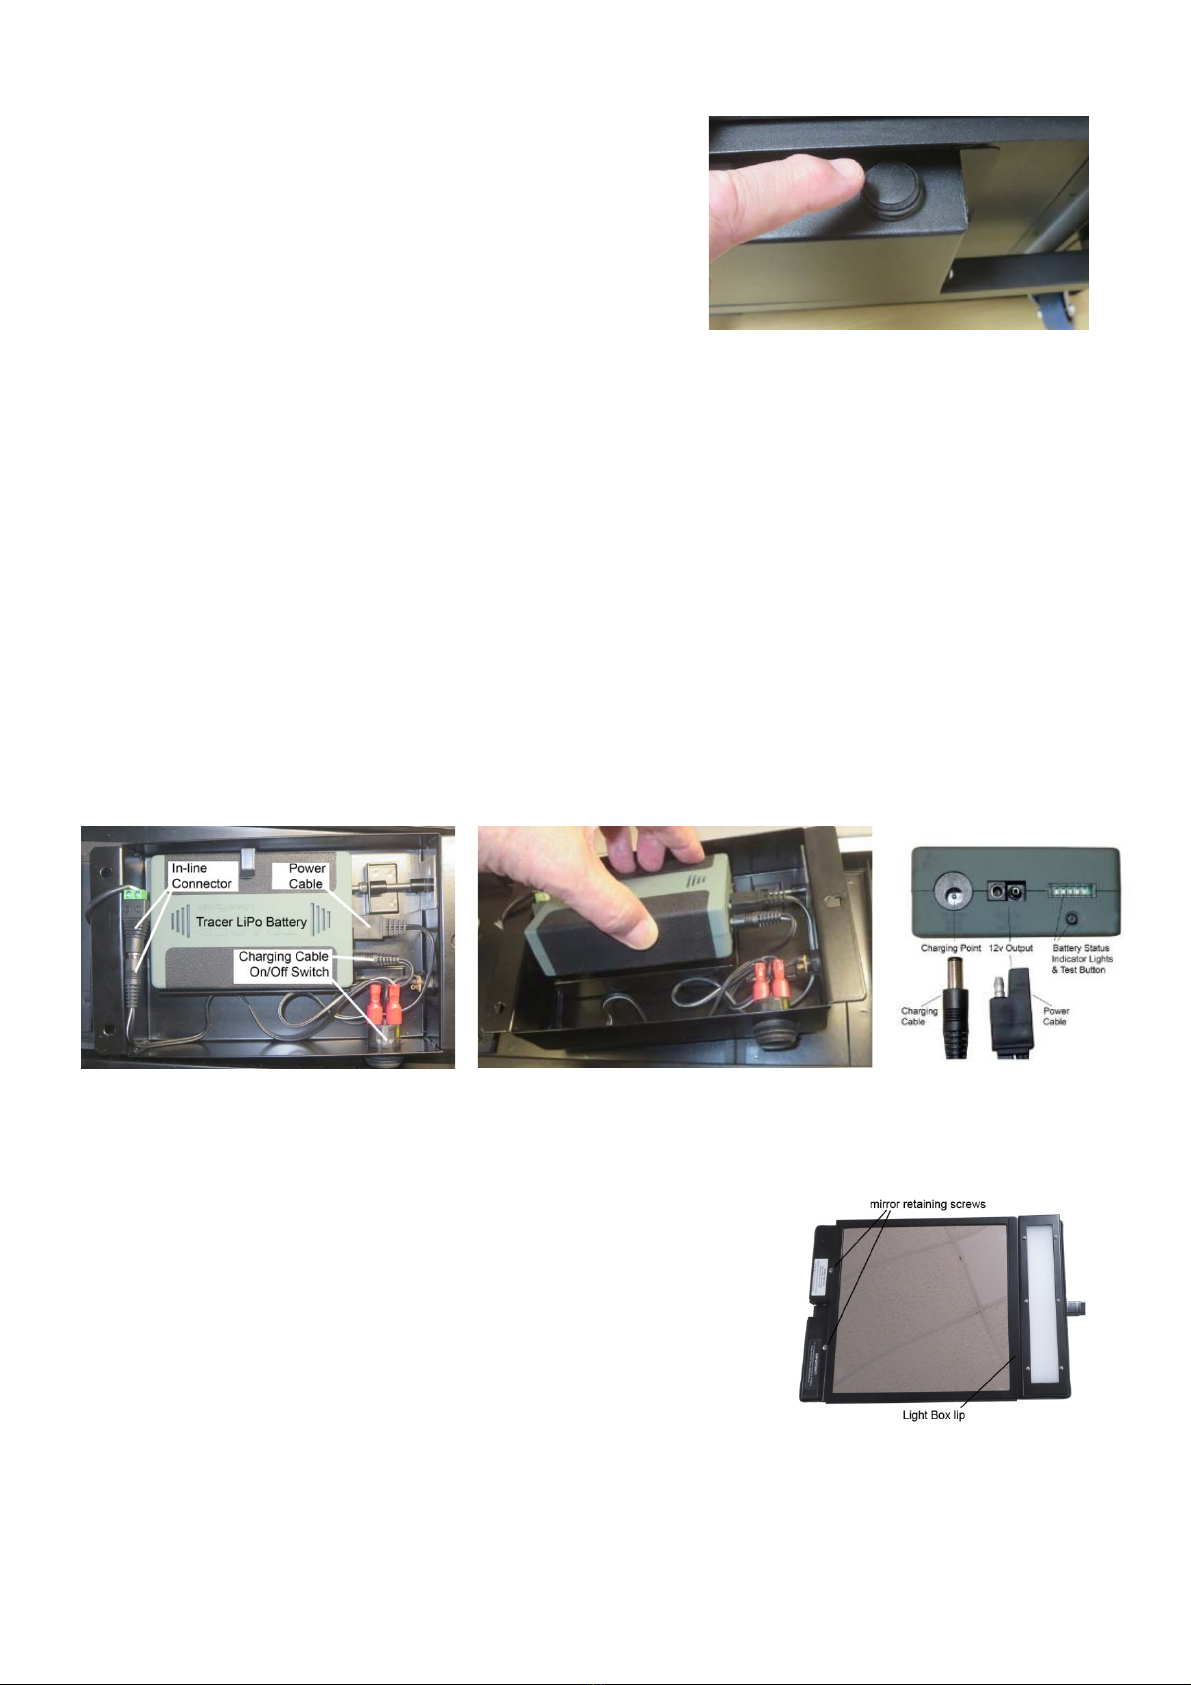
Replacing the mirror
; (Replacement Mirror, screw & nut sets are available from Insight Security).
1. Undo the 2x M5 screw and nut fixings at the rear of the unit, securing
the Mirror Retaining Bracket to the Base Tray.
2. Slide the mirror / bracket structure backward and lift away from the unit.
3. Remove the damaged mirror from the Mirror Retaining Bracket and
insert the replacement mirror in its place.
4. Slide the assembly back into position on the base tray, ensuring that the
front edge locates under the Light Box Lip and resecure the bracket with
the new screws and nuts supplied. (use of new anti-vibration nuts is
always recommended as undoing and retightening the existing nuts
could compromise their subsequent anti-vibration effectiveness).
Replacing a damaged castor
; (Replacement Castor and nut sets are available from Insight Security).
Each of the castors fitted to the unit is secured with M6 anti-vibration nuts. To remove a castor, simply remove the 4 nuts
holding it in place. A replacement castor can then be fitted and secured using new Nyloc anti-vibration nuts.
Replacing the lamp unit
;

The LED Light Bar has an estimated operational life of 50,000 hours, so should offer many years of service before it needs
replacing. Replacement Light Bars are available, however this is not a customer replaceable unit, so the Trolley Mirror unit
would need to be returned to Insight for repair.
Replacing the handle
;
The Telescopic Handle attaches to the base unit with a bolt, nut and washer set. In the unlikely event that the handle unit is
damaged, a replacement handle assembly and bolt set can be supplied by Insight Security and is a customer installable unit.
CV650 Illuminated Trolley Mirror - Designed for high performance with minimal operator fatigue
Ready for action LED lamp delivers brilliant reflected image Easy to carry
Trouble Shooting Guide
;
1 LED Light Bar not working • Check unit is switched on.
• Check battery status (charge if needed).
• Release the battery box and check internal connection.
2 Battery not charging • Check the red light illuminates on the Tracer Battery Charger when plugged into
the battery charging point and switched on.
• The light on the charger changes to green when battery is fully charged.
WARNING: Use only the Tracer Rapid Charger to recharge the battery.
The use of alternative battery chargers could damage the Tracer Battery.
3 Battery not holding charge • If the battery charges but discharges quickly, it indicates that the battery has
reached the end of its useful life and needs replacing.
4 Handle has become loose • Tighten the nut & bolt securing the Handle Assembly to the Base Tray.
5 Lost nuts or fixings • Replacement nuts can be sourced from Insight Security or from any good nut and
Bolt Store. Nyloc type anti-vibration nuts are needed.
M6 nuts (used for the Castors), M5 nuts (for Battery Box and Mirror Retaining
Bracket) M8 nut (to secure handle assembly)
Note; if you have any issues that cannot be solved by the above trouble shooting guide, contact your supplier or Insight Security for advice.
To protect your investment for years to come, the SM CV650 is built to exacting standards and
designed to deliver a long operational life. Its use in demanding environments, may over time
lead to damage to some components, which is why Insight Security offer a range of customer
installable replacements, easily installed using simple tools such as screwdriver and spanner.
Insight Security, Units 1 & 2, Cliffe Industrial Estate, Lewes, East Sussex, BN8 6JL, UK
T: +44 (0)1273 475500 E: [email protected] W: www.insight-security.com
Table of contents