SMART-AVI HDMV-9X-PLUS User manual

9-Port KVM HD Multiviewer for a Single Monitor 2
TECHNICAL SPECIFICATIONS_____________________________________________________________ 3
WHAT’S IN THE BOX?_____________________________________________________________________ 4
FRONT AND REAR________________________________________________________________________ 4
INSTALLATION____________________________________________________________________________ 5
SYSTEM OPERATION______________________________________________________________________ 6
SELECTING VIEWING MODES_____________________________________________________________ 6
RESOLUTION BUTTON____________________________________________________________________ 7
RS-232 AND HOTKEY COMMANDS_______________________________________________________ 7
TROUBLESHOOTING______________________________________________________________________ 8
TECHNICAL SUPPORT_____________________________________________________________________ 8
LIMITED WARRANTY STATEMENT________________________________________________________ 9

9-Port KVM HD Multiviewer for a Single Monitor 3
VIDEO
Format HDMI
Video Bandwidth 3Gbps
Input Interface (9) HDMI 19-pin (female)
Output Interface (1) HDMI 19-pin (female)
HDMI Compliance HDMI 1.4b
HDCP Compliance HDCP 1.4
Resolution Up to 4K2K @ 30 Hz
DDC 5 volts p-p (TTL)
Input Equalization Automatic
Input Cable Length Up to 20 ft.
Output Cable Length Up to 20 ft.
AUDIO
Input From HDMI Inputs
Output (1) Connector Stereo 3.5 mm Female
USB
Signal Type USB 2.0, 1.1 and 1.0 Keyboard and Mouse only.
Input Interface (9) USB Type B (female)
Output Interface (2) USB 1.1 Type A (female) for keyboard/mouse;
(2) USB 2.0
POWER
Power Requirements 12V DC, 3A power adapter with center-pin positive polarity
ENVIRONMENT
Operating Temperature 23 to 95°F (-5 to 35°C)
Storage Temperature -4 to 185 °F (-20 to 85 °C)
Humidity Up to 95% (No Condensation)
CONTROL
Front panel Push Buttons with LED indicators
RS-232 Via Serial @ 115200 bps
Hotkey Via Keyboard

9-Port KVM HD Multiviewer for a Single Monitor 4
HDMV-9X-PLUS 9-Port HDMI, USB Real-Time Multiviewer and KVM Switch.
PS12VD3A 12V DC, 3A (minimum) power adapter with center-pin positive polarity.
User Manual

9-Port KVM HD Multiviewer for a Single Monitor 5
1. Ensure that power is turned off or disconnected from the unit and the computers.
2. Use a HDMI cable to connect the HDMI output port from each computer to the
corresponding HDMI IN ports of the unit.
3. Use a USB cable (Type-A to Type-B) to connect a USB port on each computer to the re-
spective USB ports of the unit.
4. Optionally connect a stereo audio cable (3.5mm to 3.5mm) to connect the audio output of
the computers to the AUDIO IN ports of the unit.
5. Connect a monitor to the HDMI OUT console port of the unit using a HDMI cable.
6. Connect a USB keyboard and mouse to the two USB console ports.
7. Optionally connect stereo speakers to the AUDIO OUT port of the unit.
8. Optionally connect a RS-232 Cable to the RS-232 port.
9. Finally, power on the KVM by connecting a 12VDC power supply to the power
connector, and then turn on all the computers.
HDMV-9X-PLUS Shown

9-Port KVM HD Multiviewer for a Single Monitor 6
When selecting a channel by pressing buttons 1-9 on the front panel, the blue backlight LED will light
up to indicate that input is selected.
There are a total of 8 viewing modes within the 4 categories, this is a list of all the modes based on the
Number given in the command protocol:
1 - Full Screen
2 - Dual (Split)
3 - Dual (PiP)
4 - Quad (Equal)
5 - Quad (T-Quad Right)
6 - Quad (T-Quad Left)
7 - Quad (T-Quad Bottom)
8 - 9X
One of the four Mode Select buttons (FULL, DUAL, QUAD, and 9X) can be used to switch the current
viewing mode. For the options with multiple viewing modes, multiple presses of the mode button will
switch to a different variation within that same mode. Please refer to the viewing mode list above for
more detail on these modes.
When in viewing modes with multiple screens on the display, any specific input can be assigned to any
specific position on the display. For example, the 9x Mode (Mode #8) can be divided in the following way:

9-Port KVM HD Multiviewer for a Single Monitor 7
Each section of the display can be considered a separate “output”. To congure input and output for
any of the 8 display modes the following command is used:
IN -> [select input 1-9] -> OUT -> [select output 1-9]
ex. Dual Mode (split)
Input 1 is display on Output 1. Input 2 is displayed on Output 2
To change Output 1 to display Input 3
INPUT -> 3 -> OUTPUT -> 1
To change Output 2 to display Input 4
INPUT -> 4 -> OUTPUT -> 2

9-Port KVM HD Multiviewer for a Single Monitor 8
Pressing the Resolution button (RES) cycles between the available resolutions. Here is a chart of the
resolution options and the numbers associated with them. To view the current resolution, use the
RS-232 command (//r?).
The HDMV-9X-PLUS may also be controlled via RS-232 and Hotkey commands.
For RS-232, you must use HyperTerminal or an alternative terminal application. The settings for the
connection are as follows:
Baudrate 115200; Data Bits 8; Parity None; Stop Bits 1; Flow Control None.
To use the HotKey commands, the keyboard must be connected to the designated keyboard or mouse
USB slot.
The following commands can be used for RS-232 and Hotkey control:
Resolution Number Specications
14K
21080p
31080i
4720p
51360 x 768
61024 x 768
Command Description RS-232 Hotkey
Switch USB and Video //m[in#][ENTER] [ctrl][ctrl]m[in#][ENTER]
Switch Only Video IN //c[in#][ENTER] [ctrl][ctrl]c[in#][ENTER]
Switch Only Video IN/OUT //i[in#][out#][ENTER] [ctrl][ctrl]i[in#][out#][ENTER]
Switch to Video Mode [1-8] //x[mode #][ENTER] [ctrl][ctrl]x[mode #][ENTER]
Get Current Video Mode //x?[ENTER] -
Switch KM Devices Only //k[in#][ENTER] [ctrl][ctrl]k[in#][ENTER]
Switch USB 2.0 Devices Only //u[in#][ENTER] [ctrl][ctrl]u[in#][ENTER]
Switch Resolution //p[1-6] [ENTER] [ctrl][ctrl]p[1-6][ENTER]
Resolution Status //p?[ENTER] -
Set EDID //e[1-2][ENTER] [ctrl][ctrl]e[1-2][ENTER]
———————————————————————————————-
1: EDID 1.4
2: EDID copy HDMI out
EDID Status //e?[ENTER] -
Audio SET //a[1-9][ENTER] [ctrl][ctrl]a[1-9][ENTER]
Audio Status //a? -

9-Port KVM HD Multiviewer for a Single Monitor 9
No Power
Make sure that the power adapter is securely connected to the power connector of the unit.
Check the output voltage of the power supply and make sure that the voltage value is
around 12VDC.
Replace the power supply.
No Video
Check if all the video cables are connected properly.
Connect the computer directly to the monitor to verify that your monitor and computer are
functioning properly.
Restart the computers
Keyboard is not working
Check if the keyboard is properly connected to the unit.
Check if the USB cables connecting the unit and the computers are properly connected.
Try connecting the USB on the computer to a different port.
Make sure that the keyboard works when directly connected to the computer.
Replace the keyboard.
Mouse is not working
Check if the mouse is properly connected to the unit.
Try connecting the USB on the computer to a different port.
Make sure that the mouse works when directly connected to the computer.
Replace the mouse.
No Audio
Check if all the audio cables are connected properly.
Connect the speakers directly to the computer to verify that the speakers and the computer
audio are functioning properly.
Check the audio settings of the computer and verify that the audio output is through the
speakers.
For product inquiries, warranty questions, or technical questions, please contact [email protected].

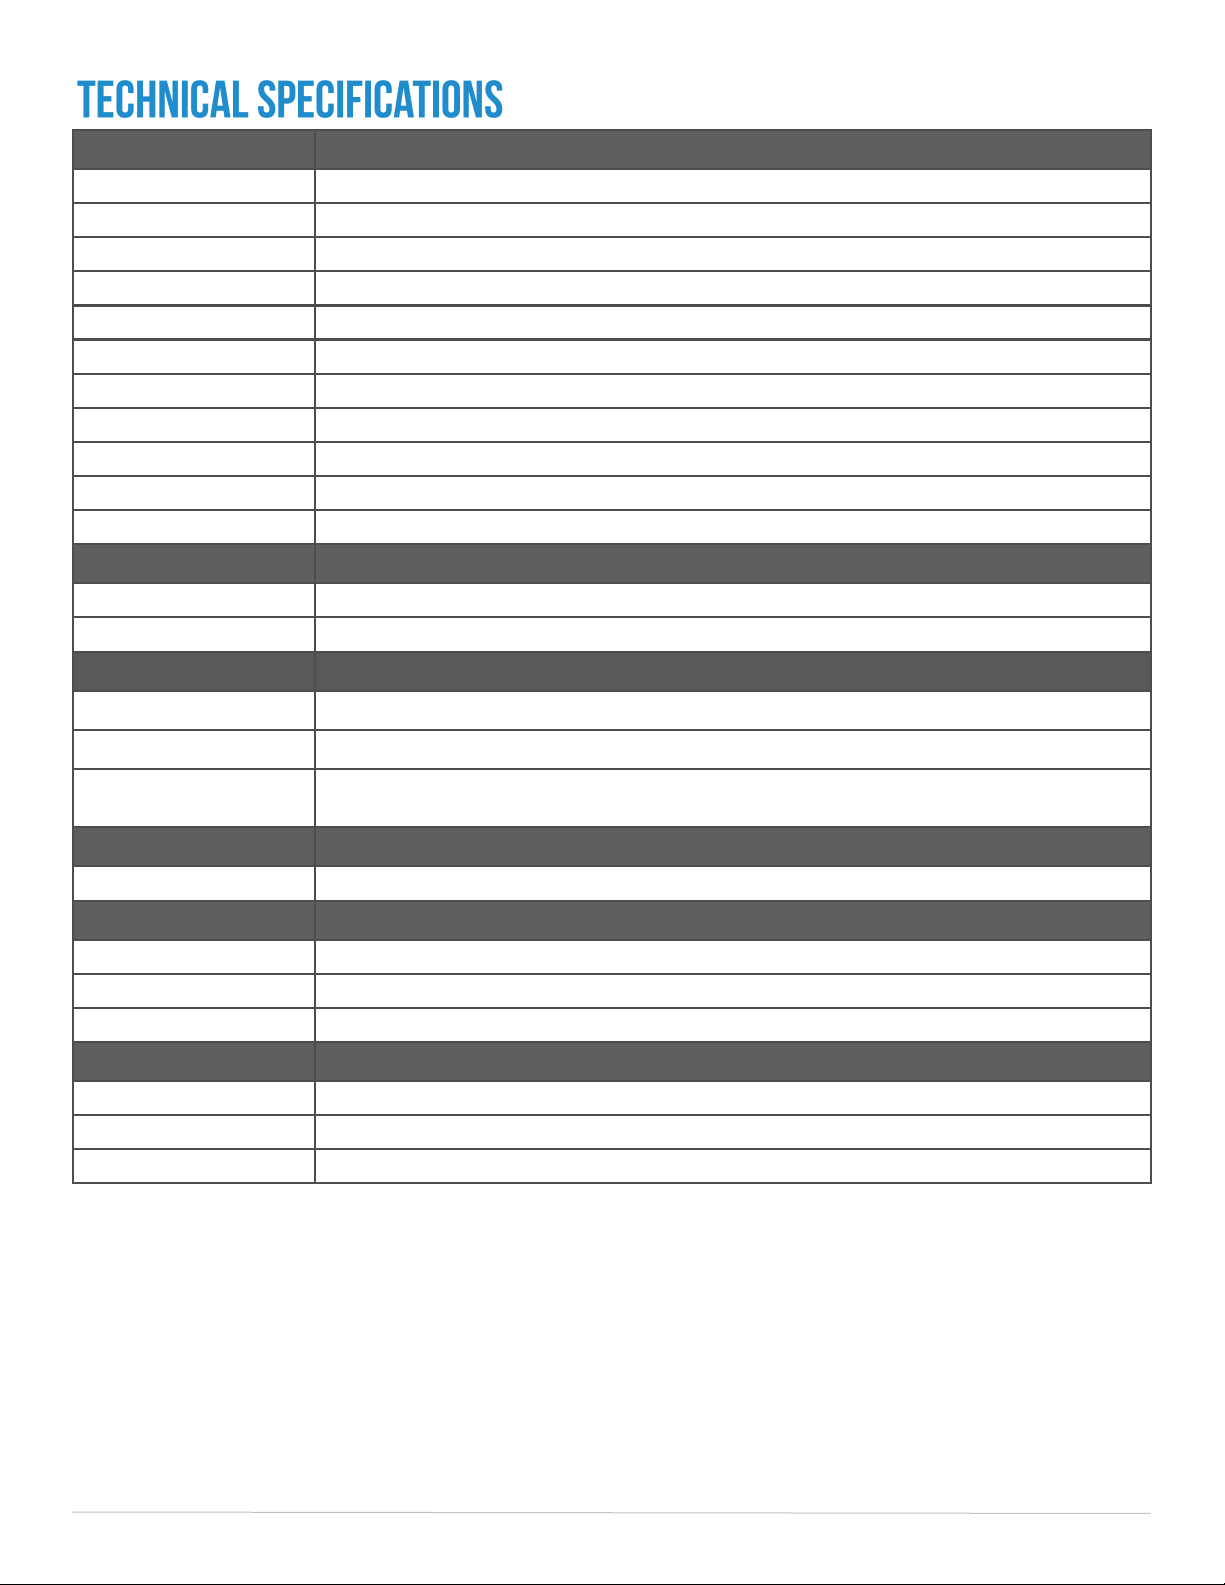
9-Port KVM HD Multiviewer for a Single Monitor 10
A. Extent of limited warranty
SmartAVI, Inc. warrants to the end-user customers that the SmartAVI product specied above will be
free from defects in materials and workmanship for the duration of 1 year, which duration begins on
the date of purchase by the customer. Customer is responsible for maintaining proof of date of
purchase.
SmartAVI limited warranty covers only those defects which arise as a result of normal use of the prod-
uct, and do not apply to any:
a. Improper or inadequate maintenance or modications
b. Operations outside product specications
c. Mechanical abuse and exposure to severe conditions
If SmartAVI receives, during applicable warranty period, a notice of defect, SmartAVI will at its
discretion replace or repair defective product. If SmartAVI is unable to replace or repair defective
product covered by the SmartAVI warranty within reasonable period of time, SmartAVI shall refund
the cost of the product.
SmartAVI shall have no obligation to repair, replace or refund unit until customer returns defective
product to SmartAVI.
Any replacement product could be new or like new, provided that it has functionality at least equal to
that of the product being replaced.
SmartAVI limited warranty is valid in any country where the covered product is distributed by SmartA-
VI.
B. Limitations of warranty
To the extant allowed by local law, neither SmartAVI nor its third party suppliers make any other
warranty or condition of any kind whether expressed or implied with respect to the SmartAVI
product, and specically disclaim implied warranties or conditions of merchantability, satisfactory
quality, and tness for a particular purpose.
C. Limitations of liability
To the extent allowed by local law the remedies provided in this warranty statement are the
customers sole and exclusive remedies.
To the extant allowed by local law, except for the obligations specically set forth in this warranty
statement, in no event will SmartAVI or its third party suppliers be liable for direct, indirect, special,
incidental, or consequential damages whether based on contract, tort or any other legal theory and
whether advised of the possibility of such damages.
D. Local law
To the extent that this warranty statement is inconsistent with local law, this warranty
statement shall be considered modied to be consistent with such law.

9-Port KVM HD Multiviewer for a Single Monitor 11
The information contained in this document is subject to change without notice. SmartAVI
makes no warranty of any kind with regard to this material, including but not limited to, implied
warranties of merchantability and tness for particular purpose. SmartAVI will not be liable for
errors contained herein or for incidental or consequential damages in connection with the
furnishing, performance or use of this material. No part of this document may be photocopied,
reproduced, or translated into another language without prior written consent from SmartAVI,
Inc.
20180109
Tel: (800) AVI-2131 • (702) 800-0005
2455 W Cheyenne Ave, Suite 112
North Las Vegas, NV 89032
www.smartavi.com
Other SMART-AVI Monitor manuals