Smart Digital HandiTheatre Home Manual

INSTRUCTION GUIDE
HandiTheatre Home
Step by step assemble
MORE FUN! MORE MAGIC!
MORE ENTERTAINMENT!
Need further assistance?
Contact us:
Phone number
+61 3 9729 6300
Website
www.smartdigital.com.au
Facebook
@smart.digital.australia.pty.ltd
Instagram
@SmartDigitalAustralia
Youtube
www.youtube.com/c/SmartDigitalAu

STEP BY STEP
1SCREEN
SETUP
VIDEO
SETUP
3 5 CHECK
LIST
7
SCREEN
DEFLATION
2SCREEN
INFLATION 4
AUDIO-
VISUAL
SETUP
6SETUP
PLAN
VIDEO
SETUP
SCREEN
PACKUP
8 10 TROUBLE-
SHOOTING
9 11 SCREEN
CARE
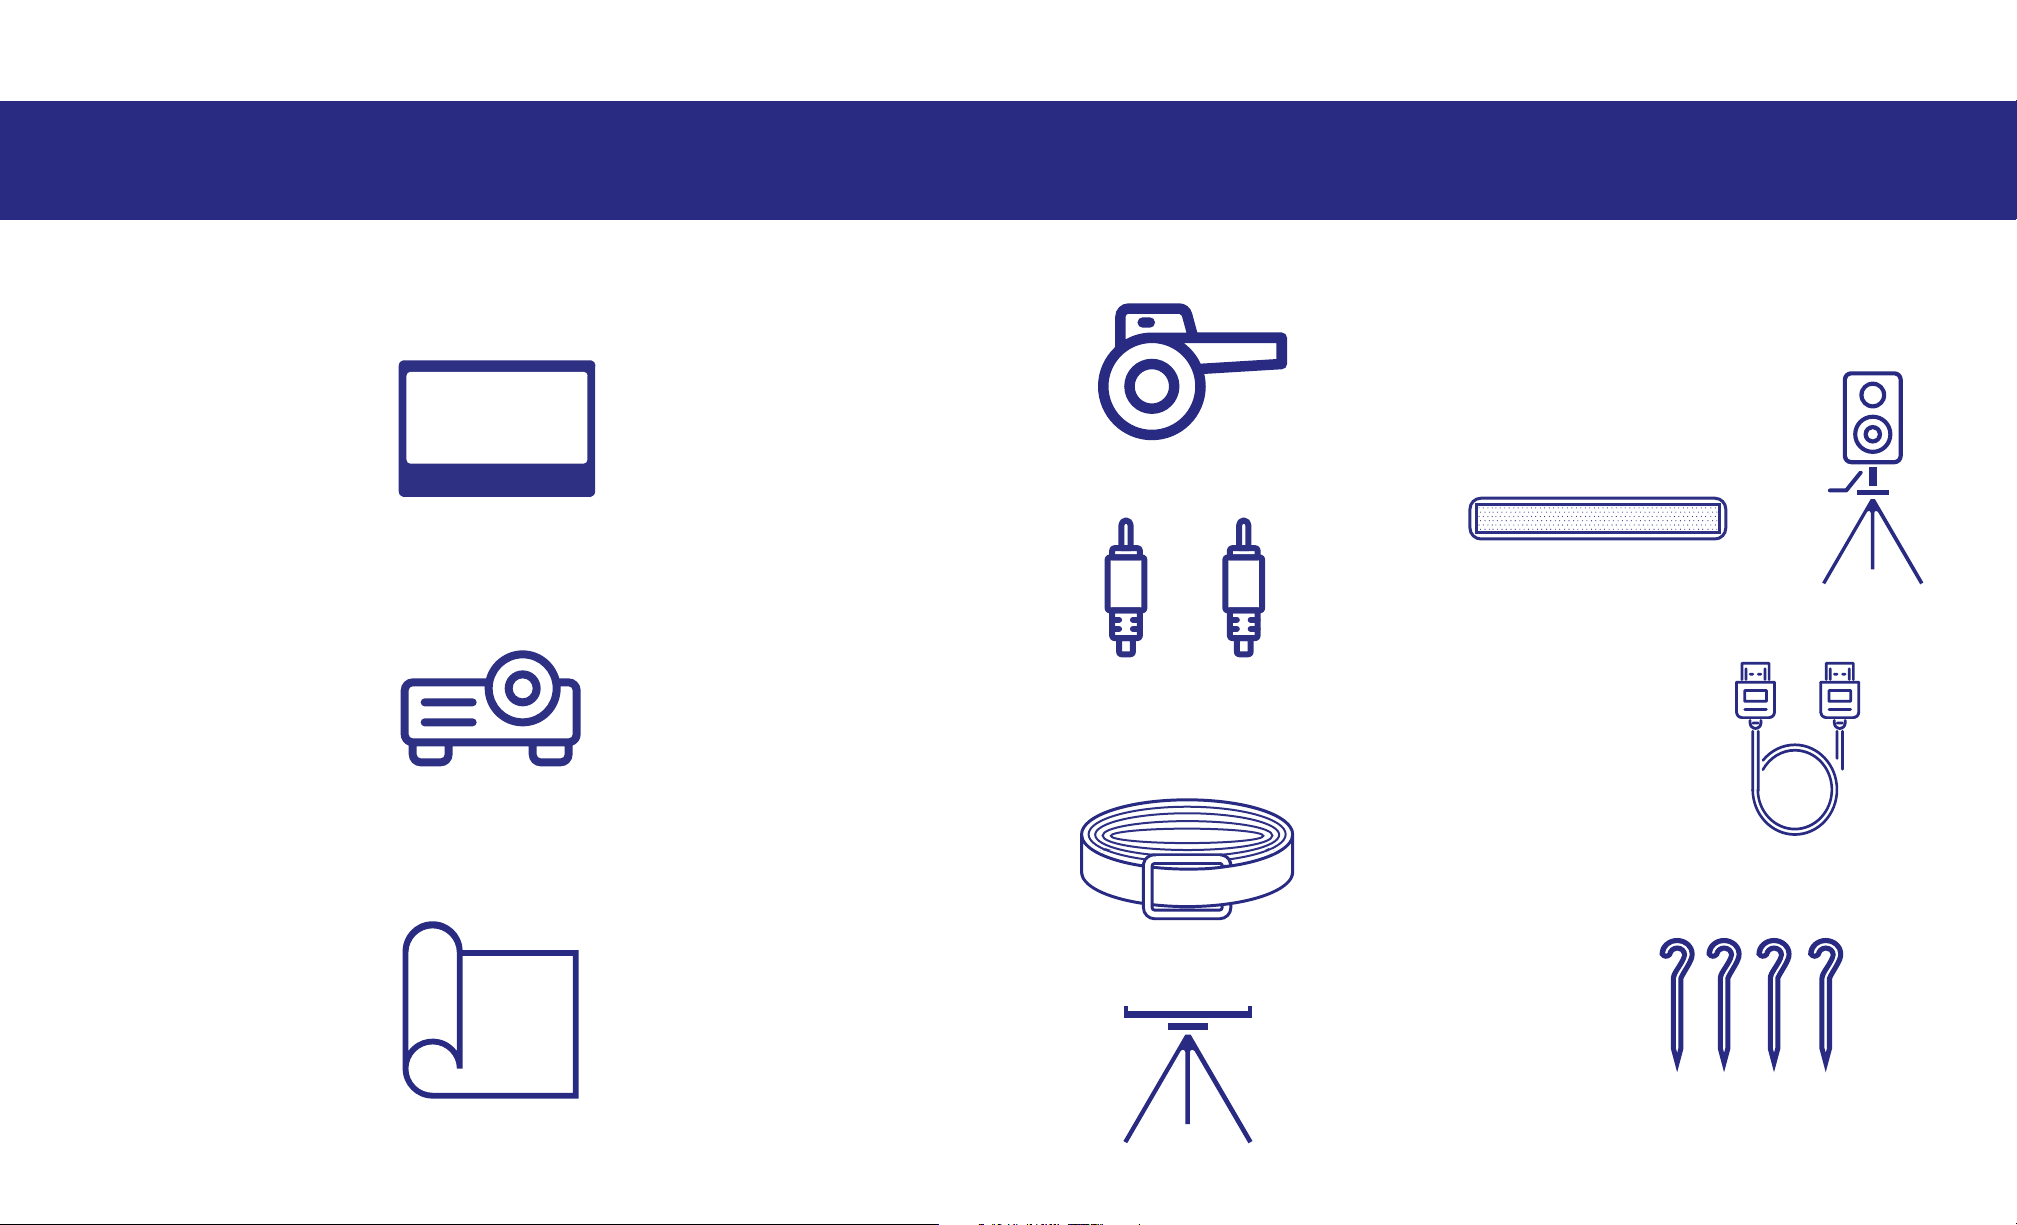
PACKAGE INCLUDES
Inflatable screen`
Inflation Blower
Soundbar/Speaker
Projector LED
Audio Cables
Tethers
HDMI Cable
Protective tarp Stakes
or
Red White
(optional)
Projector Stand
(optional)
(4-8)
(optional)

SCREEN SETUP
1SCREEN INFLATION
2
2. For added protection, we recommend the
use of a tarp placed between the screen and
the ground. This can be secured with small
tent pegs. (protective tarp and pegs supplied
as an option)
Your screen has two one-way
values – located on the left and
right at the rear of the screen.
Each valve can be fully removed
for deflation or used via the
access cap in the centre of the
value for inflation.
3. Remove the screen from the carry bag and unroll onto protective
tarp or setup area.
4. Remove the long tethers from the bag. Attach to the four D-rings
located at the top of the inflatable screen (there are 2 on the left and
2 on the right) using the metal clip end of the tether to attached to
the D-rings on the screen. You may also have shorter tethers that
can be secured to the bottom D-rings on the screen.
5. Make sure there is plenty of slack in the tethers.
6. Walk out about 2 to 3m with each tether in approximately
45-degree angle from the screen. Then attach supplied pegs to the
end of the tethers and drive the pegs into the ground.
1. Decide on a location with enough space for the screen, projector
and speakers, that is relatively flat. Allow for space either side of the
screen area for tether points.
(see video setup section on placement distances for projector)
1. Make sure both valves are inserted and remove the inner access
cap on one side.
Valves
Top view
Screen
Valve
End-cap

SCREEN INFLATION
2. Use the supplied electric air pump to fully inflate the screen via the
open valve. There maybe dierent nozzles supplied with the electric
air pump to make a close or tight seal to the valve. Do not over inflate
the screen (once the frame tube is tight cease inflation).
3. Replace the valve screw cap.
1. The Handitheatre screen can be used in a front or rear projection
configuration – meaning placement of the projector can be in front or
behind the screen. Distance from projector to screen surface will vary
depending on your screen size (100” or 140”) and model of projector.
Below is a guide for approximate distances depending on your
projector:
2. Once you have determined the type of setup and the threw
distance, place the projector at the appropriate distance from the
screen on a stable surface – this may be a projector table or stool. For
rear projection setup, it is recommended to have the projector low as
possible for the audience to avoid looking at a bright spot from the
projector light source.
4. If your screen is a mattress design (without support legs) you will
need to lift and correct the screen into it’s intended vertical position.
5. Adjust the tethers to reduce any slack and so the screen stays
vertical by itself.
- For screens with support legs, you screen may have already inflated
into the correct vertical position.
3
Matress style screens
VIDEO SETUP
Projector 100’’ Screen 140’’ Screen
SD602
SD825
2.6m
2.8m
3.3 m - 3.6 m
3.4 m - 3.7 m
4.2 m - 4.7 m
3.7m
3.9m
4.6 m - 5.1 m
4.8 m - 5.3 m
6.0 m - 6.7 m
BenQ MH550, TH585, EH600
BenQ MW550, EW600
Optoma W335
Throw distance guides

3. Connect your video source (such as DVD player, Apple TV or
Smartbox) to the projector via a HDMI cable. If your projector has
multiple HDMI inputs, connect to “HDMI 1”. If you have changed the
projector’s source, you may have to cycle throw the selectable
sources via the projector remote once powered on.
4. Connect the power source and turn on the projector.
5. Your projector may have a zoom adjustment to adjust the image to
fill the screen, or you may have to move the projector
forward/backwards slightly.
6. Your projector will also have a focus adjustment – adjust to make
sure the image is as sharp as possible.
7. For rear projection setup you will need to mirror the image output,
so the audience is viewing the projected image correctly. This should
be accessible via the projector settings menu using the projector
remote control (this process will vary depending on the projector
model).
8. For projectors with inbuilt apps or streaming you may not need to
connect an external media source (from step 3) but you will need to
connect the projector to an available WiFi connection. For casting or
wireless connection of smart phones, tablets or laptops please refer to
the projector’s instruction manual.
Refer to the “Audiovisual Setup Guide”
for this step.
VIDEO SETUP 4AUDIO SETUP
5AUDIOVISUAL SETUP
The audio setup will vary depending on your package configuration
and supplied speakers. For most setups, speakers are connected to
the projector via the 3.5mm audio output socket.
For setups using a Smartbox, your speakers will be directly connected
to the Smartbox via the XLR stereo outputs. For more details, please
refer to the separate detailed audio guide.
For Bluetooth connections you will need a Bluetooth compatible
projector and Bluetooth compatible speaker(s). Pairing the speakers
will be via the projector setting menu (please refer to your projector’s
instruction manual).

AUDIOVISUAL SETUP 6SET UP PLAN
1. Line up the projector to the centre of your screen.
- Even though you will still get the image, if the projector is o centre,
the image will be distorted.
2. Adjust the focus of the lens to make the image sharp if it is blurry.
3. ‘Zoom control’ will further help in adjusting the image to fit the
screen.
4. Use the keystone if your image seems bigger at the top or at the
bottom to achieve a perfect rectangle.
5. If using rear projection, flip the image.
- Normally, this can be done via projector settings.
Other Adjustments: Projection screen
Soundbar
Audio out from
projector to
speaker /
soundbar
Projector
Playback device
Power Source
HDMI cable from
projector to player
(speakers and position may dier – plus
choice of front or rear projection)
Speakers

Turn everything on
Power boards
Soundbar
Projector
Playback device (DVD player, Game console, Laptop, PC)
JUST HIT PLAY!
1. Unclip tethers from stakes.
2. Completely remove valve from one side and allow deflation.
3. Remove tethers from screen D-rings on the screen.
1. Lay out the deflated screen. Remove or loosen the valves on both
sides (this will allow any trapped air to escape when being rolled up)
– be careful not to lose these.
2. For screens with leg supports, fold these over the rest of the
screen frame.
3. Fold the screen in half lengthways from top to bottom (with the
white screen surface front on the inside).
4. The air pump can be used to
help deflation and remove most
of the remaining air in the screen
to help folding away. The suction
inlet should be located on the
side of the air pump.
SCREEN PACKUP
9
SCREEN DEFLATION
84. Fold the screen in half again in the same direction.
5. Roll the screen up tightly along the length (and secure with strap if
provided). Make sure valves are attached if possible.
6. The screen should then be placed back into its carry bag for
protection along with tethers, pegs, and valves.
CHECK LIST
7
Blow
Suck

TROUBLESHOOTING
1. Keep it clean and dry (as much as you can).
- It is recommended to set up your screen on the protective tarp to
prevent it from coming into contact with the ground, grass, dirt or sand
that may stain your screen.
2. As the screen deflates, fold in half to minimise dirt on the screen
surface.
3. Ensure your screen is always dry when rolled up and put away. Any
moisture can result in mould and can damage your screen.
General Care
SCREEN CARE
For laptops connected via HDMI, ensure the
laptop’s operating system has audio output
selected to external HDMI.
For setups with soundbars or speakers that
are capable of multiple inputs, ensure you
have selected the correct input mode (eg. if
using Bluetooth make sure speaker is in
bluetooth mode, or if using aux input, make
sure speaker is in aux input mode).
11
TROUBLESHOOTING
10
Problem Resolution
1. Projector is on
but image is blank
Check to ensure you have selected the
appropriate projector ‘source’ for the input
connection on your projector (typically ‘HDMI
1’).
Ensure any connected external media
sources are not using a HDMI cable longer
than 5-10m (unless using an appropriately
rated optical fibre type HDMI cable)
2. No audio or low
audio but showing
video.
You may have volume controls across
multiple devices. Ensure volume is adjusted
correctly across all devices including:
1. Projector volume
2. Source volume (such as laptop, or DVD
player)
3. Speaker volume (including line-in and
master volume)
4. Smartbox (including HDMI and master
volume)

- Ensure all your tethers are also dry as these can be aected by
mould.
3. Alternately, leave your screen inflated and bring inside to dry o.
- Small stains can be cleaned with methylated spirits.
- This not only cleans your screen but dries very quickly without
leaving any streaks. This method can also be used to spot clean the
screen surface.
- If the screen surface becomes really dirty, simply zip it o the screen
frame, wash in the washing machine on a gentle cycle, and then hang
out to dry.
- Do not wash the inflatable screen frame.
SCREEN CARE
Drying
If your screen gets wet from dew or rain, don’t stress! Simply follow
the next steps:
1. Shake o water and then loosely pack away.
2. Bring it out the following day when the weather is better, once set
up, the screen will dry out usually within around 30 minutes. If the
screen was very wet, this may take a little longer.
- Cleaning the screen frame is best done with a soft cloth and warm
water. Use dishwasher detergent, if required.
Cleaning
Patching
If your screen obtains a cut, a hole, or is pierced by a sharp object, it
can be repaired!
Simply use your repair kit to fix your screen:
- Patching the screen should be done when the screen is deflated.
1. Cut a piece of the PVC fabric, so that it covers the hole entirely, with
approximately 2cm around each side overhanging the gash.
2. Make sure that both the PVC patch and the tubing around the hole
are clean.
3. Use the bike puncture repair glue to glue around the edge of the
patch to create a seal over the hole.
- Warning: Do not use too much! The glue can ooze out and make a
mess of your tubing.
Other manuals for HandiTheatre Home
2
Table of contents
Other Smart Digital Home Theater System manuals


