SMART CIRCLE SURROUND 3X User manual

Devices, Inc.
Copyright 1999-2000 by SMART Devices, Inc.
5945 Peachtree Corners East
Norcross, GA 30071-1337
CIRCLE SURROUND 3X
FOR HOME CINEMA
CS-3X, Jr.
TM
The SMART Center Surround 3X for Home Cinema adds that extra dimension
of sound to your Dolby DigitalTM or DTS DigitalTM soundtracks from LaserDiscs
or DVD Discs.Add one or more rear wall speakers and additional amplifiers to
get the full enjoyment from the latest film releases encoded with the new
Surround EXTM format. In addition, this product even allows you to play your
existing digital soundtracks and hear them in a way you have never heard them
before. The existing in-phase material present in the Left Surround and Right
Surround channels is routed to the rear wall speakers and the directionality is
greatly enhanced.A CENTER FILL level control lets you easily balance the rear
wall speakers against the Left Surround and Right Surround speakers.You can
easily select between the CS-3X mode and the regular LS-RS mode with the
push of a button. Built-in pink noise lets you easily set the surround channel
levels, and if you have equalizers installed, the pink noise source gives you a
signal that a Real Time Analyzer expects. This product even has a built-in
subwoofer output signal for adding those usually missing low frequencies to
your surround system. By adding a subwoofer system to the surrounds, when a
sound pans from the front speakers to the surrounds, the low frequency
information can also be heard from the surround system.This can significantly
enhance your listening experience if your surround speakers do not handle
low frequencies very well.
CS-3X, Jr. Rev 3 Manual
12/15/1999

2
CAUTION:TO REDUCETHE RISK OF ELECTRIC SHOCK, DO NOT REMOVE
THE COVERS.THERE ARE NO USER SERVICEABLE PARTS INSIDE. REFER
SERVICINGTO QUALIFIED SERVICE PERSONNEL.
WARNING:TO PREVENT FIRE OR SHOCK HAZARD, DO NOT EXPOSETHIS
PRODUCTTO RAIN OR MOISTURE
IMPORTANT SAFETY INSTRUCTIONS
CAUTION:
--Read all of these instructions.
--Save these instructions for later use.
--Follow all warnings and instructions in this manual and on the product.
1 Read all the safety and operating instructions before connecting and
operating the product.
2 Follow all operating and use instructions.
3 Remove power from this product before cleaning.
4 Use only a slightly damp cloth for cleaning.
5 To avoid potential fire and shock hazards, do not use this product near
water or damp places.
6 The product should only be operated from a power source of the type
indicated on the power pack and on the product. Failure to do so could
damage the equipment, void the warranty, and present a potentially
dangerous situation.
7 Do not attempt to service this product yourself. Opening this product may
expose you to dangerous voltage or other hazards.
8 If service is required, only authorized service centers should perform the
work using only replacement parts specified by the manufacturer. Unautho-
rized parts substitutions may result in electric shock, fire or other hazards.
9 This product should be placed away from heat-producing sources such as
radiators, heat registers, or other products (including amplifiers) that
produce heat.
10 It is normal for this product to be warm to the touch in normal operation. It
should not be so warm that you cannot comfortably leave your hand on the
product for an indefinite period of time.

3
Contents
IMPORTANT SAFETY INSTRUCTIONS ..................................................................2
INSTALLATION PRECAUTIONS .............................................................................4
CONNECTIONS ....................................................................................................4
POWER..................................................................................................................4
LINE LEVEL SOURCE .............................................................................................4
SPEAKER LEVEL SOURCE (AMPLIFIER OUTPUTS) ................................................4
OUTPUTS..............................................................................................................4
SETTING LEVELS ...................................................................................................5
CAUTIONS ............................................................................................................6
OPERATION ..........................................................................................................6
BACKGROUND.....................................................................................................6
MULTI-CHANNEL MATRIX DECODER ..................................................................7
SPECIFICATIONS ...................................................................................................8
LIMITED WARRANTY ............................................................................................8
This product has a serial number located on the bottom.
Please record this serial number for your records.
SERIAL # _______________
Thank you for buying this SMART product.
Please take the time to familiarize yourself with this product by carefully reading
this manual. Most questions can be answered by reading and following the in-
structionscontainedherein. Because of the multitude ofproductsfromothermanu-
facturers, this manual cannot possibly cover all the different configurations and
hookups. Please consult with your Home Cinema Dealer for any unusual situa-
tions involving the connection and use of this product with equipment from other
manufacturers. When properly connected and operated, this product should de-
liver outstanding results.
Surround EXTM and Dolby DigitalTM are registered trademarks of
Dolby Laboratories, Inc., San Francisco, CA, USA
DTS DigitalTM is a registered trademark of DigitalTheatre Systems,
Agoura Hills, CA, USA
Circle SurroundTM is a registered trademark of SRS Labs, Inc.,
Santa Ana, CA, USA

4
INSTALLATION PRECAUTIONS
Noise Interference may result if this product is placed too close to an operating
television set or a computer, or if it is placed on top of an amplifier or power con-
ditioner product.
High temperatures are detrimental to the performance and longetivity of electronic
equipment. Do not place too close to high temperature devices.
CONNECTIONS
The Center Surround 3X connects between the existing processor surround output
channels and the power amplifiers and speakers. The Center Surround 3X can ac-
cept either standard line level processor outputs from RCA jacks or amplifier out-
puts which normally connect to the surround speakers. If you have an integrated
processor/power amplifier, it may be possible to break the signal between the pro-
cessor outputs and the amplifier inputs. See your equipment manual for informa-
tion on whether this is possible. If so, you may be able to use the surround amplifier
channels in the integrated unit. If this is not possible, then you will need a separate
dual channel power amplifier for the Left Surround and Right Surround speakers.
POWER
Connect the power pack plug into the POWER jack. Make sure it is fully seated.
Use ONLY the power pack supplied. Do not substitute as damage could occur.
LINE LEVEL SOURCE
If you are using the line level surround outputs from your processor, disconnect
them from your existing surround channel amplifiers and connect them to the RCA
jacks marked LS IN and RS IN. Push the SOURCE pushbutton to the LINE position.
SPEAKER LEVEL SOURCE (AMPLIFIER OUTPUTS)
If you are using the existing surround amplifier speaker outputs as your source, then
connect them using ordinary speaker hookup wire to the 4 terminals marked LS+
and LS- and RS+ and RS-. Connect the + terminals to the hot side of your amplifier
outputs and the - terminals to the ground or minus side of your amplifier outputs.
Release the SOURCE pushbutton to the SPKR position.
OUTPUTS
Connect a RCA patch cable from the LS OUT and RS OUT jacks to the Left Sur-
round and Right Surround amplifier inputs. Connect a RCA patch cable from the CS
OUT jack to the amplifier input for the rear wall surround speakers. If you have a
surround subwoofer system, connect a RCA patch cable from the SW OUT jack to
the Subwoofer Amplifier input. The SP1 and SP2 outputs are for special future for-
mats such as overhead surround channels and are not used at present.

5
SETTING LEVELS
The CS-3X, Jr. comes from the factory set up for unity gain levels.This means that
whatever levels are going in are also the same levels going out.This is probably
adequate for most situations. However, there are trimpots provided for adjusting
the levels of each individual channel. In addition, there is a volume adjustment
knob (marked CENTER FILL) on the front panel for setting the rear wall (CS) speak-
ers’ volume relative to the Left and Right Surround volume. Typically, the CS
channel volume is set about 3dB higher than the Left and Right Surround chan-
nels.You may want to experiment with the CENTER FILL control to get the best
effect in your particular listening room.
Also, there is built-in pink noise which can be used to help balance the levels
between the surround channels if any adjustment is needed.To activate the pink
noise, push down the DIP switch marked ON.Then to send the noise to a particu-
lar channel, push down the DIP switch corresponding to the desired channel. Be
sure to push all the Pink Noise DIP switches back up when you are finished with
the pink noise.
There are six OUTPUT LEVEL trimpots which are used to adjust the output levels
if needed to balance the levels between the various surround channels. In most
cases, these can be left at the factory settings. If you need to adjust these, use the
supplied alignment tool or a small jeweler’s type screwdriver.These trimpots are
muti-turn types. If you turn them all the way to one end, they will click slightly as
you continue to turn them.You cannot damage them by turning too far.
This picture of the back of the CS-3X, Jr. shows the connection points, controls
and switches which are used in setting up the product for proper operation.The
SP MONO DIP switch is for setting the SP1 and SP2 outputs for mono operation.
It is used for future formats only.
Setup DIP Switches
Output Level Trimpots
Line Inputs
Line Outputs
Source Selector
Speaker Level Inputs
Power Jack
SURROUND ADAPTOR

6
CAUTIONS
This product requires that the LS and RS inputs have reasonably well-balanced
levels and NO equalization or tone control shaping of the signals. If your proces-
sor has gain or balance adjustments for the LS and RS channels, make sure that
the signal levels are set the same. Likewise, if you have tone or EQ controls for the
LS and RS channels, make sure that these are set to the flat positions, i.e., no
boost or cut at any frequency. If you want to equalize the surround channels, add
equalizers between the CS-3X, Jr. outputs and the amplifier inputs.
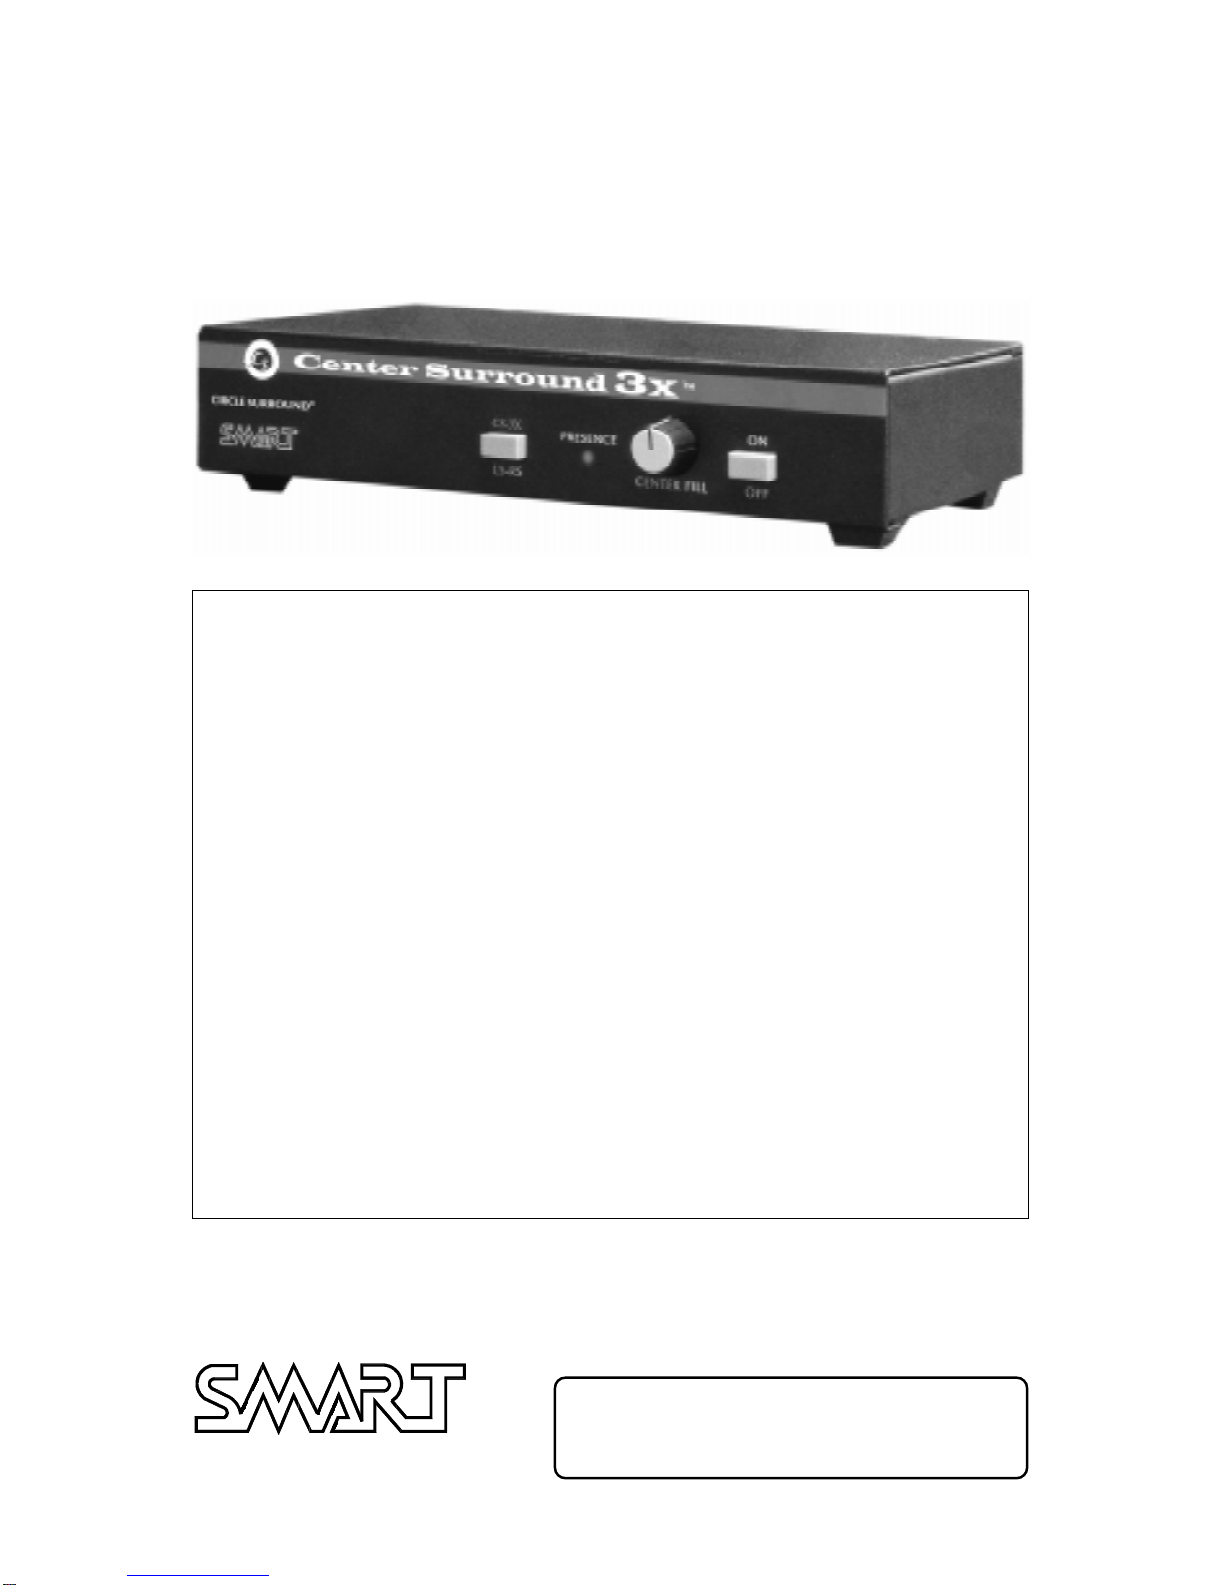
OPERATION
The CS-3X, Jr. is very easy to use. There are only three front panel controls and
switches. Normally, the only thing to do is to select the proper format depending
on whether you are playing a digital soundtrack or a standard stereo soundtrack
through a matrix decoder such as Circle SurroundTM or PrologicTM .
The pushbutton marked CS-3X and LS-RS is the format pushbutton. In the CS-3X
format (pusbutton in), digital soundtracks with separate left and right surround
tracks will be played in the Surround EXTM format. This produces three separate
surroundchannels.Thisis the formatyouwillnormallyuse with digitalsoundtracks.
The LS-RS format (pushbutton out) is used for playing matrix decoded stereo
soundtracks.This format can also be used when playing a digital soundtrack if the
resulting sound with the CS (rear wall) speakers playing is not as you desire. In the
LS-RS format, only the Left and Right Surround speakers are active.
The ON/OFF pushbutton does not actually turn off power to the unit, but instead
bypasses the LS and RS inputs directly to the LS and RS outputs.This pushbutton
would only be placed in the OFF position if there was a problem with the CS-3X,
Jr. and you wished to take it out of the circuit.
The CENTER FILL control is used to adjust the CS channel output level relative to
the Left and Right Surround levels. It can be used to raise or lower the CS volume
to suit the particular soundtrack being played. Usually this level is about 3dB
higher than the Left and Right Surround channels.
BACKGROUND
Even though the Surround EXTM format was created recently and has only been
specifically used in a couple of movies, the fact is that ALL digital soundtracks
have had in-phase material recorded on the surround channels when the sound
mixer wanted the surround sound to appear to come from somewhere between
the left and right walls. This in-phase material is decoded by the CS-3X and sent
to the rear wall channel speakers and can enhance the directionality and the
overall listening experience. If this effect is not desired for a particular movie,
simply place the CS-3X in the LS-RS format. Ultimately it is up to you how you
prefer to hear your system perform.

7
MULTI-CHANNEL MATRIX DECODER
This product can also be used as a complete multi-channel matrix decoder for
usewithastandard 2-channelaudiosourcesuch asaHi-FiStereoVCR,LaserDisc
or DVD player. Using the product in this way requires that you have a proces-
sor or control center with multi-channel analog inputs. Of course, it cannot be
used in this manner and simultaneously as a surround adaptor for digital
soundtracks.
The LS and RS inputs become the Left and Right inputs. These would be con-
nected to the Left and Right outputs of the 2-channel source.
The LS and RS outputs become the Left and Right outputs. The CS output be-
comes the Center output.The SP1 and SP2 outputs become the Left Surround
and Right Surround outputs. The SW output is still the Subwoofer output.
TheCircleSurroundmatrixdeliversoutstandingresultscomparedto other matrix
types used in the home cinema market.
The CS-3X, Jr. does not have a built-in time delay for the surround channels.
But in many home environments, there is not always a need for a time delay
due to the size of the listening room.
Also, some matrices are better than others at keeping the front channel mate-
rial out of the surround channels, and the Circle Surround matrix is quite good
in this respect. One of the reasons for time delay in the professional cinemas is
that dialog sometimes leaks into the surround channels and causes a very an-
noying echo effect. Time delay is used to mask this problem. If the matrix is
good at keeping dialog out of the surround channels, then time delay is not as
big an issue for the home environment with the smaller listening space.

8
SPECIFICATIONS
Device Type Multi-Channel Surround Decoder
Inputs 2 Line Level - LS IN and RS IN
Unbalanced high impedance
2 Speaker Level - LS IN and RS IN
Balanced high impedance
Outputs 6 - LS OUT, RS OUT, CS OUT, SW OUT,
SP1 OUT and SP2 OUT
Unbalanced low impedance
Adjustable by trimpots on rear chassis
Signal to Noise Ratio Better than -70 dB re: -10dBV input
Dynamic Range 85dB at operating input level of -10dBV
Headroom 14 dB above operating input level of -10dBV
Distortion Typically less than .05% at 1 kHz
at -10 dBV input level
Typically less than 0.1% at 1kHz
at +4dBV input level
Subwoofer Output -3 dB at 125 Hz, 12dB per octave low pass crsoosover
Channel Separation Typically better than 25 dB at 1 kHz
Pink Noise Built-in pink noise source, switch selectable
to each output
Power Supply UL Approved Wall Plug Power Pack
120VAC 60 Hz Input - 15VAC 320 mA Ouput
Weight and Dimensions 3.5 lbs. 8.6” W x 2.00” H x 6.25“ D
LIMITED WARRANTY
SMART products and accessories are warranted against malfunction or failure due
to defects in workmanship or materials for a period of one year from the date of
shipment. If a problem occurs during the warranty period, the unit will be repaired,
without charge for materials or labor. This limited warranty does not cover prod-
ucts that have been abused, altered, modified, or operated in other than specified
conditions. Returned equipment or defective parts must be shipped freight prepaid
to us by the dealer or customer. Our limited warranty does not cover damages
resulting from accident, misuse or abuse, lack of responsible care, or failures not
attributable to manufacturing defects, except as provided herein. SMART Devices,
Inc. makes no warranties, express or implied, including warranties of merchant-
ability or fitness for a particular purpose.
This manual suits for next models
1
Table of contents
Other SMART Media Converter manuals