SmartCow SmartCam User manual

SmartCam
User's Manual
October 2022

Copyright and legal statement
©2022 SmartCow AI Technologies Ltd. All rights reserved.
No part of this document may be reproduced, translated, modified, published, distributed, transmitted, or displayed
in any form or by any means, without the prior written permission from SmartCow AI Technologies Ltd. SmartCow® is
a registered trademark of SmartCow AI Technologies Ltd. Otherwise, you will be responsible for any infringement of
copyright law.
All other product names, brands, or logos used herein are the trademarks or registered trademarks of their respective
owners. All such material is used with the permission of the owners. The content of this document is furnished
confidential, privileged and for informational and instructional use only. It is subject to change without notice, and
should not be construed as a commitment by SmartCow. SmartCow acts in good faith and attempts to ensure that
content is accurate, complete or reliable, but it does not represent it to be error-free. SmartCow, its subsidiaries, the
directors, employees, and agents assume no responsibility or liability for any inaccuracies, omissions, or errors that may
appear in the content of this document.
Copyright and legal statement ii

Contents
Copyright and legal statement.............................................................................................................ii
Chapter 1: About the manual...............................................................................................................4
Chapter 2: About SmartCam................................................................................................................ 5
2.1 Features and key benefits..................................................................................................................................5
2.2 SmartCam specifications.................................................................................................................................... 5
2.3 Mechanical and input/output connections....................................................................................................... 6
Chapter 3: Setting up SmartCam..........................................................................................................7
3.1 Prerequisites.......................................................................................................................................................7
3.2 General steps to use your SmartCam................................................................................................................8
3.3 Running the SmartCam Discovery Tool..............................................................................................................8
3.4 Running Web Preview App on SmartCam......................................................................................................... 9
3.4.1 Updating Web Preview App to a new version..................................................................................10
3.5 Changing the camera's sensor configuration...................................................................................................10
3.6 Adjusting the exposure compensation for low-light conditions...................................................................... 11
Appendix A: Example applications and use cases..............................................................................13
Running a DeepStream application for viewing the RTSP stream......................................................................... 13
Appendix B: Troubleshooting and FAQs............................................................................................. 14
iii

About the manual 1
This manual provides an overview of SmartCam as well as instructions for anyone involved in SmartCam installation and
operation. The document is intended to ensure the safe and efficient operation of the device by the operating personnel.
About the manual 4
About SmartCam 2
Topics:
•Features and key benefits
•SmartCam specifications
•Mechanical and input/output connections
SmartCam is an AI camera with high-resolution sensors suitable for smart retail, smart factories, and smart cities.
2.1 Features and key benefits
The following are the key benefits of SmartCam.
• Compact camera design with high computing power, up to 1.33 TFLOPs AI performance
• IP66-rated enclosure that can withstand harsh conditions
• Flexible power sources that support both PoE+ and DC power
• 5MP CMOS camera sensor with wide-angle lens, suitable for a variety of AI recognition applications
• Powered by NVIDIA Jetson platform
• ONVIF compliant
• mSATA 128G storage
2.2 SmartCam specifications
Table 1: SmartCam specifications
Max. Image Resolution 2592H x 1944V
Video Stream Codec H.264 / H.265 supported
Video
Bit Rate Control CBR / VBR
AR0521(1/2.5") from ON Semiconductor
Type/ Optical Size 1/2.5" Optical format CMOS
image sensor
Resolution 5MP
Image Format UYVY
Pixel Size 2.2µm x 2.2µm
Sensor Active Area 2592 (H) x 1944 (V)
Responsivity 18.8 ke—/lux-sec
SNR 40dB
Image Sensor
Tip: Pixel size
and sensor active
area parameters
are useful when
dewarping an
image to remove
lens distortion.
Dynamic Range 74.3dB
WDR Digital WDR
Camera
Day/Night Mode N.A.
S/N Ratio 40dB
Focal Length 3mm
Field of View 140.5°(D) x 110°(H) x 82°(V)
Focus Control Fixed
Lens
Aperture F2.8
About SmartCam 5

Iris Control Fixed
Ethernet 1x GBE through RJ45 connector
ONVIF Profile S
Network
Protocol IPv4, IPv6, TCP, UDP, ARP, HTTP, HTTPS, DNS, RTP/RTCP,
RTSP
Operating Temperature -20 ~ +60°C
Operating Humidity 10% ~ 90%
Power Input DC Jack 12V / POE+ (IEEE 802.3at)
Important: Does not support IEEE 802.3af.
Power Consumption 30W Max
General
Expansion Optionally support GNSS feature. (33 channels support
GPS L1 C/A, GLONASS L1 C/A, Beidou B1 C/A, QZSS)
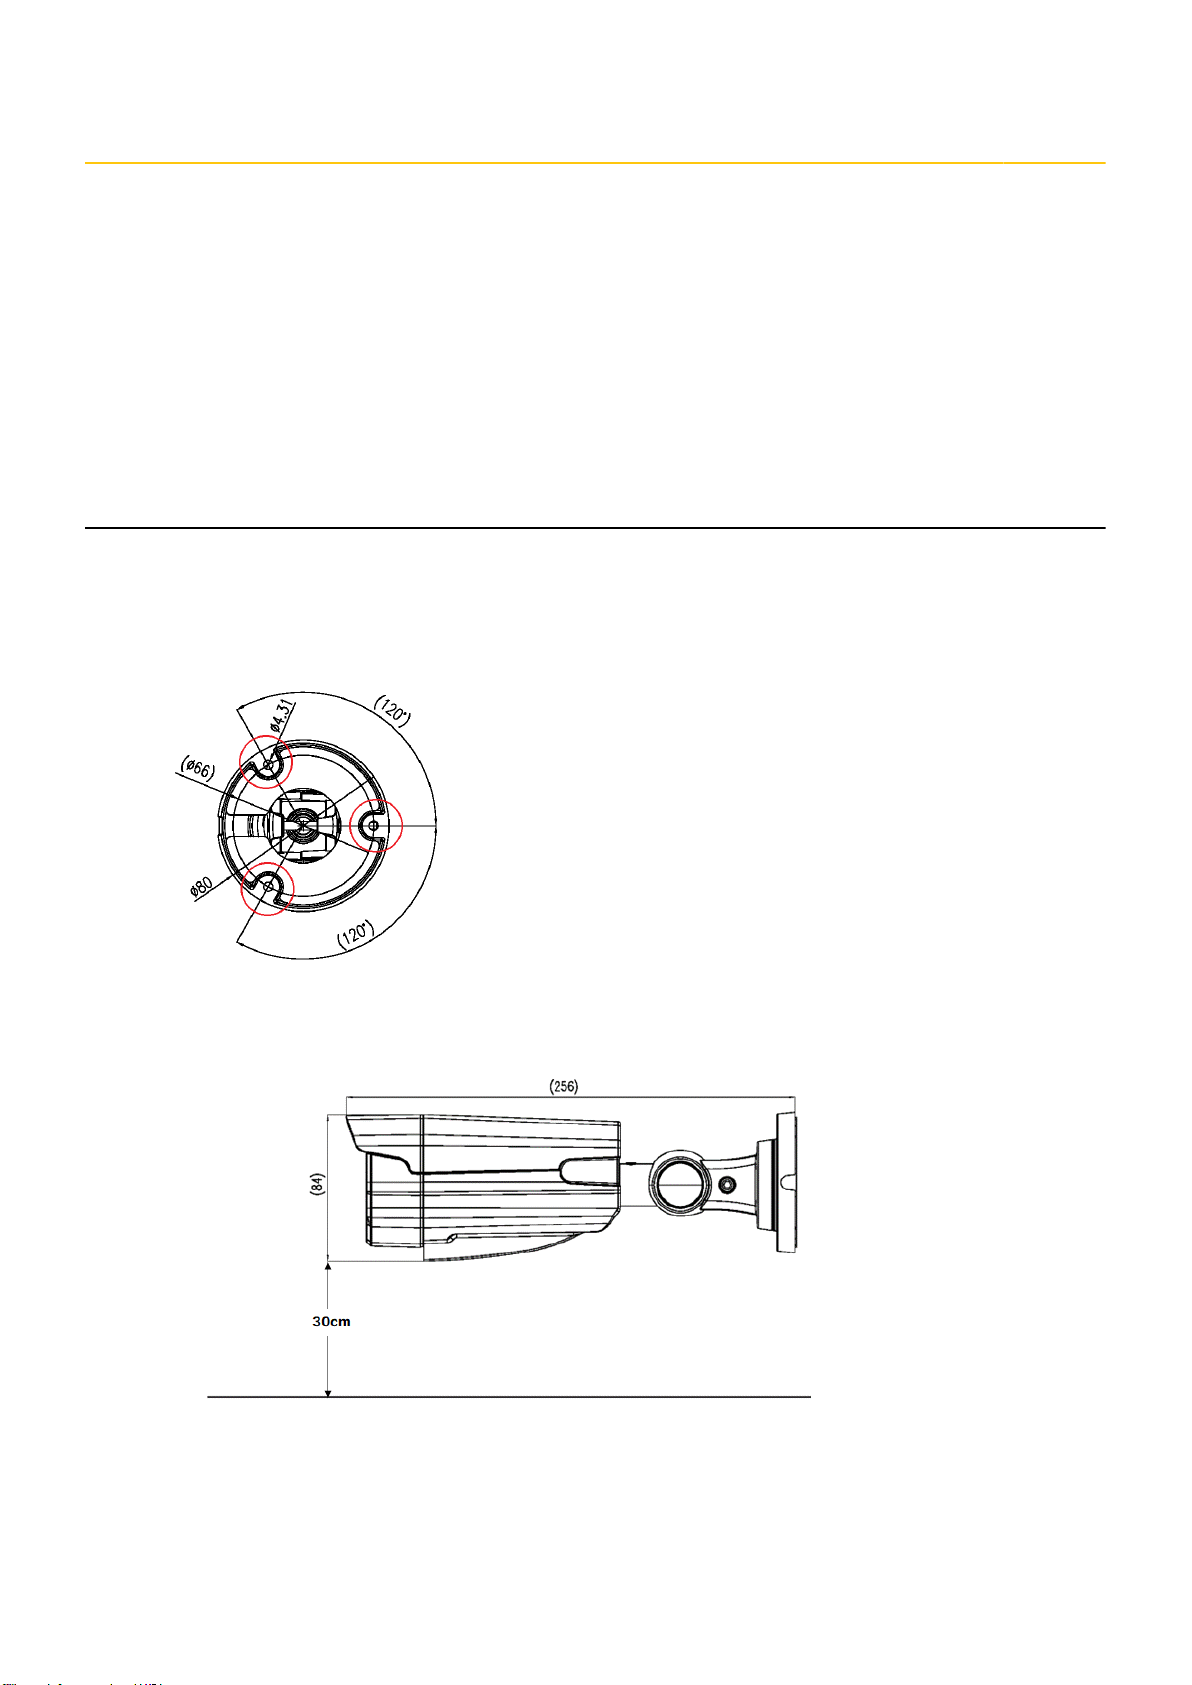
Dimensions 95mm x 84mm x 256mm
Housing Material Aluminum
Mechanical
Weight 850g
Certification CE / FCC / RoHS / NEMA / IP66
2.3 Mechanical and input/output connections
About SmartCam 6
Setting up SmartCam 3
Topics:
•Prerequisites
•General steps to use your SmartCam
•Running the SmartCam Discovery Tool
•Running Web Preview App on SmartCam
•Changing the camera's sensor configuration
•Adjusting the exposure compensation for low-light conditions
3.1 Prerequisites
Mounting
Ensure that you meet the following requirements when mounting SmartCam.
• Always mount SmartCam using the mounting screw holes on the camera's base.
• To ensure heat dissipation, keep a minimum distance of 12" (30cm) between the base of the mounted SmartCam fin
and the nearest obstacle.
• Do not install SmartCam in direct sunlight.
Electrical requirements
Use one of the following power supplies to turn on the SmartCam.
• DC 12V 5A power supply using an adapter with a 2.1 x 5.5 x 11 mm output connector.
Setting up SmartCam 7

• POE+ switch (IEEE 802.3at standard) using a CAT5e cable or above.
Note: When choosing to power SmartCam through POE, ensure that the power supply of the POE+ switch
selected is at least 30W and in compliance with IEEE 802.23at (POE+) standard.
3.2 General steps to use your SmartCam
Table 2: General steps
Sl. No Step Additional Information
1. Connect SmartCam to the power supply. Electrical requirements
2. If you are using DC 12V 5A power supply, connect
the Ethernet cable to the RJ45 jack.
3. Find your SmartCam's IP address using the
SmartCam Discovery Tool.
Running the SmartCam Discovery Tool
Tip: You can identify the SmartCam by its
hostname, tegra-ubuntu.local.
Alternatively, you can scan your network with IP
scanners such as zenmap or angry ip scanner to find your
SmartCam's IP address.
4. SSH into the SmartCam. To ssh into your SmartCam, use the IP address discovered
using SmartCam Discovery Tool and then run the
following command.
ssh [email protected] default
password: nvidia
5. Run the Web Preview App on SmartCam
and then view the live video stream on any
compatible web browser.
Running Web Preview App on SmartCam on page 9
6. (Optional) Change the camera's sensor
configuration.
Changing the camera's sensor configuration on page
10
7. (Optional) Adjust the exposure compensation for
low-light conditions.
Adjusting the exposure compensation for low-light
conditions on page 11
3.3 Running the SmartCam Discovery Tool
Use the SmartCam Discovery Tool to scan and discover all cameras within the network's local IP range.
On Windows
1. Download the SmartCam Discovery Tool.
https://smartcow-smartcam-discovery-tool.s3.us-east-2.amazonaws.com/windows/
SmartCamDiscoveryInstaller_0.0.1.zip
2. Install and configure SmartCam Discovery tool.
a. Extract SmartCamDiscoveryInstaller.exe from the downloaded ZIP file.
b. Run the installer.
By default, a desktop shortcut is created, and the system prompts you for firewall access during the first
time you launch the tool. You can use the tool for discovery after allowing firewall access.
Note: If you are prompted with a warning window, select More Info and click on Run Anyway, and then
proceed with the rest of the installation steps.
3. Run the SmartCam Discovery tool on your computer to get a list of cameras on your local network.
To run the SmartCam Discovery Tool, double-click the shortcut icon pointing to the executable file that is available at
the default installation folder:
Setting up SmartCam 8

C:\Program Files\SmartCow Discovery Tool
You can view the camera’s name and IP address as shown in the following figure.
On Ubuntu
1. Download the SmartCam Discovery Tool.
https://smartcow-smartcam-discovery-tool.s3.us-east-2.amazonaws.com/linux/smartcam-
discovery_0.0.1-bionic_amd64.deb
2. Install and configure SmartCam Discovery tool.
To install the smartcam-discovery package, run the following command.
sudo apt install [path/to/.deb file]
For example:
sudo apt install smartcam-discovery_0.0.1-bionic_amd64.deb
3. Run the SmartCam Discovery tool on your computer to get a list of cameras on your local network.
To run the SmartCam Discovery tool, run the following command.
smartcam-discovery-gtk
You can view the camera’s name and IP address as shown in the following figure.
3.4 Running Web Preview App on SmartCam
SmartCam Web Preview is a web application that captures video feed from SmartCow cameras and displays the live
video stream on any compatible web browser.
Setting up SmartCam 9

Before you begin
• Ensure that SmartCam has a discoverable public IP address and within the same network as the SmartCam Web
Preview.
• Supported browsers: Google Chrome
About this task
The application is pre-installed on all SmartCow cameras and is available to all SmartCow users. You can use this
application to preview the captured video feed and adjust the camera's position and angle as needed.
Procedure
1. To ssh into your SmartCam, use the discovered IP address and then run the following command.
ssh [email protected] default
password: nvidia
2. To launch the Web Preview App on your SmartCam, run the following command.
smartcam-web-preview
3. If the application is not installed and the command above failed to run, reach out to the SmartCow team for the
credentials to download the application from the apt repository.
user=xxxx
password=xxxxxxxx
sudo apt update
sudo apt install -y curl ca-certificates
curl -1sLf "https://$user:[email protected]/apt/gpg.key" | sudo apt-key add -
echo "deb https://smartcow.io/apt/repo/smartcam-web-preview-dev $(grep
'^DISTRIB_CODENAME=' /etc/lsb-release | cut -f2 -d=) multiverse" | sudo tee -a /etc/apt/sources.list.d/
smartcow-repo.list
echo "machine smartcow.io login $user password $password" | sudo tee -a
/etc/apt/auth.conf.d/smartcow-repo.conf>/dev/null
sudo apt update
sudo apt install -y smartcam-web-preview
4. When the application is running, type the IP address of your SmartCam with port number 8080 on your browser to
check the camera feed preview.
For example, https://<SmartCam_IP_address>:8080
3.4.1 Updating Web Preview App to a new version
Procedure
To run a new version of Web Preview App, run the following command.
sudo apt-get install --only-upgrade smartcam-web-preview
3.5 Changing the camera's sensor configuration
You can install and use the v4l2-ctl utility to change the sensor configuration of the camera.
Procedure
1. Run the SmartCam Discovery Tool to get the SmartCam's IP address.
For more information, see Running the SmartCam Discovery Tool.
2. Install the v4l2-ctl utility.
At the terminal, type the following command.
sudo apt install v4l-utils
3. To view a list of configuration parameters, type the following command.
v4l2-ctl --all
Setting up SmartCam 10

The configuration parameters that are most commonly used are listed in the following table.
Table 3: Configuration parameters
Controls Minimum Value Maximum Value Default Value Auto Control
Brightness -15 15 0 NO
Contrast 0 30 10 NO
Saturation 0 60 16 NO
White Balance 1000 10000 4500 YES
Gamma 40 500 220 NO
Gain 1 100 1 NO
Horizontal Flip 0 1 0 NO
Vertical Flip 0 1 0 NO
Sharpness 0 127 16 NO
Exposure 1(100 µs) 4300 (430ms) 312(31.2ms) YES
Pan -648000 648000 0 NO
Tilt -648000 648000 0 NO
Zoom 100 800 100 NO
ROI Window Size 8 64 24 NO
Denoise 0 15 8 NO
Exposure Compensation 8000 430000 140000 NO
4. To change a parameter, use the --set-ctrl argument.
For example, to set the brightness level to 5, run the following command.
v4l2-ctl --set-ctrl=brightness=5
3.6 Adjusting the exposure compensation for low-light conditions
About this task
To achieve good low light quality, it is essential to adjust the exposure according to the change in lighting conditions. To
support this feature, SmartCam has the full field of view (FoV) auto mode that changes SmartCam’s exposure based on
the lighting conditions to provide the best low light quality.
Note: Lower FPS can occur when the auto exposure algorithm increases the exposure to compensate for the
lighting in the scene.
To maintain the frame rate under low-light conditions, you can use the v4l2-ctl utility to set the exposure compensation
value.
Before you begin Ensure that you have installed the v4l2-ctl utility. For more information, see Changing the camera's
sensor configuration on page 10.
Procedure
1. Calculate (estimate) the exposure compensation value.
You can calculate (estimate) the exposure compensation value using the following formula.
Exposure compensation = 1/(frames per second (FPS)). For example, exposure compensation = 1/28FPS = 35ms.
Note: Setting the exposure compensation value to a lower value can result in a decrease in image quality.
2. Run the v4l2-ctl utility.
Setting up SmartCam 11

For example, if you want to set the exposure compensation to 35ms, run the following command.
v4l2-ctl --set-ctrl=exposure_compensation=35000
Note: This calculation only applies to the maximum exposure time for slow moving targets. If you want to
capture very fast moving objects, for example, lower the exposure value because the speed of the object
must be considered in this calculation.
Setting up SmartCam 12
Example applications and use cases A
Topics:
•Running a DeepStream application for viewing the RTSP stream
This section provides some examples of applications and use cases.
Running a DeepStream application for viewing the RTSP stream
About this task
This example demonstrates how to use the SmartCam with DeepStream. It uses SmartCam's video stream as input, runs
inference and streams output as an RTSP stream. This app uses resnet10.caffemodel for detection.
Note: This example optimizes the model for Int8 precision. Because SmartCam is built on the Jetson TX2 NX
module, the default precision will be FP16 precision.
Procedure
1. Change the directory to the folder containing the DeepStream application.
cd /opt/nvidia/deepstream/deepstream/samples/configs/deepstream-app
2. Edit the source1_usb_dec_infer_resnet_int8.txt file.
sudo vim source1_usb_dec_infer_resnet_int8.txt
3. Change the following parameter values in the source1_usb_dec_infer_resnet_int8.txt file to match the following
values.
#line 35 onwards
[source0]
enable=1
#Type - 1=CameraV4L2 2=URI 3=MultiURI type=1
camera-width=2592
camera-height=1944
camera-fps-n=28
camera-fps-d=1
camera-v4l2-dev-node=0
#line 46 Disable overlay sink
[sink0]
enable=0
#line 75 Enable RTSP stream
[sink2]
enable=1
4. Save the source1_usb_dec_infer_resnet_int8.txt file.
5. Run the application by running the following command.
deepstream-app -c ./source1_usb_dec_infer_resnet_int8.txt
After the pipeline starts playing, you can view the RTSP stream at:
rtsp://<SmartCam_IP_address>:8554/ds-test
Example applications and use cases 13

Troubleshooting and FAQs B
This section describes the troubleshooting scenarios and frequently asked questions.
Table 4: Troubleshooting and FAQs
Problem Solution
I am unable to discover any cameras after running the
discovery tool.
Check that firewall access is enabled and that the cameras
are installed on the same network as your computer.
When I use the Google Chrome browser, I am unable to view
the preview or an invalid web page is displayed.
Run the Web Preview application in debug mode using the
following commands and send the logs to the SmartCow
personnel with whom you are liaising.
export GST_DEBUG="*:3"
smartcam-web-preview --verbose --debug
The SmartCam Discovery Tool is not running. How do I find
SmartCam's IP address?
• Ensure that the power adapter jack is not loose.
•You can scan your network with IP scanners such as
zenmap or angry ip scanner to find your SmartCam's IP
address.
You can identify the SmartCam by its hostname,
tegra-ubuntu.local.
How do I reset SmartCam? When SmartCam is powered on, press and hold the reset
button for three seconds.
Troubleshooting and FAQs 14

Document control
Document Version Product Version Release Date
1.0 1.0 2022-09-13
1.0 Rev A 1.0 2022-10-10
Document control 15
Table of contents


