SMARTPOINT SPSLEDLTS-30 User manual

For more products please visit www.smartpointco.com
USER MANUAL
USER MANUAL
SmartIndoor
LED String Lights
FCC ID: 2AKBP-MSL8V2

For more products please visit www.smartpointco.com
FCC Statement:
1. This device complies with Part 15 of the FCC Rules. Operation is
subject to the following two conditions: (1) this device may not cause
harmful interference, and (2) this device must accept any
interference received, including interference that may cause
undesired operation.
Caution: The user is cautioned that changes or modifications not
expressly approved by the party responsible for compliance could
void the user's authority to operate the equipment.
Note: This equipment has been tested and found to comply with the
limits for a Class B digital device, pursuant to part 15 of the FCC
Rules. These limits are designed to provide reasonable protection
against harmful interference in a residential installation. This
equipment generates uses and can radiate radio frequency energy
and, if not installed and used in accordance with the instructions,
may cause harmful interference to radio communications. However,
there is no guarantee that interference will not occur in a particular
installation. If this equipment does cause harmful interference to
radio or television reception, which can be determined by turning
the equipment off and on, the user is encouraged to try to correct
the interference by one or more of the following measures:
— Reorient or relocate the receiving antenna.
— Increase the separation between the equipment and receiver.
— Connect the equipment into an outlet on a circuit different from
that to which the receiver is connected.
— Consult the dealer or an experienced radio/TV technician for help.
2. This equipment complies with FCC radiation exposure limits set
forth for an uncontrolled environment. This equipment should be
installed and operated with a minimum distance of 20cm between
the radiator and any part of your body.

For more products please visit www.smartpointco.com
WARRANTY INFORMATION
One Year Limited Warranty.
©Smartpoint LLC,
250 Liberty Street, Suite 1A
Metuchen, NJ 08840
Manufactured, marketed and distributed by Smartpoint LLC, under license.
Amazon, Alexa and all related logos are trademarks of Amazon.com, Inc. or its affiliates.
Google, Android, Google Play and Google Home are trademarks of Google LLC.
App Store
®
is a registered trademark of Apple, Inc.
All trademarks and registered trademarks are property of their respective owners.
Made in China

SPECIFICATIONS
Model: SPSLEDLTS-30
Color: RGBW
Power supply: USB
Input Voltage: 5V 2A
Control method: Remote/Phone App/Control Box
Operating Temperature: -13°F - 140°F
Wireless type: Wi-Fi 2.4GHz
Wireless Standard: IEEE 802.11b/g/n
FEATURES
• Wi-Fi remote controlled
• Changes to 16 million colors or white
• Dimmable & Programmable with Schedule
• App and Voice Control
• Works with Hey Google or Amazon Alexa
• Syncs with music
• Can be controlled with remote control
• Pre-programmed color changing modes
Items included in package:
Smart String Lights, Remote Control, USB Adapter,
User Manual and Adhesive Strip.
Please note that these lights cannot be cut!

DOWNLOAD APP
1. Android™: download “Smartpoint Home” app
on Google Play.
2. iPhone: download “Smartpoint Home” app
from the App Store.
Smartpoint Home
*Screenshots may slightly differ from actual app.

REGISTRATION AND LOGIN
1. Run the “Smartpoint Home” app from your
smart phone.
2. Sign up and login.
*

ADD DEVICE
1. Plug lights into a USB port. Then press
and hold reset button on the cord for 4-6
seconds and let go. The lights will then
begin to blink rapidly.
2. Make sure phone is connected to your Wi-Fi
network and that it is a 2.4GHz network.
3. Press the (+) symbol in the top right corner of
the app and when device window pops up
press “Go to add”.
4. On the next screen press the “+” symbol to
begin adding the String Lights.
5. Make sure phone is connected to the Wi-Fi
network that the device will be connected to.
Enter your password for the Wi-Fi network.

6. Connecting process will begin. Do not unplug
String Lights while connecting. Wait for
connection process to complete.
7. Once device has been successfully added, name
the device what you would like it to be called in
the app. The String Lights are ready for use.
4. On the next screen press the “+” symbol to
begin adding the String Lights.
5. Make sure phone is connected to the Wi-Fi
network that the device will be connected to.
Enter your password for the Wi-Fi network.
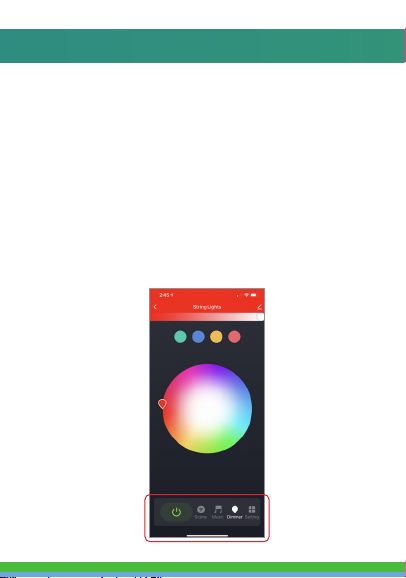
CONTROLLING THE LIGHTS
There are three modes for the String Lights.
Dimmer, Scene and Music modes. All of these modes can
be found at the bottom of the app screen when the lights
are selected.
Dimmer mode lets you pick the brightness and color of the
lights. To make the light white click on the white part of the
color wheel or use the remote control and press “W”
Scene mode has preprogrammed color settings to pick from.
Music mode changes light to the rhythm of music.
The bottom right has an on/off switch for the lights.
You can also set a schedule or timer for your String Lights
at the bottom right of the app screen.

Lights can also be controlled with controller box.
Music Button: Short press to enter music sync mode.
You can cycle between 4 music modes.
Color Button: Short press to switch to 20 different
preprogrammed scene modes.
On/Off: : Short press to turn on/off LED lights.
Long press for 5 seconds to put in network set up
mode.
There is also an included adhesive strip to secure
the controller box to a smooth, flat surface.
Lights can also be controlled with Remote Control.
(remove clear plastic tab to use remote control)
1. Increases LED brightness adjustment
2. Decreases LED brightness adjustment
3. On/Off button
4. LED white button (switch between cold & warm)
5. LED color buttons (red, green and blue)
6. Timing function on/off: 1 hour, 4 hours, 8 hours
7. 3 music modes
8. 5 fixed color rich modes
9. Brightness button: 25%, 50%, 100%
10. Cycles through 20 preprogrammed modes
(Automatically switches every 30 seconds)
11. In static mode these buttons cycle through
different colors. In dynamic mode these buttons
cycle through preprogrammed modes
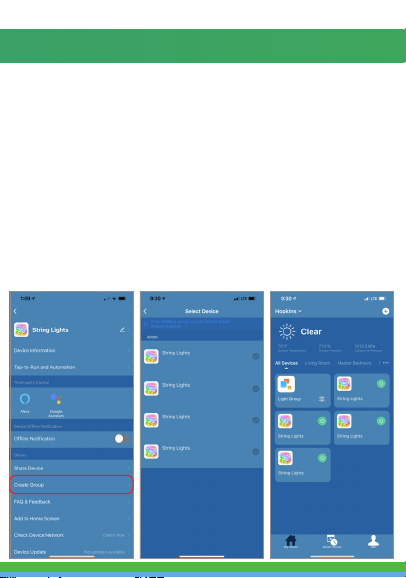
GROUPING MULTIPLE LIGHTS TOGETHER
If you have multiple string lights you can group them into one
group so you can control all of the settings of all the lights at
the same time.
To group multiple lights together be sure to add all of the
lights to your Smartpoint Home App. Then select one of the
lights and press the settings button in the top right hand
corner. Then press “Create Group”. After that, select the lights
you want to add to the group and press “Save”. Next, name
the group and then press save. The group will now show up on
the home screen of your app. When you click on the group,
whatever settings you save in the group applies to all of the
lights in the group.
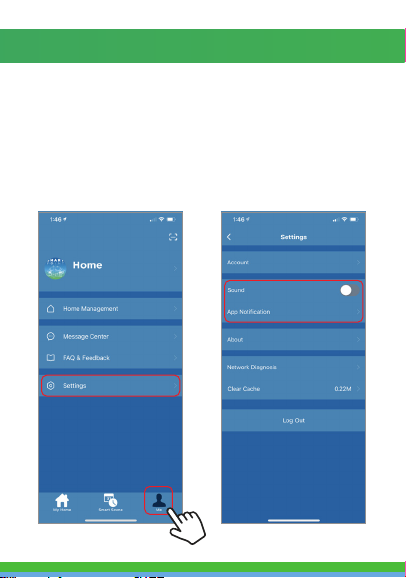
PUSH NOTIFICATIONS
1. You can turn on/off notifications for all devices
connected to app by clicking on the “Me” button at the
bottom right of the screen.
2. Then click on ”Settings” button. From there you can turn
access notification settings.
If you have multiple string lights you can group them into one
group so you can control all of the settings of all the lights at
the same time.
To group multiple lights together be sure to add all of the
lights to your Smartpoint Home App. Then select one of the
lights and press the settings button in the top right hand
corner. Then press “Create Group”. After that, select the lights
you want to add to the group and press “Save”. Next, name
the group and then press save. The group will now show up on
the home screen of your app. When you click on the group,
whatever settings you save in the group applies to all of the
lights in the group.

1. From the home screen, click on the device you would like
to remove.
2. Then click on the edit symbol on the top right of the
screen.
3. From there you would then click the “Remove Device”
button at the bottom of the screen.
REMOVE A DEVICE /
RECONNECTING TO A NEW WIFI NETWORK
If you need to change the WIFI network that your device is
connected to, delete the device from the Brookstone Smart
App and then start the set up process again when you are
connected to the new WIFI Network.

How to control the String Lights with Amazon Alexa
Please make sure that your Alexa app is
connected to your Amazon Echo and both
work together successfully on your Wi-Fi
home network.
Step A. Log into your Alexa app, tap bottom
right corner, and then tap “Skills & Games”.

How to control the String Lights with Amazon Alexa
Step E. Wait a few seconds for Alexa to detect the String Lights
from the Smartpoint Home app and you will find the device
named “String Lights” has been paired to Alexa app from
“Smartpoint Home” app. Follow the on-screen instructions to
further set up the device.
The bulb will be named whatever you named it in the
Smartpoint Home App.
Step B. Type “Smartpoint Home”, find “Smartpoint Home” app
in the search results and tap and then tap “enable to use”.
Step C. Enter your account info for the “Smartpoint
Home” app, tap “Link Now”, then tap “Smartpoint
Home” and tap “Link Now” again. On the next page
press “Authorize” to link Smartpoint Home account to
Alexa.
Step D. Once your Smartpoint Home account is successfully
linked to Alexa, the next page will pop up. Tap ”Close” at the
bottom and then tap “Discover Devices” on the next page at the
bottom right.

Step E. Wait a few seconds for Alexa to detect the String Lights
from the Smartpoint Home app and you will find the device
named “String Lights” has been paired to Alexa app from
“Smartpoint Home” app. Follow the on-screen instructions to
further set up the device.
The bulb will be named whatever you named it in the
Smartpoint Home App.
Step D. Once your Smartpoint Home account is successfully
linked to Alexa, the next page will pop up. Tap ”Close” at the
bottom and then tap “Discover Devices” on the next page at the
bottom right.

After Step E is done, you can now control the String Lights with
Alexa app from the devices page.
Step F. Now you are able to control the String Lights via
Amazon Alexa with your voice.
Try these commands and see what happens by
asking Alexa:
• Alexa, turn on “String Lights”
• Alexa, turn off “String Lights”
Note: The device name is the one you give to the
String Lights on “Smartpoint Home” app. Let’s name it
“Living Room”.
For example, now you can say:
• “Alexa, make the Living Room Blue”,
• “Alexa, make the Living Room Red”, etc.
Any device you connect to the Smartpoint Home App
should automatically be added to Alexa. If it does not
add automatically, ask Alexa to discover devices.
Table of contents
Other SMARTPOINT Lighting Equipment manuals

Popular Lighting Equipment manuals by other brands


Hayward
Hayward ColorLogic WFBCUS1100 owner's manual

Laserworld
Laserworld RS 400 G US manual

Confer Plastics
Confer Plastics ROLLGUARD 7200 ASSEMBLY, INSTALLATION AND USE MANUAL

DTS
DTS XR1200 WASH Fresnel user manual

LEGRAND
LEGRAND BH4NDWE instruction manual

Kichler Lighting
Kichler Lighting 15505CBR quick start guide