SmartPool SolarArc S202 Quick guide

www.smartpool.com
The SMART Way to Heat Your Pool
INSTALLATION AND INSTRUCTION MANUAL
Model S202
Read all instructions BEFORE assembling and using SolarArc2.
RETAIN THIS MANUAL FOR FUTURE USE.
WARNINGS AND SAFETY INSTRUCTIONS
22
Solar•Arc ™
Table of Contents
Safety Information .........................................................................................................................................................................1
Parts List/Reference........................................................................................................................................................................2
How SolarArc2Works .....................................................................................................................................................................2
Installation.....................................................................................................................................................................................3
Connecting Multiple Units .............................................................................................................................................................4
Winterization .................................................................................................................................................................................5
Troubleshooting .............................................................................................................................................................................5
Limited Warranty Statement...........................................................................................................................................................6
!
Carefully read this manual in its entirety. Failure to comply with these instructions can cause injury, death or damage to persons or property.
Ensure all plugs are removed and the filter is turned to the “Filter” position prior to operating the Solar Arc².
Install the Solar Arc²far enough away from the pool to prevent it from being used as a way to gain access to the pool.
Do not install the Solar Arc²in a traffic area as it could become a tripping hazard.
Do NOT allow children to install or operate Solar Arc².
Always turn the filter system off when installing, winterizing or servicing Solar Arc².
When loosening any threaded connections on you filter, pump or pool; be sure that inlets and outlets are blocked to prevent water loss.
WARNING:
!
WARNING:
!
WARNING:
!
CAUTION:
!
CAUTION:
!
IMPORTANT:
!
IMPORTANT:
2(732) 730-9880
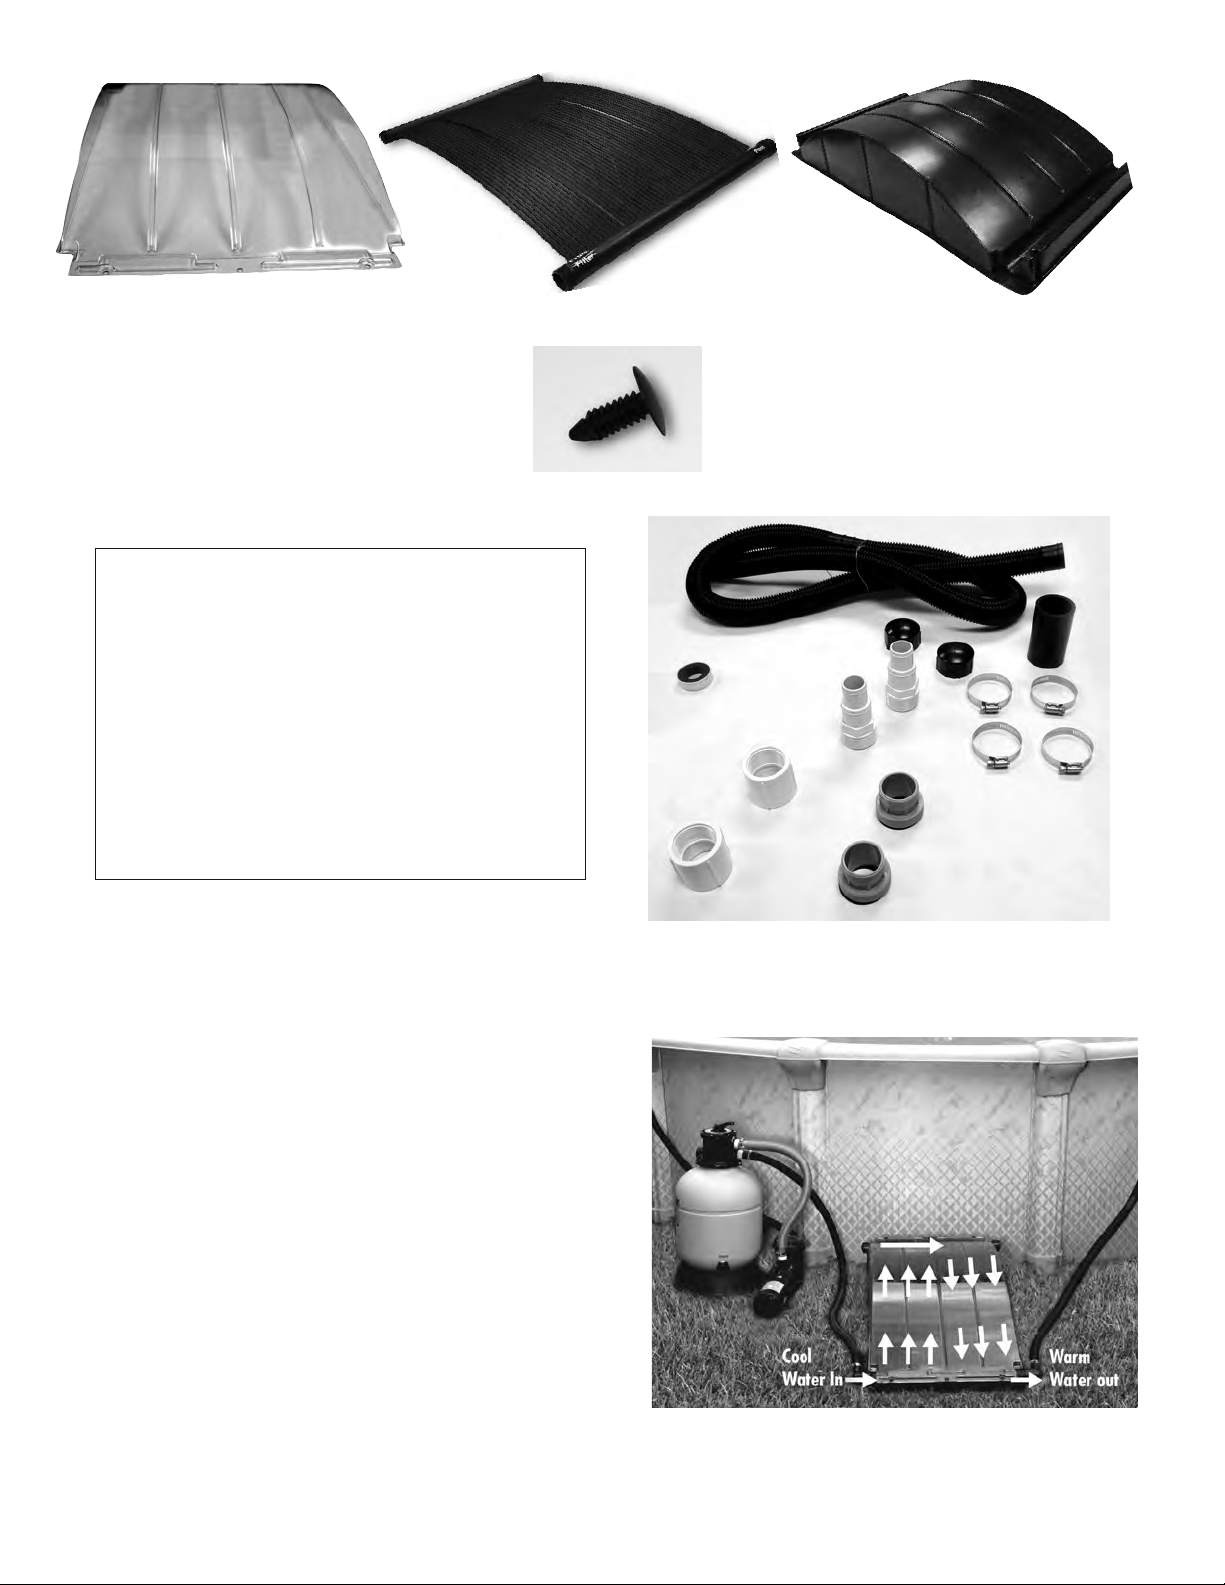
How SolarArc2Works:
Water flows from your pool’s filter into the bottom left corner
(inlet) of the SolarArc2. A baffle built into the lower header pipe
of the SolarArc2forces the water up through the left half of the
unit. When the water reaches the SolarArc2’s upper header pipe, it
flows to the right and back down through the right half of the
SolarArc2. As the water travels through the SolarArc2, it is heated
by the sun. The heated water then flows out of the bottom right
corner (outlet) of the SolarArc2and back to your pool.
SK26 Installation Kit
A 2 11⁄2” - 11⁄4” Pipe Adaptors
B 2 Threaded PVC End Caps
C 4 11⁄2” Stainless Steel Clamps
D 1 33⁄4” Long Rubber Hose
E 1 Teflon Tape 1/2”
F 2 11⁄2” FF PVC Couplings
G 1 6’Flex Hose
H 2 Soft-Sided Pool Adapters
1 Installation Manual w/Warranty Statement
A
B
C
D
E
G
H
F
SOLARARC2COMPONENTS
Base (SC202BASE)
Glazing Cover (SC202COVER) 2' x 2' Solar Collector (SCPNL202)
Plastic push-in rivets
(SC204FASTENER)

www.smartpool.com3
Installation
Tools and Material Required (not included)
• Flat-head Screwdriver and/or 5/16” Nut Driver
• Inlet/Outlet Pool Plugs
• Channel Lock Pliers
• Flex Hose with Threaded Connection (soft-sided pools using 2.25” connectors only)
Positioning the Arc
• In order for the Solar Arc²to function properly, it must be exposed to at least 6 hours of direct sunlight each day.
• Ensure the Arc is on a level surface.
• Do NOT place the Arc in a location that will either provide access to the pool or interfere with the flow of traffic.
• Place the Arc after, NOT before the filter system as doing so could cause debris to clog the heating system.
• Do NOT install the Arc on a roof or standing structure, it should be placed on the ground.
• Solar Arc²can be placed up to 20’ away from the filter system using a 1hp pump (addition plumbing will be required).
Connecting the Panel
1) Remove Solar Arc²and the kit components from the box.
2) Remove the protective film from the clear cover of the unit (Figure 1).
3) Wrap each of the (4) headers and (2) pipe adaptors or (2) threaded adaptors with an adequate amount of Teflon
tape (Figures 2 and 3).
NOTE: The threaded adaptors are used for larger, soft-sided pools with a 2.25” threaded flex hose.
4) Thread the pipe adaptors or threaded adaptors into the 1.5” PVC coupling (Figure 4).
5) Thread the coupling and pipe adaptor onto the ends of the header labeled “FROM FILTER” and “TO POOL”, using
channel locks to ensure a secure fit (Figure 5).
6) Attach (2) end caps to the opposing header (not labeled), using channel locks to ensure a secure fit (Figure 6).
7) Plug the return fitting to the pool to ensure there is no water loss (Figure 7).
8) Turn the filter to the OFF position and turn the valve to the CLOSED position. The skimmer can also be plugged to
ensure water does not drain from the pool when the return hose is disconnected (Figure 8).
9) Disconnect the hose from the return fitting (Figure 9).
10) Connect the hose removed from the return fitting to the pipe adaptor/header labeled “FROM FILTER” and tighten
the hose clamp with a screwdriver (Figure 10).
NOTE: Installation using the 2.25” threaded adaptor will not use the hose clamps.
11) Slide (2) hose clamps onto the provided 6’ hose.
NOTE: For threaded, soft-sided pool hose, an additional hose will be needed. Hose clamps will not be used with this
type of installation.
12) Connect one end of the 6’ hose to the return of the pool and the other to the pipe adaptor/header labeled “TO
POOL”. Secure the hose by positioning and tightening the hose clamps (Figures 11 and 12).
13) Once all connections are made, remove all plugs from the inlet/outlet and turn the filter to the FILTER position.
WARNING: Do NOT operate the filter or Solar Arc²while the filter is in the CLOSED position or there are any plugs in
the inlet or outlet as this can create dangerous levels of pressure. Ensure the entire system is open and the filter is in
the FILTER position prior to running the system.

4(732) 730-9880
Multi-Unit Installation
Multiple Arcs can be connected in series for larger pools or to increase the heat output. The installation for several Arcs
is the same for a single panel with the exception of having to connect the panels together prior to connecting the panels to
the pool.
Two Panel System:
1) Place the rubber hose connector on the header labeled “TO POOL” on the first Arc.
2) Slide (2) hose clamps onto the rubber hose.
3) Place the second Arc next to the first Arc so that the header labeled “FROM POOL”
is next to the rubber hose.
4) Insert the header into the rubber hose and secure the connection with the hose
clamps (Figure 13).
5) Follow instructions 2-13 above to connect the system to the pool.
NOTE: More than 2 systems can be connected, repeat instructions 1-4 in this section
if more panels are being ganged together.
Figure 1
Figure 4
Figure 7
Figure 10 Figure 11 Figure 12
Figure 13
Figure 8 Figure 9
Figure 5 Figure 6
Figure 2 Figure 3

www.smartpool.com5
Operation
WARNING: Do NOT operate the filter or Solar Arc²while the filter is in the CLOSED position or there are any plugs in
the inlet or outlet as this can create dangerous levels of pressure. Ensure the entire system is open and the filter is in
the FILTER position prior to running the system.
To run the solar heater, simply ensure the filter is in the FILTER position and turn it to the ON position. Run the system
during hours of peak sunlight to maximize heating potential. The use of a solar blanket at night will assist in retaining
the heat generated by the Arc.
* NOTE: Bubbles are normal, as air in the system will need to be expelled during initial startup.
Winterization
This section does NOT cover the winterization of your pool or filter system. Reference your pool and filter manuals or
contact your pool professional for information on how to winterize your pool and filter system.
1) Plug the return fitting to the pool to ensure there is no water loss (Figure 7).
2) Turn the filter to the OFF position and turn the valve to the CLOSED position. The skimmer can also be plugged to
ensure water does not drain from the pool when the return hose is disconnected (Figure 8).
3) Loosen the hose clamps (or threaded coupling for some soft-sided hoses) that connect the pool hoses to the pipe
adapters of the collector.
4) Loosen the end caps to allow the water to drain out of the headers.
5) Turn the unit on its side to ensure all the water is removed from the collector.
6) Once all the water has be evacuated, store the Arc in a dry area that remains above freezing temperatures.
Problems Possibilities/Solutions
SolarArc2does not appear to be heating the pool. • Make sure that water is flowing through SolarArc2by checking the flow
at the pool return.
• Note the weather - has it been cloudy or raining?
• Use your pool cover at night to reduce heat loss.
• Refer to our order guide - pool size may require additional SolarArcs
Bubbles continue to appear from the pool water inlet during
operation.*
• Check the connections for leaks.
• Check the flow rate.
• Check the tubing for leaks or clogging.
SolarArc2leaks • Make sure connectors and hose clamps are tight and not defective.
• Additional Teflon tape on headers and fittings may be required.
Troubleshooting

6(732) 730-9880
SmartPool LLC warrants to the original purchaser of the SolarArc2that the company will, at its option, repair or replace any SolarArc2that proves to be defective in either workmanship or material
upon prepaid return of the SolarArc2by the owner, along with the original purchase receipt, to SmartPool, Inc., subject to the provisions of the limited warranty stated above, and the exclusions and
limitations set forth below. SmartPool LLC will, pursuant to the terms of this warranty, at its sole option. either repair the SolarArc2at a nominal charge to the owner, or replace the SolarArc2per the
provisions stated herein. All repaired or replaced SolarArc2s will be returned at the homeowner’s expense.
This warranty applies only while using this product in the United States and Canada. Customers outside the continental United States will be responsible for inbound and outbound freight on all
claims. Those within the continental US will be responsible for shipping charges to a repair center, if there is not one within driving distance. SmartPool will cover freight back to the customers within
the continental US for approved warranty claims.
What is covered: The SolarArc2is warranted to be free of defects in material and workmanship when leaving the factory. First year coverage includes the clear cover, base and collector. After the first year only
the collector will be covered under the warranty, as described above.
What is not covered: Hardware; including hoses, clamps and plastic fittings; Any damage due to freezing caused by or related to improper drainage, winterization, or storage; Damage, defects, malfunctions, or
other failures arising from use of the product which does not comply with the instructions provided by the manufacturer; Damage, defects, malfunctions, or other failure caused by or related to repairs performed
by any servicer other than an authorized service representative of SmartPool LLC Claims will not be accepted for a SolarArc2’s damage in transit unless damage to shipping container is noted at time of delivery on
the transport company’s delivery bill.
SMARTPOOL, LLC SHALL IN NO WAY BE LIABLE OR RESPONSIBLE UNDER ANY CIRCUMSTANCES OR IN ANY AMOUNT FOR ANY CONSEQUENTIAL OR INCIDENTAL DAMAGES OR FOR ANY
INJURY OR DAMAGES TO PERSON OR PROPERTY USING OR USED IN CONNECTION WITH THIS PRODUCT, OR FOR LOSS OF PROFITS OR OTHER COSTS OR EXPENSES OF ANY KIND OR
CHARACTER. THERE ARE NO OTHER WARRANTIES OR REPRESENTATIONS, EITHER EXPRESS OR IMPLIED, WHETHER OF MERCHANTABILITY, FITNESS FOR A PARTICULAR PURPOSE, OR
OTHER, MADE BY SMARTPOOL, INC., OTHER THAN THOSE SPECIFICALLY SET FORTH IN THIS WARRANTY. NO PERSON, FIRM, OR CORPORATION IS AUTHORIZED TO MAKE ANY
REPRESENTATIONS, OR INCUR ANY OBLIGATIONS IN THE NAME OF OR ON BEHALF OF SMARTPOOL, INC., EXCEPT AS STATED HEREIN. THIS WARRANTY IS EXPRESSLY UNDERSTOOD TO
BE THE EXCLUSIVE REMEDY AVAILABLE TO THE PURCHASER, AND THIS WARRANTY CONTAINS THE FULL AND COMPLETE AGREEMENT BETWEEN SMARTPOOL AND THE PURCHASER.
THIS WARRANTY SETS FORTH THE ONLY OBLIGATIONS OF SMARTPOOL WITH REGARD TO THIS PRODUCT, AND THERE ARE NO WARRANTIES WHICH EXTEND BEYOND THE DESCRIPTION
ON THE FACE HEREOF.
ALL WARRANTY CLAIMS MUST BE HANDLED DIRECTLY
WITH SMARTPOOL. DO NOT RETURN TO YOUR DEALER. SMARTPOOL
ACCEPTS CLAIMS FROM POOL OWNERS ONLY.
Call 1-732-730-9880 to initiate a claim.
SOLARARC2
Five Year Limited Warranty
(Valid for North America Only)
FIVE YEAR WARRANTY
Five year limited warranty from date of purchase.
After the first year, the claimant shall pay the list price at the date of the claim less one-sixtieth (1/60) of that
price for each full month remaining in the warranty period. This applies to the collector only.
The representations set forth herein are the only representations made by SmartPool LLC with respect to the product, and this warranty does not constitute either a performance or
satisfaction guarantee. It is the responsibility of the product owner to regularly test and check the product for proper function and safety.
This warranty gives the original purchaser specific legal rights. You may have other rights depending on where you live.
Table of contents
Other SmartPool Swimming Pool manuals


