SmartPro Finder I Owner's manual

25
4
6
8
I. Disclaimers, Exclusions and Limitations of Liability
PLEASE READ AND NOTE SMARTPRO WARRANTY TERMS AND CONDITIONS as stated in
the warranty card. SmartPro warranty for its testers are subject to proper use by its user in accordance
with all the terms and conditions as started in the relevant user manual book and shall cover only
manufacturing defects.
Due to continuous product improvement, SmartPro reserves the right to revise all documents
including the right to make changes to the user manual without notice and without obligation
to notify any person of such revisions or changes. User s are advised to check SmartPro’s
website http://www.smartproinstrument .com from time to time.
SmartPro shall not be responsible for any damage or loss resulting from the use of this tester or
user manual, and under no circumstances shall SmartPro, its manufacturer or any of its subsidiaries,
licensors, distributors, resellers, servants and/or agents be liable for any direct or indirect damages,
resulting from the use of this tester.
II. About the SmartPro Finder I
The SmartPro Finder I is a pocket sized instrument that instantly verifies the authenticity of
diamonds based on their thermal properties. Diamonds, with their exceptional heat conductivity
properties, are unlike any other simulants, natural or synthetic, and are therefore not easily replicable.
The SmartPro Finder I has been subjected to thorough and extensive laboratory tests, and will
generally give a clear and reliable reading of the gemstone being tested under proper use. However,
you are advised to conduct further supporting tests.
As with all thermal testers in the market, the SmartPro Finder I is not able to differentiate between
natural diamonds and moissanite.
Include in your package:
a. SmartPro Finder I
b. User manual book
c. Warranty card
d. Protective carry case
e. Probe tip oxidation sheet
f. Neck strap
g. Metal stone tray
Fig. 2.1
23
All testers have been calibrated during the manufacturing process and no further adjustment or
user intervention to the tester is required.
Self-calibration should not be attempted. To minimize any risk associated, user should contact
event that users require the manufacturer to re-calibrate the unit, the users will bear the associated
to/from freight cost for the shipping of unit to the service center.
Calibration
21
Gently rub the table of gemstone against the tissue/jewelry cloth and place the gemstone on the
center of the test pad (Fig.1.8).
Fig. 1.8
20
Fig. 1.2
9
11
13
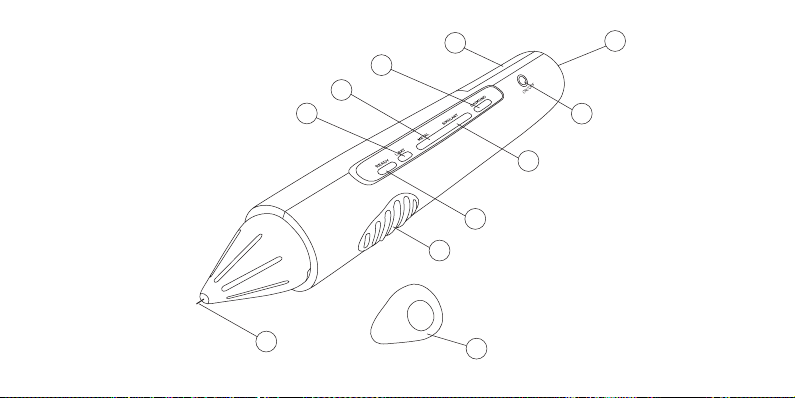
Composition
1. Retractable probe tip
2. Serrated Metal Part
3 “Ready” Indicator LED
4. “Low Battery” Indicator LED
5. “Metal” Indicator LED
6. “Simulant” Indicator LEDs
7. “Diamond” Indicator LED
8. ON/OFF Button Switch
9. Battery compartment
10. Neck Strap Attachment
11. Probe Protective Cap
f. Do not drop, knock, or shake the tester. Rough handling can break internal circuit boards and
fine mechanics.
g. Do not use harsh chemicals, cleaning solvents, or strong detergents to clean the tester.
h. Do not paint the tester. Paint can clog the moving parts and prevent proper operation.
If the tester is not working properly, kindly contact our customer service at
SmartPro Instrument co.,ltd
249/40, Moo 9, J.S.P. Building
Bangbon 1 Rd., Bangbon
Bangkok 10150 Thailand
+66 (0) 2 899 2956-7
Attn: Customer Service Executive
Turning on
Remove the protective cover from the probe tip (Fig. 1.2).
Prepare clean tissue / jewelry cloth. Carefully retrieve the gemstone with tweezers and place the
gemstone face down the table (Fig.1.7).
Cleaning your gemstone prior to testing
Fig. 1.7
The gemstone should be clean and dry before testing. However, elaborate cleaning procedures
are not normally necessary (Fig.1.6).
18
Recommended testing conditions
Fig. 1.6
Cleaning the probe tip
Please note that if the tester is being used for the first time, or if the tester has not been used for
a week, it is advisable to clean the probe tip using an oxidation removal sheet to attain consistent
and accurate reading.
b. Hold the probe pen with pen tip forming the right angle (90 degree) with an oxidation removal.
Gently move in a circular motion without retracting the tip (Fig. 1.5).
16
a. Ensure the unit is switched off.
c. Repeat the same motion several times. The cleaning process is completed and tester is now
ready for use.
11
1
2
3
6
8
10
4
7
9
5
GENERATION AHEAD TECHNOLOGY
Thank you for choosing our SmartPro Finder I and taking time for the user manual book which will
enable you to understand your recent purchase better.
SmartPro Instrument also recommends that you register your warranty by sending the warranty
registration card to us or registering online at http://www.smartproinstrument.com
a. The probe and wire tip is extremely sensitive and should be handled with care. Please always
replace the protective cap. Caution should be taken so as not to damage the probe and wire tip.
b. Do not leave worn out batteries in the battery compartment as the batteries may corrode, leak
or damage the tester. Batteries should be removed when the tester is expected to be stored for
an extended period of time.
28
4. TAKING CARE of your SmartPro Finder I
20
Fig. 1.2
9
11
13
Composition
1. Retractable probe tip
2. Serrated Metal Part
3 “Ready” Indicator LED
4. “Low Battery” Indicator LED
5. “Metal” Indicator LED
6. “Simulant” Indicator LEDs
7. “Diamond” Indicator LED
8. ON/OFF Button Switch
9. Battery compartment
10. Neck Strap Attachment
11. Probe Protective Cap
f. Do not drop, knock, or shake the tester. Rough handling can break internal circuit boards and
fine mechanics.
g. Do not use harsh chemicals, cleaning solvents, or strong detergents to clean the tester.
h. Do not paint the tester. Paint can clog the moving parts and prevent proper operation.
If the tester is not working properly, kindly contact our customer service at
SmartPro Instrument co.,ltd
249/40, Moo 9, J.S.P. Building
Bangbon 1 Rd., Bangbon
Bangkok 10150 Thailand
+66 (0) 2 899 2956-7
Attn: Customer Service Executive
Turning on
Remove the protective cover from the probe tip (Fig. 1.2).
Prepare clean tissue / jewelry cloth. Carefully retrieve the gemstone with tweezers and place the
gemstone face down the table (Fig.1.7).
Cleaning your gemstone prior to testing
Fig. 1.7
The gemstone should be clean and dry before testing. However, elaborate cleaning procedures
are not normally necessary (Fig.1.6).
18
Recommended testing conditions
Fig. 1.6
Cleaning the probe tip
Please note that if the tester is being used for the first time, or if the tester has not been used for
a week, it is advisable to clean the probe tip using an oxidation removal sheet to attain consistent
and accurate reading.
b. Hold the probe pen with pen tip forming the right angle (90 degree) with an oxidation removal.
Gently move in a circular motion without retracting the tip (Fig. 1.5).
16
a. Ensure the unit is switched off.
c. Repeat the same motion several times. The cleaning process is completed and tester is now
ready for use.
11
1
2
3
6
8
10
4
7
9
5

25
4
6
8
I. Disclaimers, Exclusions and Limitations of Liability
PLEASE READ AND NOTE SMARTPRO WARRANTY TERMS AND CONDITIONS as stated in
the warranty card. SmartPro warranty for its testers are subject to proper use by its user in accordance
with all the terms and conditions as started in the relevant user manual book and shall cover only
manufacturing defects.
Due to continuous product improvement, SmartPro reserves the right to revise all documents
including the right to make changes to the user manual without notice and without obligation
to notify any person of such revisions or changes. User s are advised to check SmartPro’s
website http://www.smartproinstrument .com from time to time.
SmartPro shall not be responsible for any damage or loss resulting from the use of this tester or
user manual, and under no circumstances shall SmartPro, its manufacturer or any of its subsidiaries,
licensors, distributors, resellers, servants and/or agents be liable for any direct or indirect damages,
resulting from the use of this tester.
II. About the SmartPro Finder I
The SmartPro Finder I is a pocket sized instrument that instantly verifies the authenticity of
diamonds based on their thermal properties. Diamonds, with their exceptional heat conductivity
properties, are unlike any other simulants, natural or synthetic, and are therefore not easily replicable.
The SmartPro Finder I has been subjected to thorough and extensive laboratory tests, and will
generally give a clear and reliable reading of the gemstone being tested under proper use. However,
you are advised to conduct further supporting tests.
As with all thermal testers in the market, the SmartPro Finder I is not able to differentiate between
natural diamonds and moissanite.
Include in your package:
a. SmartPro Finder I
b. User manual book
c. Warranty card
d. Protective carry case
e. Probe tip oxidation sheet
f. Neck strap
g. Metal stone tray
Fig. 2.1
23
All testers have been calibrated during the manufacturing process and no further adjustment or
user intervention to the tester is required.
Self-calibration should not be attempted. To minimize any risk associated, user should contact
event that users require the manufacturer to re-calibrate the unit, the users will bear the associated
to/from freight cost for the shipping of unit to the service center.
Calibration
21
Gently rub the table of gemstone against the tissue/jewelry cloth and place the gemstone on the
center of the test pad (Fig.1.8).
Fig. 1.8
1. GETTING STARTED with SmartPro Finder I
Powering up
19
This tester can be powered by the use of batteries. Required AAA Batteries (x2), take note of
the positive (+) and negative (-) directions of batteries (Fig 1.1). The use of Alkaline batteries is
preferred, as it should generally give approximately 2.5 hours continuous operation, While the
use of ordinary batteries will give a shorter working life.
Press the [ON/OFF] button (Fig. 1.3) and wait for warm up the tester about 20 seconds.
10
12
14
The recommended testing temperature is 18oC - 27oC or 65oF - 80oF Please allow the gemstone or
jewelry piece to adjust to room temperature prior to testing. Exposure and/or operation of the tester
outside the room temperature would affect the result and performance of tester.
The probe tip must be placed at the right angle or perpendicular to the facet of gemstone for an
accurate reading.
Tests should be conducted on the table of the gemstone. In the event of any doubt, kindly test on
the girdle of the gemstones instead.
To achieve optimum accuracy for tests involving very small, it is important to allow the gemstone
to cool down before subsequent tests.
a. Keep the tester dry. Precipitation and all types of liquids or moisture can contain minerals that
will corrode electronic circuits. If your tester does get wet, remove the battery, and allow the
tester to dry completely before replacing it.
b. Do not use, store or expose the tester industry and dirty areas. It’s moving part and electronic
components can be damage.
c. Do not use, store or expose the tester in hot areas. High temperatures can damage or shorten
the life of the tester, damage batteries, and warp or melt certain plastics.
d. Do not use, store or expose the tester in cold areas. When the tester returns to its normal tem-
perature, moisture can form inside the device and damage electronic circuit boards.
e. Do not attempt to open the tester other than as instructed in user manual book.
III. IMPORTANT NOTICE
Fig. 1.1
Fig. 1.3
17
Fig. 1.5
While in this preparation mode, you can check status through the ORANGE “Ready” LED will blink
continuously until has the steady lighting with beep sound It’s means your tester is ready now for
use (Fig.1.4).
15
Fig. 1.4
GENERATION AHEAD TECHNOLOGY
Thank you for choosing our SmartPro Finder I and taking time for the user manual book which will
enable you to understand your recent purchase better.
SmartPro Instrument also recommends that you register your warranty by sending the warranty
registration card to us or registering online at http://www.smartproinstrument.com
a. The probe and wire tip is extremely sensitive and should be handled with care. Please always
replace the protective cap. Caution should be taken so as not to damage the probe and wire tip.
b. Do not leave worn out batteries in the battery compartment as the batteries may corrode, leak
or damage the tester. Batteries should be removed when the tester is expected to be stored for
an extended period of time.
28
4. TAKING CARE of your SmartPro Finder I
20
Fig. 1.2
9
11
13
Composition
1. Retractable probe tip
2. Serrated Metal Part
3 “Ready” Indicator LED
4. “Low Battery” Indicator LED
5. “Metal” Indicator LED
6. “Simulant” Indicator LEDs
7. “Diamond” Indicator LED
8. ON/OFF Button Switch
9. Battery compartment
10. Neck Strap Attachment
11. Probe Protective Cap
f. Do not drop, knock, or shake the tester. Rough handling can break internal circuit boards and
fine mechanics.
g. Do not use harsh chemicals, cleaning solvents, or strong detergents to clean the tester.
h. Do not paint the tester. Paint can clog the moving parts and prevent proper operation.
If the tester is not working properly, kindly contact our customer service at
SmartPro Instrument co.,ltd
249/40, Moo 9, J.S.P. Building
Bangbon 1 Rd., Bangbon
Bangkok 10150 Thailand
+66 (0) 2 899 2956-7
Attn: Customer Service Executive
Turning on
Remove the protective cover from the probe tip (Fig. 1.2).
Prepare clean tissue / jewelry cloth. Carefully retrieve the gemstone with tweezers and place the
gemstone face down the table (Fig.1.7).
Cleaning your gemstone prior to testing
Fig. 1.7
The gemstone should be clean and dry before testing. However, elaborate cleaning procedures
are not normally necessary (Fig.1.6).
18
Recommended testing conditions
Fig. 1.6
Cleaning the probe tip
Please note that if the tester is being used for the first time, or if the tester has not been used for
a week, it is advisable to clean the probe tip using an oxidation removal sheet to attain consistent
and accurate reading.
b. Hold the probe pen with pen tip forming the right angle (90 degree) with an oxidation removal.
Gently move in a circular motion without retracting the tip (Fig. 1.5).
16
a. Ensure the unit is switched off.
c. Repeat the same motion several times. The cleaning process is completed and tester is now
ready for use.
11
1
2
3
6
8
10
4
7
9
5
1. GETTING STARTED with SmartPro Finder I
Powering up
19
This tester can be powered by the use of batteries. Required AAA Batteries (x2), take note of
the positive (+) and negative (-) directions of batteries (Fig 1.1). The use of Alkaline batteries is
preferred, as it should generally give approximately 2.5 hours continuous operation, While the
use of ordinary batteries will give a shorter working life.
Press the [ON/OFF] button (Fig. 1.3) and wait for warm up the tester about 20 seconds.
10
12
14
The recommended testing temperature is 18oC - 27oC or 65oF - 80oF Please allow the gemstone or
jewelry piece to adjust to room temperature prior to testing. Exposure and/or operation of the tester
outside the room temperature would affect the result and performance of tester.
The probe tip must be placed at the right angle or perpendicular to the facet of gemstone for an
accurate reading.
Tests should be conducted on the table of the gemstone. In the event of any doubt, kindly test on
the girdle of the gemstones instead.
To achieve optimum accuracy for tests involving very small, it is important to allow the gemstone
to cool down before subsequent tests.
a. Keep the tester dry. Precipitation and all types of liquids or moisture can contain minerals that
will corrode electronic circuits. If your tester does get wet, remove the battery, and allow the
tester to dry completely before replacing it.
b. Do not use, store or expose the tester industry and dirty areas. It’s moving part and electronic
components can be damage.
c. Do not use, store or expose the tester in hot areas. High temperatures can damage or shorten
the life of the tester, damage batteries, and warp or melt certain plastics.
d. Do not use, store or expose the tester in cold areas. When the tester returns to its normal tem-
perature, moisture can form inside the device and damage electronic circuit boards.
e. Do not attempt to open the tester other than as instructed in user manual book.
III. IMPORTANT NOTICE
Fig. 1.1
Fig. 1.3
17
Fig. 1.5
While in this preparation mode, you can check status through the ORANGE “Ready” LED will blink
continuously until has the steady lighting with beep sound It’s means your tester is ready now for
use (Fig.1.4).
15
Fig. 1.4
20
Fig. 1.2
9
11
13
Composition
1. Retractable probe tip
2. Serrated Metal Part
3 “Ready” Indicator LED
4. “Low Battery” Indicator LED
5. “Metal” Indicator LED
6. “Simulant” Indicator LEDs
7. “Diamond” Indicator LED
8. ON/OFF Button Switch
9. Battery compartment
10. Neck Strap Attachment
11. Probe Protective Cap
f. Do not drop, knock, or shake the tester. Rough handling can break internal circuit boards and
fine mechanics.
g. Do not use harsh chemicals, cleaning solvents, or strong detergents to clean the tester.
h. Do not paint the tester. Paint can clog the moving parts and prevent proper operation.
If the tester is not working properly, kindly contact our customer service at
SmartPro Instrument co.,ltd
249/40, Moo 9, J.S.P. Building
Bangbon 1 Rd., Bangbon
Bangkok 10150 Thailand
+66 (0) 2 899 2956-7
Attn: Customer Service Executive
Turning on
Remove the protective cover from the probe tip (Fig. 1.2).
Prepare clean tissue / jewelry cloth. Carefully retrieve the gemstone with tweezers and place the
gemstone face down the table (Fig.1.7).
Cleaning your gemstone prior to testing
Fig. 1.7
The gemstone should be clean and dry before testing. However, elaborate cleaning procedures
are not normally necessary (Fig.1.6).
18
Recommended testing conditions
Fig. 1.6
Cleaning the probe tip
Please note that if the tester is being used for the first time, or if the tester has not been used for
a week, it is advisable to clean the probe tip using an oxidation removal sheet to attain consistent
and accurate reading.
b. Hold the probe pen with pen tip forming the right angle (90 degree) with an oxidation removal.
Gently move in a circular motion without retracting the tip (Fig. 1.5).
16
a. Ensure the unit is switched off.
c. Repeat the same motion several times. The cleaning process is completed and tester is now
ready for use.
11
1
2
3
6
8
10
4
7
9
5
l. INTRODUCTION 04
ll. ABOUT THE SMARTPRO FINDER I 05
lll. IMPORTANT NOTICE 10
1. GETTING STARTED 12
2. PERFORMING A TEST 24
3. READING TEST RESULTS 27
4. TAKING CARE 28
CONTENTS
1. GETTING STARTED with SmartPro Finder I
Powering up
19
This tester can be powered by the use of batteries. Required AAA Batteries (x2), take note of
the positive (+) and negative (-) directions of batteries (Fig 1.1). The use of Alkaline batteries is
preferred, as it should generally give approximately 2.5 hours continuous operation, While the
use of ordinary batteries will give a shorter working life.
Press the [ON/OFF] button (Fig. 1.3) and wait for warm up the tester about 20 seconds.
10
12
14
The recommended testing temperature is 18oC - 27oC or 65oF - 80oF Please allow the gemstone or
jewelry piece to adjust to room temperature prior to testing. Exposure and/or operation of the tester
outside the room temperature would affect the result and performance of tester.
The probe tip must be placed at the right angle or perpendicular to the facet of gemstone for an
accurate reading.
Tests should be conducted on the table of the gemstone. In the event of any doubt, kindly test on
the girdle of the gemstones instead.
To achieve optimum accuracy for tests involving very small, it is important to allow the gemstone
to cool down before subsequent tests.
a. Keep the tester dry. Precipitation and all types of liquids or moisture can contain minerals that
will corrode electronic circuits. If your tester does get wet, remove the battery, and allow the
tester to dry completely before replacing it.
b. Do not use, store or expose the tester industry and dirty areas. It’s moving part and electronic
components can be damage.
c. Do not use, store or expose the tester in hot areas. High temperatures can damage or shorten
the life of the tester, damage batteries, and warp or melt certain plastics.
d. Do not use, store or expose the tester in cold areas. When the tester returns to its normal tem-
perature, moisture can form inside the device and damage electronic circuit boards.
e. Do not attempt to open the tester other than as instructed in user manual book.
III. IMPORTANT NOTICE
Fig. 1.1
Fig. 1.3
17
Fig. 1.5
While in this preparation mode, you can check status through the ORANGE “Ready” LED will blink
continuously until has the steady lighting with beep sound It’s means your tester is ready now for
use (Fig.1.4).
15
Fig. 1.4

20
Fig. 1.2
9
11
13
Composition
1. Retractable probe tip
2. Serrated Metal Part
3 “Ready” Indicator LED
4. “Low Battery” Indicator LED
5. “Metal” Indicator LED
6. “Simulant” Indicator LEDs
7. “Diamond” Indicator LED
8. ON/OFF Button Switch
9. Battery compartment
10. Neck Strap Attachment
11. Probe Protective Cap
f. Do not drop, knock, or shake the tester. Rough handling can break internal circuit boards and
fine mechanics.
g. Do not use harsh chemicals, cleaning solvents, or strong detergents to clean the tester.
h. Do not paint the tester. Paint can clog the moving parts and prevent proper operation.
If the tester is not working properly, kindly contact our customer service at
SmartPro Instrument co.,ltd
249/40, Moo 9, J.S.P. Building
Bangbon 1 Rd., Bangbon
Bangkok 10150 Thailand
+66 (0) 2 899 2956-7
Attn: Customer Service Executive
Turning on
Remove the protective cover from the probe tip (Fig. 1.2).
Prepare clean tissue / jewelry cloth. Carefully retrieve the gemstone with tweezers and place the
gemstone face down the table (Fig.1.7).
Cleaning your gemstone prior to testing
Fig. 1.7
The gemstone should be clean and dry before testing. However, elaborate cleaning procedures
are not normally necessary (Fig.1.6).
18
Recommended testing conditions
Fig. 1.6
Cleaning the probe tip
Please note that if the tester is being used for the first time, or if the tester has not been used for
a week, it is advisable to clean the probe tip using an oxidation removal sheet to attain consistent
and accurate reading.
b. Hold the probe pen with pen tip forming the right angle (90 degree) with an oxidation removal.
Gently move in a circular motion without retracting the tip (Fig. 1.5).
16
a. Ensure the unit is switched off.
c. Repeat the same motion several times. The cleaning process is completed and tester is now
ready for use.
11
1
2
3
6
8
10
4
7
9
5
l. Introduction
Congratulations on your new SmartPro Finder I a synchronized and highly effective Diamond Tester
that helps you verifies the authenticity of diamonds based on thermal conductivity.
In creating SmartPro Finder I,professional engineers selected every material and element to have
this fine-looking and and effective tester that helps in the identification of the diamond and simulants.
This device provides fairly consistent and reliable test results.
4

25
4
6
8
I. Disclaimers, Exclusions and Limitations of Liability
PLEASE READ AND NOTE SMARTPRO WARRANTY TERMS AND CONDITIONS as stated in
the warranty card. SmartPro warranty for its testers are subject to proper use by its user in accordance
with all the terms and conditions as started in the relevant user manual book and shall cover only
manufacturing defects.
Due to continuous product improvement, SmartPro reserves the right to revise all documents
including the right to make changes to the user manual without notice and without obligation
to notify any person of such revisions or changes. User s are advised to check SmartPro’s
website http://www.smartproinstrument .com from time to time.
SmartPro shall not be responsible for any damage or loss resulting from the use of this tester or
user manual, and under no circumstances shall SmartPro, its manufacturer or any of its subsidiaries,
licensors, distributors, resellers, servants and/or agents be liable for any direct or indirect damages,
resulting from the use of this tester.
II. About the SmartPro Finder I
The SmartPro Finder I is a pocket sized instrument that instantly verifies the authenticity of
diamonds based on their thermal properties. Diamonds, with their exceptional heat conductivity
properties, are unlike any other simulants, natural or synthetic, and are therefore not easily replicable.
The SmartPro Finder I has been subjected to thorough and extensive laboratory tests, and will
generally give a clear and reliable reading of the gemstone being tested under proper use. However,
you are advised to conduct further supporting tests.
As with all thermal testers in the market, the SmartPro Finder I is not able to differentiate between
natural diamonds and moissanite.
Include in your package:
a. SmartPro Finder I
b. User manual book
c. Warranty card
d. Protective carry case
e. Probe tip oxidation sheet
f. Neck strap
g. Metal stone tray
Fig. 2.1
23
All testers have been calibrated during the manufacturing process and no further adjustment or
user intervention to the tester is required.
Self-calibration should not be attempted. To minimize any risk associated, user should contact
event that users require the manufacturer to re-calibrate the unit, the users will bear the associated
to/from freight cost for the shipping of unit to the service center.
Calibration
21
Gently rub the table of gemstone against the tissue/jewelry cloth and place the gemstone on the
center of the test pad (Fig.1.8).
Fig. 1.8
20
Fig. 1.2
9
11
13
Composition
1. Retractable probe tip
2. Serrated Metal Part
3 “Ready” Indicator LED
4. “Low Battery” Indicator LED
5. “Metal” Indicator LED
6. “Simulant” Indicator LEDs
7. “Diamond” Indicator LED
8. ON/OFF Button Switch
9. Battery compartment
10. Neck Strap Attachment
11. Probe Protective Cap
f. Do not drop, knock, or shake the tester. Rough handling can break internal circuit boards and
fine mechanics.
g. Do not use harsh chemicals, cleaning solvents, or strong detergents to clean the tester.
h. Do not paint the tester. Paint can clog the moving parts and prevent proper operation.
If the tester is not working properly, kindly contact our customer service at
SmartPro Instrument co.,ltd
249/40, Moo 9, J.S.P. Building
Bangbon 1 Rd., Bangbon
Bangkok 10150 Thailand
+66 (0) 2 899 2956-7
Attn: Customer Service Executive
Turning on
Remove the protective cover from the probe tip (Fig. 1.2).
Prepare clean tissue / jewelry cloth. Carefully retrieve the gemstone with tweezers and place the
gemstone face down the table (Fig.1.7).
Cleaning your gemstone prior to testing
Fig. 1.7
The gemstone should be clean and dry before testing. However, elaborate cleaning procedures
are not normally necessary (Fig.1.6).
18
Recommended testing conditions
Fig. 1.6
Cleaning the probe tip
Please note that if the tester is being used for the first time, or if the tester has not been used for
a week, it is advisable to clean the probe tip using an oxidation removal sheet to attain consistent
and accurate reading.
b. Hold the probe pen with pen tip forming the right angle (90 degree) with an oxidation removal.
Gently move in a circular motion without retracting the tip (Fig. 1.5).
16
a. Ensure the unit is switched off.
c. Repeat the same motion several times. The cleaning process is completed and tester is now
ready for use.
11
1
2
3
6
8
10
4
7
9
5
5
TO THE MAXIMUM EXTENT PERMITTED BY APPLICABLE LAW, under no circumstances shall
SmartPro, its manufacturer or any of its subsidiaries, licensors, distributors, resellers, servants
and/or agents be responsible for any special, incidental, consequential or indirect damages
howsoever caused.
The tester or SmartPro Finder I (SPF I) referred to in this user manual is provided and/or sold on
an “as is” basis. Except as required by applicable law, no warranties of any kind, either expressed
or implied, including, but not limited to, the implied warranties of merchantability and fitness for a
particular purpose.
Place the gemstone on the metal stone tray and it with one hand while holding the tester with the
other hand (Fig.2.2).
26
5
7
CONTENTS
I. Disclaimers, Exclusions and Limitations of Liability
II. About the SmartPro Finder I
III. IMPORTANT NOTICE
1. GETTING STARTED with SmartPro Finder I
2. PERFORMING TEST with SmartPro Finder I
3. READING TEST RESULT on SmartPro Finder I
4. TAKING CARE of your SmartPro Finder I
04
06
10
12
24
27
28
a. High efficiency diamond tester
b. Retractable thermoelectric probe tip that ensures constant pressure between probe tip and
gemstone
c. Industry’s thinnest probe tip (0.48mm) for testing diamonds as small as 0.01ct
d. Diamond indicator LED blinking with sound
e. Metal detection indicator LED alarm with ringing sound.
f. Simulant indicator LED
g. Low battery indicator LED
h. No waiting time between tests
i. Super Clear & Bright LED display
j. Automatically power-off within 2 minutes (Sleep mode)
k. Powered by AAA batteries (x2)
The SmartPro Finder I features the following:
For testing loose gemstones
METAL
SIMULANT
DAIMOND
Fig. 2.2
24
For mounted jewelry or gemstones
2. PERFORMING A TEST with SmartPro Finder I
Hold the jewelry or gemstone with one hand and the tester with other hand (Fig.2.1). For proper
operation of the tester, the thumb and index finger must always be placed on the metal-plated
serrated part located on both sides of the tester at all times. Care should be taken when testing
mounted jewelry. User must ensure that the stones are securely mounted before conducting a test
as gap between stone an setting might lead to inaccurate reading.
Place the tip of the probe pen against the gemstone. Apply minimal pressure to fully depress the
tip into the probe pen for correct reading. This is to provide a steady and constant contact made
between the probe tip and the gemstone.
22
Battery information
Do not leave worn out batteries in the battery compartment as the batteries may corrode, leak,
and damage the tester. Batteries should be removed when the tester is expected to be store for
an extended period of time.
To prevent inaccurate readings, replace with new battery as soon as the “Low Battery” indicator
LED is blinking and become faster when battery near to empty.

25
4
6
8
I. Disclaimers, Exclusions and Limitations of Liability
PLEASE READ AND NOTE SMARTPRO WARRANTY TERMS AND CONDITIONS as stated in
the warranty card. SmartPro warranty for its testers are subject to proper use by its user in accordance
with all the terms and conditions as started in the relevant user manual book and shall cover only
manufacturing defects.
Due to continuous product improvement, SmartPro reserves the right to revise all documents
including the right to make changes to the user manual without notice and without obligation
to notify any person of such revisions or changes. User s are advised to check SmartPro’s
website http://www.smartproinstrument .com from time to time.
SmartPro shall not be responsible for any damage or loss resulting from the use of this tester or
user manual, and under no circumstances shall SmartPro, its manufacturer or any of its subsidiaries,
licensors, distributors, resellers, servants and/or agents be liable for any direct or indirect damages,
resulting from the use of this tester.
II. About the SmartPro Finder I
The SmartPro Finder I is a pocket sized instrument that instantly verifies the authenticity of
diamonds based on their thermal properties. Diamonds, with their exceptional heat conductivity
properties, are unlike any other simulants, natural or synthetic, and are therefore not easily replicable.
The SmartPro Finder I has been subjected to thorough and extensive laboratory tests, and will
generally give a clear and reliable reading of the gemstone being tested under proper use. However,
you are advised to conduct further supporting tests.
As with all thermal testers in the market, the SmartPro Finder I is not able to differentiate between
natural diamonds and moissanite.
Include in your package:
a. SmartPro Finder I
b. User manual book
c. Warranty card
d. Protective carry case
e. Probe tip oxidation sheet
f. Neck strap
g. Metal stone tray
Fig. 2.1
23
All testers have been calibrated during the manufacturing process and no further adjustment or
user intervention to the tester is required.
Self-calibration should not be attempted. To minimize any risk associated, user should contact
event that users require the manufacturer to re-calibrate the unit, the users will bear the associated
to/from freight cost for the shipping of unit to the service center.
Calibration
21
Gently rub the table of gemstone against the tissue/jewelry cloth and place the gemstone on the
center of the test pad (Fig.1.8).
Fig. 1.8
1. GETTING STARTED with SmartPro Finder I
Powering up
19
This tester can be powered by the use of batteries. Required AAA Batteries (x2), take note of
the positive (+) and negative (-) directions of batteries (Fig 1.1). The use of Alkaline batteries is
preferred, as it should generally give approximately 2.5 hours continuous operation, While the
use of ordinary batteries will give a shorter working life.
Press the [ON/OFF] button (Fig. 1.3) and wait for warm up the tester about 20 seconds.
10
12
14
The recommended testing temperature is 18oC - 27oC or 65oF - 80oF Please allow the gemstone or
jewelry piece to adjust to room temperature prior to testing. Exposure and/or operation of the tester
outside the room temperature would affect the result and performance of tester.
The probe tip must be placed at the right angle or perpendicular to the facet of gemstone for an
accurate reading.
Tests should be conducted on the table of the gemstone. In the event of any doubt, kindly test on
the girdle of the gemstones instead.
To achieve optimum accuracy for tests involving very small, it is important to allow the gemstone
to cool down before subsequent tests.
a. Keep the tester dry. Precipitation and all types of liquids or moisture can contain minerals that
will corrode electronic circuits. If your tester does get wet, remove the battery, and allow the
tester to dry completely before replacing it.
b. Do not use, store or expose the tester industry and dirty areas. It’s moving part and electronic
components can be damage.
c. Do not use, store or expose the tester in hot areas. High temperatures can damage or shorten
the life of the tester, damage batteries, and warp or melt certain plastics.
d. Do not use, store or expose the tester in cold areas. When the tester returns to its normal tem-
perature, moisture can form inside the device and damage electronic circuit boards.
e. Do not attempt to open the tester other than as instructed in user manual book.
III. IMPORTANT NOTICE
Fig. 1.1
Fig. 1.3
17
Fig. 1.5
While in this preparation mode, you can check status through the ORANGE “Ready” LED will blink
continuously until has the steady lighting with beep sound It’s means your tester is ready now for
use (Fig.1.4).
15
Fig. 1.4
6
TO THE MAXIMUM EXTENT PERMITTED BY APPLICABLE LAW, under no circumstances shall
SmartPro, its manufacturer or any of its subsidiaries, licensors, distributors, resellers, servants
and/or agents be responsible for any special, incidental, consequential or indirect damages
howsoever caused.
The tester or SmartPro Finder I (SPF I) referred to in this user manual is provided and/or sold on
an “as is” basis. Except as required by applicable law, no warranties of any kind, either expressed
or implied, including, but not limited to, the implied warranties of merchantability and fitness for a
particular purpose.
Place the gemstone on the metal stone tray and it with one hand while holding the tester with the
other hand (Fig.2.2).
26
5
7
CONTENTS
I. Disclaimers, Exclusions and Limitations of Liability
II. About the SmartPro Finder I
III. IMPORTANT NOTICE
1. GETTING STARTED with SmartPro Finder I
2. PERFORMING TEST with SmartPro Finder I
3. READING TEST RESULT on SmartPro Finder I
4. TAKING CARE of your SmartPro Finder I
04
06
10
12
24
27
28
a. High efficiency diamond tester
b. Retractable thermoelectric probe tip that ensures constant pressure between probe tip and
gemstone
c. Industry’s thinnest probe tip (0.48mm) for testing diamonds as small as 0.01ct
d. Diamond indicator LED blinking with sound
e. Metal detection indicator LED alarm with ringing sound.
f. Simulant indicator LED
g. Low battery indicator LED
h. No waiting time between tests
i. Super Clear & Bright LED display
j. Automatically power-off within 2 minutes (Sleep mode)
k. Powered by AAA batteries (x2)
The SmartPro Finder I features the following:
For testing loose gemstones
METAL
SIMULANT
DAIMOND
Fig. 2.2
24
For mounted jewelry or gemstones
2. PERFORMING A TEST with SmartPro Finder I
Hold the jewelry or gemstone with one hand and the tester with other hand (Fig.2.1). For proper
operation of the tester, the thumb and index finger must always be placed on the metal-plated
serrated part located on both sides of the tester at all times. Care should be taken when testing
mounted jewelry. User must ensure that the stones are securely mounted before conducting a test
as gap between stone an setting might lead to inaccurate reading.
Place the tip of the probe pen against the gemstone. Apply minimal pressure to fully depress the
tip into the probe pen for correct reading. This is to provide a steady and constant contact made
between the probe tip and the gemstone.
22
Battery information
Do not leave worn out batteries in the battery compartment as the batteries may corrode, leak,
and damage the tester. Batteries should be removed when the tester is expected to be store for
an extended period of time.
To prevent inaccurate readings, replace with new battery as soon as the “Low Battery” indicator
LED is blinking and become faster when battery near to empty.
h. Ready indicator LED
i. No waiting time between LED tests
j. Super Clear & Bright LED display
k. Automatically power-off with in 2 minutes (Sleep mode)
l. Powered by AAA batteries (x2)

25
4
6
8
I. Disclaimers, Exclusions and Limitations of Liability
PLEASE READ AND NOTE SMARTPRO WARRANTY TERMS AND CONDITIONS as stated in
the warranty card. SmartPro warranty for its testers are subject to proper use by its user in accordance
with all the terms and conditions as started in the relevant user manual book and shall cover only
manufacturing defects.
Due to continuous product improvement, SmartPro reserves the right to revise all documents
including the right to make changes to the user manual without notice and without obligation
to notify any person of such revisions or changes. User s are advised to check SmartPro’s
website http://www.smartproinstrument .com from time to time.
SmartPro shall not be responsible for any damage or loss resulting from the use of this tester or
user manual, and under no circumstances shall SmartPro, its manufacturer or any of its subsidiaries,
licensors, distributors, resellers, servants and/or agents be liable for any direct or indirect damages,
resulting from the use of this tester.
II. About the SmartPro Finder I
The SmartPro Finder I is a pocket sized instrument that instantly verifies the authenticity of
diamonds based on their thermal properties. Diamonds, with their exceptional heat conductivity
properties, are unlike any other simulants, natural or synthetic, and are therefore not easily replicable.
The SmartPro Finder I has been subjected to thorough and extensive laboratory tests, and will
generally give a clear and reliable reading of the gemstone being tested under proper use. However,
you are advised to conduct further supporting tests.
As with all thermal testers in the market, the SmartPro Finder I is not able to differentiate between
natural diamonds and moissanite.
Include in your package:
a. SmartPro Finder I
b. User manual book
c. Warranty card
d. Protective carry case
e. Probe tip oxidation sheet
f. Neck strap
g. Metal stone tray
Fig. 2.1
23
All testers have been calibrated during the manufacturing process and no further adjustment or
user intervention to the tester is required.
Self-calibration should not be attempted. To minimize any risk associated, user should contact
event that users require the manufacturer to re-calibrate the unit, the users will bear the associated
to/from freight cost for the shipping of unit to the service center.
Calibration
21
Gently rub the table of gemstone against the tissue/jewelry cloth and place the gemstone on the
center of the test pad (Fig.1.8).
Fig. 1.8
20
Fig. 1.2
9
11
13
Composition
1. Retractable probe tip
2. Serrated Metal Part
3 “Ready” Indicator LED
4. “Low Battery” Indicator LED
5. “Metal” Indicator LED
6. “Simulant” Indicator LEDs
7. “Diamond” Indicator LED
8. ON/OFF Button Switch
9. Battery compartment
10. Neck Strap Attachment
11. Probe Protective Cap
f. Do not drop, knock, or shake the tester. Rough handling can break internal circuit boards and
fine mechanics.
g. Do not use harsh chemicals, cleaning solvents, or strong detergents to clean the tester.
h. Do not paint the tester. Paint can clog the moving parts and prevent proper operation.
If the tester is not working properly, kindly contact our customer service at
SmartPro Instrument co.,ltd
249/40, Moo 9, J.S.P. Building
Bangbon 1 Rd., Bangbon
Bangkok 10150 Thailand
+66 (0) 2 899 2956-7
Attn: Customer Service Executive
Turning on
Remove the protective cover from the probe tip (Fig. 1.2).
Prepare clean tissue / jewelry cloth. Carefully retrieve the gemstone with tweezers and place the
gemstone face down the table (Fig.1.7).
Cleaning your gemstone prior to testing
Fig. 1.7
The gemstone should be clean and dry before testing. However, elaborate cleaning procedures
are not normally necessary (Fig.1.6).
18
Recommended testing conditions
Fig. 1.6
Cleaning the probe tip
Please note that if the tester is being used for the first time, or if the tester has not been used for
a week, it is advisable to clean the probe tip using an oxidation removal sheet to attain consistent
and accurate reading.
b. Hold the probe pen with pen tip forming the right angle (90 degree) with an oxidation removal.
Gently move in a circular motion without retracting the tip (Fig. 1.5).
16
a. Ensure the unit is switched off.
c. Repeat the same motion several times. The cleaning process is completed and tester is now
ready for use.
11
1
2
3
6
8
10
4
7
9
5
GENERATION AHEAD TECHNOLOGY
Thank you for choosing our SmartPro Finder I and taking time for the user manual book which will
enable you to understand your recent purchase better.
SmartPro Instrument also recommends that you register your warranty by sending the warranty
registration card to us or registering online at http://www.smartproinstrument.com
a. The probe and wire tip is extremely sensitive and should be handled with care. Please always
replace the protective cap. Caution should be taken so as not to damage the probe and wire tip.
b. Do not leave worn out batteries in the battery compartment as the batteries may corrode, leak
or damage the tester. Batteries should be removed when the tester is expected to be stored for
an extended period of time.
28
4. TAKING CARE of your SmartPro Finder I
20
Fig. 1.2
9
11
13
Composition
1. Retractable probe tip
2. Serrated Metal Part
3 “Ready” Indicator LED
4. “Low Battery” Indicator LED
5. “Metal” Indicator LED
6. “Simulant” Indicator LEDs
7. “Diamond” Indicator LED
8. ON/OFF Button Switch
9. Battery compartment
10. Neck Strap Attachment
11. Probe Protective Cap
f. Do not drop, knock, or shake the tester. Rough handling can break internal circuit boards and
fine mechanics.
g. Do not use harsh chemicals, cleaning solvents, or strong detergents to clean the tester.
h. Do not paint the tester. Paint can clog the moving parts and prevent proper operation.
If the tester is not working properly, kindly contact our customer service at
SmartPro Instrument co.,ltd
249/40, Moo 9, J.S.P. Building
Bangbon 1 Rd., Bangbon
Bangkok 10150 Thailand
+66 (0) 2 899 2956-7
Attn: Customer Service Executive
Turning on
Remove the protective cover from the probe tip (Fig. 1.2).
Prepare clean tissue / jewelry cloth. Carefully retrieve the gemstone with tweezers and place the
gemstone face down the table (Fig.1.7).
Cleaning your gemstone prior to testing
Fig. 1.7
The gemstone should be clean and dry before testing. However, elaborate cleaning procedures
are not normally necessary (Fig.1.6).
18
Recommended testing conditions
Fig. 1.6
Cleaning the probe tip
Please note that if the tester is being used for the first time, or if the tester has not been used for
a week, it is advisable to clean the probe tip using an oxidation removal sheet to attain consistent
and accurate reading.
b. Hold the probe pen with pen tip forming the right angle (90 degree) with an oxidation removal.
Gently move in a circular motion without retracting the tip (Fig. 1.5).
16
a. Ensure the unit is switched off.
c. Repeat the same motion several times. The cleaning process is completed and tester is now
ready for use.
11
1
2
3
6
8
10
4
7
9
5
7
25
4
6
8
I. Disclaimers, Exclusions and Limitations of Liability
PLEASE READ AND NOTE SMARTPRO WARRANTY TERMS AND CONDITIONS as stated in
the warranty card. SmartPro warranty for its testers are subject to proper use by its user in accordance
with all the terms and conditions as started in the relevant user manual book and shall cover only
manufacturing defects.
Due to continuous product improvement, SmartPro reserves the right to revise all documents
including the right to make changes to the user manual without notice and without obligation
to notify any person of such revisions or changes. User s are advised to check SmartPro’s
website http://www.smartproinstrument .com from time to time.
SmartPro shall not be responsible for any damage or loss resulting from the use of this tester or
user manual, and under no circumstances shall SmartPro, its manufacturer or any of its subsidiaries,
licensors, distributors, resellers, servants and/or agents be liable for any direct or indirect damages,
resulting from the use of this tester.
II. About the SmartPro Finder I
The SmartPro Finder I is a pocket sized instrument that instantly verifies the authenticity of
diamonds based on their thermal properties. Diamonds, with their exceptional heat conductivity
properties, are unlike any other simulants, natural or synthetic, and are therefore not easily replicable.
The SmartPro Finder I has been subjected to thorough and extensive laboratory tests, and will
generally give a clear and reliable reading of the gemstone being tested under proper use. However,
you are advised to conduct further supporting tests.
As with all thermal testers in the market, the SmartPro Finder I is not able to differentiate between
natural diamonds and moissanite.
Include in your package:
a. SmartPro Finder I
b. User manual book
c. Warranty card
d. Protective carry case
e. Probe tip oxidation sheet
f. Neck strap
g. Metal stone tray
Fig. 2.1
23
All testers have been calibrated during the manufacturing process and no further adjustment or
user intervention to the tester is required.
Self-calibration should not be attempted. To minimize any risk associated, user should contact
event that users require the manufacturer to re-calibrate the unit, the users will bear the associated
to/from freight cost for the shipping of unit to the service center.
Calibration
21
Gently rub the table of gemstone against the tissue/jewelry cloth and place the gemstone on the
center of the test pad (Fig.1.8).
Fig. 1.8
1. GETTING STARTED with SmartPro Finder I
Powering up
19
This tester can be powered by the use of batteries. Required AAA Batteries (x2), take note of
the positive (+) and negative (-) directions of batteries (Fig 1.1). The use of Alkaline batteries is
preferred, as it should generally give approximately 2.5 hours continuous operation, While the
use of ordinary batteries will give a shorter working life.
Press the [ON/OFF] button (Fig. 1.3) and wait for warm up the tester about 20 seconds.
10
12
14
The recommended testing temperature is 18oC - 27oC or 65oF - 80oF Please allow the gemstone or
jewelry piece to adjust to room temperature prior to testing. Exposure and/or operation of the tester
outside the room temperature would affect the result and performance of tester.
The probe tip must be placed at the right angle or perpendicular to the facet of gemstone for an
accurate reading.
Tests should be conducted on the table of the gemstone. In the event of any doubt, kindly test on
the girdle of the gemstones instead.
To achieve optimum accuracy for tests involving very small, it is important to allow the gemstone
to cool down before subsequent tests.
a. Keep the tester dry. Precipitation and all types of liquids or moisture can contain minerals that
will corrode electronic circuits. If your tester does get wet, remove the battery, and allow the
tester to dry completely before replacing it.
b. Do not use, store or expose the tester industry and dirty areas. It’s moving part and electronic
components can be damage.
c. Do not use, store or expose the tester in hot areas. High temperatures can damage or shorten
the life of the tester, damage batteries, and warp or melt certain plastics.
d. Do not use, store or expose the tester in cold areas. When the tester returns to its normal tem-
perature, moisture can form inside the device and damage electronic circuit boards.
e. Do not attempt to open the tester other than as instructed in user manual book.
III. IMPORTANT NOTICE
Fig. 1.1
Fig. 1.3
17
Fig. 1.5
While in this preparation mode, you can check status through the ORANGE “Ready” LED will blink
continuously until has the steady lighting with beep sound It’s means your tester is ready now for
use (Fig.1.4).
15
Fig. 1.4
GENERATION AHEAD TECHNOLOGY
Thank you for choosing our SmartPro Finder I and taking time for the user manual book which will
enable you to understand your recent purchase better.
SmartPro Instrument also recommends that you register your warranty by sending the warranty
registration card to us or registering online at http://www.smartproinstrument.com
a. The probe and wire tip is extremely sensitive and should be handled with care. Please always
replace the protective cap. Caution should be taken so as not to damage the probe and wire tip.
b. Do not leave worn out batteries in the battery compartment as the batteries may corrode, leak
or damage the tester. Batteries should be removed when the tester is expected to be stored for
an extended period of time.
28
4. TAKING CARE of your SmartPro Finder I
20
Fig. 1.2
9
11
13
Composition
1. Retractable probe tip
2. Serrated Metal Part
3 “Ready” Indicator LED
4. “Low Battery” Indicator LED
5. “Metal” Indicator LED
6. “Simulant” Indicator LEDs
7. “Diamond” Indicator LED
8. ON/OFF Button Switch
9. Battery compartment
10. Neck Strap Attachment
11. Probe Protective Cap
f. Do not drop, knock, or shake the tester. Rough handling can break internal circuit boards and
fine mechanics.
g. Do not use harsh chemicals, cleaning solvents, or strong detergents to clean the tester.
h. Do not paint the tester. Paint can clog the moving parts and prevent proper operation.
If the tester is not working properly, kindly contact our customer service at
SmartPro Instrument co.,ltd
249/40, Moo 9, J.S.P. Building
Bangbon 1 Rd., Bangbon
Bangkok 10150 Thailand
+66 (0) 2 899 2956-7
Attn: Customer Service Executive
Turning on
Remove the protective cover from the probe tip (Fig. 1.2).
Prepare clean tissue / jewelry cloth. Carefully retrieve the gemstone with tweezers and place the
gemstone face down the table (Fig.1.7).
Cleaning your gemstone prior to testing
Fig. 1.7
The gemstone should be clean and dry before testing. However, elaborate cleaning procedures
are not normally necessary (Fig.1.6).
18
Recommended testing conditions
Fig. 1.6
Cleaning the probe tip
Please note that if the tester is being used for the first time, or if the tester has not been used for
a week, it is advisable to clean the probe tip using an oxidation removal sheet to attain consistent
and accurate reading.
b. Hold the probe pen with pen tip forming the right angle (90 degree) with an oxidation removal.
Gently move in a circular motion without retracting the tip (Fig. 1.5).
16
a. Ensure the unit is switched off.
c. Repeat the same motion several times. The cleaning process is completed and tester is now
ready for use.
11
1
2
3
6
8
10
4
7
9
5
20
Fig. 1.2
9
11
13
Composition
1. Retractable probe tip
2. Serrated Metal Part
3 “Ready” Indicator LED
4. “Low Battery” Indicator LED
5. “Metal” Indicator LED
6. “Simulant” Indicator LEDs
7. “Diamond” Indicator LED
8. ON/OFF Button Switch
9. Battery compartment
10. Neck Strap Attachment
11. Probe Protective Cap
f. Do not drop, knock, or shake the tester. Rough handling can break internal circuit boards and
fine mechanics.
g. Do not use harsh chemicals, cleaning solvents, or strong detergents to clean the tester.
h. Do not paint the tester. Paint can clog the moving parts and prevent proper operation.
If the tester is not working properly, kindly contact our customer service at
SmartPro Instrument co.,ltd
249/40, Moo 9, J.S.P. Building
Bangbon 1 Rd., Bangbon
Bangkok 10150 Thailand
+66 (0) 2 899 2956-7
Attn: Customer Service Executive
Turning on
Remove the protective cover from the probe tip (Fig. 1.2).
Prepare clean tissue / jewelry cloth. Carefully retrieve the gemstone with tweezers and place the
gemstone face down the table (Fig.1.7).
Cleaning your gemstone prior to testing
Fig. 1.7
The gemstone should be clean and dry before testing. However, elaborate cleaning procedures
are not normally necessary (Fig.1.6).
18
Recommended testing conditions
Fig. 1.6
Cleaning the probe tip
Please note that if the tester is being used for the first time, or if the tester has not been used for
a week, it is advisable to clean the probe tip using an oxidation removal sheet to attain consistent
and accurate reading.
b. Hold the probe pen with pen tip forming the right angle (90 degree) with an oxidation removal.
Gently move in a circular motion without retracting the tip (Fig. 1.5).
16
a. Ensure the unit is switched off.
c. Repeat the same motion several times. The cleaning process is completed and tester is now
ready for use.
11
1
2
3
6
8
10
4
7
9
5
8
1. GETTING STARTED with SmartPro Finder I
Powering up
19
This tester can be powered by the use of batteries. Required AAA Batteries (x2), take note of
the positive (+) and negative (-) directions of batteries (Fig 1.1). The use of Alkaline batteries is
preferred, as it should generally give approximately 2.5 hours continuous operation, While the
use of ordinary batteries will give a shorter working life.
Press the [ON/OFF] button (Fig. 1.3) and wait for warm up the tester about 20 seconds.
10
12
14
The recommended testing temperature is 18oC - 27oC or 65oF - 80oF Please allow the gemstone or
jewelry piece to adjust to room temperature prior to testing. Exposure and/or operation of the tester
outside the room temperature would affect the result and performance of tester.
The probe tip must be placed at the right angle or perpendicular to the facet of gemstone for an
accurate reading.
Tests should be conducted on the table of the gemstone. In the event of any doubt, kindly test on
the girdle of the gemstones instead.
To achieve optimum accuracy for tests involving very small, it is important to allow the gemstone
to cool down before subsequent tests.
a. Keep the tester dry. Precipitation and all types of liquids or moisture can contain minerals that
will corrode electronic circuits. If your tester does get wet, remove the battery, and allow the
tester to dry completely before replacing it.
b. Do not use, store or expose the tester industry and dirty areas. It’s moving part and electronic
components can be damage.
c. Do not use, store or expose the tester in hot areas. High temperatures can damage or shorten
the life of the tester, damage batteries, and warp or melt certain plastics.
d. Do not use, store or expose the tester in cold areas. When the tester returns to its normal tem-
perature, moisture can form inside the device and damage electronic circuit boards.
e. Do not attempt to open the tester other than as instructed in user manual book.
III. IMPORTANT NOTICE
Fig. 1.1
Fig. 1.3
17
Fig. 1.5
While in this preparation mode, you can check status through the ORANGE “Ready” LED will blink
continuously until has the steady lighting with beep sound It’s means your tester is ready now for
use (Fig.1.4).
15
Fig. 1.4

25
4
6
8
I. Disclaimers, Exclusions and Limitations of Liability
PLEASE READ AND NOTE SMARTPRO WARRANTY TERMS AND CONDITIONS as stated in
the warranty card. SmartPro warranty for its testers are subject to proper use by its user in accordance
with all the terms and conditions as started in the relevant user manual book and shall cover only
manufacturing defects.
Due to continuous product improvement, SmartPro reserves the right to revise all documents
including the right to make changes to the user manual without notice and without obligation
to notify any person of such revisions or changes. User s are advised to check SmartPro’s
website http://www.smartproinstrument .com from time to time.
SmartPro shall not be responsible for any damage or loss resulting from the use of this tester or
user manual, and under no circumstances shall SmartPro, its manufacturer or any of its subsidiaries,
licensors, distributors, resellers, servants and/or agents be liable for any direct or indirect damages,
resulting from the use of this tester.
II. About the SmartPro Finder I
The SmartPro Finder I is a pocket sized instrument that instantly verifies the authenticity of
diamonds based on their thermal properties. Diamonds, with their exceptional heat conductivity
properties, are unlike any other simulants, natural or synthetic, and are therefore not easily replicable.
The SmartPro Finder I has been subjected to thorough and extensive laboratory tests, and will
generally give a clear and reliable reading of the gemstone being tested under proper use. However,
you are advised to conduct further supporting tests.
As with all thermal testers in the market, the SmartPro Finder I is not able to differentiate between
natural diamonds and moissanite.
Include in your package:
a. SmartPro Finder I
b. User manual book
c. Warranty card
d. Protective carry case
e. Probe tip oxidation sheet
f. Neck strap
g. Metal stone tray
Fig. 2.1
23
All testers have been calibrated during the manufacturing process and no further adjustment or
user intervention to the tester is required.
Self-calibration should not be attempted. To minimize any risk associated, user should contact
event that users require the manufacturer to re-calibrate the unit, the users will bear the associated
to/from freight cost for the shipping of unit to the service center.
Calibration
21
Gently rub the table of gemstone against the tissue/jewelry cloth and place the gemstone on the
center of the test pad (Fig.1.8).
Fig. 1.8
1. GETTING STARTED with SmartPro Finder I
Powering up
19
This tester can be powered by the use of batteries. Required AAA Batteries (x2), take note of
the positive (+) and negative (-) directions of batteries (Fig 1.1). The use of Alkaline batteries is
preferred, as it should generally give approximately 2.5 hours continuous operation, While the
use of ordinary batteries will give a shorter working life.
Press the [ON/OFF] button (Fig. 1.3) and wait for warm up the tester about 20 seconds.
10
12
14
The recommended testing temperature is 18oC - 27oC or 65oF - 80oF Please allow the gemstone or
jewelry piece to adjust to room temperature prior to testing. Exposure and/or operation of the tester
outside the room temperature would affect the result and performance of tester.
The probe tip must be placed at the right angle or perpendicular to the facet of gemstone for an
accurate reading.
Tests should be conducted on the table of the gemstone. In the event of any doubt, kindly test on
the girdle of the gemstones instead.
To achieve optimum accuracy for tests involving very small, it is important to allow the gemstone
to cool down before subsequent tests.
a. Keep the tester dry. Precipitation and all types of liquids or moisture can contain minerals that
will corrode electronic circuits. If your tester does get wet, remove the battery, and allow the
tester to dry completely before replacing it.
b. Do not use, store or expose the tester industry and dirty areas. It’s moving part and electronic
components can be damage.
c. Do not use, store or expose the tester in hot areas. High temperatures can damage or shorten
the life of the tester, damage batteries, and warp or melt certain plastics.
d. Do not use, store or expose the tester in cold areas. When the tester returns to its normal tem-
perature, moisture can form inside the device and damage electronic circuit boards.
e. Do not attempt to open the tester other than as instructed in user manual book.
III. IMPORTANT NOTICE
Fig. 1.1
Fig. 1.3
17
Fig. 1.5
While in this preparation mode, you can check status through the ORANGE “Ready” LED will blink
continuously until has the steady lighting with beep sound It’s means your tester is ready now for
use (Fig.1.4).
15
Fig. 1.4
20
Fig. 1.2
9
11
13
Composition
1. Retractable probe tip
2. Serrated Metal Part
3 “Ready” Indicator LED
4. “Low Battery” Indicator LED
5. “Metal” Indicator LED
6. “Simulant” Indicator LEDs
7. “Diamond” Indicator LED
8. ON/OFF Button Switch
9. Battery compartment
10. Neck Strap Attachment
11. Probe Protective Cap
f. Do not drop, knock, or shake the tester. Rough handling can break internal circuit boards and
fine mechanics.
g. Do not use harsh chemicals, cleaning solvents, or strong detergents to clean the tester.
h. Do not paint the tester. Paint can clog the moving parts and prevent proper operation.
If the tester is not working properly, kindly contact our customer service at
SmartPro Instrument co.,ltd
249/40, Moo 9, J.S.P. Building
Bangbon 1 Rd., Bangbon
Bangkok 10150 Thailand
+66 (0) 2 899 2956-7
Attn: Customer Service Executive
Turning on
Remove the protective cover from the probe tip (Fig. 1.2).
Prepare clean tissue / jewelry cloth. Carefully retrieve the gemstone with tweezers and place the
gemstone face down the table (Fig.1.7).
Cleaning your gemstone prior to testing
Fig. 1.7
The gemstone should be clean and dry before testing. However, elaborate cleaning procedures
are not normally necessary (Fig.1.6).
18
Recommended testing conditions
Fig. 1.6
Cleaning the probe tip
Please note that if the tester is being used for the first time, or if the tester has not been used for
a week, it is advisable to clean the probe tip using an oxidation removal sheet to attain consistent
and accurate reading.
b. Hold the probe pen with pen tip forming the right angle (90 degree) with an oxidation removal.
Gently move in a circular motion without retracting the tip (Fig. 1.5).
16
a. Ensure the unit is switched off.
c. Repeat the same motion several times. The cleaning process is completed and tester is now
ready for use.
11
1
2
3
6
8
10
4
7
9
5
9
20
Fig. 1.2
9
11
13
Composition
1. Retractable probe tip
2. Serrated Metal Part
3 “Ready” Indicator LED
4. “Low Battery” Indicator LED
5. “Metal” Indicator LED
6. “Simulant” Indicator LEDs
7. “Diamond” Indicator LED
8. ON/OFF Button Switch
9. Battery compartment
10. Neck Strap Attachment
11. Probe Protective Cap
f. Do not drop, knock, or shake the tester. Rough handling can break internal circuit boards and
fine mechanics.
g. Do not use harsh chemicals, cleaning solvents, or strong detergents to clean the tester.
h. Do not paint the tester. Paint can clog the moving parts and prevent proper operation.
If the tester is not working properly, kindly contact our customer service at
SmartPro Instrument co.,ltd
249/40, Moo 9, J.S.P. Building
Bangbon 1 Rd., Bangbon
Bangkok 10150 Thailand
+66 (0) 2 899 2956-7
Attn: Customer Service Executive
Turning on
Remove the protective cover from the probe tip (Fig. 1.2).
Prepare clean tissue / jewelry cloth. Carefully retrieve the gemstone with tweezers and place the
gemstone face down the table (Fig.1.7).
Cleaning your gemstone prior to testing
Fig. 1.7
The gemstone should be clean and dry before testing. However, elaborate cleaning procedures
are not normally necessary (Fig.1.6).
18
Recommended testing conditions
Fig. 1.6
Cleaning the probe tip
Please note that if the tester is being used for the first time, or if the tester has not been used for
a week, it is advisable to clean the probe tip using an oxidation removal sheet to attain consistent
and accurate reading.
b. Hold the probe pen with pen tip forming the right angle (90 degree) with an oxidation removal.
Gently move in a circular motion without retracting the tip (Fig. 1.5).
16
a. Ensure the unit is switched off.
c. Repeat the same motion several times. The cleaning process is completed and tester is now
ready for use.
11
1
2
3
6
8
10
4
7
9
5
1. GETTING STARTED with SmartPro Finder I
Powering up
19
This tester can be powered by the use of batteries. Required AAA Batteries (x2), take note of
the positive (+) and negative (-) directions of batteries (Fig 1.1). The use of Alkaline batteries is
preferred, as it should generally give approximately 2.5 hours continuous operation, While the
use of ordinary batteries will give a shorter working life.
Press the [ON/OFF] button (Fig. 1.3) and wait for warm up the tester about 20 seconds.
10
12
14
The recommended testing temperature is 18oC - 27oC or 65oF - 80oF Please allow the gemstone or
jewelry piece to adjust to room temperature prior to testing. Exposure and/or operation of the tester
outside the room temperature would affect the result and performance of tester.
The probe tip must be placed at the right angle or perpendicular to the facet of gemstone for an
accurate reading.
Tests should be conducted on the table of the gemstone. In the event of any doubt, kindly test on
the girdle of the gemstones instead.
To achieve optimum accuracy for tests involving very small, it is important to allow the gemstone
to cool down before subsequent tests.
a. Keep the tester dry. Precipitation and all types of liquids or moisture can contain minerals that
will corrode electronic circuits. If your tester does get wet, remove the battery, and allow the
tester to dry completely before replacing it.
b. Do not use, store or expose the tester industry and dirty areas. It’s moving part and electronic
components can be damage.
c. Do not use, store or expose the tester in hot areas. High temperatures can damage or shorten
the life of the tester, damage batteries, and warp or melt certain plastics.
d. Do not use, store or expose the tester in cold areas. When the tester returns to its normal tem-
perature, moisture can form inside the device and damage electronic circuit boards.
e. Do not attempt to open the tester other than as instructed in user manual book.
III. IMPORTANT NOTICE
Fig. 1.1
Fig. 1.3
17
Fig. 1.5
While in this preparation mode, you can check status through the ORANGE “Ready” LED will blink
continuously until has the steady lighting with beep sound It’s means your tester is ready now for
use (Fig.1.4).
15
Fig. 1.4

TO THE MAXIMUM EXTENT PERMITTED BY APPLICABLE LAW, under no circumstances shall
SmartPro, its manufacturer or any of its subsidiaries, licensors, distributors, resellers, servants
and/or agents be responsible for any special, incidental, consequential or indirect damages
howsoever caused.
The tester or SmartPro Finder I (SPF I) referred to in this user manual is provided and/or sold on
an “as is” basis. Except as required by applicable law, no warranties of any kind, either expressed
or implied, including, but not limited to, the implied warranties of merchantability and fitness for a
particular purpose.
Place the gemstone on the metal stone tray and it with one hand while holding the tester with the
other hand (Fig.2.2).
26
5
7
CONTENTS
I. Disclaimers, Exclusions and Limitations of Liability
II. About the SmartPro Finder I
III. IMPORTANT NOTICE
1. GETTING STARTED with SmartPro Finder I
2. PERFORMING TEST with SmartPro Finder I
3. READING TEST RESULT on SmartPro Finder I
4. TAKING CARE of your SmartPro Finder I
04
06
10
12
24
27
28
a. High efficiency diamond tester
b. Retractable thermoelectric probe tip that ensures constant pressure between probe tip and
gemstone
c. Industry’s thinnest probe tip (0.48mm) for testing diamonds as small as 0.01ct
d. Diamond indicator LED blinking with sound
e. Metal detection indicator LED alarm with ringing sound.
f. Simulant indicator LED
g. Low battery indicator LED
h. No waiting time between tests
i. Super Clear & Bright LED display
j. Automatically power-off within 2 minutes (Sleep mode)
k. Powered by AAA batteries (x2)
The SmartPro Finder I features the following:
For testing loose gemstones
METAL
SIMULANT
DAIMOND
Fig. 2.2
24
For mounted jewelry or gemstones
2. PERFORMING A TEST with SmartPro Finder I
Hold the jewelry or gemstone with one hand and the tester with other hand (Fig.2.1). For proper
operation of the tester, the thumb and index finger must always be placed on the metal-plated
serrated part located on both sides of the tester at all times. Care should be taken when testing
mounted jewelry. User must ensure that the stones are securely mounted before conducting a test
as gap between stone an setting might lead to inaccurate reading.
Place the tip of the probe pen against the gemstone. Apply minimal pressure to fully depress the
tip into the probe pen for correct reading. This is to provide a steady and constant contact made
between the probe tip and the gemstone.
22
Battery information
Do not leave worn out batteries in the battery compartment as the batteries may corrode, leak,
and damage the tester. Batteries should be removed when the tester is expected to be store for
an extended period of time.
To prevent inaccurate readings, replace with new battery as soon as the “Low Battery” indicator
LED is blinking and become faster when battery near to empty.
20
Fig. 1.2
9
11
13
Composition
1. Retractable probe tip
2. Serrated Metal Part
3 “Ready” Indicator LED
4. “Low Battery” Indicator LED
5. “Metal” Indicator LED
6. “Simulant” Indicator LEDs
7. “Diamond” Indicator LED
8. ON/OFF Button Switch
9. Battery compartment
10. Neck Strap Attachment
11. Probe Protective Cap
f. Do not drop, knock, or shake the tester. Rough handling can break internal circuit boards and
fine mechanics.
g. Do not use harsh chemicals, cleaning solvents, or strong detergents to clean the tester.
h. Do not paint the tester. Paint can clog the moving parts and prevent proper operation.
If the tester is not working properly, kindly contact our customer service at
SmartPro Instrument co.,ltd
249/40, Moo 9, J.S.P. Building
Bangbon 1 Rd., Bangbon
Bangkok 10150 Thailand
+66 (0) 2 899 2956-7
Attn: Customer Service Executive
Turning on
Remove the protective cover from the probe tip (Fig. 1.2).
Prepare clean tissue / jewelry cloth. Carefully retrieve the gemstone with tweezers and place the
gemstone face down the table (Fig.1.7).
Cleaning your gemstone prior to testing
Fig. 1.7
The gemstone should be clean and dry before testing. However, elaborate cleaning procedures
are not normally necessary (Fig.1.6).
18
Recommended testing conditions
Fig. 1.6
Cleaning the probe tip
Please note that if the tester is being used for the first time, or if the tester has not been used for
a week, it is advisable to clean the probe tip using an oxidation removal sheet to attain consistent
and accurate reading.
b. Hold the probe pen with pen tip forming the right angle (90 degree) with an oxidation removal.
Gently move in a circular motion without retracting the tip (Fig. 1.5).
16
a. Ensure the unit is switched off.
c. Repeat the same motion several times. The cleaning process is completed and tester is now
ready for use.
11
1
2
3
6
8
10
4
7
9
5
1. GETTING STARTED with SmartPro Finder I
Powering up
19
This tester can be powered by the use of batteries. Required AAA Batteries (x2), take note of
the positive (+) and negative (-) directions of batteries (Fig 1.1). The use of Alkaline batteries is
preferred, as it should generally give approximately 2.5 hours continuous operation, While the
use of ordinary batteries will give a shorter working life.
Press the [ON/OFF] button (Fig. 1.3) and wait for warm up the tester about 20 seconds.
10
12
14
The recommended testing temperature is 18oC - 27oC or 65oF - 80oF Please allow the gemstone or
jewelry piece to adjust to room temperature prior to testing. Exposure and/or operation of the tester
outside the room temperature would affect the result and performance of tester.
The probe tip must be placed at the right angle or perpendicular to the facet of gemstone for an
accurate reading.
Tests should be conducted on the table of the gemstone. In the event of any doubt, kindly test on
the girdle of the gemstones instead.
To achieve optimum accuracy for tests involving very small, it is important to allow the gemstone
to cool down before subsequent tests.
a. Keep the tester dry. Precipitation and all types of liquids or moisture can contain minerals that
will corrode electronic circuits. If your tester does get wet, remove the battery, and allow the
tester to dry completely before replacing it.
b. Do not use, store or expose the tester industry and dirty areas. It’s moving part and electronic
components can be damage.
c. Do not use, store or expose the tester in hot areas. High temperatures can damage or shorten
the life of the tester, damage batteries, and warp or melt certain plastics.
d. Do not use, store or expose the tester in cold areas. When the tester returns to its normal tem-
perature, moisture can form inside the device and damage electronic circuit boards.
e. Do not attempt to open the tester other than as instructed in user manual book.
III. IMPORTANT NOTICE
Fig. 1.1
Fig. 1.3
17
Fig. 1.5
While in this preparation mode, you can check status through the ORANGE “Ready” LED will blink
continuously until has the steady lighting with beep sound It’s means your tester is ready now for
use (Fig.1.4).
15
Fig. 1.4
10
1. GETTING STARTED with SmartPro Finder I
Powering up
19
This tester can be powered by the use of batteries. Required AAA Batteries (x2), take note of
the positive (+) and negative (-) directions of batteries (Fig 1.1). The use of Alkaline batteries is
preferred, as it should generally give approximately 2.5 hours continuous operation, While the
use of ordinary batteries will give a shorter working life.
Press the [ON/OFF] button (Fig. 1.3) and wait for warm up the tester about 20 seconds.
10
12
14
The recommended testing temperature is 18oC - 27oC or 65oF - 80oF Please allow the gemstone or
jewelry piece to adjust to room temperature prior to testing. Exposure and/or operation of the tester
outside the room temperature would affect the result and performance of tester.
The probe tip must be placed at the right angle or perpendicular to the facet of gemstone for an
accurate reading.
Tests should be conducted on the table of the gemstone. In the event of any doubt, kindly test on
the girdle of the gemstones instead.
To achieve optimum accuracy for tests involving very small, it is important to allow the gemstone
to cool down before subsequent tests.
a. Keep the tester dry. Precipitation and all types of liquids or moisture can contain minerals that
will corrode electronic circuits. If your tester does get wet, remove the battery, and allow the
tester to dry completely before replacing it.
b. Do not use, store or expose the tester industry and dirty areas. It’s moving part and electronic
components can be damage.
c. Do not use, store or expose the tester in hot areas. High temperatures can damage or shorten
the life of the tester, damage batteries, and warp or melt certain plastics.
d. Do not use, store or expose the tester in cold areas. When the tester returns to its normal tem-
perature, moisture can form inside the device and damage electronic circuit boards.
e. Do not attempt to open the tester other than as instructed in user manual book.
III. IMPORTANT NOTICE
Fig. 1.1
Fig. 1.3
17
Fig. 1.5
While in this preparation mode, you can check status through the ORANGE “Ready” LED will blink
continuously until has the steady lighting with beep sound It’s means your tester is ready now for
use (Fig.1.4).
15
Fig. 1.4
in dusty

TO THE MAXIMUM EXTENT PERMITTED BY APPLICABLE LAW, under no circumstances shall
SmartPro, its manufacturer or any of its subsidiaries, licensors, distributors, resellers, servants
and/or agents be responsible for any special, incidental, consequential or indirect damages
howsoever caused.
The tester or SmartPro Finder I (SPF I) referred to in this user manual is provided and/or sold on
an “as is” basis. Except as required by applicable law, no warranties of any kind, either expressed
or implied, including, but not limited to, the implied warranties of merchantability and fitness for a
particular purpose.
Place the gemstone on the metal stone tray and it with one hand while holding the tester with the
other hand (Fig.2.2).
26
5
7
CONTENTS
I. Disclaimers, Exclusions and Limitations of Liability
II. About the SmartPro Finder I
III. IMPORTANT NOTICE
1. GETTING STARTED with SmartPro Finder I
2. PERFORMING TEST with SmartPro Finder I
3. READING TEST RESULT on SmartPro Finder I
4. TAKING CARE of your SmartPro Finder I
04
06
10
12
24
27
28
a. High efficiency diamond tester
b. Retractable thermoelectric probe tip that ensures constant pressure between probe tip and
gemstone
c. Industry’s thinnest probe tip (0.48mm) for testing diamonds as small as 0.01ct
d. Diamond indicator LED blinking with sound
e. Metal detection indicator LED alarm with ringing sound.
f. Simulant indicator LED
g. Low battery indicator LED
h. No waiting time between tests
i. Super Clear & Bright LED display
j. Automatically power-off within 2 minutes (Sleep mode)
k. Powered by AAA batteries (x2)
The SmartPro Finder I features the following:
For testing loose gemstones
METAL
SIMULANT
DAIMOND
Fig. 2.2
24
For mounted jewelry or gemstones
2. PERFORMING A TEST with SmartPro Finder I
Hold the jewelry or gemstone with one hand and the tester with other hand (Fig.2.1). For proper
operation of the tester, the thumb and index finger must always be placed on the metal-plated
serrated part located on both sides of the tester at all times. Care should be taken when testing
mounted jewelry. User must ensure that the stones are securely mounted before conducting a test
as gap between stone an setting might lead to inaccurate reading.
Place the tip of the probe pen against the gemstone. Apply minimal pressure to fully depress the
tip into the probe pen for correct reading. This is to provide a steady and constant contact made
between the probe tip and the gemstone.
22
Battery information
Do not leave worn out batteries in the battery compartment as the batteries may corrode, leak,
and damage the tester. Batteries should be removed when the tester is expected to be store for
an extended period of time.
To prevent inaccurate readings, replace with new battery as soon as the “Low Battery” indicator
LED is blinking and become faster when battery near to empty.
25
4
6
8
I. Disclaimers, Exclusions and Limitations of Liability
PLEASE READ AND NOTE SMARTPRO WARRANTY TERMS AND CONDITIONS as stated in
the warranty card. SmartPro warranty for its testers are subject to proper use by its user in accordance
with all the terms and conditions as started in the relevant user manual book and shall cover only
manufacturing defects.
Due to continuous product improvement, SmartPro reserves the right to revise all documents
including the right to make changes to the user manual without notice and without obligation
to notify any person of such revisions or changes. User s are advised to check SmartPro’s
website http://www.smartproinstrument .com from time to time.
SmartPro shall not be responsible for any damage or loss resulting from the use of this tester or
user manual, and under no circumstances shall SmartPro, its manufacturer or any of its subsidiaries,
licensors, distributors, resellers, servants and/or agents be liable for any direct or indirect damages,
resulting from the use of this tester.
II. About the SmartPro Finder I
The SmartPro Finder I is a pocket sized instrument that instantly verifies the authenticity of
diamonds based on their thermal properties. Diamonds, with their exceptional heat conductivity
properties, are unlike any other simulants, natural or synthetic, and are therefore not easily replicable.
The SmartPro Finder I has been subjected to thorough and extensive laboratory tests, and will
generally give a clear and reliable reading of the gemstone being tested under proper use. However,
you are advised to conduct further supporting tests.
As with all thermal testers in the market, the SmartPro Finder I is not able to differentiate between
natural diamonds and moissanite.
Include in your package:
a. SmartPro Finder I
b. User manual book
c. Warranty card
d. Protective carry case
e. Probe tip oxidation sheet
f. Neck strap
g. Metal stone tray
Fig. 2.1
23
All testers have been calibrated during the manufacturing process and no further adjustment or
user intervention to the tester is required.
Self-calibration should not be attempted. To minimize any risk associated, user should contact
event that users require the manufacturer to re-calibrate the unit, the users will bear the associated
to/from freight cost for the shipping of unit to the service center.
Calibration
21
Gently rub the table of gemstone against the tissue/jewelry cloth and place the gemstone on the
center of the test pad (Fig.1.8).
Fig. 1.8
20
Fig. 1.2
9
11
13
Composition
1. Retractable probe tip
2. Serrated Metal Part
3 “Ready” Indicator LED
4. “Low Battery” Indicator LED
5. “Metal” Indicator LED
6. “Simulant” Indicator LEDs
7. “Diamond” Indicator LED
8. ON/OFF Button Switch
9. Battery compartment
10. Neck Strap Attachment
11. Probe Protective Cap
f. Do not drop, knock, or shake the tester. Rough handling can break internal circuit boards and
fine mechanics.
g. Do not use harsh chemicals, cleaning solvents, or strong detergents to clean the tester.
h. Do not paint the tester. Paint can clog the moving parts and prevent proper operation.
If the tester is not working properly, kindly contact our customer service at
SmartPro Instrument co.,ltd
249/40, Moo 9, J.S.P. Building
Bangbon 1 Rd., Bangbon
Bangkok 10150 Thailand
+66 (0) 2 899 2956-7
Attn: Customer Service Executive
Turning on
Remove the protective cover from the probe tip (Fig. 1.2).
Prepare clean tissue / jewelry cloth. Carefully retrieve the gemstone with tweezers and place the
gemstone face down the table (Fig.1.7).
Cleaning your gemstone prior to testing
Fig. 1.7
The gemstone should be clean and dry before testing. However, elaborate cleaning procedures
are not normally necessary (Fig.1.6).
18
Recommended testing conditions
Fig. 1.6
Cleaning the probe tip
Please note that if the tester is being used for the first time, or if the tester has not been used for
a week, it is advisable to clean the probe tip using an oxidation removal sheet to attain consistent
and accurate reading.
b. Hold the probe pen with pen tip forming the right angle (90 degree) with an oxidation removal.
Gently move in a circular motion without retracting the tip (Fig. 1.5).
16
a. Ensure the unit is switched off.
c. Repeat the same motion several times. The cleaning process is completed and tester is now
ready for use.
11
1
2
3
6
8
10
4
7
9
5
1. GETTING STARTED with SmartPro Finder I
Powering up
19
This tester can be powered by the use of batteries. Required AAA Batteries (x2), take note of
the positive (+) and negative (-) directions of batteries (Fig 1.1). The use of Alkaline batteries is
preferred, as it should generally give approximately 2.5 hours continuous operation, While the
use of ordinary batteries will give a shorter working life.
Press the [ON/OFF] button (Fig. 1.3) and wait for warm up the tester about 20 seconds.
10
12
14
The recommended testing temperature is 18oC - 27oC or 65oF - 80oF Please allow the gemstone or
jewelry piece to adjust to room temperature prior to testing. Exposure and/or operation of the tester
outside the room temperature would affect the result and performance of tester.
The probe tip must be placed at the right angle or perpendicular to the facet of gemstone for an
accurate reading.
Tests should be conducted on the table of the gemstone. In the event of any doubt, kindly test on
the girdle of the gemstones instead.
To achieve optimum accuracy for tests involving very small, it is important to allow the gemstone
to cool down before subsequent tests.
a. Keep the tester dry. Precipitation and all types of liquids or moisture can contain minerals that
will corrode electronic circuits. If your tester does get wet, remove the battery, and allow the
tester to dry completely before replacing it.
b. Do not use, store or expose the tester industry and dirty areas. It’s moving part and electronic
components can be damage.
c. Do not use, store or expose the tester in hot areas. High temperatures can damage or shorten
the life of the tester, damage batteries, and warp or melt certain plastics.
d. Do not use, store or expose the tester in cold areas. When the tester returns to its normal tem-
perature, moisture can form inside the device and damage electronic circuit boards.
e. Do not attempt to open the tester other than as instructed in user manual book.
III. IMPORTANT NOTICE
Fig. 1.1
Fig. 1.3
17
Fig. 1.5
While in this preparation mode, you can check status through the ORANGE “Ready” LED will blink
continuously until has the steady lighting with beep sound It’s means your tester is ready now for
use (Fig.1.4).
15
Fig. 1.4
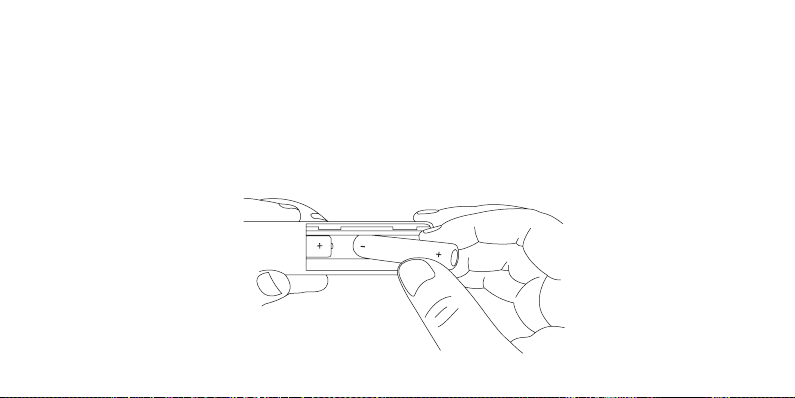
25
4
6
8
I. Disclaimers, Exclusions and Limitations of Liability
PLEASE READ AND NOTE SMARTPRO WARRANTY TERMS AND CONDITIONS as stated in
the warranty card. SmartPro warranty for its testers are subject to proper use by its user in accordance
with all the terms and conditions as started in the relevant user manual book and shall cover only
manufacturing defects.
Due to continuous product improvement, SmartPro reserves the right to revise all documents
including the right to make changes to the user manual without notice and without obligation
to notify any person of such revisions or changes. User s are advised to check SmartPro’s
website http://www.smartproinstrument .com from time to time.
SmartPro shall not be responsible for any damage or loss resulting from the use of this tester or
user manual, and under no circumstances shall SmartPro, its manufacturer or any of its subsidiaries,
licensors, distributors, resellers, servants and/or agents be liable for any direct or indirect damages,
resulting from the use of this tester.
II. About the SmartPro Finder I
The SmartPro Finder I is a pocket sized instrument that instantly verifies the authenticity of
diamonds based on their thermal properties. Diamonds, with their exceptional heat conductivity
properties, are unlike any other simulants, natural or synthetic, and are therefore not easily replicable.
The SmartPro Finder I has been subjected to thorough and extensive laboratory tests, and will
generally give a clear and reliable reading of the gemstone being tested under proper use. However,
you are advised to conduct further supporting tests.
As with all thermal testers in the market, the SmartPro Finder I is not able to differentiate between
natural diamonds and moissanite.
Include in your package:
a. SmartPro Finder I
b. User manual book
c. Warranty card
d. Protective carry case
e. Probe tip oxidation sheet
f. Neck strap
g. Metal stone tray
Fig. 2.1
23
All testers have been calibrated during the manufacturing process and no further adjustment or
user intervention to the tester is required.
Self-calibration should not be attempted. To minimize any risk associated, user should contact
event that users require the manufacturer to re-calibrate the unit, the users will bear the associated
to/from freight cost for the shipping of unit to the service center.
Calibration
21
Gently rub the table of gemstone against the tissue/jewelry cloth and place the gemstone on the
center of the test pad (Fig.1.8).
Fig. 1.8
20
Fig. 1.2
9
11
13
Composition
1. Retractable probe tip
2. Serrated Metal Part
3 “Ready” Indicator LED
4. “Low Battery” Indicator LED
5. “Metal” Indicator LED
6. “Simulant” Indicator LEDs
7. “Diamond” Indicator LED
8. ON/OFF Button Switch
9. Battery compartment
10. Neck Strap Attachment
11. Probe Protective Cap
f. Do not drop, knock, or shake the tester. Rough handling can break internal circuit boards and
fine mechanics.
g. Do not use harsh chemicals, cleaning solvents, or strong detergents to clean the tester.
h. Do not paint the tester. Paint can clog the moving parts and prevent proper operation.
If the tester is not working properly, kindly contact our customer service at
SmartPro Instrument co.,ltd
249/40, Moo 9, J.S.P. Building
Bangbon 1 Rd., Bangbon
Bangkok 10150 Thailand
+66 (0) 2 899 2956-7
Attn: Customer Service Executive
Turning on
Remove the protective cover from the probe tip (Fig. 1.2).
Prepare clean tissue / jewelry cloth. Carefully retrieve the gemstone with tweezers and place the
gemstone face down the table (Fig.1.7).
Cleaning your gemstone prior to testing
Fig. 1.7
The gemstone should be clean and dry before testing. However, elaborate cleaning procedures
are not normally necessary (Fig.1.6).
18
Recommended testing conditions
Fig. 1.6
Cleaning the probe tip
Please note that if the tester is being used for the first time, or if the tester has not been used for
a week, it is advisable to clean the probe tip using an oxidation removal sheet to attain consistent
and accurate reading.
b. Hold the probe pen with pen tip forming the right angle (90 degree) with an oxidation removal.
Gently move in a circular motion without retracting the tip (Fig. 1.5).
16
a. Ensure the unit is switched off.
c. Repeat the same motion several times. The cleaning process is completed and tester is now
ready for use.
11
1
2
3
6
8
10
4
7
9
5
12
1. GETTING STARTED with SmartPro Finder I
Powering up
19
This tester can be powered by the use of batteries. Required AAA Batteries (x2), take note of
the positive (+) and negative (-) directions of batteries (Fig 1.1). The use of Alkaline batteries is
preferred, as it should generally give approximately 2.5 hours continuous operation, While the
use of ordinary batteries will give a shorter working life.
Press the [ON/OFF] button (Fig. 1.3) and wait for warm up the tester about 20 seconds.
10
12
14
The recommended testing temperature is 18oC - 27oC or 65oF - 80oF Please allow the gemstone or
jewelry piece to adjust to room temperature prior to testing. Exposure and/or operation of the tester
outside the room temperature would affect the result and performance of tester.
The probe tip must be placed at the right angle or perpendicular to the facet of gemstone for an
accurate reading.
Tests should be conducted on the table of the gemstone. In the event of any doubt, kindly test on
the girdle of the gemstones instead.
To achieve optimum accuracy for tests involving very small, it is important to allow the gemstone
to cool down before subsequent tests.
a. Keep the tester dry. Precipitation and all types of liquids or moisture can contain minerals that
will corrode electronic circuits. If your tester does get wet, remove the battery, and allow the
tester to dry completely before replacing it.
b. Do not use, store or expose the tester industry and dirty areas. It’s moving part and electronic
components can be damage.
c. Do not use, store or expose the tester in hot areas. High temperatures can damage or shorten
the life of the tester, damage batteries, and warp or melt certain plastics.
d. Do not use, store or expose the tester in cold areas. When the tester returns to its normal tem-
perature, moisture can form inside the device and damage electronic circuit boards.
e. Do not attempt to open the tester other than as instructed in user manual book.
III. IMPORTANT NOTICE
Fig. 1.1
Fig. 1.3
17
Fig. 1.5
While in this preparation mode, you can check status through the ORANGE “Ready” LED will blink
continuously until has the steady lighting with beep sound It’s means your tester is ready now for
use (Fig.1.4).
15
Fig. 1.4

20
Fig. 1.2
9
11
13
Composition
1. Retractable probe tip
2. Serrated Metal Part
3 “Ready” Indicator LED
4. “Low Battery” Indicator LED
5. “Metal” Indicator LED
6. “Simulant” Indicator LEDs
7. “Diamond” Indicator LED
8. ON/OFF Button Switch
9. Battery compartment
10. Neck Strap Attachment
11. Probe Protective Cap
f. Do not drop, knock, or shake the tester. Rough handling can break internal circuit boards and
fine mechanics.
g. Do not use harsh chemicals, cleaning solvents, or strong detergents to clean the tester.
h. Do not paint the tester. Paint can clog the moving parts and prevent proper operation.
If the tester is not working properly, kindly contact our customer service at
SmartPro Instrument co.,ltd
249/40, Moo 9, J.S.P. Building
Bangbon 1 Rd., Bangbon
Bangkok 10150 Thailand
+66 (0) 2 899 2956-7
Attn: Customer Service Executive
Turning on
Remove the protective cover from the probe tip (Fig. 1.2).
Prepare clean tissue / jewelry cloth. Carefully retrieve the gemstone with tweezers and place the
gemstone face down the table (Fig.1.7).
Cleaning your gemstone prior to testing
Fig. 1.7
The gemstone should be clean and dry before testing. However, elaborate cleaning procedures
are not normally necessary (Fig.1.6).
18
Recommended testing conditions
Fig. 1.6
Cleaning the probe tip
Please note that if the tester is being used for the first time, or if the tester has not been used for
a week, it is advisable to clean the probe tip using an oxidation removal sheet to attain consistent
and accurate reading.
b. Hold the probe pen with pen tip forming the right angle (90 degree) with an oxidation removal.
Gently move in a circular motion without retracting the tip (Fig. 1.5).
16
a. Ensure the unit is switched off.
c. Repeat the same motion several times. The cleaning process is completed and tester is now
ready for use.
11
1
2
3
6
8
10
4
7
9
5
GENERATION AHEAD TECHNOLOGY
Thank you for choosing our SmartPro Finder I and taking time for the user manual book which will
enable you to understand your recent purchase better.
SmartPro Instrument also recommends that you register your warranty by sending the warranty
registration card to us or registering online at http://www.smartproinstrument.com
a. The probe and wire tip is extremely sensitive and should be handled with care. Please always
replace the protective cap. Caution should be taken so as not to damage the probe and wire tip.
b. Do not leave worn out batteries in the battery compartment as the batteries may corrode, leak
or damage the tester. Batteries should be removed when the tester is expected to be stored for
an extended period of time.
28
4. TAKING CARE of your SmartPro Finder I
20
Fig. 1.2
9
11
13
Composition
1. Retractable probe tip
2. Serrated Metal Part
3 “Ready” Indicator LED
4. “Low Battery” Indicator LED
5. “Metal” Indicator LED
6. “Simulant” Indicator LEDs
7. “Diamond” Indicator LED
8. ON/OFF Button Switch
9. Battery compartment
10. Neck Strap Attachment
11. Probe Protective Cap
f. Do not drop, knock, or shake the tester. Rough handling can break internal circuit boards and
fine mechanics.
g. Do not use harsh chemicals, cleaning solvents, or strong detergents to clean the tester.
h. Do not paint the tester. Paint can clog the moving parts and prevent proper operation.
If the tester is not working properly, kindly contact our customer service at
SmartPro Instrument co.,ltd
249/40, Moo 9, J.S.P. Building
Bangbon 1 Rd., Bangbon
Bangkok 10150 Thailand
+66 (0) 2 899 2956-7
Attn: Customer Service Executive
Turning on
Remove the protective cover from the probe tip (Fig. 1.2).
Prepare clean tissue / jewelry cloth. Carefully retrieve the gemstone with tweezers and place the
gemstone face down the table (Fig.1.7).
Cleaning your gemstone prior to testing
Fig. 1.7
The gemstone should be clean and dry before testing. However, elaborate cleaning procedures
are not normally necessary (Fig.1.6).
18
Recommended testing conditions
Fig. 1.6
Cleaning the probe tip
Please note that if the tester is being used for the first time, or if the tester has not been used for
a week, it is advisable to clean the probe tip using an oxidation removal sheet to attain consistent
and accurate reading.
b. Hold the probe pen with pen tip forming the right angle (90 degree) with an oxidation removal.
Gently move in a circular motion without retracting the tip (Fig. 1.5).
16
a. Ensure the unit is switched off.
c. Repeat the same motion several times. The cleaning process is completed and tester is now
ready for use.
11
1
2
3
6
8
10
4
7
9
5
20
Fig. 1.2
9
11
13
Composition
1. Retractable probe tip
2. Serrated Metal Part
3 “Ready” Indicator LED
4. “Low Battery” Indicator LED
5. “Metal” Indicator LED
6. “Simulant” Indicator LEDs
7. “Diamond” Indicator LED
8. ON/OFF Button Switch
9. Battery compartment
10. Neck Strap Attachment
11. Probe Protective Cap
f. Do not drop, knock, or shake the tester. Rough handling can break internal circuit boards and
fine mechanics.
g. Do not use harsh chemicals, cleaning solvents, or strong detergents to clean the tester.
h. Do not paint the tester. Paint can clog the moving parts and prevent proper operation.
If the tester is not working properly, kindly contact our customer service at
SmartPro Instrument co.,ltd
249/40, Moo 9, J.S.P. Building
Bangbon 1 Rd., Bangbon
Bangkok 10150 Thailand
+66 (0) 2 899 2956-7
Attn: Customer Service Executive
Turning on
Remove the protective cover from the probe tip (Fig. 1.2).
Prepare clean tissue / jewelry cloth. Carefully retrieve the gemstone with tweezers and place the
gemstone face down the table (Fig.1.7).
Cleaning your gemstone prior to testing
Fig. 1.7
The gemstone should be clean and dry before testing. However, elaborate cleaning procedures
are not normally necessary (Fig.1.6).
18
Recommended testing conditions
Fig. 1.6
Cleaning the probe tip
Please note that if the tester is being used for the first time, or if the tester has not been used for
a week, it is advisable to clean the probe tip using an oxidation removal sheet to attain consistent
and accurate reading.
b. Hold the probe pen with pen tip forming the right angle (90 degree) with an oxidation removal.
Gently move in a circular motion without retracting the tip (Fig. 1.5).
16
a. Ensure the unit is switched off.
c. Repeat the same motion several times. The cleaning process is completed and tester is now
ready for use.
11
1
2
3
6
8
10
4
7
9
5
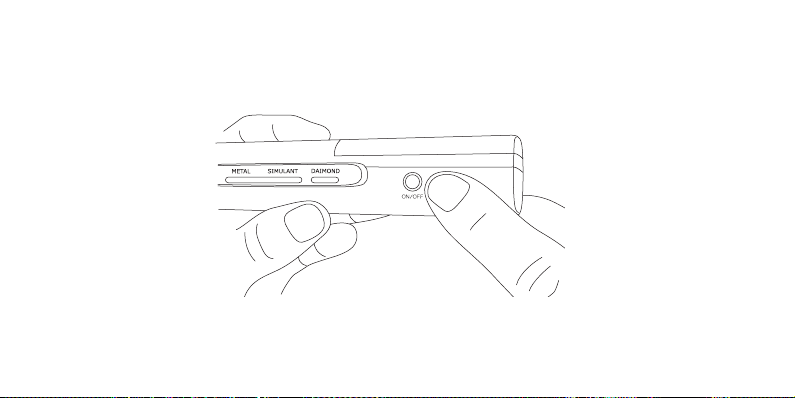
25
4
6
8
I. Disclaimers, Exclusions and Limitations of Liability
PLEASE READ AND NOTE SMARTPRO WARRANTY TERMS AND CONDITIONS as stated in
the warranty card. SmartPro warranty for its testers are subject to proper use by its user in accordance
with all the terms and conditions as started in the relevant user manual book and shall cover only
manufacturing defects.
Due to continuous product improvement, SmartPro reserves the right to revise all documents
including the right to make changes to the user manual without notice and without obligation
to notify any person of such revisions or changes. User s are advised to check SmartPro’s
website http://www.smartproinstrument .com from time to time.
SmartPro shall not be responsible for any damage or loss resulting from the use of this tester or
user manual, and under no circumstances shall SmartPro, its manufacturer or any of its subsidiaries,
licensors, distributors, resellers, servants and/or agents be liable for any direct or indirect damages,
resulting from the use of this tester.
II. About the SmartPro Finder I
The SmartPro Finder I is a pocket sized instrument that instantly verifies the authenticity of
diamonds based on their thermal properties. Diamonds, with their exceptional heat conductivity
properties, are unlike any other simulants, natural or synthetic, and are therefore not easily replicable.
The SmartPro Finder I has been subjected to thorough and extensive laboratory tests, and will
generally give a clear and reliable reading of the gemstone being tested under proper use. However,
you are advised to conduct further supporting tests.
As with all thermal testers in the market, the SmartPro Finder I is not able to differentiate between
natural diamonds and moissanite.
Include in your package:
a. SmartPro Finder I
b. User manual book
c. Warranty card
d. Protective carry case
e. Probe tip oxidation sheet
f. Neck strap
g. Metal stone tray
Fig. 2.1
23
All testers have been calibrated during the manufacturing process and no further adjustment or
user intervention to the tester is required.
Self-calibration should not be attempted. To minimize any risk associated, user should contact
event that users require the manufacturer to re-calibrate the unit, the users will bear the associated
to/from freight cost for the shipping of unit to the service center.
Calibration
21
Gently rub the table of gemstone against the tissue/jewelry cloth and place the gemstone on the
center of the test pad (Fig.1.8).
Fig. 1.8
1. GETTING STARTED with SmartPro Finder I
Powering up
19
This tester can be powered by the use of batteries. Required AAA Batteries (x2), take note of
the positive (+) and negative (-) directions of batteries (Fig 1.1). The use of Alkaline batteries is
preferred, as it should generally give approximately 2.5 hours continuous operation, While the
use of ordinary batteries will give a shorter working life.
Press the [ON/OFF] button (Fig. 1.3) and wait for warm up the tester about 20 seconds.
10
12
14
The recommended testing temperature is 18oC - 27oC or 65oF - 80oF Please allow the gemstone or
jewelry piece to adjust to room temperature prior to testing. Exposure and/or operation of the tester
outside the room temperature would affect the result and performance of tester.
The probe tip must be placed at the right angle or perpendicular to the facet of gemstone for an
accurate reading.
Tests should be conducted on the table of the gemstone. In the event of any doubt, kindly test on
the girdle of the gemstones instead.
To achieve optimum accuracy for tests involving very small, it is important to allow the gemstone
to cool down before subsequent tests.
a. Keep the tester dry. Precipitation and all types of liquids or moisture can contain minerals that
will corrode electronic circuits. If your tester does get wet, remove the battery, and allow the
tester to dry completely before replacing it.
b. Do not use, store or expose the tester industry and dirty areas. It’s moving part and electronic
components can be damage.
c. Do not use, store or expose the tester in hot areas. High temperatures can damage or shorten
the life of the tester, damage batteries, and warp or melt certain plastics.
d. Do not use, store or expose the tester in cold areas. When the tester returns to its normal tem-
perature, moisture can form inside the device and damage electronic circuit boards.
e. Do not attempt to open the tester other than as instructed in user manual book.
III. IMPORTANT NOTICE
Fig. 1.1
Fig. 1.3
17
Fig. 1.5
While in this preparation mode, you can check status through the ORANGE “Ready” LED will blink
continuously until has the steady lighting with beep sound It’s means your tester is ready now for
use (Fig.1.4).
15
Fig. 1.4
GENERATION AHEAD TECHNOLOGY
Thank you for choosing our SmartPro Finder I and taking time for the user manual book which will
enable you to understand your recent purchase better.
SmartPro Instrument also recommends that you register your warranty by sending the warranty
registration card to us or registering online at http://www.smartproinstrument.com
a. The probe and wire tip is extremely sensitive and should be handled with care. Please always
replace the protective cap. Caution should be taken so as not to damage the probe and wire tip.
b. Do not leave worn out batteries in the battery compartment as the batteries may corrode, leak
or damage the tester. Batteries should be removed when the tester is expected to be stored for
an extended period of time.
28
4. TAKING CARE of your SmartPro Finder I
14
20
Fig. 1.2
9
11
13
Composition
1. Retractable probe tip
2. Serrated Metal Part
3 “Ready” Indicator LED
4. “Low Battery” Indicator LED
5. “Metal” Indicator LED
6. “Simulant” Indicator LEDs
7. “Diamond” Indicator LED
8. ON/OFF Button Switch
9. Battery compartment
10. Neck Strap Attachment
11. Probe Protective Cap
f. Do not drop, knock, or shake the tester. Rough handling can break internal circuit boards and
fine mechanics.
g. Do not use harsh chemicals, cleaning solvents, or strong detergents to clean the tester.
h. Do not paint the tester. Paint can clog the moving parts and prevent proper operation.
If the tester is not working properly, kindly contact our customer service at
SmartPro Instrument co.,ltd
249/40, Moo 9, J.S.P. Building
Bangbon 1 Rd., Bangbon
Bangkok 10150 Thailand
+66 (0) 2 899 2956-7
Attn: Customer Service Executive
Turning on
Remove the protective cover from the probe tip (Fig. 1.2).
Prepare clean tissue / jewelry cloth. Carefully retrieve the gemstone with tweezers and place the
gemstone face down the table (Fig.1.7).
Cleaning your gemstone prior to testing
Fig. 1.7
The gemstone should be clean and dry before testing. However, elaborate cleaning procedures
are not normally necessary (Fig.1.6).
18
Recommended testing conditions
Fig. 1.6
Cleaning the probe tip
Please note that if the tester is being used for the first time, or if the tester has not been used for
a week, it is advisable to clean the probe tip using an oxidation removal sheet to attain consistent
and accurate reading.
b. Hold the probe pen with pen tip forming the right angle (90 degree) with an oxidation removal.
Gently move in a circular motion without retracting the tip (Fig. 1.5).
16
a. Ensure the unit is switched off.
c. Repeat the same motion several times. The cleaning process is completed and tester is now
ready for use.
11
1
2
3
6
8
10
4
7
9
5
1. GETTING STARTED with SmartPro Finder I
Powering up
19
This tester can be powered by the use of batteries. Required AAA Batteries (x2), take note of
the positive (+) and negative (-) directions of batteries (Fig 1.1). The use of Alkaline batteries is
preferred, as it should generally give approximately 2.5 hours continuous operation, While the
use of ordinary batteries will give a shorter working life.
Press the [ON/OFF] button (Fig. 1.3) and wait for warm up the tester about 20 seconds.
10
12
14
The recommended testing temperature is 18oC - 27oC or 65oF - 80oF Please allow the gemstone or
jewelry piece to adjust to room temperature prior to testing. Exposure and/or operation of the tester
outside the room temperature would affect the result and performance of tester.
The probe tip must be placed at the right angle or perpendicular to the facet of gemstone for an
accurate reading.
Tests should be conducted on the table of the gemstone. In the event of any doubt, kindly test on
the girdle of the gemstones instead.
To achieve optimum accuracy for tests involving very small, it is important to allow the gemstone
to cool down before subsequent tests.
a. Keep the tester dry. Precipitation and all types of liquids or moisture can contain minerals that
will corrode electronic circuits. If your tester does get wet, remove the battery, and allow the
tester to dry completely before replacing it.
b. Do not use, store or expose the tester industry and dirty areas. It’s moving part and electronic
components can be damage.
c. Do not use, store or expose the tester in hot areas. High temperatures can damage or shorten
the life of the tester, damage batteries, and warp or melt certain plastics.
d. Do not use, store or expose the tester in cold areas. When the tester returns to its normal tem-
perature, moisture can form inside the device and damage electronic circuit boards.
e. Do not attempt to open the tester other than as instructed in user manual book.
III. IMPORTANT NOTICE
Fig. 1.1
Fig. 1.3
17
Fig. 1.5
While in this preparation mode, you can check status through the ORANGE “Ready” LED will blink
continuously until has the steady lighting with beep sound It’s means your tester is ready now for
use (Fig.1.4).
15
Fig. 1.4

25
4
6
8
I. Disclaimers, Exclusions and Limitations of Liability
PLEASE READ AND NOTE SMARTPRO WARRANTY TERMS AND CONDITIONS as stated in
the warranty card. SmartPro warranty for its testers are subject to proper use by its user in accordance
with all the terms and conditions as started in the relevant user manual book and shall cover only
manufacturing defects.
Due to continuous product improvement, SmartPro reserves the right to revise all documents
including the right to make changes to the user manual without notice and without obligation
to notify any person of such revisions or changes. User s are advised to check SmartPro’s
website http://www.smartproinstrument .com from time to time.
SmartPro shall not be responsible for any damage or loss resulting from the use of this tester or
user manual, and under no circumstances shall SmartPro, its manufacturer or any of its subsidiaries,
licensors, distributors, resellers, servants and/or agents be liable for any direct or indirect damages,
resulting from the use of this tester.
II. About the SmartPro Finder I
The SmartPro Finder I is a pocket sized instrument that instantly verifies the authenticity of
diamonds based on their thermal properties. Diamonds, with their exceptional heat conductivity
properties, are unlike any other simulants, natural or synthetic, and are therefore not easily replicable.
The SmartPro Finder I has been subjected to thorough and extensive laboratory tests, and will
generally give a clear and reliable reading of the gemstone being tested under proper use. However,
you are advised to conduct further supporting tests.
As with all thermal testers in the market, the SmartPro Finder I is not able to differentiate between
natural diamonds and moissanite.
Include in your package:
a. SmartPro Finder I
b. User manual book
c. Warranty card
d. Protective carry case
e. Probe tip oxidation sheet
f. Neck strap
g. Metal stone tray
Fig. 2.1
23
All testers have been calibrated during the manufacturing process and no further adjustment or
user intervention to the tester is required.
Self-calibration should not be attempted. To minimize any risk associated, user should contact
event that users require the manufacturer to re-calibrate the unit, the users will bear the associated
to/from freight cost for the shipping of unit to the service center.
Calibration
21
Gently rub the table of gemstone against the tissue/jewelry cloth and place the gemstone on the
center of the test pad (Fig.1.8).
Fig. 1.8
1. GETTING STARTED with SmartPro Finder I
Powering up
19
This tester can be powered by the use of batteries. Required AAA Batteries (x2), take note of
the positive (+) and negative (-) directions of batteries (Fig 1.1). The use of Alkaline batteries is
preferred, as it should generally give approximately 2.5 hours continuous operation, While the
use of ordinary batteries will give a shorter working life.
Press the [ON/OFF] button (Fig. 1.3) and wait for warm up the tester about 20 seconds.
10
12
14
The recommended testing temperature is 18oC - 27oC or 65oF - 80oF Please allow the gemstone or
jewelry piece to adjust to room temperature prior to testing. Exposure and/or operation of the tester
outside the room temperature would affect the result and performance of tester.
The probe tip must be placed at the right angle or perpendicular to the facet of gemstone for an
accurate reading.
Tests should be conducted on the table of the gemstone. In the event of any doubt, kindly test on
the girdle of the gemstones instead.
To achieve optimum accuracy for tests involving very small, it is important to allow the gemstone
to cool down before subsequent tests.
a. Keep the tester dry. Precipitation and all types of liquids or moisture can contain minerals that
will corrode electronic circuits. If your tester does get wet, remove the battery, and allow the
tester to dry completely before replacing it.
b. Do not use, store or expose the tester industry and dirty areas. It’s moving part and electronic
components can be damage.
c. Do not use, store or expose the tester in hot areas. High temperatures can damage or shorten
the life of the tester, damage batteries, and warp or melt certain plastics.
d. Do not use, store or expose the tester in cold areas. When the tester returns to its normal tem-
perature, moisture can form inside the device and damage electronic circuit boards.
e. Do not attempt to open the tester other than as instructed in user manual book.
III. IMPORTANT NOTICE
Fig. 1.1
Fig. 1.3
17
Fig. 1.5
While in this preparation mode, you can check status through the ORANGE “Ready” LED will blink
continuously until has the steady lighting with beep sound It’s means your tester is ready now for
use (Fig.1.4).
15
Fig. 1.4
20
Fig. 1.2
9
11
13
Composition
1. Retractable probe tip
2. Serrated Metal Part
3 “Ready” Indicator LED
4. “Low Battery” Indicator LED
5. “Metal” Indicator LED
6. “Simulant” Indicator LEDs
7. “Diamond” Indicator LED
8. ON/OFF Button Switch
9. Battery compartment
10. Neck Strap Attachment
11. Probe Protective Cap
f. Do not drop, knock, or shake the tester. Rough handling can break internal circuit boards and
fine mechanics.
g. Do not use harsh chemicals, cleaning solvents, or strong detergents to clean the tester.
h. Do not paint the tester. Paint can clog the moving parts and prevent proper operation.
If the tester is not working properly, kindly contact our customer service at
SmartPro Instrument co.,ltd
249/40, Moo 9, J.S.P. Building
Bangbon 1 Rd., Bangbon
Bangkok 10150 Thailand
+66 (0) 2 899 2956-7
Attn: Customer Service Executive
Turning on
Remove the protective cover from the probe tip (Fig. 1.2).
Prepare clean tissue / jewelry cloth. Carefully retrieve the gemstone with tweezers and place the
gemstone face down the table (Fig.1.7).
Cleaning your gemstone prior to testing
Fig. 1.7
The gemstone should be clean and dry before testing. However, elaborate cleaning procedures
are not normally necessary (Fig.1.6).
18
Recommended testing conditions
Fig. 1.6
Cleaning the probe tip
Please note that if the tester is being used for the first time, or if the tester has not been used for
a week, it is advisable to clean the probe tip using an oxidation removal sheet to attain consistent
and accurate reading.
b. Hold the probe pen with pen tip forming the right angle (90 degree) with an oxidation removal.
Gently move in a circular motion without retracting the tip (Fig. 1.5).
16
a. Ensure the unit is switched off.
c. Repeat the same motion several times. The cleaning process is completed and tester is now
ready for use.
11
1
2
3
6
8
10
4
7
9
5
1. GETTING STARTED with SmartPro Finder I
Powering up
19
This tester can be powered by the use of batteries. Required AAA Batteries (x2), take note of
the positive (+) and negative (-) directions of batteries (Fig 1.1). The use of Alkaline batteries is
preferred, as it should generally give approximately 2.5 hours continuous operation, While the
use of ordinary batteries will give a shorter working life.
Press the [ON/OFF] button (Fig. 1.3) and wait for warm up the tester about 20 seconds.
10
12
14
The recommended testing temperature is 18oC - 27oC or 65oF - 80oF Please allow the gemstone or
jewelry piece to adjust to room temperature prior to testing. Exposure and/or operation of the tester
outside the room temperature would affect the result and performance of tester.
The probe tip must be placed at the right angle or perpendicular to the facet of gemstone for an
accurate reading.
Tests should be conducted on the table of the gemstone. In the event of any doubt, kindly test on
the girdle of the gemstones instead.
To achieve optimum accuracy for tests involving very small, it is important to allow the gemstone
to cool down before subsequent tests.
a. Keep the tester dry. Precipitation and all types of liquids or moisture can contain minerals that
will corrode electronic circuits. If your tester does get wet, remove the battery, and allow the
tester to dry completely before replacing it.
b. Do not use, store or expose the tester industry and dirty areas. It’s moving part and electronic
components can be damage.
c. Do not use, store or expose the tester in hot areas. High temperatures can damage or shorten
the life of the tester, damage batteries, and warp or melt certain plastics.
d. Do not use, store or expose the tester in cold areas. When the tester returns to its normal tem-
perature, moisture can form inside the device and damage electronic circuit boards.
e. Do not attempt to open the tester other than as instructed in user manual book.
III. IMPORTANT NOTICE
Fig. 1.1
Fig. 1.3
17
Fig. 1.5
While in this preparation mode, you can check status through the ORANGE “Ready” LED will blink
continuously until has the steady lighting with beep sound It’s means your tester is ready now for
use (Fig.1.4).
15
Fig. 1.4
YELLOW

TO THE MAXIMUM EXTENT PERMITTED BY APPLICABLE LAW, under no circumstances shall
SmartPro, its manufacturer or any of its subsidiaries, licensors, distributors, resellers, servants
and/or agents be responsible for any special, incidental, consequential or indirect damages
howsoever caused.
The tester or SmartPro Finder I (SPF I) referred to in this user manual is provided and/or sold on
an “as is” basis. Except as required by applicable law, no warranties of any kind, either expressed
or implied, including, but not limited to, the implied warranties of merchantability and fitness for a
particular purpose.
Place the gemstone on the metal stone tray and it with one hand while holding the tester with the
other hand (Fig.2.2).
26
5
7
CONTENTS
I. Disclaimers, Exclusions and Limitations of Liability
II. About the SmartPro Finder I
III. IMPORTANT NOTICE
1. GETTING STARTED with SmartPro Finder I
2. PERFORMING TEST with SmartPro Finder I
3. READING TEST RESULT on SmartPro Finder I
4. TAKING CARE of your SmartPro Finder I
04
06
10
12
24
27
28
a. High efficiency diamond tester
b. Retractable thermoelectric probe tip that ensures constant pressure between probe tip and
gemstone
c. Industry’s thinnest probe tip (0.48mm) for testing diamonds as small as 0.01ct
d. Diamond indicator LED blinking with sound
e. Metal detection indicator LED alarm with ringing sound.
f. Simulant indicator LED
g. Low battery indicator LED
h. No waiting time between tests
i. Super Clear & Bright LED display
j. Automatically power-off within 2 minutes (Sleep mode)
k. Powered by AAA batteries (x2)
The SmartPro Finder I features the following:
For testing loose gemstones
METAL
SIMULANT
DAIMOND
Fig. 2.2
24
For mounted jewelry or gemstones
2. PERFORMING A TEST with SmartPro Finder I
Hold the jewelry or gemstone with one hand and the tester with other hand (Fig.2.1). For proper
operation of the tester, the thumb and index finger must always be placed on the metal-plated
serrated part located on both sides of the tester at all times. Care should be taken when testing
mounted jewelry. User must ensure that the stones are securely mounted before conducting a test
as gap between stone an setting might lead to inaccurate reading.
Place the tip of the probe pen against the gemstone. Apply minimal pressure to fully depress the
tip into the probe pen for correct reading. This is to provide a steady and constant contact made
between the probe tip and the gemstone.
22
Battery information
Do not leave worn out batteries in the battery compartment as the batteries may corrode, leak,
and damage the tester. Batteries should be removed when the tester is expected to be store for
an extended period of time.
To prevent inaccurate readings, replace with new battery as soon as the “Low Battery” indicator
LED is blinking and become faster when battery near to empty.
25
4
6
8
I. Disclaimers, Exclusions and Limitations of Liability
PLEASE READ AND NOTE SMARTPRO WARRANTY TERMS AND CONDITIONS as stated in
the warranty card. SmartPro warranty for its testers are subject to proper use by its user in accordance
with all the terms and conditions as started in the relevant user manual book and shall cover only
manufacturing defects.
Due to continuous product improvement, SmartPro reserves the right to revise all documents
including the right to make changes to the user manual without notice and without obligation
to notify any person of such revisions or changes. User s are advised to check SmartPro’s
website http://www.smartproinstrument .com from time to time.
SmartPro shall not be responsible for any damage or loss resulting from the use of this tester or
user manual, and under no circumstances shall SmartPro, its manufacturer or any of its subsidiaries,
licensors, distributors, resellers, servants and/or agents be liable for any direct or indirect damages,
resulting from the use of this tester.
II. About the SmartPro Finder I
The SmartPro Finder I is a pocket sized instrument that instantly verifies the authenticity of
diamonds based on their thermal properties. Diamonds, with their exceptional heat conductivity
properties, are unlike any other simulants, natural or synthetic, and are therefore not easily replicable.
The SmartPro Finder I has been subjected to thorough and extensive laboratory tests, and will
generally give a clear and reliable reading of the gemstone being tested under proper use. However,
you are advised to conduct further supporting tests.
As with all thermal testers in the market, the SmartPro Finder I is not able to differentiate between
natural diamonds and moissanite.
Include in your package:
a. SmartPro Finder I
b. User manual book
c. Warranty card
d. Protective carry case
e. Probe tip oxidation sheet
f. Neck strap
g. Metal stone tray
Fig. 2.1
23
All testers have been calibrated during the manufacturing process and no further adjustment or
user intervention to the tester is required.
Self-calibration should not be attempted. To minimize any risk associated, user should contact
event that users require the manufacturer to re-calibrate the unit, the users will bear the associated
to/from freight cost for the shipping of unit to the service center.
Calibration
21
Gently rub the table of gemstone against the tissue/jewelry cloth and place the gemstone on the
center of the test pad (Fig.1.8).
Fig. 1.8
20
Fig. 1.2
9
11
13
Composition
1. Retractable probe tip
2. Serrated Metal Part
3 “Ready” Indicator LED
4. “Low Battery” Indicator LED
5. “Metal” Indicator LED
6. “Simulant” Indicator LEDs
7. “Diamond” Indicator LED
8. ON/OFF Button Switch
9. Battery compartment
10. Neck Strap Attachment
11. Probe Protective Cap
f. Do not drop, knock, or shake the tester. Rough handling can break internal circuit boards and
fine mechanics.
g. Do not use harsh chemicals, cleaning solvents, or strong detergents to clean the tester.
h. Do not paint the tester. Paint can clog the moving parts and prevent proper operation.
If the tester is not working properly, kindly contact our customer service at
SmartPro Instrument co.,ltd
249/40, Moo 9, J.S.P. Building
Bangbon 1 Rd., Bangbon
Bangkok 10150 Thailand
+66 (0) 2 899 2956-7
Attn: Customer Service Executive
Turning on
Remove the protective cover from the probe tip (Fig. 1.2).
Prepare clean tissue / jewelry cloth. Carefully retrieve the gemstone with tweezers and place the
gemstone face down the table (Fig.1.7).
Cleaning your gemstone prior to testing
Fig. 1.7
The gemstone should be clean and dry before testing. However, elaborate cleaning procedures
are not normally necessary (Fig.1.6).
18
Recommended testing conditions
Fig. 1.6
Cleaning the probe tip
Please note that if the tester is being used for the first time, or if the tester has not been used for
a week, it is advisable to clean the probe tip using an oxidation removal sheet to attain consistent
and accurate reading.
b. Hold the probe pen with pen tip forming the right angle (90 degree) with an oxidation removal.
Gently move in a circular motion without retracting the tip (Fig. 1.5).
16
a. Ensure the unit is switched off.
c. Repeat the same motion several times. The cleaning process is completed and tester is now
ready for use.
11
1
2
3
6
8
10
4
7
9
5
20
Fig. 1.2
9
11
13
Composition
1. Retractable probe tip
2. Serrated Metal Part
3 “Ready” Indicator LED
4. “Low Battery” Indicator LED
5. “Metal” Indicator LED
6. “Simulant” Indicator LEDs
7. “Diamond” Indicator LED
8. ON/OFF Button Switch
9. Battery compartment
10. Neck Strap Attachment
11. Probe Protective Cap
f. Do not drop, knock, or shake the tester. Rough handling can break internal circuit boards and
fine mechanics.
g. Do not use harsh chemicals, cleaning solvents, or strong detergents to clean the tester.
h. Do not paint the tester. Paint can clog the moving parts and prevent proper operation.
If the tester is not working properly, kindly contact our customer service at
SmartPro Instrument co.,ltd
249/40, Moo 9, J.S.P. Building
Bangbon 1 Rd., Bangbon
Bangkok 10150 Thailand
+66 (0) 2 899 2956-7
Attn: Customer Service Executive
Turning on
Remove the protective cover from the probe tip (Fig. 1.2).
Prepare clean tissue / jewelry cloth. Carefully retrieve the gemstone with tweezers and place the
gemstone face down the table (Fig.1.7).
Cleaning your gemstone prior to testing
Fig. 1.7
The gemstone should be clean and dry before testing. However, elaborate cleaning procedures
are not normally necessary (Fig.1.6).
18
Recommended testing conditions
Fig. 1.6
Cleaning the probe tip
Please note that if the tester is being used for the first time, or if the tester has not been used for
a week, it is advisable to clean the probe tip using an oxidation removal sheet to attain consistent
and accurate reading.
b. Hold the probe pen with pen tip forming the right angle (90 degree) with an oxidation removal.
Gently move in a circular motion without retracting the tip (Fig. 1.5).
16
a. Ensure the unit is switched off.
c. Repeat the same motion several times. The cleaning process is completed and tester is now
ready for use.
11
1
2
3
6
8
10
4
7
9
5
1. GETTING STARTED with SmartPro Finder I
Powering up
19
This tester can be powered by the use of batteries. Required AAA Batteries (x2), take note of
the positive (+) and negative (-) directions of batteries (Fig 1.1). The use of Alkaline batteries is
preferred, as it should generally give approximately 2.5 hours continuous operation, While the
use of ordinary batteries will give a shorter working life.
Press the [ON/OFF] button (Fig. 1.3) and wait for warm up the tester about 20 seconds.
10
12
14
The recommended testing temperature is 18oC - 27oC or 65oF - 80oF Please allow the gemstone or
jewelry piece to adjust to room temperature prior to testing. Exposure and/or operation of the tester
outside the room temperature would affect the result and performance of tester.
The probe tip must be placed at the right angle or perpendicular to the facet of gemstone for an
accurate reading.
Tests should be conducted on the table of the gemstone. In the event of any doubt, kindly test on
the girdle of the gemstones instead.
To achieve optimum accuracy for tests involving very small, it is important to allow the gemstone
to cool down before subsequent tests.
a. Keep the tester dry. Precipitation and all types of liquids or moisture can contain minerals that
will corrode electronic circuits. If your tester does get wet, remove the battery, and allow the
tester to dry completely before replacing it.
b. Do not use, store or expose the tester industry and dirty areas. It’s moving part and electronic
components can be damage.
c. Do not use, store or expose the tester in hot areas. High temperatures can damage or shorten
the life of the tester, damage batteries, and warp or melt certain plastics.
d. Do not use, store or expose the tester in cold areas. When the tester returns to its normal tem-
perature, moisture can form inside the device and damage electronic circuit boards.
e. Do not attempt to open the tester other than as instructed in user manual book.
III. IMPORTANT NOTICE
Fig. 1.1
Fig. 1.3
17
Fig. 1.5
While in this preparation mode, you can check status through the ORANGE “Ready” LED will blink
continuously until has the steady lighting with beep sound It’s means your tester is ready now for
use (Fig.1.4).
15
Fig. 1.4
16
1. GETTING STARTED with SmartPro Finder I
Powering up
19
This tester can be powered by the use of batteries. Required AAA Batteries (x2), take note of
the positive (+) and negative (-) directions of batteries (Fig 1.1). The use of Alkaline batteries is
preferred, as it should generally give approximately 2.5 hours continuous operation, While the
use of ordinary batteries will give a shorter working life.
Press the [ON/OFF] button (Fig. 1.3) and wait for warm up the tester about 20 seconds.
10
12
14
The recommended testing temperature is 18oC - 27oC or 65oF - 80oF Please allow the gemstone or
jewelry piece to adjust to room temperature prior to testing. Exposure and/or operation of the tester
outside the room temperature would affect the result and performance of tester.
The probe tip must be placed at the right angle or perpendicular to the facet of gemstone for an
accurate reading.
Tests should be conducted on the table of the gemstone. In the event of any doubt, kindly test on
the girdle of the gemstones instead.
To achieve optimum accuracy for tests involving very small, it is important to allow the gemstone
to cool down before subsequent tests.
a. Keep the tester dry. Precipitation and all types of liquids or moisture can contain minerals that
will corrode electronic circuits. If your tester does get wet, remove the battery, and allow the
tester to dry completely before replacing it.
b. Do not use, store or expose the tester industry and dirty areas. It’s moving part and electronic
components can be damage.
c. Do not use, store or expose the tester in hot areas. High temperatures can damage or shorten
the life of the tester, damage batteries, and warp or melt certain plastics.
d. Do not use, store or expose the tester in cold areas. When the tester returns to its normal tem-
perature, moisture can form inside the device and damage electronic circuit boards.
e. Do not attempt to open the tester other than as instructed in user manual book.
III. IMPORTANT NOTICE
Fig. 1.1
Fig. 1.3
17
Fig. 1.5
While in this preparation mode, you can check status through the ORANGE “Ready” LED will blink
continuously until has the steady lighting with beep sound It’s means your tester is ready now for
use (Fig.1.4).
15
Fig. 1.4

TO THE MAXIMUM EXTENT PERMITTED BY APPLICABLE LAW, under no circumstances shall
SmartPro, its manufacturer or any of its subsidiaries, licensors, distributors, resellers, servants
and/or agents be responsible for any special, incidental, consequential or indirect damages
howsoever caused.
The tester or SmartPro Finder I (SPF I) referred to in this user manual is provided and/or sold on
an “as is” basis. Except as required by applicable law, no warranties of any kind, either expressed
or implied, including, but not limited to, the implied warranties of merchantability and fitness for a
particular purpose.
Place the gemstone on the metal stone tray and it with one hand while holding the tester with the
other hand (Fig.2.2).
26
5
7
CONTENTS
I. Disclaimers, Exclusions and Limitations of Liability
II. About the SmartPro Finder I
III. IMPORTANT NOTICE
1. GETTING STARTED with SmartPro Finder I
2. PERFORMING TEST with SmartPro Finder I
3. READING TEST RESULT on SmartPro Finder I
4. TAKING CARE of your SmartPro Finder I
04
06
10
12
24
27
28
a. High efficiency diamond tester
b. Retractable thermoelectric probe tip that ensures constant pressure between probe tip and
gemstone
c. Industry’s thinnest probe tip (0.48mm) for testing diamonds as small as 0.01ct
d. Diamond indicator LED blinking with sound
e. Metal detection indicator LED alarm with ringing sound.
f. Simulant indicator LED
g. Low battery indicator LED
h. No waiting time between tests
i. Super Clear & Bright LED display
j. Automatically power-off within 2 minutes (Sleep mode)
k. Powered by AAA batteries (x2)
The SmartPro Finder I features the following:
For testing loose gemstones
METAL
SIMULANT
DAIMOND
Fig. 2.2
24
For mounted jewelry or gemstones
2. PERFORMING A TEST with SmartPro Finder I
Hold the jewelry or gemstone with one hand and the tester with other hand (Fig.2.1). For proper
operation of the tester, the thumb and index finger must always be placed on the metal-plated
serrated part located on both sides of the tester at all times. Care should be taken when testing
mounted jewelry. User must ensure that the stones are securely mounted before conducting a test
as gap between stone an setting might lead to inaccurate reading.
Place the tip of the probe pen against the gemstone. Apply minimal pressure to fully depress the
tip into the probe pen for correct reading. This is to provide a steady and constant contact made
between the probe tip and the gemstone.
22
Battery information
Do not leave worn out batteries in the battery compartment as the batteries may corrode, leak,
and damage the tester. Batteries should be removed when the tester is expected to be store for
an extended period of time.
To prevent inaccurate readings, replace with new battery as soon as the “Low Battery” indicator
LED is blinking and become faster when battery near to empty.
25
4
6
8
I. Disclaimers, Exclusions and Limitations of Liability
PLEASE READ AND NOTE SMARTPRO WARRANTY TERMS AND CONDITIONS as stated in
the warranty card. SmartPro warranty for its testers are subject to proper use by its user in accordance
with all the terms and conditions as started in the relevant user manual book and shall cover only
manufacturing defects.
Due to continuous product improvement, SmartPro reserves the right to revise all documents
including the right to make changes to the user manual without notice and without obligation
to notify any person of such revisions or changes. User s are advised to check SmartPro’s
website http://www.smartproinstrument .com from time to time.
SmartPro shall not be responsible for any damage or loss resulting from the use of this tester or
user manual, and under no circumstances shall SmartPro, its manufacturer or any of its subsidiaries,
licensors, distributors, resellers, servants and/or agents be liable for any direct or indirect damages,
resulting from the use of this tester.
II. About the SmartPro Finder I
The SmartPro Finder I is a pocket sized instrument that instantly verifies the authenticity of
diamonds based on their thermal properties. Diamonds, with their exceptional heat conductivity
properties, are unlike any other simulants, natural or synthetic, and are therefore not easily replicable.
The SmartPro Finder I has been subjected to thorough and extensive laboratory tests, and will
generally give a clear and reliable reading of the gemstone being tested under proper use. However,
you are advised to conduct further supporting tests.
As with all thermal testers in the market, the SmartPro Finder I is not able to differentiate between
natural diamonds and moissanite.
Include in your package:
a. SmartPro Finder I
b. User manual book
c. Warranty card
d. Protective carry case
e. Probe tip oxidation sheet
f. Neck strap
g. Metal stone tray
Fig. 2.1
23
All testers have been calibrated during the manufacturing process and no further adjustment or
user intervention to the tester is required.
Self-calibration should not be attempted. To minimize any risk associated, user should contact
event that users require the manufacturer to re-calibrate the unit, the users will bear the associated
to/from freight cost for the shipping of unit to the service center.
Calibration
21
Gently rub the table of gemstone against the tissue/jewelry cloth and place the gemstone on the
center of the test pad (Fig.1.8).
Fig. 1.8
20
Fig. 1.2
9
11
13
Composition
1. Retractable probe tip
2. Serrated Metal Part
3 “Ready” Indicator LED
4. “Low Battery” Indicator LED
5. “Metal” Indicator LED
6. “Simulant” Indicator LEDs
7. “Diamond” Indicator LED
8. ON/OFF Button Switch
9. Battery compartment
10. Neck Strap Attachment
11. Probe Protective Cap
f. Do not drop, knock, or shake the tester. Rough handling can break internal circuit boards and
fine mechanics.
g. Do not use harsh chemicals, cleaning solvents, or strong detergents to clean the tester.
h. Do not paint the tester. Paint can clog the moving parts and prevent proper operation.
If the tester is not working properly, kindly contact our customer service at
SmartPro Instrument co.,ltd
249/40, Moo 9, J.S.P. Building
Bangbon 1 Rd., Bangbon
Bangkok 10150 Thailand
+66 (0) 2 899 2956-7
Attn: Customer Service Executive
Turning on
Remove the protective cover from the probe tip (Fig. 1.2).
Prepare clean tissue / jewelry cloth. Carefully retrieve the gemstone with tweezers and place the
gemstone face down the table (Fig.1.7).
Cleaning your gemstone prior to testing
Fig. 1.7
The gemstone should be clean and dry before testing. However, elaborate cleaning procedures
are not normally necessary (Fig.1.6).
18
Recommended testing conditions
Fig. 1.6
Cleaning the probe tip
Please note that if the tester is being used for the first time, or if the tester has not been used for
a week, it is advisable to clean the probe tip using an oxidation removal sheet to attain consistent
and accurate reading.
b. Hold the probe pen with pen tip forming the right angle (90 degree) with an oxidation removal.
Gently move in a circular motion without retracting the tip (Fig. 1.5).
16
a. Ensure the unit is switched off.
c. Repeat the same motion several times. The cleaning process is completed and tester is now
ready for use.
11
1
2
3
6
8
10
4
7
9
5
20
Fig. 1.2
9
11
13
Composition
1. Retractable probe tip
2. Serrated Metal Part
3 “Ready” Indicator LED
4. “Low Battery” Indicator LED
5. “Metal” Indicator LED
6. “Simulant” Indicator LEDs
7. “Diamond” Indicator LED
8. ON/OFF Button Switch
9. Battery compartment
10. Neck Strap Attachment
11. Probe Protective Cap
f. Do not drop, knock, or shake the tester. Rough handling can break internal circuit boards and
fine mechanics.
g. Do not use harsh chemicals, cleaning solvents, or strong detergents to clean the tester.
h. Do not paint the tester. Paint can clog the moving parts and prevent proper operation.
If the tester is not working properly, kindly contact our customer service at
SmartPro Instrument co.,ltd
249/40, Moo 9, J.S.P. Building
Bangbon 1 Rd., Bangbon
Bangkok 10150 Thailand
+66 (0) 2 899 2956-7
Attn: Customer Service Executive
Turning on
Remove the protective cover from the probe tip (Fig. 1.2).
Prepare clean tissue / jewelry cloth. Carefully retrieve the gemstone with tweezers and place the
gemstone face down the table (Fig.1.7).
Cleaning your gemstone prior to testing
Fig. 1.7
The gemstone should be clean and dry before testing. However, elaborate cleaning procedures
are not normally necessary (Fig.1.6).
18
Recommended testing conditions
Fig. 1.6
Cleaning the probe tip
Please note that if the tester is being used for the first time, or if the tester has not been used for
a week, it is advisable to clean the probe tip using an oxidation removal sheet to attain consistent
and accurate reading.
b. Hold the probe pen with pen tip forming the right angle (90 degree) with an oxidation removal.
Gently move in a circular motion without retracting the tip (Fig. 1.5).
16
a. Ensure the unit is switched off.
c. Repeat the same motion several times. The cleaning process is completed and tester is now
ready for use.
11
1
2
3
6
8
10
4
7
9
5
1. GETTING STARTED with SmartPro Finder I
Powering up
19
This tester can be powered by the use of batteries. Required AAA Batteries (x2), take note of
the positive (+) and negative (-) directions of batteries (Fig 1.1). The use of Alkaline batteries is
preferred, as it should generally give approximately 2.5 hours continuous operation, While the
use of ordinary batteries will give a shorter working life.
Press the [ON/OFF] button (Fig. 1.3) and wait for warm up the tester about 20 seconds.
10
12
14
The recommended testing temperature is 18oC - 27oC or 65oF - 80oF Please allow the gemstone or
jewelry piece to adjust to room temperature prior to testing. Exposure and/or operation of the tester
outside the room temperature would affect the result and performance of tester.
The probe tip must be placed at the right angle or perpendicular to the facet of gemstone for an
accurate reading.
Tests should be conducted on the table of the gemstone. In the event of any doubt, kindly test on
the girdle of the gemstones instead.
To achieve optimum accuracy for tests involving very small, it is important to allow the gemstone
to cool down before subsequent tests.
a. Keep the tester dry. Precipitation and all types of liquids or moisture can contain minerals that
will corrode electronic circuits. If your tester does get wet, remove the battery, and allow the
tester to dry completely before replacing it.
b. Do not use, store or expose the tester industry and dirty areas. It’s moving part and electronic
components can be damage.
c. Do not use, store or expose the tester in hot areas. High temperatures can damage or shorten
the life of the tester, damage batteries, and warp or melt certain plastics.
d. Do not use, store or expose the tester in cold areas. When the tester returns to its normal tem-
perature, moisture can form inside the device and damage electronic circuit boards.
e. Do not attempt to open the tester other than as instructed in user manual book.
III. IMPORTANT NOTICE
Fig. 1.1
Fig. 1.3
17
Fig. 1.5
While in this preparation mode, you can check status through the ORANGE “Ready” LED will blink
continuously until has the steady lighting with beep sound It’s means your tester is ready now for
use (Fig.1.4).
15
Fig. 1.4

TO THE MAXIMUM EXTENT PERMITTED BY APPLICABLE LAW, under no circumstances shall
SmartPro, its manufacturer or any of its subsidiaries, licensors, distributors, resellers, servants
and/or agents be responsible for any special, incidental, consequential or indirect damages
howsoever caused.
The tester or SmartPro Finder I (SPF I) referred to in this user manual is provided and/or sold on
an “as is” basis. Except as required by applicable law, no warranties of any kind, either expressed
or implied, including, but not limited to, the implied warranties of merchantability and fitness for a
particular purpose.
Place the gemstone on the metal stone tray and it with one hand while holding the tester with the
other hand (Fig.2.2).
26
5
7
CONTENTS
I. Disclaimers, Exclusions and Limitations of Liability
II. About the SmartPro Finder I
III. IMPORTANT NOTICE
1. GETTING STARTED with SmartPro Finder I
2. PERFORMING TEST with SmartPro Finder I
3. READING TEST RESULT on SmartPro Finder I
4. TAKING CARE of your SmartPro Finder I
04
06
10
12
24
27
28
a. High efficiency diamond tester
b. Retractable thermoelectric probe tip that ensures constant pressure between probe tip and
gemstone
c. Industry’s thinnest probe tip (0.48mm) for testing diamonds as small as 0.01ct
d. Diamond indicator LED blinking with sound
e. Metal detection indicator LED alarm with ringing sound.
f. Simulant indicator LED
g. Low battery indicator LED
h. No waiting time between tests
i. Super Clear & Bright LED display
j. Automatically power-off within 2 minutes (Sleep mode)
k. Powered by AAA batteries (x2)
The SmartPro Finder I features the following:
For testing loose gemstones
METAL
SIMULANT
DAIMOND
Fig. 2.2
24
For mounted jewelry or gemstones
2. PERFORMING A TEST with SmartPro Finder I
Hold the jewelry or gemstone with one hand and the tester with other hand (Fig.2.1). For proper
operation of the tester, the thumb and index finger must always be placed on the metal-plated
serrated part located on both sides of the tester at all times. Care should be taken when testing
mounted jewelry. User must ensure that the stones are securely mounted before conducting a test
as gap between stone an setting might lead to inaccurate reading.
Place the tip of the probe pen against the gemstone. Apply minimal pressure to fully depress the
tip into the probe pen for correct reading. This is to provide a steady and constant contact made
between the probe tip and the gemstone.
22
Battery information
Do not leave worn out batteries in the battery compartment as the batteries may corrode, leak,
and damage the tester. Batteries should be removed when the tester is expected to be store for
an extended period of time.
To prevent inaccurate readings, replace with new battery as soon as the “Low Battery” indicator
LED is blinking and become faster when battery near to empty.
20
Fig. 1.2
9
11
13
Composition
1. Retractable probe tip
2. Serrated Metal Part
3 “Ready” Indicator LED
4. “Low Battery” Indicator LED
5. “Metal” Indicator LED
6. “Simulant” Indicator LEDs
7. “Diamond” Indicator LED
8. ON/OFF Button Switch
9. Battery compartment
10. Neck Strap Attachment
11. Probe Protective Cap
f. Do not drop, knock, or shake the tester. Rough handling can break internal circuit boards and
fine mechanics.
g. Do not use harsh chemicals, cleaning solvents, or strong detergents to clean the tester.
h. Do not paint the tester. Paint can clog the moving parts and prevent proper operation.
If the tester is not working properly, kindly contact our customer service at
SmartPro Instrument co.,ltd
249/40, Moo 9, J.S.P. Building
Bangbon 1 Rd., Bangbon
Bangkok 10150 Thailand
+66 (0) 2 899 2956-7
Attn: Customer Service Executive
Turning on
Remove the protective cover from the probe tip (Fig. 1.2).
Prepare clean tissue / jewelry cloth. Carefully retrieve the gemstone with tweezers and place the
gemstone face down the table (Fig.1.7).
Cleaning your gemstone prior to testing
Fig. 1.7
The gemstone should be clean and dry before testing. However, elaborate cleaning procedures
are not normally necessary (Fig.1.6).
18
Recommended testing conditions
Fig. 1.6
Cleaning the probe tip
Please note that if the tester is being used for the first time, or if the tester has not been used for
a week, it is advisable to clean the probe tip using an oxidation removal sheet to attain consistent
and accurate reading.
b. Hold the probe pen with pen tip forming the right angle (90 degree) with an oxidation removal.
Gently move in a circular motion without retracting the tip (Fig. 1.5).
16
a. Ensure the unit is switched off.
c. Repeat the same motion several times. The cleaning process is completed and tester is now
ready for use.
11
1
2
3
6
8
10
4
7
9
5
18
1. GETTING STARTED with SmartPro Finder I
Powering up
19
This tester can be powered by the use of batteries. Required AAA Batteries (x2), take note of
the positive (+) and negative (-) directions of batteries (Fig 1.1). The use of Alkaline batteries is
preferred, as it should generally give approximately 2.5 hours continuous operation, While the
use of ordinary batteries will give a shorter working life.
Press the [ON/OFF] button (Fig. 1.3) and wait for warm up the tester about 20 seconds.
10
12
14
The recommended testing temperature is 18oC - 27oC or 65oF - 80oF Please allow the gemstone or
jewelry piece to adjust to room temperature prior to testing. Exposure and/or operation of the tester
outside the room temperature would affect the result and performance of tester.
The probe tip must be placed at the right angle or perpendicular to the facet of gemstone for an
accurate reading.
Tests should be conducted on the table of the gemstone. In the event of any doubt, kindly test on
the girdle of the gemstones instead.
To achieve optimum accuracy for tests involving very small, it is important to allow the gemstone
to cool down before subsequent tests.
a. Keep the tester dry. Precipitation and all types of liquids or moisture can contain minerals that
will corrode electronic circuits. If your tester does get wet, remove the battery, and allow the
tester to dry completely before replacing it.
b. Do not use, store or expose the tester industry and dirty areas. It’s moving part and electronic
components can be damage.
c. Do not use, store or expose the tester in hot areas. High temperatures can damage or shorten
the life of the tester, damage batteries, and warp or melt certain plastics.
d. Do not use, store or expose the tester in cold areas. When the tester returns to its normal tem-
perature, moisture can form inside the device and damage electronic circuit boards.
e. Do not attempt to open the tester other than as instructed in user manual book.
III. IMPORTANT NOTICE
Fig. 1.1
Fig. 1.3
17
Fig. 1.5
While in this preparation mode, you can check status through the ORANGE “Ready” LED will blink
continuously until has the steady lighting with beep sound It’s means your tester is ready now for
use (Fig.1.4).
15
Fig. 1.4
20
Fig. 1.2
9
11
13
Composition
1. Retractable probe tip
2. Serrated Metal Part
3 “Ready” Indicator LED
4. “Low Battery” Indicator LED
5. “Metal” Indicator LED
6. “Simulant” Indicator LEDs
7. “Diamond” Indicator LED
8. ON/OFF Button Switch
9. Battery compartment
10. Neck Strap Attachment
11. Probe Protective Cap
f. Do not drop, knock, or shake the tester. Rough handling can break internal circuit boards and
fine mechanics.
g. Do not use harsh chemicals, cleaning solvents, or strong detergents to clean the tester.
h. Do not paint the tester. Paint can clog the moving parts and prevent proper operation.
If the tester is not working properly, kindly contact our customer service at
SmartPro Instrument co.,ltd
249/40, Moo 9, J.S.P. Building
Bangbon 1 Rd., Bangbon
Bangkok 10150 Thailand
+66 (0) 2 899 2956-7
Attn: Customer Service Executive
Turning on
Remove the protective cover from the probe tip (Fig. 1.2).
Prepare clean tissue / jewelry cloth. Carefully retrieve the gemstone with tweezers and place the
gemstone face down the table (Fig.1.7).
Cleaning your gemstone prior to testing
Fig. 1.7
The gemstone should be clean and dry before testing. However, elaborate cleaning procedures
are not normally necessary (Fig.1.6).
18
Recommended testing conditions
Fig. 1.6
Cleaning the probe tip
Please note that if the tester is being used for the first time, or if the tester has not been used for
a week, it is advisable to clean the probe tip using an oxidation removal sheet to attain consistent
and accurate reading.
b. Hold the probe pen with pen tip forming the right angle (90 degree) with an oxidation removal.
Gently move in a circular motion without retracting the tip (Fig. 1.5).
16
a. Ensure the unit is switched off.
c. Repeat the same motion several times. The cleaning process is completed and tester is now
ready for use.
11
1
2
3
6
8
10
4
7
9
5
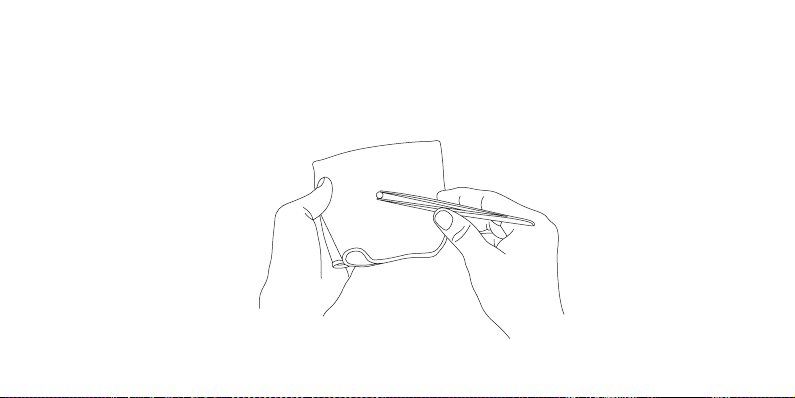
25
4
6
8
I. Disclaimers, Exclusions and Limitations of Liability
PLEASE READ AND NOTE SMARTPRO WARRANTY TERMS AND CONDITIONS as stated in
the warranty card. SmartPro warranty for its testers are subject to proper use by its user in accordance
with all the terms and conditions as started in the relevant user manual book and shall cover only
manufacturing defects.
Due to continuous product improvement, SmartPro reserves the right to revise all documents
including the right to make changes to the user manual without notice and without obligation
to notify any person of such revisions or changes. User s are advised to check SmartPro’s
website http://www.smartproinstrument .com from time to time.
SmartPro shall not be responsible for any damage or loss resulting from the use of this tester or
user manual, and under no circumstances shall SmartPro, its manufacturer or any of its subsidiaries,
licensors, distributors, resellers, servants and/or agents be liable for any direct or indirect damages,
resulting from the use of this tester.
II. About the SmartPro Finder I
The SmartPro Finder I is a pocket sized instrument that instantly verifies the authenticity of
diamonds based on their thermal properties. Diamonds, with their exceptional heat conductivity
properties, are unlike any other simulants, natural or synthetic, and are therefore not easily replicable.
The SmartPro Finder I has been subjected to thorough and extensive laboratory tests, and will
generally give a clear and reliable reading of the gemstone being tested under proper use. However,
you are advised to conduct further supporting tests.
As with all thermal testers in the market, the SmartPro Finder I is not able to differentiate between
natural diamonds and moissanite.
Include in your package:
a. SmartPro Finder I
b. User manual book
c. Warranty card
d. Protective carry case
e. Probe tip oxidation sheet
f. Neck strap
g. Metal stone tray
Fig. 2.1
23
All testers have been calibrated during the manufacturing process and no further adjustment or
user intervention to the tester is required.
Self-calibration should not be attempted. To minimize any risk associated, user should contact
event that users require the manufacturer to re-calibrate the unit, the users will bear the associated
to/from freight cost for the shipping of unit to the service center.
Calibration
21
Gently rub the table of gemstone against the tissue/jewelry cloth and place the gemstone on the
center of the test pad (Fig.1.8).
Fig. 1.8
20
Fig. 1.2
9
11
13
Composition
1. Retractable probe tip
2. Serrated Metal Part
3 “Ready” Indicator LED
4. “Low Battery” Indicator LED
5. “Metal” Indicator LED
6. “Simulant” Indicator LEDs
7. “Diamond” Indicator LED
8. ON/OFF Button Switch
9. Battery compartment
10. Neck Strap Attachment
11. Probe Protective Cap
f. Do not drop, knock, or shake the tester. Rough handling can break internal circuit boards and
fine mechanics.
g. Do not use harsh chemicals, cleaning solvents, or strong detergents to clean the tester.
h. Do not paint the tester. Paint can clog the moving parts and prevent proper operation.
If the tester is not working properly, kindly contact our customer service at
SmartPro Instrument co.,ltd
249/40, Moo 9, J.S.P. Building
Bangbon 1 Rd., Bangbon
Bangkok 10150 Thailand
+66 (0) 2 899 2956-7
Attn: Customer Service Executive
Turning on
Remove the protective cover from the probe tip (Fig. 1.2).
Prepare clean tissue / jewelry cloth. Carefully retrieve the gemstone with tweezers and place the
gemstone face down the table (Fig.1.7).
Cleaning your gemstone prior to testing
Fig. 1.7
The gemstone should be clean and dry before testing. However, elaborate cleaning procedures
are not normally necessary (Fig.1.6).
18
Recommended testing conditions
Fig. 1.6
Cleaning the probe tip
Please note that if the tester is being used for the first time, or if the tester has not been used for
a week, it is advisable to clean the probe tip using an oxidation removal sheet to attain consistent
and accurate reading.
b. Hold the probe pen with pen tip forming the right angle (90 degree) with an oxidation removal.
Gently move in a circular motion without retracting the tip (Fig. 1.5).
16
a. Ensure the unit is switched off.
c. Repeat the same motion several times. The cleaning process is completed and tester is now
ready for use.
11
1
2
3
6
8
10
4
7
9
5
20
20
Fig. 1.2
9
11
13
Composition
1. Retractable probe tip
2. Serrated Metal Part
3 “Ready” Indicator LED
4. “Low Battery” Indicator LED
5. “Metal” Indicator LED
6. “Simulant” Indicator LEDs
7. “Diamond” Indicator LED
8. ON/OFF Button Switch
9. Battery compartment
10. Neck Strap Attachment
11. Probe Protective Cap
f. Do not drop, knock, or shake the tester. Rough handling can break internal circuit boards and
fine mechanics.
g. Do not use harsh chemicals, cleaning solvents, or strong detergents to clean the tester.
h. Do not paint the tester. Paint can clog the moving parts and prevent proper operation.
If the tester is not working properly, kindly contact our customer service at
SmartPro Instrument co.,ltd
249/40, Moo 9, J.S.P. Building
Bangbon 1 Rd., Bangbon
Bangkok 10150 Thailand
+66 (0) 2 899 2956-7
Attn: Customer Service Executive
Turning on
Remove the protective cover from the probe tip (Fig. 1.2).
Prepare clean tissue / jewelry cloth. Carefully retrieve the gemstone with tweezers and place the
gemstone face down the table (Fig.1.7).
Cleaning your gemstone prior to testing
Fig. 1.7
The gemstone should be clean and dry before testing. However, elaborate cleaning procedures
are not normally necessary (Fig.1.6).
18
Recommended testing conditions
Fig. 1.6
Cleaning the probe tip
Please note that if the tester is being used for the first time, or if the tester has not been used for
a week, it is advisable to clean the probe tip using an oxidation removal sheet to attain consistent
and accurate reading.
b. Hold the probe pen with pen tip forming the right angle (90 degree) with an oxidation removal.
Gently move in a circular motion without retracting the tip (Fig. 1.5).
16
a. Ensure the unit is switched off.
c. Repeat the same motion several times. The cleaning process is completed and tester is now
ready for use.
11
1
2
3
6
8
10
4
7
9
5
20
Fig. 1.2
9
11
13
Composition
1. Retractable probe tip
2. Serrated Metal Part
3 “Ready” Indicator LED
4. “Low Battery” Indicator LED
5. “Metal” Indicator LED
6. “Simulant” Indicator LEDs
7. “Diamond” Indicator LED
8. ON/OFF Button Switch
9. Battery compartment
10. Neck Strap Attachment
11. Probe Protective Cap
f. Do not drop, knock, or shake the tester. Rough handling can break internal circuit boards and
fine mechanics.
g. Do not use harsh chemicals, cleaning solvents, or strong detergents to clean the tester.
h. Do not paint the tester. Paint can clog the moving parts and prevent proper operation.
If the tester is not working properly, kindly contact our customer service at
SmartPro Instrument co.,ltd
249/40, Moo 9, J.S.P. Building
Bangbon 1 Rd., Bangbon
Bangkok 10150 Thailand
+66 (0) 2 899 2956-7
Attn: Customer Service Executive
Turning on
Remove the protective cover from the probe tip (Fig. 1.2).
Prepare clean tissue / jewelry cloth. Carefully retrieve the gemstone with tweezers and place the
gemstone face down the table (Fig.1.7).
Cleaning your gemstone prior to testing
Fig. 1.7
The gemstone should be clean and dry before testing. However, elaborate cleaning procedures
are not normally necessary (Fig.1.6).
18
Recommended testing conditions
Fig. 1.6
Cleaning the probe tip
Please note that if the tester is being used for the first time, or if the tester has not been used for
a week, it is advisable to clean the probe tip using an oxidation removal sheet to attain consistent
and accurate reading.
b. Hold the probe pen with pen tip forming the right angle (90 degree) with an oxidation removal.
Gently move in a circular motion without retracting the tip (Fig. 1.5).
16
a. Ensure the unit is switched off.
c. Repeat the same motion several times. The cleaning process is completed and tester is now
ready for use.
11
1
2
3
6
8
10
4
7
9
5
Table of contents
Other SmartPro Scanner manuals


