SmartPro Aura Owner's manual

AURA
USER MANUAL BOOK
USER MANUAL BOOK
www.smartproinstrument.com
AURA

I. DISCLAIMER, EXCLUSIONS, AND LIMITATIONS OF LIABILITY
Please read and note SmartPro WARRANTY TERMS AND CONDITIONS as stated in
the warranty card. SmartPro warranty for its subject to proper use by its user in
accordance with all the terms and conditions as stated in the relevant user manual
and shall cover only manufacturing defects.
Due to continued product improvement, SmartPro reserves the right to revise all
documents including the right to make changes to the user manual without notice
and without obligation to notify any person of such revisions or changes. Users are
advised to check SmartPro’s website http://www.smartproinstrument.com.
SmartPro shall not be responsible for any damage or loss resulting from the use of
the product or user manual, and under no circumstances shall SmartPro, its manu-
facturer or any of its subsidiaries, licensors, distributors, resellers, servants and/or
agents be liable for any direct or indirect damages resulting from the use of this
product.
To the maximum extent permitted by applicable law, under no circumstances shall
SmartPro, its manufacturer or any of its subsidiaries, licensors, distributors,
resellers, servants and/or agents be liable for any special, incidental, consequential
or indirect damages howsoever caused.
Smartpro Aura referred to in this user manual is provided and/or sold on “as is”
basis. Except as required by applicable law, no warranties of any kind, expressed or
implied, including, but not limited to, the implied warranties of merchantability
and fitness for a particular purpose.
II. ABOUT SMARTPRO AURA
Congratulations for having our SmartPro Aura (SPAura). The first Synthetic
Diamond Screener that has the ability to screen automatically for mounted jewelry
but can also be used to test loose stones with various test results such as Natural
Diamond, CVD Synthetic Diamond, HPHT Synthetic Diamond, and Cubic zirconia
(CZ). This smartest Screener has unique features to show the estimated diameter
size (mm) and counting of each loose stones being tested, plus auto-generating
test certificate results.
USER’S MANUAL v1.4.1
SmartPro Aura
Synthetic Diamond Scanner
CONTENTS
I. DISCLAMERS, EXCLUSIONS AND LIMITATIONS
OF LIABILITY
II. ABOUT SMARTPRO AURA
III. FEATURES AND ADVANTAGES
IV. PRODUCT SPECIFICATIONS
V. TESTER OVERVIEW
VI. ACCESSORIES
VII. POWERING DEVICE
VIII. TESTER LIGHT INDICATORS
IX. CONTROL SETTINGS
X. TESTING / DETECTION
XI. TEST RESULT VIEW MODE
XII. TEST CERTIFICATE
XIII. SHARING IMAGES / TEST CERTIFICATE
XIV. PRINTING IMAGES / TEST CERTIFICATE
XV. IMAGE / FOLDER GALLERY
XVI. MAIN SETTINGS
XVII. SAFE HANDLING / MAINTENANCE
XVIII. TROUBLESHOOTING / FAQs
05
05
06
08
09
10
11
12
14
18
20
20
21
24
24
25
04
04

I. DISCLAIMER, EXCLUSIONS, AND LIMITATIONS OF LIABILITY
Please read and note SmartPro WARRANTY TERMS AND CONDITIONS as stated in
the warranty card. SmartPro warranty for its subject to proper use by its user in
accordance with all the terms and conditions as stated in the relevant user manual
and shall cover only manufacturing defects.
Due to continued product improvement, SmartPro reserves the right to revise all
documents including the right to make changes to the user manual without notice
and without obligation to notify any person of such revisions or changes. Users are
advised to check SmartPro’s website http://www.smartproinstrument.com.
SmartPro shall not be responsible for any damage or loss resulting from the use of
the product or user manual, and under no circumstances shall SmartPro, its manu-
facturer or any of its subsidiaries, licensors, distributors, resellers, servants and/or
agents be liable for any direct or indirect damages resulting from the use of this
product.
To the maximum extent permitted by applicable law, under no circumstances shall
SmartPro, its manufacturer or any of its subsidiaries, licensors, distributors,
resellers, servants and/or agents be liable for any special, incidental, consequential
or indirect damages howsoever caused.
Smartpro Aura referred to in this user manual is provided and/or sold on “as is”
basis. Except as required by applicable law, no warranties of any kind, expressed or
implied, including, but not limited to, the implied warranties of merchantability
and fitness for a particular purpose.
II. ABOUT SMARTPRO AURA
Congratulations for having our SmartPro Aura (SPAura). The first Synthetic
Diamond Screener that has the ability to screen automatically for mounted jewelry
but can also be used to test loose stones with various test results such as Natural
Diamond, CVD Synthetic Diamond, HPHT Synthetic Diamond, and Cubic zirconia
(CZ). This smartest Screener has unique features to show the estimated diameter
size (mm) and counting of each loose stones being tested, plus auto-generating
test certificate results.
4

5
III. FEATURES AND ADVANTAGES
1. FEATURES
Able to test Mounted Jewelry and loose stones
Able to Detect as small as 0.05mm stones
Built-in high-end Smartphone with high camera Resolution
Low current consumption
360-degree view for Rings and Jewelry
Test Result Sharing
Manual Mode View
Auto Detection Mode View
2. ADVANTAGES
Automated test results
2-Modes for Loose Detection (Separated and Bulk Stones)
2-Modes for Jewelry Detection (On Tray and 360 degrees)
Auto-generated test result certification
Stone Auto counting (for loose)
Stone diameter measurement (in mm)
Testing Results Natural Diamond, CVD Synthetic Diamond,
HPHT Synthetic Diamond,
Cubic zirconia (CZ),
*for Synthetic Moissanite will
show undefined
Stone Colors (capable to detect) Colorless to near Colorless (D-K)
Stone Size (capable to detect) 0.002 carat and above
IV. PRODUCT SPECIFICATIONS

Estimated Maximum Count of Stones per test: 520 loose stones (5 pcs. per block)
Time Duration per test Approximately 18 secs. (loose detection)
Loose Stone Tray Size (camera view) 64 x 104 mm
Tester Body Dimensions 230 x 301.5 mm
Weight prox. 5.0 Kg
Power Supply 100-240 VAC, 1.4A
Power Fuse 3A
Power Cable Type IEC C13
Screen Device Samsung S9+
Lamp Life Approximately 675,000 tests
Operating System Android
Screen Size 6.2 Inches (157.48mm)
Screen Resolution 1440 x 2960
Device Memory 6GB RAM, 64GB
Mobile Battery Auto-charging
Ventilation Requirements Do not obstruct the ventilation holes
Body Color Red with Black
V. TESTER OVERVIEW
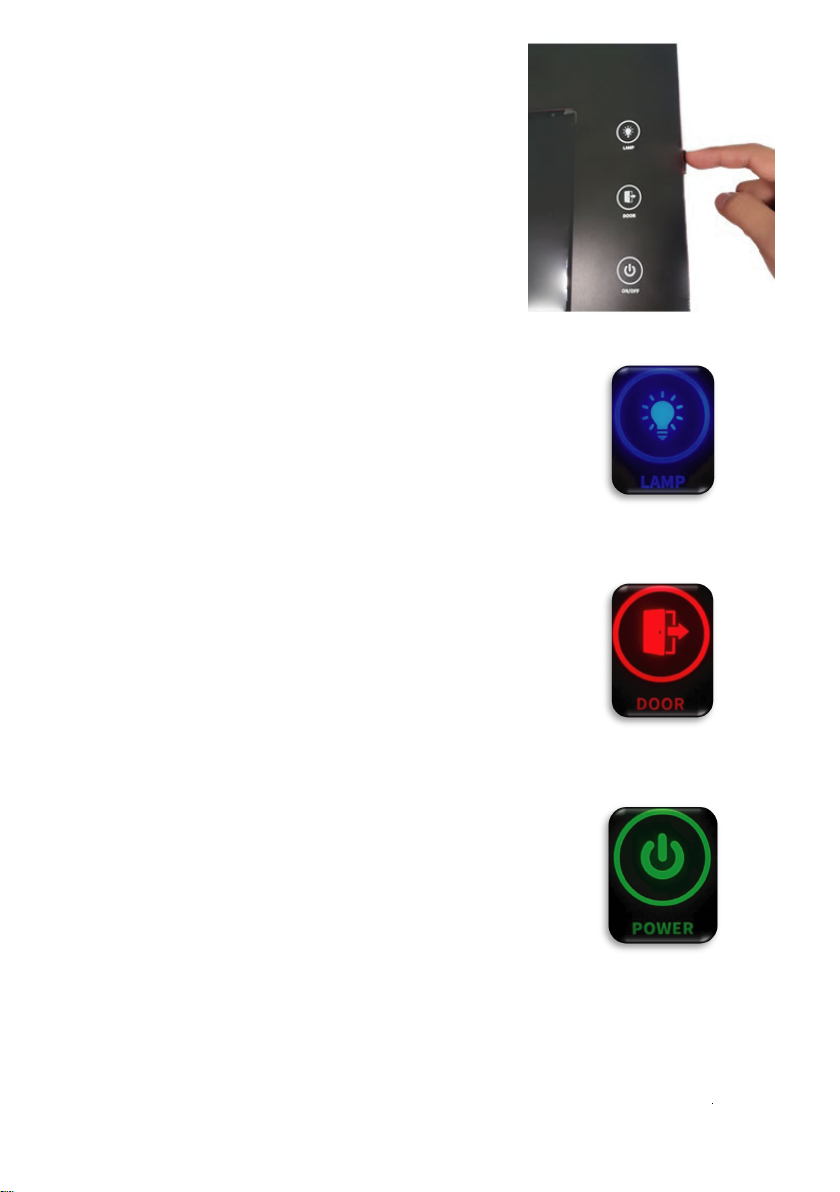
1. TESTER BOX OVERVIEW.
Power Switch
UV Lamp, Door and
Power Indicators
Mobile Switch
Built-in Mobile
Door
6

2. MOBILE SCREEN OVERVIEW
7
UV Lamp
Control
Menu Settings
Back Button
Daylight
Control
Pictrue
Gallery
360-degree
ManualControl
Camera Focus
Control
Mobile
Temperature
Indicator
Test/Capture
Button

8
CVD
DIAMOND
HPHT
OTHER
Label guide on the tray
Waiting for test slots
Testing slots (camera view)
Tested Diamond Slot
Tested CVD Slot
Tested HPHT Slot
Tested other stone Slot
1. LOOSE STONE TRAY - VIEW SIZE: 64 x 104 MM
Earing slots
Ring slots
Camera view
2. RING/JEWELRY - 36 SLOTS FOR EARRING AND 16 SLOT FOR RING
ACCESSORIES
VI.
3. JEWELRY ATTACHMENT (FOR 360 VIEW)
3.1 Ring attachment
FOR TEST
FOR TEST

9
VII. POWERING DEVICE
1. Turning ON the AURA Box.
3.2 Bracelet attachment
3. JEWELRY ATTACHMENT (FOR 360 VIEW)
3.1 Ring attachment
1.1 Connect the Power Cable into the Inlet Power Socket at back side of
AURA then the other side to the power Outlet.
1.2 Switch ON the Inlet Power Switch.
2. Turning ON the built-in mobile.
10
VIII. TESTER LIGHT INDICATORS
2. Turning ON the built-in mobile.
1.1 No light – indicates that the UV Lamp is turned
OFF.Blue light – indicates that the UV Lamp is turned
ON.
Note: if the UV lamp is turned ON then suddenly the
Door opens, Lamp will automatically will turned OFF.
2.1 No light – indicates that the door of the AURA box
is fully closed.
2.2 Red light – indicates that the door of the AURA
box is opened.
3.1 No light – indicates that the AURA box is switched
OFF.
3.2 Blinking Green light – indicates that the AURA box
is turned ON but it is not yet connected to the mobile
phone.
3.3 Stable Green light – indicates the AURA box is
turned ON and ready to use.
1. UV Lamp Indicator
3. Power Indicator
2. Door Indicator
Click and hold the Mobile Switch at the right
side of AURA until the mobile screen opens.
Note : Mobile is blocked to other
applications so that the Smartpro Application
will run smoothly without any error / bugs.
11
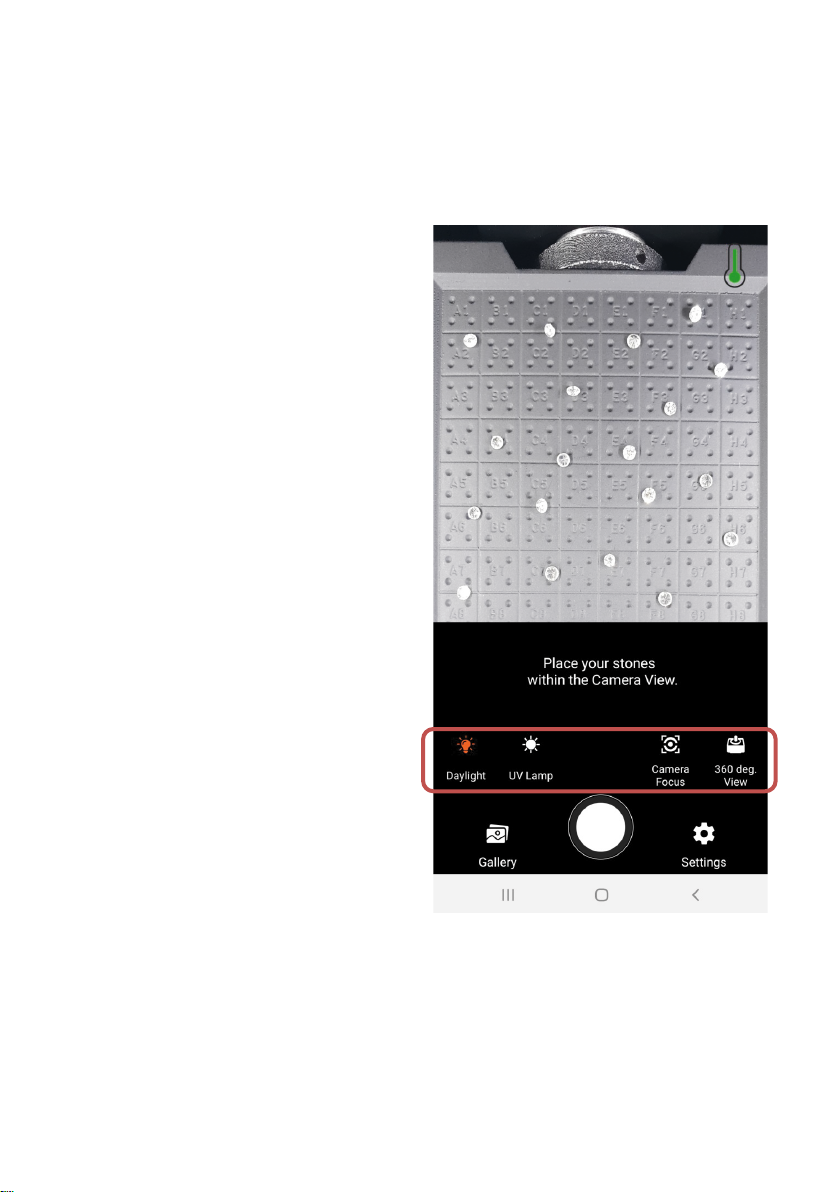
IX. CONTROL SETTINGS
User may control light source for capturing images such as Daylight and fluores-
cent image of stones. To have a better quality of images, user may adjust the
following controls:
1. Daylight Icon – controls the Daylight LED source ON/OFF.
2. UV Lamp Icon – controls the UV Lamp
ON/OFF.
Note: UV Lamp is automatically
turns OFF after 9 sec. and turns ON
again after 2 secs. for maintaining the
Lamp’s standard operating tempera-
ture.
3. Camera Focus Icon – able to adjust
automatically or manually to get the
best quality image.
4. Stepper Motor Movement Icon – used
to control the rotation of the ring and
mounted jewelry holders and to have a
360 degree view while the Daylight or
UV Lamp is ON.
12
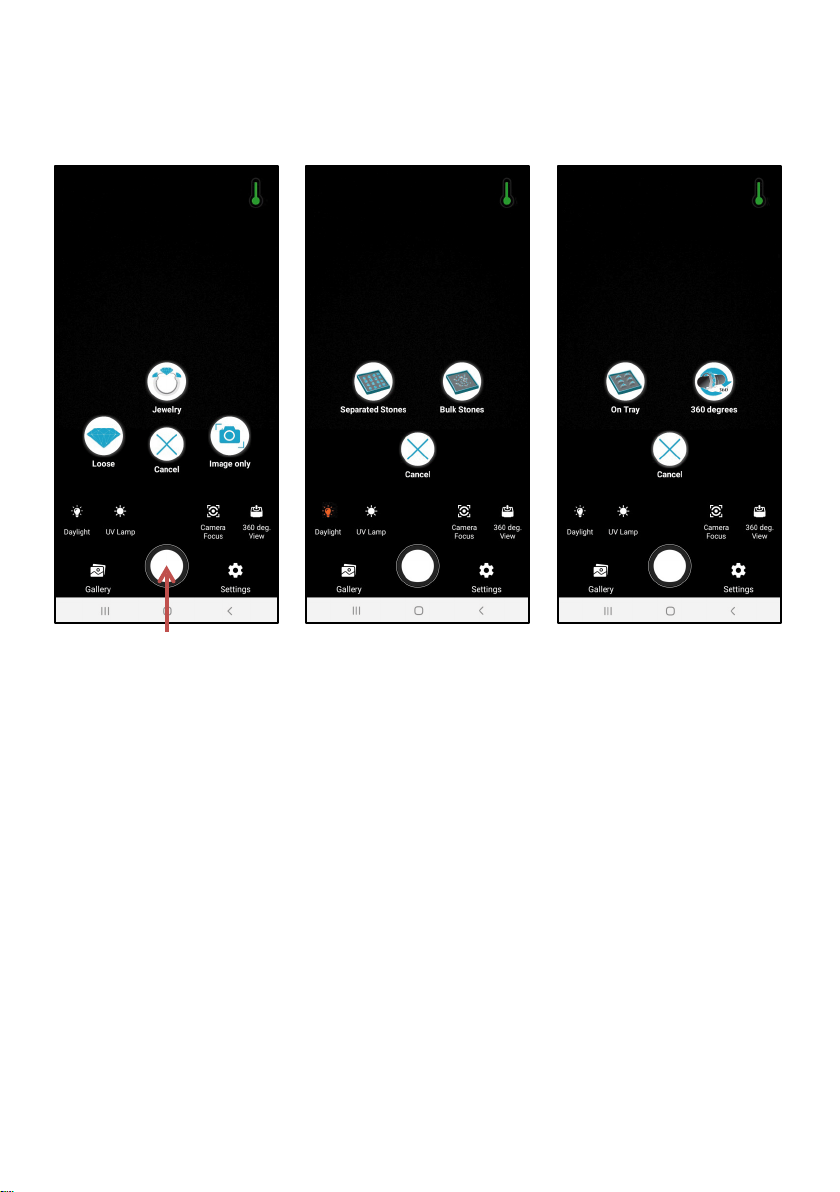
I. TESTING / DETECTION
There are many types of mounting styles of the stones in Jewelry and others
are selling in loose. So we created a tester that is able to test
Different settings. Here are the Detection Options that are available
Jewelry Detection Options
Loose Detection Options
Test / Capture Button
1 Loose Stones Detection
1.1 Separated Stones – this detection option is used for the loose stones
that need to be distinguishing or separated between Natural Diamonds, CVD, HPHT
and CZ. This process also is capable to count and get the approximate size of the
stones by its diameter.
Notes: • For accurate testing, user should separate stones from the other
(not overlapping) especially if the user is targeting to have proper counting and
estimated diameter measurements.
• Size measurement is especially for round stones.
• This process cannot be used for bulk stones testing.
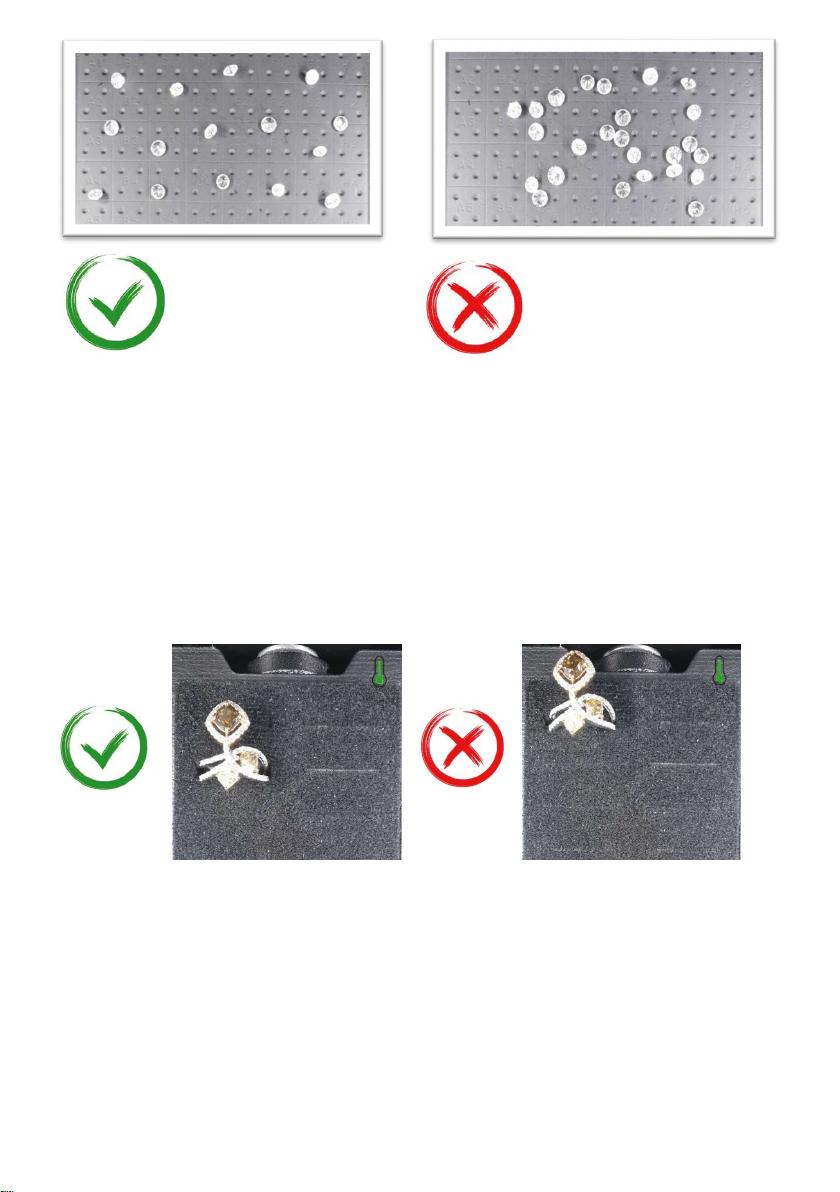
Arrange the Jewelry on the same height as possible to get a better camera focus
for the best detection process
13
Stones are separated
with each other.
Stones are nearly placed
with each other.
1.2 Bulk Stones Detection – (This option is currently unavailable. This
feature will be available soon.)
2. Jewelry Stones Detection
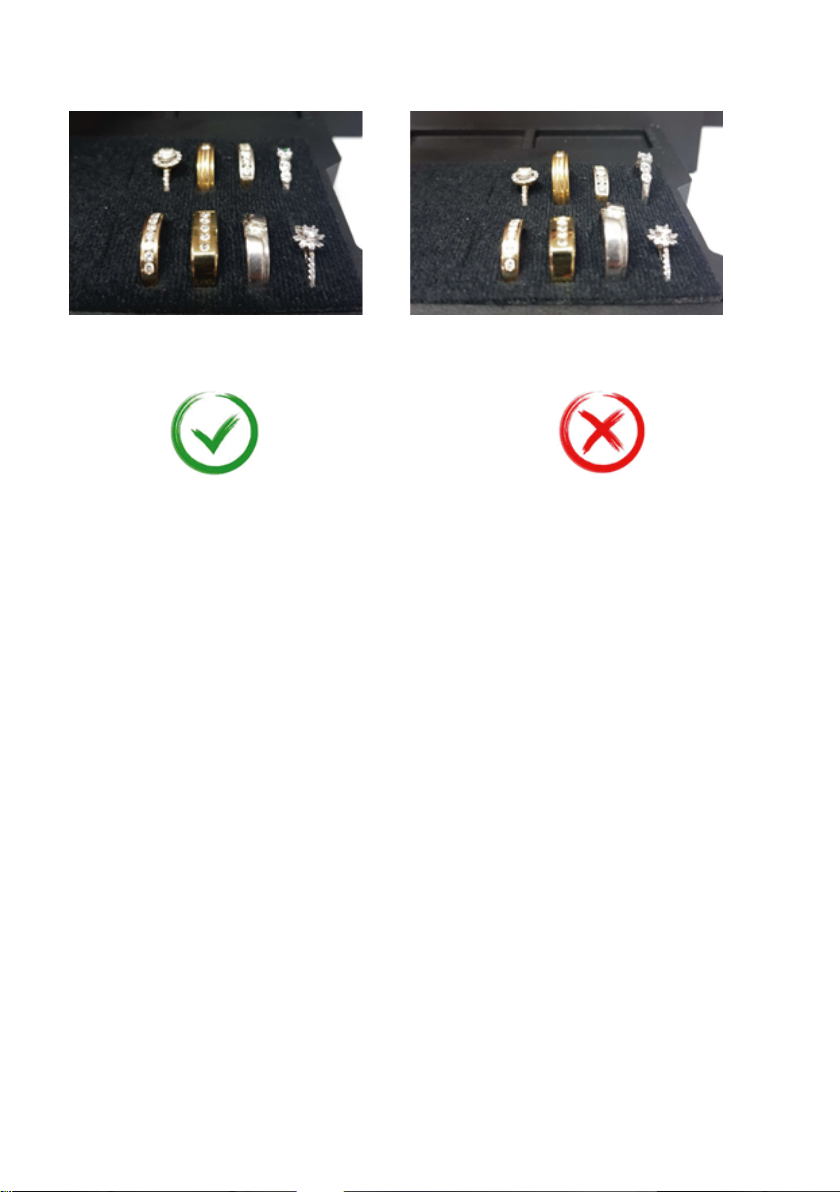
2.1 On Tray Detection – used to test mounted stones such as rings,
earrings and bangles on testing tray.
Notes:
! Do not place stones or Jewelry over the Detection Area (black foam area).
Jewelry is placed within
the detection area.
Jewelry is placed over the
detection area.
Detection - used to test mounted stones such as rings, necklace and bangles that
are attached to a built-in stepper motor to test in 360
2.3 360 Degrees Detection - used to test mounted stones such as rings,
necklace and bangles that are attached to a built-in motor to rotate in 360
degrees view. There will be 4 angle tests with auto generated test results and
certificates by one click only.
Note: There will be no counting and measurement in this mode.
3. Capture Image Only – User can capture photo of daylight image or fluorescent
image of stones. The captured image will be automatically saved in the gallery.
XI. TEST RESULT VIEW MODE
After detection process is done, the Preview Image Page will show on screen with
the summary of test results for Loose but for Jewelry there will be no counting
results. The results will be determined by a colored borders.
Jewelries are placed with not the
same height.
Jewelries are placed with the
same height.
Arrange the Jewelry on the same height as possible to get a better camera focus
for the best detection process
14

15
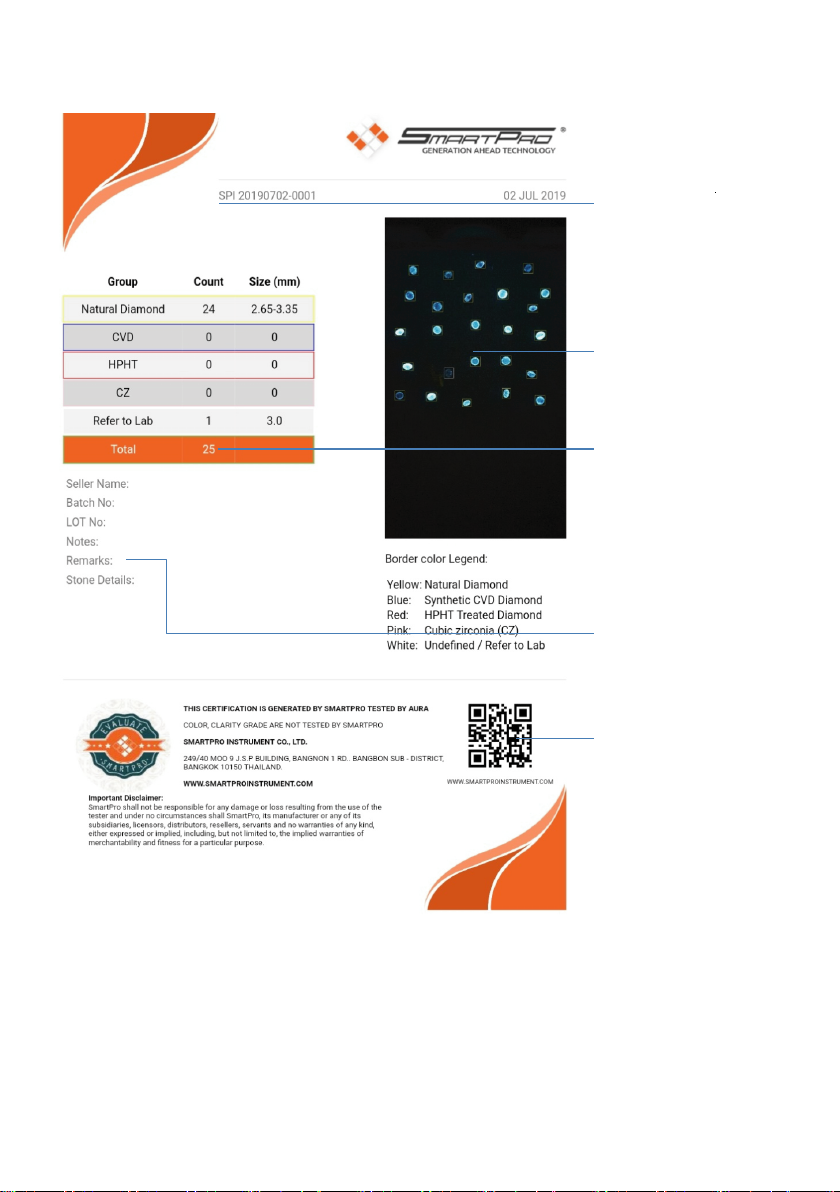
Boarder Color Equivalent :
Diamond : Yellow
CVD : Blue
HPHT : Red
CZ : Pink
Undefined : White
Preview Image View Mode
Touch for
View Mode
Summary
Test Result
Go to Test
Certificate
Touch for
View Mode
Save Detection
Images to Gallery
Delete Test Result
User can be able to zoom-in and
zoom-out the Fluorescent Image
while the Daylight image will follow
accordingly.
User may touch the Result Photo to go to View Mode with the Daylight Image and
the Fluorescent Image. This will also help the user to easily separate each stone
according to its type from the result.

16
2. Jewelry Detection
In this detection mode, Laboratory Grown stones will automatically be marked as
red, while the other stones will be observed by the User by comparing the Stones
being tested with the Reference Images.
Here are the Reference Images:
Diamond
Cubic Zirconia (CZ)
CVD Synthetic
Note: If the User still have doubt in determining the type of the Stones whether the
stone is Synthetic or Natural, do a Longwave Fluorescent test using a regular UV light
source. Lab Grown Diamonds will not fluoresce unlike about 25% to 30% of Natural
Diamonds will do.
17
Preview Image View mode
Preview Image View mode
3. Jewelry Detection – 360 View
The same detection as Jewelry on tray but uses a Jewelry attachment to hold Rings and
Jewelries and a motor for the rotation. This is a 4 in 1 detection. Meaning first detection
will be done then the motor will rota te for 90 degrees to take another detection. There
will be 4 detection in total to complete the 360 view.
2.1 Jewelry On Tray
Touch for
View Mode
Touch for View
Mode
Result
Image
Daylight
Image
Reference Images
Slide the stones
to see more images.
Tap the Result
Image to select
the Degree View. Same view as
Jewelry on Tray.
Stone with Red
markings are Lab.
Grown stone.
18
XII. TEST CERTIFICATE
In order to show the test result professionally, Smartpro has made a auto-generated
Test Certificate that will be found in the Preview Page after the detection process.
This Certification may send directly to any email address by clicking the share button.
User may also save this test certificate and will be found in the Gallery together with
the other saved images related to the test. The file will be saved as a pdf file.
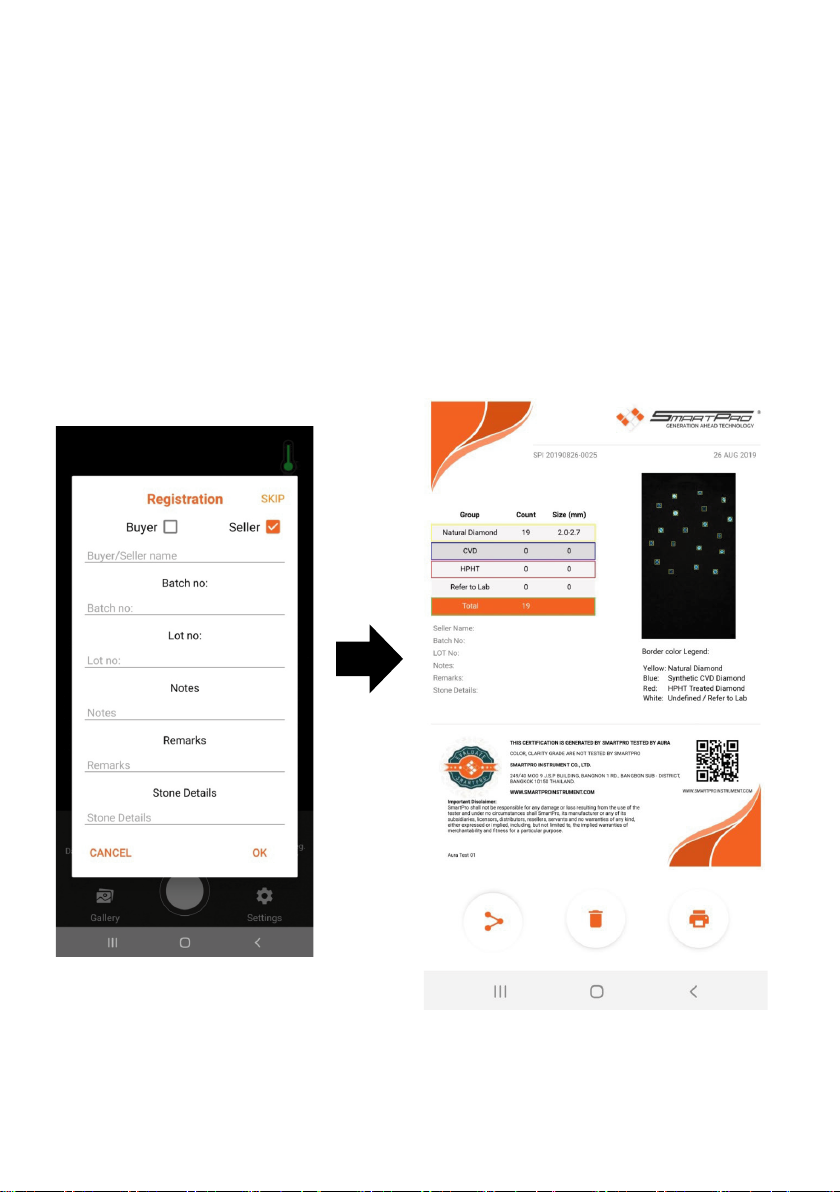
1. REGISTRATION
This registration is for the details to be filled up and automatically will appear to the
Test Certificate. This certificate may be used by a Buyer or Seller by choosing in the
registration form.
Test Unique ID
Fluorescent Image
Test Result
Details and
Remarks
Smartpro Website
QR code
Test Results with
counting and
estimated stone
diameter
19
2. OVERVIEW

20
XIII. SHARING IMAGES / TEST CERTIFICATE
XIV. PRINTING IMAGES / TEST CERTIFICATE
Go to Gallery and choose the
image / file you want to share and
touch the share Icon then enter
the Receiver’s email address. This
needs an internet connection.
Make sure that you turned ON
the Wi-Fi and connect to the
internet.
Go to Gallery and choose the
image / file you want to print,
then touch the print Icon to open
the printer settings. In printing
settings, find a Wifi ready printer
to connect. Make sure to choose
the ISO A4 for the paper size
before printing.
Share Icon
Print Icon

XVI. IMAGE / FOLDER GALLERY
Image Gallery has 3 Main folders to save images from detection and captured
images which these images will be saved automatically to their respective folder.
The Main folders are Jewelry Detection folder, Loose Detection folder, and
Captured Images folder.
1. FOLDER NAME
Each Detection result will have a unique folder containing captured images with result
image and Test Certificate. Folder names are generated by the mobile application
automatically using the current date when the detection has made.
Exampleof auto-generated Folder (yyyymmdd_nnnn): 20190701_0001
2. Search Folder
Users are able to search folder by date like in the picture below:
2019 07 01 0001
Year
Month
Day
Running numbers
(number increment by 1 per
detection. The Number will
start at 0001 on next day)
21
Type the date here to
filter the folders.
Other manuals for Aura
2
Table of contents
Other SmartPro Scanner manuals


Popular Scanner manuals by other brands


Epson
Epson DS-50000 WorkForce DS-50000 user guide

UMAX Technologies
UMAX Technologies Astra 6400 owner's guide

VINASHIN MOTOR
VINASHIN MOTOR MOTO-1 user manual

Epson
Epson CaptureOne TM-S1000 Technical reference guide

Metrologic
Metrologic FocusBT MS9535 Installation and user guide

Epson
Epson WorkForce Pro GT-S50 Specifications