Smartro SC93 User manual
Instruction Manual
WIRELESS WEATHER STATION
Model: SC93
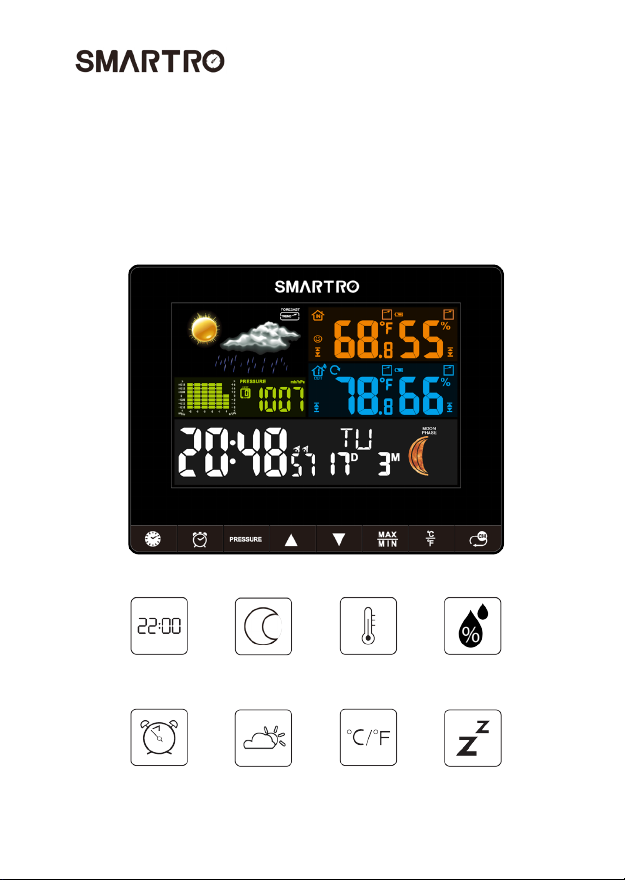
Time
Dual Alarm Weather
Forecast
°C/°F
Selectable
Snooze
Moon
Phase
In & Out
Temp
In & Out
Humidity

1. Preface.........................................................................................1
2. Attention.......................................................................................1
3. Package Content..........................................................................2
4. Product Specication...................................................................2
4.1 Color Weather Station..............................................................2
4.2 Wireless Remote Sensor..........................................................3
5. Know Your Device........................................................................5
5.1 Screen......................................................................................5
5.2 Main Unit..................................................................................6
5.3 Wireless Remote Sensor..........................................................7
6. Preparation..................................................................................8
7. Initial Time Setup..........................................................................9
8. Dual Alarm Setting......................................................................10
8.1 How to Check Your Alarms.....................................................10
8.2 Activate/Deactivate the Alarm Function..................................10
8.3 Manual Setting of the Alarms..................................................10
8.4 Turn off the Alarm Tone..........................................................11
8.5 Snooze Function.....................................................................11
9. Weather Station and Remote Sensor Pairing & Manual Signal Reception..12
9.1 Weather Station and Remote Sensor Pairing.........................12
9.2 Loop Mode.............................................................................13
9.3 Manual Signal Reception........................................................14
10. Temperature & Humidity...........................................................15
10.1 °C/°F Selection.....................................................................15
10.2 How to Set Temperature & Humidity Alert............................15
10.3 Temperature & Humidity Trend.............................................17
10.4 How to Check Maximum/Minimum Temperature/Humidity...17
11. Weather Forecast.....................................................................18
11.1 Weather Forecast Statement................................................18
11.2 The Symbols of Weather Forecast........................................18
12. Moon Phase.............................................................................19
13. Air Pressure..............................................................................19
13.1 Air Pressure Trend Display...................................................19
13.2 How to Check Air Pressure History.......................................19
14. Backlight..................................................................................20
15. Troubleshooting.......................................................................21
16. After-sales Support...................................................................23
17. Waste Disposal........................................................................24
Content

1. Preface
2. Attention
Thank you for choosing this device from SMARTRO.
Before You Start Using It
● Make sure to read the instruction manual carefully. This information
will help you to familiarize yourself with your new device, to learn all of
its functions and get advice in the event of problems.
● Following the instructions will prevent damage to your device.
● We shall not be liable for any damage that occurs as a result of
not-following of these instructions.
● Please keep this instruction manual for future reference.
●Please follow the instructions for operation.
● Please use the original or manufacturer specied attachments or
accessories.
● Do not disassemble the product, so as to avoid safety hazards.
●Do not place any items on top of the product that may damage
the product.
● Do not place the product near water source or in a damp place.
●Please terminate use immediately upon damage, which is
caused as a result of improper use or repair by a non-factory
approved technician.
1
3. Package Content
● Color Weather Station*1
● Wireless Remote Sensor*1
● DC Power Adapter*1
● Instruction Manual*1
●Do not place the product in places that are exposed to direct
sunlight and high temperature such as radiator, electric heater,
stove, etc.
●Keep the product away from strong electromagnetic waves,
strong static electricity, or moisture and condensation.
● Children below 10 years of age should be supervised by an
adult, if/when using this product.
● Clean your device with a soft damp cloth. Do not use solvents or
scouring agents.
2
4. Product Specication
4.1 Color Weather Station
●Tabletop stand/ wall mount
●Weather forecast
●Indoor & outdoor temperature
Indoor temperature measurement range: 0°C(32°F) ~ +50°C
(122°F)

Outdoor temperature measurement range: -40°C (-40°F) ~ +70°C
(158°F)
●Indoor humidity measurement range: 1%RH~99%RH
●Barometric pressure
●Maximum & minimum records
●Dual alarm with snooze function
●Air pressure trend
●Temperature/ humidity alert
●Moon phase
●Alternative 12/24 hour format
●Calendar
●°C/°F switchable
●Adjustable backlight display
●Low battery indicator
●Power supply:
Battery: 2 x AA batteries (not included)
DC power adapter: 5V 500mA
4.2 Wireless Remote Sensor
●Tabletop stand/ wall mount/ hanging hole
●3 channels available
●Low battery indicator
●°C/°F switchable
●Power supply: 2 x AA batteries (not included)
●Range of transmission: 200 feet in open area
●Outdoor temperature measurement range: -40°C (-40°F) ~
+70°C (158°F)
●Outdoor humidity measurement range: 1%RH~99%RH
3 4
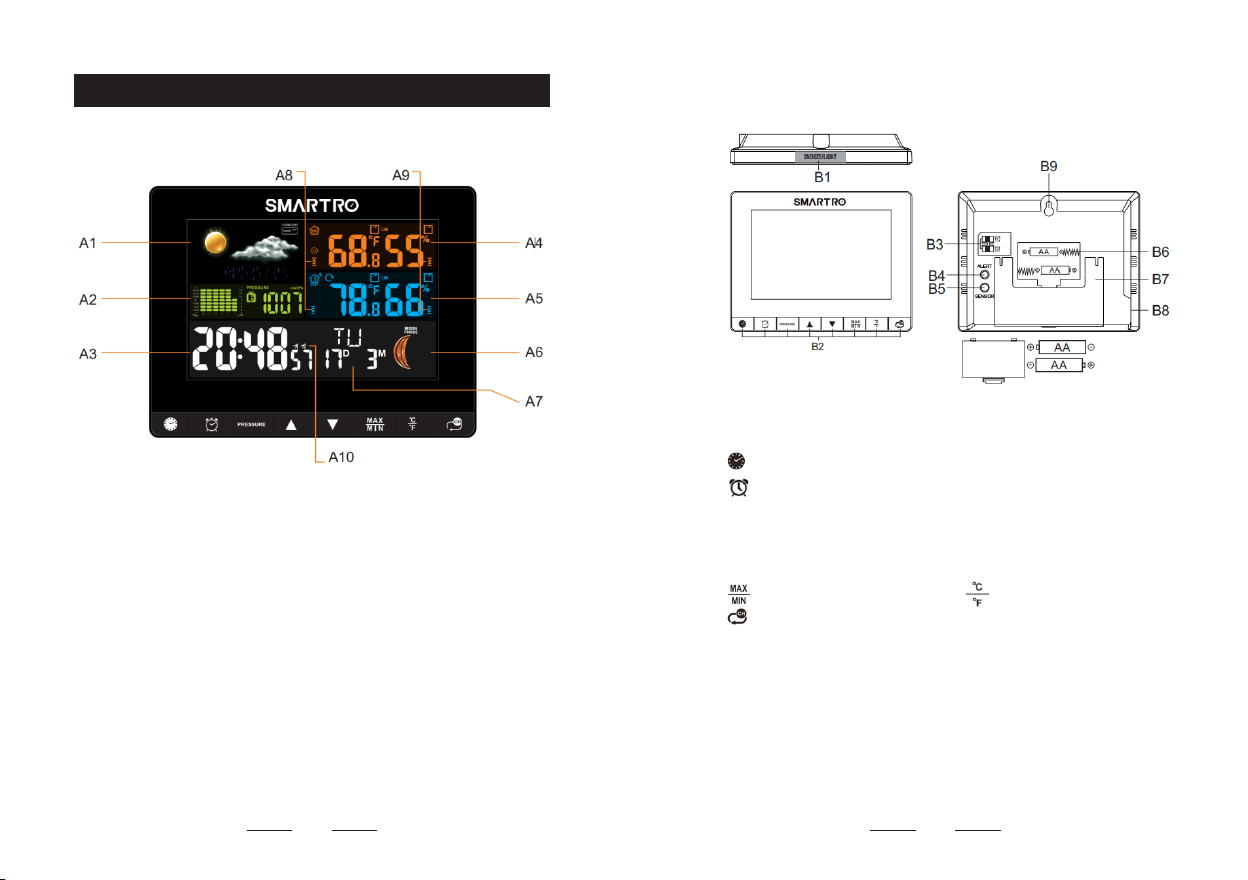
5. Know Your Device
5
A1: Weather forecast
A2: Air pressure
A3: Time
A4: Indoor temperature and humidity
A5: Outdoor temperature and humidity
A6: Moon phase icon
A7: Date
A8: Temperature alert
A9: Humidity alert
A10: Dual alarm
6
B1: SNOOZE/LIGHT
B2: Button
: Time setting (long press 2s to set)
: Alarm setting (long press 2s to set)
PRESSURE: review history record
▲: For setup preferences
▼: For setup preferences
: Maximum/ Minimum values : Select temperature unit
: Switch channel
B3: Alarm switch
B4: Temperature/humidity alert
B5: Sensor
B6: Battery compartment
B7: Fold-out tabletop stand
B8: Power supply socket
B9: Wall-mount hole
5.1 Screen
5.2 Main Unit
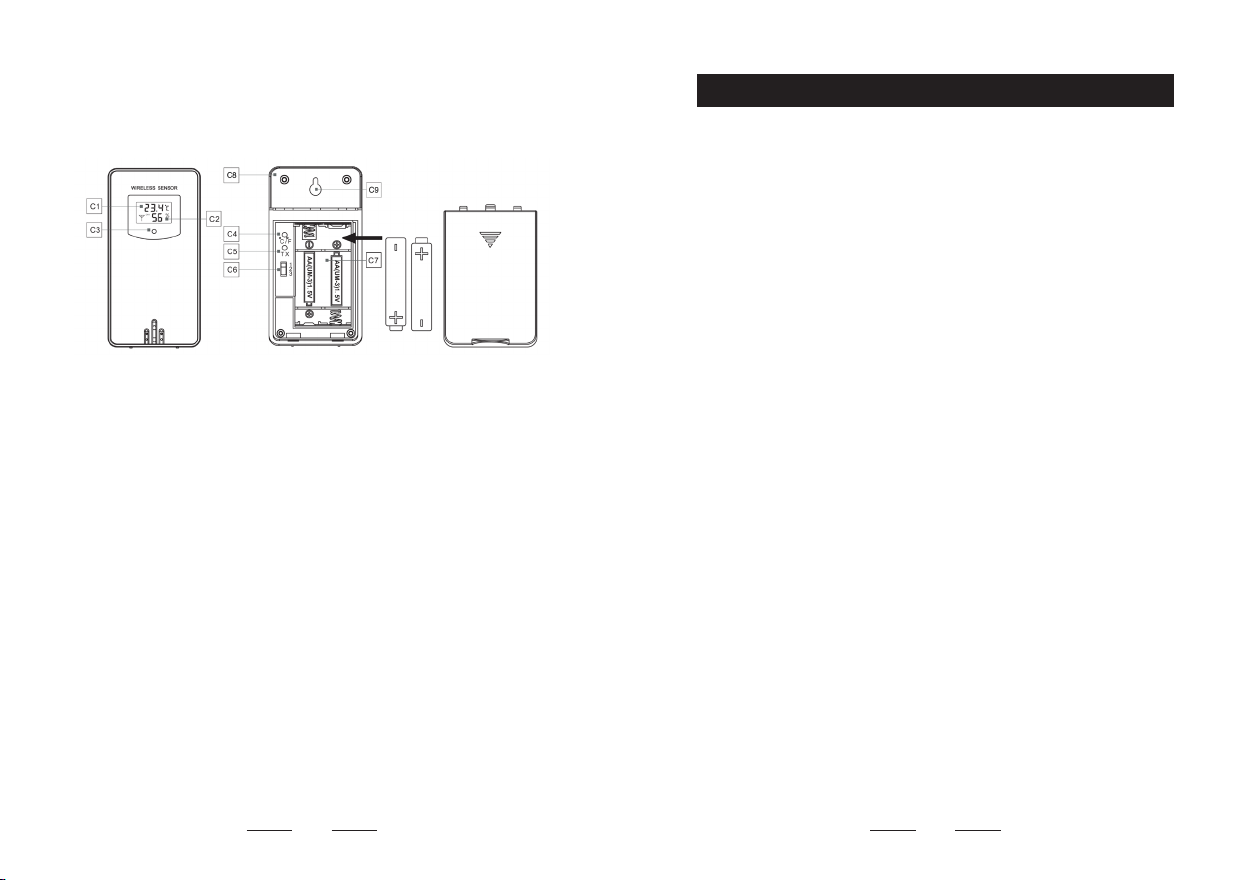
C1: Temperature
C2: Humidity
C3: Transmission signal light
C4: "°C/°F" button
C5: "TX" button
C6: Channel switch knob
C7: Battery compartment
C8: Hanging hole
C9: Wall-mount hole
6. Preparation
●Open weather station battery compartment cover, insert 2 x
AA batteries, ensure correct battery polarities [ "+" and "–" ]. And
connect the DC adapter to power the weather station.
●The screen will light up, and the device will make a beeping
sound. The weather station starts to detect indoor temperature and
humidity.
●The receiver will start to make a connection with the outdoor
remote sensor, a reception RF antenna symbol in the "OUT"
display area will icker on the screen. This procedure will takes 3
minutes at most.
●Open the wireless remote sensor battery compartment cover.
Choose a same channel as the weather station. Insert 2 x AA
batteries, ensure correct battery polarities [ "+" and "–" ].
●After the unit has made a connection with the outdoor remote
sensor, the detected temperature and humidity will display on the
screen.
● For specic pairing operation of the weather station and remote
sensor, please refer to 9.1 Weather Station and Remote Sensor
Pairing on page 12.
87
5.3 Wireless Remote Sensor
9
7. Initial Time Setup
● Long press " " key for two seconds.
● The year display "2020" starts to ash. Press "▲" or "▼" to set
the correct year.
● Press " " to conrm your setting.
● The month display starts to ash. Press "▲" or "▼" to set the
correct month.
● Press " " to conrm your setting.
● The date display starts to flash. Press "▲" or "▼" to set the
correct date.
●Press " " to conrm your setting.
● "M" and "D" will be ashing, press "▲" or "▼" to set the date
display to Month/Date or Date/Month.
●Press " " to conrm your setting.
● The time displays either in 12 or 24 hour format. Press "▲" or
"▼" to choose 12hr or 24hr.
●Press " " to conrm your setting.
● The hour display starts to flash. Press "▲" or "▼" to set the
correct hour.
● Press " " to conrm your setting.
● The minute display starts to ash. Press "▲" or "▼" to set the
correct minute.
●Press " " to conrm your setting.
● The weather icon display starts to ash. Press "▲" or "▼" to set
the weather of the day. Please set the weather icon according to
the real-time weather condition outside.
● Press " " to conrm your setting and complete the setup.
8. Dual Alarm Setting
Note:
During the setup, if there is no operation of buttons within 20
seconds, the weather station will save the current setting and
automatically return to normal display from manual setting mode.
8.1 How to Check Your Alarms
Press " " key.
Press 1x: Display time of alarm 1
Press 2x: Display time of alarm 2
Press 3x: Display current time
8.2 Activate/Deactivate the Alarm Function
●When the switch of alarm 1 or alarm 2 on the back of the
weather station is moved to "ON" position, the symbol " " or " "
will appear on the screen. The alarm function is activated.
●When the switch of alarm 1 or alarm 2 on the back of the weather
station is moved to "OFF" position, the symbol " " or " " will
disappear from the screen. The alarm function is deactivated.
8.3 Manual Setting of the Alarms
Please make sure the alarm switches are moved to "ON" before
manually setting the alarms.
10

11 12
●Press and hold " " key for two seconds, the hour of alarm 1
starts to ash.
● Press "▲" or "▼" keys to set the required hour.
●Press " " to conrm your setting.
● The minute of alarm 1 starts to ash. Press "▲" or "▼" to set the
required minute.
●Press " " to conrm your setting.
● The hour of alarm 2 starts to ash. Press "▲" or "▼" to set the
required hour.
●Press " " to conrm your setting.
● The minute of alarm 2 starts to ash. Press "▲" or "▼" to set the
required minute.
●Press " " to save and complete the setup.
8.4 Turn off the Alarm Tone
The alarm will ring for 2 minutes, pressing any button except
"SNOOZE/LIGHT" will stop the tone. The alarm will repeat at the
same time the next day.
8.5 Snooze Function
Proceed as follows to activate snooze function.
9.1 Weather Station and Remote Sensor Pairing
Weather station:
—Connect the weather station to power supply.
—Select a channel that permanently displays on the weather
station. Press " " button to select CH1, CH2 or CH3.
—After the weather station is powered on, the RF signal icon
located on the upper left side of the "OUTDOOR" column
will flash for 3 minutes. This indicates that the weather station
is in synchronization mode and waiting for the remote sensor to
connect.
—If the RF signal icon stops ashing after 3 minutes, long press
"SENSOR" button on the back of the weather station to activate the
weather station synchronization mode. The RF signal icon will
ash again.
●While the alarm is ringing, touch "SNOOZE/LIGHT" to activate
the snooze function. When the snooze function is activated, " "
or " " will keep ashing on the display. The alarm will ring again in
5 minutes.
●When the snooze function is activated, press any button except
"SNOOZE/LIGHT" to exit the snooze mode.
●If alarm 2 rings during the snooze mode of alarm 1, the snooze
function of alarm 1 will automatically be deactivated.
Note:
During the setup of the alarms, if there is no operation of buttons
within 20 seconds, the weather station will save the current setting
and automatically return to normal display from manual setting
mode.
9. Weather Station and Remote Sensor
Pairing & Manual Signal Reception

13 14
Wireless Remote Sensor:
—Select a same channel with the weather station for the remote
sensor. Open the battery compartment of the remote sensor to
select channel with numbered knobs (1, 2, and 3).
—Insert 2 x AA batteries in the remote sensor. The indicator
will light up once to indicate that the wireless remote sensor is
sending out signals. Please ensure that the weather station is in
synchronization mode so that it can receive the signals sending
from the remote sensor.
—When the weather station successfully receives signals from
the remote sensor, the temperature and humidity detected by the
remote sensor will display on "OUTDOOR" column of the weather
station.
—The weather station can connect up to 3 wireless remote sensors
at the same time. If multiple sensors are used simultaneously,
please repeat 9.1 Weather Station and Remote Sensor Pairing
to connect other remote sensors. Please make sure these sensors
are on different channels.
—Press " " button on the weather station to view the readings of
each channel.
9.2 Loop Mode
This mode is applicable in the event that multiple wireless remote
sensors are used simultaneously.
— Press " " button on the weather station until " " is displaying
in the top left corner of outdoor temperature area. In this mode, the
outdoor readings will display from CH1 to CH3 automatically every
5 seconds.
—To see the temperature and humidity on a fixed channel, just
press " " button until " " disappears. Once it disappears, the
outdoor readings will stop cycling.
9.3 Manual Signal Reception
If there is no outdoor temperature showing on weather station or
there is no change in the temperature and humidity for a long time,
it indicates that the weather station fails to receive signals from
wireless remote sensor, please take the following operations:
—Please ensure that the channels of the weather station and
sensor are same.
—Long press "SENSOR" button on the back of the weather station
to receive signals manually. A flashing RF antenna symbol will
display beside the channel. This means that the weather station is
in a receiving state.
—Press "TX" button on wireless remote sensor to send out signals
manually and a red light will ash.
Note:
●In the case of using only one sensor, when the channel of the
weather station is not same as the channel of the sensor, there
would be no outside temperature showing on the weather station.
●The wireless sensor can be placed anywhere (indoor or outdoor)
you want to measure the temperature remotely.

15 16
10. Temperature & Humidity
10.1 °C/°F Selection
Weather station:
Press "°C/°F" button on the weather station to choose the
temperature display unit.
Sensor:
Open the battery compartment cover and press "°C/°F" button to
choose the temperature display unit on the sensor.
10.2 How to Set Temperature & Humidity Alert
Press "ALERT" on the back of the weather station to activate or
deactivate the temperature and humidity alert. The icon " " will
appear or disappear on the screen.
Choose the channel you want to start setting the temperature and
humidity alert as follows:
●Long press "ALERT" until " "and the outdoor temperature are
ashing. Press "▲" or "▼" to set the required maximum outdoor
temperature. Press " ALERT" to conrm your setting.
●When " " and the outdoor temperature are ashing, press "▲"
or "▼" to set the required minimum outdoor temperature. Press
"ALERT" to conrm your setting.
●When " " and the outdoor humidity are flashing, press "▲"
or "▼" to set the required maximum outdoor humidity. Press
"ALERT" to conrm your setting.
●When " " and the outdoor humidity are ashing, press "▲" or
"▼" to set the required minimum outdoor humidity. Press " ALERT"
to conrm your setting.
●When " " and the indoor temperature are ashing, press "▲"
or "▼" to set the required maximum indoor temperature. Press
"ALERT" to conrm your setting.
●When " " and the indoor temperature are ashing, press "▲"
or "▼" to set the required minimum indoor temperature. Press
"ALERT" to conrm your setting.
●When " " and the indoor humidity are flashing, press "▲" or
"▼" to set the required maximum indoor humidity. Press "ALERT"
to conrm your setting.
●When " " and the indoor humidity are flashing, press "▲" or
"▼" to set the required minimum indoor humidity. Press "ALERT" to
conrm your setting.
●If you want to set the alert values of the other 2 channels, please
press " " to change the channel and repeat the steps above.
●When the temperature or humidity reaches the set value of
the alert, " " or " " and the temperature or humidity will start
ashing and a beep will arise for 5 seconds. Pressing any button
can temporarily stop the alarm, however " " or " " will still keep
ashing on the screen. The alert will restart in one minute unless
it is deactivated or the temperature and humidity return to the set
range. To completely end the alarm, please press "ALERT".
●If you want to measure the outdoor temperature, please place
the sensor outside away from direct sunlight and rain such as
under eaves or on a porch.

17 18
10.4 How to Check Maximum/Minimum Temperature/Humidity
●To toggle indoor/outdoor maximum, minimum temperature and
humidity data, please press " " :
Press once to show the maximum temperature and humidity values.
Press twice to show the minimum temperature and humidity values.
Press three times to return to the current temperature and humidity
values.
●To reset the maximum and minimum temperature and humidity,
press " " to select maximum or minimum value, and long press
the button for 2 seconds to clear the history maximum or minimum
values. At this time, "MAX" or "MIN" will disappear from the display
screen.
●If not checking the maximum or minimum values, long pressing
" " can clear both of the history values.
Note:
●The temperature and humidity alerts of 3 channels can be set
separately. If any channel reaches the set value of the alert, the
main unit will start ringing.
●In any case, if " " is displaying on the screen and the alert
function is not needed, please press "ALERT" to clear it
away. Otherwise, it will ring at any time when reaching the set
temperature or humidity set value. To avoid disturbance at the
night, please turn it off.
Note:
●If the temperature or humidity reading is below the ranges, LL.L
will appear. If the temperature or humidity reading is above the
ranges, HH.H will appear.
10.3 Temperature & Humidity Trend
The weather station monitors the current temperature and humidity
change.
: The temperature/humidity is rising.
: The temperature/humidity is falling.
→ : The temperature/humidity is remaining constant.
11. Weather Forecast
11.1 Weather Forecast Statement
●The weather station calculates the weather forecast based on
the history recorded barometric pressure trend.
●The weather forecast cannot be compared with the professional
weather services supported by satellites and high-performance
computers. It provides an approximate indication of current developments.
●Please take the weather forecast from local weather station as
authoritative.
11.2 The Symbols of Weather Forecast
sunny thunder
storm
cloudyrainysnowy slightly
cloudy
19
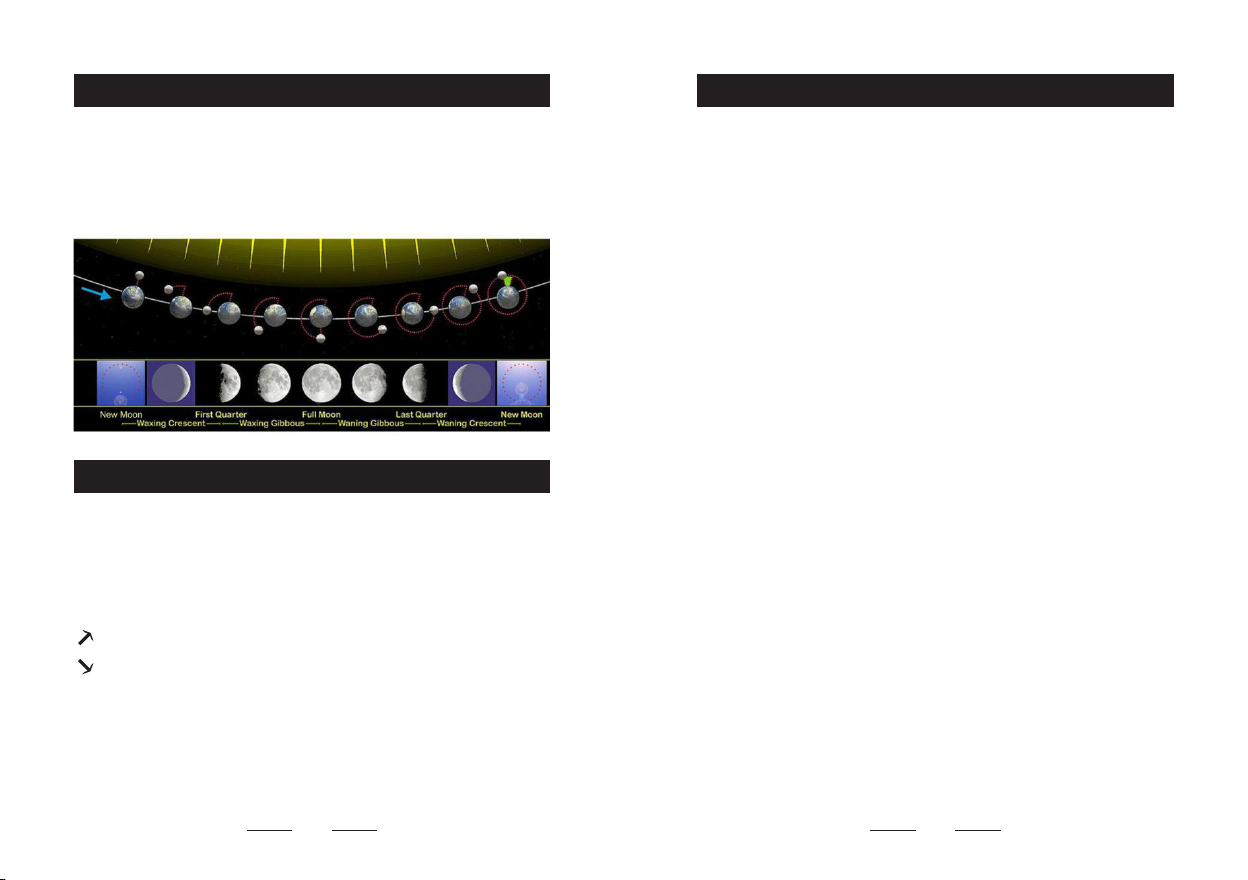
12. Moon Phase
13. Air Pressure
14. Backlight
When the calender has been set, the weather station will display 8
different moon phases: New moon, Waxing Crescent, First Quarter,
Full Moon, Waning Gibbous, Last Quarter, Waning Crescent, New
Moon.
13.1 Air Pressure Trend Display
The weather station measures the current relative air pressure.
The current air pressure is compared with recorded air pressure
trends.
: The air pressure is rising.
: The air pressure is falling.
→ : The air pressure is remaining constant.
—Connect the weather station with DC adapter, the backlight will
always keep on. The backlight has 3 brightness levels, Bright-
Low-Out for selection. To adjust the backlight brightness, touch
"SNOOZE/LIGHT" to choose a brightness that is comfortable for
you.
—Any restart or power break will cause a loss of the previous
manual setting. In case of power failure, please insert 2 AA batteries
in the weather station to keep the memory of manual setting.
13.2 How to Check Air Pressure History
Press "PRESSURE" to display the recorded air pressure values
during the last 12 hours.
20
Note:
●The power of the batteries is not enough to support such large
display. So it is not recommended to power the weather station
only by batteries.
●When the weather station is only powered by batteries, touching
"SNOOZE/LIGHT" will temporarily activate the backlight for 10
seconds, then it will be automatically off and enter into a power
saving mode.
●To keep the display stay on constantly, please connect the
weather station with DC adapter.
21
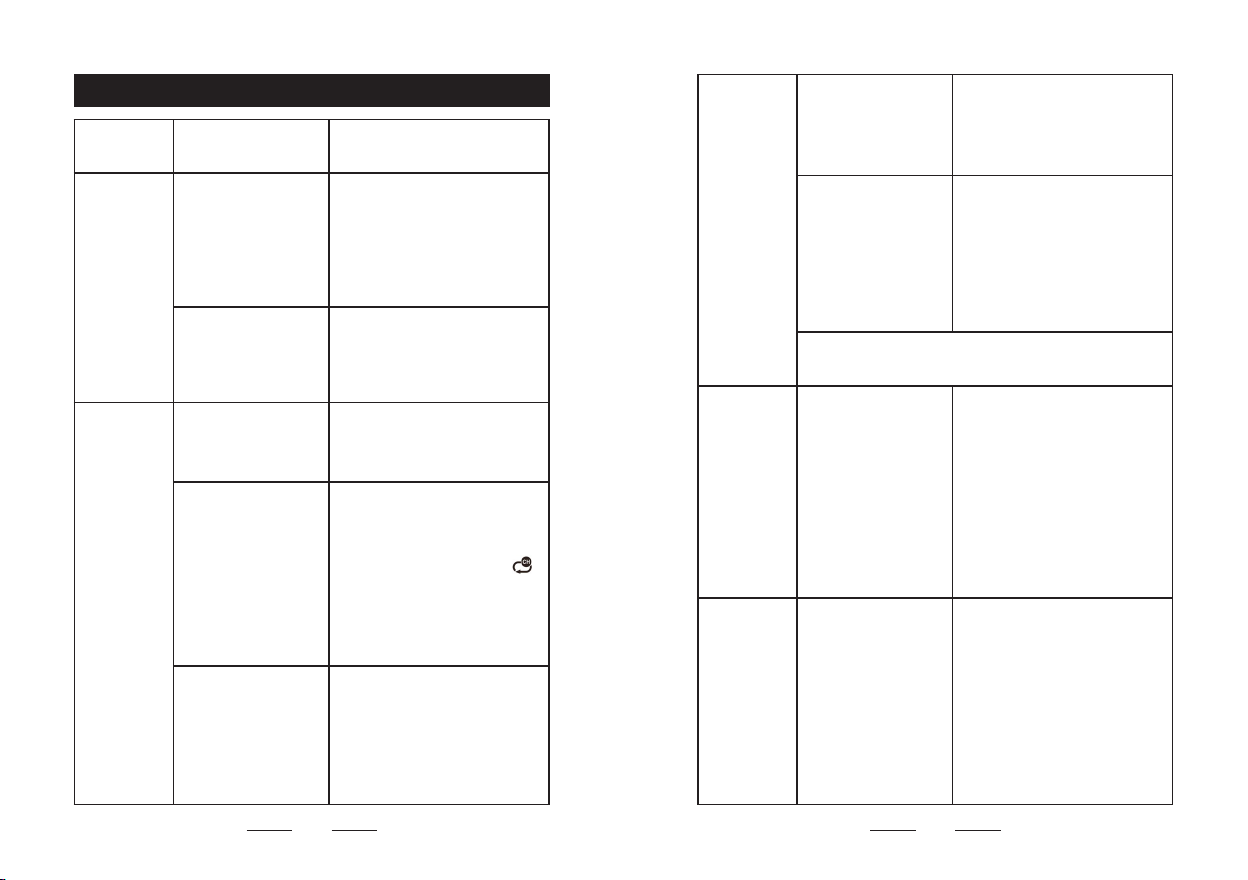
PROBLEM CAUSE SOLUTION
No backlight.
The weather station
is only powered by
batteries.
1. Press "SNOOZE/LIGHT"
to temporarily activate the
backlight for 10 seconds.
2. Connect DC adapter to
power up the weather station,
the backlight will remain on.
DC adapter is
connected, but the
backlight is set to
"OUT" state.
Press "SNOOZE/LIGHT"
to adjust the backlight
brightness, out-medium-high.
No outdoor
temperature
displays on
the weather
station.
The batteries of the
sensor have run out.
Replace 2×AA new batteries
for the outdoor remote sensor.
The channel
displaying on the
weather station
is different from
the channel of the
remote sensor.
Adjust the channel of the
weather station or the sensor
to keep them paired.
Weather station: Press " "
to select a channel.
Sensor: Switch the knob "1
2 3" inside the battery bay to
select a channel.
The weather station
did not receive
signals from the
outdoor sensor.
1. Long press "SENSOR"
on the back of the weather
station to search signals
again.
2. Press "TX" of sensor to
send signals.
The outdoor
temperature
on the
weather
station is
different from
that on the
sensor.
The remote sensors
are exposed to the
sun or rain.
Keep the wireless sensor
away from direct sunlight and
rain.
There is a delay
or interruption of
transmission.
1. Long press "SENSOR"
on the back of the weather
station.
2. Press "TX" of sensor to
send signals.
3. Wait for several hours to
see if the readings are close
or same.
If problem persists, please contact after-sales
The indoor
and outdoor
readings
are different
when putting
the two
devices
together.
Temperature range
in 50°F~104°F(10°C
~40°C), tolerance:
±0.9°F.
Other: ±2.7°F.
Humidity range in
30%~80%, tolerance:
±3%. Other: ±5%.
1. The difference is in a
normal range.
2. If the difference is beyond
the range, please please
contact after-sales support at:
The forecast
displaying on
the weather
station is
different from
the real-time
weather.
The weather station
calculates the
weather forecast
for the next 12
hours based on the
barometric pressure
trend, which is not
the current weather.
Please refer to the real-time
weather.
15. Troubleshooting
22

17. Waste Disposal
●This product is manufactured with high-grade materials and
components which can be recycled and reused.
● As a consumer, you are legally required to take them to your
retail store or an appropriate collection site depending on national
or local regulations in order to protect the environment.
●The symbols for the heavy metals contained are: Cd=cadmium,
Hg=mercury, Pb=lead.
●Please do not dispose of this instrument in household waste.
The user is obligated to take end-of-life devices to a designated
collection point for the disposal of electrical and electronic
equipment, in order to ensure environmentally-compatible disposal.
23
16. After-sales Support
If your device fails to work despite these measures or your
experience with us was less than perfect in any way, please do not
hesitate to contact us.
For more products, please visit our website: https://www.smartro.co/
For further support and discount information, join our Facebook
group or follow us on Instagram.
: smartro_01
: http://bit.ly/smartro_01
: +1(323)287-5798
The alarm
rings
unexpectedly
at night.
The time alarms
function is activated.
Please check the set alarms
and reset them or switch the
alarms to "OFF".
The temperature
or humidity alert
is activated. The
temperature or
humidity have
reached alert range.
Reset the temperature or
humidity alert range.
Press "ALERT" on the back of
the weather station to turn it
off.
The outdoor
readings
display
occasionally
on the clock.
The display was set
to loop mode.
Press " " until the arrow icon
disappear to cancel the loop
mode.
If problem persists, please contact after-sales
24

Other manuals for SC93
1
Table of contents
Other Smartro Weather Station manuals

Popular Weather Station manuals by other brands


elsner elektronik
elsner elektronik Suntracer KNX basic Technical specifications and installation instructions

La Crosse Technology
La Crosse Technology Bonus Station user manual

Bresser
Bresser 7002520 000 000 instruction manual

vlahova
vlahova RB101 user manual

ThermoPro
ThermoPro TP-53 instruction manual

La Crosse Technology
La Crosse Technology 308-2414FR Faqs


