Smeg NKT335EEU User manual

DE Gebrauchsanweisung 2-14. . . . . . . . . . . . . . . . .
GB Instruction manual 15-27. . . . . . . . . . . . . . . . . .
FR ode d'emploi 28-42. . . . . . . . . . . . . . . . . . . . .
IT Istruzioni per l'uso 43-55. . . . . . . . . . . . . . . . . .
NL Gebruiksaanwijzing 56-68. . . . . . . . . . . . . . . . .
GR Ïäçãßåò ÷ñÞóåùò 69-83. . . . . . . . . . . . . . . . . .
ES Instrucciones para el uso 84-99. . . . . . . . . . . .
Gebrauchsanweisung
Instruction manual
ode d'emploi
Istruzioni per l'uso
Gebruiksaanwijzing
Ïäçãßåò ÷ñÞóåùò
Instrucciones para el uso
801 141 05
NKT 335 E
DE, GB, FR, IT, NL, GR, ES
B070480

Table of contents
15
Protection of the Environment 16. . . . . . . . . . . . . . .
Notes on disposal 16. . . . . . . . . . . . . . . . . . . . . . . . . . . .
How to save energy 16. . . . . . . . . . . . . . . . . . . . . . . . . .
Before connecting your new appliance 17. . . . . . . .
Important information 18. . . . . . . . . . . . . . . . . . . . . . .
Safety information 18. . . . . . . . . . . . . . . . . . . . . . . . . . . .
How to prevent damage to your appliance 19. . . . . . .
The hob 21. . . . . . . . . . . . . . . . . . . . . . . . . . . . . . . . . . .
Hotplate control 21. . . . . . . . . . . . . . . . . . . . . . . . . . . . .
Residual heat indicator 21. . . . . . . . . . . . . . . . . . . . . . . .
Setting procedure 22. . . . . . . . . . . . . . . . . . . . . . . . . .
Coo ing zone controls 22. . . . . . . . . . . . . . . . . . . . . . . .
Table 23. . . . . . . . . . . . . . . . . . . . . . . . . . . . . . . . . . . . . .
Care and cleaning 24. . . . . . . . . . . . . . . . . . . . . . . . . .
Hob 24. . . . . . . . . . . . . . . . . . . . . . . . . . . . . . . . . . . . . . .
Hob surround 25. . . . . . . . . . . . . . . . . . . . . . . . . . . . . . .
Note 26. . . . . . . . . . . . . . . . . . . . . . . . . . . . . . . . . . . . . . .
AfterĆsales service 27. . . . . . . . . . . . . . . . . . . . . . . . . .

16
Protection of the Environment
Your new appliance was protected by suitable
pac aging while it was on its way to you. All materials
used for this purpose are environmentĆfriendly and
suitable for recycling. Please ma e a contribution to
protecting the environment by disposing of the
pac aging appropriately.
Old appliances are not worthless rubbish! EnvironĆ
mentĆconscious recycling can reclaim valuable raw
materials.
Before disposing of your old appliance, please ma e
sure that it is unusable, or label it with a stic er stating
Caution: This appliance is defective!"
UpĆtoĆdate information concerning options for
disposing of your old appliance and the pac aging
from the new one can be obtained from your retailer
or local municipal office.
qWe recommend that you use saucepans and
frying pans with thic flat bases. Uneven bases
increase coo ing times.
qAlways select a saucepan that is the right size for
the food to be coo ed. A large saucepan that is
only halfĆfilled will consume more energy.
qSaucepans and frying pans should always be
covered by a matching lid.
qUsing a saucepan base that is the same size as
the hotplate ensures the optimum transfer of heat.
When purchasing saucepans, chec that the
manufacturer frequently specifies the top diameter
of the pan rim. Generally, this value is greater than
the diameter of the pan base.
qSwitch bac to a lower heat setting at the
appropriate time.
Notes on disposal
How to save energy

17
qMa e use of the residual heat. For longer coo ing
times, it is possible to switch off the hotplate 5 to
10 minutes before the end of the coo ing time.
qEven though the hotplate has been switched off,
you can use it for as long as the residual heat
indicator is illuminated to warm dishes or melt
ingredients.
Pan with flat
bottom and lid
Normal 1ā½Ćfold 4Ćfold
Bottom of pan
i not flat Pan without lid
Energy
con umption
Before connecting your new
appliance
Please read this instruction manual carefully before
using your new hob for the first time. The instructions
contain important information with regard to user
safety and appliance use and care.
qThe electrical connection of your appliance must
be carried out by an approved technician only.
Incorrect connection invalidates any warranty
claims in the event of appliance damage.

18
qPlease retain these operating and installation
instructions. The envelope for the operating
instructions contains details of the afterĆsales
service which you may need to call if repairs are
required. Please submit the operating and
installation instructions to any subsequent user
of the appliance.
qDo not operate the hob if transport damage is
apparent.
Important information
qThis appliance complies with all regulations
relevant to electrical appliances. Repairs should
only be carried out by service engineers trained
by the manufacturer. Repairs that have not been
carried out properly represent a considerable
hazard to the user.
qThis appliance must be used for the preparation
of food only.
qThe hob and pans or utensils can become very
hot while it is in use. Ma e sure that children are
always ept away from the hob.
qDo not leave the hob unattended if you are
coo ing with fat or oil. Oil can catch fire if it
overheats. Never pour water onto burning oil or fat.
Burns hazard! Cover the pan in order to smother
the flames and switch off the coo ing zone. Leave
the pan to stand on the hob until it has cooled
down.
qThe connecting cords of electrical appliances
must not come into contact with the hot coo ing
surfaces, as this could result in damage to the hob
and the connecting cord's insulating jac et.
Safety information

19
qIn the event that a drawer is located beneath the
hob, you must not store any combustible items
or spray cans in the drawer. Do not place any
combustible items on top of the hob.
qIf any crac s, fissures or other brea s appear
on the hob, it must be rendered inoperable
immediately. The hob should be switched off either
via the coo er fuse or circuitĆbrea er in the main
fuse box, or unplugged from its source of power,
whichever is applicable.
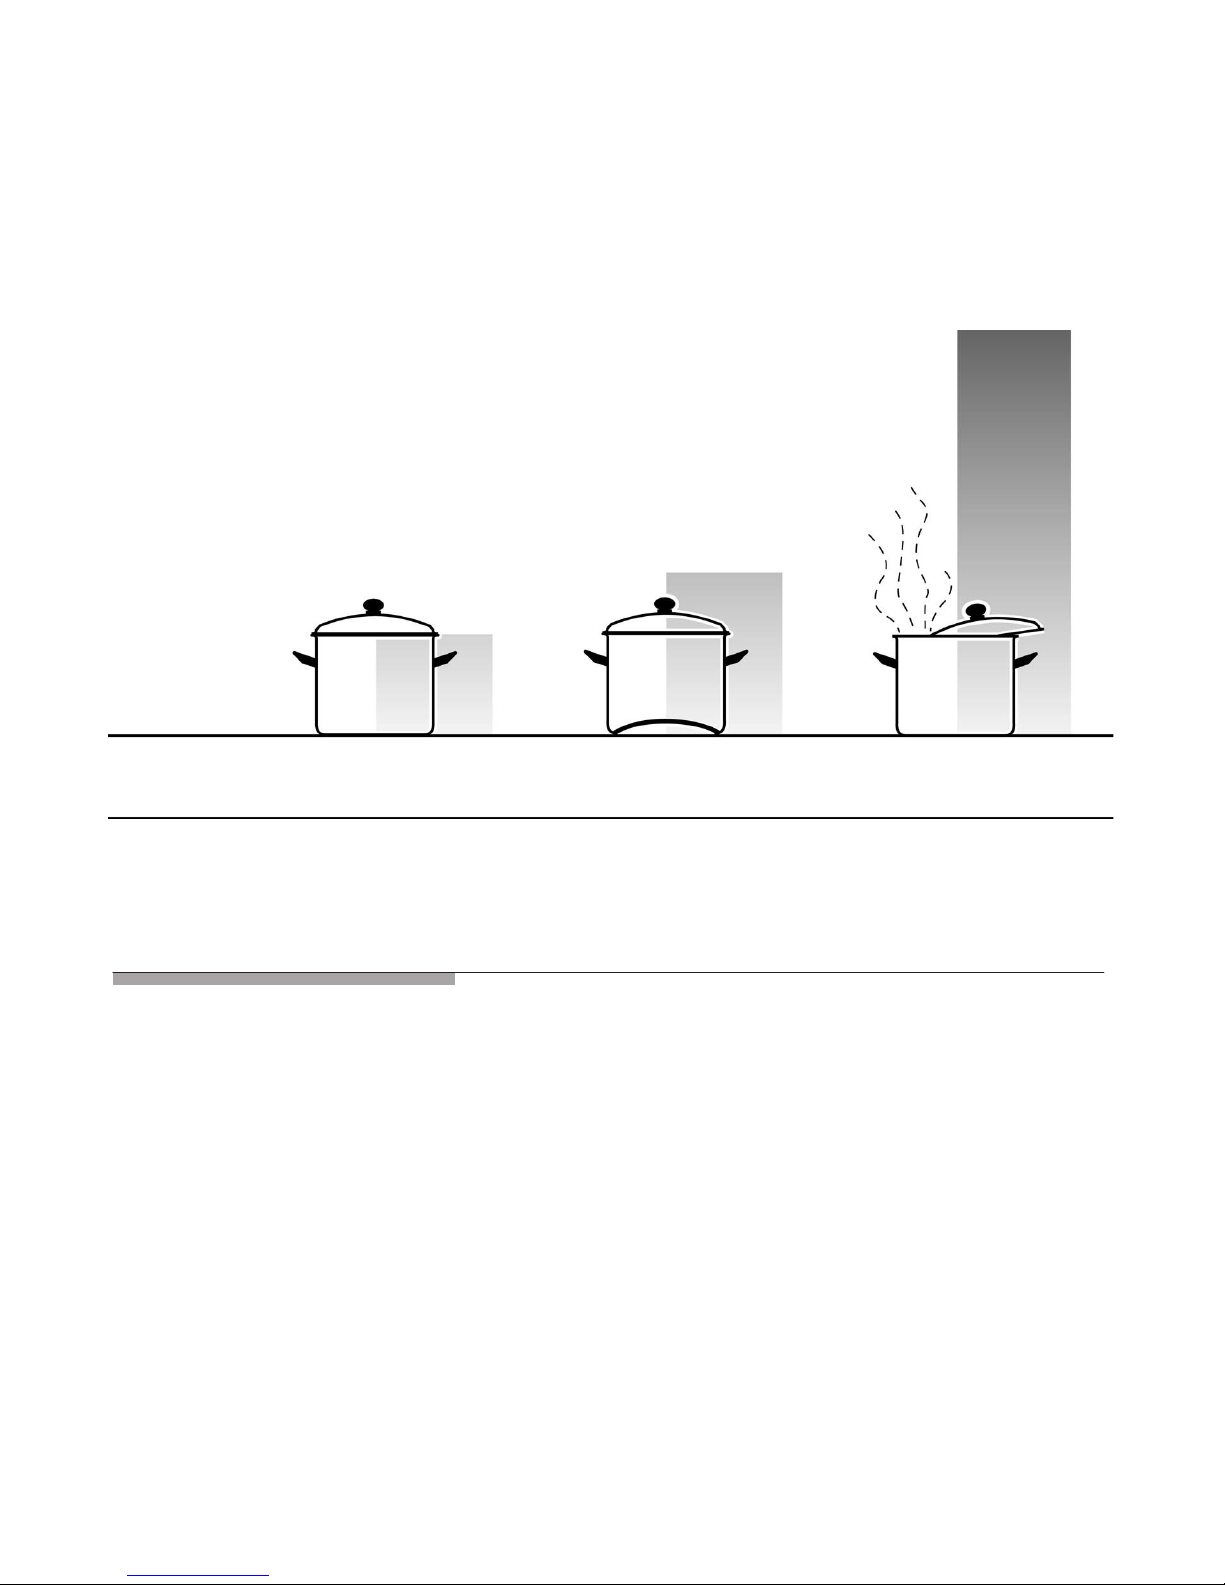
qCaution! The saucepan base and the hotplate
must be dry whilst coo ing. Any liquid between the
coo ware base and the hotplate will vaporize. The
ensuing steam pressure can cause the saucepan
to jump violently. Ris of injury!
qObserve the residual heat indicator. This provides
an indication of which hotplates are still hot.
qSwitch off the hotplate if the indicator does not
wor when the hotplate is heating.
Call the afterĆsales service.
Please heed the following information in order to preĆ
vent damage to your hob and to eep it in good conĆ
dition:
qPots and pans should not have a rough base
otherwise they will scratch the coo ing zone.
qDo not prepare food in aluminium foil or plastic
containers as the material will melt and stic to
the hob.
qDo not let enamel pans boil dry as this could
damage the base of the pan and the glassĆ
ceramic.
qIf you are using special utensils, observe the
manufacturer's instructions.
How to prevent
damage to your
appliance
Utensils

20
qDo not use the hob as a storage space or wor
surface. Salt, sugar or sand (can occur when
vegetables are cleaned) can cause scratches on
the hob.
qEnsure that no hard or sharp object is dropped
onto the hob, otherwise it could become damaged
as a result.
qOnly clean the hob when it has cooled, i.e., when
the residual heat display no longer illuminates.
If used when the hotplate is hot, agents used for
cleaning and care of the hotplate will cause stains.
qDo not use a protective foil on the hob.
qDo not put any hot pans on the display panels, the
adjustment range or the hob surround.
Iridescent discoloration (metallic shimmer) is caused
by particles rubbing off the bases of some pans or by
using unsuitable cleaners. This can be removed with
Sainsbury's CERAMIC Hob CLEANER or Hob Clean
but it is a timeĆconsuming job. Our customer service
will remove such stains at a charge. Aggressive or
abrasive cleaning agents will rub off the decor,
causing dar patches.
Any food remains that were not removed and have
become ba ed on will also cause hob discoloration.
They do not influence the function or stability of the
glass ceramic.
Pitting caused by melted
sugar or food with a high
sugar content.
Scratches caused by
salt, sugar, sand or rough
pan bases.
Cooking zone
Hob discoloration
Examples of possible
damage

21
etallic shimmering
discoloration due to
wear from pan bases or
use of an unsuitable
cleaning agent.
Decor rubbed off
due to use of an
unsuitable cleaning agent
The hob
Cooking zone 18 cm
Operation di play and
Re idual heat indicator
Cooking zone 14,5 cm
Hotplate control
The hob has a separate residual heat indicator for
each of the hotplates. This indicates which hotplates
are still hot.
NKT 335 E
Residual heat
indicator

22
Setting procedure
The hotplate controls are used to set the heat setting
of the hotplates.
You can turn the controls either to the right or to the
left.
1āāā= lowest setting
6 āā= highest heat setting
Cooking zone
controls

23
The following tables provide you with a few examples.
Please remember that the coo ing times depend on
the type, weight and quality of the food, which means
that deviations are possible.
Set the coo ing zone control to setting 6 for bringing
to the boil or initial frying. Then switch the control bac
to the appropriate simmer setting.
Amount Boil start
setting 6
Ongoing
cooking
Total cooking
time
Melting
Chocolate, butter, honey
Gelatine
100 g
1 packet
-
-
1
1
-
-
Heating and keeping warm
Stew (e. g. lentil di h)
Milk
400 g Ć 800 g
500 ml Ć 1 l
1 Ć 3 min.
1 Ć 3 min.
1 Ć 2
1 Ć 2
-
-
Heating
Tinned vegetable
Thickened oup
Milk
400 g Ć 800 g
500 ml Ć 1 l
200 ml Ć 400 ml
2 Ć 4 min.
4 Ć 6 min.
1 Ć 3 min.
1 Ć 2
1 Ć 2
1 Ć 2
5 Ć 10 min.
5 Ć 10 min.
4 Ć 7 min.
Defrosting and heating
Frozen pinach
Frozen goula h
300 g Ć 600 g
500 g Ć 1 kg
2 Ć 4 min.
2 Ć 4 min.
2 Ć 3
2 Ć 3
10 Ć 20 min.
20 Ć 30 min.
Boiling
Rice (with twice the amount
of water)
Fre h vegetable with
1 Ć 3 cup of water
Potatoe boiled in kin with
1 Ć 3 cup of water
Boiled potatoe with
1 Ć 3 cup of water
Pa ta (1 Ć 2 l water)
125 g Ć 250 g
500 g Ć 1 kg
750 g Ć 1.5 kg
750 g Ć 1.5 kg
200 g Ć 400 g
2 Ć 4 min.
3 Ć 5 min.
4 Ć 6 min.
4 Ć 6 min.
7 Ć 12 min.
1
1 Ć 2
1 Ć 2
1 Ć 2
1 Ć 2
20 Ć 30 min.
10 Ć 20 min.
30 Ć 40 min.
20 Ć 30 min.
10 Ć 15 min.
Roasting
Pot roa t
Beef roll
1 kg
4 pc .
5 Ć 8 min.
6 Ć 11 min.
2 Ć 3
2 Ć 3
80 Ć 100 min.
50 Ć 60 min.
Poaching
Dumpling (2 Ć 3 l water)
Fi h
4 Ć 8 pc .
300 g Ć 600 g
7 Ć 12 min.
5 Ć 8 min.
2 Ć 3
1 Ć 2
30 Ć 40 min.
15 Ć 25 min.
Table

24
Total cooking
time
Ongoing
cooking
Boil start
setting 6
Amount
Frying
Fi h finger
Pancake
Cutlet (in breadcrumb )
Steak 2 Ć 3 pc .
2 Ć 3 min.
2 Ć 3 min.
2 Ć 3 min.
2 Ć 3 min.
3 Ć 4
3 Ć 4
3 Ć 4
4 Ć 5
8 Ć 11 min.
ongoing
frying
7 Ć 10 min.
5 Ć 10 min.
DeepĆfat frying
(in 1 Ć 2 l of oil)
Frozen product
Other
200 g / load
400 g / load
10 Ć 15 min.
10 Ć 15 min.
4 Ć 5
2 Ć 3
Ongoing
deepĆfat frying
Ongoing
deepĆfat frying
* Mineral and vitamin are water oluble, therefore: U e le water - vitamin and mineral are
retained. U e horter cooking time - for crunchy vegetable .
Care and cleaning
Do not under any circumstances use a highpressure
or steam cleaner.
A protective cleaning agent will coat the
glassĆceramic hob with a gleaming, dirtĆrepellent film.
This will help to preserve the attractive appearance of
your hob over a long period of time and ma e it easier
to clean as well. We recommend you use cerafix"
which can be purchased from chemists, hardware
stores or supermar ets.
Clean the hob every time that you use it, so that food
remains are prevented from being ba ed on to the
surface.
Hob

25
Water spots can also be removed using lemon juice or
vinegar. If you accidentally spill acidic liquids onto the
hob frame, please wipe off immediately using a damp
cloth. Otherwise dull areas may appear on the hob
surface.
If the hob is very dirty, it is best to use a common
household glass scraper.
Suitable cleaners for ceramic hobs:
Cleaning agent Supply source
Gla craper DIY tore /hobby
market , electric
appliance tore ,
peciali t kitchen tore ,
afterĆ ale ervice
Replacement blade DIY tore /hobby
market , drug tore ,
painting acce ory
tore , afterĆ ale
ervice
COLLO luneta, HOB BRITE
Hob Clean, Hob & Sink Clean,
Sain bury' CERAMIC Hob
CLEANER, SWISS CLEANER,
WK TOP
Chemi t , hardware
tore , electrical
retailer , upermarket ,
grocer , department
tore
Unsuitable cleaning agents:
Do not under any circumstances use an abrasive
sponge or a scouring agent. Nor should any
chemically aggressive cleaners such as oven
sprays or stain removers be used.
Iridescent discoloration (metallic shimmering) is
caused by the bases of some pans or by using
unsuitable cleaners. This can be removed with
Sainsbury's CERMAIC Hob CLEANER or
Hob Clean but it is a timeĆconsuming job.
Our afterĆsales service will also remove such
discolourations for a small fee.
Note:

26
The hob surround is best cleaned with lu ewarm
soapy water. Do not use a sharp or abrasive cleaning
agent.
qThe temperature of the hotplate is controlled via
the switching on and off of the heater; This means
that the hotplate does not always glow red. If you
select a lower heat setting, the heater will switch
off more often than with a higher heat setting. The
heater still switches on and off even on the highest
setting.
qA quiet buzzing sound may be heard when the
hotplates are heating up.
The heater of the individual hotplates may glow
to varying degrees of brightness. It may appear
to extend outside the borders defining the coo ing
zone, depending on the angle from which it is
observed.
This represents a technical characteristic and has
no influence on quality or function.
qIrregularities on the surface are a natural
characteristic of glassĆceramic products.
The hob's mirror finish can mean that even
the smallest bubble, less than 1 mm in diameter,
is more or less visible. They neither impair the
performance nor the durability of the
glassĆceramic hob.
Hob surround
Note

27
AfterĆsales service
When calling upon our afterĆsales service, please
specify the E number and FD number of your apĆ
pliance.
The nameplate containing these numbers can be
found on the bac page of these operating instrucĆ
tions.
This manual suits for next models
1
Other Smeg Hob manuals

Smeg
Smeg Gas Hob CIR60X3 User manual

Smeg
Smeg PV395LCNAU User manual

Smeg
Smeg GM134EB User manual

Smeg
Smeg GKCO64-3 User manual

Smeg
Smeg PV631CNXAU User manual

Smeg
Smeg SIM61B Quick start guide

Smeg
Smeg SE332EB User manual

Smeg
Smeg SRV596GK5 User manual

Smeg
Smeg P755AB1 User manual

Smeg
Smeg GKC955 User manual

Smeg
Smeg SI1M7643B User manual

Smeg
Smeg SI5643B User manual

Smeg
Smeg SIM581B User manual

Smeg
Smeg Genuine Apell Gas Hob AP704S3 User manual

Smeg
Smeg SE2641CX User manual

Smeg
Smeg SE32X User manual

Smeg
Smeg SC35 User manual

Smeg
Smeg 38/2C002 User manual

Smeg
Smeg SR 864 PGB User manual

Smeg
Smeg SAI3963B User manual