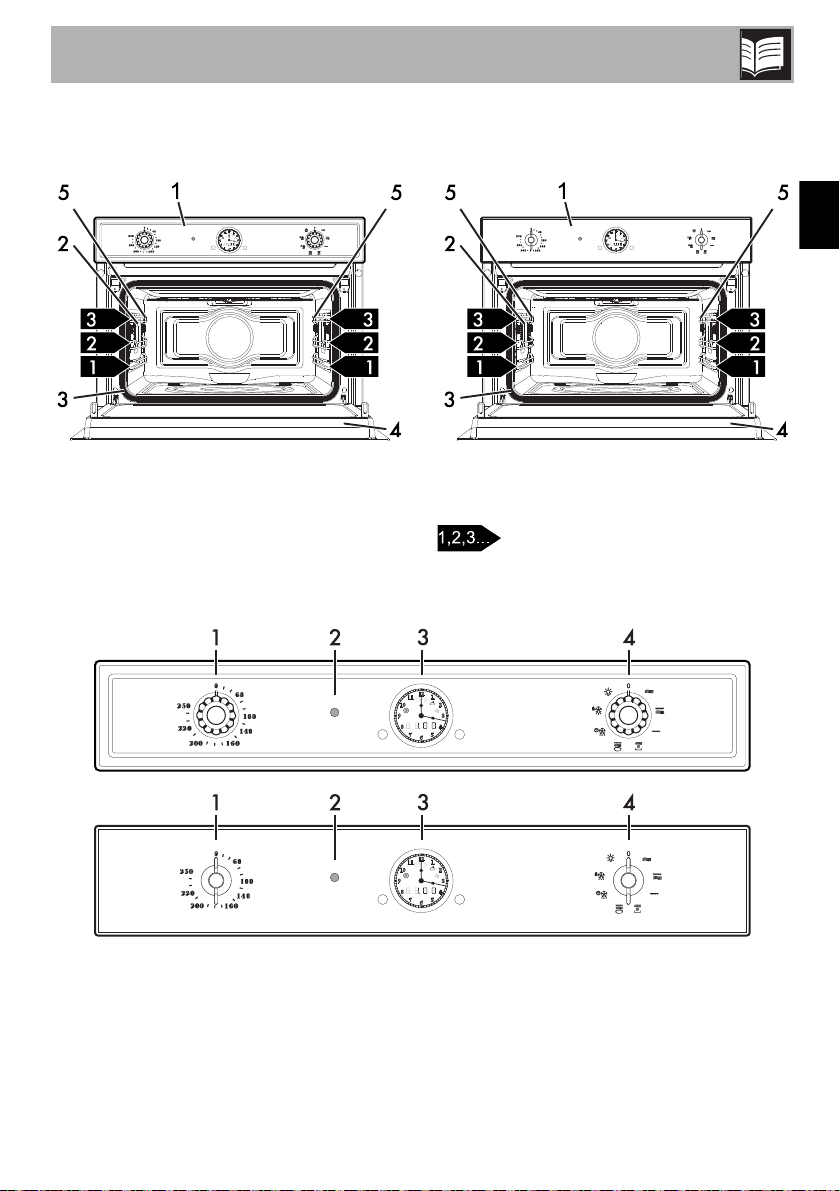
Smeg SF 4750 MPO User manual

Contents
37
EN
1 Instructions 38
1.1 General safety instructions 38
1.2 Instructions for using microwaves 39
1.3 Manufacturer liability 41
1.4 Appliance purpose 41
1.5 Identification plate 41
1.6 Disposal 41
1.7 This user manual 42
1.8 How to read the user manual 42
2 Description 43
2.1 General Description 43
2.2 Control panel 43
2.3 Microwaves 44
2.4 Other parts 44
2.5 Available accessories 45
3 Use 46
3.1 Instructions 46
3.2 First use 47
3.3 Using the accessories 48
3.4 Using the oven 49
3.5 Cooking functions 51
3.6 Special functions 56
3.7 Secondary menu 61
4 Cleaning and maintenance 63
4.1 Instructions 63
4.2 Cleaning the surfaces 63
4.3 Ordinary daily cleaning 63
4.4 Food stains or residues 63
4.5 Drying 64
4.6 Cleaning the door glazing 64
4.7 Cleaning the inside of the oven 64
5 Installation 67
5.1 Electrical connection 67
5.2 Cable replacement 67
5.3 Positioning 68
We advise you to read this manual carefully, which contains all the instructions for
maintaining the appliance’s aesthetic and functional qualities.
For further information on the product: www.smeg.com

Instructions
38
1 Instructions
IMPORTANT SAFETY INSTRUCTIONS
PLEASE READ CAREFULLY AND RETAIN FOR FUTURE USE.
1.1 General safety instructions
Risk of personal injury
• WARNING: If the door or the
door seal is damaged, the oven
must not be used until it has been
repaired by a competent person.
• WARNING: It is hazardous for
anyone other than a competent
person to carry out any service or
repair operation which involves
the removal of a cover which
offers protection against exposure
to microwave energy.
• WARNING: Liquids and other
foods must not be heated in
sealed containers since they are
liable to explode.
• WARNING: During use the
appliance and its accessible parts
become very hot.
• Never touch the heating elements
during use.
• Keep children under eight years
of age at a safe distance if they
are not constantly supervised.
• This appliance may be used by
children aged at least 8 and by
people of reduced physical and
mental capacity, or lacking in
experience in the use of electrical
appliances, as long they are
supervised or instructed by adults
who are responsible for their
safety.
• Children must never play with the
appliance.
• The appliance must never be
cleaned by unsupervised children.
• Switch off the appliance
immediately after use.
• If smoke is emitted, switch off or
unplug the appliance and keep
the door closed in order to stifle
any flames.
• Never attempt to extinguish a
flame or fire with water.
• Have qualified personnel carry
out installation and assistance
interventions according to the
standards in force.
• Do not modify this appliance.
• Do not insert pointed metal
objects (cutlery or utensils) into the
slots in the appliance.

Instructions
39
EN
• Do not try to repair the appliance
yourself or without the intervention
of a qualified technician.
• If the power supply cable is
damaged, contact technical
support immediately and they will
replace it.
Risk of damaging the appliance
• Do not use abrasive or corrosive
detergents on glass parts (e.g.
powder products, stain removers
and metallic sponges).
• Use wooden or plastic utensils.
• Do not use a steam jet to clean
the appliance.
• Do not obstruct ventilation
openings and heat dispersal slots.
• Never leave the appliance
unattended during cooking
operations where fats or oils could
be released.
• Do not use the appliance to heat
rooms for any reason.
• Do not rest any weight or sit on
the open door of the appliance.
• Take care that no objects are
stuck in the doors.
1.2 Instructions for using
microwaves
• Check the appliance visually
during the cooking of foods in
plastic or paper containers.
• Use the microwave only for the
preparation of food for
consumption. Other types of
applications are strictly forbidden
Improper use
Danger of explosion
• When using the microwave to
heat or reheat liquids, the boiling
process may be delayed – boiling
temperature can be reached
without the formation of the usual
"rolling boil". This delayed boiling
and consequent superheating of
the liquid can generate an
explosion inside the appliance, or
sudden boiling over of the
superheated liquid can occur
when removing the container from
the appliance. To avoid these
dangers, it is necessary to insert
the supplied boiling rod (or a
heat-resistant plastic spoon) in the
container while heating.

Instructions
40
(e.g. drying clothes, warming
slippers, sponges, wet cloths or the
like, dehydrating foods) because
they can lead to the risk of injury or
fire.
• Clean the appliance constantly
and remove any food residue.
• Do not use the microwave to dry
food.
• Do not use the microwave to heat
oils or fry.
• Do not use the appliance to heat
foods or beverages containing
alcohol.
• Baby food should not be heated
in sealed containers. Remove the
cover or the teat (in the case of
baby bottles). Always check the
preparation's temperature once
heating has completed, it should
not be too high. For an even
temperature and to avoid scalding
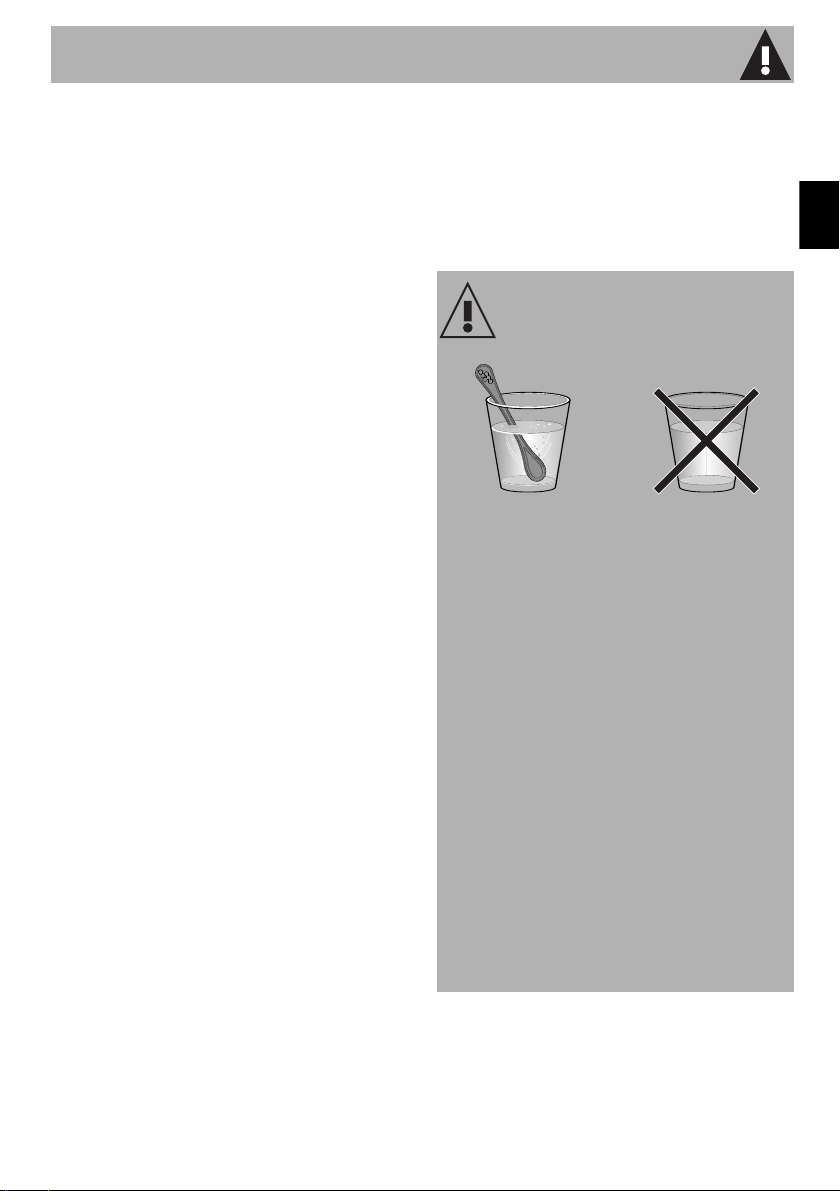
stir or shake the contents.
• Do not heat eggs in their shells or
whole hard boiled eggs; they may
explode even after the heating
process has completed.
• Before cooking food with a hard
skin or peel (e.g. potatoes, apples,
etc.) it is necessary to puncture the
skin.
• Do not heat food contained within
food packages.
• Do not use the microwave
functions when the oven is empty.
• Use cookware and utensils that
are suitable for use in a
microwave oven.
• Do not use aluminium containers
to cook food.
• Do not use dishes with metallic
decorations (gold-plated or silver).
• The appliance operates in the
2.4GHz ISM band.
• In compliance with the provisions
relating to electromagnetic
compatibility the appliance
belongs to group 2 and class B
(EN 55011).
• This appliance complies with the
standards and directives currently
in force concerning safety and
electromagnetic compatibility. It is
however recommended for
pacemaker wearers to maintain a
minimum distance of 20-30cm
between the microwave when it is
operating and the pacemaker.
Consult the pacemaker
manufacturer for more information.

Instructions
41
EN
1.3 Manufacturer liability
The manufacturer declines all liability for
damage to persons or property caused by:
• Use of the appliance other than the one
envisaged;
• Non-observance of the user manual
provisions;
• Tampering with any part of the
appliance;
• Use of non-original spare parts.
1.4 Appliance purpose
• This appliance is intended for cooking
food in the home environment. Every
other use is considered inappropriate. It
cannot be used:
• in employee kitchens, shops, offices
and other working environments.
• in farms/agritourism establishments.
• by guests in hotels, motels and
residential environments.
• in bed and breakfast establishments.
• The appliance is not designed to
operate with external timers or with
remote-control systems.
1.5 Identification plate
The identification plate bears the technical
data, serial number and brand name of the
appliance. Do not remove the identification
plate for any reason.
1.6 Disposal
This appliance must be disposed of
separately from other waste
(Directives 2002/95/EC, 2002/
96/EC, 2003/108/EC). The appliance
does not contain substances in quantities
sufficient to be considered hazardous to
health and the environment, in accordance
with current European directives.
To dispose of the appliance:
• Cut the power supply cable and remove
it along with the plug (if present).
• Deliver the appliance to the appropriate
recycling centre for electrical and
electronic equipment waste, or return it to
the retailer when purchasing an
equivalent product, on a one for one
basis.
Power voltage
Danger of electrocution
• Disconnect the main power supply.
• Disconnect the power cable from the
electrical system.

Instructions
42
Our appliances are packed in non-
polluting and recyclable materials.
• Deliver the packing materials to the
appropriate recycling centre.
1.7 This user manual
This user manual is an integral part of the
appliance and must therefore be kept in its
entirety and within the user’s reach for the
whole working life of the appliance.
• Read this user manual carefully before
using the appliance.
1.8 How to read the user manual
This user manual uses the following reading
conventions:
1. Use instruction sequence.
• Single use instruction.
Plastic packaging
Danger of suffocation
• Do not leave the packaging or any part
of it unattended.
• Do not let children play with the
packaging plastic bags.
Instructions
General information on this user
manual, on safety and final
disposal.
Description
Description of the appliance and its
accessories.
Use
Information on the use of the
appliance and its accessories,
cooking advice.
Cleaning and maintenance
Information for proper cleaning and
maintenance of the appliance.
Installation
Information for the qualified
technician: Installation, operation
and inspection.
Safety instructions
Information
Advice

Description
43
EN
2 Description
2.1 General Description
1 Control panel
2 Oven light
3 Seal
4 Door
5 Rack/tray support frames
Frame shelf
2.2 Control panel
1 Temperature knob
This knob allows you to select the cooking
temperature when using a traditional or
combination function.

Description
44
2 Thermostat indicator light
Traditional and combination functions:
when the indicator light is flashing, it
indicates that the oven is heating up to
reach the set temperature. Once the
temperature has been reached, the light
remains lit until the oven is switched off.
Microwave functions: remains lit to indicate
that a microwave function is in progress.
Always remains lit until the oven is turned off.
3 Clock
Displays the current time, the selected
cooking temperature and power, and any
time set.
4 Function knob
This knob can be used to:
• Turn the appliance on and off
• Select a function
• Turn the appliance's internal lighting on
or off
2.3 Microwaves
The appliance is equipped with a
microwave generator called a magnetron.
The microwaves generated are evenly
emitted into the oven compartment in order
to reach the food and heat it.
Heating takes place through the process of
friction between the molecules contained
within the food (mainly water molecules),
with the consequent generation of heat.
The heat generated directly inside the food
leads to defrosting, re-heating or cooking in
a shorter length of time compared to
traditional cooking.
The use of suitable containers for
microwave cooking allows the microwaves
to reach the food in a uniform manner (see
Materials suitable for microwaves).
2.4 Other parts
Shelves
The appliance features shelves to position
trays and racks at different heights. The
insertion heights are indicated from the
bottom upwards (see 2.1 General
Description).
Cooling fan
The fan cools the oven and comes into
operation during cooking.
The fan causes a steady outflow of air from
above the door which may continue for a
brief period of time even after the appliance
has been turned off.
When you have finished using the
appliance, always return the
function knob to the 0position.

Description
45
EN
Interior lighting
The appliance's interior lighting comes on:
• When the door is opened
• When any function is selected
• When the function knob is turned to the
symbol.
2.5 Available accessories
Rack
Useful for supporting containers with food
during cooking.
Baker Plate
Good for browning foods evenly.
Boiling rod
To be placed in containers when heating
liquids, necessary to avoid delayed boiling
with resulting superheating.
Some models are not provided
with all accessories.
The oven accessories intended to
come into contact with food are
made of materials that comply with
the provisions of current legislation.
Original supplied and optional
accessories can be requested to
Authorised Assistance Centres.
Use only original accessories
supplied by the manufacturer.

Use
46
3 Use
3.1 Instructions
Materials suitable for microwaves
In general, in order for the food to be
reached, the materials used for microwave
cooking must be transparent to microwave
energy.
Materials suitable for use:
• Glass* (always remove covers): oven
dishes, glasses, glass jars.
• Porcelain.
• Ceramics/Terracotta.
• Plastic* (microwave safe): containers,
cling film (must not come into contact with
the food during cooking).
*only if heat-resistant.
High temperature inside the oven
during use
Danger of burns
• Keep the oven door closed during
cooking.
• Protect your hands wearing heat
resistant gloves when moving food
inside the oven.
• Do not touch the heating elements inside
the oven.
• Do not pour water directly onto very hot
trays.
• Do not allow children to get near the
oven when it is in operation.
High temperature inside the oven
during use
Danger of fire or explosion
• Do not spray any spray products near
the oven.
• Do not use or leave flammable materials
near the oven.
• Do not use plastic kitchenware to cook
food (except with the microwave
function).
• Do not put sealed tins or containers in
the oven.
• Do not leave the oven unattended
during cooking operations where fats or
oils could be released.
• Remove all trays and racks which are
not required during cooking.
Improper use
Risk of damage to enamelled
surfaces
• Do not cover the bottom of the oven
cavity with aluminium or tin foil sheets.
• If you wish to use greaseproof paper,
place it so that it will not interfere with the
hot air circulation inside the oven.
• Do not bang or drag cookware over the
glazed bottom of the oven
compartment.
• Do not pour water directly onto very hot
trays.

Use
47
EN
Materials which must not be used :
• Metal (generates sparks/arcing):
aluminium foil and trays, metal dishes
and utensils, freezer bag twist ties.
• Wood.
• Crystal glasses.
• Paper (risk of fire).
• Expanded polystyrene containers
(possible contamination of foodstuffs).
Testing dishes
To check whether or not cookware is
suitable for use with microwave cooking
carry out this simple test:
1. Remove all accessories from the oven
compartment.
2. Place the cookware to be tested into the
oven compartment.
3. Select the maximum power level (e.g.
1000W).
4. Set a cooking time of 30 seconds.
5. Start cooking.
6. At the end of the test the cookware must
be either cold or slightly warm. If the
cookware is hot then it should be
considered as unsuitable for microwave
use.
3.2 First use
1. Remove any protective film from the
outside or inside of the appliance,
including accessories.
2. Remove any labels (apart from the
technical data plate) from the
accessories and from the oven cavity.
3. Remove and wash all the appliance
accessories (see 4 Cleaning and
maintenance).
4. Heat the empty oven at maximum
temperature (using the traditional
functions) so as to remove any
manufacturing residues.
Dishes must be without metal
decorations.
The microwave function can be
used without any food inside the
oven only for this test.
Unsuitable cookware
Risk of damages to the appliance
• If there is crackling or if sparks are
emitted from the cookware then
immediately terminate the test. In this
instance the cookware is not suitable for
microwave cooking.
For the first reheating use a
traditional function and not a
microwave function.

Use
48
3.3 Using the accessories
Rack
The rack must be inserted into the side
guides until it comes to a complete stop.
• The mechanical safety locks that prevent
the rack from being taken out
accidentally have to face downwards
and towards the oven back.
Baker plate
For optimum performance, the Baker Plate
must be placed in the centre of the rack.
High temperature
Danger of burns
• This accessory gets very hot. Always use
oven gloves when handling.
Insert the rack delicately into the
oven until it stops.
Clean the rack before using it for
the first time to remove any residue
left by the manufacturing process.
High temperature
Danger of burns
• The accessory gets very hot. Always use
oven gloves when handling.
Improper use
Risk of damage to surfaces
• Do not use knives directly on the surface
of the plate
• When cleaning, do not use metal
sponges or scourers which could
damage the surface.

Use
49
EN
Boiling rod
When using the microwave to heat or warm
liquids there may be a delay during the
boiling process. To avoid this phenomenon,
it is necessary to insert the supplied boiling
rod (or a heat-resistant plastic spoon) in the
container while reheating.
3.4 Using the oven
Clock
Microwave indicator light
Clock indicator light
Minute minder timer indicator light
Timed cooking indicator light
Programmed cooking indicator light
ASetting knob
BConfirmation knob
Improper use
Danger of explosion/burns
• To avoid the danger of explosion inside
the appliance or the sudden boiling over
of superheated liquids, it is always
necessary to immerse the boiling rod in
the liquid being heated.
High temperature
Risk of damage to the accessory
• Use the boiling rod only with
Microwave functions. The rod must not
be used with combined and traditional
functions.

Use
50
Operating modes
Stand-by: When no function is selected, the
clock shows the current time.
ON: The function knob must be turned
away from the 0position to start any
function. The clock shows the set
parameters, such as temperature, cooking
time, microwave power and when the set
temperature has been reached.
Setting the time
On first use, or after a power failure, the
symbol flashes on the clock.
1. Turn the setting knob to the left or right to
set the current time.
2. After approximately 5 seconds, the
symbol will disappear and the clock will
resume regular operation.
It may become necessary to change the
current time, for example for daylight saving
time.
3. To change the clock setting, ensure that
no function is active (the temperature
knob and function knob must be in the 0
position).
4. Turn the setting knob to the left or right.

Use
51
EN
3.5 Cooking functions
Microwaves
1. Turn the function knob to the microwave
symbol. The and symbols flash
on the clock and the display shows the
default cooking time
(minutes/seconds).
2. Turn the setting knob to the left or right to
set the cooking time value (max 30
minutes).
3. Press the setting knob. The symbol
flashes on the clock and the display
shows the default microwave power
4. Turn the setting knob to the left or right to
modify the power value from 100W to
1000W (see “Microwave power
levels”).
For microwave cooking, the food
must be placed in a container on
the rack on the first shelf.
IT IS NOT RECOMMENDED TO
COOK FOOD IN A
CONTAINER RESTING ON THE
BOTTOM OF THE COOKING
COMPARTMENT.
For best results, with prolonged
microwave and combined
cooking, it is best to stir foods once
or twice.
Cooking functions can be
interrupted at any time by turning
the function knob to the 0position.
Given that they penetrate directly
into the food, microwaves allow
cooking to take place in a very short
period of time and with a
considerable saving of energy.
They are suitable for cooking
without fat and also for defrosting
and re-heating food while
maintaining its original appearance
and fragrance.

Use
52
5. Press the setting knob to confirm the set
data. The and symbols flash on
the clock.
6. Press the confirmation knob to start
cooking.
7. At the end of the cooking time,
will flash on the display
and a buzzer will sound that can be
deactivated by pressing the setting knob.
Microwave power levels
Below is a list of the power levels that can
be selected:
If the door is opened then cooking
will stop. After closing it again,
press the confirmation knob to
continue cooking.
Press the confirmation knob to
temporarily stop the cooking
function. Press it again to resume
cooking.
Turn the setting knob to set an
additional cooking time.
Press the confirmation knob to start
cooking.
To switch the appliance off, turn the
function knob to the 0position.
It is not possible to set a
microwave cooking function
without setting a cooking time.
Power (W) Useful for
100
Defrosting food200
300
400 Cooking meat or delicate cooking
500
600
Re-heating and cooking food700
800
900 Heating liquids
1000

Use
53
EN
Combination (microwave + grill)
1. Turn the function knob to the
combination symbol. The and
symbols flash on the clock and the
display shows the default cooking time
(hours/minutes).
2. Turn the setting knob to the left or right to
set the cooking time value (max 13
hours).
3. Press the setting knob. The symbol
flashes on the clock and the display
shows the default microwave power
4. Turn the setting knob to the left or right to
modify the power value from 100W to
700W.
5. Press the setting knob to confirm the set
data. The and symbols flash on
the clock.
6. Turn the temperature knob to set the
required temperature. The set
temperature will be displayed for 5
seconds.
7. Press the confirmation knob to start
cooking.
8. At the end of the cooking time,
will flash on the display
and a buzzer will sound that can be
deactivated by pressing the setting knob.
The use of the grill results in perfect
browning of the food's surface.
Using the microwave on the other
hand leads to rapid internal
cooking of the food.
Preheating is not performed with
this function.
If the door is opened then cooking
will stop. After closing it again,
press the confirmation knob to
continue cooking.
During cooking it is possible to
modify the cooking temperature.
Turn the temperature knob to set
the new temperature, which is
shown on the display for 5
seconds.
Press the confirmation knob to
temporarily stop the cooking
function. Press it again to resume
cooking.
Turn the setting knob to set an
additional cooking time.
Press the confirmation knob to start
cooking.
To switch the appliance off, turn the
function knob to the 0position.

Use
54
Traditional (grill)
1. Turn the function knob to the grill symbol.
2. Turn the temperature knob to the required
value (from 50° to 250°). The display
will show the set temperature (e.g.
).
3. After a few seconds, the thermostat light
will flash to indicate that preheating has
begun.
4. Once the temperature has been
reached, the thermostat light will stop
flashing and a buzzer will sound to
indicate that the food can now be
placed in the oven.
5. When cooking has finished, turn the
function and temperature knobs to the 0
position.
Timed cooking
After setting a traditional cooking function:
1. Press the setting knob twice. The
symbol flashes on the clock and the
display shows the default cooking time
(hours/minutes).
2. Turn the setting knob to the left or right
within 5 seconds to set the cooking time
value (max 13 hours).
3. Press the setting knob twice (the and
symbols will flash on the clock), or
wait 5 seconds from the last setting: the
symbol will stay lit and timed
cooking has begun.
While timed cooking is in progress, it is
possible to further modify its duration.
4. Press the setting knob.
5. Turn the setting knob to the left or right
within 5 seconds to set the new cooking
time value.
The heat coming from the grill
element gives perfect grilling results
above all for thin and medium
thickness meat and allows you to
give the food an even browning at
the end of the cooking. Perfect for
sausages, spare ribs and bacon.
This function enables large
quantities of food, particularly meat,
to be grilled evenly.
Timed cooking is the function
which allows a cooking operation
to be started and then ended after
a specific length of time set by the
user.

Use
55
EN
6. Press the setting knob twice or wait 5
seconds from the last setting.
7. At the end of the cooking time,
will flash on the display
and a buzzer will sound that can be
deactivated by pressing the setting knob.
Delayed cooking
After setting a traditional cooking function:
1. Press the setting knob twice. The
symbol flashes on the clock and the
display shows the default cooking time
(hours/minutes).
2. Turn the setting knob to the left or right
within 5 seconds to set the cooking time
value (max 13 hours). E.g.
3. Press the setting knob. The symbol
flashes on the clock and the display
shows the default delay time
(hours/minutes).
4. Turn the setting knob to the left or right
within 5 seconds to set the cooking time
value (max 24 hours). E.g.
5. Press the setting knob or wait 5 seconds
from the last setting: delayed cooking
has begun.
6. The set delay time is shown on the
display (in our example ).
7. After this length of time has passed,
cooking will start and the display will
show the cooking time (in our example
).
8. At the end of the cooking time,
will flash on the display
and a buzzer will sound that can be
deactivated by pressing the setting knob.
To delete timed cooking at any
moment, press the setting knob
and hold for approximately 3
seconds.
Delayed cooking is the function
which allows cooking to be started
after a length of time set by the
user, after which the oven will
switch off automatically.
To delete delayed cooking at any
moment, press the setting knob
and hold for approximately 3
seconds.

Use
56
Minute minder
1. Press the setting knob. The symbol
flashes on the clock and the display
shows the default cooking time
(hours/minutes).
2. Turn the setting knob to the left or right
within 5 seconds to set the cooking time
value (max 4 hours).
3. Press the setting knob once again or wait
5 seconds from the last setting entered:
the symbol stays lit and the minute
minder has started.
While the minute minder is in progress, it is
possible to further modify its duration.
4. Press the setting knob.
5. Turn the setting knob to the left or right
within 5 seconds to set the new cooking
time value.
6. Press the setting knob again or wait 5
seconds from the last setting.
7. At the end of the minute minder,
and the symbol will
flash and a buzzer will sound that can be
deactivated by pressing the setting knob.
3.6 Special functions
Reheating
1. Turn the function knob to the reheating
symbol. The and symbols flash
on the clock and the display shows the
default cooking time
(minutes/seconds).
2. Turn the setting knob to the left or right to
set the cooking time value (max 99
minutes).
3. Press the setting knob.
4. Press the confirmation knob to start
reheating.
5. At the end of the reheating time,
will flash on the display
and a buzzer will sound that can be
deactivated by pressing the setting knob.
This function only activates the
buzzer, without stopping cooking.
The minute minder can be
activated both during cooking and
when the appliance is in standby.
To delete a minute minder at any
moment, press the setting knob
and hold for approximately 3
seconds.
This function is for microwave re-
heating of food that has been
previously cooked and stored in the
refrigerator.
Table of contents
Other Smeg Microwave Oven manuals

Smeg
Smeg S30AS User manual

Smeg
Smeg MP722PO User manual

Smeg
Smeg Microwave Oven FORNO S12 Operation and maintenance manual

Smeg
Smeg Classic FMIA320X2 User manual

Smeg
Smeg OTR111SU User manual

Smeg
Smeg SC770U User manual

Smeg
Smeg MOE25X User manual

Smeg
Smeg MOE34CXI User manual

Smeg
Smeg SF4390MCX Guide

Smeg
Smeg ME203FX User manual