Smeg SCP 160 XU User manual

Table of Contents
1. IMPORTANT SAFETY INSTRUCTIONS ................................................................................. 4
2. INSTALLATION ....................................................................................................................... 5
2.1 Oven Use ........................................................................................................................................................ 5
3. GUIDE TO OVEN CONTROLS ............................................................................................... 8
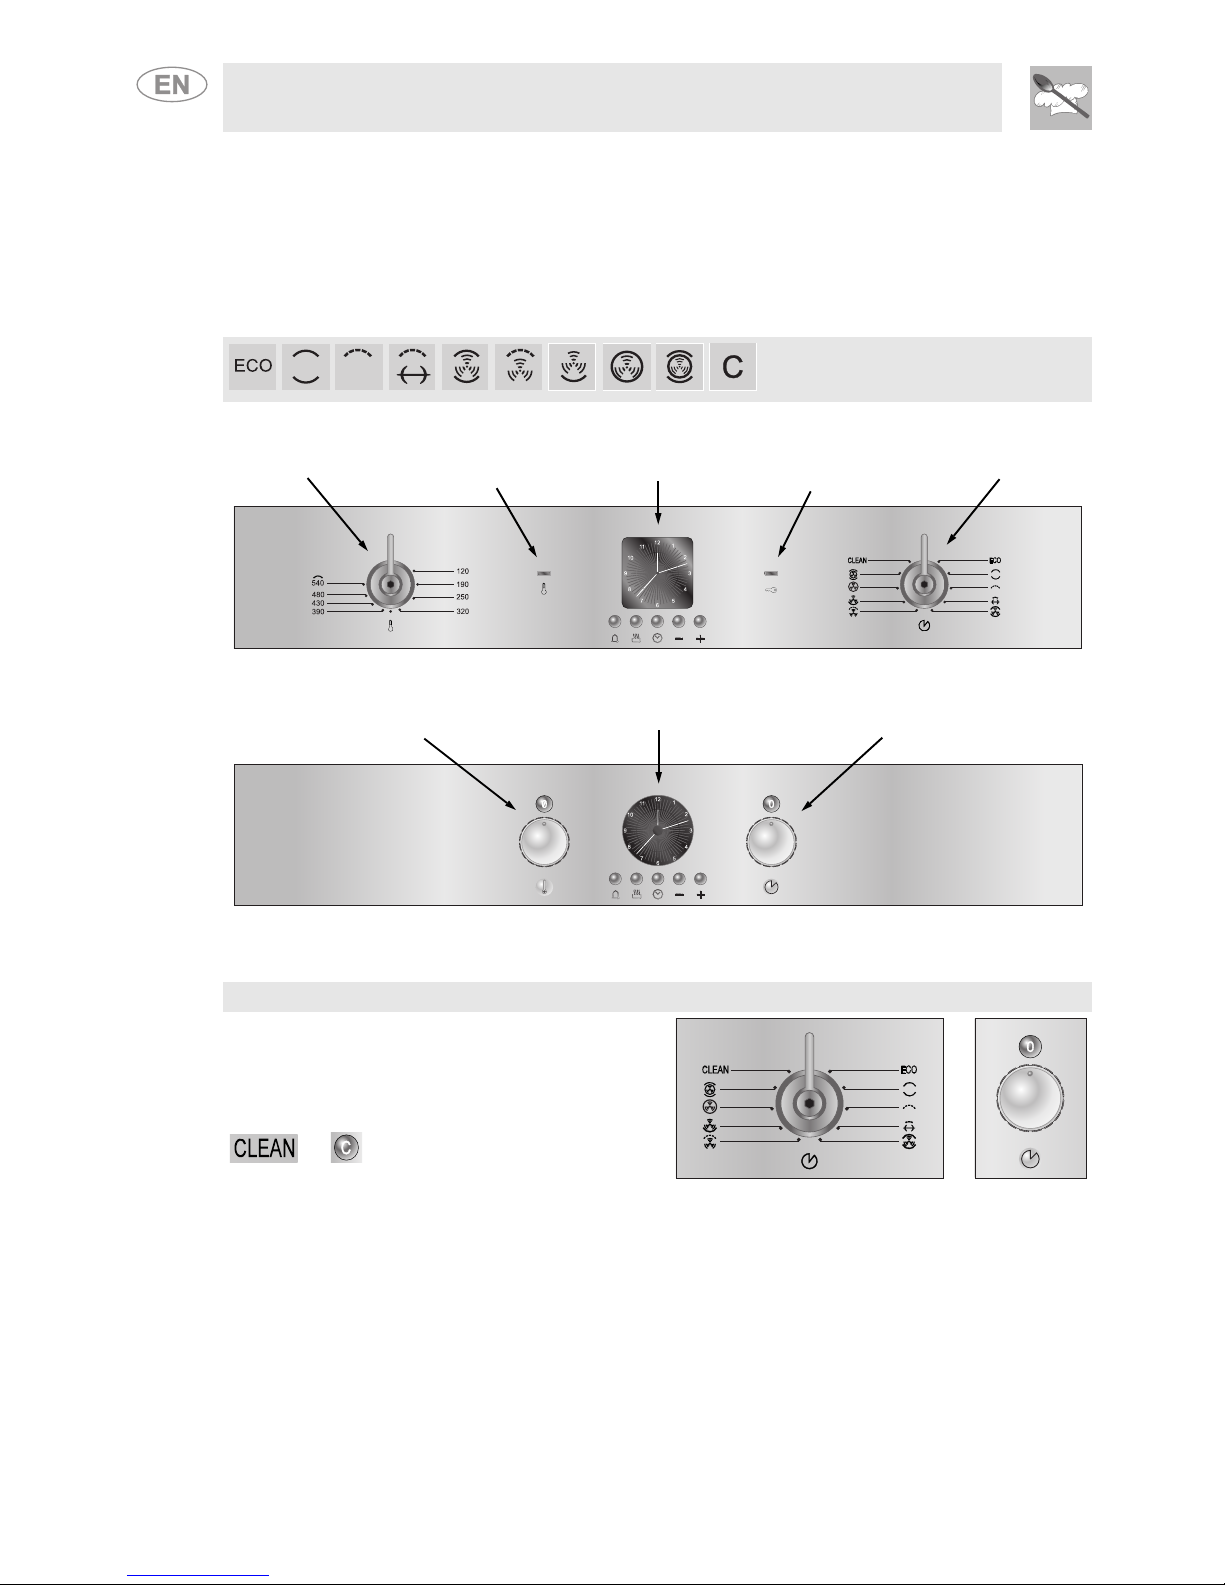
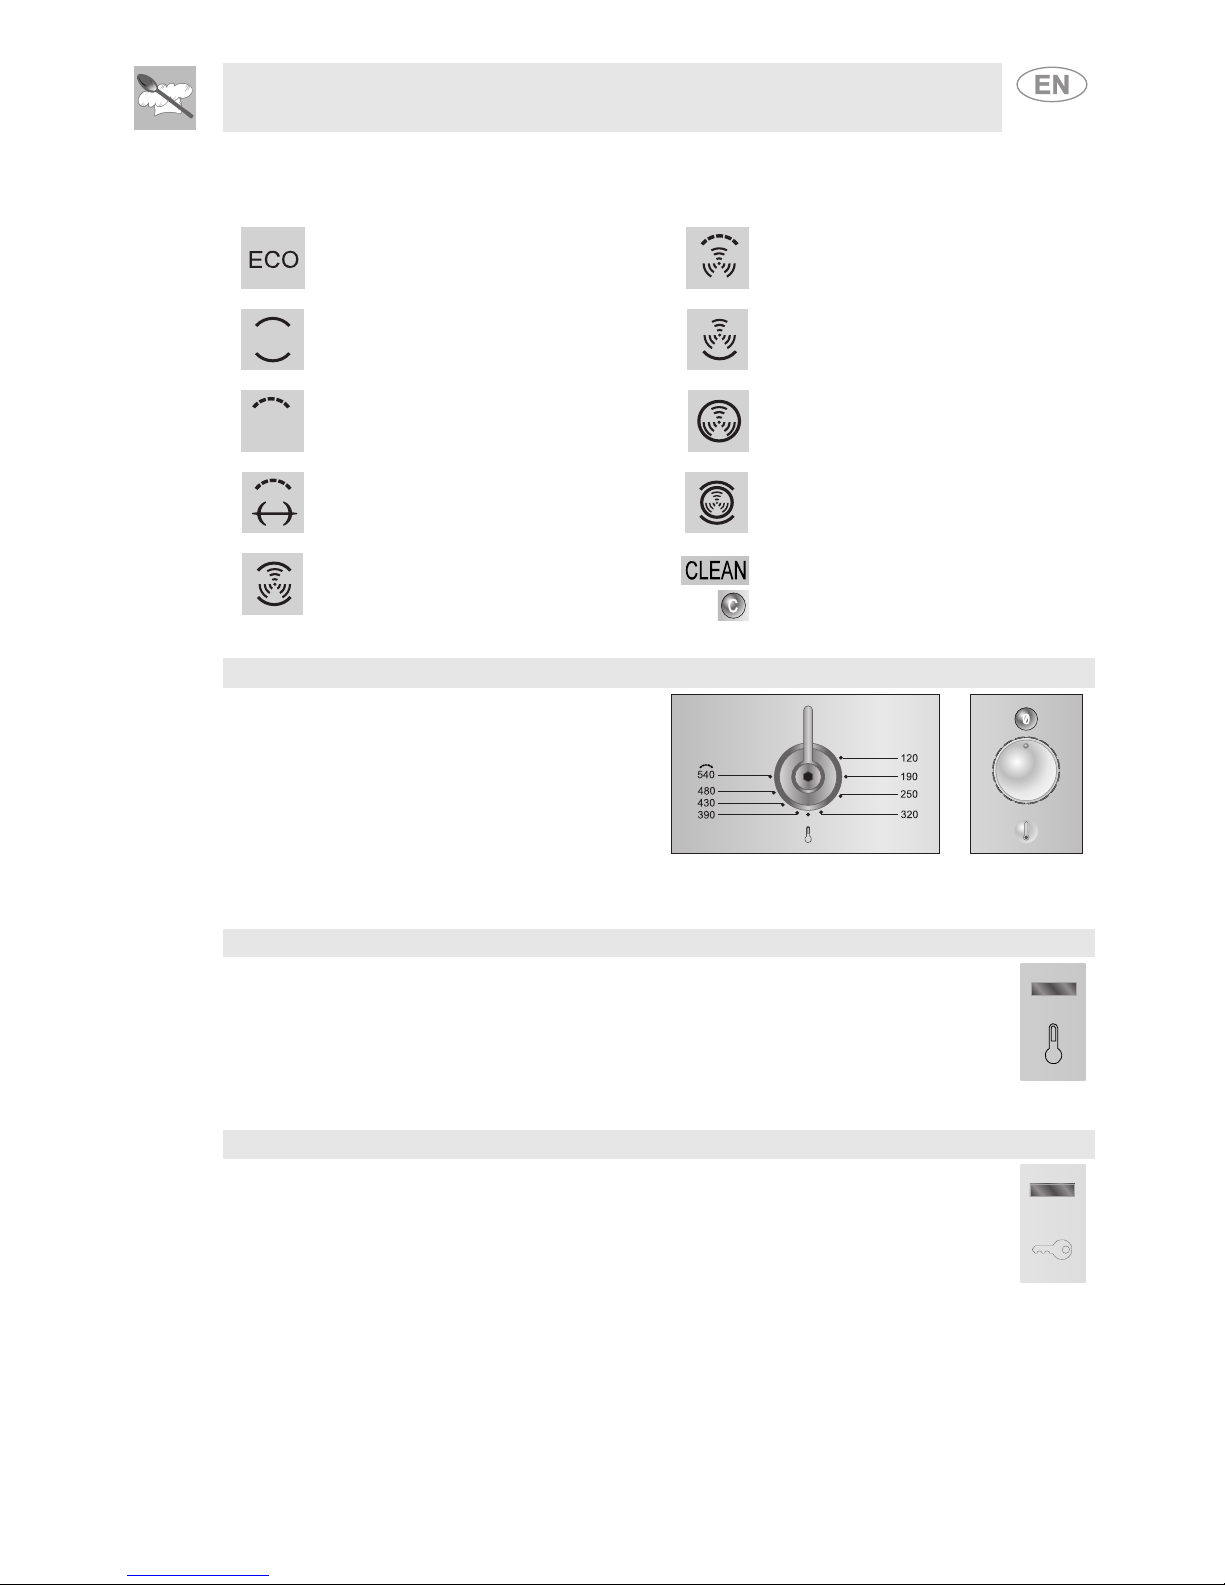
3.1 Front panel ...................................................................................................................................................... 8
3.2 Description of controls ..................................................................................................................................... 8
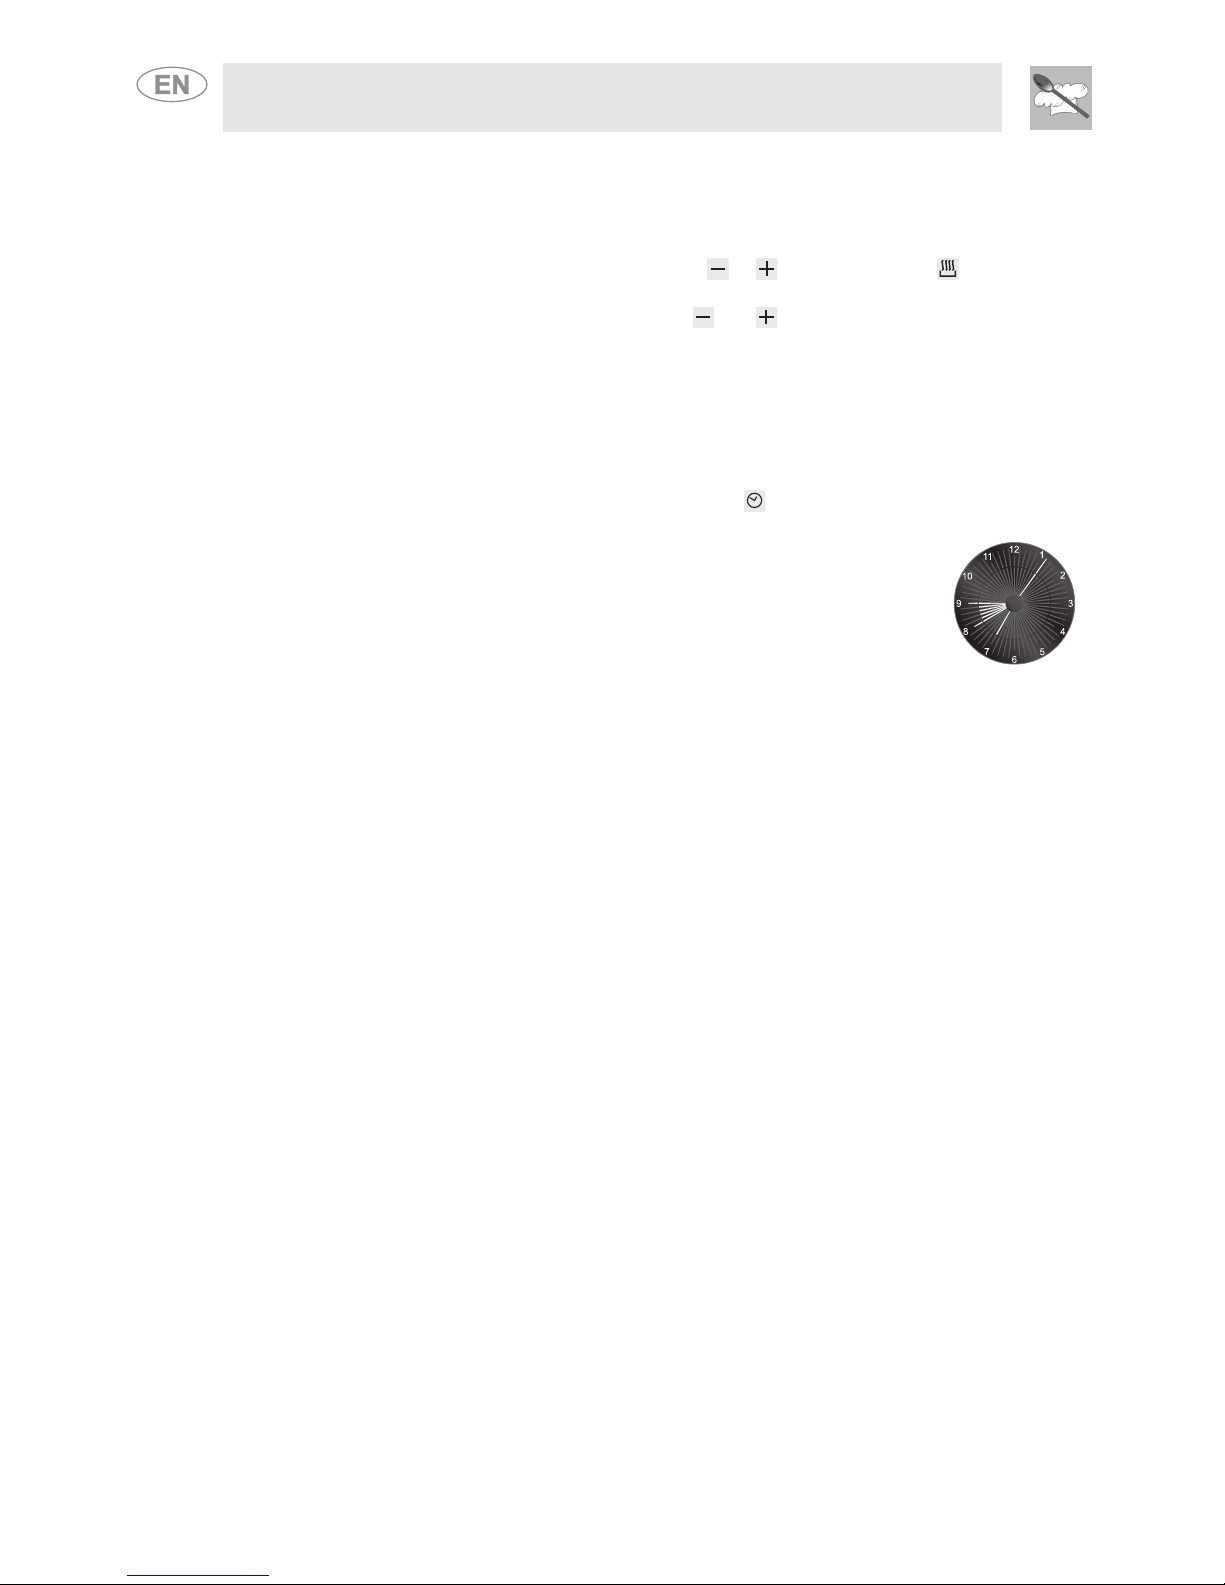
4. ELECTRONIC ANALOG CLOCK .......................................................................................... 10
5. AVAILABLE ACCESSORIES ................................................................................................ 13
6. USING THE OVEN ................................................................................................................ 14
6.1 Warnings and general advice for use ............................................................................................................ 14
6.2 General description ....................................................................................................................................... 14
7. FUNCTIONS GUIDE .............................................................................................................15
8. COOKING SUGGESTIONS AND TIPS ................................................................................. 17
8.1 Suggestions on using the accessories: ......................................................................................................... 17
8.2 General suggestions: .................................................................................................................................... 17
8.3 Cooking hints ................................................................................................................................................ 18
8.4 Cooking tables: ............................................................................................................................................. 21
9. CLEANING AND MAINTENANCE OF THE OVEN ............................................................... 23
9.1 Cleaning stainless steel ................................................................................................................................ 23
9.2 Regular daily cleaning ................................................................................................................................... 23
9.3 Food stains or residues ................................................................................................................................. 23
9.4 Cleaning the inside of the oven ..................................................................................................................... 23
9.6 Self cleaning: automatic oven cleaning ......................................................................................................... 24
9.7 Before starting the automatic self cleaning cycle .......................................................................................... 24
9.5 Cleaning the door glazing ............................................................................................................................. 24
9.8 Setting the self cleaning cycle ....................................................................................................................... 25
9.9 During and after the self cleaning cycle ........................................................................................................ 25
9.10 Setting the self cleaning cycle with delayed start ........................................................................................ 25
10. EXTRAORDINARY MAINTENANCE ................................................................................... 26
10.1 Replacing oven light bulbs .......................................................................................................................... 26
10.2 Removing the oven door ............................................................................................................................. 26
10.3 Removing the internal glass panes ............................................................................................................. 27
10.4 What to do if... ............................................................................................................................................. 29
NOTE: THIS APPLIANCE MUST BE INSTALLED SOLELY AND EXCLUSIVELY BY A QUALIFIED
TECHNICIAN. ANY TECHNICAL PROCEDURES MUST BE CARRIED OUT BY AN AUTHORIZED
TECHNICIAN.
INSTRUCTIONS FOR THE USER: these instructions contain user advice, a description of the controls
and the correct procedures for cleaning and maintenance of the appliance.
3

Important Safety Instruction
4
1. IMPORTANT SAFETY INSTRUCTIONS
READ AND SAVE THESE INSTRUCTIONS – Your safety and the safety of others are very important.
We have provided many important safety messages throughout this manual and on the appliance.
Read all instructions before using the appliance and always obey all safety messages.
RECOGNIZE SAFETY INFORMATION
This is a safety alert symbol. This symbol alerts you to potential hazards that can kill or hurt you and
others.
UNDERSTAND SIGNAL WORDS
A signal word – DANGER, WARNING, or CAUTION – is used with the safety alert symbol. DANGER
identifies the most serious hazards. It means you can be killed or seriously injured if you do not
immediately follow the instructions. WARNING means you can be killed or seriously injured if you do not
follow the instructions. CAUTION indicates a potentially hazardous situation which, if not avoided, may
result in minor or moderate injury.
WARNING
- This appliance is intended for home use only.
- Only use the appliance for its intended purpose. The manufacturer cannot be
held responsible for damages caused by improper use of this oven.
- This appliance complies with current safety requirements. Improper use of the
appliance can lead to personal injury and material damage.
- Read all the instructions before installing or using the oven for the first time.
- Keep these operating instructions in a safe place and pass them on to any future
user.

Important Safety Instruction
5
2. INSTALLATION
- Before installation, make sure that the voltage and frequency listed on the ID plate correspond with
the household electrical supply. This data must be the same to prevent injury or damage to the
appliance. Consult a qualified electrician if in doubt.
- Make sure your appliance is properly installed and grounded by a qualified technician.
- To guarantee the electrical safety of this appliance, it must always be continuously connected to an
effective grounding system. This basic safety requirement must be met. If there is any doubt, have
your household electrical system checked by a qualified electrician.
- The manufacturer is not responsible for damage caused by the lack or inadequacy of an effective
grounding system or the failure to meet the requirements of national and local electrical codes.
- The oven should not be operated until it has been properly installed within the cabinetry.
- Installation, maintenance and repair work should be performed by an authorized service technician.
Work by unqualified persons can be dangerous and may void the warranty.
- Before installation or service, disconnect the power supply to the work area by “tripping” the circuit
breaker, or shutting off the main power.
- Clean Only Parts Listed in Manual.
2.1 Oven Use
WARNING BURN HAZARD
The oven can produce high temperatures that can cause burns.
To reduce the risk of fire, electrical shock, personal injury, or damage when using
the oven, follow the basic precautions, including the following:
- Prevent children from touching the appliance when in use.
- Use heat-resistant pot holders when placing items in the oven, shifting them, or removing them
from the oven. The top heating element and oven racks can become very hot and cause burns.
- To prevent burns, always place the oven racks at the desired height while the oven is cool.
- Always open the door carefully. Allow hot air or steam to exit before food is placed in the oven or
removed.
- To prevent burns, allow the heating elements to cool before cleaning by hand.
- Before Self-Cleaning the Oven – Remove broiler pan and other utensils.
- Only clean the parts listed in this manual.
- During the self cleaning function the oven will become very warm. Prevent children from coming in
contact with the oven.
- Remove all accessories from the oven before starting the self cleaning function. The high
temperatures needed for this program will damage the accessories.

Important Safety Instruction
6
CAUTION: heating elements may be hot even if not glowing. During and after use, do not allow clothing
or other flammable materials to come into contact with the heating elements or interior surfaces of the
oven until they have had sufficient time to cool. External parts of the oven such as the oven door glass,
vent openings and the control panel may also become hot.
- Do not obstruct oven vents.
- Do not let metal objects (aluminum, foil, metal pans) come into contact with the heating elements.
- Do not slide cookware across the bottom of the oven. This could scratch and damage the surface.
- Do not lean, sit or place heavy items on the open oven door. The door can support a maximum
weight of 75 lbs. (34 kg).
- Do not heat unopened food containers in the oven. Pressure could build up and the container could
burst.
- Never add water to a hot oven tray or pan or pour water directly on food in a hot oven. The steam that
is formed could cause serious burns. Any sudden change in temperature can damage the oven's
enamel.
- This oven must only be used for cooking. Do not use this appliance as a dryer, kiln, dehumidifier,
etc. Fumes or vapors given off by glues, plastics or other non-food items could ignite and cause
material damage to property and personal injury.
- Cover all cooked food that is left in the oven to be kept warm. This will prevent moisture from
condensing on the inside of the oven. Long-term or excessive condensation could damage the oven.
- Never use aluminum foil to line the oven bottom. Do not place pots, pans or baking sheets
directly on the oven bottom when using the top and bottom heating elements, the top and bottom
heating elements + convection fan or the convection heating element. This could crack the enamel of
the oven bottom.
- Never store flammable liquids or materials in, above or under an oven or near cooking
surfaces.
- Do not use a steam cleaner to clean the oven. Steam can penetrate electrical components and
cause a short circuit.
- Children should not be left alone or unattended in the area where the oven is in use. Never allow
children to sit or stand on any part of the oven.
- DO NOT TOUCH HEATING ELEMENTS OR INTERIOR SURFACES OF OVEN. Heating elements
may be hot even though they are dark in color. Interior surfaces of an oven become hot enough to
cause burns. During and after use, do not touch, or let clothing or other flammable materials contact
heating elements or interior surfaces of oven until they have had sufficient time to cool.
CAUTION: Items of interest to children should not be stored in cabinets above the oven. Children
climbing on the oven to reach these items could be seriously injured.

Important Safety Instruction
7
- Do not leave the oven unattended when cooking with oils or fats as there is an increased risk of fire if
overheated.
- Never use water to put out grease fires!
- Put the fire out with a properly rated dry chemical or foam-type fire extinguisher.
- Be careful of loose-fitting or hanging garments while operating the oven.
- Do not use the oven as a room heater.
- Make sure that the power cords of small appliances do not come into contact with or get caught in
the oven door.
- Use only dry, heat resistant potholders. Moist or damp potholders used on hot surfaces may result
in burns from steam. Do not let potholders come into contact with hot oil. Do not use towels or other
bulky cloth in place of potholders.
- Do not clean the door gasket. The door gasket is essential for a good steal. Care should be taken
not to rub, damage, or move the gasket.
- Do not use Oven cleaners. No commercial oven cleaner or oven liner protective coating of any kind
should be used in or around any part of the oven.
SAVE THESE INSTRUCTIONS
NOTE: The California Safe Drinking Water and Toxic Enforcement Act requires the Governor of
California to publish a list of substances known to the State of California to cause cancer, birth defects,
or other reproductive harm, and requires businesses to give warning of potential exposure to such
substances.
WARNING: This product contains a chemical known by the State of California to cause cancer, birth
defects, or other reproductive harm.
This appliance can cause low-level exposure to some of the substances listed, including benzene,
formaldehyde, carbon monoxide, toluene, and soot.

Instructions for the user
8
3. GUIDE TO OVEN CONTROLS
3.1 Front panel
All the commands and controls for the oven are positioned on the front panel.
SCP 160 XUSCP 171 XU
3.2 Description of controls
FUNCTION SELECTOR KNOB
Selects the desired cooking functions. The symbols
are shown below. By turning the knob, the various
function symbols light up simultaneously with the
timer and internal oven lights.
Selectable functions, automatic self cleaning cycle
or
Thermostat
light
Door interlock
warning light
Thermostat
knob
Function selector
knob
Thermostat
knob
Function selector
knob
Electronic analog
clock
Electronic analog
clock

Instructions for the User
9
FUNCTIONS:
ECO function Convection Broil
Top and bottom heat Convection with bottom heat
Broil European convection
Rotisserie with broil European convection with top and
bottom heat
Convection with top and bottom
heat
Self cleaning
THERMOSTAT KNOB
The cooking temperature is set by turning the knob
clockwise to the desired temperature, between
120°F and 540°F. The thermostat light comes on to
indicate that the oven is warming up. When this
light goes out it means that the desired
temperature has been reached.
The light will come on periodically during use to
indicate that the thermostat is keeping the oven set
at a constant temperature.
THERMOSTAT LIGHT
Flashes to indicate that the oven is heating up. When the light stops flashing and remains
constantly on, the preset temperature has been reached and will be maintained until the oven
is switched off.
When the set temperature is reached, a beeper will be triggered to inform the user.
This light also comes on when the automatic (pyrolysis) cleaning cycle is started, and does
not go out until the end of the preset time.
DOOR INTERLOCK WARNING LIGHT
During the automatic (Pyrolysis) cleaning cycle, this light comes on to indicate that the oven
door interlock has been activated. For information on indication of the DOOR INTERLOCK
device status in models not fitted with this light, see point “9.9 During and after the self
cleaning cycle”.

Instructions for the user
10
4. ELECTRONIC ANALOG CLOCK
LIST OF BUTTON FUNCTIONS
TIMER BUTTON
END OF COOKING BUTTON
CLOCK ADJUSTMENT AND RESET
VALUE DECREASE BUTTON
VALUE INCREASE BUTTON
4.0.1 Setting the time
When the oven is used for the first time, or after an interruption in the electrical power supply, the display
flashes at regular intervals.
Press for 1 to 2 seconds to stop the display from flashing and to start the procedure for setting the
correct time. Press the value modification buttons or to increase or decrease the setting by one
minute.
Press one of the two value modification buttons until the current time appears. 6 to 7 seconds after the
last button is pressed, the clock will start at the set time.
When the oven is in standby mode, to modify the time simply press the button for about 2 seconds
and adjust the time using the and buttons. A few seconds after the last button is pressed, the clock
will restart normal operation.
At the end of each programmed operation 8 beeps will sound 3 to 4 times at intervals of about 1 and a
half minutes. The beeps can be hushed at any time by pushing any button.

Instructions for the User
11
4.0.2 Timer
The timer does not stop cooking; it simply activates the buzzer.
• Press and the clock dial display will light up as shown in figure 1;
• Within 6 to 7 seconds, press the or buttons to set the timer. Each time a
button is pressed, 1 outer mark on the clock dial, representing 1 minute of cooking
time, will light up or go out. (Figure 2 shows a cooking time of 10 minutes).
• The countdown will start 6 to 7 seconds after the last button is pressed; when the
programmed time has elapsed, the buzzer will sound.
• During the countdown, the current time can be viewed by pressing the button
once; press it again to return to the timer display.
• At the end of the countdown, the oven must be turned off manually by turning both
the oven thermostat knob and function selector knob to 0.
• The maximum cooking time that can be set is 60 minutes.
1)
2)
4.0.3 Programming timed cooking
Cooking time: the 2nd button can be used to set the cooking time. Before it can be set, the
thermostat knob must be turned to the desired cooking temperature and the function selector knob must
be turned to any setting. To set the cooking time, proceed as follows:
• Press the button for 1 to 2 seconds; the pointer will go to 12 (Fig. 1).
• The cooking time can be set using the and buttons: each time the button
is pressed 1 minute is added to the cooking time (figure 2 shows a cooking time of
1 hour).
• Once the desired cooking time is reached, cooking will start about 6 seconds after
the or buttons were pressed.
• Once cooking has started the display will show the current time, represented by
the constantly illuminated marks on the dial and the minutes left to the end of the
cooking time, represented by the flashing marks (each flashing mark means 12
minutes of cooking time left).
1)
2)
• At the end of the cooking time, the timer will switch the oven heating elements off, the buzzer will start
to beep and the numbers on the clock dial will flash.
• The cooking time can also be reset by resetting the program selected: pressing the central button
for 2 seconds will delete the set cooking time and the oven will have to be turned off manually.
Warning: it is not possible to set a cooking time of more than 6 hours.

Instructions for the user
12
Starting cooking: besides setting a cooking time, the cooking start time can also be set (with a
maximum delay of 12 hours in relation to the current time). To set the cooking start/end time, proceed as
follows:
• Set the cooking time as described in the previous point.
• Within 6 to 7 seconds after the last time you press the or buttons, press the button again to
set the cooking start time. The current time will appear on the display with the inside segments
illuminated to show the end of cooking time. Use the and buttons to set the cooking start time.
• 6 to 7 seconds after the last button is pressed the display will show the current time and the cooking
start and end times, which will be represented by the illuminated inner marks. The clock dial display
marks will be constantly illuminated as long as the current time is not the same as the cooking start
time; as soon as the current time reaches the set starting time, all the inner marks will start to flash,
indicating that the oven has started cooking.
• At the end of the cooking time, the timer will switch the oven heating elements off, the buzzer will start
to beep and the numbers on the clock dial will flash.
• To reset the entire program, press and hold the central button for 2 seconds: if cooking has
already started, the oven will have to be turned off manually.
• Here we can see a programming example: the current time is 19:06 and cooking is
programmed to start at 20:00 and end at 21:00 hours.
• At 20:00 hours the inner marks between 8 and 9 will start to flash, while the hour
hand will remain still.
Warning: for the oven to start cooking after the programming procedures just described, the
thermostat and function selector knob must be correctly set at the desired temperature and
function.

Instructions for the User
13
5. AVAILABLE ACCESSORIES
Oven rack: for cooking food on pans, small cakes, roasts or food
requiring light broiling.
Pan rack: goes on top of the pan for food that might drip.
Oven pan: useful for catching oil from foods on the rack above.
Roof liner: remove it to make cleaning inside the oven easier.
Rotisserie frame: supports the rotisserie rod (see page page 17
for instructions for use).
Roasting spit: useful for cooking chicken, sausages and anything
else requiring uniform cooking over the entire surface.
Chromium-plated gripper: useful for removing hot racks and
pans.
The chromium-plated gripper is a very useful kitchen utensil which not only ensures a firm grip on trays
and shelves but also avoids direct contact (necessary if oven cloths or gloves are used).
Not all accessories are provided on some models.
Optional accessories
Original accessories can be ordered through our Authorised Service Centres.

Instructions for the user
14
6. USING THE OVEN
6.1 Warnings and general advice for use
WARNING BURN HAZARD
Keep the oven door closed during cooking.
NOTE: When using the oven for the first time, heat it to the maximum temperature
(540°F) for sufficient time to burn away any oily residues from the manufacturing
process.
The heating elements and the fan are deactivated when the oven door is opened.
NOTE
: During cooking, do not cover the bottom of the oven with aluminum or tin foil and do not place pans or
oven trays on it as this may damage the enamel coating. If you wish to use greaseproof paper, position it so that
it will not interfere with the hot air circulation inside the oven.
NOTE
:
If you have to attend to the food in the oven, leave the door open for the
shortest time possible, so that the internal temperature doesn’t drop.
To prevent any steam in the oven from creating problems, open the door in two
stages: half open (approx. 2 inches) for 4-5 seconds and then fully open. To
access food, always leave the door open the shortest time possible, to prevent
the temperature in the oven from falling and ruining the food.
6.2 General description
6.2.1 Oven racks
The oven features 4 runners for positioning trays and racks at different heights.
The insertions heights are numbered from the bottom upwards (see figure).
6.2.2 Cooling system
The oven is equipped with a cooling system which begins operating as soon as a cooking function starts.
The fan produces a steady flow of air from above the door which may continue for a brief period of time
even after the oven has been turned off.
6.2.3 Inside light
The oven light comes on when the door is opened or any function is selected, with the exception of the
Self Cleaning or function.

Instructions for the User
15
7. FUNCTIONS GUIDE
ECO FUNCTION:
Using the broil and the bottom heating element plus the fan is particularly suitable for
cooking small quantities of food, as it consumes a low amount of energy.
TOP AND BOTTOM HEAT:
As the heat comes from the top and bottom at the same time, this system is
particularly suitable for certain types of food. Traditional cooking, also known as
static or thermal radiation cooking, is suitable for cooking just one dish at a time.
Perfect for all types of roasts, bread, and tarts and in any case particularly suitable
for fatty meats such as goose and duck.
BROIL:
The heat coming from the broil element gives perfect broiling results mostly for thin
and medium thickness meats and in combination with the rotisserie (where fitted)
gives the food an even browning at the end of the cooking. Perfect for sausages,
ribs and ham. This function can be used to broil large quantities of food, particularly
meat, evenly.
ROTISSERIE WITH BROIL:
The rotisserie functions in combination with the broil element, browning food
perfectly.
CONVECTION WITH TOP AND BOTTOM HEAT:
The operation of the fan, combined with traditional cooking, ensures uniform
cooking even with complex recipes. Perfect for cookies and cakes, even when
simultaneously cooked on several levels.
CONVECTION BROIL:
The air produced by the fan softens the strong heatwave generated by the broil,
giving perfect broiling even for very thick foods. Perfect for large cuts of meat (e.g.
pork shank).
CONVECTION WITH BOTTOM HEAT:
The combination of the fan with just the bottom heating element allows cooking to
be completed more rapidly. This system is recommended for sterilizing or for
finishing off the cooking of foods already well-cooked on the surface, but not inside,
which therefore need a little more heat. Perfect for any type of food.

Instructions for the user
16
EUROPEAN CONVECTION:
The combination of the fan and the circular element (incorporated in the rear of the
oven) can be used to cook different foods on several levels, as long as they need
the same temperatures and cooking time. Air circulation ensures the instant and
uniform distribution of heat. It will be possible, for instance, to cook fish, vegetables
and cookies simultaneously without any smells and flavors mixing.
EUROPEAN CONVECTION WITH TOP AND BOTTOM HEAT:
The combination of ventilated cooking and traditional cooking can be used to cook
different foods on several levels extremely quickly and efficiently.
Perfect for large volumes that need intense cooking.

Instructions for the User
17
8. COOKING SUGGESTIONS AND TIPS
8.1 Suggestions on using the accessories:
Use only original SMEG trays.
When the tray is in the oven, the handle must be facing the oven door.
Push the trays right inside the oven.
Use only original SMEG racks.
When the rack is in the oven, the contoured part must be facing
downwards.
Push the racks right inside the oven.
Use only original SMEG racks.
Push the racks right inside the oven.
For best cooking results, we recommend placing cookware in the center of
the rack.
Prepare the rotisserie rod with
the food, tightening the screws
A of the prongs. Fit the frame B
onto the second runner from the
bottom. Remove the handle D
and position the rotisserie rod
so that the pulley E is still in the
guides on the frame B. Push
the frame B fully in until the tip
of the rotisserie rod enters the
hole C on the rear wall of the
oven. Place an oven pan F on the bottom rack and pour a little water into it to prevent smoke from
forming.
8.2 General suggestions:
For cooking on several levels, we recommend using a convection function
to achieve uniform cooking at all heights.
In general, it is not possible to shorten the cooking times by increasing the
temperature (the food will likely be well-cooked on the outside and
undercooked on the inside).
During the cooking of desserts and vegetables, dripping from the bottom
of the door could occur. This is a natural physical phenomenon which
mainly occurs when the food is placed in the oven before preheating. To
avoid this, open the door a couple of times during the cooking taking great
care.

Instructions for the user
18
8.3 Cooking hints
Each function has its own preset preheating cycle during which the thermostat lamp flashes. When the
preset temperature is reached, the lamp remains constantly on.
The oven door must be closed during cooking operations.
8.3.1 Conventional cooking
FUNCTION SELECTOR
THERMOSTAT 120 ÷ 540 °F
This conventional cooking method, with heat from above and below, is suitable for cooking food on just
one shelf. The oven must be preheated to the chosen temperature. Do not place the food in the oven
until the thermostat light goes out. Very fatty meats can be placed inside the oven when it is still cold.
Place frozen meat in the oven directly, without thawing. The only precaution required is to set
temperatures about 70 °F lower and cooking times about 1/4 longer than for fresh meat.
Use deep containers to prevent splashes from dirtying the sides of the oven.
8.3.2 Hot air cooking
FUNCTION SELECTOR
THERMOSTAT 120 ÷ 540 °F
This conventional cooking method, with heat from above and below, is suitable for cooking food on just
one shelf. The oven must be preheated to the chosen temperature. Do not place the food in the oven
until the thermostat light goes out. Very fatty meats can be placed inside the oven when it is still cold.
Place frozen meat in the oven directly, without thawing. The only precaution required is to set
temperatures about 70 °F lower and cooking times about 1/4 longer than for fresh meat.
Multiple cooking is possible provided that all foods require the same temperature.

Instructions for the User
19
8.3.3 Delicate cooking
FUNCTION SELECTOR
THERMOSTAT 120 ÷ 540 °F
Suitable for confectionery and cakes with wet top and low sugar content, and moist desserts in moulds.
Also excellent for completing cooking of foods underneath or for cooking procedures where heat is
required above all at the bottom. The tray should be placed on the bottom runner.
8.3.4 Grilling
FUNCTION SELECTOR
THERMOSTAT
Used for quick browning of foods. The tray should be placed on the top runner. For short processes and
small amounts, place the shelf on the third runner from the bottom. For longer cooking times and grilling
on large surfaces, place the shelf on lower runners, depending on the size of the food.
Keep the door closed when grilling is in progress. Grilling with the door open may permanently
damage the oven and reduce operating safety.
8.3.5 Hot air grilling
FUNCTION SELECTOR
THERMOSTAT
Allows uniform heat distribution with better penetration to the core of foods. Foods are lightly browned on
the outside but still soft on the inside.
Keep the door closed when grilling is in progress. Grilling with the door open may permanently
damage the oven and reduce operating safety.

Instructions for the user
20
8.3.6 Thawing
FUNCTION SELECTOR
THERMOSTAT 0
The air movement provided by the fan alone thaws foods more quickly.
The air circulating inside the oven is at room temperature.
Thawing at room temperature has the advantage that the food's flavour and appearance are retained
intact.
8.3.7 Spit roasting
FUNCTION SELECTOR
THERMOSTAT
This is an energy saving-cooking system. Place the food at the centre of the plate or rack and cook as
indicated in para. “8.3.4 Grilling”. Recommended for small pieces only.
Prepare the food on the spit rod and block fork screws A. Insert the frame B in the second level from the
bottom. Remove handle D and position the spit rod so the pulley E remains guided on frame B.
Completely fit frame B until the tip of the spit rod fits into hole C on the back wall of the oven. Place an
oven dish F on the bottom guide and pour in a little water to prevent smoke from forming.

Instructions for the User
21
8.4 Cooking tables:
Note: The times indicated in the following tables do not include the preheating times. Always
make sure you pre-heat the oven.
FUNCTION RUNNER
LEVEL
FROM
BOTTOM
TEMPERATURE
°F
TIME IN MINUTES
FIRST COURSES
LASAGNA Top and bottom heat 1430 - 450 50 - 60
OVEN-BAKED PASTA Top and bottom heat 1430 - 450 40
MEAT
ROASTED VEAL Convection with top
and bottom heat 2360 - 375 70 - 80
PORK LOIN Convection with top
and bottom heat 2360 - 375 70 - 80
PORK SHOULDER
European convection
with top and bottom
heat
2356 - 375 90 - 100
ROASTED RABBIT European convection 2360 - 375 70 - 80
TURKEY BREAST Convection with top
and bottom heat 2360 - 375 110 - 120
ROASTED NECK OF PORK
European convection
with top and bottom
heat
2360 - 375 190 - 210
ROASTED CHICKEN
European convection
with top and bottom
heat
2360 - 375 60 - 70
BROILED MEATS FIRST
SURFACE
SECOND
SURFACE
PORK CHOPS Convection Broil 4535 7 - 9 5 - 7
FILLET OF PORK Broil 3535 9 - 11 5 - 9
FILLET OF BEEF Broil 3535 9 - 11 9 - 11
LIVER Convection Broil 4535 2 - 3 2 - 3
SAUSAGES Convection Broil 3535 7 - 9 5 - 6

Instructions for the user
22
MEATBALLS Broil 3535 7 - 9 5 - 6
ROTISSERIE MEATS
CHICKEN Rotisserie with broil
On a
rotisserie
rod
480 - 535 60 - 70
FISH
SALMON TROUT Bottom – fan-ass.
circular 2300 - 320 35 - 40
PIZZA Convection with top
and bottom heat 1480 - 535 6 - 10
BREAD European convection 2375 - 395 25 - 30
MUFFINS
European convection
with top and bottom
heat
2355 - 375 15 - 20
DESSERTS
DOUGHNUTS Convection with top
and bottom heat 2320 55 - 60
FRUIT TART Convection with top
and bottom heat 2320 30 - 35
SMALL PASTRIES Bottom + fan-ass.
circular 2320 - 340 20 - 25
JAM TARTS
European convection
with top and bottom
heat
2320 20 - 25
PARADISE CAKE Convection with top
and bottom heat 2320 55 - 60
ECLAIR
European convection
with top and bottom
heat
2300 - 320 40 - 50
LIGHT SPONGE CAKE European convection 2300 - 320 45 - 50
RICE PUDDING
European convection
with top and bottom
heat
2320 40 - 50
CROISSANTS European convection 2320 25 - 30
Other manuals for SCP 160 XU
1
This manual suits for next models
1
Table of contents
Other Smeg Oven manuals

Smeg
Smeg SFA304X User manual

Smeg
Smeg SFPA6925B User manual

Smeg
Smeg SC436X-8 User manual

Smeg
Smeg FV38X User manual

Smeg
Smeg SDO10-5 User manual

Smeg
Smeg SF9800PRO User manual

Smeg
Smeg Single Oven SCP111-1 User manual

Smeg
Smeg Oven SC106ALU User manual

Smeg
Smeg Classica SFP6303SPX User manual

Smeg
Smeg SCA712X User manual