smirthwaite Samba HiLo 8811 User manual
02/21
i
Samba HiLo
INSTRUCTIONS FOR USE

ii
CONTENTS
1.0 Introduction ............................................................................................................ 1
2.0 Illustration of Your Samba ....................................................................................... 2
2.1 Technical Data ............................................................................................................ 3
3.0 For your Safety ........................................................................................................ 4
4.0 Unpacking your Samba Seating System .................................................................... 6
5.0 Setting up and Adjusting your Samba Seating System .............................................. 7
5.1 Seat Adjustments ....................................................................................................... 7
5.2 Push Handles ............................................................................................................ 11
5.3 Armrests ................................................................................................................... 12
5.4 Footrests .................................................................................................................. 13
6.0 Accessories ............................................................................................................ 15
6.1 Tray ........................................................................................................................... 15
6.2 Swing Away Laterals ................................................................................................. 16
6.3 Adjustable Headrest ................................................................................................. 17
7.0 Care and Maintenance ........................................................................................... 18
7.1 Charging the battery ................................................................................................ 18
7.2 Daily Checks ............................................................................................................. 18
7.3 Service Interval ......................................................................................................... 19
7.4 Nominal Service Life ................................................................................................. 19
7.5 Extending Nominal Service Life ................................................................................ 20
7.6 Documentation/Records .......................................................................................... 21
7.7 Product Configuration .............................................................................................. 21
8.0 Warranty & Service ............................................................................................... 22
9.0 Continuous Improvement ...................................................................................... 22
10.0 Warranty & Aftersale ............................................................................................ 24
10.1 Product Information ................................................................................................. 24
10.2 Service & Inspection Record Form ........................................................................... 24

1.0 INTRODUCTION
Thank you for choosing the Samba HiLo seating system from Smirthwaite.
The Samba is a highly adjustable chair that offers a modular midline support system for
children requiring greater levels of postural control. The variable seat height allows a child
to engage in education, play and everyday activities at peer level, supporting their ongoing
development. The chair is suitable for use in schools, therapy units and at home.
IMPORTANT!
These instructions should be read by all therapists and carers using the
equipment and should be retained for future reference. The product should
always be used under adult supervision.
A clinical assessment of the child’s needs should be undertaken to ensure the
Samba chair is correctly adjusted. Adjustments should only be made by a
therapist, Smirthwaite Technical Product Advisor or suitably trained personnel.
Any incorrect use of the product and failure to follow the instructions may put
the user at risk or impede the function. If you have any queries using this
product or wish for further copies, please do not hesitate to contact our
Customer Service Team on T: +44 (0)1626 835552.
This product has been designed and manufactured specifically and solely for use
by clients with special needs.

2
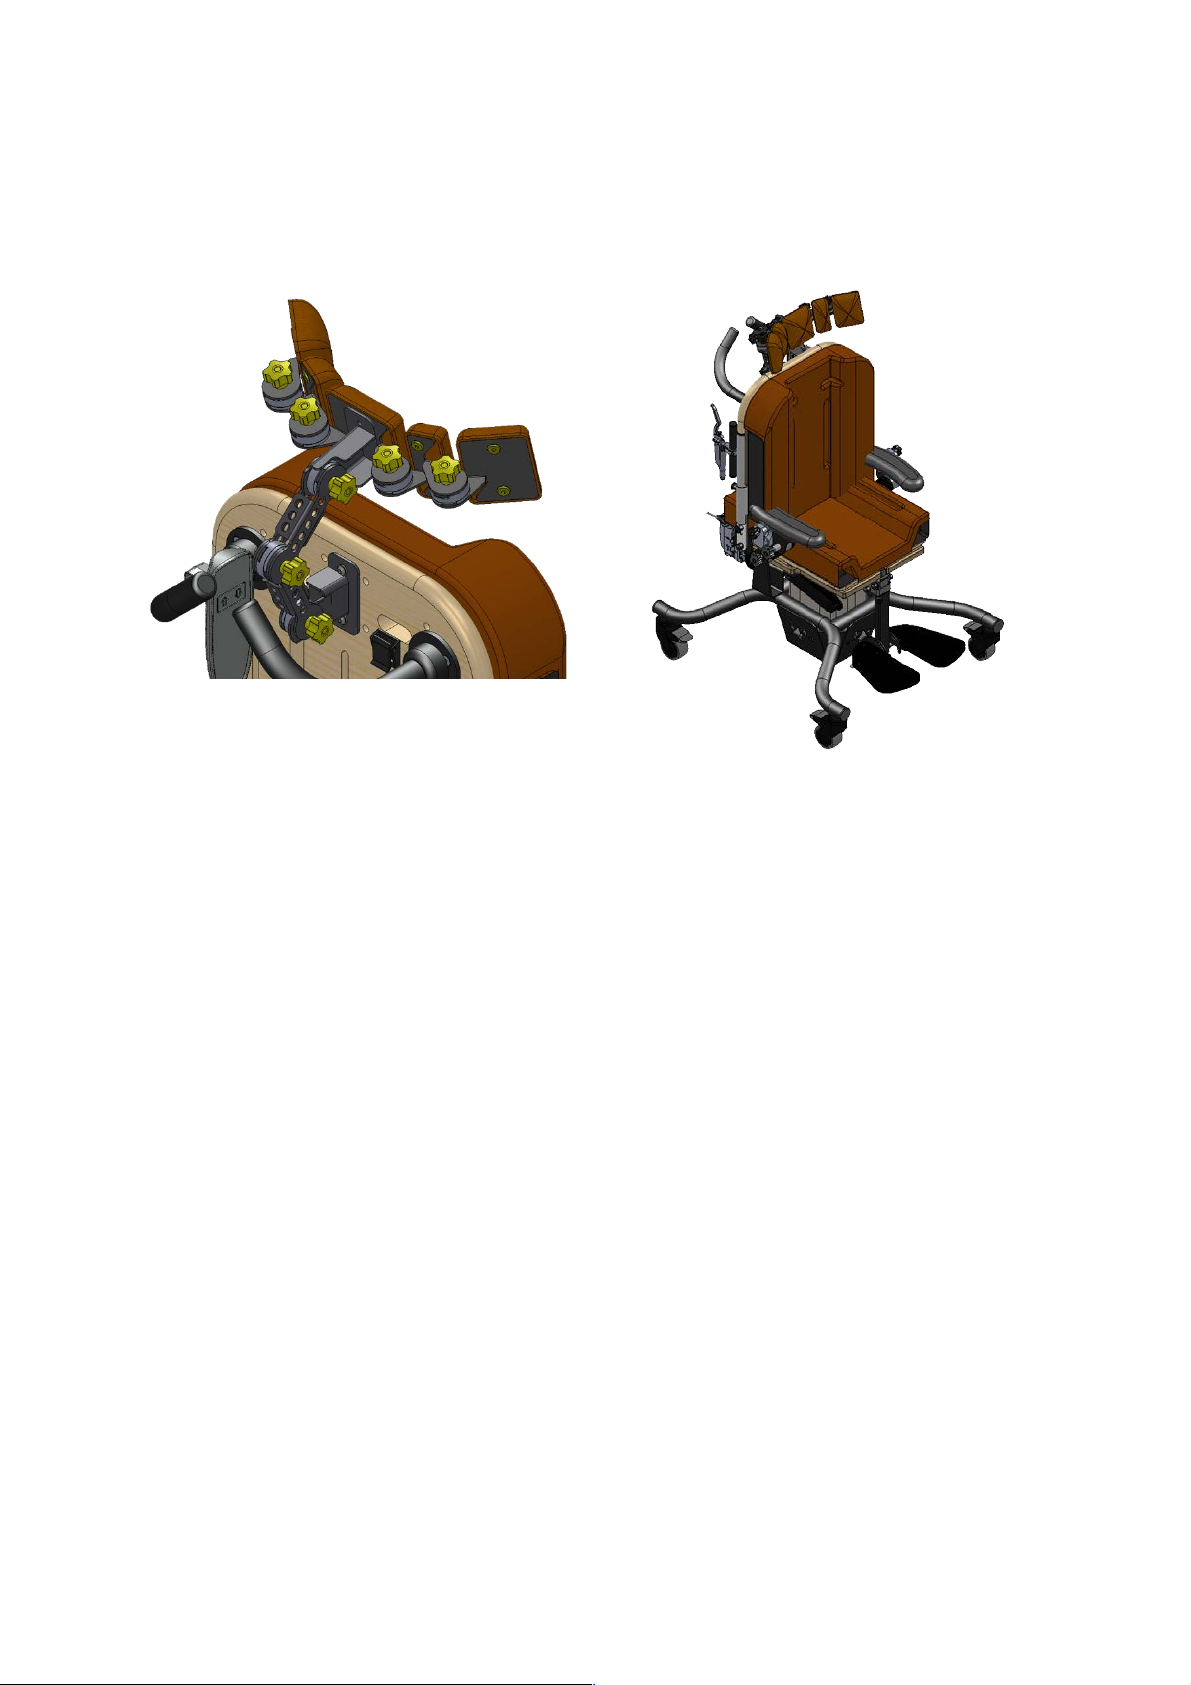
2.0 ILLUSTRATION OF YOUR SAMBA HILO
Samba HiLo and available accessories
A. Main Seat Capsule
B. Push Handles
C. Armrests
D. Footrest
E. Multi-Adjustable Headrest
F. Swing Away Laterals
G. Tray
H. Power Assisted Star Chassis
I. Tilt-in-space (TIS) Lever
J. Control Pad

3
2.1 TECHNICAL DATA
All dimensions are in mm unless otherwise stated.
Size
1
2
3
4
5
Code
8811
8812
8813
8814
8815
Dimension
Min
Max
Min
Max
Min
Max
Min
Max
Min
Max
Tilt in
Space
Supine 25° - Prone 15°
Seat Height
445-645
440 - 640
Seat Depth
180
280
245
340
300
400
375
500
450
600
Seat Width
300
345
345
400
450
Footrest
Length
150
170
200
250
255
335
310
460
310
460
Back Angle
Forward 6°– Back 17°
Back
Height
365
405
430
470
490
530
490
570
520
600
Arm Rest
Height
300 Max
Chair
Footprint
715 x 615
Tray Size
580 x 530
625 x 530
625 x 530
625 x 530
625 x 530
User
Weight
Limit (kg)
80
4
3.0 FOR YOUR SAFETY
STOP!
Please read these instructions CAREFULLY and THOROUGHLY.
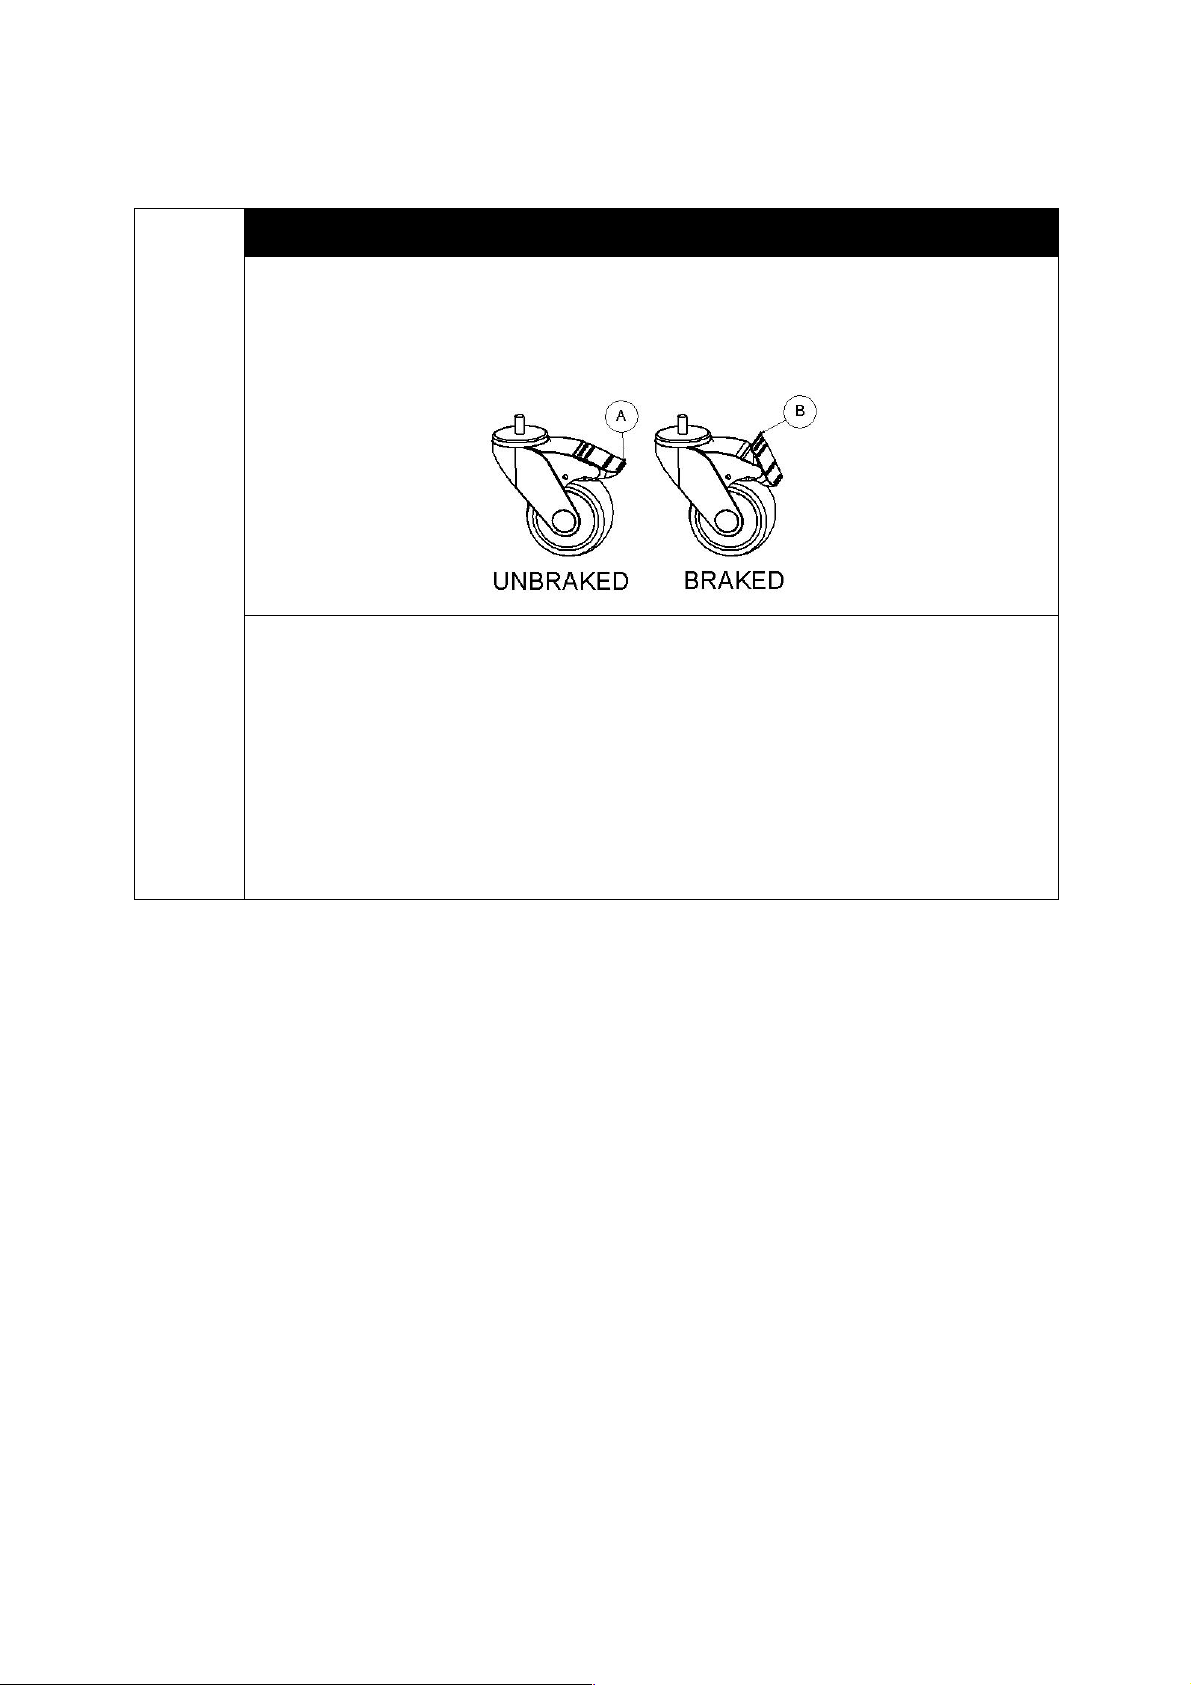
Always lock the castors when attaching items, or making adjustments. To lock,
apply foot to point (A); to unlock, apply foot to point (B).
LAP STRAPS & HARNESSES SAFETY NOTICE
Lap straps and harnesses must be appropriate and safe for the user and the
users clothing.
Lap straps and harnesses must be checked every time the chair is used to ensure
they are fitted as prescribed by the clinician, take account of the users clothing
and are tightened so that the user cannot sustain injury.
Checking the fit of lap straps and harnesses must be done with the user in the
chair and should be undertaken as soon as the users sits in the chair.
§ The user should NOT be left unattended whilst in the product. Always ensure a
responsible therapist or carer is in attendance.
§ For the initial setting up of the chair and any subsequent/future review of the child,
measurements of the child are required to set the chair up correctly.
§ The carer should be familiar with the methods of adjustment and have completed all
adjustments appropriately to meet the needs of the child before transferring the child
onto the product.
§ Ensure all castors on the mobile base are locked, with castors facing inwards before
making and adjustments.
§ The castors are designed for indoor use only and may be damaged if used outdoors.
§ Regular maintenance checks and cleaning are essential for the safe use of this
equipment (see section 7.0).
§ Ensure that all nuts, bolts and hand wheels are securely tightened and that none are
missing.
§ The chassis is ONLY to be used indoors on a flat level surface.
§ Always fasten the lap strap harness and any other straps provided with the product.

5
§ Always keep this product away from naked flames, cigarettes and sources of heat
including open fireplaces, radiators and heaters.
§ Always keep electrical components away from water or any excessive amount of liquid.
§ DO NOT fit parts or accessories of other manufacturers to this product unless authorized
to do so in writing by Smirthwaite Ltd. Failure to follow these instructions will not only
invalidate the guarantee but could make the product dangerous to use. Smirthwaite Ltd
will not accept liability for any injury or damage incurred through such malpractices.
§ Any repairs required must be carried out by Smirthwaite Ltd authorized personnel.
§ DO NOT EXCEED USER MAXIMUM WEIGHT LIMITS.
§ The Samba is CE marked. This certifies that it meets all relevant European safety
requirments.
§ If you believe the product or any fitted accessory to be faulty at any time, DO NOT USE –
contact Smirthwaite Ltd by telephone on +44 (0)1626 835552.

6
4.0 UNPACKING YOUR SAMBA HILO SEATING SYSTEM
STOP!
If in any doubt, ALWAYS seek ADVICE.
Always turn hand wheels, levers and screws clockwise to tighten or anti-
clockwise to loosen.
§ When delivered, the product will be supplied fully assembled, with the exception of the
fitment of the additional accessories.
§ If your order has been supplied as a custom kit, please ensure you follow both the
instructions documented in this IFU and any additional instructions supplied.
§ Also supplied will be a ‘S-Key’ with 4mm hex ends.
§ Refer to Section 5.0 for details of how to fit and adjust your accessories prior to use.
§ Please take note of any instructions on the packaging/box when unpacking.
§ Once the chair has been carefully unpacked, please check all parts.
§ NOTE: For powered Samba chairs. The battery has been tested and fully charged prior to
leaving our factory but MUST BE CHARGED for 24Hours before use upon receipt. To
ensure maximum battery life is achieved, it is recommended that the battery is kept fully
charged. The battery is charged by plugging the charging unit into the handset and
connecting the charger unit to a mains power socket. The control box is fitted with a red
emergency stop button – this must be fully pulled out in order to charge and adjust the
chair height.
STOP!
If you believe this product to be faulty – DO NOT USE
Contact: Smirthwaite Ltd
T: +44 (0)1626 835552
F: +44 (0)1626 835428
7
5.0 SETTING UP AND ADJUSTING YOUR SAMBA HILO SEATING
SYSTEM
STOP!
If in any doubt, ALWAYS seek ADVICE.
Always turn hand wheels, levers and screws clockwise to tighten or anti-clockwise
to loosen.
5.1 SEAT ADJUSTMENTS
5 adjustments can be made to the seat; depth, back height, back angle, seat height and tilt.
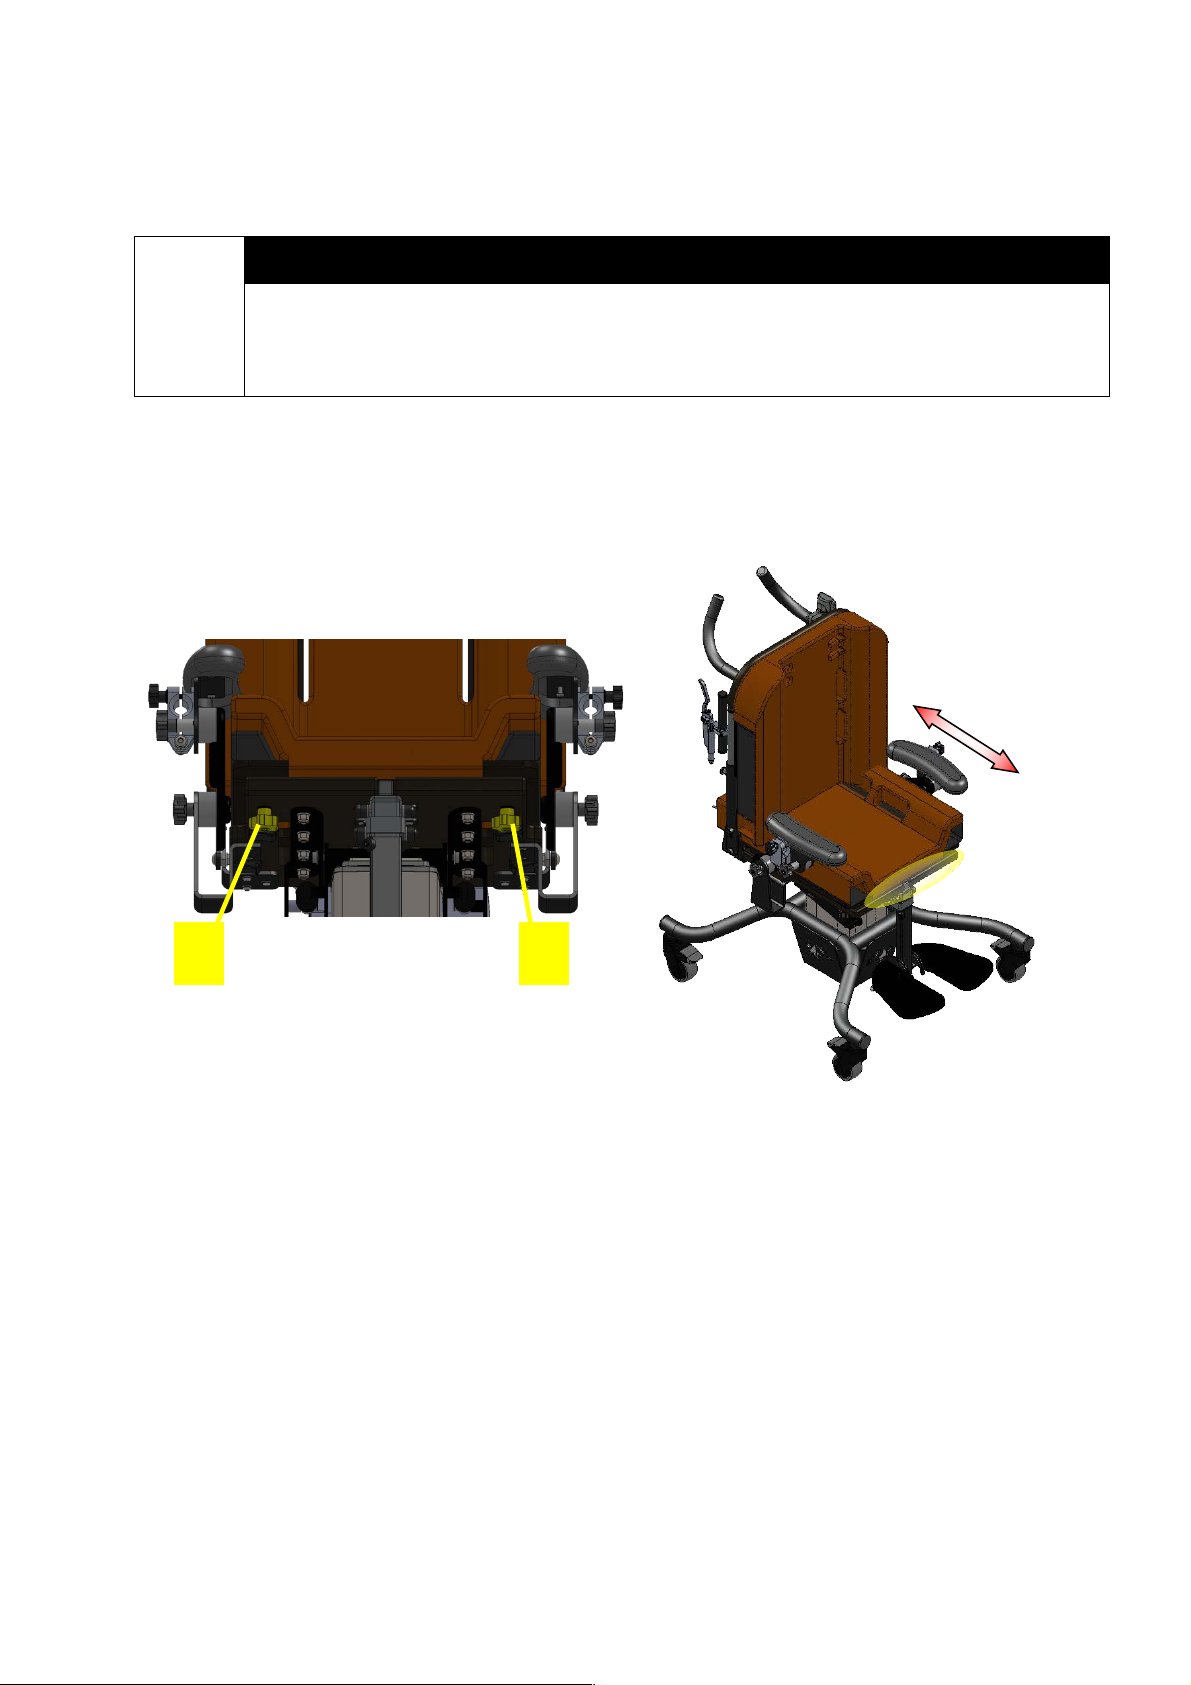
5.1.1 SEAT DEPTH
To move seat forwards or backwards
§ Loosen hand wheels (1 & 2), located underneath the seat base, by turning them anti-
clockwise.
§ Slide seat to desired position.
§ Allow 25mm gap between the back of knee and the edge of the seat.
§ Tighten hand wheels (1 & 2) by turning them clockwise. This will set the seat depth
position.
2
1

8
5.1.2 BACK HEIGHT
To move the back up and down:
§ Pull out one of the plunger pins (3 & 4), located on the back of the chair, and turn
the head 90° so that the plunger pin head stays locked out.
§ Ensure a firm grip is applied to the back of the chair. Then pull out the other plunger
pin (3 & 4).
§ Slide the back to approximately the desired position.
§ Release the plunger pin and move the back up or down slightly until the plunger pin
clicks into its closed position.
§ Pull and rotate the first plunger pin so that it clicks into its closed position.
§ The back will be fixed in this position.
3
4

9
5.1.3 BACK ANGLE
To adjust the back angle of the chair:
§ Locate the plunger pins (5) at the base of the seat capsule.
§ Pull one of the plungers fully out and rotate the head 90° so that it is locked in
position.
§ Ensure a firm grip is applied to the back of the chair.
§ Pull the other plunger pin (on the opposite side of the chair to the previous one) fully
out and move the back of the chair to the approximate desired angle.
§ Release the second plunger pin and move the back slightly until the plunger pin
clicks into position.
§ Return to the first plunger pin (5) and rotate the head 90° so that it clicks into
position.
§ The back angle is now fixed.
5

10
5.1.4 HEIGHT
§ The height of the chair can be altered by using the ‘Actuator Control Pad’ (6) which is
hooked onto the push handle of the chair. This pad can be unhooked and can be moved
to a more suitable position if required.
§ Push either the ‘Up’ arrow or the ‘Down’ arrow to move the chair the required height.
Only press one arrow button at a time.
5.1.5 TILT IN SPACE
To adjust the tilt angle of the seat:
§ Locate the TIS Handle (7) on the handle on the side of the chair.
§ Squeeze the handle which will release the Tilt-in-space mechanism.
§ Adjust the angle of the chair by pushing down or pulling up on the push handle.
§ Release the handle to lock the chair in position.
§ Ensure the brakes are applied to the castors before altering the angle of the chair.
6
7

11
5.2 PUSH HANDLES
To adjust the angle of the push handles:
§ Remove the top of the back cushion by sliding it over the back-upholstery board. This
will reveal the 2 adjustment bolts (8 & 9).
§ Using the supplied S-key, loosen these adjustment bolts (8 & 9) by turning them anti-
clockwise.
§ Rotate the handles to the desired position.
§ Tighten the 2 adjustment bolts (8 & 9), by turning then clockwise, using the S-key
provided.
8
9

12
5.3 ARMRESTS
The position and the angle of the armrests can be adjusted.
5.3.1 POSITION
To adjust the position of the armrests:
§ Loosen the lower handwheel (10) on the armrest by turning it anti-clockwise.
§ Slide and rotate the armrest to the desired position.
§ Tighten the lower handwheel (10) by turning it clockwise. This will lock the armrest
in position.
§ Repeat for the other armrest on the other side.
5.3.2 ANGLE
To adjust the angle of the armrests:
§ Loosen the upper handwheel (11) on the armrest by turning it anti-clockwise.
§ Rotate the armrest to the desired position.
§ Tighten the upper handwheel (10) by turning it clockwise. This will lock the armrest
in position.
§ Repeat for the other armrest on the other side.
10
11

13
5.4 FOOTRESTS
2 adjustments can be made to the footrests; the depth from the back of the chair and the
height. The foot boards can also be flipped up so they can be stowed away.
5.4.1 DEPTH
To adjust the depth of the footrests:
§ Using the 4mm S-Key provided, loosen the grub screw (12) by turning it anti-
clockwise.
§ Slide the footrest to the desired depth.
§ Lock the footrest in place by tightening the grub screw (12) by turning it clockwise.
This can be done with the S-Key provided.
5.4.2 HEIGHT
To adjust the height of the footrests:
§ Using the 4mm S-Key provided, loosen the grub screw (13) by turning it anti-
clockwise.
§ Slide the footrest to the desired height.
§ Lock the footrest in place by tightening the grub screw (13) by turning it clockwise.
This can be done with the S-Key provided.
12
13

14
5.4.3 FLIP-UP FOOTREST
The footrest boards can easily be flipped up to be stored out of the way. To do this simply
pull the end of the footrest boards upwards.
15
6.0 ACCESSORIES
Instructions for more accessories can be found in the standard Samba IFU.
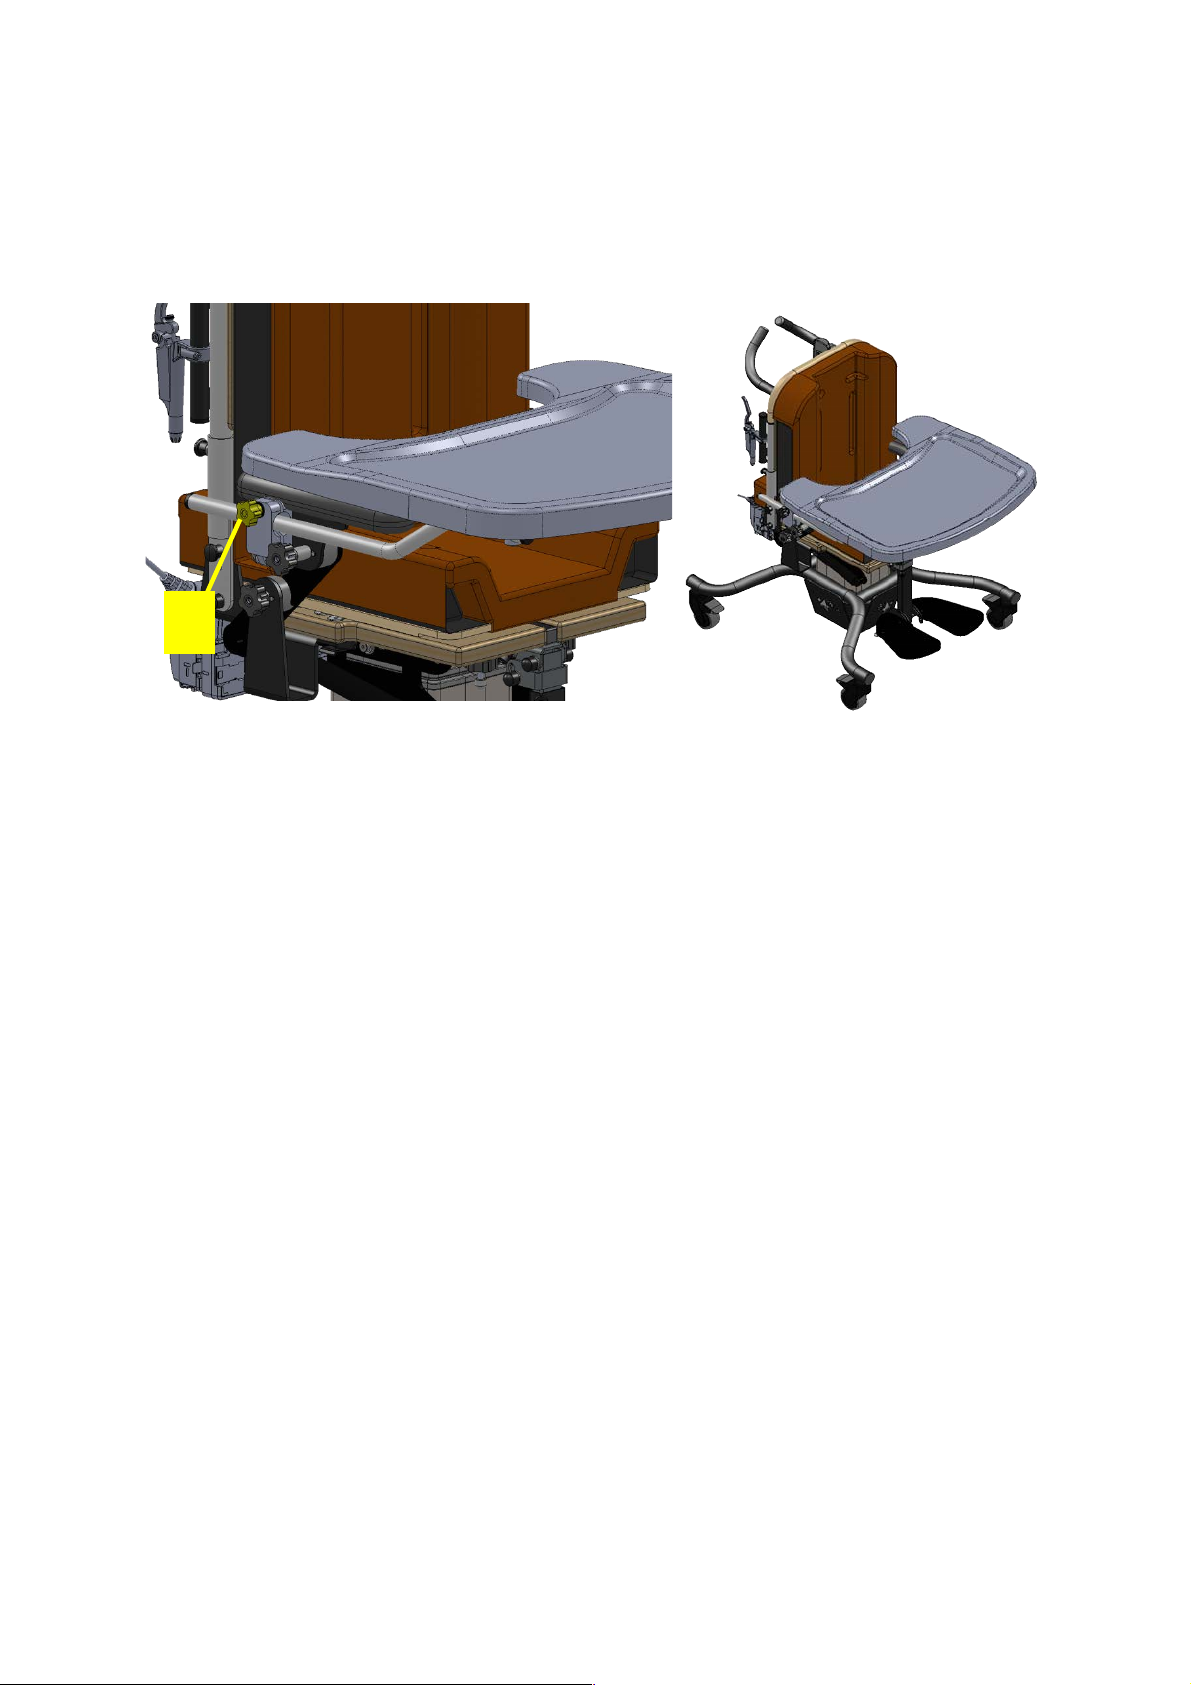
6.1 TRAY
To attach the tray to the chair:
§ Ensure the armrests are fixed to the chair and are set to the same height. (See
section 5.3)
§ Loosen the handwheels (14), by turning them anti-clockwise, on the tray clamps
located on the outside of the armrests.
§ Insert the tray arms into the clamps and set to desired depth.
§ Secure in position but tightening the handwheels (14), by turning then clockwise.
14

16
6.2 SWING AWAY LATERALS
If ordered, the laterals will come attached to the chair however they can easily be removed
and attached if necessary. The height and width of the laterals can be adjusted and each
lateral can be swung away from the chair for ease of access.
6.2.1 HEIGHT & WIDTH
To adjust the position of the laterals;
§ Loosen the handwheels (16), by turning anti-clockwise.
§ Move the laterals to the desired position. Each lateral can be moved independently
of each other.
§ Tighten the handwheels (16), by turning clockwise, to secure in position.
6.2.2 REMOVAL AND REATTACHMENT
To remove the laterals;
§ Loosen the handwheels (16), by turning anti-clockwise.
§ Slide the laterals out of the side of the chair.
To reattach the laterals;
§ Slide the laterals into the side of the chair ensuring that the prongs locate around the
threaded part of the handwheels (16)
§ Tighten the handwheels (16), by turning clockwise, to secure in position.
6.2.3 SWING AWAY
To swing the laterals away;
§ Pull the plunger pins on the laterals (15) to disengage the plunger pin.
§ Swing the lateral away from the chair.
§ Swing the lateral back towards the inside of the chair until the plunger pin engages
to return to their original position.
15
16
17
6.3 ADJUSTABLE HEADREST
The Smirthwaite adjustable headrest can be fitted to the Samba HiLo and if ordered will
come attached to the chair. For information about adjustments that can be made to the
headrest, see the ‘Adjustable Headrest IFU’.

18
7.0 CARE AND MAINTENANCE
IMPORTANT!
CLEANING IS RECOMMENDED ON A REGULAR BASIS
§ Clean wooden with a damp cloth and mild detergent.
§ Clean metalwork with a damp cloth.
§ Stubborn marks on the woodwork should be cleaned using a soft brush
§ Do not soak or immerse the product in water
§ Store the product in a cool dry place and out of direct sunlight
§ DO NOT use bleach, solvents, abrasives, synthetic detergents, wax polishes, antibacterial
sprays or wipes
§ Operating temperature for the actuator is +5°C - +40°C
§ The actuator should be used for no more than 2 minutes at a time followed by a
downtime of at least 18 minutes.
§ For further information, please refer to your regional healthcare cleaning guidelines
7.1 CHARGING THE BATTERY
§ Apply the brakes to the castors before charging. Also do not use the chair whilst
charging.
§ When the battery is low a buzzer will sound. When this happens plug the charging cable
into the socket on the battery pack assembly on the push handle of the chair.
§ Plug the other cable into a mains socket and turn on to begin charging the battery.
§ The battery will become fully charged in approximately 6 hours.
7.2 DAILY CHECKS
§ Check for signs of wear, tear or damage.
§ Check the tray (if supplied) to ensure no parts are loose or damaged.
§ Check for missing parts.
§ Check that all screws are present and tighten correctly, and are not cross-threaded or
damaged.
§ Check all straps for fraying, and that buckles are not missing/damaged.
This manual suits for next models
4
Table of contents
Other smirthwaite Wheelchair manuals


Popular Wheelchair manuals by other brands

Pride Mobility
Pride Mobility QUANTUM SERIES owner's manual

Quickie
Quickie Puma 40 Instructions for use

Everest & Jennings
Everest & Jennings EJ78X-1 Operation manual

Invacare
Invacare Infinity Series brochure

Stealth Products
Stealth Products The World's Best Laterals user manual

Küschall
Küschall CHAMPION quick start guide

decon
decon E-Move MEM20 user manual

Invacare
Invacare Typhoon II Service manual

lifestyle mobility aids
lifestyle mobility aids M170-3-416SF operating instructions

SORG
SORG Vector Service record for the rehab technician

Invacare
Invacare Comet Owner's operating and maintenance manual

Alber
Alber e-fix E35 Instructions for use


