Smith's Heating First 50902 User manual

CORDLESS KNIFE &
TOOL SHARPENER
AFFÛTEUR SANS FIL POUR COUTEAUX ET OUTILS
AFILADOR INALÁMBRICO DE CUCHILLOS Y HERRAMIENTAS
OWNER’S MANUAL • MANUEL DE L’UTILISATEUR • MANUAL DE USUARIO
Original instructions • Mode d’emploi original • Instrucciones originales
Product color may vary depending on the model purchased.
La couleur du produit peut varier selon le modèle acheté.
El color del producto puede variar dependiendo del
modelo adquirido.

2

3
TABLE OF CONTENTS
ENGLISH INSTRUCTIONS ............................................................................................. 4-12
FREQUENTLY ASKED QUESTIONS & TROUBLESHOOTING GUIDE........................................ 13
WARRANTY ................................................................................................................... 14
REGISTRATION FORM..................................................................................................... 15
TABLE DES MATIÈRES
INSTRUCTIONS FRANÇAISES ..................................................................................... 16-25
QUESTIONS FRÉQUENTES ET GUIDE DE DÉPANNAGE....................................................... 25
GARANTIE ..................................................................................................................... 26
FORMULAIRE D’INSCRIPTION ......................................................................................... 27
INDICE
INSTRUCCIONES EN ESPAÑOL................................................................................... 28-37
PREGUNTAS MÁS FRECUENTES Y GUÍA DE SOLUCIÓN DE PROBLEMAS............................ 37
GARANTÍA ..................................................................................................................... 38
FORMULARIO DE INSCRIPCIÓN....................................................................................... 39

4
IMPORTANT SAFEGUARDS
CAUTION: Read Owner’s Manual Before Using This Sharpener.
This is a TUV listed appliance. It is intended for consumer use only. When using this product, the
following safety precautions should always be followed:
nDo not expose the battery to extreme heat or flame.
nDo not short circuit, over-charge or over-discharge the battery.
nDo not subject the battery to strong mechanical shocks.
nDo not immerse the battery in water or sea water, or get it wet.
nDo not reverse the polarity of the battery for any reason.
nDo not disassemble or modify the battery.
nDo not handle or store with metallic objects.
nDo not use the battery with conspicuous damage or deformation.
nDo not attempt to charge the battery with a plug socket or car-cigarette-plug.
nDo not attempt to solder the battery.
nDo not touch a leaking battery directly.
nDo not use for other equipment.
nDo not use Lithium-ion battery in mixture.
nDo not use or leave the battery for prolonged periods under direct sunlight (or in hot car).
nKeep away from children.
nDo not directly impact, puncture, or strike the battery.
nAlways keep the knife level in the sharpening slot.
nRead the instruction manual thoroughly before using this sharpener.
nAlways clean all dirt and food from knives before sharpening.
nAlways place unit on a sturdy, flat surface.
nHold knife securely but comfortably in your hand.
nAlways hold knife against guide when sharpening.
nPull knife through the belts at recommended speeds.
nUse moderately light downward pressure to establish contact with the belts.
nHandle sharpened knives with care as they will be extremely sharp.
nClean sharpener periodically.
nNever use lubricants with this product.
nNever test sharpness with fingers.
nDo not use this product for other than intended use.
nAfter sharpening, always clean knife before use.
BATTERY CHARGING & STORAGE
nCharging - Only use the included lithium-ion charger for charging battery.
1. Plug the charger into an appropriate outlet before inserting the cord into the unit.
2. The Red LED will remain on until the unit is fully charged.
The Smith’s charger is designed to charge the unit with in 1-2 hours depending on battery level.
nStorage recommendations
- Store the unit at normal room temperatures in a low-humidity environment.
SAVE THESE INSTRUCTIONS
WARNING! When using electric tools, basic safety precautions, including the following, should always
be followed to reduce the risk of fire, electric shock and personal injury. Read all these instructions
before operating this product and save these instructions.

5
WARNING Read all safety warnings, instructions, illustrations and specifications provided with this power tool. Failure to follow all instructions listed below may result
in electric shock, fire and/or serious injury.
The term “power tool” in the warnings refers to your mains-operated (corded) power tool or battery-operated (cordless) power tool.
1) Work area
a) Keep work area clean and well lit. Cluttered and dark areas invite accidents.
b) Do not operate power tools in explosive atmospheres, such as in the presence of flammable liquids, gases or dust. Power tools create sparks which
may ignite the dust or fumes.
c) Keep children and bystanders away while operating a power tool. Distractions can cause you to lose control.
2) Electrical safety
a) Power tool plugs must match the outlet. Never modify the plug in any way. Do not use any adapter plugs with earthed (grounded) power tools.
Unmodified plugs and matching outlets will reduce risk of electric shock.
b Avoid body contact with earthed or grounded surfaces such as pipes, radiators, ranges and refrigerators. There is an increased risk of electric shock if
your body is earthed or grounded.
c) Do not expose power tools to rain or wet conditions. Water entering a power tool will increase the risk of electric shock.
d) Do not abuse the cord. Never use the cord for carrying, pulling or unplugging the power tool. Keep cord away from heat, oil, sharp edges or
moving parts. Damaged or entangled cords increase the risk of electric shock.
e) When operating a power tool outdoors, use an extension cord suitable for outdoor use. Use of a cord suitable for outdoor use reduces the risk of
electric shock.
f) If operating a power tools in a damp location is unavoidable, use a residual current device (RCD) protected supply. Use of an RCD reduces the risk
of electric shock.
3) Personal safety
a Stay alert, watch what you are doing and use common sense when operating a power tool. Do not use a power tool while you are tired or under
the influence of drugs, alcohol or medication. A moment of inattention while operating power tools may result in serious personal injury.
b) Use safety equipment. Always wear eye protection. Safety equipment such as dust mask, non-skid safety shoes, hard hat, or hearing protection used for
appropriate conditions will reduce personal injuries.
c) Prevent unintentional starting. Ensure the switch is in the off-position before connecting to power source and/or battery pack, picking up or
carrying the tool. Carrying power tools with your finger on the switch or energizing power tools that have the switch on invites accidents.
d) Remove any adjusting key or wrench before turning the power tool on. A wrench or a key left attached to a rotating part of the power tool may result in
personal injury.
e) Do not overreach. Keep proper footing and balance at all times. This enables better control of the power tool in unexpected situations.
f) Dress properly. Do not wear loose clothing or jewelry. Keep your hair, clothing and gloves away from moving parts. Loose clothes, jewelry or long hair
can be caught in moving parts.
g) If devices are provided for the connection of dust extraction and collection facilities, ensure these are connected and properly used. Use of dust
collection can reduce dust-related hazards.
4) Power tool use and care
a) Do not force the power tool. Use the correct power tool for your application. The correct power tool will do the job better and safer at the rate for which it
was designed.
b) Do not use the power tool if the switch does not turn it on and off. Any power tool that cannot be controlled with the switch is dangerous and must be
repaired.
c) Disconnect the plug from the power source and/or the battery pack from the power tool before making any adjustments, changing accessories,
or storing power tools. Such preventive safety measures reduce the risk of starting the power tool accidentally.
d) Store idle power tools out of the reach of children and do not allow persons unfamiliar with the power tool or these instructions to operate the
power tool. Power tools are dangerous in the hands of untrained users.
e) Maintain power tools. Check for misalignment or binding of moving parts, breakage of parts and any other condition that may affect the power
tools operation. If damaged, have the power tool repaired before use. Many accidents are caused by poorly maintained power tools.
f) Keep cutting tools sharp and clean. Properly maintained cutting tools with sharp cutting edges are less likely to bind and are easier to control;
g) Use the power tool, accessories and tool bits etc. in accordance with these instructions, taking into account the working conditions and the work
to be performed. Use of the power tool for operations different from those intended could result in a hazardous situation.
5) Service
a) Have your power tool serviced by a qualified repair person using only identical replacement parts. This will ensure that the safety of the power tool is
maintained.
6) Battery tool use and care
a) Recharge only with the charger specified by the manufacturer. A charger that is suitable for one type of battery pack may create a risk of fire when use with
another battery pack.
b) Use power tools only with specifically designated battery packs. Use of any other battery packs may create a risk if injury and fire.
c) When battery pack is not in use, keep it away from other metal objects, like paper clips, coins, keys, nails, screws or other small metal objects,
that can make a connection from one terminal to another. Shorting the battery terminals tighter may cause burns or a fire.
d) Under abusive conditions, liquid may be ejected from the battery; avoid contact. If contact accidentally occurs, flush with water. If liquid contacts
eyes, additionally seek medical help. Liquid ejected from the battery may cause irritation or burns.
RESIDUAL RISKS
Even when the power tool is used as prescribed it is not possible to eliminate all residual risk factors. The following hazards may arise in connection
with the power tool’s construction and design:
– Damage to lungs if an effective dust mask is not worn.
– Damage to hearing if effective hearing protection is not worn.
– Damages to health resulting from vibration emission if the power tool is being used over longer period of time or not adequately managed and properly maintained.
WARNING! This power tool produces an electromagnetic field during operation. This field may under some circumstances interfere with active or passive medical
implants. To reduce the risk of serious or fatal injury, we recommend persons with medical implants to consult their physician and the medical implant manufacturer before
operating this machine.
INTENDED USE
This machine is intended to remove surface material using an abrasive belt. The equipment is to be used only for its prescribed purpose. Any other use is deemed to be a
case of misuse.

6
INTRODUCING YOUR KNIFE & TOOL SHARPENER
Hand grip
Cord port
Belt tensioner
Belt tension
release
Sharpening cassette
rotation release - on
front of machine
Adjustable
knife guide
Angle Adjustment -
on back of guide
Manual
sharpening slot
Abrasive belts -
80 Coarse (Black)
240 Medium (Gray)
600 Fine (Red)
Sharpening cassette
Power switch
Momentary Continuous
Off
Red LED

7
SETTING UP YOUR KNIFE & TOOL SHARPENER
STEP 1
Slide sharpening cassette release as shown (Fig. 1) to rotate sharpening cassette from transportation position (Fig. 2)
Then rotate cassette to sharpening position (Fig. 3) or grinding position (Fig. 4).
Fig. 1
Fig. 3 - Sharpening position
Fig. 4 - Grinding position
NOTE: For safety purposes, power switch is inoperable when the
sharpening cassette is completely removed from the unit.
Fig. 2 - Transportation position
Sharpening
cassette release
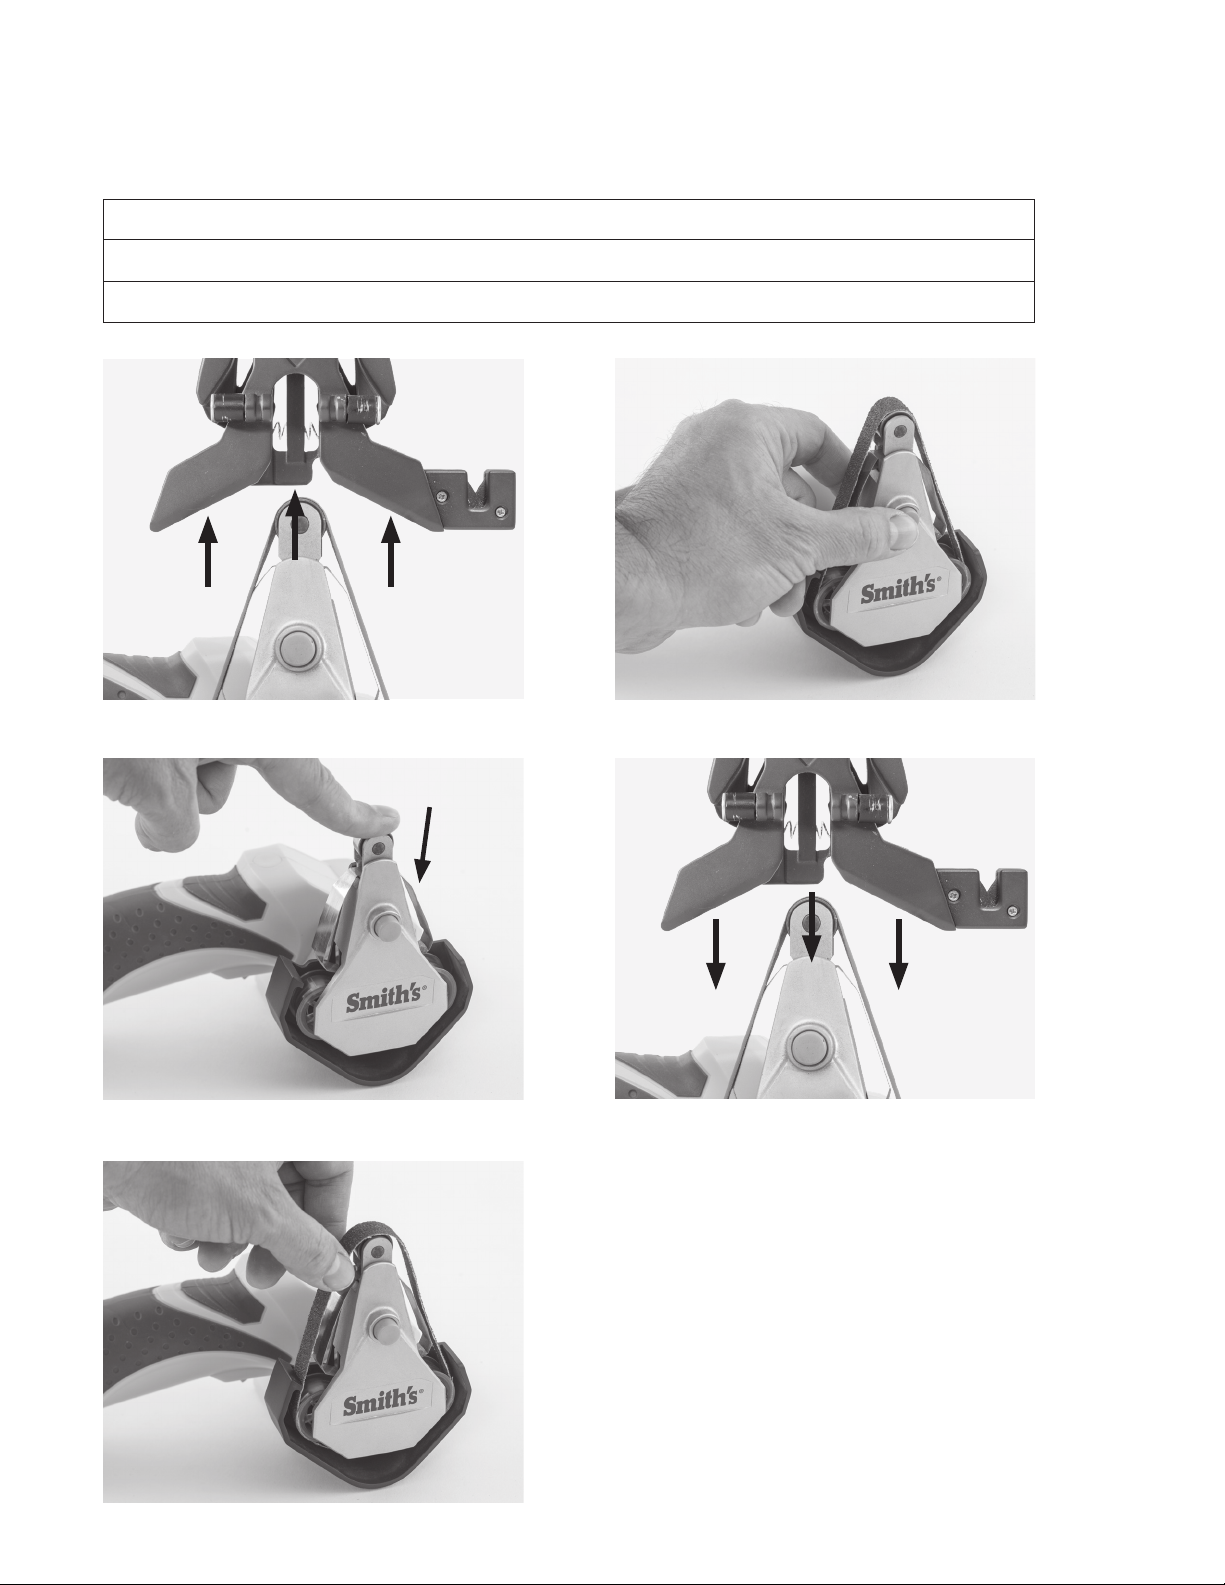
8
STEP 2
Install desired belt.
Belt Selection Guide
Coarse 80 BLACK for grinding and sharpening most tools
Medium 240 GRAY for knife & scissor sharpening
Fine 600 RED for honing knives
3.Center belt on all 4 pulleys.
4.Push belt tension release button to tighten belt.
2.Push tensioner down to lock in place.
1.Remove knife guide.
5.Re-install knife guide.

9
Blade Handle
THE ANATOMY OF A KNIFE
YOU ARE NOW READY TO SHARPEN/GRIND!
AB
C
E
F
D
G
A. Point ............................. The very end of the knife, which is used for piercing
B. Tip ................................ The first third of the blade (approximately), which is used for
small or delicate work
C. Edge ............................. The cutting surface of the knife, which extends from the point
to the heel
D. Heel .............................. The rear part of the blade, used for cutting activities that require
more force
E. Spine ............................ The top, thicker portion of the blade, which adds weight and strength
F. Bolster ......................... The thick metal portion joining the handle and the blade, which
adds weight and balance and keeps the user’s hand from slipping
G. Finger Guard ................ The portion of the bolster that keeps the user’s hand from slipping
onto the blade
ANGLE ADJUSTMENT
The fact that this knife sharpener allows the user to adjust the angle of grind ensures its versatility for sharpening a vast array
of knives. Both guides adjust to the appropriate finishing angle for the knife being sharpened. This allows you to sharpen
everything from thin kitchen knives to wider tactical style knives at the same angles originally produced by their manufacturer.
The product also offers a manual sharpening slot designed to sharpen serrated edge knives.

10
SHARPENING STRAIGHT EDGE KNIVES
STEP 1
Slide knife guide onto sharpening cassette in sharpening position (Fig. 1).
NOTE: Proper knife-sharpening position; blade against outer edge of guide. Place
knife blade in the guide so that the side of blade is firmly against the outside edge of
the guide slot. Insert knife blade all the way to the heel of the blade.
STEP 2
Adjust the angle of the knife guide as needed for the particular blade you are sharp-
ening (i.e. kitchen and fillet knives 15º, pocket knives 20º, hunting knives 25º, scissors
30º). Refer to the knife manufacturer’s recommendations for best results.
STEP 3
With knife in guide, squeeze power switch, and pull knife straight and steadily through
guide from heel to point (Fig. 2). 8-in. knife should take 2 seconds per stroke. Release
power switch after knife exits guide. This will save battery power and extend life of
belts.
STEP 4
Repeat Step 2 now using the other side of guide. Repeat steps 2 and 3 for 5 strokes
per side (10 total strokes). Pull knife through manual sharpening slot 3 to 4 times
using very light downward pressure to remove any burr on cutting edge (Fig. 3).
Your knife should now be tomato sharp.
SHARPENING SERRATED EDGE KNIVES
STEP 1
Use the manual sharpening slot on the knife guide (Fig. 1).
NOTE: DO NOT USE THE BELT OR ELECTRIC SLOTS FOR SERRATED BLADES.
STEP 2
With knife in guide, pull knife straight and steadily through guide for serrated portion of
blade (Fig. 2). Repeat 10-12 times.
NOTE: To sharpen knives with partial serrations, follow the instructions for straight
edge knives for the standard portion of the blade (Fig. 3). Then place the knife in the
manual sharpening slot and follow the instructions for serrated edges (Fig. 4).
Fig. 1
Manual
sharpening
slot
Fig. 1
Fig. 2
Fig. 3
Fig. 2
Fig. 3 Fig. 4

11
SHARPENING SCISSORS & SHEARS
STEP 1
Slide knife sharpening guide onto sharpening cassette in sharpening position (Fig. 1)
and adjust angle guide to 30º setting.
NOTE: Sharpen only the beveled side of your scissors; marking the beveled side with a
black marker will make it easier to see when the cutting edge has been sharpened.
STEP 2
Pull scissors steadily through guide along full length of blade (Fig. 2). Repeat 4-5 times.
NOTE: proper scissors-sharpening position. Place scissor blade in guide slot all the way
to the hinge. Guide will help keep the blade flat and stable during sharpening.
STEP 3
Repeat Steps 1 to 3 on other scissors blade. Test scissors, repeat as needed.
SHARPENING TOOLS
Shovels, Hoes, Axes, Hatchets, Machetes, Post-Hole diggers, and other
edge tools
NOTE: It will take longer to restore a sharp edge to extremely dull or damaged tools.
WARNING: Always wear heavy gloves and eye protection when using this
product for tool sharpening. Always clean the blade before sharpening.
STEP 1
Remove knife guide (Fig. 1); move sharpening cassette to grinding position.
STEP 2
Clamp tool to be sharpened securely in bench vise. Squeeze power switch; grind edge
of tool until you are satisfied with the sharpness (Fig. 2).
NOTE: Because the sharpener is rechargeable and porta-
ble, you can use the sharpener in the field without using a
clamp or vise. Hold the tool to be sharpened as tightly and
steadily as possible in one hand, and hold the sharpener in
your other hand. Use extreme caution when operating the
sharpener in this manner (Fig. 3).
Fig. 1
Fig. 1
Fig. 2
Fig. 2
Fig. 3

12
SHARPENING TOOLS
Pruners, Shears, & Other Bypass Cutting Tools
NOTE: These tools usually have only one sharp, beveled blade. Re-sharpen ONLY the
beveled blade. These tools do not require sharpening to a precise angle. It will take
longer to restore a sharp edge to extremely dull or damaged tools.
WARNING: Always wear heavy gloves and eye protection when using this
product for tool sharpening. Always clean the blade before sharpening.
STEP 1
Remove knife guide (Fig.1); move sharpening cassette to grinding position.
STEP 2
Clamp tool to be sharpened securely in bench vise. Squeeze power switch; grind edge
of tool until you are satisfied with the sharpness (Fig. 2).
NOTE: Because the sharpener is rechargeable and
portable, you can use the sharpener in the field without
using a clamp or vise. Hold the tool to be sharpened as
tightly and steadily as possible in one hand, and hold the
sharpener in your other hand. Use extreme caution when
operating the sharpener in this manner (Fig. 3).
SHARPENING TOOLS
Lawnmower Blades, Straight & Curved (Mulching) Blades
NOTE: Lawnmower blades are normally only beveled on one side of the blade.
Only sharpen the side of the blade with the bevel. Lawnmower blades do not
require sharpening to a precise angle. It will take longer to restore a sharp edge
to an extremely dull or damaged blade.
WARNING: Always wear heavy gloves and eye protection when using this
product for tool sharpening. Always clean the blade before sharpening.
STEP 1
Remove blade from mower following manufacturer’s instructions; secure blade in
bench vise.
STEP 2
Remove knife guide (Fig.1); move sharpening cassette to grinding position.
STEP 3
Clamp blade securely in bench vise. Squeeze power switch; grind edge of tool until
you are satisfied with the sharpness (Fig. 2). Unclamp blade, rotate 180º and sharpen
other side of blade.
STEP 4
Balance blade to manufacturer’s specifcations and reinstall on lawnmower following
manufacturer’s instructions.
Fig. 1
Fig. 1
Fig. 2
Fig. 2
Fig. 3
NOTE: ALWAYS SECURE MOWER BLADES IN A VISE PRIOR TO SHARPENING. DO NOT ATTEMPT TO HOLD MOWER BLADES BY
HAND WHILE SHARPENING.

13
GRINDING, POLISHING, DEBURRING
The Knife & Tool Sharpener is the ideal handheld grinder for small tasks, from deburring to polishing. Remember, the tool is not
intended for heavy-duty use; do not exceed 20 minutes use in 1 hour.
• Deburr tubing • Grinding plastic • Automotive fabrication
• Grinding metal • Sanding wood • Any detail grinding task
FREQUENTLY ASKED QUESTIONS
How often should I sharpen my knives?
All cutlery requires maintenance and sharpening. A sharp knife can easily be maintained by adhering to a few basic rules.
Cut only on soft surfaces such as wood or poly boards. Hard surfaces like glass, stone, stainless steel, acrylic, or laminate will dull knives immediately on
contact. Always avoid cutting frozen food, slicing into bones, or using a knife to pry things open. These uses may result in severely dulling, bending, or
breaking your knife. Hone your knife before or after each use if you want to maintain a razor sharp edge.
How can I tell if my knife is sharp?
Use it to cut paper or slice food. If the knife does not cut smoothly, it needs additional sharpening.
My knife is not sharp and I’ve gone through the whole knife sharpening process. What am I doing wrong?
Although unusual, there are times when you have to make more passes through the sharpening slots to achieve the desired results (in excess of 25
times or more for extreme cases). This may occur during the first sharpening of a knife or if a knife was sharpened incorrectly by another process. It may
also occur when sharpening blades made of extremely hard steel, such as some hunting and tactical knives.
Sometimes the sharpening wheel stalls when I am drawing the knife through the blade guides. What causes this?
The knife sharpener is designed so that very little effort is needed to draw the blade through the sharpening slots. If excessive
downward pressure is applied to the knife as it is being pulled through the sharpening slots, the sharpener may stall.
How do I get an even edge on my blade?
It is important that you keep the proper orientation of the knife blade during sharpening. Always keep the knife blade straight up and down and against
the knife guide, so that the belt contacts the blade consistently along the cutting edge. Always sharpen from heel to tip, never back and forth. Remember
to lift up slightly on the handle as the curved portion of the blade is drawn through the sharpening slots.
Occasionally I see sparks when sharpening my knives. What causes this?
At a professional knife sharpening service, certain blades with high carbon content (usually higher quality knives) sometimes will spark or produce a
stream of sparks when they come in contact with the sharpening abrasive. Your sharpener uses the same type of sharpening abrasive that the profes-
sionals use. Therefore, you can expect to see similar sparking when you sharpen blades with high carbon content. This is normal.
My sharpener produces a loud vibrating sound. Why is this?
Your Cordless Knife & Tool Sharpener uses rapidly rotating belts to sharpen knives. Because of the speed of rotation, a vibrating sound may be heard.
This is normal and to be expected. If the noise or vibration becomes excessive, contact Customer Service at 501-321-2244 or visit our website at
www.smithsproducts.com for contact information.
TROUBLE SHOOTING GUIDE
Symptom: Sharpener stops running while in use.
Cause: The batteries have lost sufficient energy to power the motor.
Solution: Use the provided charger to charge the batteries and the sharpener will restart. If motor still will not run, contact Customer
Service at 501-321-2244 or via our website, www.smithsproducts.com.
Symptom: Abrasive belts stop removing metal.
Cause: The initial aggressive cutting speed of the abrasive belts will slow with use and eventually wear out.
Solution: If after extended periods of use you feel like the abrasive belts have completely lost their aggressive cutting
ability, replace the belt. Visit your place of purchase, call Smith’s Customer Service at 501-321- 2244, or visit our website at www.
smithsproducts.com to purchase replacement belts.
Symptom: The batteries will not charge when connected to an electrical socket.
Cause: Sharpener or charging cord could be damaged or malfunctioning.
Solution: Contact Customer Service at 501-321-2244 or visit our website at www.smithsproducts.com for contact information.
MAINTENANCE
There is little maintenance required with your sharpener. To clean the exterior housing, clean with a soft, damp cloth.
• Do not use a powdered abrasive cleaner to clean sharpener.
• To protect against risk of electrical shock do not put any part of appliance in water or other liquid.
• Do not use a lubricant on any component.
ABOUT SMITH’S®
The Smith’s®brand offers consumers high performance edge sharpeners for the most discerning tastes. Synonymous with exceptional
value, Smith’s is a brand marketed towards the retail market. Founded in 1886 in Hot Springs, Arkansas and widely regarded as a world
leader for sharpening tools, Smith’s®lays claim to the design and manufacture of the broadest line of knife and scissors sharpeners
currently available. The company has over 130 years of experience providing innovative edge related products for the Housewares, Sporting
Goods and Hardware markets. For more information, visit www.smithsproducts.com.

14
THREE YEAR LIMITED USE
MODEL 50902 & 50969
WARRANTY
For warranty registration, visit our website,
www.smithsproducts.com/warranty, or complete the owner registration
card on the following page, detach, and mail to:
Smith's Consumer Products Inc.
747 Mid-America Boulevard • Hot Springs, Arkansas 71913-8414 USA
OWNER REGISTRATION CARD MODEL 50902 & 50969
Owner Registration :
Name __________________________________________________________________ Phone # ( ____ ) ___________________________________
Address __________________________________________________________________________________________________________________
Postal Code ________________ City _______________________________________________________________ Country_______________ _
E-mail ________________________________________ Date of Purchase ____________________ Amount Paid $ _____________________
Store Name _______________________________________________________________________________________________________________
Store Address ______________________________________________________________________________________________________________
Postal Code ________________ City _______________________________________________________________ Country_______________ ___
This Smith's Consumer Products Inc. sharpener is guaranteed against defective
material
or workmanship for a period of three (3) full years from the date of
purchase
if the product is used for non-industrial or non-commercial purposes
only.
Smith's Consumer Products Inc. or its distributors will repair or replace, at
our
option, any product or part that is defective in material or workmanship
without
charge if the product is returned to us within the three (3) year warranty
period.
The limited warranty DOES NOT cover replacement of ceramic wheels or
ceramic stones necessitated by use of the product or product damage resulting
from
misuse. For warranty repairs, return the complete product, postage
prepaid,
directly to the address shown below. Be sure to include a copy of your
sales slip to establish warranty eligibility.
ALL
IMPLIED WARRANTIES, INCLUDING IMPLIED WARRANTIES OF
MERCHANTABILITY
AND FITNESS FOR A PARTICULAR PURPOSE, ARE
EXPRESSLY
LIMITED TO THE PERIOD OF THREE (3) YEARS FROM THE DATE
OF
PURCHASE. SMITH’S AND ITS DISTRIBUTORS SHALL NOT BE LIABLE
FOR
ANY INCIDENTAL OR CONSEQUENTIAL DAMAGES. Some countries do
not
allow the exclusion or limitation of incidental or consequential damages, so
the
above limitation or exclusion may not apply to you. This warranty gives you
specific
legal rights, and you may also have other rights, which vary from country
to country.
THIS WARRANTY APPLIES ONLY TO NON-INDUSTRIAL OR NON-COMMERICAL USE.
KEEP ORIGINAL RECEIPT AS PROOF OF PURCHASE FOR WARRANTY PURPOSES.
Mailing address must be on the outside
and confidential information folded inside
8092LEDOMDRACNOIT
ARTSIGERRENWO
foht
s
uW
®
)renepra
h
Sf
omottobnO(____
_
___
__________
__#
:
n
oitartsigeR
renwO
____
__
__
_
_
_____
_
___
_
____
___
___
_
____emaN enoh
P____
_
________
____
_
________
_____ _______
_____
____
_______
_
________
)____(
# ___
__
______
______
_
___
_______ss
erd
dA __________________________________
___
__
__ _____
___
___
_
_______
____
___
_
_____
_
______
___ ____
_
_
__________
_
__
_____
______
_
_
________
___
__
_
_ytiC _
__
_
________
__etatS__
_________
___________ __
___________
________
_
__edo
C
pi
Z
_
____________
_
_
______
esa
hcruPfo
eta
D ______
__
____
_$di
aPtnuo
m
A____
__
______ _
____
______
__
_____
___
___________
___
_______
_
_emaN
erot
S _
___________
___________________
____
_
_
__
_
__ ______
________
____
_
______
_
_______________ __
___
_
___________
_
_s
se
rddAerotS ___
________________________
______
_
_
_______ ____________
______
_
____
__________
_
___
_____
_ _____
__
_
_
_____
____
__________
______
__
_
_
_
__
_
____
ytiC _
_
___
_
_______
e
t
atS
_
_
____
_
_____________
_
__ __
____
__
______
__________ed
o
CpiZ
__ _
TO MAIL: FOLD AND TAPE
TO MAIL: FOLD AND TAPE
REGISTER YOUR WARRANTY
ONLINE AT:
www.smithsedge.com/warranty-registration
Edgeware® &
Smith's Consumer Products Inc. #____________________ (on bottom of sharpener)

15
THREE YEAR LIMITED USE
MODEL 50902 & 50969
WARRANTY
For warranty registration, visit our website,
www.smithsproducts.com/warranty, or complete the owner registration
card on the following page, detach, and mail to:
Smith's Consumer Products Inc.
747 Mid-America Boulevard • Hot Springs, Arkansas 71913-8414 USA
OWNER REGISTRATION CARD MODEL 50902 & 50969
Owner Registration
:
Name __________________________________________________________________ Phone # ( ____ ) ___________________________________
Addr
ess __________________________________________________________________________________________________________________
Postal Code ________________ City _______________________________________________________________ Country_______________ _
E-mail ________________________________________ Date of Pur
chase ____________________ Amount Paid $ _____________________
Stor
e Name _______________________________________________________________________________________________________________
Store Addr
ess ______________________________________________________________________________________________________________
Postal Code ________________ City _______________________________________________________________ Country_______________ ___
This Smith's Consumer Products Inc. sharpener is guaranteed against defective
material or workmanship for a period of three (3) full years from the date of
purchase if the product is used for non-industrial or non-commercial purposes
only. Smith's Consumer Products Inc. or its distributors will repair or replace, at
our option, any product or part that is defective in material or workmanship
without charge if the product is returned to us within the three (3) year warranty
period. The limited warranty DOES NOT cover replacement of ceramic wheels or
ceramic stones necessitated by use of the product or product damage resulting
from misuse. For warranty repairs, return the complete product, postage
prepaid, directly to the address shown below. Be sure to include a copy of your
sales slip to establish warranty eligibility.
ALL IMPLIED WARRANTIES, INCLUDING IMPLIED WARRANTIES OF
MERCHANTABILITY AND FITNESS FOR A PARTICULAR PURPOSE, ARE
EXPRESSLY LIMITED TO THE PERIOD OF THREE (3) YEARS FROM THE DATE
OF PURCHASE. SMITH’S AND ITS DISTRIBUTORS SHALL NOT BE LIABLE
FOR ANY INCIDENTAL OR CONSEQUENTIAL DAMAGES. Some countries do
not allow the exclusion or limitation of incidental or consequential damages, so
the above limitation or exclusion may not apply to you. This warranty gives you
specific legal rights, and you may also have other rights, which vary from country
to country.
THIS WARRANTY APPLIES ONLY TO NON-INDUSTRIAL OR NON-COMMERICAL USE.
KEEP ORIGINAL RECEIPT AS PROOF OF PURCHASE FOR WARRANTY PURPOSES.
Mailing address must be on the outside
and confidential information folded inside
8092LEDOMDRACNOIT
ARTSIGERRENWO
foht
s
uW
®
)renepra
h
Sf
omottobnO(____
_
___
__________
__#
:
n
oitartsigeR
renwO
____
__
__
_
_
_____
_
___
_
____
___
___
_
____emaN enoh
P____
_
________
____
_
________
_____ _______
_____
____
_______
_
________
)____(
# ___
__
______
______
_
___
_______ss
erd
dA __________________________________
___
__
__ _____
___
___
_
_______
____
___
_
_____
_
______
___ ____
_
_
__________
_
__
_____
______
_
_
________
___
__
_
_ytiC _
__
_
________
__etatS__
_________
___________ __
___________
________
_
__edo
C
pi
Z
_
____________
_
_
______
esa
hcruPfo
eta
D ______
__
____
_$di
aPtnuo
m
A____
__
______ _
____
______
__
_____
___
___________
___
_______
_
_emaN
erot
S _
___________
___________________
____
_
_
__
_
__ ______
________
____
_
______
_
_______________ __
___
_
___________
_
_s
se
rddAerotS ___
________________________
______
_
_
_______ ____________
______
_
____
__________
_
___
_____
_ _____
__
_
_
_____
____
__________
______
__
_
_
_
__
_
____ytiC _
_
___
_
_______
e
t
atS
_
_
____
_
_____________
_
__ __
____
__
______
__________ed
o
CpiZ
__ _
TO MAIL: FOLD AND TAPE
TO MAIL: FOLD AND TAPE
REGISTER YOUR WARRANTY
ONLINE AT:
www.smithsedge.com/warranty-registration
Edgeware® &
S
mith's Consumer Products Inc. #____________________ (on bottom of sharpener)
THREE YEAR LIMITED USE
MODEL 50902 & 50969
WARRANTY
For warranty registration, visit our website,
www.smithsproducts.com/warranty, or complete the owner registration
card on the following page, detach, and mail to:
Smith's Consumer Products Inc.
747 Mid-America Boulevard • Hot Springs, Arkansas 71913-8414 USA
OWNER REGISTRATION CARD MODEL 50902 & 50969
Owner Registration :
Name __________________________________________________________________ Phone # ( ____ ) ___________________________________
Address __________________________________________________________________________________________________________________
Postal Code ________________ City _______________________________________________________________ Country_______________ _
E-mail ________________________________________ Date of Purchase ____________________ Amount Paid $ _____________________
Store Name _______________________________________________________________________________________________________________
Store Address ______________________________________________________________________________________________________________
Postal Code ________________ City _______________________________________________________________ Country_______________ ___
This Smith's Consumer Products Inc. sharpener is guaranteed against defective
material or workmanship for a period of three (3) full years from the date of
purchase if the product is used for non-industrial or non-commercial purposes
only. Smith's Consumer Products Inc. or its distributors will repair or replace, at
our option, any product or part that is defective in material or workmanship
without charge if the product is returned to us within the three (3) year warranty
period. The limited warranty DOES NOT cover replacement of ceramic wheels or
ceramic stones necessitated by use of the product or product damage resulting
from misuse. For warranty repairs, return the complete product, postage
prepaid, directly to the address shown below. Be sure to include a copy of your
sales slip to establish warranty eligibility.
ALL IMPLIED WARRANTIES, INCLUDING IMPLIED WARRANTIES OF
MERCHANTABILITY AND FITNESS FOR A PARTICULAR PURPOSE, ARE
EXPRESSLY LIMITED TO THE PERIOD OF THREE (3) YEARS FROM THE DATE
OF PURCHASE. SMITH’S AND ITS DISTRIBUTORS SHALL NOT BE LIABLE
FOR ANY INCIDENTAL OR CONSEQUENTIAL DAMAGES. Some countries do
not allow the exclusion or limitation of incidental or consequential damages, so
the above limitation or exclusion may not apply to you. This warranty gives you
specific legal rights, and you may also have other rights, which vary from country
to country.
THIS WARRANTY APPLIES ONLY TO NON-INDUSTRIAL OR NON-COMMERICAL USE.
KEEP ORIGINAL RECEIPT AS PROOF OF PURCHASE FOR WARRANTY PURPOSES.
Mailing address must be on the outside
and confidential information folded inside
8092LEDOMDRACNOIT
ARTSIGERRENWO
foht
s
uW
®
)renepra
h
Sf
omottobnO(____
_
___
__________
__#
:
n
oitartsigeR
renwO
____
__
__
_
_
_____
_
___
_
____
___
___
_
____emaN enoh
P____
_
________
____
_
________
_____ _______
_____
____
_______
_
________
)____(
# ___
__
______
______
_
___
_______ss
erd
dA __________________________________
___
__
__ _____
___
___
_
_______
____
___
_
_____
_
______
___ ____
_
_
__________
_
__
_____
______
_
_
________
___
__
_
_ytiC _
__
_
________
__etatS__
_________
___________ __
___________
________
_
__edo
C
pi
Z
_
____________
_
_
______
esa
hcruPfo
eta
D ______
__
____
_$di
aPtnuo
m
A____
__
______ _
____
______
__
_____
___
___________
___
_______
_
_emaN
erot
S _
___________
___________________
____
_
_
__
_
__ ______
________
____
_
______
_
_______________ __
___
_
___________
_
_s
se
rddAerotS ___
________________________
______
_
_
_______ ____________
______
_
____
__________
_
___
_____
_ _____
__
_
_
_____
____
__________
______
__
_
_
_
__
_
____ytiC _
_
___
_
_______
e
t
atS
_
_
____
_
_____________
_
__ __
____
__
______
__________ed
o
CpiZ
__ _
TO MAIL: FOLD AND TAPE
TO MAIL: FOLD AND TAPE
REGISTER YOUR WARRANTY
ONLINE AT:
www.smithsedge.com/warranty-registration
Edgeware® &
Smith's Consumer Products Inc. #____________________ (on bottom of sharpener)

16
MESURES DE SECURITE IMPORTANTES
ATTENTION : Lisez le manuel de l’utilisateur avant d’utiliser cet affûteur.
Cet appareil bénéficie de l’homologation TUV. Il a été conçu pour une utilisation domestique uniquement.
Lors de l’utilisation d’appareils électriques, les mesures de sécurité de base doivent toujours être respectées :
nNe pas exposer la batterie à une chaleur extrême ou à une flamme.
nNe pas court-circuiter, surcharger ou décharger excessivement la batterie.
nNe pas soumettre la batterie à de forts chocs mécaniques.
nNe pas mouiller la batterie et ne pas l’immerger dans l’eau douce ou l’eau de mer.
nNe pas inverser la polarité de la batterie pour quelque raison que ce soit.
nNe pas démonter ou modifier la batterie.
nNe pas manipuler ou entreposer avec des objets métalliques.
nNe pas utiliser la batterie si elle montre des signes manifestes de détérioration ou de déformation.
nNe pas essayer de charger la batterie avec une prise de courant ou une prise allume-cigare de voiture.
nNe pas essayer de souder la batterie.
nNe pas toucher à main nue une batterie qui fuit.
nNe pas utiliser pour un autre appareil.
nNe pas utiliser la batterie Lithium-ion avec d’autres types de batterie.
nNe pas utiliser ou laisser la batterie sous la lumière directe du soleil (ou dans une voiture surchauffée)
pendant des périodes prolongées.
nTenir hors de portée des enfants.
nNe pas heurter, trouer ou frapper directement la batterie.
nGardez toujours le niveau du couteau dans la fente d’affûtage.
nLisez attentivement le manuel d’instructions avant d’utiliser l’affûteur.
nNettoyez les saletés et les aliments présents sur les couteaux avant d’aiguiser ceux-ci.
nPlacez toujours l’appareil sur une surface plane et solide.
nTenez le couteau fermement, mais confortablement dans votre main.
nToujours tenir le couteau contre le guide lors de l’affûtage.
nTirez le couteau à travers les courroies aux vitesses recommandées.
nUtilisez une pression vers le bas modérément légère pour établir un contact avec les ceintures.
nManipulez les couteaux aiguisés avec soin car ils seront extrêmement pointu.
nNettoyez périodiquement l’aiguiseur.
nN’utilisez jamais de lubrifiant avec ce produit.
nNe vérifiez jamais si le couteau est assez aiguisé avec les doigts.
nN’utilisez pas l’affûteur à toute autre fin que celle pour laquelle il a été conçu.
nAprès l’affûtage, toujours nettoyer le couteau avant utilisation.
CHARGE ET STOCKAGE DE LA BATTERIE
nCharge - Utiliser exclusivement le chargeur au lithium-ion fourni pour charger la batterie.
1. Branchez le chargeur dans une prise appropriée avant d’insérer le cordon dans l’appareil.
2. Le voyant rouge reste allumé jusqu’à ce que l’unité soit complètement chargée.
Le chargeur de Smith’s est conçu pour charger l’unité en 1-2 heures selon le niveau de la batterie.
nRecommandations de stockage
- Rangez l’appareil à une température ambiante normale dans un environnement à faible humidité.
CONSERVEZ CES INSTRUCTIONS
AVERTISSEMENT! Cet affûteur électrique produit une lame très tranchante. Faites attention lorsque vous
manipulez votre couteau après l’avoir aiguisé. Ne vérifiez pas l’affûtage du couteau en passant vos doigts
ou une partie quelconque de votre corps le long du tranchant de la lame. Pour éviter toute blessure, soyez
extrêmement prudent lorsque vous manipulez des couteaux aiguisés.

17
AVERTISSEMENT Lisez tous les avertissements de sécurité, instructions, illustrations et spécifications fournis avec cet outil électrique. Le non-respect de toutes les
instructions énumérées ci-dessous peut entraîner un choc électrique, un incendie et / ou des blessures graves.
Enregistrez tous les avertissements et instructions pour référence ultérieure.
The term “power tool” in the warnings refers to your mains-operated (corded) power tool or battery-operated (cordless) power tool.
1) Zone de travail
a) Gardez la zone de travail propre et bien éclairée. Les zones obsolètes et obscures invitent des accidents.
b) Ne pas utiliser d’outils électriques dans des atmosphères explosives, par exemple en présence de liquides inflammables, de gaz ou de poussière. Les outils
électriques créent des étincelles qui peut enflammer la poussière ou les fumées.
c) Gardez les enfants et les personnes présentes à l’écart lorsque vous utilisez un outil électrique. Les distractions peuvent vous faire perdre le contrôle.
2) Sécurité électrique
a) Les fiches d’outils électriques doivent correspondre à la prise de courant. Ne modifiez jamais la fiche de quelque manière que ce soit. N’utilisez pas
d’adaptateurs avec des outils électriques mis à la terre. Les bouchons non modifiés et les prises correspondantes réduiront le risque de choc électrique.
b) Évitez le contact avec le corps avec des surfaces mises à la terre ou à la terre telles que des tuyaux, des radiateurs, des cuisinières et des réfrigérateurs.
Il y a un risque accru de choc électrique si votre corps est mis à la terre ou mis à la terre.
c) Ne pas exposer les outils électriques aux conditions de pluie ou humides. L’entrée d’eau dans un outil électrique augmentera le risque d’électrocution.
d) Ne pas abuser du cordon. N’utilisez jamais le cordon pour transporter, tirer ou débrancher l’outil électrique. Tenir le cordon hors de la chaleur, de l’huile,
des arêtes nettes ou pièces mobiles. Les câbles endommagés ou enchevêtrés augmentent le risque d’électrocution.
e) Lorsque vous utilisez un outil électrique à l’extérieur, utilisez une rallonge adaptée à une utilisation à l’extérieur. L’utilisation d’un cordon adapté à l’extérieur
réduit le risque de choc électrique.
f) Si l’utilisation d’un outil électrique dans un endroit humide est inévitable, utilisez une alimentation protégée par un courant résiduel (RCD). L’utilisation d’un
RCD réduit le risque d’électrocution.
3) Sécurité personnelle
a) Une Alerte permanente, regardez ce que vous faites et utilisez le bon sens lors de l’utilisation d’un outil électrique. N’utilisez pas d’outil électrique
pendant que vous êtes fatigué ou sous l’influence des drogues, de l’alcool ou des médicaments. Un moment d’inattention lors du fonctionnement des outils
électriques peut entraîner des blessures graves.
b) Utiliser un équipement de sécurité. Toujours porter une protection oculaire. Équipement de sécurité tels que masque anti-poussière, chaussures de sécurité
antidérapantes, casque ou protection auditive utilisés pour les conditions appropriées réduiront les blessures corporelles.
c) Empêche le démarrage involontaire. Assurez-vous que le commutateur est en position hors tension avant de vous connecter à la source d’alimentation et
/ ou à la batterie, à la prise ou portant l’outil. Le fait de porter des outils électriques avec le doigt sur le commutateur ou les outils électriques à allumage activé entraîne
des accidents.
d) Retirez toute clé de réglage ou clé avant de mettre l’outil sous tension. Une clé ou une clé laissée attachée à une partie tournante de l’outil électrique peut entraîner
blessure personnelle.
e) Ne pas trop dépasser. Gardez une bonne assise et un bon équilibre à tout moment. Cela permet un meilleur contrôle de l’outil électrique dans des situations inattendues.
f) S’habiller correctement. Ne portez pas de vêtements ou de bijoux. Gardez vos cheveux, vos vêtements et vos gants loin des pièces mobiles. Des vêtements,
des bijoux ou des cheveux longs peuvent être capturés dans des pièces mobiles.
g) Si des dispositifs sont prévus pour la connexion des installations d’extraction et de collecte de poussière, assurez-vous qu’ils sont connectés et
correctement utilisés. Utilisation de la poussière la collecte peut réduire les dangers liés à la poussière.
4) Utilisation et entretien des outils électriques
a) Ne forcez pas l’outil électrique. Utilisez l’outil électrique approprié pour votre application. L’outil électrique correct fera le travail mieux et plus sûr au taux pour
lequel il a été conçu.
b) N’utilisez pas l’outil électrique si l’interrupteur ne l’allume pas ou ne l’éteint pas. Tout outil électrique qui ne peut pas être contrôlé avec le commutateur est
dangereux et doit être réparé.
c) Débrancher la fiche de la source d’alimentation et / ou de la batterie de l’outil électrique avant de procéder à des réglages, changer les accessoires, ou le
stockage des outils électriques. De telles mesures de sécurité préventives réduisent le risque de démarrage accidentel de l’outil électrique.
d) Rangez les outils électriques inactifs hors de la portée des enfants et ne laissez pas les personnes qui ne connaissent pas l’outil électrique ou ces
instructions pour outil électrique. Les outils électriques sont dangereux entre les mains d’utilisateurs non formés.
e) Maintenir les outils électriques. Vérifier le désalignement ou la liaison des pièces en mouvement, la rupture des pièces et toute autre condition pouvant
affecter le pouvoir opération des outils. En cas d’endommagement, réparer l’outil électrique avant utilisation. De nombreux accidents sont causés par des outils
électriques mal entretenus.
f) Gardez les outils coupants nettoyés et nettoyés. Les outils de coupe correctement entretenus avec des arêtes tranchantes sont moins susceptibles de se lier et sont plus
faciles à contrôler;
g) Utilisez l’outil électrique, les accessoires et les outils, etc. conformément à ces instructions, en tenant compte des conditions de travail et du travail à
effectuer réalisé. L’utilisation de l’outil électrique pour des opérations différentes de celles prévues pourrait entraîner une situation dangereuse.
5) Service
a) Faites réparer votre outil électrique par un réparateur qualifié en utilisant uniquement des pièces de rechange identiques. Cela garantira que la sécurité de
l’outil électrique est entretenu.
6) Utilisation et entretien des outils de la batterie
a) Recharge uniquement avec le chargeur spécifié par le fabricant. Un chargeur adapté à un type de batterie peut créer un risque d’incendie lorsqu’il est utilisé avec
une autre batterie.
b) Utilisez uniquement des outils électriques avec des batteries spécifiquement désignées. L’utilisation de toute autre batterie peut entraîner un risque en cas de
blessure et d’incendie.
c) Lorsque le bloc-piles n’est pas utilisé, gardez-le à distance d’autres objets métalliques, tels que des trombones, des pièces de monnaie, des clés, des
ongles, des vis ou d’autres petits objets métalliques, qui peut établir une connexion d’un terminal à l’autre. Le fait de raccourcir les bornes de la batterie peut
provoquer des brûlures ou un incendie.
d) Dans des conditions abusives, le liquide peut être éjecté de la batterie; Éviter tout contact. En cas de contact accidentel, rincer à l’eau. Si les contacts
liquides les yeux, en outre, demander de l’aide médicale. Le liquide éjecté de la batterie peut provoquer une irritation ou des brûlures.
RISQUES RÉSIDUELS
Même lorsque l’outil électrique est utilisé tel que prescrit, il n’est pas possible d’éliminer tous les facteurs de risque résiduels. Les risques suivants peuvent
apparaître dans le cadre de la construction et de la conception de l’outil électrique :
– Dommage aux poumons si un masque antipoussière efficace n’est pas porté.
– Dommage à l’audition si une protection auditive efficace n’est pas portée.
– Dommages à la santé résultant d’une émission de vibrations si l’outil électrique est utilisé pendant une période de temps prolongée ou n’est pas correctement géré et
correctement entretenu.
ATTENTION! Cet outil électrique produit un champ électromagnétique pendant le fonctionnement. Ce champ peut, dans certaines circonstances, interférer avec des implants
médicaux actifs ou passifs. Pour réduire le risque de blessures graves ou mortelles, nous recommandons aux personnes ayant des implants médicaux de consulter leur médecin
et le fabricant de l’implant médical avant d’utiliser cette machine.
UTILISATION PRÉVUE
Cette machine est destinée à enlever le matériau de surface à l’aide d’une ceinture abrasive. L’équipement doit être utilisé uniquement dans le but prescrit. Toute autre utilisation
est considérée comme un cas d’utilisation abusive.

18
VOTRE AFFÛTEUR À COUTEAUX ET OUTILS
Cassette d’affûtage
Poignée
Port du cordon
Tendeur de courroie
Libération de la
tension de la
courroie
Libération de la
rotation de la
cassette d’affûtage
– à l’avant de la
machine
Interrupteur
d’alimentation
Arrêt
Guide ajustable
pour couteaux
Ajustement de l’angle -
à l’arrière du guide
Fente d’affûtage
manuel
Courroies abrasives
80 Gros grain (noir)
240 Grain moyen (gris)
600 Grain fin (rouge)
Momentané Continu
LED rouge

19
MONTAGE DE VOTRE AFFÛTEUR POUR COUTEAUX ET OUTILS
ÉTAPE 1
Faire coulisser le bouton de libération de la cassette d’affûtage comme indiqué (Fig. 1) pour faire tourner celle-ci hors de la position
de transport (Fig. 2)
Faites ensuite pivoter la cassette dans la position d’affûtage (Fig. 3)
ou dans la position de meulage (Fig. 4).
Fig. 1
Fig. 3 - Position d’affûtage
Fig. 4 - Position de meulage
REMARQUE : Pour des raisons de sécurité, l’interrupteur
d’alimentation est inutilisable lorsque la cassette d’affûtage est
complètement retirée de l’appareil.
Fig. 2 - Position de transport
Libération de
la rotation de
la cassette
d’affûtage

20
ÉTAPE 2
Installez la courroie désirée.
Guide de sélection de la courroie
Gros grain 80 NOIR pour meuler et affûter la plupart des outils
Grain moyen 240 GRIS pour affûter couteaux et ciseaux
Grain fin 600 ROUGE pour le finissage des couteaux
3.Centrez la courroie sur les 4 poulies.
4.Poussez le bouton de libération de la tension
de la courroie pour serrer celle-ci.
2.Poussez le tendeur vers le bas pour le verrouiller
en place.
1. Retirez le guide-couteaux.
5. Réinstallez le guide-couteaux.
This manual suits for next models
1
Table of contents
Languages:
Other Smith's Heating First Power Tools manuals


