WARRIOR 56434 Assembly instructions

Visit our website at: http://www.harborfreight.com
Email our technical support at: [email protected]
Owner’s Manual & Safety Instructions
Save This Manual Keep this manual for the safety warnings and precautions, assembly,
operating, inspection, maintenance and cleaning procedures. Write the product’s serial number in the back
of the manual near the assembly diagram (or month and year of purchase if product has no number). Keep
this manual and the receipt in a safe and dry place for future reference. 21e
When unpacking, make sure that the product is intact
and undamaged. If any parts are missing or broken,
please call 1-888-866-5797 as soon as possible.
Copyright© 2021 by Harbor Freight Tools®. All rights reserved.
No portion of this manual or any artwork contained herein may be reproduced in
any shape or form without the express written consent of Harbor Freight Tools.
Diagrams within this manual may not be drawn proportionally. Due to continuing
improvements, actual product may differ slightly from the product described herein.
To ol s r eq ui r ed f o r as s em bl y a nd se rvice m a y not be i nc luded.
Read this material before using this product.
Failure to do so can result in serious injury.
SAVE THIS MANUAL.

Page 2 For technical questions, please call 1-888-866-5797. Item 56434
WARNING SYMBOLS AND DEFINITIONS
This is the safety alert symbol. It is used to alert you to potential
personal injury hazards. Obey all safety messages that
follow this symbol to avoid possible injury or death.
Indicates a hazardous situation which, if not avoided,
will result in death or serious injury.
Indicates a hazardous situation which, if not avoided,
could result in death or serious injury.
Indicates a hazardous situation which, if not avoided,
could result in minor or moderate injury.
Addresses practices not related to personal injury.
IMPORTANT SAFETY INFORMATION
General Safety Warnings
WARNING Read all safety warnings and instructions.
Failure to follow the warnings and instructions may result in electric shock, fire and/or serious injury.
Save all warnings and instructions for future reference.
The warnings, precautions, and instructions discussed in this instruction manual cannot cover all possible
conditions and situations that may occur. It must be understood by the operator that common sense and
caution are factors which cannot be built into this product, but must be supplied by the operator.
1. Work area safety
a. Keep work area clean and well lit.
Cluttered or dark areas invite accidents.
b. Do not operate power tools in explosive
atmospheres, such as in the presence of
flammable liquids, gases or dust. Power tools
create sparks which may ignite the dust or fumes.
c. Keep children and bystanders away
while operating a power tool. Distractions
can cause you to lose control.
2. Electrical safety
a. Power tool plugs must match the outlet.
Never modify the plug in any way. Do
not use any adapter plugs with grounded
power tools. Unmodified plugs and matching
outlets will reduce risk of electric shock.
b. Avoid body contact with grounded surfaces
such as pipes, radiators, ranges and
refrigerators. There is an increased risk of
electric shock if your body is grounded.
c. Do not expose power tools to rain or wet
conditions. Water entering a power tool
will increase the risk of electric shock.
d. Do not abuse the cord. Never use the cord
for carrying, pulling or unplugging the power
tool. Keep cord away from heat, oil, sharp
edges or moving parts. Damaged or entangled
cords increase the risk of electric shock.
e. When operating a power tool outdoors,
use an extension cord suitable for outdoor
use. Use of a cord suitable for outdoor
use reduces the risk of electric shock.
3. Personal safety
a. Stay alert, watch what you are doing and
use common sense when operating a
power tool. Do not use a power tool while
you are tired or under the influence of
drugs, alcohol or medication. A moment
of inattention while operating power tools
may result in serious personal injury.
b. Use personal protective equipment. Always
wear eye protection. Safety equipment such
as dust mask, non-skid safety shoes, hard
hat, or hearing protection used for appropriate
conditions will reduce personal injuries.
c. Prevent unintentional starting. Ensure the
switch is in the off-position before connecting
to power source and/or battery pack, picking
up or carrying the tool. Carrying power tools
with your finger on the switch or energizing power
tools that have the switch on invites accidents.

Page 3For technical questions, please call 1-888-866-5797.Item 56434
d. Do not overreach. Keep proper footing and
balance at all times. This enables better control
of the power tool in unexpected situations.
e. Dress properly. Do not wear loose clothing or
jewelry. Keep your hair, clothing and gloves
away from moving parts. Loose clothes, jewelry
or long hair can be caught in moving parts.
f. Only use safety equipment that has been
approved by an appropriate standards agency.
Unapproved safety equipment may not provide
adequate protection. Eye protection must be ANSI-
approved and breathing protection must be NIOSH-
approved for the specific hazards in the work area.
4. Power tool use and care
a. Do not force the power tool. Use the
correct power tool for your application. The
correct power tool will do the job better and
safer at the rate for which it was designed.
b. Do not use the power tool if the switch
does not turn it on and off. Any power
tool that cannot be controlled with the switch
is dangerous and must be repaired.
c. Disconnect the plug from the power source
and/or the battery pack from the power tool
before making any adjustments, changing
accessories, or storing power tools. Such
preventive safety measures reduce the risk
of starting the power tool accidentally.
d. Store idle power tools out of the reach of
children and do not allow persons unfamiliar
with the power tool or these instructions
to operate the power tool. Power tools are
dangerous in the hands of untrained users.
e. Maintain power tools. Check for misalignment
or binding of moving parts, breakage of parts
and any other condition that may affect the
power tool’s operation. If damaged, have the
power tool repaired before use. Many accidents
are caused by poorly maintained power tools.
f. Use the power tool, accessories and tool bits
etc. in accordance with these instructions,
taking into account the working conditions
and the work to be performed. Use of the
power tool for operations different from those
intended could result in a hazardous situation.
5. Service
a. Have your power tool serviced by a
qualified repair person using only identical
replacement parts. This will ensure that
the safety of the power tool is maintained.
b. Double Insulation: When servicing, use
only identical replacement parts.
Heat Gun Safety Warnings
1. Hidden areas behind walls, ceilings, floors,
soffit boards, and other panels may contain
flammable materials that could be ignited by
the heat gun when working in these locations.
The ignition of these materials may not be readily
apparent and could result in property damage
and injury to persons. When working in these
locations, keep the heat gun moving in a back-
and-forth motion. Lingering or pausing in one spot
could ignite the panel or the material behind it.
2. Extreme care should be taken when stripping
paint. The peelings, residue and vapors of paint
may contain lead, which is poisonous. Any pre-
1977 paint may contain lead and paint applied to
homes prior to 1950 is likely to contain lead. Once
deposited on surfaces, hand-to-mouth contact
can result in the ingestion of lead. Exposure to
even low levels of lead can cause irreversible
brain and nervous system damage; young and
unborn children are particularly vulnerable.
Before beginning any paint removal process you
should determine whether the paint you are removing
contains lead. This can be done by your local
health department or by a professional who uses a
paint analyzer to check the lead content of the paint
to be removed. LEAD-BASED PAINT SHOULD
ONLY BE REMOVED BY A PROFESSIONAL
AND SHOULD NOT BE REMOVED BY USING
A HEAT GUN. Before beginning a paint removal
process you should determine whether the paint
you are removing contains lead. This can be
done by your local health department or by a
professional who uses a paint analyzer to check
the lead content of the paint to be removed.
3. Exercise CAUTION when using this product
outdoors. To reduce the risk of electric shock, keep
extension cord connection dry and off the ground.
4. Persons removing paint should
follow these guidelines:
• Move the work piece outdoors. If this
is not possible, keep the work area well
ventilated. Open the windows and put an
exhaust fan in one of them. Be sure the fan
is moving the air from inside to outside.
• Remove or cover any carpets, rugs, furniture,
clothing, cooking utensils and air ducts.

Page 4 For technical questions, please call 1-888-866-5797. Item 56434
• Place drop clothes in the work area to catch any
paint chips or peelings. Wear protective clothing
such as extra work shirts, overalls and hats.
• Work in one room at a time. Furnishings
should be removed or placed in the center of
the room and covered. Work areas should
be sealed off from the rest of the dwelling
by sealed doorways with drop clothes.
• Children, pregnant or potentially pregnant
women, and nursing mothers should not
be present in the work area until the work
is done and all clean up is complete.
• Wear a dust respirator mask or a dual filter (dust
and fume) respirator mask which has been
approved by the Occupational Safety and Health
Administration (OSHA), the National Institute
of Safety and Health (NIOSH), or the United
States Bureau of Mines. These masks and
replaceable filters are readily available at major
hardware stores. Make sure the mask fits. Beards
and facial hair may keep masks from sealing
properly. Change filters often. DISPOSABLE
PAPER MASKS ARE NOT ADEQUATE.
• Use caution when operating the Heat
Gun. Keep the Heat Gun moving, as
excessive heat will generate fumes which
can be inhaled by the operator.
• Keep food and drink out of the work area.
Wash hands, arms and face and rinse mouth
before eating or drinking. Do not smoke
or chew tobacco in the work area.
• Clean up all removed paint and dust by wet
mopping the floors. Use a wet cloth to clean all
walls, sills and any other surface where paint or
dust is clinging. DO NOT SWEEP, DRY DUST
OR VACUUM. Use a high phosphate detergent or
trisodium phosphate (TSP) to wash and mop areas.
• At the end of each work session put the paint
chips and debris in a double plastic bag, close it
with tape or twist ties and dispose of properly.
• Remove protective clothing and work shoes
in the work area to avoid carrying dust into
the rest of the dwelling. Wash work clothes
separately. Wipe shoes off with a wet rag that
is then washed with the work clothes. Wash
hair and body thoroughly with soap and water.
5. When working with plastics, varnish, or
similar materials, gases develop that are
easily flammable and can lead to explosions.
Be prepared for flames to develop and keep
suitable fire extinguishing means at hand.
6. The Nozzle becomes very hot. Do not lay the
Heat Gun on flammable surfaces when operating
the Gun or immediately after turning the Gun
off. Always set the Heat Gun on a flat, level
surface so that the Nozzle tip is directed upwards
and away from the supporting surface.
7. Do not use the Heat Gun near flammable materials.
8. Do not point the Heat Gun at people or
animals. The intense heat can injure them.
9. Do not touch the tube of the heating element or the
Nozzle when they are hot. They will be hot enough to
cause burns during use and immediately afterwards.
10. Do not use the Heat Gun on glass.
11. Do not use the Heat Gun as a hair dryer or to heat up
materials that can be damaged by high temperatures.
12. Maintain labels and nameplates on
the tool. These carry important safety
information. If unreadable or missing, contact
Harbor Freight Tools for a replacement.
13. Avoid unintentional starting. Prepare to
begin work before turning on the tool.
14. Do not leave the tool unattended when it is plugged
into an electrical outlet. Turn off the tool, and
unplug it from its electrical outlet before leaving.
15. This product is not a toy. Keep it out of
reach of children.
16. People with pacemakers should consult their
physician(s) before use. Electromagnetic fields in
close proximity to heart pacemaker could cause
pacemaker interference or pacemaker failure. In
addition, people with pacemakers should:
• Avoid operating alone.
• Don’t use with power switch locked on.
• Properly maintain and inspect to avoid electrical
shock.
• Any power cord must be properly grounded.
Ground Fault Circuit Interrupter (GFCI) should also be
implemented – it prevents sustained electrical shock.
17. The warnings, precautions, and instructions discussed
in this instruction manual cannot cover all possible
conditions and situations that may occur. It must
be understood by the operator that common sense
and caution are factors which cannot be built into
this product, but must be supplied by the operator.
SAVE THESE INSTRUCTIONS.
Page 5For technical questions, please call 1-888-866-5797.Item 56434
Grounding
TO PREVENT ELECTRIC SHOCK AND DEATH FROM INCORRECT GROUNDING WIRE
CONNECTION:
Check with a qualified electrician if you are in doubt as to whether the outlet is properly grounded.
Do not modify the power cord plug provided with the tool. Never remove the grounding prong from
the plug. Do not use the tool if the power cord or plug is damaged. If damaged, have it repaired by
a service facility before use. If the plug will not fit the outlet, have a proper outlet installed by a
qualified electrician.
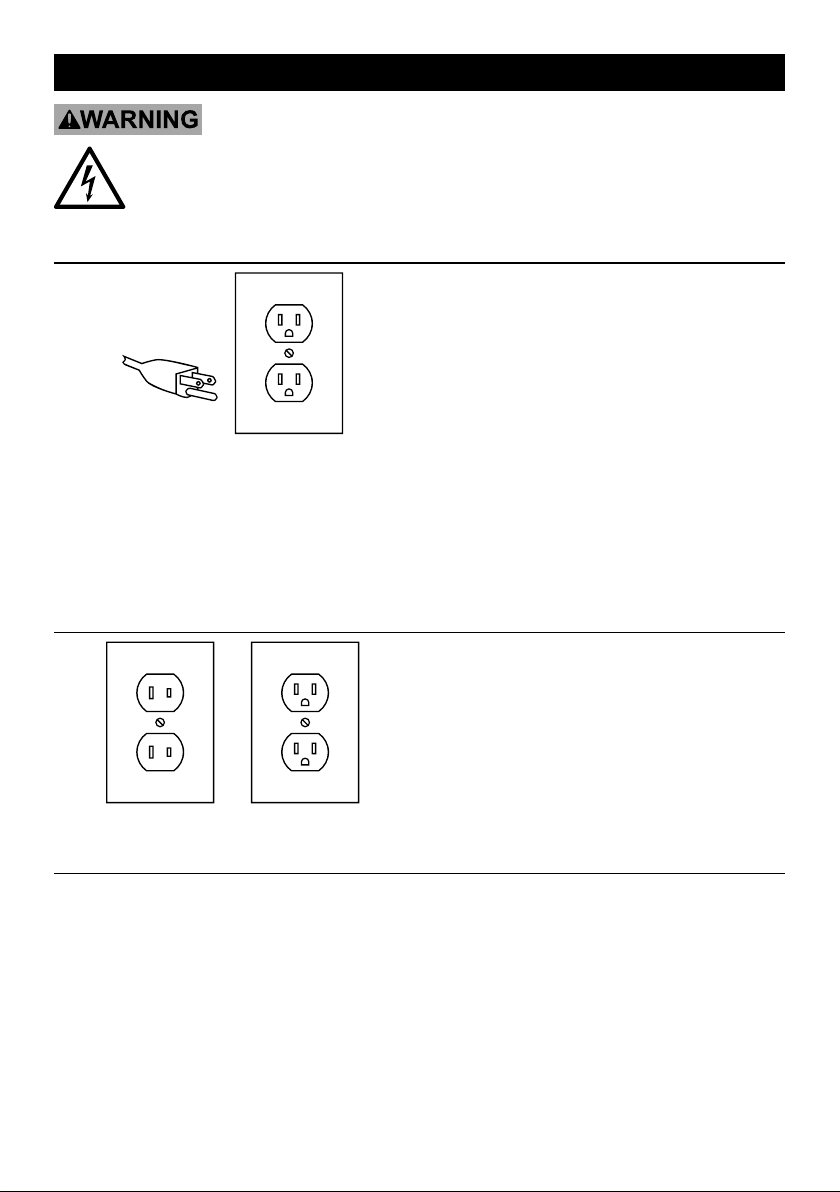
Grounded Tools: Tools with Three Prong Plugs
3-Prong Plug and Outlet
1. Tools marked with “Grounding Required” have a three
wire cord and three prong grounding plug. The plug
must be connected to a properly grounded outlet. If
the tool should electrically malfunction or break down,
grounding provides a low resistance path to carry
electricity away from the user, reducing the risk of
electric shock. (See 3-Prong Plug and Outlet.)
2. The grounding prong in the plug is connected through
the green wire inside the cord to the grounding
system in the tool. The green wire in the cord must
be the only wire connected to the tool’s grounding
system and must never be attached to an electrically
“live” terminal. (See 3-Prong Plug and Outlet.)
3. The tool must be plugged into an appropriate outlet,
properly installed and grounded in accordance
with all codes and ordinances. The plug and
outlet should look like those in the preceding
illustration. (See 3-Prong Plug and Outlet.)
Double Insulated Tools: Tools with Two Prong Plugs
Outlets for 2-Prong Plug
1. Tools marked “Double Insulated” do not require
grounding. They have a special double insulation
system which satisfies OSHA requirements and
complies with the applicable standards of Underwriters
Laboratories, Inc., the Canadian Standard
Association, and the National Electrical Code.
2. Double insulated tools may be used in either
of the 120 volt outlets shown in the preceding
illustration. (See Outlets for 2-Prong Plug.)
Extension Cords
1. Grounded tools require a three wire extension
cord. Double Insulated tools can use either
a two or three wire extension cord.
2. As the distance from the supply outlet increases, you
must use a heavier gauge extension cord. Using
extension cords with inadequately sized wire causes a
serious drop in voltage, resulting in loss of power and
possible tool damage.
(See Table A.)
3. The smaller the gauge number of the wire, the
greater the capacity of the cord. For example,
a 14 gauge cord can carry a higher current
than a 16 gauge cord. (See Table A.)
4. When using more than one extension cord to make
up the total length, make sure each cord contains at
least the minimum wire size required. (See Table A.)

Page 6 For technical questions, please call 1-888-866-5797. Item 56434
5. If you are using one extension cord for more
than one tool, add the nameplate amperes
and use the sum to determine the required
minimum cord size. (See Table A.)
6. If you are using an extension cord outdoors, make
sure it is marked with the suffix “W-A” (“W” in
Canada) to indicate it is acceptable for outdoor use.
7. Make sure the extension cord is properly wired
and in good electrical condition. Always replace
a damaged extension cord or have it repaired
by a qualified electrician before using it.
8. Protect the extension cords from sharp objects,
excessive heat, and damp or wet areas.
RECOMMENDED MINIMUM WIRE GAUGE
FOR EXTENSION CORDS* (120/240 VOLT)
NAMEPLATE
AMPERES
(at full load)
EXTENSION CORD
LENGTH
25’ 50’ 75’ 100’ 150’
0 – 2.0 18 18 18 18 16
2.1 – 3.4 18 18 18 16 14
3.5 – 5.0 18 18 16 14 12
5.1 – 7.0 18 16 14 12 12
7.1 – 12.0 18 14 12 10 -
12.1 – 16.0 14 12 10 - -
16.1 – 20.0 12 10 - - -
TABLE A
* Based on limiting the line volt-
age drop to five volts at 150% of
the rated amperes.
Symbology
Double Insulated
VAC Volts Alternating Current
AAmperes
n0 xxxx/min. No Load Revolutions
per Minute (RPM)
Specifications
Electrical Input 120 VAC / 60 Hz / 1500 Watts
Heat
Temperatures
Low Setting: 700° F (Maximum)
High Setting: 1000° F (Maximum)
Adjustable Heat
Setting Type Three-Way Rocker Switch
Controls
Figure A
Power Switch (3)
I - LOW
0 - OFF
II - HIGH
Barrel
Cover (8)

Page 7For technical questions, please call 1-888-866-5797.Item 56434
Instructions for putting into use
Read the ENTIRE IMPORTANT
SAFETY INFORMATION section at the
beginning of this manual including
all text under subheadings therein
before set up or use of this product.
TO PREVENT SERIOUS INJURY FROM ACCIDENTAL OPERATION:
Turn the Power Switch of the tool off and unplug the tool from its electrical outlet
before assembling or making any adjustments to the tool.
Note: For additional information regarding the
parts listed in the following pages, refer to the
Assembly Diagram near the end of this manual.
Product Applications
1. When observing the safety rules, this
Heat Gun is designed for all applications
with hot air that are listed below:
• Shrinking of heat shrink tubing, solder
connectors and solder terminals,
packaging and electrical components.
• Deforming of articles made from acrylic,
PVC, and polystyrene tubing, plates,
and profiles as well as most woods.
• Welding of thermoplastic polymer, flooring
materials of PVC and linoleum, PVC-
coated fabric, tarpaulins and foils.
• Soldering of tin, special silver solder,
SMD elements, cable lugs, and for
loosening soldered connections.
• Paint removal. Removal of old and
even thick coatings of oil paint,
varnish, and synthetic plaster.
• Drying of color shade samples, filter, adhesives,
construction joints and stucco forms.
• Joining adhesives. Large surface gluing with
contact adhesives, activation of pressure
sensitive adhesives, acceleration of bonding
processes, releasing of bonding points as well
as releasing or bonding of edge bond or veneer.
• Defrosting of icy stairs and steps, door locks,
trunk lids, car doors or water pipes, as well as
for defrosting refrigerators and ice boxes.
• Disinfection. With the tool set at 1000°
Fahrenheit, animal sites/stables may be
disinfected. Woodworm infestation may be
controlled.
(CAUTION! Danger of fire. Do
not overheat the wood.)

Page 8 For technical questions, please call 1-888-866-5797. Item 56434
Operating Instructions
Read the ENTIRE IMPORTANT
SAFETY INFORMATION section at the
beginning of this manual including
all text under subheadings therein
before set up or use of this product.
Tool Set Up
TO PREVENT SERIOUS INJURY FROM ACCIDENTAL OPERATION:
Turn the Power Switch of the tool off and unplug the tool from its electrical outlet
before adjusting tool or installing accessories.
Work Piece and Work Area Set Up
1. Designate a work area that is clean and well-
lit. The work area must not allow access by
children or pets to prevent distraction and injury.
2. Route the power cord along a safe route to reach
the work area without creating a tripping hazard or
exposing the power cord to possible damage. The
power cord must reach the work area with enough
extra length to allow free movement while working.
3. Secure loose work pieces using a vise or clamps
(not included) to prevent movement while working.
4. There must not be objects, such as utility lines,
nearby that will present a hazard while working.
General Operating Instructions
1. Make sure Power Switch (3) is in its “0” (OFF)
position. Then plug Power Cord (1) into the nearest
120 volt, grounded, electrical outlet. See Figure A.
2. To turn on the Heat Gun, set its Power
Switch (3) to “l” or “ll”. See Figure A.
• Switch “l” - Low temperature position
(700° Fahrenheit maximum). Used for mild
heating applications, i.e., heat shrink tube,
heat shrink bag, plastic bending, shaping
and welding, removing old paint coating.
• Switch “ll” - High temperature position (1000°
Fahrenheit maximum). Used for intense
heating applications, i.e., frozen water pipe,
defrosting refrigerator, and metal welding.
3. To turn off the Heat Gun, set its Power Switch
(3) to “l”. Then set the Power Switch to “0″ and
unplug the tool from its electrical outlet. (This
method helps cool down the Heat Element (11)
properly to extend the life of the Heat Gun.)
4. CAUTION! Danger of fire. Make sure
to set the Heat Gun on a non-flammable
surface until it has completely cooled.
5. Once cooled, store the Heat Gun in a clean,
dry, safe location out of reach of children
and other unauthorized people.
6. To prevent accidents, turn off the tool and
disconnect its power supply after use. Clean, then
store the tool indoors out of children’s reach.

Page 9For technical questions, please call 1-888-866-5797.Item 56434
Maintenance And Servicing
Procedures not specifically explained
in this manual must be performed
only by a qualified technician.
TO PREVENT SERIOUS INJURY FROM ACCIDENTAL OPERATION: Turn the Power
Switch of the tool off and unplug the tool from its electrical outlet before performing
any inspection, maintenance, or cleaning procedures.
TO PREVENT SERIOUS INJURY FROM TOOL FAILURE: Do not use damaged equipment. If
abnormal noise or vibration occurs, have the problem corrected before further use.
Cleaning, Maintenance, and Lubrication
1. DISCONNECT from power outlet and make
sure that it is completely cooled.
2. BEFORE EACH USE, inspect the general
condition of the Heat Gun. Check for loose screws,
misalignment or binding of moving parts, cracked
or broken parts, damaged electrical wiring, and any
other condition that may affect its safe operation.
3. AFTER USE, clean the external surfaces of
the tool with a clean, moist cloth and mild
detergent. Then dry. Do not use solvents.
4. WARNING! All maintenance, service, and
repairs not mentioned in this manual must only
be performed by a qualified service technician.
5. WARNING! TO PREVENT SERIOUS
INJURY: If the supply cord of this power
tool is damaged, it must be replaced only
by a qualified service technician.
Troubleshooting
Problem Possible Causes Possible Solutions
Heat Gun will
not turn on.
1. Power Switch set at “0”.
2. No power at outlet.
3. Cord not connected.
1. Turn Power Switch to “l” or “ll”.
2. Check power at outlet.
3. Check that cord is plugged in.
Unsatisfactory results. Improper heat setting. Adjust heat setting (“l” or “ll”)
for correct application.
Follow all safety precautions whenever diagnosing or servicing the tool. Disconnect power
supply before service.

Page 10 For technical questions, please call 1-888-866-5797. Item 56434
Parts List and Assembly Diagram
PLEASE READ THE FOLLOWING CAREFULLY
THE MANUFACTURER AND/OR DISTRIBUTOR HAS PROVIDED THE PARTS LIST AND ASSEMBLY DIAGRAM
IN THIS MANUAL AS A REFERENCE TOOL ONLY. NEITHER THE MANUFACTURER OR DISTRIBUTOR
MAKES ANY REPRESENTATION OR WARRANTY OF ANY KIND TO THE BUYER THAT HE OR SHE IS
QUALIFIED TO MAKE ANY REPAIRS TO THE PRODUCT, OR THAT HE OR SHE IS QUALIFIED TO REPLACE
ANY PARTS OF THE PRODUCT. IN FACT, THE MANUFACTURER AND/OR DISTRIBUTOR EXPRESSLY
STATES THAT ALL REPAIRS AND PARTS REPLACEMENTS SHOULD BE UNDERTAKEN BY CERTIFIED AND
LICENSED TECHNICIANS, AND NOT BY THE BUYER. THE BUYER ASSUMES ALL RISK AND LIABILITY
ARISING OUT OF HIS OR HER REPAIRS TO THE ORIGINAL PRODUCT OR REPLACEMENT PARTS
THERETO, OR ARISING OUT OF HIS OR HER INSTALLATION OF REPLACEMENT PARTS THERETO.
Parts List
Record Product’s Serial Number Here:
Note: If product has no serial number, record month and year of purchase instead.
Note: Some parts are listed and shown for illustration purposes only, and are not available
individually as replacement parts. Specify UPC 792363564342 when ordering parts.
Part Description Qty
1 Power Cord & Plug 1
2 Terminal Block 1
3 Power Switch 1
4 Screw 2
5 Wire Clamp 1
6 Screw 3
7 Screw 1
8 Barrel Cover 1
9 Ring 1
10 Barrel 1
11 Heat Element 1
Part Description Qty
12 Barrel Mounting Flange 1
13 Fan Cover 1
14 Fan 1
15 Screw 2
16 Motor Mounting Plate 1
17 Motor 1
18 Rear Enclosure 1
19 Right Enclosure 1
20 Screw 2
21 Left Enclosure 1
22 Screw 4
Other manuals for 56434
1
Table of contents
Other WARRIOR Power Tools manuals


