SMOOTHSTONE 7960 User manual

Phone User Instructions
Your Smoothstone Phone
Inbox Saved Change
Password
Playback
Personal
Greeting
Record
Personal
Greeting
Access
Personal
Dist. Group
Compose
Message Hear or Change
Custom Operator #
Reply to
Message
Dial the
Originator
Delete
Save
Forward
Replay
Continue to
Main Menu
Dial the
Originator
Delete
Forward
Replay
DND
Busy
Name
Return to
Main Menu
No
Answer
DND
Busy
Name
System
Default
No
Answer
Return to
Main Menu
Edit
Create
Delete
List
Return to
Main Menu
Restore
Default
Change
Return to
Main Menu
2
ABC
13
DEF
4
GHI
2
ABC
1 1 1 1
3
DEF 2
ABC
2
ABC
2
ABC
2
ABC
5
JKL
6
MNO
7
PQRS
8
TUV
3
DEF
3
DEF
3
DEF
3
DEF
4
GHI
4
GHI
4
GHI
4
GHI
5
JKL
5
JKL
6
MNO
7
PQRS
8
TUV
*
TUV
*
TUV
*
TUV
*
TUV
2
ABC
3
DEF
4
GHI
6
MNO
7
PQRS
8
TUV
Continue to
Main Menu
Reply to
Message
(*) Will by pass all messages and go right into the Voicemail Main Menu.
(#) Will fast forward through the message or skip the header.
VoiceMail Operation Tree
B
C
D
P
E
F
G
H
I
J
O N M L K
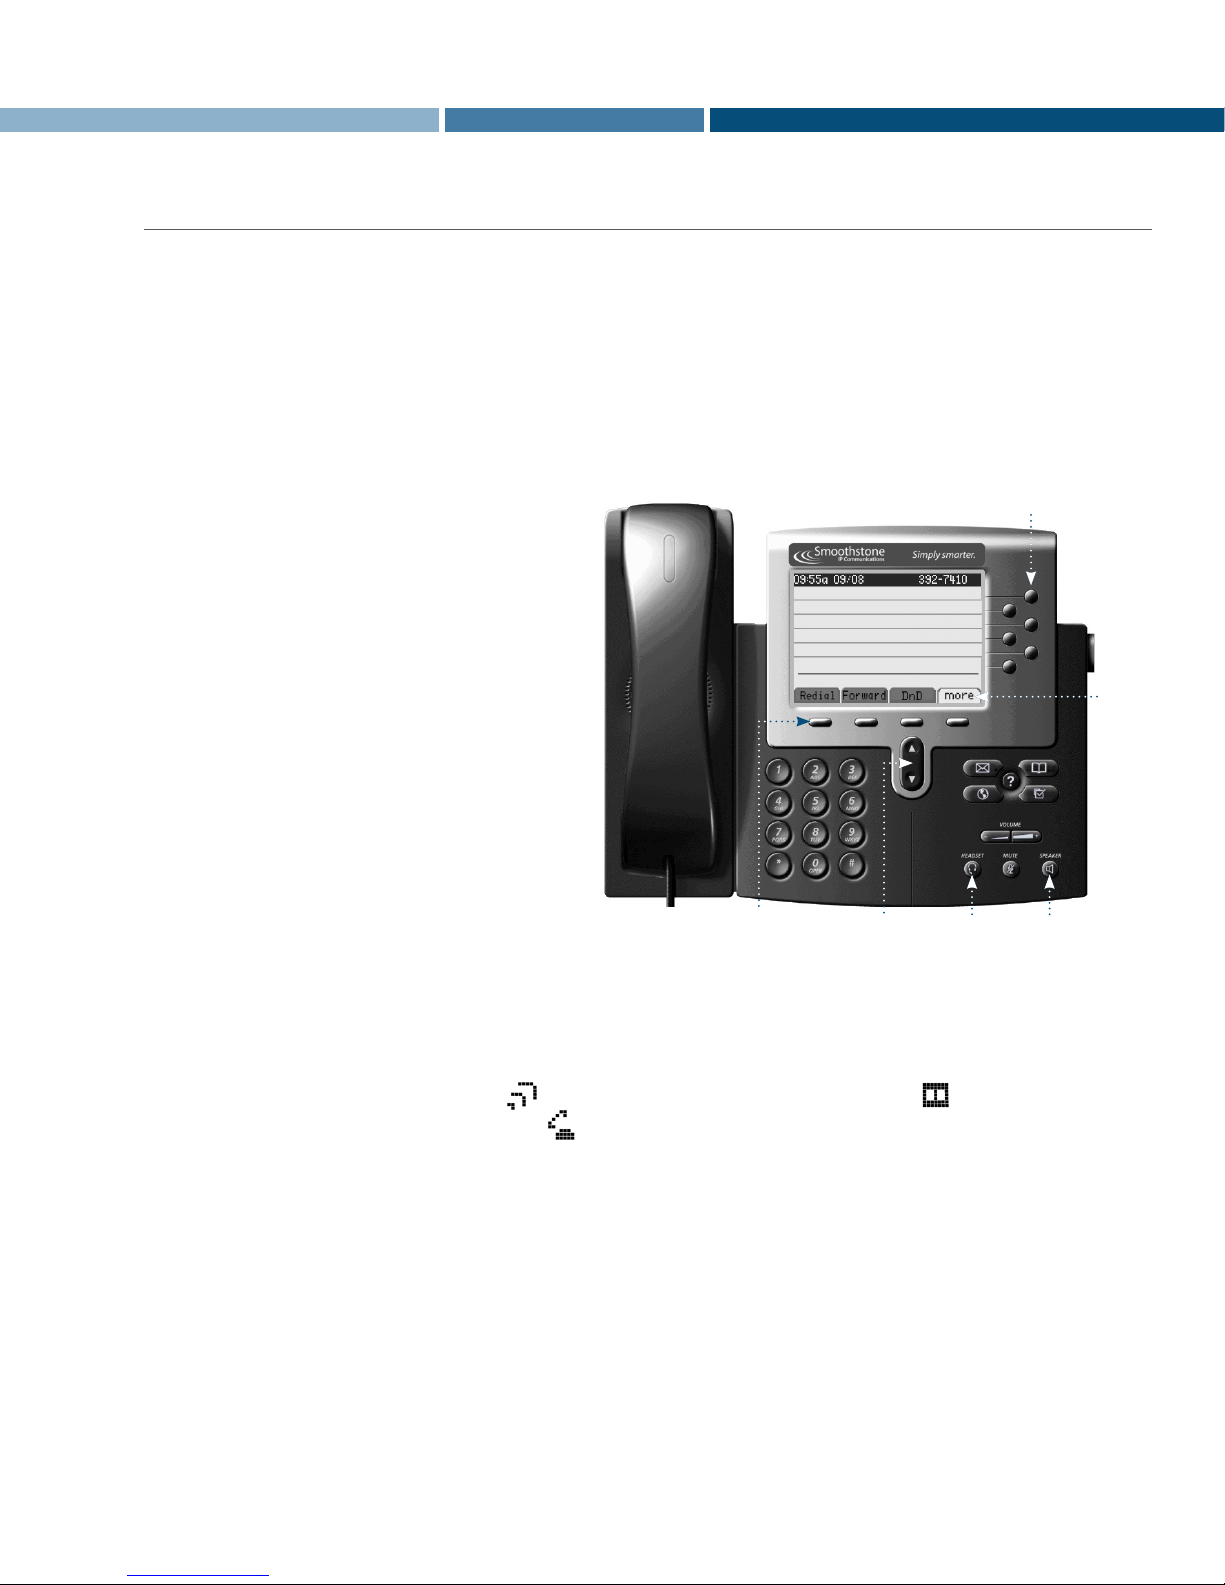
Handset with
Indicator Light
Functions like a traditional handset.The light strip at
the top of the handset ashes when the phone rings
and remains lit to indicate a new voice mail message
(depending on your message system).
LCD Screen Displays features such as the time, date, your phone
number, caller ID, line/call status, and soft key tabs.
Line Buttons Opens a new line, speed dials the number on the LCD
screen, or ends a call.The 7960 has six Line Buttons.
Foot Stand Adjustment Adjusts the angle of the phone base.
Directories Button Provides access to call histories and directories
(if available).
? Button Displays help on your LCD screen for a phone key
or function (if available)
Setting Button
Provides access to phone settings such as contrast
and ring sound, network conguration, and status
information.
Volume Button
Increases or decreases volume for the handset, headset,
or speakerphone. Also controls the ringer volume (if
on-hook), and the LCD contrast.
Speaker Button Toggles the speaker on or o.
Mute Button Toggles the mute on or o.
Headset Button Toggles the headset on or o.
Messages Button Provides access to the voice mail message system.
Scroll Button Enables you to scroll through text and select features
displayed on the LCD screen.
Dial Pad Functions like the dial pad on a traditional
telephone.
Soft Keys
Enables you access to functions displayed on the
corresponding LCD tabs. Soft key functions change
depending on the status of the phone (for example, if
the phone is active or idle).
B
C
D
E
F
G
H
I
J
K
L
M
N
O
P
Phone User Instructions

For further online training go to: http://www.smoothstone.com/articulate/IP_Phone_Training/player.html
Phone User Instructions
Phone User Instructions
Basic Calling (DID)
Initiating a new call
1. Pick up handset or press speaker button
2. Dial number (9 is required for all outside calls)
Receiving a call
1. Pick up handset or press speaker button
Receiving a second call
1. Press Answer (Places current call on hold)
Switching between 2 calls
1. Use the Up and Down arrow to move
between calls
2. Press Resume (Places current call on hold)
Initiating a second call
1. Press NewCall (Places current call on hold)
2. Dial number (9 is required for all outside calls)
Notes:
1. Internal calls play a single repeated ring tone.
2. External calls play a double repeated ring tone.
3. Hunt Group calls play a triple repeated system ring
tone (chirp 1).
Transferring
Transferring to another number
1. Press More
2. Press Trnsfer
3. Dial number (9 is required for all outside calls)
4. Inform caller that you are transferring a call
(optional)
5. Press EndCall
Transferring a call to Voicemail
1. Press More
2. Press Trnsfer
3. Press 377 (pause)
4. Press their four digit extension
5. Press EndCall
Canceling a transfer
1. Press the up arrow
2. Press Resume
VoiceMail
Retrieving from your phone
1. Press Messages button
2. Enter password
Retrieving from another phone in the oce
1. Dial 355
2. Type in your extension
3. Enter password
4. Press #
Retrieving by calling your extension
1. Dial your direct number (DID)
2. Press * when your voicemail greeting starts
3. Enter password
4. Press #
Conference Calling
Adding a 3rd party to an existing call
1. Press More
2. Press Confrn
3. Dial number (9 is required for all outside calls)
4. Allow other party to answer
5. Press More
6. Press Confrn
Notes:
1. You may have up to 5 parties (yourself and 4 others) on this
type of conference.
2. The system does not allow you to merge two existing
calls on your phone into a conference. One call must be
dropped and added via the instructions above.
Forwarding
Forwarding all calls to another number
1. Press Forward
2. Dial number (9 is required for all outside calls)
3. Press Forward (Fwd IS displayed in the
status area)
Canceling call forwarding
1. Press Forward
2. Press Forward (Fwd is NOT displayed in the
status area)
Parking
Parking a call
1. Press More
2. Press More
3. Press MCPark
4. Record park number (####)
5. Press EndCall
Receiving a parked call
1. Dial the park number (####)
Note:
Calls not retrieved within 60 seconds ring back to the
parking phone.
Do Not Disturb (DND)
Setting Do Not Disturb
1. Press DND to activate (DND IS displayed in
the status area)
2. Press DND to deactivate (DND is NOT dis
played in the status area)
Note:
1. Incoming call will be answered by the phones DND
greeting when active.
Call Pickup
Answering a call on another phone
1. Press More
2. Press DC Pick
3. Enter the extension of the phone to
be answered
Intercom
Calling another station
1. Press More
2. Press Intcom
3. Enter extension
Note:
If person is on the phone it will ring busy.
CLIENT ENGINEERING SUPPORT:
3150 or (888) 728.0950

7960 PHONE USER MANUAL
THE PHYSICAL FEATURES OF YOUR NEW PHONE ARE LISTED AND DEFINED BELOW:
1. Handset with indicator light Functions like a traditional handset.The light strip near the ear piece ashes when the phone rings
and remains lit to indicate newVoicemail messages (depending on your message system).
2. LCD screen Displays information like time, date, your phone number, caller ID, line/call status, and soft key tabs.
3. Line/ Speed Dial buttons Opens a new line, speed dials the number listed on the LCD screen, or ends a call.The Cisco 7960
multi-line phone has six line buttons.
4. Foot stand adjustment button Allows you to set the angle of the phone base.
5. Directories button Provides access to call histories and directories (if available).
6. ? button Activates the Help information on your LCD screen for a phone button or function (if available).
7. Settings button Activates phone settings, such as contrast and ring volume and status and network conguration.
8. Speaker button Toggles the speaker on/ o.
9. Mute button Toggles mute on/ o.
10. Headset button Toggles headset on/ o.
11. Volume button Increases/ decreases the volume on the handset, headset, or speakerphone (whichever is active);
ringer volume; and control for the LCD contrast.
12. Services button Provides access to phone services.
13. Messages button Provides access to the Voicemail system.
14. Navigation button Allows scrolling through text and select features displayed on the LCD screen.
15. Dial pad Functions exactly like the dial pad on a traditional phone.
16. Soft keys Enables the advanced features of the phone, listed according to the corresponding LCD tabs. Soft
key functions change depending on the phone status (for example, if the phone is active or idle)
1
23
4
5
6
8
7
9
10
11
12
14
13
16 15
7960 PHONE USER MANUAL
BASIC CALLING FEATURES
Placing a Call
1. Lift the handset and dial the number,
2. Press the Speaker button and dial the number, or
3. Press the Headset button and dial the number, if using a headset.
• For local calls, dial “9”, then the number.
• Forlong distance calls, dial “9”, “1”, then the number, including area code.
• Forinternal oce calls, dial the 4-digit extension.
Answering a Call
1. Lift the handset,
2. Press the Answer soft key,
3. Press the Speaker button, or
4. Press the Headset button, if using a headset.
Ending a Call
1. Hang up the handset,
2. Press the EndCall soft key, or
3. Press the Speaker button, if using the speaker.
Placing a Call on Hold
1. During a call, press Hold.
2. To return to the call, press Resume.
Do Not Disturb
1. Press DnD. All calls will now forward directly to Voicemail.
2. To cancel DnD status, press DnD again.
Using Call Waiting
1. To answer another call while on a line, press Answer.
2. The new call will have the Active Call symbol, the old call will display the Call on Hold symbol.
3. The shaded line aects only the line in use .
4. The scroll button allows movement between calls.
NOTE: When switching between calls, pressing the Resume soft key will automatically place the active call on hold.
Line Buttons
Speaker
Button
Headset
Button
Scroll
Button
Soft
Buttons
Handset
Soft
Keys

Parking a Call
1. During a call, press the more soft key twice, then press MCPark.
2. The parked number will be displayed on the status line.
3. Press End Call.
4. To retrieve, dial the park number and resume your conversation.
NOTE: If the parked call is not answered within the given time limit, the call will ring once and go directly to the original recipient’s
Voicemail.
Redial Soft Key Soft Features
Your Parked Call # will be found
at the bottom of the screen
Park number is 6020
INFORMATION FEATURES
Using Call History
1. Press the Directories button.
2. Use the Scroll button to highlight the desired call history option.
3. Press Select to display the desired call history.
Changing the LCD Contrast
1. Press the Settings button.
2. Use the Scroll button to highlight Contrast in the Settings menu.
3. Press Select to choose the Contrast option.
4. Press Up or Down to set LCD contrast.
5. Press OK to accept the changes.
NOTE: Changes will be saved automatically until changed again.
Directories Button
Settings Button

7960 PHONE USER MANUAL
AUDIO FEATURES
Changing the Ringer Type
1. Press the Settings button.
2. Use the Scroll button to select Ring Type in the Settings menu.
3. Press Select to display a list of Ring Types.
4. Use the Scroll button to select one of the available Ring Types.
5. Press Play to hear a Ring Type.
6. Press Select and then OK to choose the Ring Type.
Adjusting the Ringer Volume
1. While the phone is inactive, press the Volume button to hear a sample ring.
2. While ringing, press the Volume buttons to adjust the sound.
Adjusting the Handset, Speakerphone, and Headset Volume
1. During a call, press the Volume buttons to increase or decrease the internal volume of your Handset, Speakerphone, or Headset.
2. After reaching the desired volume, press Save.
Muting a Call
1. Press the Mute button.
2. To disengage mute, press the Mute button again.
NOTE: If muting a call while on speakerphone, lifting the handset will disengage mute status.

7960 PHONE USER MANUAL
VOICEMAIL SYSTEM
Initial Voicemail Setup
1. Press the Messages button.
2. Enter the password supplied by your Administrator.
3. Take a moment to record your No Answer, Busy, and DnD greetings. Currently, they are set to the default greetings.
4. When you receive a Voicemail message, an envelope icon will appear next to your line and your handset will light up red.
Accessing Messages at Work
1. Press the Messages button.
2. Enter the password, then press“#”(the pound key).
Accessing Messages Outside the Oce
1. Dial your DID.
2. Press * (the star key) after your recording begins to play and you will receive a prompt for your password.
3. Enter your password, then press # (the pound key).
1
2
3
4
5
6
7
8
Inbox
Reply
Dial the
Originator
Delete
Save
Forward
Replay
Continue to
Main Menu
4
1
2
3
4
*
Playback
Personal
Greeting
No
Answer
Dial the
Originator
Busy
Name
Return to
Main Menu
7Compose
Message
3Change
Password
2
2
3
4
6
7
8
Saved
Reply
Dial the
Originator
Delete
Forward
Replay
Continue to
Main Menu
5
1
2
3
4
5
*
DnD
Busy
Name
System
Default
Record
Personal
Greeting
Return to
Main Menu
6
1
2
3
4
*
List
Edit
Create
Delete
Return to
Main Menu
Access
Personal
Distribution
Group 8
1
2
3
*
Change
Restore
Default
Return to
Main Menu
(*) will bypass all messages and go to the main menu
(#) will fast forward to the message
355 will check VM when you pick up the handset and dial the number
377 will leave a VM when you pick up the handset and dial the number
No
Answer
Hear or
Change
Custom
Operator #
Table of contents


