SNAPCYCLE Eagle User manual

ELECTRIC BICYCLE
Snapcycle Eagle
User’s Manual


ENGLISH MANUAL
Snapcycle Inc.
5318 E. 2nd St
Long Beach, CA 90803
www.snapcycle.com


1
Contents
1. Preface ........................................................................................................................................... 2
1.1 Welcome ................................................................................................................................ 2
1.2 About this manual .................................................................................................................. 2
1.3 Symbols used in the manual ................................................................................................... 2
1.4 Service & technical support .................................................................................................... 2
2. Safety .............................................................................................................................................. 3
2.1 Safe Use of the E-bike ................................................................................................................... 3
2.2 Battery and Charger Safety .......................................................................................................... 4
2.3 Changing Components or Adding Accessories ............................................................................. 4
3. Unboxing & Assembly ........................................................................................................................ 5
3.1 Overview ...................................................................................................................................... 5
3.2 Cockpit .......................................................................................................................................... 6
4. Operations .......................................................................................................................................... 6
4.1 Product Specifications .................................................................................................................. 6
4.2 Mechanical Checklist .................................................................................................................... 7
4.3 First Ride ....................................................................................................................................... 8
4.4 Bike Display and Controls ............................................................................................................. 9
4.5 Battery and Charging .................................................................................................................. 15
5. Transportation & Storage ................................................................................................................. 16
5.1 Transportation ............................................................................................................................ 16
5.2 Storage ....................................................................................................................................... 16
6. Error Code and Troubleshooting ...................................................................................................... 17
6.1 Error Code 21H ........................................................................................................................... 17
6.2 Error Code 22H ........................................................................................................................... 17
6.3 Error Code 24H ........................................................................................................................... 18
6.4 Error Code 30H ........................................................................................................................... 19
7. Maintenance .................................................................................................................................... 20
7.1 Inspection and Safety Check ....................................................................................................... 20
7.2 Cleaning ...................................................................................................................................... 20
7.3 Lubrication .................................................................................................................................. 20
8. Product Warranty ............................................................................................................................. 22
9. Safety Disclaimer .............................................................................................................................. 25

2
1. Preface
1.1 Welcome
Congratulations on your purchase of a Snapcycle® E-Bike and welcome to the Snapcycle
community.
Snapcycle is committed to providing electric bicycles with state-of-the-art design, and world-
class quality. Our corporate goal is to offer everyone a happy and enjoyable ride, which will
form some of your memorable moments in your life. Either riding along the beach with loved
ones, or riding in a national park with grand-children will all become a source of happiness
when you recall such moments down the road in life. It is this commitment to our customers
that inspires us to constantly improve the quality of our products and services, and to
continuously innovate in order to serve our customers better.
1.2 About this manual
This manual contains important safety, performance, service and maintenance information.
Please read all information in this manual before you start riding your new e-bike. Please pay
full attention to the safety instructions in this manual and do not overlook them. This manual
would give you a thorough understanding of the general functionalities and features of the e-
bike and how it should be operated and maintained.
1.3 Symbols used in the manual
WARNING: Warns about a situation that can cause death, serious physical injury
and/or material damage if one does not follow the safety instructions.
1.4 Service & technical support
If you have questions after reading this manual, please contact the Snapcycle Help Center.
We are always here to support you.
Snapcycle Help Center: support.snapcycle.com
Email: [email protected]
Happy Riding SNAPCYCLE® .
3
2. Safety
2.1 Safe Use of the E-bike
1) You need to check the traffic rules and regulations in your area, including but not limited to
regulations about bicycle lighting, licensing of e-bikes, riding on sidewalks, laws regulating bike
path and trail use, helmet laws, child carrier laws, special e-bike traffic laws. It is your
responsibility to know and obey the laws.
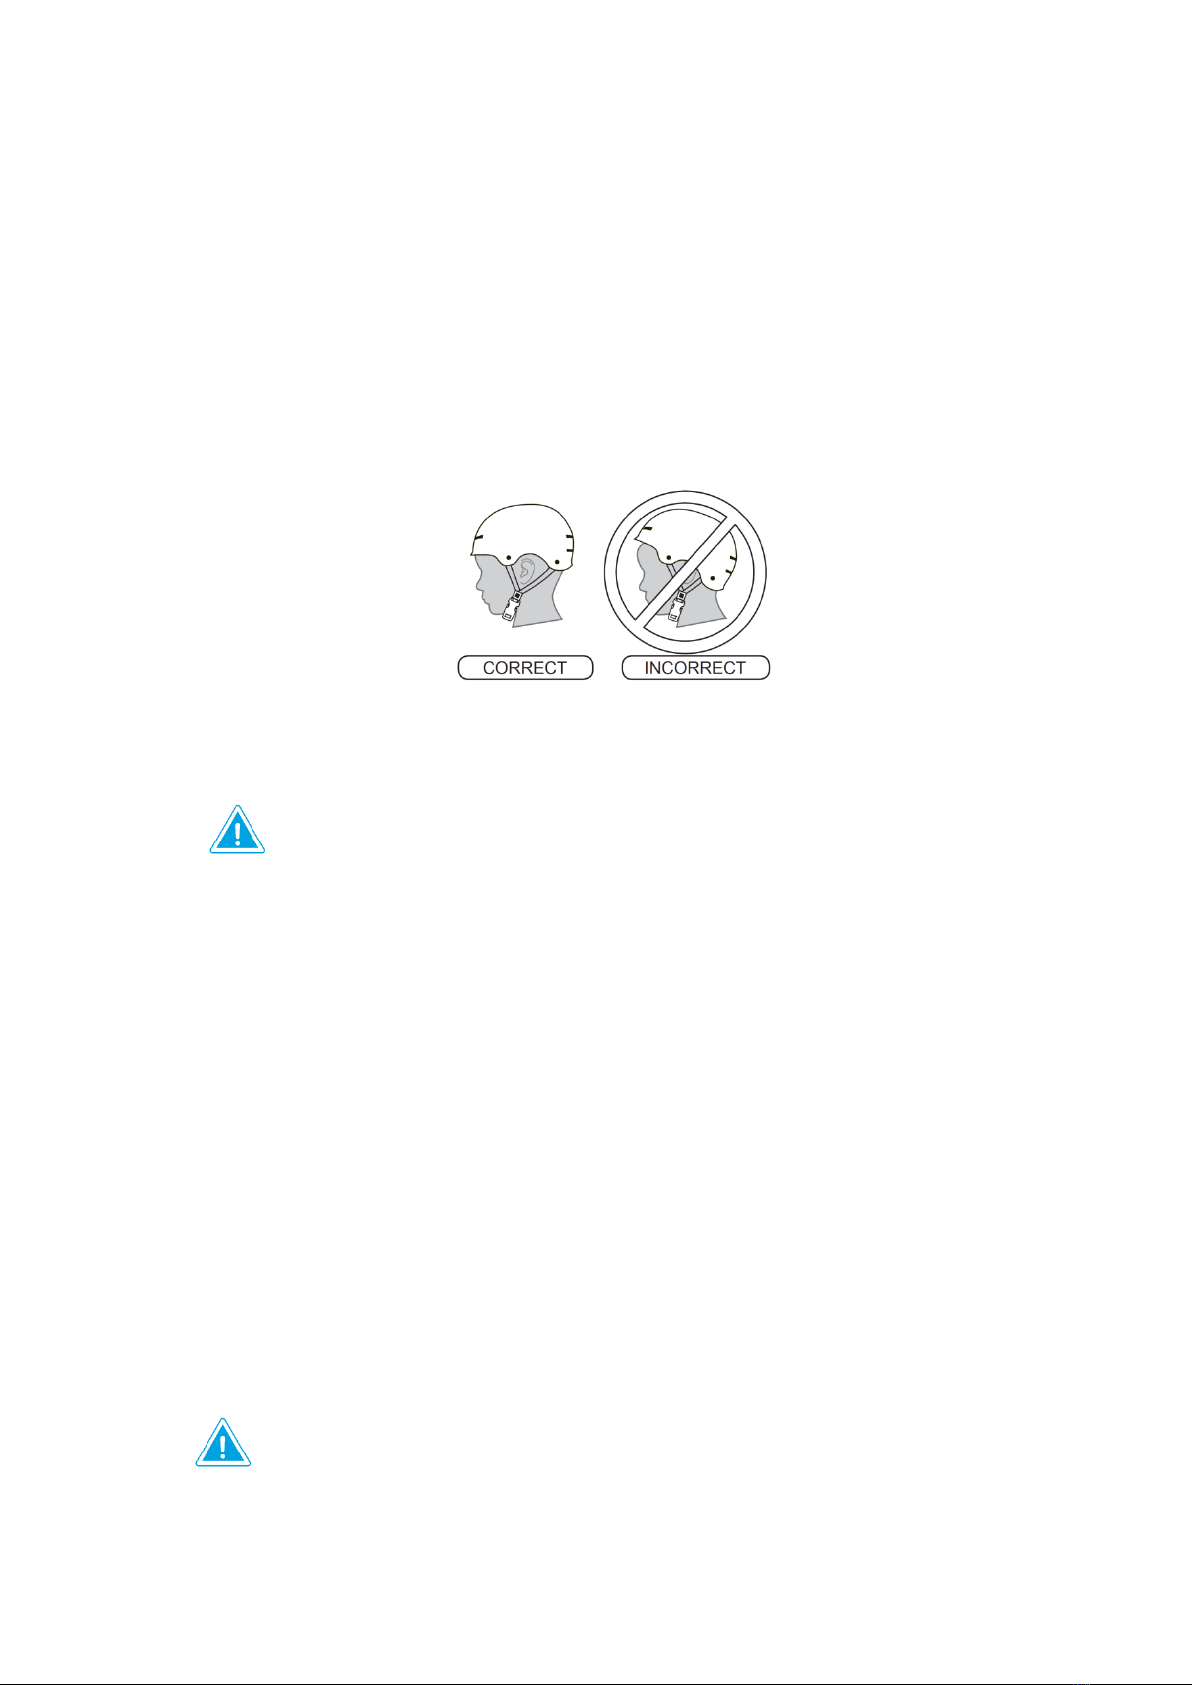
2) Always wear a helmet when riding your e-bike. Ensure that the helmet fits your head and is
securely tightened down. If you attach a seat for children to the e-bike, they must also be
wearing a properly fitted helmet at all times.
Always read the user manual of the helmet to make sure it is fitted and attached properly to the
wearer’s head according to the fitting instructions described in the user manual.
Warning: Failure to wear a helmet when riding may result in serious injury or death.
3) Before using the e-bike on the road, ride the e-bike in a secure area to get familiarised with
riding the e-bike with electric pedalling assistance and its functionalities.
• Conduct mechanical and electrical checks following the pre-riding checklist in Section 4 of
this manual to ensure the e-bike is safe to use.
• This bicycle is made to be ridden by one rider at a time for general transportation and
recreational use. It is not made to withstand the abuse of stunting and jumping.
• Wet weather impairs traction, braking and visibility. The risk of an accident is dramatically
increased in wet conditions. Ride slowly with caution, especially when turning.
• Riding a bicycle at night is much more dangerous than riding during the day. It is
recommended to not ride at night if possible. If you indeed to ride at night, you need to
install a tail light on the e-bike and ensure it has sufficient battery power. Ride at slow
speed. Do turn on the head light, and tail light when riding at night. It is recommended for
the riders to use additional night lighting system such as flashing light on helmet, adding
additional reflectors on the e-bikes on all facets.
Warning: Keep both hands on the grips on the handlebar and the brake levers within
reach while riding. Failing to do so can cause you to lose control over the e-bike, and
may cause serious injury or death.

4
Warning: Never exceed the maximum permissible load of the e-bike. Failing to do so
may result in structural failure, and cause serious injury or death.
Warning: When pushing the e-bike on pedestrian pathways, the rider needs to turn
off the power to avoid any accidental activation of the electric motor, which may
result in injury to you or other pedestrians.
2.2 Battery and Charger Safety
• Keep the battery & charger away from water, open window, and open fire.
• Do not use the battery & charger for other purposes other than powering the e-bike.
• Only use the original charger to charge the Snapcycle e-bike battery.
• Do not connect terminals.
• Do not open the battery casing.
• Do not attempt to repair the battery unless you are a specially trained and licensed
technician.
• Keep the battery away from children and pets.
• Avoid shock and impact to the battery & charger (e.g. by dropping, smashing ).
• Stop the charging procedure immediately if you notice a strange smell or smoke.
• In the unlikely case that the battery is on fire, do NOT try to extinguish with water. Use
sand or Carbon dioxide extinguisher instead and call emergency hotline immediately.
Warning: Water may cause the short circuit to the battery, may result in fire and
other consequences. Avoid water when using or handling batteries
2.3 Changing Components or Adding Accessories
• Changing the components on your e-bike with non-genuine replacement parts may
compromise the safety of your e-bike and may void the warranty. Check with Snapcycle
customer service before changing the components on your bike
• Please take note that the use of a third-party trailer may cause extra load stress on your
e-bike, which may affect the safe use of your e-bike. Do not modify any original parts of
the e-bike to accommodate a third-party trailer. Do not exceed the total permissible load
weight of the e-bike as stated elsewhere in this user manual.
• Please note that the use of a child seat can cause extra load stress on your e-bike, which
may affect the safe use of your e-bike. Do not modify any original parts of the e-bike to
accommodate a third-party child seat. Do not exceed the total permissible load weight of
the e-bike as stated elsewhere in this user manual. If a child seat is used, there is a risk of
trapping the child’s fingers or feet into the wheel. Please take appropriate steps to prevent
the trapping of the child’s fingers or feet. Always follow the child seat manufacturer’s
instructions for installation, usage and safety.
5
3. Unboxing & Assembly
You need to follow the unboxing and assembly instruction video that was sent to you via email upon
your purchase of the bike. You can also find the video on our product page, under the ‘Manual and
Assembly Videos’ section
If you are unable to find the assembly video, please check your spam/junk folders. You may also
write in to us at [email protected] , or phone us at (415) 888-9135.
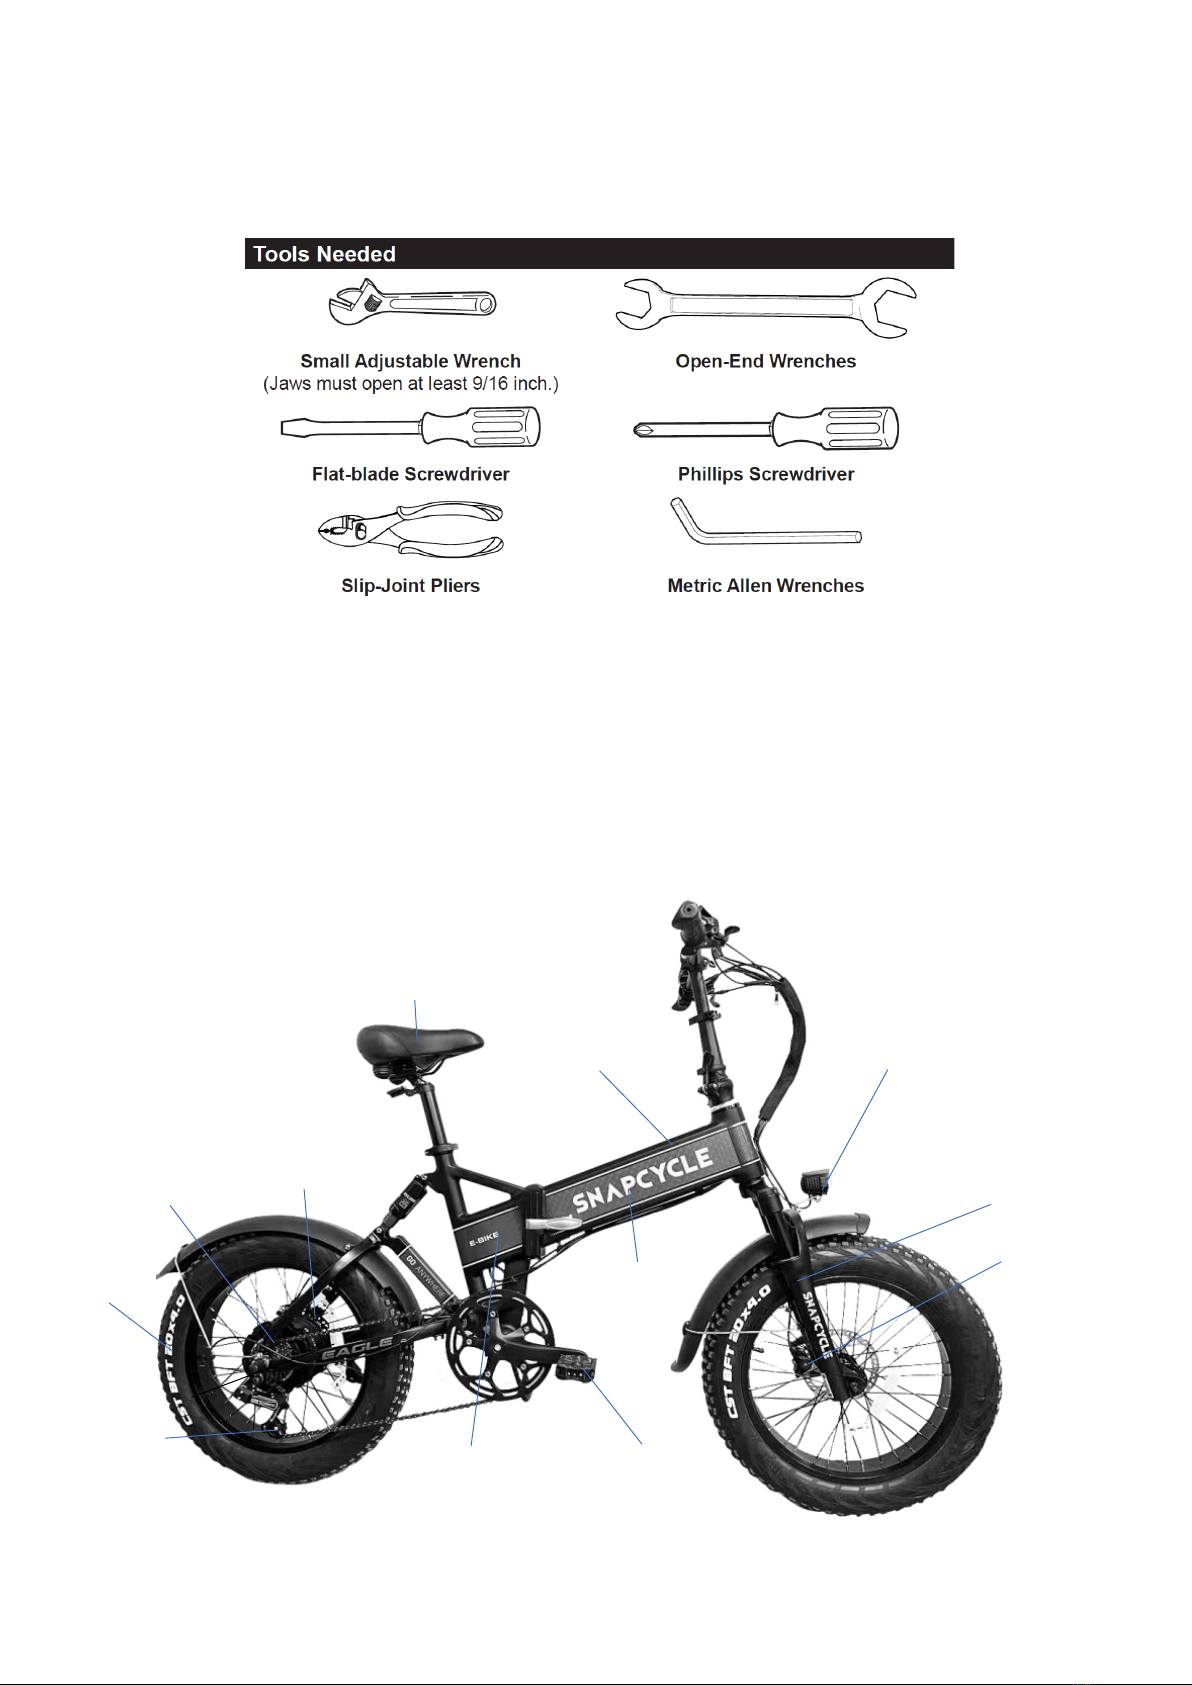
3.1 Overview
Rear Brake
Saddle
Frame
Head Light
Battery (inside
the frame)
Pedal
Front Brake
Front
Suspension
Fork
Controller (inside
the frame)
Derailleur
Motor
Tire

6
3.2 Cockpit
4. Operations
4.1 Product Specifications
Battery
48V 15AH Samsung Lithium
Battery
Charger
US Standard 3.0A smart
charger, UL Certified
Range
20 ~ 45 Miles
Controller
48V / 22A
Electric Bike
Class
Class 2 (by default)
(Configurable to Class 3)
Display
Adjustable-Angle, Backlit,
Grayscale, LCD
Hub Motor
750W brushless geared
motor
Frame
Aluminium 6061
Charging Time
4 ~ 5 Hours
Pedal Assist
Intelligent
0~5 level pedal assist
(Configurable to 9-level)
Total Payload
Capacity
330 lbs
Top Speed
20 mph by default
(Configurable to 28 mph)
Recommended
Rider’s Height
5’ 6” ~ 6’7’’
Net Weight
67.9 lbs
Brake Lever
(with brake sensor)
Handle
LCD Display
Power Button
Shimano
Shifter
Half-Twist
Throttle
Mode Button
Horn
Quick Release (for handle stem)

7
4.2 Mechanical Checklist
Before each ride and after every 30 miles of riding, we recommend the following safety checks
tabulated in the below tables.
Fasteners
Check that all fasteners and components are securely tightened
Brakes
Check and Test to ensure front and rear brakes work properly
Check and ensure the brake pads are not over-worn and are correctly
positioned.
Ensure brake cables are lubricated, properly adjusted, and has no obvious
sign of wear.
Ensure brake levers are lubricated and tightly secured to the handlebar.
Test that when applying brake, motor cuts off
Wheels and Tires
Ensure tires are inflated within the recommended limits posted on the tire
sidewalls and do not leak air.
Ensure tires have good tread, have no bulges or excessive wear, and are
free from any other visible damage.
Ensure rims rotate smoothly without any abnormal noise and have no
obvious wobbles, dents, or kinks.
Ensure all wheel spokes are tight and not broken.
Ensure axle nuts are tighten properly and front wheel quick release is
correctly tensioned, fully closed, and secured.
Seat
Ensure the seat mounting bolts are tightened to the recommend torque
value.
Ensure the seat quick release lever is properly tightened and secured and
check that the seat cannot move.
Steering
Perform a handlebar twist test to ensure the handlebar stem is secure.
Ensure the handlebar is set correctly in relation to the fork and the
direction of travel.
Chain
Ensure the chain is adequately lubricated, clean, and has no visible
damage.
Bearings
Ensure all bearings are lubricated, run freely, and display no excess
movement, grinding, or rattling.
heck headset, wheel bearings, pedal bearings, and bottom bracket
bearings.
Cranks and Pedals
Ensure pedals are securely tightened to the cranks.
Ensure the cranks are securely tightened and are not bent
Derailleurs
Check that the derailleur(s) are adjusted and working properly.
Ensure shift cables and brake levers are properly lubricated and securely
attached to the handlebar.
Motor Drive
Assembly and
Throttle
Ensure hub motor is spinning smoothly and motor bearings are in good
working order.
Ensure all power cables running to hub motor are secured and
undamaged.
Make sure the hub motor axle bolts are secured and all torque arms and
torque washers are in place.
Battery Pack
Ensure battery is charged before use.
Ensure there is no damage to battery.
Lock battery to frame and ensure that it is secured.
Charge and store bike and battery in a dry location, between 50 °F – 77 °F.

8
4.3 First Ride
For your first ride,
1. You need to fully charge your battery before use. Charge it until the LED on your charger
turns green.
2. Ensure the battery key is in LOCKED position
3. Press and hold the power button on the display control pad located on the left handlebar
until the display turns on
4. Select your preferred level of pedal-assist using the +(UP) and –(DOWN) button on the
display control pad, with Level 1 being the lowest , and Level 5 being the highest. Level 0
provides no assistance to the rider.
5. You will find a half-twist throttle on the right handlebar next to the right handlebar grip.
Twist the throttle backwards slowly depending on the speed and acceleration you wish to
have. The further you twist the throttle from its original position, the more power you will
have from the motor propelling the ebike forward. Your throttle control will be disabled if
your PAS level is at 0. You need to increase the PAS level to 1 or above in order to activate
your throttle control.
6. To turn on the headlight and taillight, press and hold the UP button to turn them on. To turn
them off, press and hold the UP button again.
When you close any of the brake levers, the rear brake light will be lit.
7. When the ebike comes to a complete stop, turn off the power by long pressing the power
button on the display control pad until the LCD display turns off. This is to ensure that the
motor will not be accidentally activated.
CAUTION: when you are not riding the bike, but with the power on, be careful not to
accidentally twist the throttle, which may throw you off balance and cause serious harm,
injury or death.
9
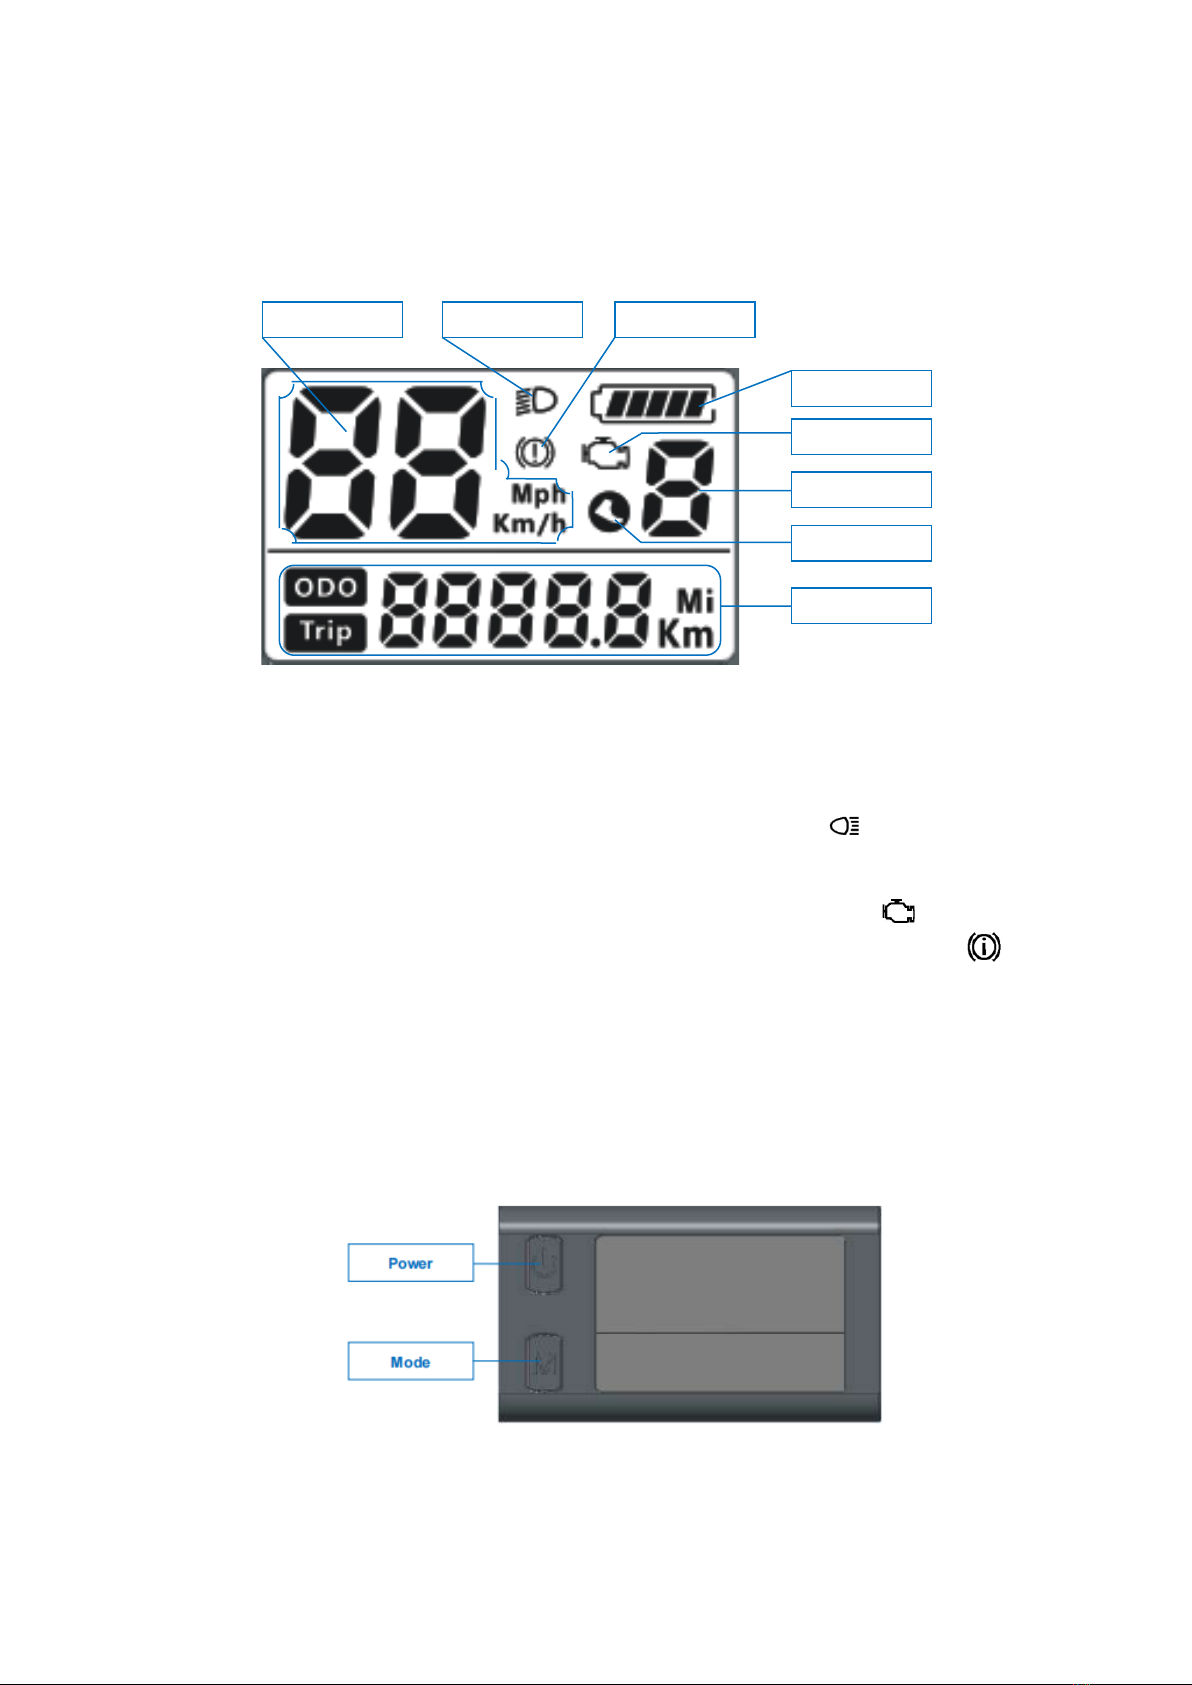
4.4 Bike Display and Controls
4.4.1 Functional Description of the Display for Eagle
• Speed Display: It shows the speed value in KM/H or MPH
• Battery Indicator: It shows the power level of the battery. The corresponding
voltage for each level can be adjusted by the user.
• Lamp Indicator: When the headlight is on, this symbol will show up.
• PAS Level: It shows the current pedal-assist level (0 ~ 5), with 0 being no pedal-
assist, 5 being the highest pedal-assist
• Error Indicator: When the system detects a fault, this symbol will show up.
• Brake Indicator: When the rider applies any of the brakes, this symbol will
show up.
• Mileage: It shows the mileage value (Trip, Odo, or Running Time)
4.4.2 Display Control Pad
WALKING icon
Mileage indicator
Brake
PAS Level
Battery indicator
ERROR
Speed
Lamp
10
Power On/Off
Press and hold Power button for 1 second can turn on/off the display. The Display can
automatically shut down when there is no operate & ride for X minutes(X could be 0~10).
Pedal-Assist Levels
Short press Power or Mode button can change the assist level. Top assist level is 5, 0 for neutral.
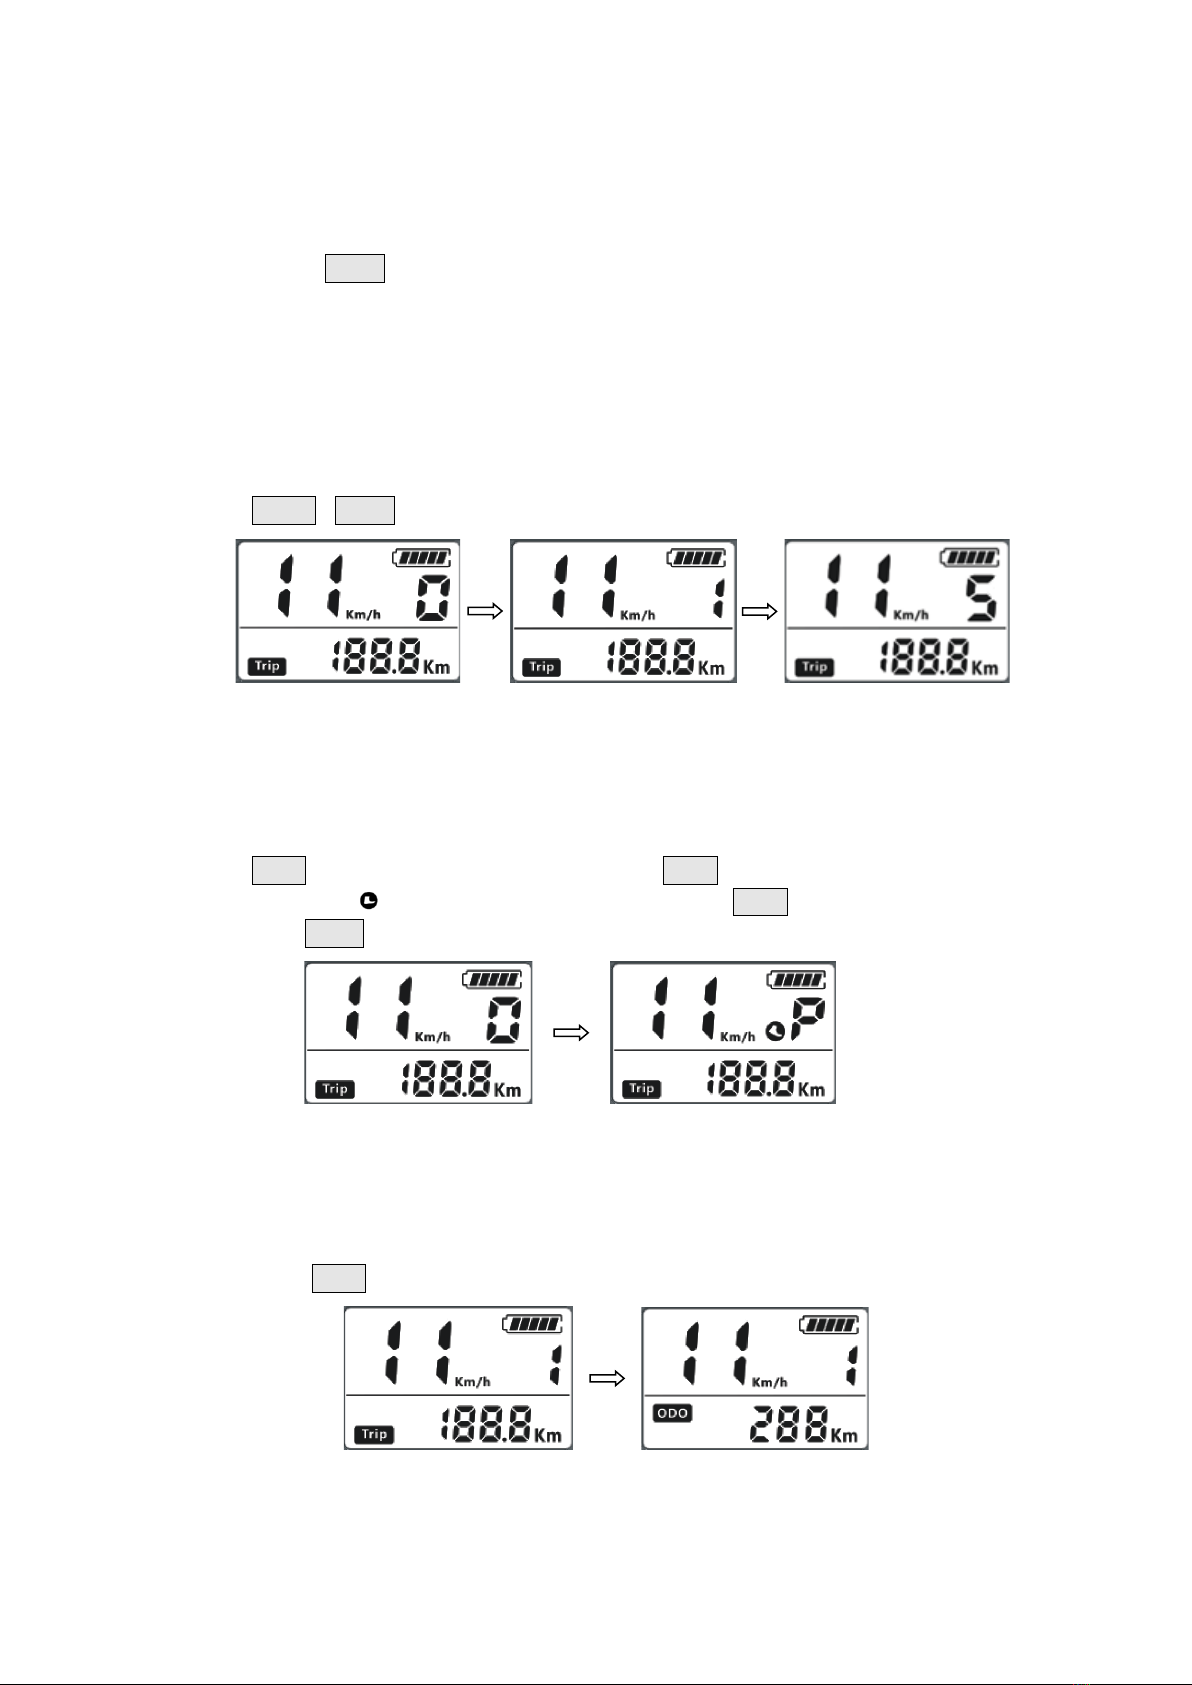
Walk Mode
Short press Mode button In this interface, press and hold Mode button for 2 second can get into
walking mode, the icon flashes; out of the mode when release Mode button. Out of this interface
when short press Power button.
Mileage mode
Double press Mode button (press interval less than 0.3 second) can change Trip/ODO.
11
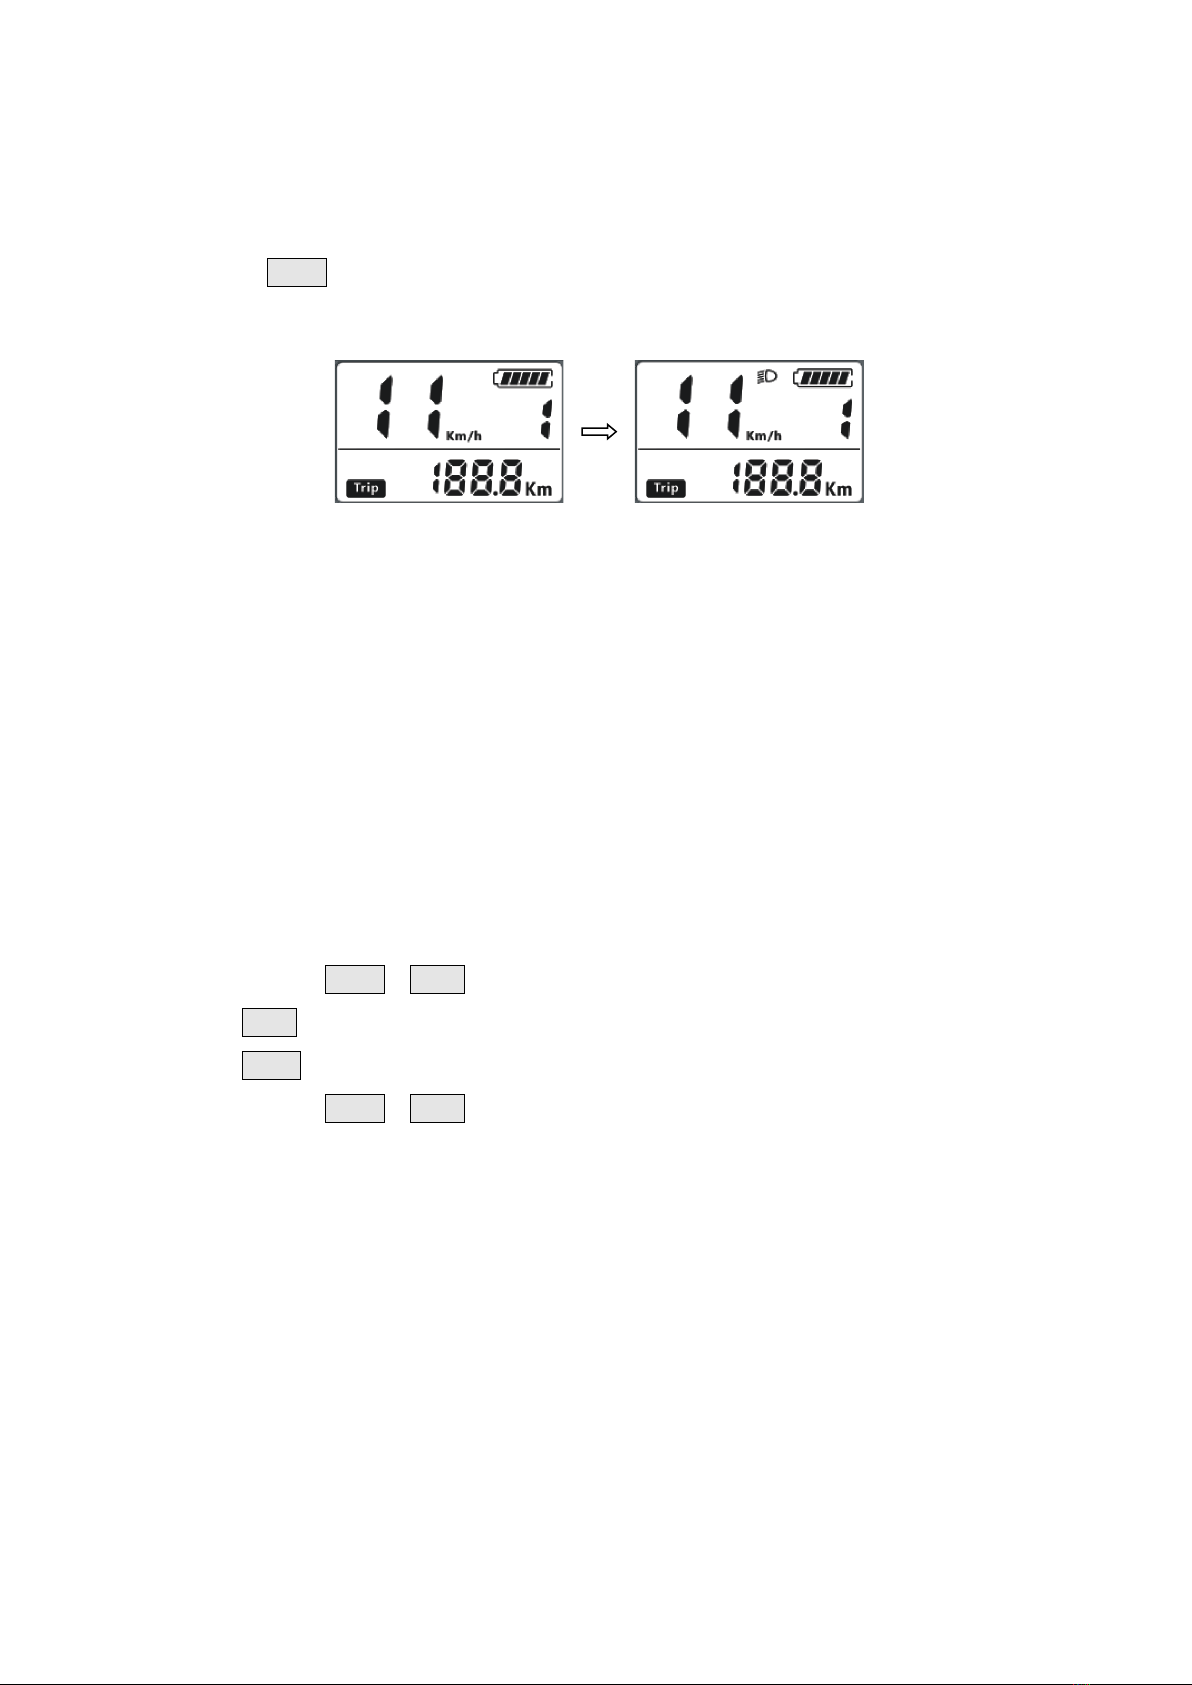
Headlight/backlight On/Off
Double press Power button (press interval less than 0.3 second) can turn on/off the headlight.
*The motor does not work when the battery voltage is low, Display still can keep the headlight on for a while when E-bike
is in riding.
4.4.3 Parameter Setting on the Display
You can refer to the guide in this section to adjust the parameter settings on the LCD display to
better suit your personal need or preference.
CAUTION: Please check your local rules and regulations before you make any adjustment to the
parameter settings of your ebike (e.g. speed limit). Make sure you operate the ebike in accordance
with local rules and regulations in your area.
Getting started:
Press and hold Power & Mode buttons together for 1 second can get into setting menus.
Press Mode button to change the parameter setting.
Press Power button can switch to next item.
Press and hold Power & Mode buttons together for 1 second will exit from menu.
Note: Display will automatically quit menu when there is no operation for 10 seconds.
* For safety reasons, display can’t get into MENU when riding.
* Display will quit MENU when start riding

12
The parameters will be displayed in the following order:
We will proceed to take you through each parameter in the pages that follow.
Clear (Cr): Press Mode button to change y can reset trip data.
_______________________________________________________________________________
System Unit (S7): Press Mode button to switch between Metric / Imperial.
_______________________________________________________________________________
Brightness (b1): Press Mode button to change the brightness of the backlight, 1 is darkness
5 is brightness.
_______________________________________________________________________________
AS
HL
bU
SP
S7
b1
OF
Pd
Ar
Hd
SA
Cr
HP
H6
Sd
CL
PS
13
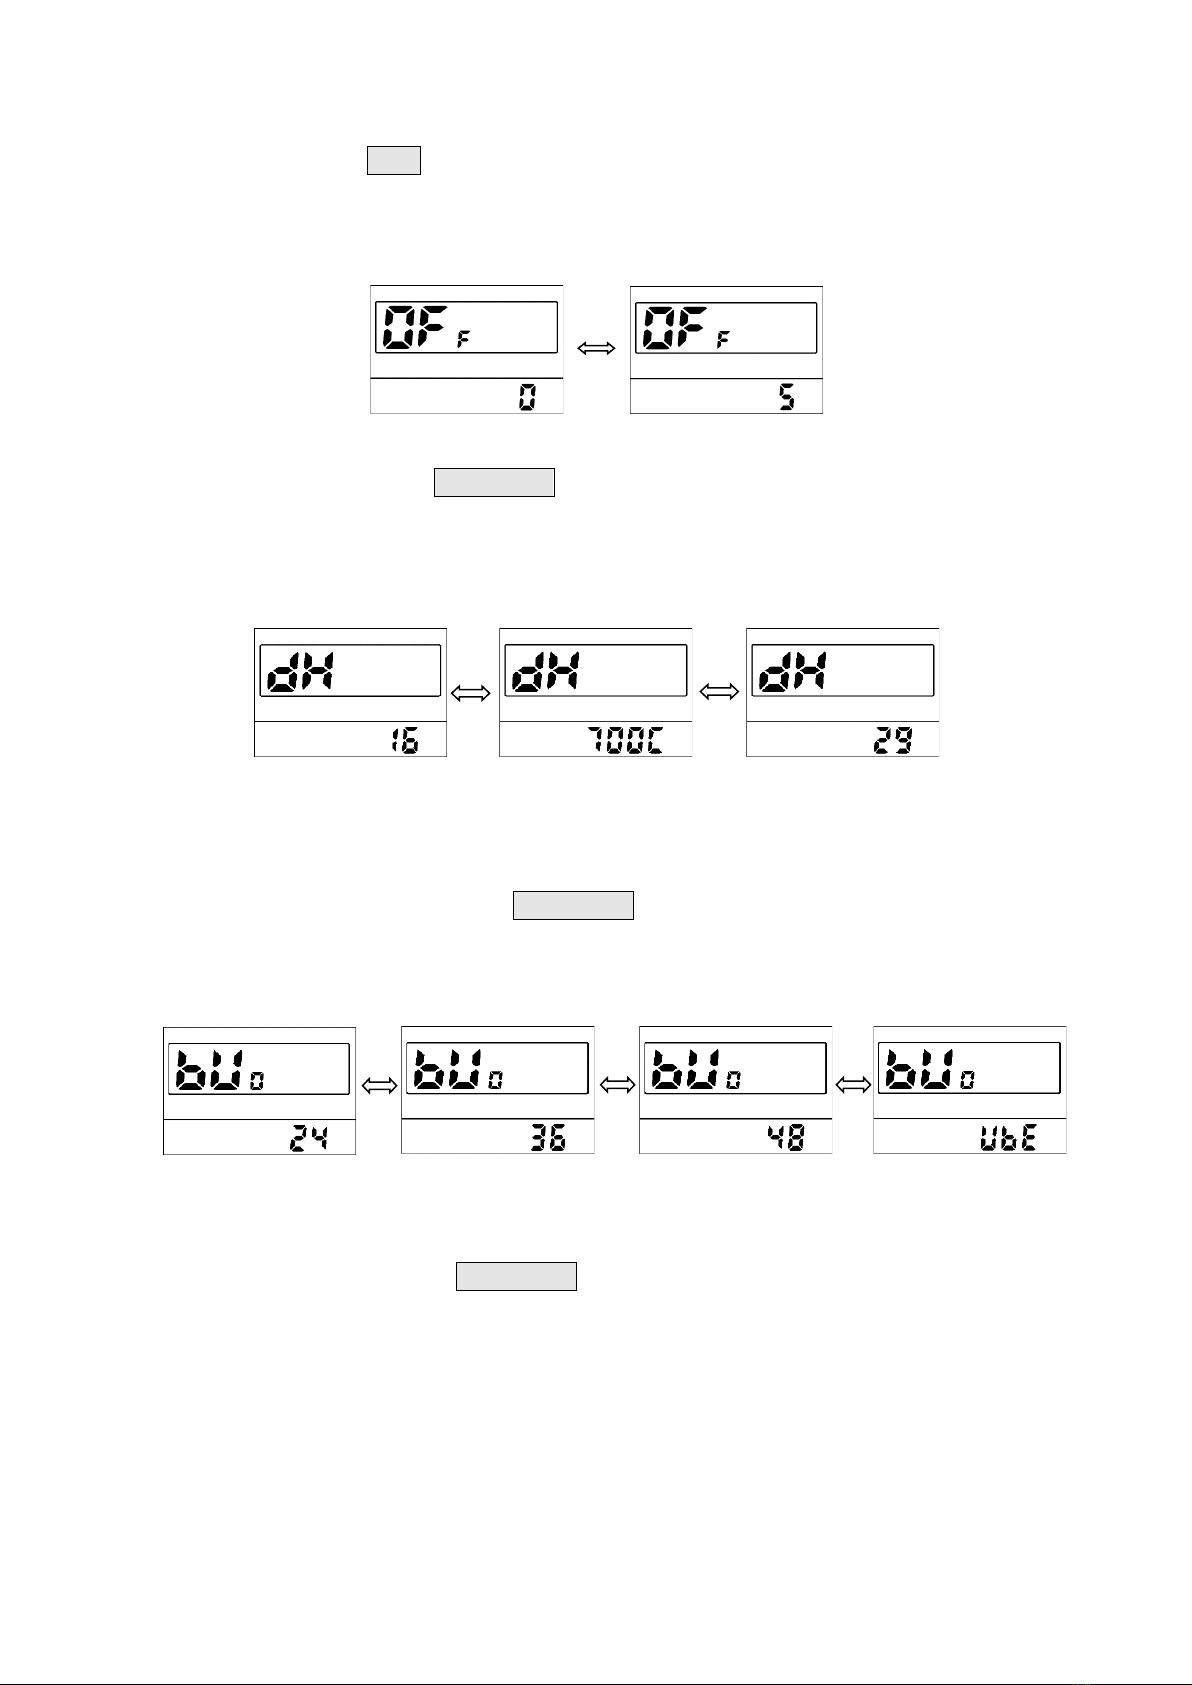
Auto Off (OF): Press Mode button to change the auto power off time, from 0~10, the number
represents time (minutes) to shutdown, 0 means disable auto off function, default value is 10
minutes.
_______________________________________________________________________________
Wheel Size (dH): Press the Power/Mode buttons to change the wheel size setting. Options
available in the system for Wheel Diameter are 16/18/20/22/24/26/27/28/700C/29 inches
(Factory Default: 29). We do not recommend modifying this setting if you are using the
original Snapcycle wheels.
_______________________________________________________________________________
Battery Voltage (bUO): Press the Power/Mode buttons to change the battery voltage
setting. Options available for the battery voltage are 24V/36V/48V/UBE, where UBE means
‘user defined value’ (Factory Default: 48).
_______________________________________________________________________________
Speed Limit (SPL): Press the Power/Mode buttons to the change the speed limit for the
pedal-assist mode (Factory Default: 20). The adjustable range is from 12 MPH to 28 MPH. If
you wish to configure your e-bike to Class 3 standard, you may change this speed limit
setting to 28 MPH.

14
CAUTION: If you change the Speed Limit (SPL), you may render your ebike non-compliant
with local regulations. Please check your local rules and regulations first before you adjust
the speed limit. Make sure you operate your ebike in accordance with local rules and
regulations in your area.
15
4.5 Battery and Charging
4.5.1 Charging
To charge the battery,
• You need to charge it at room temperature , preferably around 68 °F. Charging below 32 °F or
above 104 °F may significantly shorten the lifespan of the battery
• Do not charge it immediately after use. It is recommended to leave it there for half an hour
after riding the bike, before charging the battery.
• Plug in the charging cord into the charging port located at the right hand side of the main
frame (Refer to Section 3.1 to locate the charging port )
• Connect the charger to the main power outlets, and switch on the power.
• When the LED on the charger is red, it shows charging is in progress. When the charger LED
turns green, it shows the battery is fully charged.
• You can also remove the battery from the bike, and charge it separately , following the
instructions shown in the Section 4.5.2 below.
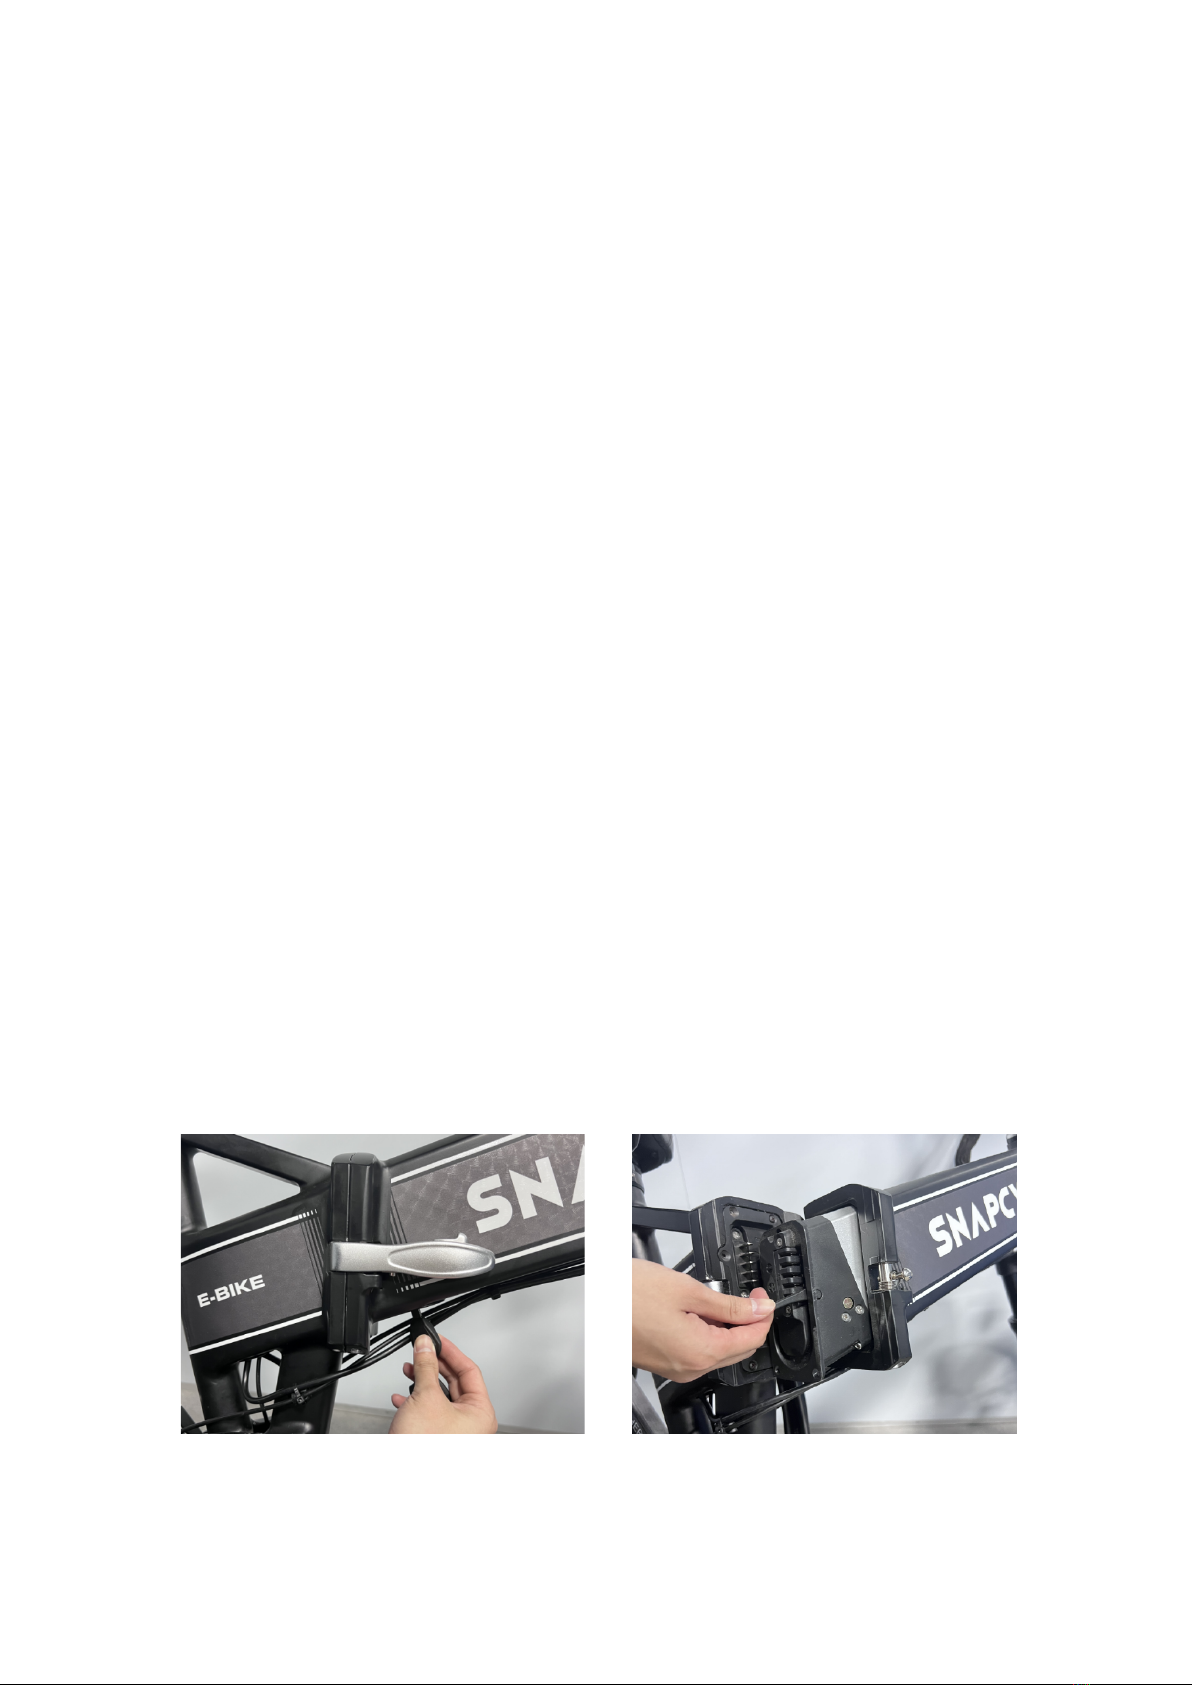
4.5.2 Removing the battery
To take the battery off from the bike, you can follow the steps shown in the schematic below.
Step 1: Turn off motor by turning key from “ignition” position to “loose” position. To do
this, push the key in to turn it all the way to the unlocked “loose” position.
Step 2: Remove the key from the battery/frame
Step 3: Open the frame. Slide the battery out of the frame (using the small finger hook)
Step 4: Close the bike’s frame again

16
5. Transportation & Storage
5.1 Transportation
CAUTION: Batteries are not designed to be on the bike during transportation by car. Batteries must
be taken off the bike(s) and transported inside the car.
5.2 Storage
Store the bike in a location where it is protected from snow, rain, sun etc. Snow and rain can cause
the bike to corrode. The ultraviolet light from the sun can fade the paint or crack any rubber or
plastic on the bike.
If the ebike is not used for a long period of time (one month or more), the battery should be stored:
• At 50%- 60% of its capacity (you should have 4 bars left on the battery indicator)
• Separate from the bike
• At temperatures between 32°F – 105 °F, preferably between 50 °F – 77 °F.
NOTE: Check the battery every month by looking at its battery level shown on the battery LED
indicator. Charge the battery if necessary.
CAUTION: Charge the battery every 3 months. Negligence to do so may void the warranty of the
battery.
Table of contents
Other SNAPCYCLE Bicycle manuals


