SNEED Coding Solutions SNEED PACK CS-5OTS User manual

SNEED CODING SOLUTIONS | WWW.SNEEDCODING.COM
CS-5OTS USER GUIDE


2
www.sneedcoding.com | (833)926-3464 | support@sneedcoding.com
Thank you for your purchase of the SNEED-PACK CS-50TS top and side belt driven carton
sealer. In this manual you will find the basic operating and maintenance procedures to ensure
your success with the CS-50TS. Please read the manual carefully before operating the
equipment.
Safety Precautions
Keep hands clear of any moving parts while the case sealer is in
operation and always power down prior to inspection. Failure to do
so may cause bodily harm.
Risk of electric shock, make sure the machine is properly grounded
before use.
.
Do not alter the mechanical or electrical systems. Any changes
could result in malfunction or injury.
Always turn off power to the case sealer when changing the tape
roll or performing maintenance.

3
www.sneedcoding.com | (833)926-3464 | support@sneedcoding.com
Contents
Specifications ................................................................................................................................................ 4
Component Diagram..................................................................................................................................... 5
Setting up the Case Sealer ............................................................................................................................ 6
Adjusting the Deck Height ........................................................................................................................ 6
Installing the Roller Tables........................................................................................................................ 7
Adjusting for your Carton Dimensions...................................................................................................... 8
Installing the Tape..................................................................................................................................... 9
Adjusting the Tape Position .................................................................................................................... 10
Setting the Tape Tension ........................................................................................................................ 10
Common Issues ...........................................................................................................................................11
Circuit Diagram ...........................................................................................................................................12
Exploded Parts Diagrams ............................................................................................................................13
Main Body & Lift Mechanism.................................................................................................................. 13
Parts List..............................................................................................................................................14
Drive / Conveyance System .................................................................................................................... 17
Parts List..............................................................................................................................................18
Tape Head ............................................................................................................................................... 20
Parts List..............................................................................................................................................20


6
www.sneedcoding.com | (833)926-3464 | support@sneedcoding.com
Setting up the Case Sealer
Adjusting the Deck Height
Figure 1
1. Begin by lifting the case sealer to the desired height with a pallet fork, dolly, or jack and
secure it safely in place.
2. Loosen the “adjustment bolts” on each leg and allow the “Height adjustment Insert” to drop
the floor.
3. Tighten the adjustment bolts and repeat these steps for each leg.
4. Once you have tightened all of the legs remove the lifting device holding the case sealer
in place.
Always consider safety and never lay down underneath the case sealer while
adjusting the legs.
Leg
Height Adjustment inserts
Adjustment bolts
Wheel Brake
Castor
Lock Nut

7
www.sneedcoding.com | (833)926-3464 | support@sneedcoding.com
Installing the Roller Tables
1. The fasteners (nuts) to attach the roller tables are already tightened onto their
corresponding bolt and will need to be removed first. *Only remove the first of two
fasteners (nuts)
2. Once the fasteners are removed place the roller tables onto the bolts and tighten them in
place.
fasteners

8
www.sneedcoding.com | (833)926-3464 | support@sneedcoding.com
Adjusting for your Carton Dimensions.
Figure 3
1. To set the case sealer to fit the dimensions of your carton/case use the adjustments shown
in Figure 3.
2. The adjustment handles will be installed backwards for shipping, remove them using the
included 10mm wrench and reinstall.
Carton width adjustment
Carton height adjustment

9
www.sneedcoding.com | (833)926-3464 | support@sneedcoding.com
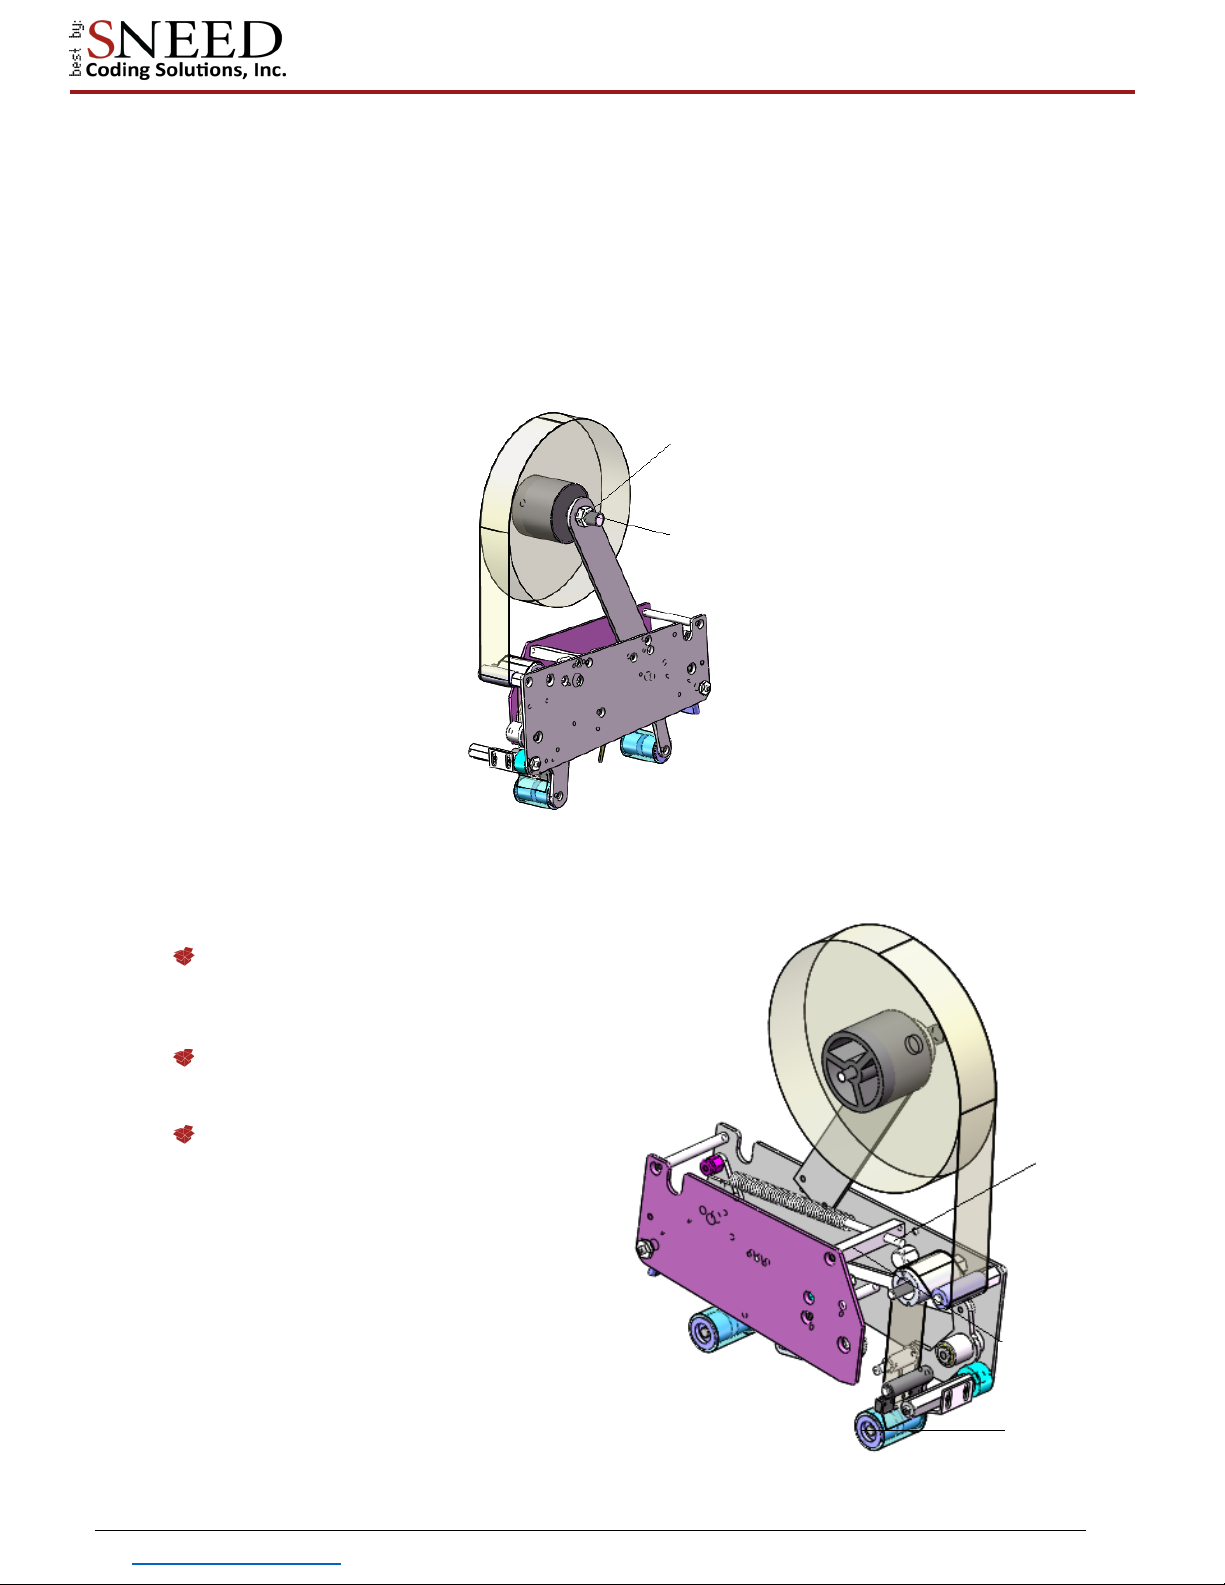
Installing the Tape
1. Begin by attaching the tape arms to each tape head using the included screws. (top and
bottom)
2. Next Install the tape onto the tape wheel so that when you pull the tape down the adhesive
side is facing outward.
3. Now guide the tape under the first guide roller, over the one-way roller, and through the
clip just above the last guide roller. The red line in figure 5 shows the tape path.
Figure 5
Tape roll
Adhesive face
Guide roller
One -way roller
Adhesive face
Guide wheel
Adhesive face
Adhesive face
10
www.sneedcoding.com | (833)926-3464 | support@sneedcoding.com
Adjusting the Tape Position
If you find that your tape is not lining up with the center of the box seems you can use the M18
nut shown in figure 6 to reposition the tape.
1. Remove the tape roll.
2. Loosen the nut.
3. Thread the tape spindle in or out to move the tape to the left or right on the arm.
4. Tighten the M18 nut into place when you have set the desired position.
Figure 6
Setting the Tape Tension
M18 Nut
Tape positioning bolt
The tape applicators will come to
you already adjusted. You may
find that over time the tension
needs to be adjusted.
To loosen or tighten the tension
of the tape applicators use the
nut on the end of the tension rod.
Turn the nut right to tighten the
spring and to the left to loosen.
Tension Rod
Tape applicator /
roller

11
www.sneedcoding.com | (833)926-3464 | support@sneedcoding.com
Common Issues
Issue
Cause
Solution
Tape does not cut
The tape head blade is dull or
jammed
1.Remove the tape jam.
2.Wipe clean any accumulated
adhesive from the tape head
with 90% isopropyl alcohol.
3.Sharpen or replace the tape
blade.
The tape has been cut but only
applied to a section of the case/
carton
The Tape head is likely jammed
1.Remove the Jam
2.Check to see if any parts of
the tape head have come loose.
The box is sealed but the flaps
are loose
1.The main tension spring is too
loose
2.the height adjustment is set
too high.
1.Tighten the nut on the tension
rod. This will stiffen the tape
applicators (pg10 / fig7)
The carton gets stuck halfway
through
The main tension springs are
too tight causing the tape
applicators to pinch the box in
place
Loosen the tension spring by
backing out the nut on the
tension rod (Pg10/Fig 7)
The tape is retracting or coming
loose from the rollers
Check to see if the one-way
tape roller is spinning both
ways.
Replace if needed


18
www.sneedcoding.com | (833)926-3464 | support@sneedcoding.com
Parts List
ON DRAW DESCRIPTION QTY MEMO
1
handle 2
2
handle setting shaft 2
3
handle setting 2
4
unit bearing assembly 4
5
chain wheel 2
6
screw rod 2
7 Sliding base 4
8
bracket 4
9
adjusting slider 2
10
bracket 2
11
pin roll
2
12
pin roll 20
13 supporting roller 40
14
driven wheel 4

Table of contents
Other SNEED Coding Solutions Industrial Equipment manuals


