Snow Peak GS-011 User manual

Instruction Manual

2
TABLEOFCONTENTS
1. Safety Precautions 3
2. Explanation of symbols used 4
2-1 WARNING 4
2-2 CAUTION 6
3. Fuel Recommendations 8
4. GS-010 GigaPower WG Stove contains
the following 8
5. Description of components 9
6. Using the GigaPower WG STOVE 10
6-1 Stove Assembly and Preparation for Burning 11
6-2 Lighting the stove, burning and flame control 13
6-3 Extinguishing the burner flame 16
6-4 Disassembly and Storage 17
7. Troubleshooting 19
8. Maintenance 22
9. Service and warranty 23
Burner
Mainvalveknob
Light/cooklever
Connector Pump
knob Mainvalve
knob
Light/cooklever
Flame
control
Connector
Flame
control Pumpknob
Main valve Pump Connector Light/cook Flame Burner
knob knob lever control
Symbols:
Inthisinstructionmanual,thefollowingsymbolshavebeenusedtoidentifythemajorparts.
2

3
Specifications
Productname:GigaPowerWGSTOVE
Model:GS-010
Externaldimensions(W/D/H):106x171x100mm/
4"x4.25"x 4"(duringuse,excludingflamecontrol)
61x90x100mm/2.5"x3.5"x4"(stowed)
Fuelbottledimensions(DxH):74x190mm /3"x7.5"
Fuelhosedimensions(DxH):11x209mm/0.5"x8.25"
Stoveweight:238g/8.25oz
Pumpunit weight:79g/2.75 oz
Fuelhoseweight: 41g/1.5oz
Fuelbottleweight:158 g / 5.5 oz(includingcap)
Totalweight:516g/18oz(excludingmaintenancekitand
storage bag)
Fuelbottlecapacity:520ml(uptoFillLevelLine)
Gasolineconsumption:221g/h
MaximumGasOutput:2500kcal/h(10,000BTUs)
Stovematerials:stainlesssteel,
brass,andaluminum
Pumpunitmaterials:aluminum,
plastic
Fuelbottlematerials:aluminum,
plastic
Fuelhosematerials:brass,
stainlesssteelmesh
Fuelgauge material:foamedPVC
Storagebagmaterial:nylon
Suppliedtoolsandreplacement
parts:
Driverwrench 1
Carbongasket 1
Pan-headscrew(M2.5) 1
Scotchpad(3x3cm) 1
O-ring (S-3) 1
O-ring (P-11) 1
O-ring (P-5) 1
Sealgasket 1
Ball 1
Ball spring 1
Maintenancegrease 1
1. Safety Precautions
Snow Peak products are designed with safety in mind. However, improper
handling/operation may result in accidents such as fire and/or burns. For
optimal results, please read these instructions carefully and make yourself
familiar with their contents. When using the stove, keep the instruction
manual at hand so that it can be referred to as needed.

4
2. Explanation of symbols used
In this instruction manual the following safety precautions are
used. Please make yourself familiar with their meanings before
reading the main text of this manual.
WARNING
If the precautions under this heading are not observed,
bodily harm such as severe or fatal injuries may result.
CAUTION
If the precautions under this heading are not observed,
the environment may be harmed.
WARNING
Bodily harm such as severe or fatal injuries may result.
2-1
Never use the stove inside rooms, tents or cars!
Deathorseverepoisoningmaybecausedbylackofoxygenortoxicgases.
Keep the stove out of reach of children!
Becauseofpotentialfireandburnhazards,keepoutofreachofchildrentoprevent
danger.
Do not attempt to disassemble the stove in any way other than described
in this manual. Moreover, never try to modify the stove in any way.
Improperdisassemblyormodificationofthestovemayresultinexplosions,fire,
burns,poisoningand/oraconsiderabledecreaseinperformance.After
assemblingthestove,confirmthatthestoveburnsproperlyandthatthereareno
fuelleaks.Forinstructionsondisassemblingthestove,referto 6-4Disassembly
andStorage,pages17-18and7.Troubleshooting,pages19-21.

5
Never use two or more units side-by-side at the same time.
Ifstoveunitsareusedside-by-sideunderneathapot/panor
othercookware,thestoveunit,thefuelhoseand/orthefuelbottle
mayoverheatcreatingextremelyhazardousconditions.
Make sure to keep a minimal distance of 1 m above and a
minimumof30 cm diameter fromanyflammable items.
Spread a burner sheet under the stove
to protect the surface from reflected heat.
Theflameofthestovemayspreaddownwardsaswellassideways.
Cookwareforcesheatdownwards;therefore,keepflammable
materialsawayfromthestove.Useoftheoptional
burnersheet isrecommended.Ifreflectedheatis
generated,theheatbuild-upbelowthestovemay
resultinafire.
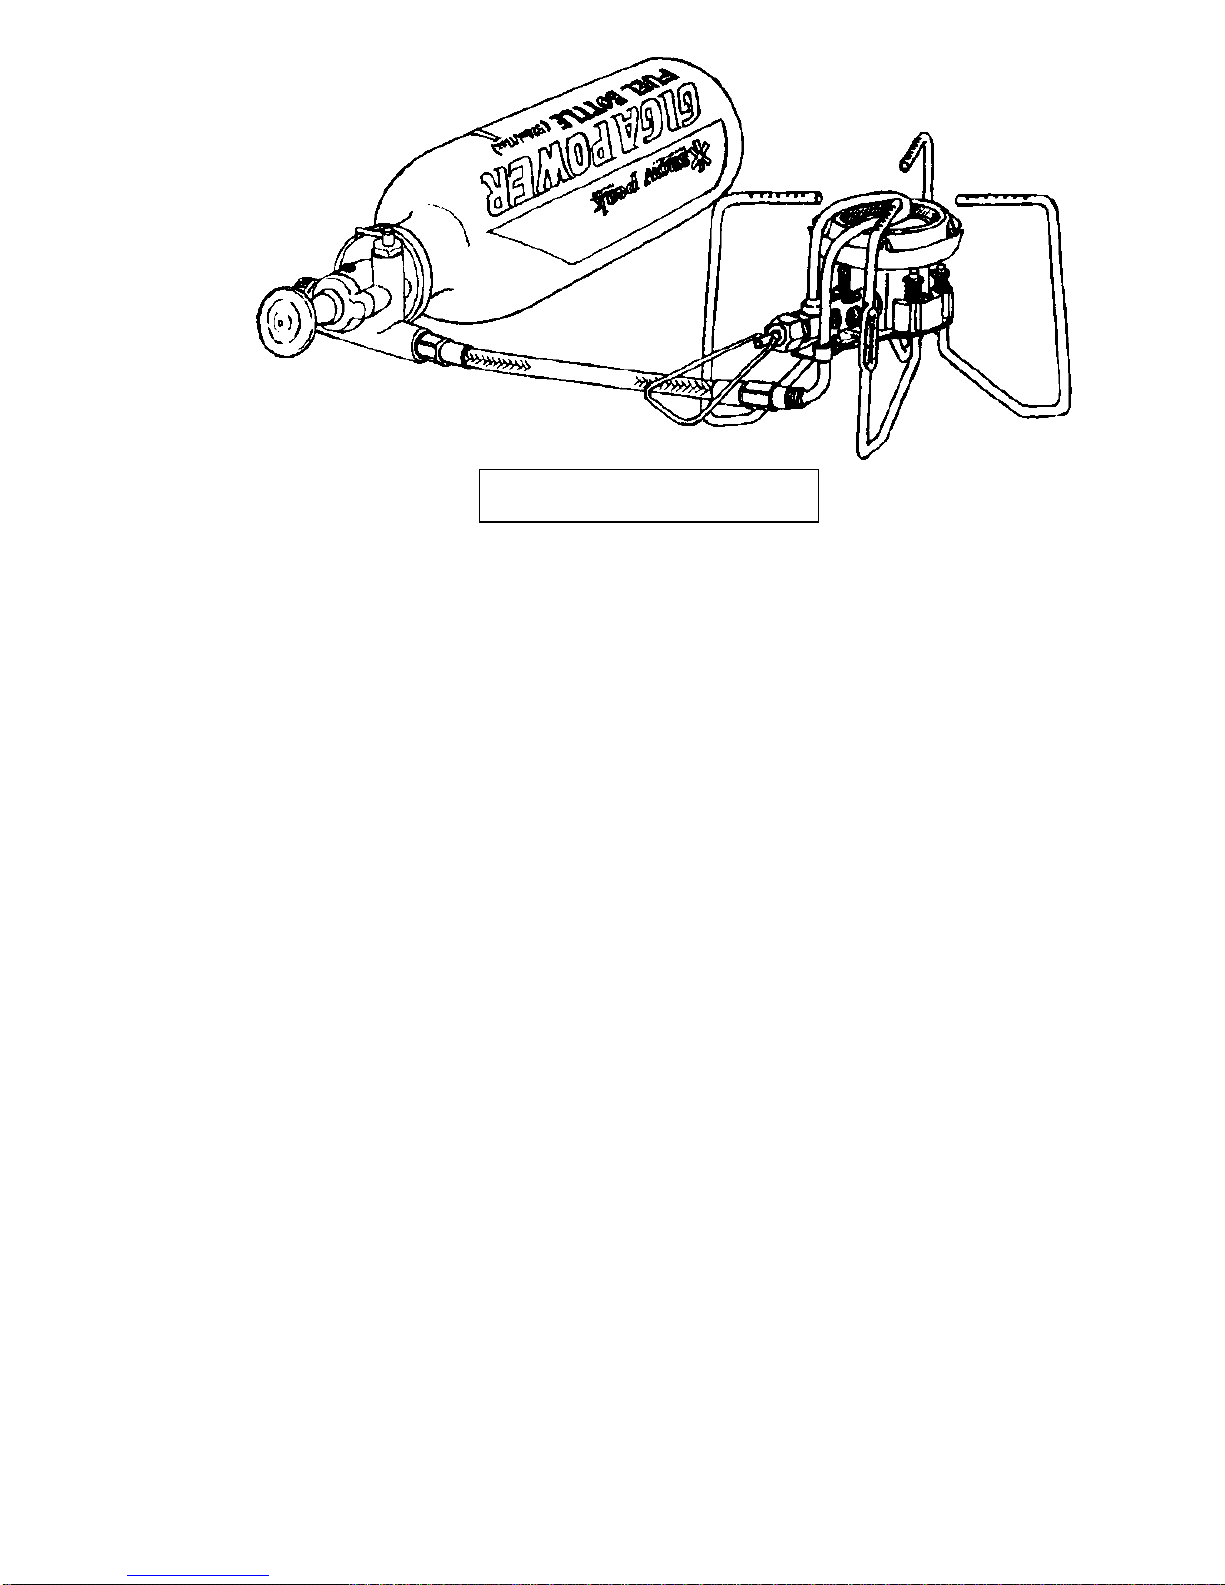
Before lighting the stove confirm that there are no fuel leaks.
Priortolightingthestove,check thefollowingpoints:
(1)Allconnection partsaretight,(2)There arenofuelleaks,and (3)Themain
valveknobisclosed.Fordetailedinformation,refertosection6-1“Stove
AssemblyandPreparationforBurning”, page11.Ifafuelleakoccurs,referto
section7.„Troubleshooting“,pages19-21; repairimmediately.Iftheleakcannot
berepaired,contactthedealerwherethisproductwaspurchasedorcontact
SnowPeakCustomerService.Nevertrytolightthestovewhenafuelleakis
present.
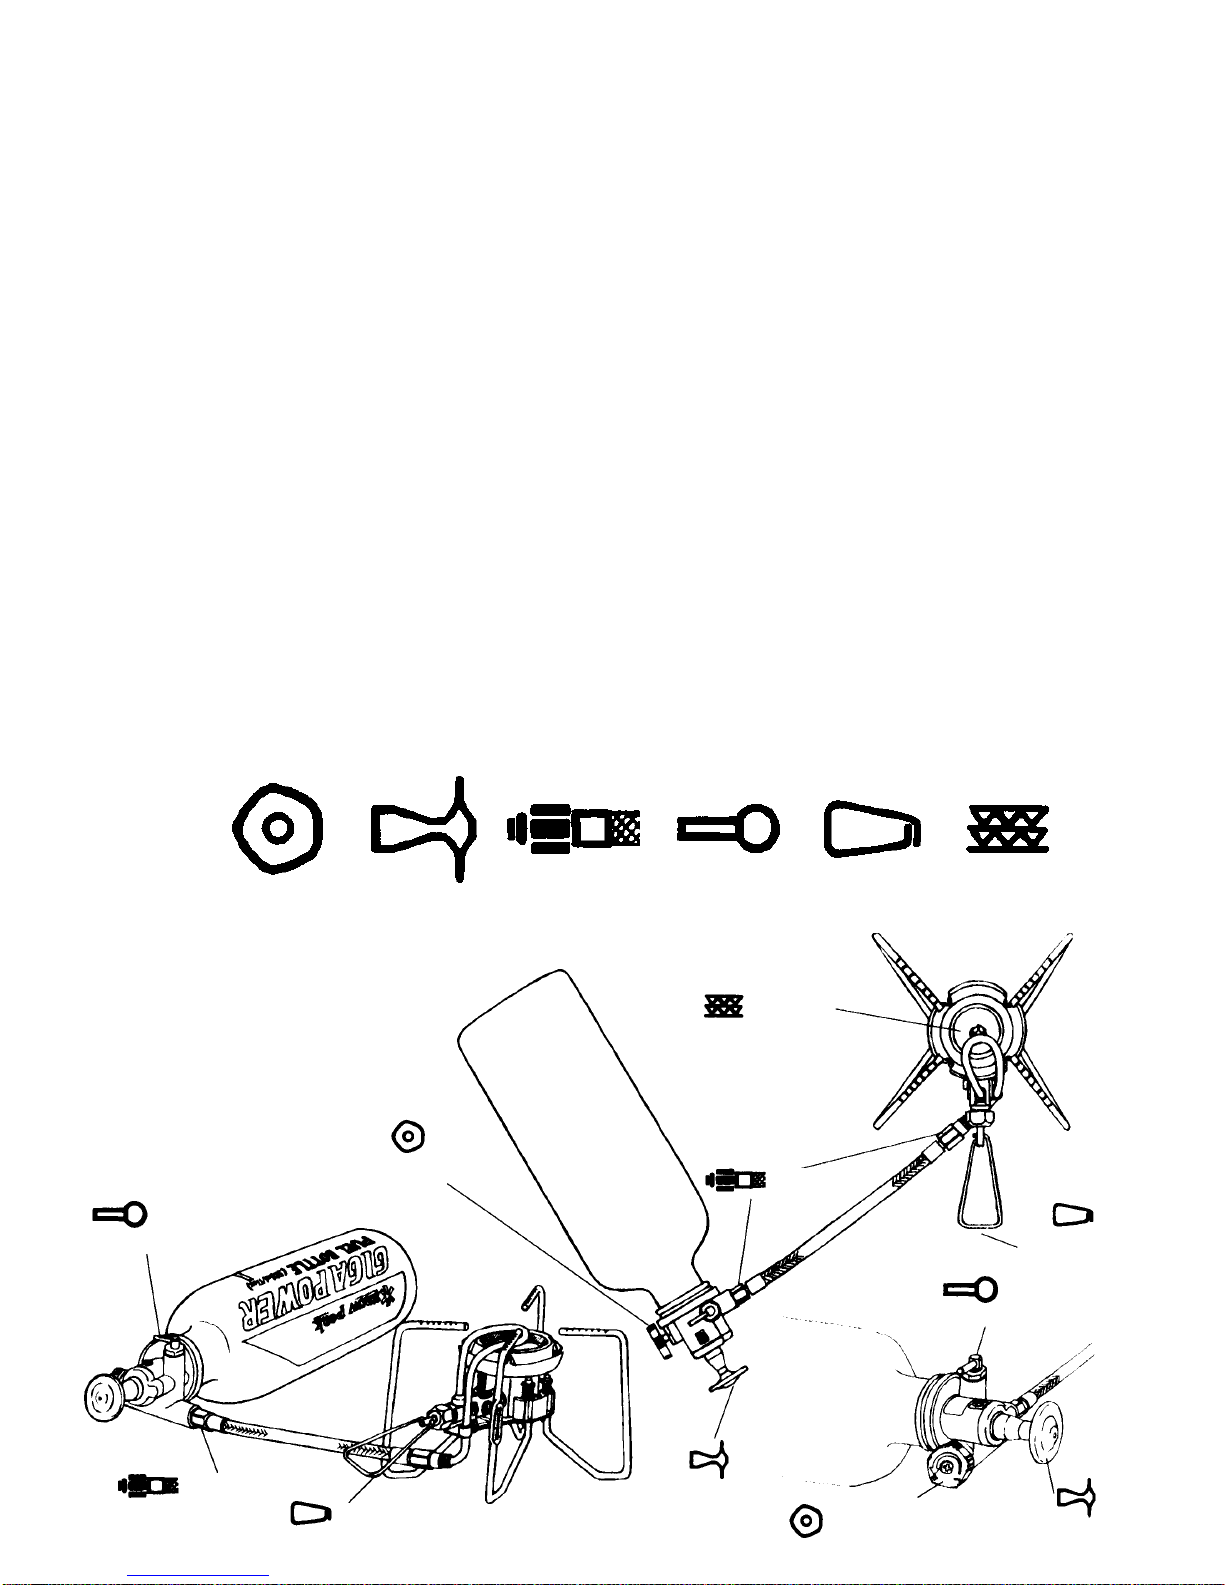
Make sure that the fuel hose is securely connected. Never bend or pull the
fuel hose while the stove is burning.
Afuelleakintheconnectingpartsmayresultinextremelyhazardousconditions.
Avoid placing body parts above the stove when lighting.
Whentheburnerisignited, amomentaryleaping flameoccurscreatingaburn
hazard.
Never leave the stove unattended while it is in operation.
Inordertocontrolorextinguishtheflame,neverleavethestove
unattendedwhileitisinoperation.
min.
1m
min30cm

6
Stove must be completely cool prior to refilling the fuel bottle.
Thestoveishotduring operationandafter extinguishingtheflame.Priorto
refilling,allowtheunitto completelycoolin ordertoavoidpossiblehazardsof
ignitionand/orburns.
Never tilt the stove or move it to another location while it is in operation.
Anymovementofthestovewhileinusemayresultinextremehazardousconditions
suchassuddenleapingflamesand/orfuelleaks.
Remove cookware from the stove prior to adding pressure to the fuel
bottle with the pump knob.
Ifcookwareisleftonthestovewhenusingthepumpknob,aleapingflamemay
surroundthecookwareand/orthecookwaremaybedislodgedresultinginsevere
burns.
Check for fuel leaks when the stove is in use.
Fuelleaksthatoccurwhileusingthestovemayresult inafire.Wheninuse,
monitorthestoveandconnectingpartsforfuelleaks.
Prior to disassembly of the pump unit and the fuel hose confirm that the
main valve knob has been closed and the stove is completely cool.
Thestovemayspontaneouslyigniteorburnsfromtheheatmayresultfrom
disassemblyoftheunitpriortocooling.Itisextremelyhazardoustooperatethe
stovewhilesmoking.
CAUTION
Damage may be caused to the environment due to fire
or other hazards.
2-2
Useonlythe Snow Peakfuelbottle to prevent unnecessaryhazards.
Fuelbottlesmanufactureredbyothercompaniesmaynotsecurelyfitthefuelpump
and/orthebottlecap.Thismayresultinfuelleaks.Fuelleaksmaycausefire
hazards.UseonlytheGigaPowerfuelbottle.
Useonly whitegasolinefuel.
Thestovemaynotoperateproperlywithotherkindsoffuel,resultinginpotential
fireandburnhazards.
Theremaybeunavoidablecircumstanceswhereinautomobilefuelmustbeused
foraminimaltime.Sustaineduseofsuchfuelmayresultinreducedperformance
aswellasdamagetothestove.

7
To transport the fuel, use only a container designed for white gasoline
fuel.
Forstorageand transportationrefillthegasolinein aspecialcontainersuchas
theGigaPowerFuelBottle. Carefullyreaddirectionsonthefuelcontainer; use
onlyasdirected.Usecontainersdesignedspecificallyforthispurpose.
Never use this stove for any purpose other than cooking.
Donotusethisstoveforpurposessuchasdrying clothes,asourceofheatother
thanforcooking,etc.
Thin-walledcookware withnon-stickcoating maybecome damagedwhen
used with this stove.
Duringusethe flamewillconcentratein thecenter. Non-stickcoatingas wellas
thecookwaremaybedamagedbythisconcentratedflame.Therefore,minimize
theheatoutputofthestove.
Storethewhite gasoline fuelina tightly sealedcontainer. Place container
inacool location, away fromdirectsunlight.
Fuelstoredinapoorly sealedcontainerwill deteriorate.Suchconditionswill
resultin bothmoisturebuild-upandleaks duetoincreasedpressureinsidethe
container.Fuelthathasdeteriorated orthatcontains moisturewillresultinpoor
burningperformance.
Never use high-volume pots/pans and other cooking utensils with the
stove.
Neveruseanypots/panshavingadiameterofmorethan230mmoravolumeof
morethan6liters.Carefullyplacethepots/pansandothercookingutensilson
thecenterpartofthestoveinastableposition.Otherwisethestovemayturn
upsidedownandbedamaged.
Rubber gaskets contract in cold temperatures resulting in potential fuel
orpressure leaks.
Underfreezingconditions,storethestoveinside.Fuelorpressure leaksmay
occurwhenstoringintemperatures belowfreezing.
Perform routine inspection and care after each use.
Aftereachuseperformthemaintenancestepsasdescribedonpage22.
Confirmthatthesuppliedpartsandreplacementpartsareinworkingcondition
andavailableasneeded.

8
3. Fuel recommendations
White Gasoline
This stove is designed to burn white gasoline. Use only white gasoline fuel
specifically for use in stoves.
Automobile Gasoline
Automobile gasoline contains additives that may result in poor performance
of the stove. If it becomes necessary to use automobile gasoline, use only
for a short period.
Avoid the following fuels
Never use kerosene, diesel oil, methylated spirits or aircraft fuel.
These fuels will cause improper burning and may lead to fires, burns and/or
toxic gas poisoning.
4. GS-010 GigaPower WG Stove contains the
following: Fuelbottle
Fuelhose
Stoveunit
Pumpunit
Maintenancekit
Fuelgauge
8

9
[Stove-unit]
Taperwasher
Spindlenut
Flamecontrol
Carbongasket
Taperwasher
Spindle
Needle
FlatcountersunkheadscrewM4
Burnercap
Waveplate
Doughnutplate
Windscreen E-3 ring
Potsupportwasher
Potsupportspring
Potsupportwasher
Potsupportcollar
Potsupport
Generator
Pipeconnection
Generatorstay
TappingscrewM3
Pan-
head
screw M3
Jet Base
Dampertube
Pot
support
bracket
Bucket
Pan-head
screwM3
[Pump unit]
Flatcountersunk
headscrew
Mainvalve
knob
Endcap
Mainvalve
P-5 O-
ring
Pan-headscrewM2.5
Light/cooklever
Endcap
Sealing
gasket
Airpipe
Bottomcap
P-5 O-ring
Ball spring
Ball
Mixer
Connectingscrew
Pan-headscrewM2.5
P-11 O-ring
Piston
Shaft
Pumpknob
Pumpcap [Driver wrench]
Phillipsheadscrewdriver
Mainvalvewrench
Spindle nut
wrench
Fuelhoseconnector
wrench
E-ring slip
Igniter electrode
adjustment
notch
for GS/GL
Spindle nut wrench for
GS-100/GL-100
[Fuel hose] Protective
cap
Protective
cap
S-3 O-ring
Connector
Fuelhose
Connector
S-3
O-ring nozzle
wrench
5. Description of
components
9

10
Pour fuel into 6-1 Stove Assembly and
Fuel Bottle. Preparation for Burning
Refertostep1.
Install 6-1 Stove Assembly and
pump unit. Preparation for Burning
Refertosteps 2-4.
Pressurize 6-1 Stove Assembly and
pump unit. Preparation for Burning
Refertostep5.
Unfold the 6-1 Stove Assembly and
pot supports. Preparation for Burning
Refertostep6.
Connect the 6-1 Stove Assembly and
fuel hose. Preparation for Burning
Refertosteps 7and8.
Fully open the 6-2 Lighting the stove,
flame control. burning and flame control
Refertostep1.
Open the 6-2 Lighting the stove,
main valve. burning and flame control
Refertosteps 2and3.
Light the 6-2 Lighting the stove,
stove. burning and flame control
Referto step3.
Start and adjust 6-2 Lighting the stove,
the flame. burning and flame control
Refertosteps4-6.
Extinguish 6-3 Extinguishing
the flame. the burner flame.
Refertosteps1-3.
Disassemble the unit 6-4 Disassembly and Storage
and store the parts. Refertosteps 1-10.
6. Using the GigaPower WG Stove

11
Caution:IffilledabovetheFillLevelLine,theflamewillbeunstable.Ifthestove
isleftinthiscondition,fuelmayleakfromthedampertubeandignite.
Extinguishtheflameimmediately,pouroutextrafuelandre-lightthestove.
NEVERfillabovetheFill LevelLine.
6-1 Stove Assembly and Preparation for Burning
Place the GigaPower WG Stove on a stable, level surface. Using the
stove on an unstable surface is dangerous and may result in
improper burning.
1. Pour white gasoline into the GigaPower fuel bottle. Do
not fill beyond the Fill Level Line.
2. Slowly insert the pump unit into the GigaPower fuel
bottle; turn clockwise to tighten. When seal gasket
becomes tight, turn an additional ¼ turn to securely
tighten the pump unit.
Caution:Ifthepumpunitdoesnotturnsmoothly,removepumpunitandscrew
again. Ifthepumpunitisforcefullyinstalled,itmaybedamaged.
Caution:Confirm thatthesealgasketis completelyfreefromdust,dirtand
foreignmatter.Aloosefit mayresultin fuelleaks.
3. Confirm that the main valve knob is firmly
tightened .
Caution:Ifthemainvalve is notfirmlytightened, fuelmayleakfromthe
connectingpartsofthefuelhosewhenpumpingcreatingextremelyhazardous
conditions.

12
4. Turn the Light/cook lever clockwise to the LIGHT
position.
5. Place thumb over hole in center of the pump knob and
slowly pressurize canister by pumping approximately 50 times.
Caution:Pumpgentlywithoutexcessiveforce.Forcefulpumpingmayresultindamageto
thepumpshaft.
Caution:If thefuellevelinthe bottleislow,thepressureinsidethefuelcanistermaynotbe
optimized.Inthisevent,pumpanadditional20-30timesorrefillthebottletotheFillLevel
Line.
6. Carefully unfold the Pot support of the stove until it “clicks”
into the locked position.
Caution:ConfirmthatallPot supportsaresecurely lockedintopositionpriortouse.
7. Remove the protective cap from both ends of the fuel hose.
Carefully join the connector with the generator on the
stove by turning the connector clockwise .
Caution:Eitherendofthefuel hosemaybeused.Firmlytightentheconnector by
hand;DO NOTuseanytoolsto tighten.Ifatoolisusedtotighten,thethreadsmaybe
damagedwhileinuse. Keeptheprotectivecapfreefromdirtanddust.
Caution:IfthestoveislightedintheCOOKposition
(counterclockwise ),excessivefuel will be
injectedintotheunitresulting inanunstable flame.If
theconditionisnotcorrected,fuelmayleakaround
thedampertubeandspontaneouslyignite.Thelever
mustbeintheLIGHTpositionwhenlightingthe
stove.

13
8. Carefully join the other end of the fuel hose to the pump unit by
turning the connector clockwise . Firmly tighten the
connector by hand; DO NOT use any tools to tighten. If a tool
is used to tighten, the threads may be damaged while in use.
6-2 Lighting the stove, burning and flame control
When lighting the stove a momentary
leaping flame will occur. To avoid possible
burns use a long match or lighter. Never
place body parts directly above the stove.
Caution:TopreventdamagetotheO-ringsonthefuelhose,lightly
applymaintenancegreasefromtime-to-time.Becarefulnotto
greasethe holeinthecenterof theconnector.
1. Turn the flame control
counterclockwise until it is
completely open.
Caution:ConfirmthattheLight/cooklever
is in the LIGHT position .
13

14
2. Light the heat source and quickly turn the
main valve knob counterclockwise
until fully open. The fuel-air mixture will ignite when the heat source
makes contact.
Caution:Ifthemainvalve and/or flamecontrol havenotbeenfullyopened,an
inadequateamount ofthefuel-airmixturewill bereleased.Thismayresultinafailureofthe
stovetolight.
Caution:Whenthestoveislightedaleapingflamewill begenerated.Toavoidburns,usealong
lighterormatch.Neverplacebodypartsabovethestove.
Caution:Iftheheatsourceextinguishesandfailstoignitethestove,turnthemainvalve
clockwise tocompletely closethemainvalve.Repeated attemptstolightthestovewill
resultingasoline collectinginsidethestove.Whenitignites anexcessiveleapingflame will
resultcreatinganextremefirehazard.Ifgasolinecollectsinsidethestove,turnunitupside
downtoremovethegasoline.Aftergasolinehasbeen
removed,starttheprocedurefromthebeginning.
Caution:To prepareforlightingthestove, hold a
heatsourcenear theburnerhead .With the
otherhand,quicklyopenthemainvalve .
vCaution:Atbelowfreezingtemperaturesthestovemaynot
igniteinstantly.Undersuchconditionspreheatthestoveby
applyingasmallamountofpriming pasteorgasolineclose
totheburner andignitethepreheating materials (see
shadedareaintheillustration).
Caution:Confirmthattherearenofuelleaksin
theconnectingandoperatingparts.

15
3. The burner flame becomes stabilized 15-20
seconds after lighting the stove. Turn the Light/
cook lever counterclockwise to the COOK
position.
4. Pump 10-20 times to re-pressurize the Fuel Bottle.
Caution:Whenoptimalpressureisachieved,theheatgeneratedwillchangethecolorofthe
windscreentored.
5. Carefully place cookware on the center of the stove and use the
flame control to adjust the heat.
Caution:Thin-walledcookwarewithnon-stickcoatingmaybecomedamagedwhenusedwiththis
stove.Therefore,minimizetheheatoutputofthestove.
Caution:Themaximumdiameterofcookwaretobeusedwiththisstoveis230mmand/or6liters
volume.Carefullyplacecookwareonthecenterofthestovetostabilize.Ifthisguidelineisnot
observed,thestovemaybecomeunstableresultingindamagetothestove,cookwareorthe
environment.
6. While in operation, monitor the stove for fuel leaks and improper
burning conditions. If a problem is discovered, turn off the stove
immediately. Wait until the stove has completely cooled prior to
performing necessary repair or maintenance.
Caution:Theflamewillnotstabilize iftheleveristurned
counterclockwisetotheCOOK position prior to theinitial
stabilization. Confirmthat theleveristurnedfully counterclockwise
totheCOOKposition after the stove isburningwithastable
blueflame.
Continuousburningwith theleverintheLIGHT position (turned
fullyclockwise)willdecreasethepressureinsidethefuelbottle
leadingtoareducedoutput.

16
6-3 Extinguishing the burner flame
1. Turn the main valve knob fully clockwise to cut off the fuel
supply.
2. Turn the flame control fully counterclockwise to open
completely (maximum output position).
3. When the burner flame has been extinguished, turn the flame
control fully clockwise.
Caution:If the flamecontrol isclosedfirst, anexcessiveamountofthe fuel-airmixturewill
becometrappedinthefuelhoseand/orthegenerator.If themainvalve isleftopenandthe
flamecontrolisclosed,donotremovethefuelhose.Ifthefuelhoseisremovedunderthis
condition,fuelwillspewfromthefuelhosecreatinghazardousconditions.Confirmthatthemain
valveknob isclosedcompletelyandthattheremainingfueliscompletelyburnedoff.Then
closetheflamecontrol.
Caution:After themainvalveisclosed, thefuel-airmixtureremaininginthegeneratorandfuel
hosecontinuestoburn.Completelyburnoffthefuel-airmixturepriortodisassemblingthestove.

17
6-4 Disassembly and Storage
1. Wait until the stove has sufficiently cooled down before proceeding
with disassembly and storage.
Caution:Stoveisextremelyhotafteruse.Useextremecautiontoavoidburns.
2. NEVER disassemble or store the stove near a fire or an open flame.
Caution:Donotdisassembleorstorethisstovecloseto afireoropenflame.Asmallamount of
gasolinemayremaininthefuelhoseresultinginapotentialfirehazard.
3. Confirm that the main valve knob has been completely closed
(turned fully clockwise ) prior to disconnecting the fuel hose from
the pump unit. Turn the connector fully counterclockwise
and carefully remove the fuel hose. Do not skew the angle of the fuel
hose when removing.
Caution:Unfasten theconnector byhand.Ifthe screwthreadbecomestootightandcannot
beloosenedbyhand,usetheDriverwrenchtoloosenit.
Caution:Turnthescrewthreaduntilitbecomesloose.Ifyouattempttoremovethefuelhose
beforethescrewthreadiscompletelylooseandstillpartlyengaged,thefuelhoseand/orthe
stovemaybedamaged.
Caution:Carefullyremovethefuelhose;donotskewthefuelhose.Ifthefuelhosebecomes
skewed,therubbergasketmaybecomedamaged.
4. Allow the compressed air to escape from the fuel bottle. Stand the
fuel bottle erect and carefully turn the pump unit counterclockwise
allowing the pressurized air to escape.
Caution:Confirmthatthereisnofireoranopenflamenearby. Suchconditionscreatepotential
fuelignitionhazards orbuns.
Caution:Pressurizedairrapidlyescapesfromthebottle;therefore,keepthebottleawayfrom
faceandbodywhenunscrewingthepumpunit.
5. Carefully remove the pump unit. Use a cloth to wipe off excess
gasoline prior to storing.
Caution:CarefullyremovethepumpunitfromtheFuelBottletoavoiddamagingtheairpipeand/
ormixer. Forcefulremovalofthepumpunitmayresultindamage.A damagedmixermayhinder
theone-touchignition.
Caution:ReturntheLight/cook lever to theLIGHTposition (turnedfullyclockwise)for
futureuse.

18
6. Firmly screw the bottle cap to the fuel bottle.
Caution:Confirmthatthesealgasketforthebottlecapisfreefromdust,dirt,andotherforeign
materials.Ifthecapcannotbeinstalledsmoothly,removeitandtryagain.Forcefullyinstalling
thebottlecapmayresultindamagetothethreadsinthebottlecap.
7. Disconnect the fuel hose from the stove. Turn the connector
fully counterclockwise . Carefully pull out the fuel hose making
sure that it is not skewed.
Caution:Unfastentheconnector byhand.Ifthescrewthreadbecomestootightand
cannotbeloosenedbyhand,usetheDriverwrenchtoloosenit.
Caution:Turnthescrewthreaduntilitbecomesloose.Ifyouattempttoremovethefuelhose
beforethescrewthreadiscompletelylooseandstillpartlyengaged,thefuelhoseand/orthe
stovemaybedamaged.
Caution:Carefullyremovethefuelhose;donotskewthefuelhose.Ifthefuelhosebecomes
skewed,therubbergasketmaybecomedamaged.
8. Drain off excess gasoline from the fuel hose.
Caution:Asmallamountofgasolinewillremaininthefuelhose.Standthefuelhoseononeend
andgentlyshakehosetodraintheremaininggasolinecompletelybeforeplacingtheprotective
caponthefuelhose.
Caution:Itisdangerousto disassemblethestove whilesmoking.Confirmthatthereisnofireor
openflamenearbyinordertoavoidthehazardoffuelignitionand/orburns.
9. Storing the Pot support on the stove. While pushing down the Pot
support spring, flip the Pot support toward the flame control .
Caution:ThePotsupportcanbemovedonlywhenthePotsupportspringispusheddown.Ifthe
Potsupportspringisnotpusheddown,thestovewillbedamaged.
10. Store all the components in the storage bag.

19
7. Troubleshooting
Problem
1.Thepumpunit
cannotbe installed
2. Unableto
smoothlypumpthe
pumpunit.Resistant
topumpingaction.
3.Fuel leaks outof
thepumpknob
whilepumping.
4.Fuel leaksfrom
theseal gasket
resultinginreduced
pressure.
5.Fuel-air mixtureis
notejectedfrom the
stove head, even
whenthemain
valve knob is
open.
Possible cause
Threaded part of pump unit
and/or fuel hose has been
damaged.
Seal gasket has not been
properlyplaced.
Pumpshaft maybe dirty.
Maybe worn,shaftmay be
bentor damaged.
Bottom cap is not properly
attached.
Ball is worn or damaged.
Ball spring is worn or
damaged.
Pump unit is not firmly
tightened in the fuel bottle.
Sealgasketsare wornor
damaged.
Sealgaskets aredirty.
Flame control is fully
open.
Fuel bottle is not filled with
white gasoline.
Fuel bottle is not
pressurized due to lack of
pumping.
Fuel hose is clogged.
Remedy
Threaded part of pump unit and/or fuel hose
has been damaged.
Seal gasket has not been properly placed.
Remove dirt from the shaft and lightly apply
maintenance grease. A worn or damaged
shaft must be returned to place of purchase or
toSnow Peakfor repair.
Attach the bottom cap properly; replace any
partsthat havebeen wornor damaged.
Replace worn or damaged seal gaskets and
removeanyforeignmatter.
If the fuel leak persists, do not use the stove.
Open the flame control by turning it fully
counterclockwise .
Confirm that the white gasoline is not
exceeding the Fill Level line.
Pressurize the Fuel Bottle by placing thumb
over the hole in the center of the pump
knob and pumping approximately 50
times. In cold weather (i.e., below freezing)
gaskets may shrink or contract resulting in
reduced pressure. Under such circumstances,
pump an additional 20-30 times for optimal
pressurization.
Turn the main valve clockwise to close.
Remove the fuel hose. Turn the main valve
slightly counterclockwise to determine if
the fuel can be injected. If the fuel is not
injected from the pump unit, the pump unit has
been damaged and must be returned to the
place of purchase or to Snow Peak.
Connect the fuel hose to the pump unit. Open
the main valve slightly; if the fuel is not
injected from the other end of the fuel hose,
the fuel hose may be clogged. Replace the
fuel hose.

20
6.Thestove does
notigniteeven
thoughthefuel-air
mixture is ejected.
7.Anunstable,
yellowflame occurs
afterignition.
Generatorisclogged.
The atmospheric
temperature is too low
(belowfreezing).
A fuel other than white
gasoline is being used.
Fuel bottle is filled above
the Fill Level Line.
The Fuel bottle has not
beenadequately
pressurized.
P-11O-ring iswornor
damaged.
Fuel has accumulated due
torepeatedattempts to
ignite the stove.
The light/cook lever is
not in the LIGHT
position.
If discharge of fuel-air mixture from the
burner cannot be ensured, a clogged
generator should be suspected. Replace with
a new jet.
Incold weather(temperatures belowfreezing)
preheat the stove by applying a small amount
of priming paste or gasoline close to the
burner and ignite the preheating material.
The use of fuel other than white gasoline will
impede burning. If a fuel other than white
gasoline has been used, completely drain the
Fuel bottle and the fuel hose. Refill the Fuel
bottle with white gasoline. If it becomes
necessary to use automobile gasoline, use
only for a short period.
The fuel level in the bottle exceeds the Fill
Level line. There is not enough fuel in the
Fuel bottle. Always fill the Fuel bottle to its
maximum capacity (to the Fill Level Line).
Fill the Fuel bottle to the Fill Level Line.
Confirm that the white gasoline is not
exceeding the Fill Level Line.
Pressurize the Fuel bottle by placing thumb
over the hole in the center of the pump
knob and pump approximately 50 times.
Incoldweather (i.e.,belowfreezing) gaskets
may shrink or contract resulting in reduced
pressure. Under such circumstances, pump
an additional 20-30 times for optimal
pressurization.
Replaceall worn ordamaged P-11 O-rings.
Extinguish the stove and remove excess fuel
fromthe bucket.
Turn the Light/cook lever to the LIGHT
position before lighting the stove.
This manual suits for next models
2
Table of contents
Other Snow Peak Stove manuals
Popular Stove manuals by other brands

DelRay
DelRay DFSP Installation & operation manual

Karibu
Karibu Bio-Saunaofen 4,5 kW Assembly and operating instructions

SCAN
SCAN 48 Instructions for installation and use

US Stove Company
US Stove Company Vogelzang VG5790 Owner's operation and instruction manual

United States Stove Company
United States Stove Company King owner's manual

SEVERIN
SEVERIN KP 1056 Dimensions