Soho-PBX SP-108C User manual

TABLE OF CONTENTS
Model SP-108C (1 CO line x 8 extensions) 1 INTRODUCTION & INSTALLATION PROCEDURE ----------------1
1.1 INTRODUCTION -------------------------------------------------------1
Automated Telephone System 1.2 CALLER ID ---------------------------------------------------------------1
1.3 PRE-INSTALLATION NOTE -----------------------------------------1
SOHO-PBX is your ideal small or home office receptionist. The
SP-108C is features packed and very easy to use. For more
information please go to SOHO-PBX website at
1.4 INSTALLATION DIAGRAM -------------------------------------------3
1.5 POWER FAILURE ------------------------------------------------------3
1.6 CO LINE -------------------------------------------------------------------3
2
1.7 INSTALLATION PROCEDURES -----------------------------------3
2 PROGRAMMING INSTRUCTIONS ---------------------------------------3
2.1 GENERAL PROGRAMMING INSTRUCTIONS ----------------3
2.2 DO NOT DISTURB ---------------------------------------------------- 4
2.3 CALL RESTRICTION ASSIGNMENTS ---------------------------4
2.3.1 TOLL RESTRICTION -------------------------------------------5
2.3.2 OUTGOING CALL RESTRICTION --------------------------5
2.3.3 TO CLEAR A RESTRICTION ---------------------------------5
2.3.4 SETTING PASSWORD TO PERMIT OUTGOING CALLS
-------------------------------------------------------------------5
2.3.5 CHANGING PASSWORD --------------------------------------6
2.4 SETTING TIME LIMIT ON OUTGOING CALL ------------------7
2.4.1 SETTING TIME LIMIT ON SPECIFIC EXTENSION ----7
2.4.2 CLEAR TIME LIMIT RESTRICTION ------------------------7
2.5 EXTENSION NUMBER ASSIGNMENT ---------------------------7
2.5.1 CHANGE EXTENSION NUMBER ---------------------------7
2.5.2 RESTORE THE DEFAULT EXTENSION NUMBER ----7
2.6 ATTENDANT MODE ASSIGNMENT ------------------------------8
1

2.6.1 AUTO ATTENDANT ASSIGNMENT WITH
ANNOUNCEMENT ------------------------------------------------------8 1.3 PRE-INSTALLATION NOTE
Ensure that the unit is properly plugged in the wall.
2.6.2 RECORD THE ANNOUNCEMENT -------------------------- 8 Avoid installing the unit in the following places:
2.6.3 PLAYBACK RECORDED ANNOUNCEMENT ------------ 9 * Dusty and wet places
2.6.4 OPERATOR/MANUAL ATTENDANT ASSIGNMENT --- 9 * Near high-frequency generating devices such as microwave ovens,
sewing machines2.7 SYSTEM DEFAULT SETTING --------------------------------------- 9 * Near television sets
* Very hot and humid environment
3 OPERATING INSTRUCTION ---------------------------------------------10
INSTALLATION DIAGRAM
3.1 INCOMING CALL -------------------------------------------------------10
3.1.1 OPERATOR/MANUAL ATTENDANT MODE -----------10
3.2 OUTGOING CALL ------------------------------------------------------10
3.3 INTERCOM CALL ------------------------------------------------------10
3.4 TRANSFER AN INCOMING CALL TO AN EXTENSION -----11
3.5 THREE PARTY CONFERENCE CALL ---------------------------12
3.6 ASSISTED OUTGOING CALL --------------------------------------12
3.7 CALL PICK UP ----------------------------------------------------------12
1 INTRODUCTION & INSTALLATION
1.1 INTRODUCTION
SOHO-PBX SP-108C is designed to provide low cost professional
telephone switching service. It has 1 CO line and allows up to 8
extensions. You can connect telephone, fax machine, modem and
most telephone recording systems with the SP-108C.
1.2 CALLER ID
This PBX is capable of receiving external FSK or DTMF Caller ID
sent from your local telephone company. In order for the Caller ID to
work, you must subscribe the service from your Local Telephone
Company. The telephone used must have DTMF Caller ID detection
capabilities.
3 4
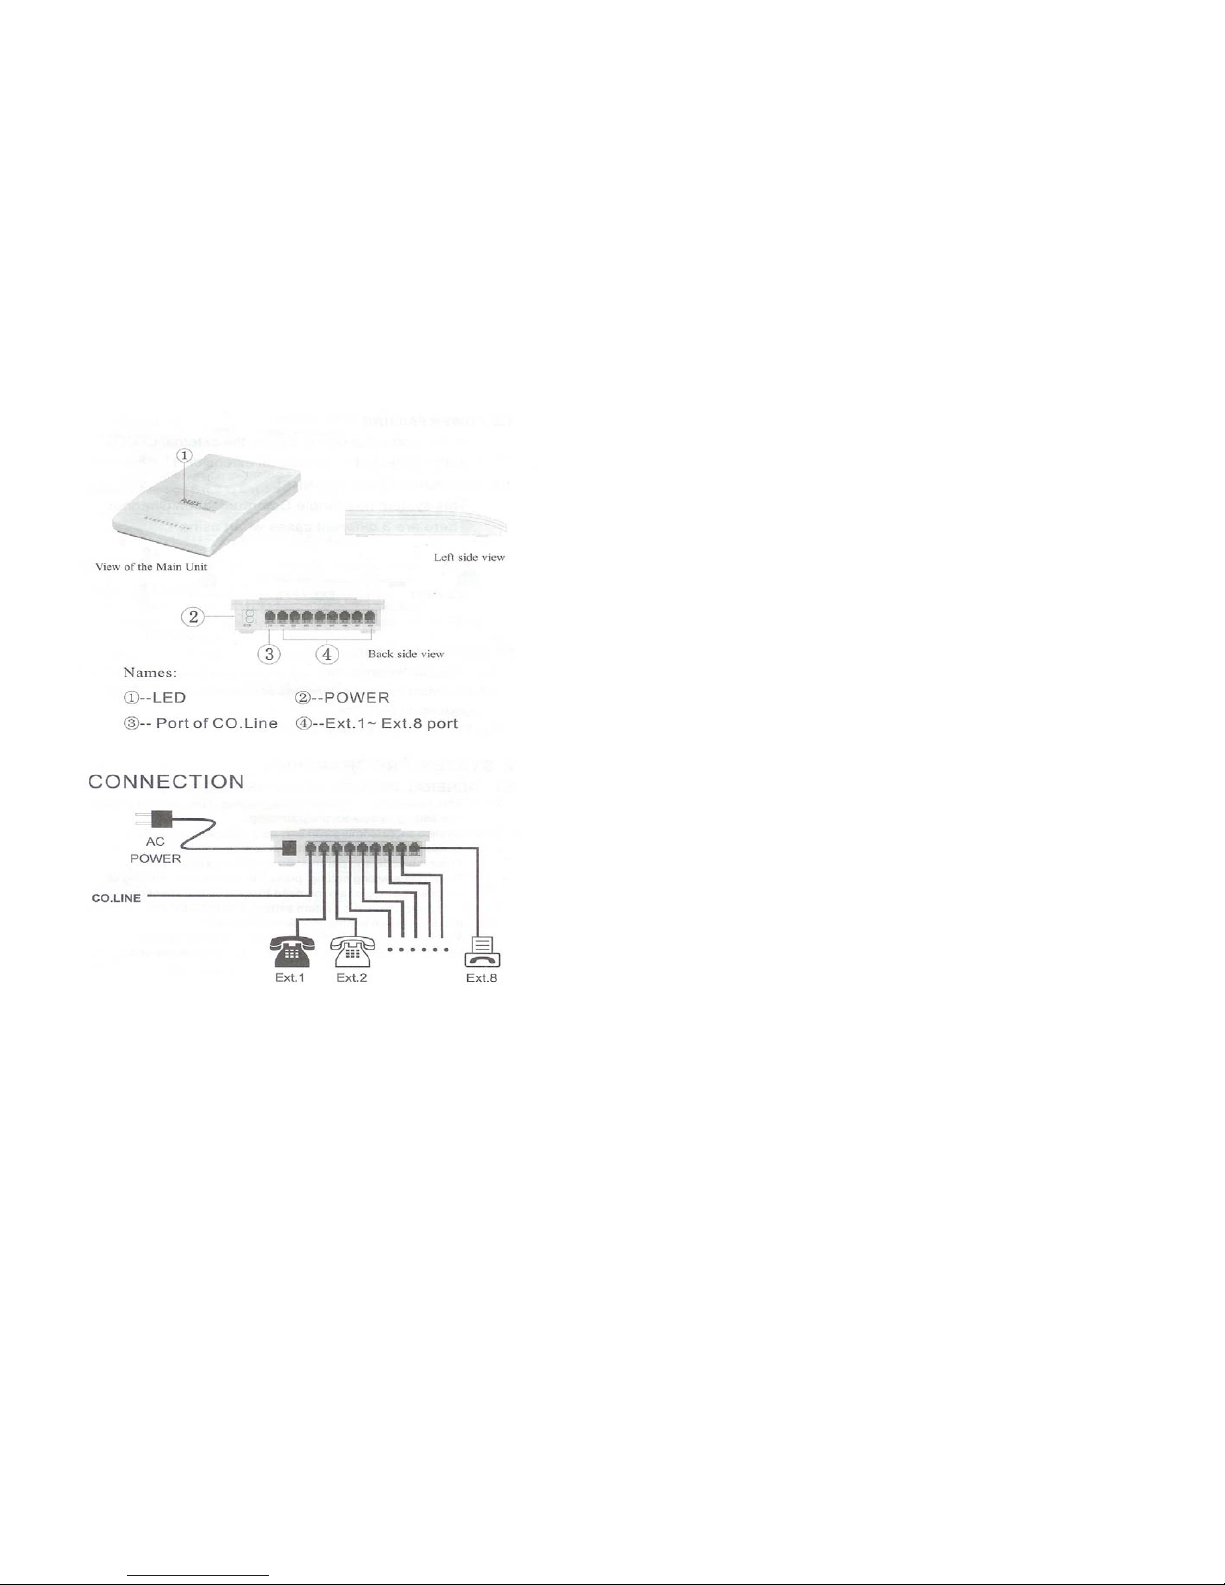
1.6 CO LINE
The SP-108C supports one CO line. Three different mode of
communications can be established.
•CO line + extension
•Extension + extension
•CO line + extension + extension
1.7 INSTALLATION PROCEDURES
1.7.1 Connect a CO line to the CO line port of SP-108C
1.7.2 Connect all analog phones to the extension ports
2 SYSTEMS PROGRAMMING
2.1 GENERAL PROGRAMMING INSTRUCTIONS
2.1.1 The SP-108C has a default factory setting.
2.1.2 Systems programming can only be performed from
extension #1.
2.1.3 To redo an incorrect instruction just press ‘*’ and repeat
the instructions again without having to press the hook.
2.2 DO NOT DISTURB
Description: To suppress an extension from ringing on
incoming CO line calls.
Instruction: Press ‘*#1n10’ (n= extension number 1 to 8).
Example: To suppress extension 2 from ringing - press
‘*#1210’. To suppress extensions 2 to 4 from ringing – press
‘*#121013101410’.
To cancel the feature – press ‘*#1n00’ (n= extension number 1
to 8).
Example: To cancel the feature for extension 2 - press
‘*#1200’.
1.5 POWER FAILURE
In the event of a power failure, CO line #1 will be automatically
connected to extension #1. 2.3 CALL RESTRICTION ASSIGNMENTS
2.3.1 TOLL RESTRICTION
Description: To restrict dialing of 4-digit long distance prefix.
5 6

(maximum 30 sets of prefixes can be assigned).
Instruction: Press ‘*#5nABCD#’ (n = extension number).
Example: To restrict extension 3 from dialing the prefix digits of
2345 – press ‘*#532345#’. To restrict extension 3 from dialing
011 – press ‘*#53011#’.
2.3.2 OUTGOING CALL RESTRICTION
Description: To restrict an extension from making
outgoing calls so that only Intercom calls can be made.
Instruction: Press ‘*#5n#’ (n = extension number).
Example: To restrict extension 3 from making outgoing
calls – press ‘*#53#’.
2.3.3 TO CLEAR A RESTRICTION
Description: To cancel the restriction on an extension.
Instruction: Press ‘*#5n0000’ (n = extension number).
Example: To clear an outgoing call restriction on
extension 3 – press ‘*#530000’.
2.3.4 SETTING PASSWORD TO PERMIT OUTGOING CALLS
Description: Using password to protect an extension
from make outgoing calls. Extension with the outgoing
call restriction assigned can use this feature also.
Instruction: Press ‘*#9abcd#’ (abcd = 4-digit password –
default password = 1234).
2.3.5 CHANGING PASSWORD
Description: Permit the user to change the password. It
must be performed on extension number 1.
Instruction: Press ‘*#8ABCD#’.
Example: To change the password to 2345 – press
‘*#82345#’.
2.4 SETTING TIME LIMIT ON OUTGOING CALLS
2.4.1 SETTING TIME LIMIT ON SPECIFIC EXTENSION
Description: Disconnect an outgoing call after a set
time limit.
Instruction: Press ‘*#3nMM#’ (n = extension number,
MM = minutes from 1 to 90).
Example: Restrict extension 3 to an outgoing call time
limit of 5 minutes – press ‘*#335#’.
2.4.2 TO CLEAR TIME LIMIT RESTRICTION
Instruction: Press ‘*#3n#’ (n = extension number).
Example: To cancel the time limit restriction on
extension number 3 – press ‘#33#’
2.5 SETTING NEW EXTENSION NUMBER
2.5.1 SETTING NEW EXTENSION NUMBER FOR AN
EXTENSION
Description: Change the existing extension number
Instruction: Press * # * abc # ABC
(abc = Existing extension number , (801-808);
ABC = New extension number to be assigned)
Example: Change the existing extension number from
803 to a new extension number 925
Press * # * 803 # 925
2.5.2 RESTORE TO DEFAULT EXTENSION
NUMBERING SCHEME
Description: Fall back to factory preset extension
numbering scheme.
Instruction: Press * # 6000#
2.6 SETTING AUTO ATTENDANT MODE
2.6.1 SETTING AUTO ATTENDANT MODE
Description: An incoming call will be greeted with the
recorded outgoing message, and routed to an appropriate extension
according to the digits received from the calling party.
Instruction: Press * # 2000
7 8

Format: abc
2.6.2 RECORD AN OUTGOING MESSAGE (OGM) abc = extension number
Description: To record an outgoing greeting message
for use in auto attendant mode. If the calling party presses a ‘0’, the
CO line will be connected to EXT 802.
Description: Input the extension number directly if no CO line is
connected to the PBX
Instruction: Press * # 2200 If there is an external incoming call when an extension A is connected
an extension B, both A & B will be supplied with series of short Beep
tone. A or B can go on-hook to get the ringing signal of the incoming
call, and pick up the call subsequently by going off-hook again.
Pick up the phone from Extension 1 and press *#2200,
one Beep tone is heard, then start the recording by speaking to the
phone. Recording is ended when another Beep tone is heard.
3.4 TRANSFER AN INCOMING CALL TO ANOTHER EXTENSION
2.6.2 PLAYBACK AN OUTGOING MESSAGE (OGM) Format: abc
Description: To listen to the recorded OGM abc = desired extension number
Instruction: Press * # 2300
Pick up the phone from Extension 1 and press *#2300,
one Beep tone is heard, followed by playing back of
the OGM.
Description: Allows an extension to transfer a received incoming call
to another extension. Example: The user of extension 805 has
received an external call, he can transfer the call to extension 807 by
pressing 807 directly.
Description: During the transfer, the on hold music will be supplied to
the external calling party.
3 OPERATING INSTRUCTION
3. 1 A CO LINE IS RECEIVING AN INCOMING CALL When Ext.807 picks up the phone, the call transfer is completed.
Music on Hold stops playing and the conversation resumes.
3.1.1 OPERATOR ATTENDANT MODE
Description: When a CO line is receiving an incoming call, all
assigned extensions will ring. Lift a handset of any ringing extensions
to answer the call. The incoming call can also be answered from
other non-ringing extensions by means of the Call Pick Up feature. If
necessary, the EXT that has answered the call can forward the
answered call to another EXT.
There are 4 different cases when a call is transferred from an
extension A to an extension B:
a) Ext A doesn't hang up while Ext. B lifts the handset.
Communication between A and B is established. The external caller
is put on hold with Music. Whoever A or B hangs up , the system will
transfer the external call to the remaining off-hook party.
b) Ext A doesn't hang up and Ext B doesn't answer in 20 seconds.
Ext A will be reconnected to the external calling party.
3.2 EXTERNAL CALL
Format: abcdef c) Ext A hangs up and Ext B answers within a certain period;
abcdef = External telephone number d) Ext A hangs up and Ext B doesn't answer the call in 20 seconds.
The external calling party will be transferred back to Ext A. If Ext A
does not answer the call in 20 seconds or Ext A is busy, then the
external call connection will be disconnected
Description: The user can dial an external telephone number directly
from an extension when the Telco dial tone is present.
3.3 INTERNAL CALL
Format: * + abc 3.5 CONFERENCE CALL AMONG 2 EXTENSIONSAND 1 CO LINE
abc = extension number Format: Press any digit for two seconds
Description: Input * to get the internal dial tone, then dial the
extension number Description: When a connection is established between an extension
and an external party, the extension can invite another extension to
join a conference call by pressing the extension number of the invited
9 10

extension directly. The invited extension will then ring while the
external party is put on-hold withmusic. After the invited extension go
off-hook, either the extension or the invited extension can press any
key on the phone for 2 seconds to let the external party to join the
conference.
3.6 Secretary Assisted Dialing
Format: #+*+abc
abc= Boss’s extension number.
Description: Firstly, a secretary from an extension has established
an outside call, then she press #*abc to transfer the established call
to extension abc.
3.7 CALL PICK UP
Format: Simply pick up the handset directly to answer an incoming
call.
Description: Allows a user from a non-ringing extension to answer an
external incoming.
11
Table of contents


