Sol SOL-ONE User manual
Style, Value, High-tech
State of the Airt –Air purification & scenting
SOL Multifunctional Modular Environment Conditioning Device
User Manual
V3.3_iOS
Dear Customer,
Thank you for purchasing the SOL device.
To avoid any occurring problems with the device and to take all the advantages that SOL
can provide for you while enjoying its maximal capacity; please read this User Manual.
You can also find and read this Manual at:
“Help” menu of the remote control device
The SOL Inc. website: www.soluxury.eu/support
We truly believe that with SOL you can improve the quality of your life and make your
environment more comfortable.
Sincerely,
Prof. Robert Somogyi
Senior President Sales

Device Manual V3.2_iOS 2
Table of Content
Notation.....................................................................................................................................................3
1 Vital Security Warnings..........................................................................................................................3
2 Attachments...........................................................................................................................................4
3 Setting up...............................................................................................................................................4
3.1 Unwrapping.....................................................................................................................................4
3.2 Placing.............................................................................................................................................4
3.3 Installation .......................................................................................................................................4
4 Using the SOL-ONE ..............................................................................................................................5
4.1 Controlling by Android smart phone...............................................................................................5
4.1.1 The specification of Android smart phones .............................................................................5
4.1.2 Downloading the application to Android smart phone.............................................................5
4.2 Controlling by iOS (Apple) smart phone.........................................................................................6
4.2.1 The specification of iOS (Apple) smart phones.......................................................................6
4.2.2 Downloading the application to iOS smart phone ...................................................................6
4.2.3 User Interface on iOS smart phone .........................................................................................6
4.2.4 Connecting to the device..........................................................................................................8
4.2.4.1 First connecting .................................................................................................................8
4.2.4.2 Reconnecting...................................................................................................................11
4.2.4.2.1 Reconnecting, one device ........................................................................................11
4.2.4.2.1.1 Autoconnect: YES..............................................................................................11
4.2.4.2.1.2 Autoconnect: NO................................................................................................11
4.2.4.2.2 Reconnecting, more than one devices.....................................................................11
4.2.4.2.2.1 Autoconnect: YES..............................................................................................12
4.2.4.2.2.2 Autoconnect: NO................................................................................................12
4.2.5 Options ...................................................................................................................................12
4.2.5.1 Day & Night settings........................................................................................................12
4.2.5.2 Device options .................................................................................................................13
4.2.5.2.1 Service time and erasing service time......................................................................13
4.2.5.2.2 Rename your device.................................................................................................14
4.2.5.2.3 Ask for PIN-switch.....................................................................................................15
4.2.5.2.4 Change PIN password..............................................................................................16
4.2.5.2.5 Scenting ...................................................................................................................16
4.2.5.2.6 Night lights dim..........................................................................................................16
4.2.5.3 Connections.....................................................................................................................17
4.2.5.4 Known devices.................................................................................................................17
4.2.6 Help ........................................................................................................................................19
4.2.7 Losing Bluetooth Connection and Reconnecting ..................................................................19
5 Describing functions ............................................................................................................................21
5.1 Turn on/off SOL-ONE ...................................................................................................................21
5.2 Turn on/off the Moodlighting.........................................................................................................21
5.3Turn on/off Air-scenting..................................................................................................................21
5.4 Controlling the RPM (up/down) of the vent ..................................................................................21
5.5 AQS Turn on/off the AQS (Air Quality Sensor) function...............................................................21
5.6 Turn on/off the UV LED.................................................................................................................22
5.7 Turning on/off the Moodlighting demo..........................................................................................22
5.8 Turn on/off the ionizing .................................................................................................................22
5.9 Color blending...............................................................................................................................22
6 Using the air-scenting unjt...................................................................................................................23
7 Maintaining and cleaning the device...................................................................................................24
8 Accessories..........................................................................................................................................25
8.1 Additives........................................................................................................................................25
8.2 Air-scenting perfumes...................................................................................................................25
9 Troubleshooting...................................................................................................................................26
10 Warranty.............................................................................................................................................27
11 Technical Data...................................................................................................................................28

Device Manual V3.2_iOS 3
NOTATION
Notification of possible contingency of danger –to recognize and act is vital
Warning
Notice
1VITAL SECURITY WARNINGS
Please read this Manual carefully before using the SOL Device and observe each
piece of information.
Use the device only with the CE marked 230VAC/12VDC 1000mA adapter which is
enclosed as an accessory. Using a non-certified adapter can cause electrocution when it is
damaged and can result in impairing the device.
Do not entrust children with turning the device on.
Do not cover the device while turning it on and running.
Always unplug the device prior to moving it..
Always unplug the device prior to removing the top part (chimney) from the bottom part.
Do not place any alien objects in the chimney.
Do not place any alien objects in the chimney’s ventilator –this can cause serious
injuries and can also result in impairing the device.
In case you use liquid for the air-purification (water and additives –in order to ensure
improved results), remove the water bowl before moving the device.
In case you use liquid for the air-purification (water and additives –in order to ensure
improved results), place the device where the spilling liquid won’t cause any kind of damage
(away from books, electricity, etc…)
In case there are little children around, be extra cautious about placing and running the
device
Place the device as it is required.
Device Manual V3.2_iOS 4
2ATTACHMENTS
1) The bottom part
2) The top part
3) Water bowl
4) 1 Adapter (CE marked 230VAC/12VDC 1000MA)
5) 1 Filter
6) User Manual
7) Warranty card
Attachments or purchasable attachment depending on the type of the device:
8) 1 Ionizing unit
9) 1 Air-scenting unit
10) 1 Air-scenting package containing:
Scenting head
2 perfume samples
11) Two types of additives (100 ml each)
3SETTING UP
3.1 UNWRAPPING
1) Open the top of the box, then take out the smaller box which contains the scenting
head and the 2 vials filled with perfume samples.
2) Take the top part (chimney) out of the box carefully.
3) Take the bottom part as well out of the box carefully.
4) Remove the water bowl from the bottom part.
5) After unwrapping, please check that you have all the attachments listed in Part 2.
3.2 PLACING
To ensure the maximal performance of the device, it is advised to set it in a place where it
can create the optimal air flow. Make sure there are no shelves or other objects above and
beside the device cloeser than a 20-30 cm, so they won’t block the inflow (at the side of the
device) and the outflow (at the top of the device) of the air.
Please check the security warnings in Part 1 prior to placing the device.
3.3 INSTALLATION
1) Place the water bowl in the bottom part.
2) Fill the bowl with water up to ¾ of the bowl then add the chosen additives.
Using water and additives is NOT REQUIRED to run the device, though it’s highly
advised as they can improve the efficiency of air-purifying.
3) Turn the top part (chimney) upside down and place the filter at the ventilator’s frame.
4) Turn the top part (chimney) back to its normal position and place it over the bottom
part. Make sure that the filter reaches the water bowl.
5) Contact the device to the adapter
Device Manual V3.2_iOS 5
6) Energize the adapter.
Now the device is in operable state.
7) In case of using the ionizing or the air-scenting unit, place it in the frame inside the
chimney. Gently rotate the ionizing or air-scenting unit until the magnets secure it at
the right position.
You can read more about turning the device on/off and using its functions in Part 4. You can
read more about the air-scenting unit in Part 5.
4USING THE SOL-ONE
4.1 CONTROLLING BY ANDROID SMART PHONE
4.1.1 THE SPECIFICATION OF ANDROID SMART PHONES
To run the application of the device controlling program on your phone, you will need an
Android 4.3 (or higher version) operating system and Bluetooth 4.0 communicating
capability.
4.1.2 DOWNLOADING THE APPLICATION TO ANDROID SMART PHONE
You can download the application from the GooglePlay store. You only have to choose and
download the application called sol remote, or you can use the link below:
https://play.google.com/store/apps/details?id=com.bcoolit.SolAndroid

Device Manual V3.2_iOS 6
4.2 CONTROLLING BY IOS (APPLE)SMART PHONE
4.2.1 THE SPECIFICATION OF IOS (APPLE)SMART PHONES
To run the device’s controlling application on your phone, you will need one of these IOS
(Apple) devices:
- iPhone 4S or higher version
- iPodTouch Generation 5
- iPad
4.2.2 DOWNLOADING THE APPLICATION TO IOS SMART PHONE
You can download the iOS application from the link below:
https://itunes.apple.com/us/app/sol-remote/id927321378?ls=1&mt=8
4.2.3 USER INTERFACE ON IOS SMART PHONE
Figure 1: User Interface on iOS smart phone

Device Manual V3.2_iOS 7
The color and the shade of the buttons indicate the device’s state:
a) All buttons are grey: the smart phone is not connected to the device via Bluetooth
b) SOL device is turned off
c) SOL device is turned on
Figure 2:Smart phone is not Figure 3: User Interface, Figure 4: User Interface,
connected to the device SOL device is turned off SOL device is turned on
via Bluetooth
The sign under the buttons represents the state of the button’s function:
Figure 5: States of the buttons of the User Interface
Owing to the bi-directional communication the device always reports its actual state to the
smart phone, therefore the User Interface of the SOL device always shows the actual
configuration and there’s no need to set that. For instance, in case you change the
ionizing device to the air-scenting device the button of the ionizing device goes grey
(inactive) and the button of the air-scenting device lights up (active) without any further
settings.

Device Manual V3.2_iOS 8
Figure 6: User Interface Figure 7: User Interface Figure 8: User Interface
SOL device with no ionizing SOL device with ionizing option SOL device with air-scenting
or air-scenting option turned off turned on, and with the level line
of perfume
4.2.4 CONNECTING TO THE DEVICE
You can control several SOL devices with the application, though you can only connect to
one device at a time.
4.2.4.1 First connecting
1) Launch the application: on iOS device
2) Bluetooth settings
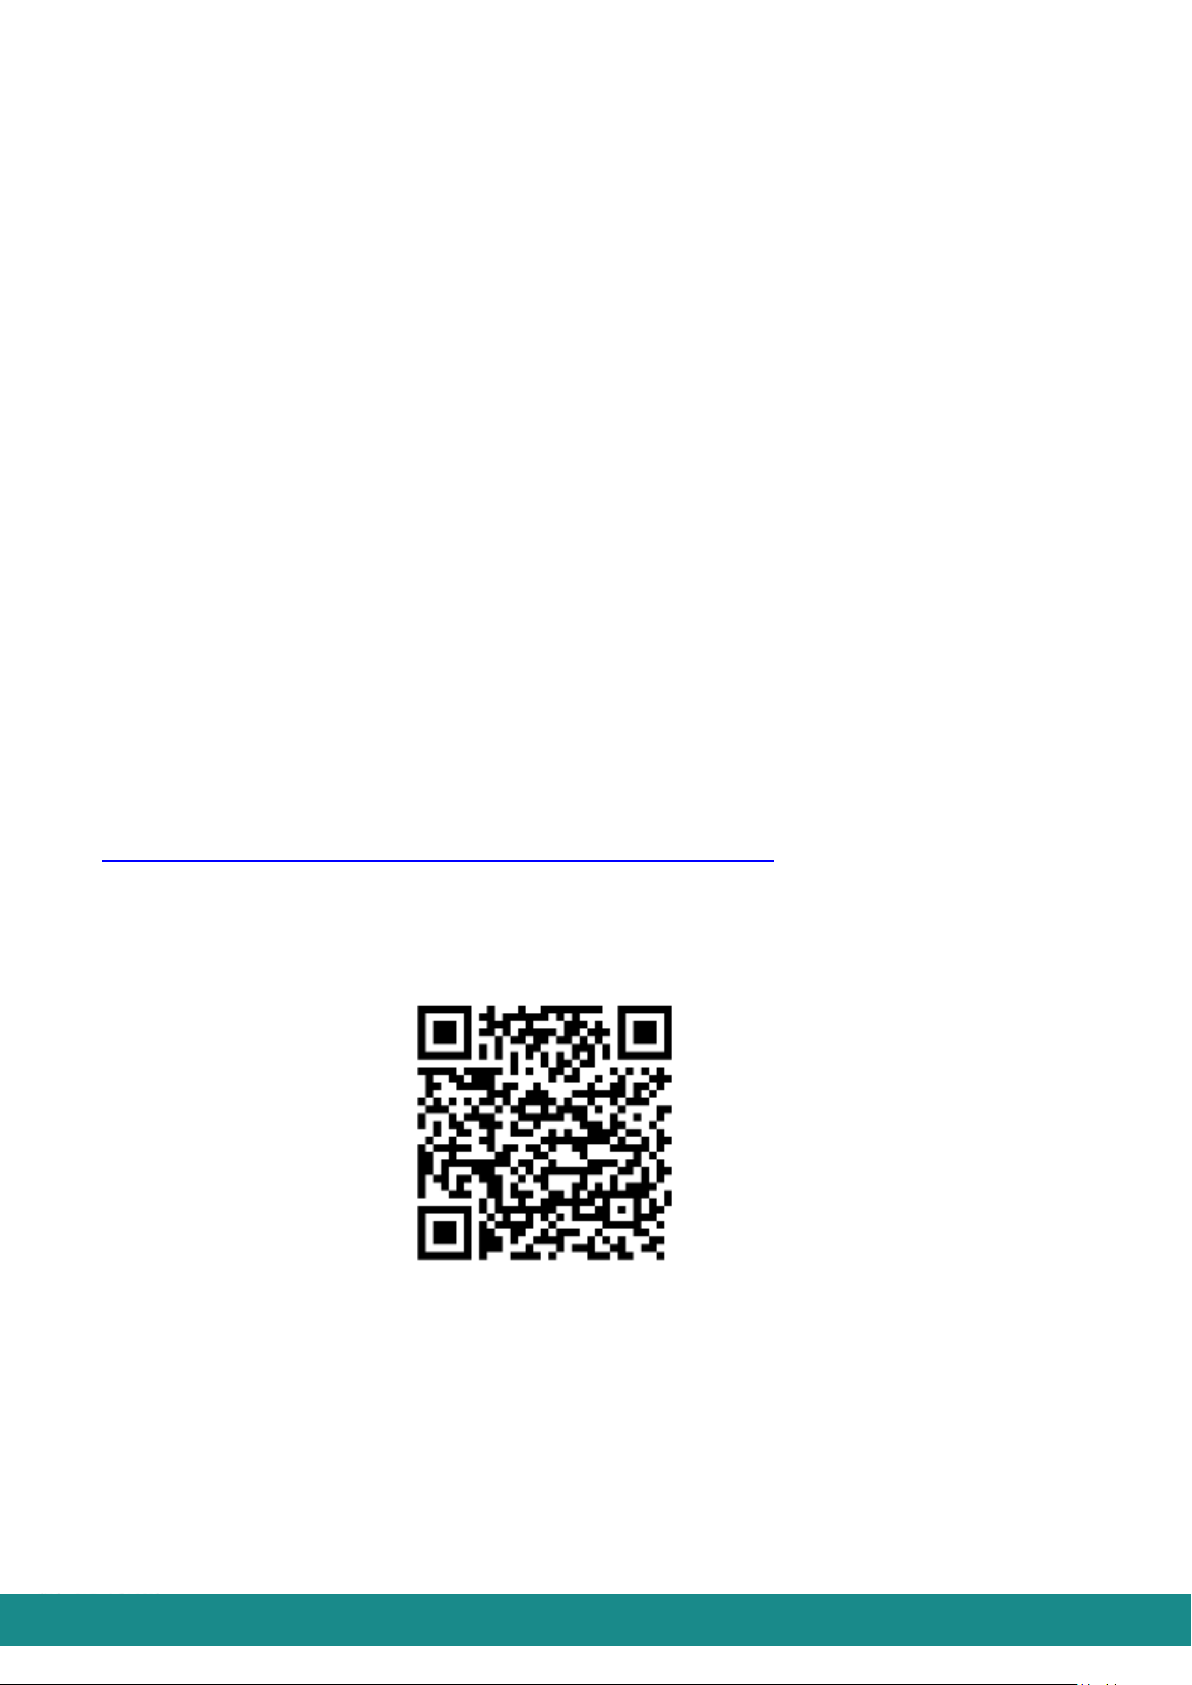
a. In case your Bluetooth is not turned on, the message below warns you that
doing so is required to control the SOL. If you click on “Settings” your smart
phone will automatically jump to the page where you can launch Bluethooth.
Device Manual V3.2_iOS 9
Figure 9: User Interface, Launch Bluetooth
After this, leave Bluetooth page and launch the application:
b. In case your Bluetooth is already running, after launching the application you
are transferred to the User Interface, where every button is grey, as shown at
Figure 2.
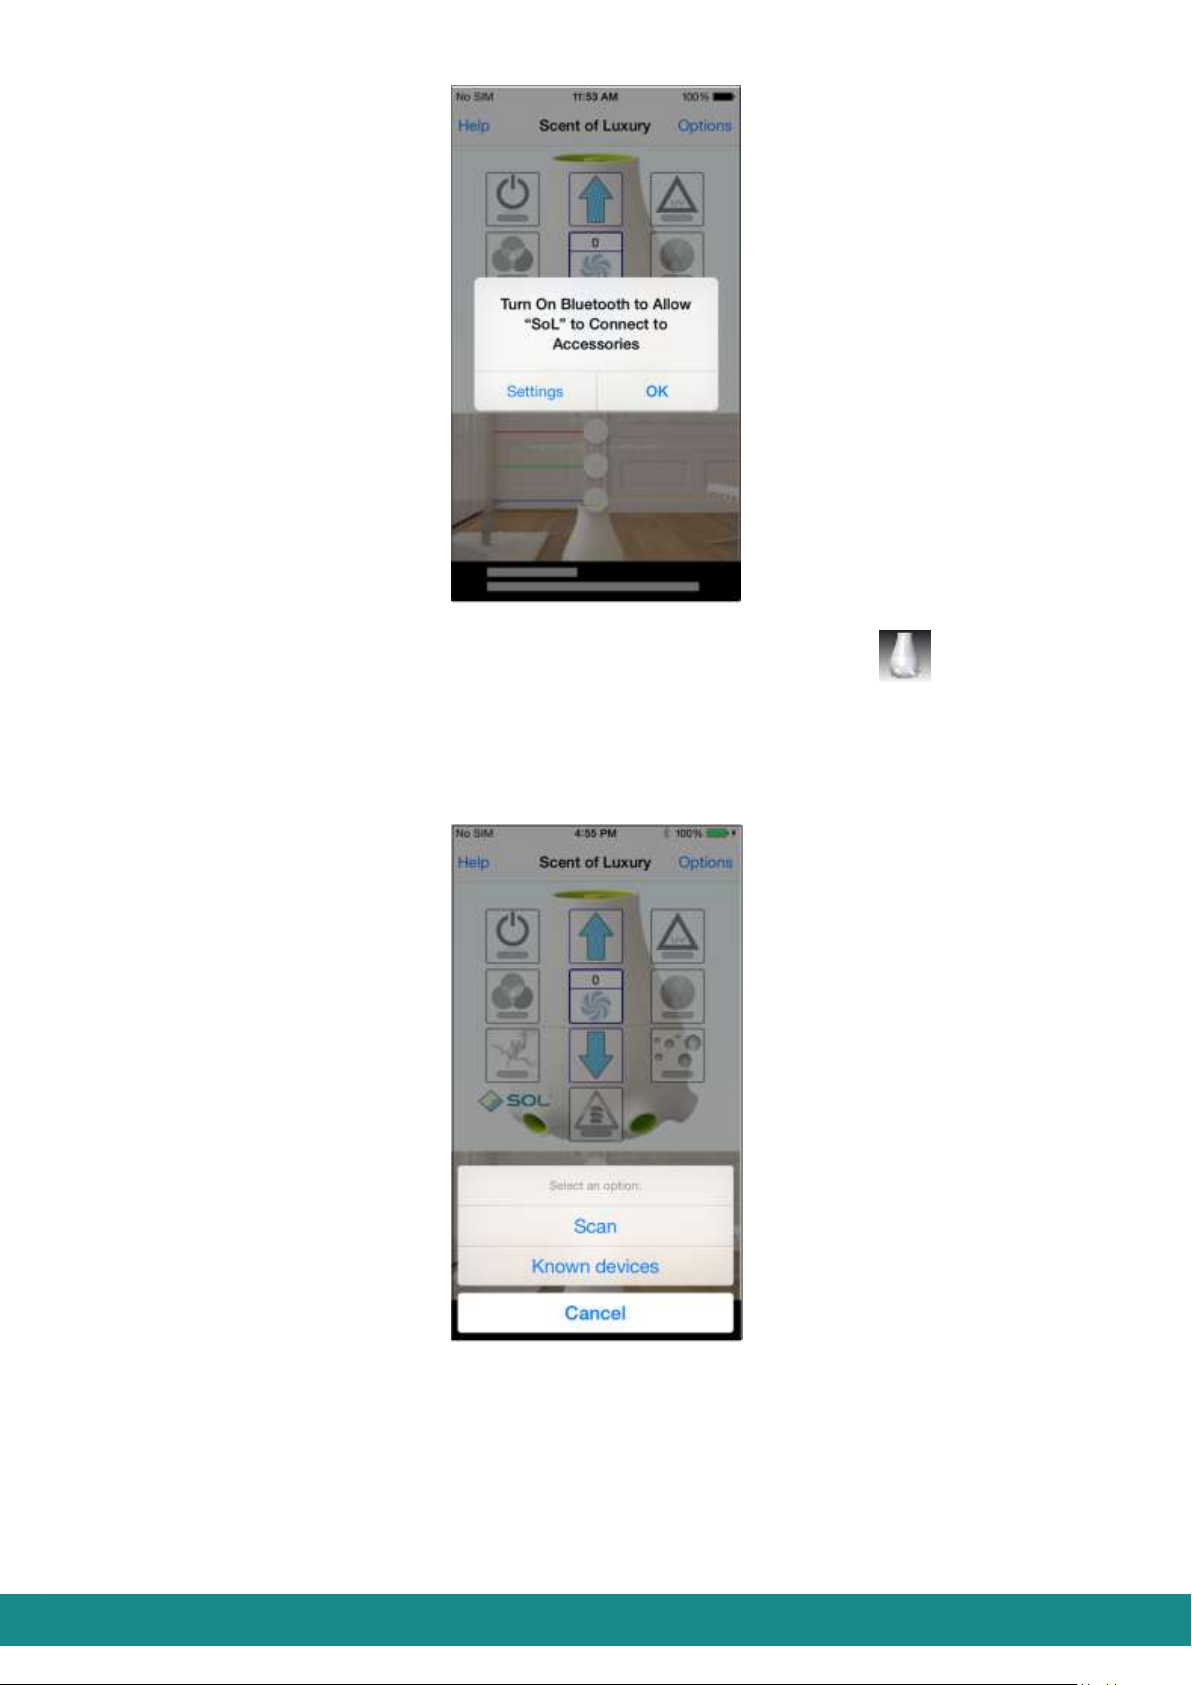
3) Touch „Options” and you will be transferred to the page as shown below:
Figure 10: User Interface, connecting device
4) Touch „Scan” and you will be transferred to the page as shown below:

Device Manual V3.2_iOS 10
Figure 11: User Interface, connecting device
5) You can see the ID of the device on the list (in case you have more than one devices,
you can see the ID of each device within the transmission distance of the Bluetooth
connection). In this case this would be „SOL 000000”. The characters standing after
SOL mean the production number.
Figure 12: User Interface, connecting device
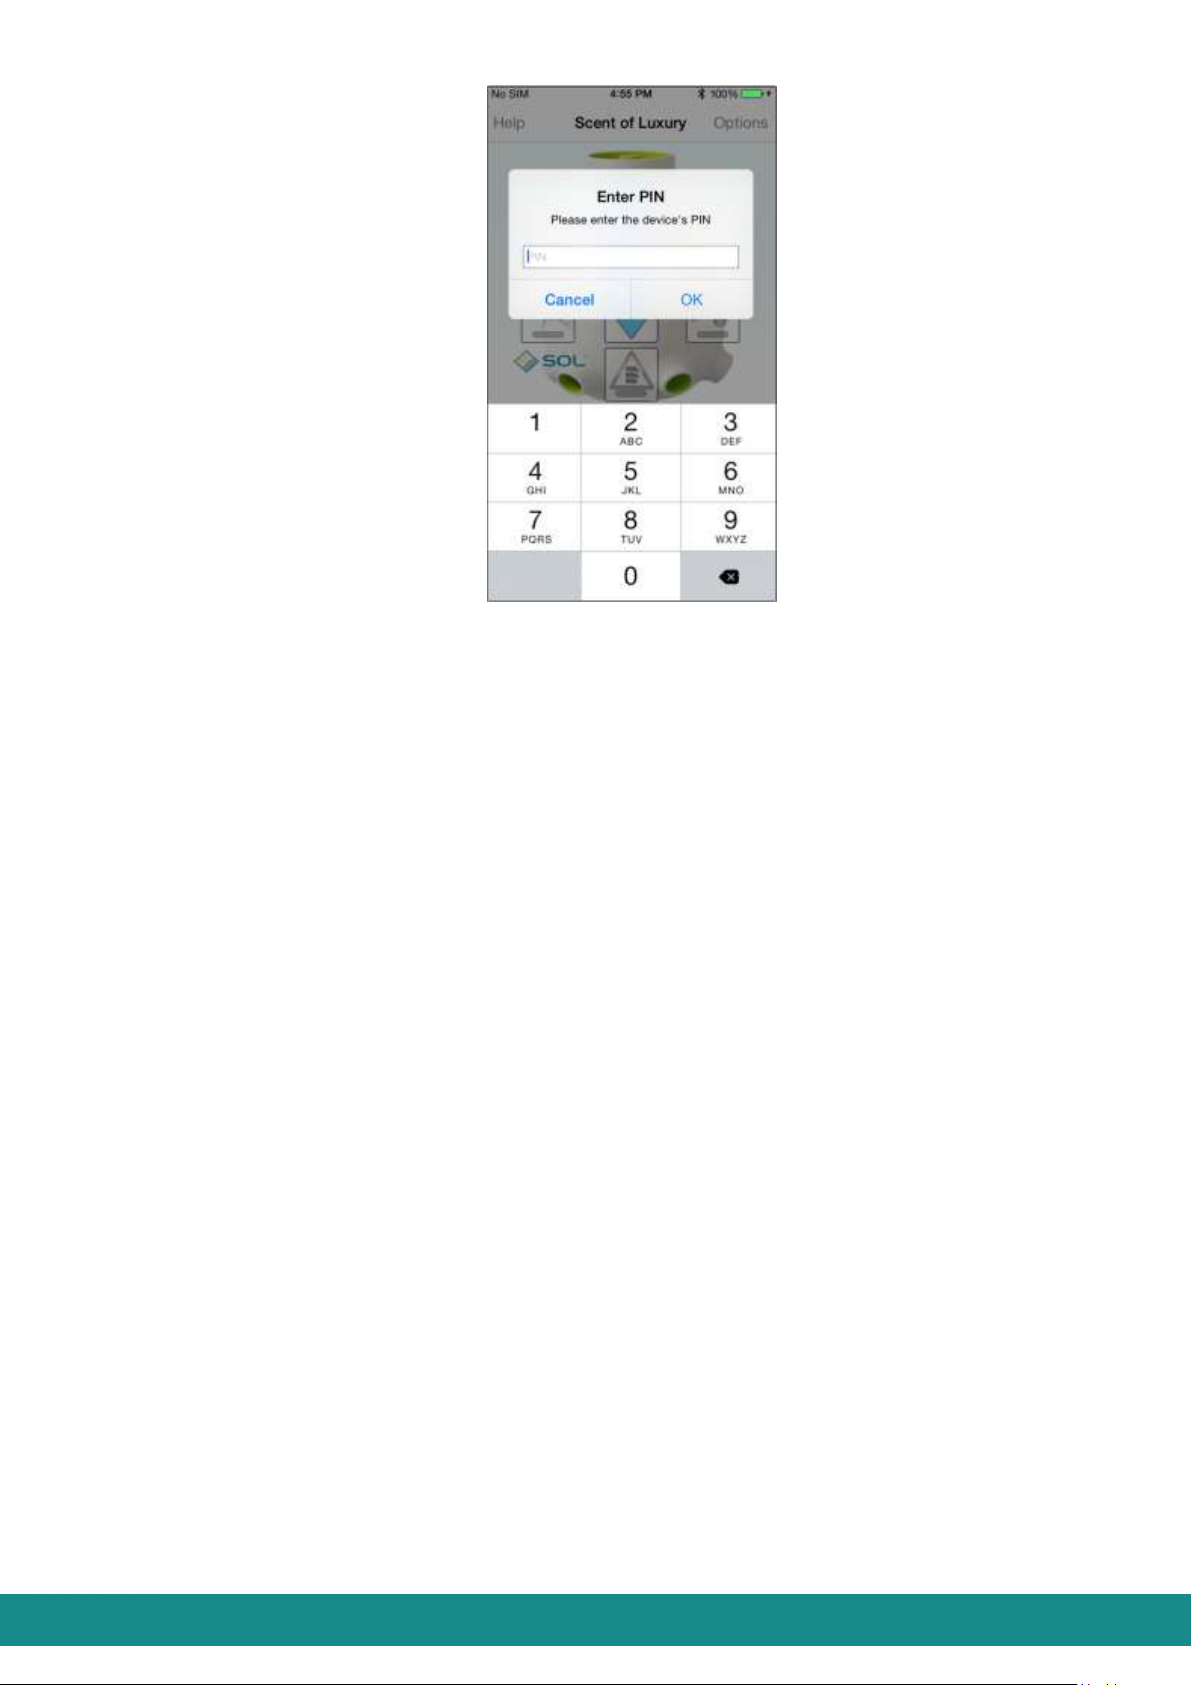
6) Choose the ID from the list and the application will request a PIN password (this is
needed to avoid others connecting to your device without permission). Originally the
PIN password is 1234 at all cases and it is highly advised to change as described in
Part 4.2.5.2.4.
At first connecting the application will always request the PIN password!
Device Manual V3.2_iOS 11
Figure 13: Entering PIN password
7) After entering the correct PIN password, the smart phone will connect to the SOL-
ONE and you will be transferred to the User Interface as shown at Figure 1 –with the
slight difference of not showing „Scent of Luxury” sign, but the actual ID of your
device.
4.2.4.2 Reconnecting
As described in Part 4.2.5.4 connecting can be done in two ways. Either you set
Autoconnect option (thus the device will connect automatically after running the application)
or you use Scan if you wish to connect the device manually. Furthermore, as described in
Part 4.2.5.2.3, you can decide whether you want the application to ask for a PIN password
or not while you use manual connection.
4.2.4.2.1 Reconnecting, one device
4.2.4.2.1.1 Autoconnect: YES
Your smart phone will automatically connect to the SOL-ONE (which is already on
Autoconnect) and you will be transferred to the User Interface as shown at Figure 1–with the
slight difference of not showing „Scent of Luxury” sign, but the actual ID of your device.
4.2.4.2.1.2 Autoconnect: NO
After launching the application, you will be transferred to the User Interface as shown at
Figure 2.
Do as told in tasks 3), 4) and 5) Part 4.2.4.1.
If your SOL ONE asks for a PIN password, enter that as described in task 6), if not, then
your smart phone will connect to the SOL-ONE and you will be transferred to the User
Interface as shown at Figure 1–with the slight difference of not showing „Scent of Luxury”
sign, but the actual ID of your device.
4.2.4.2.2 Reconnecting, more than one devices

Device Manual V3.2_iOS 12
4.2.4.2.2.1 Autoconnect: YES
In case there are more than one SOL-ONE devices fuctioning already and one of them is set
on Autoconnect within the transmission distance of your smart phone, it will automatically
connect to that device. If more than one SOL-ONE devices are set on Autoconnect your
smart phone will connect to the one it reaches first.
4.2.4.2.2.2 Autoconnect: NO
In case none of the SOL-ONE devices already functioning within the transmission distance
of your smart phone are set on Autoconnect, you will be transferred to the screeen as shown
in Figure 2 after running the application.
Do as told in tasks 3), 4), 5) in Part 4.2.4.1.
If your SOL-ONE asks for a PIN password, enter it as described in task 6).
If no password is needed, the smart phone will connect to SOL-ONE and you will be
transferred to the User Interface shown in Figure 1 - with the slight difference of not showing
the “Scent of Luxury” sign, but the actual ID of your device.
4.2.5 OPTIONS
Touching „Options” on the User Interface of your connected device, you will be transferred
to the screen as shown below –with the slight difference of not showing „Scent of Luxury”
sign, but the actual ID of your device.
Figure 14: User Interface, Options
4.2.5.1 Day & Night settings
With „Day/Night settings” function you can set the timing of your device:
1) You can set the inbuilt clock of the device by touching „Set time” and synchronize it
with the time told by your smart phones with „Local time”. After setting this the inbuilt
clock of the device will work even when it is unplugged.
2) By touching „Save” you can set the starting points of daytime and nighttime runnings:

Device Manual V3.2_iOS 13
Figure 15: User Interface Figure 16: User Interface
Setting the morning start Setting the evening start
By touching „Back” you will be transferred to the User Interface (as shown at Figure 1).
During the nighttime period the performance of the ventilator decreases to 20% therefore its
noise level will decrease as well. In this time period you can also set the lighting options of
the device. (as described in Part 4.2.5.2.3).
The version number of the application will be shown under “Save”.
4.2.5.2 Device options
By touching „Device options” you will be transferred to the page as shown at Figure 17:
Figure 17: User Interface, Device Options
4.2.5.2.1 Service time and erasing service time

Device Manual V3.2_iOS 14
„Operating hours” is the service time of your device (as shown at. Figure 18), which
indicates the hours of service.
Erasing the service time may occur in 2 cases:
1. After 168 hours of service the device will stop and a red flashing light will indicate that the
filter must be changed. At the same time you will see the warning shown below:
Figure 18: User Interface, Service time erase
You should:
a) “Reset”the device’s operating hours
b) Turn off the device and unplug it.
c) Change the filter as described in Part 7.
d) Plug the device again and turn it on.
2. In case you need to change the filter for any reason before the expiration of 168 hours,
touch „Reset” after cleaning/changing the filter in order to reset the service time.
4.2.5.2.2 Rename your device
Basically the name of the device is SOL-ONE. With „Rename”function, you can change
that to anything using 14 characters (for instance “Living room”).
Do not use characters with accents.

Device Manual V3.2_iOS 15
Figure 19: User Interface,
Rename your device
A message will inform you about a successful renaming. Touch “Ok” to confirm the new name.
“Forget device” function of Part 4.2.5.4 will delete the former name (SOL-ONE) from the list, and
then you can connect to your device again as described in points 3), 4), 5), 6), 7) of Part 4.2.4.1.
From now on your device will bear its new name.
4.2.5.2.3 Ask for PIN-switch
Figure 20: User Interface,
Ask for PIN-switch
With this switch you can set the device to request a PIN password or not, when connecting
to your smart phone.
Device Manual V3.2_iOS 16
In case of using Autoconnect your application will only request the PIN password, if
someone has changed the PIN password of the SOL-ONE device while using another smart
phone.
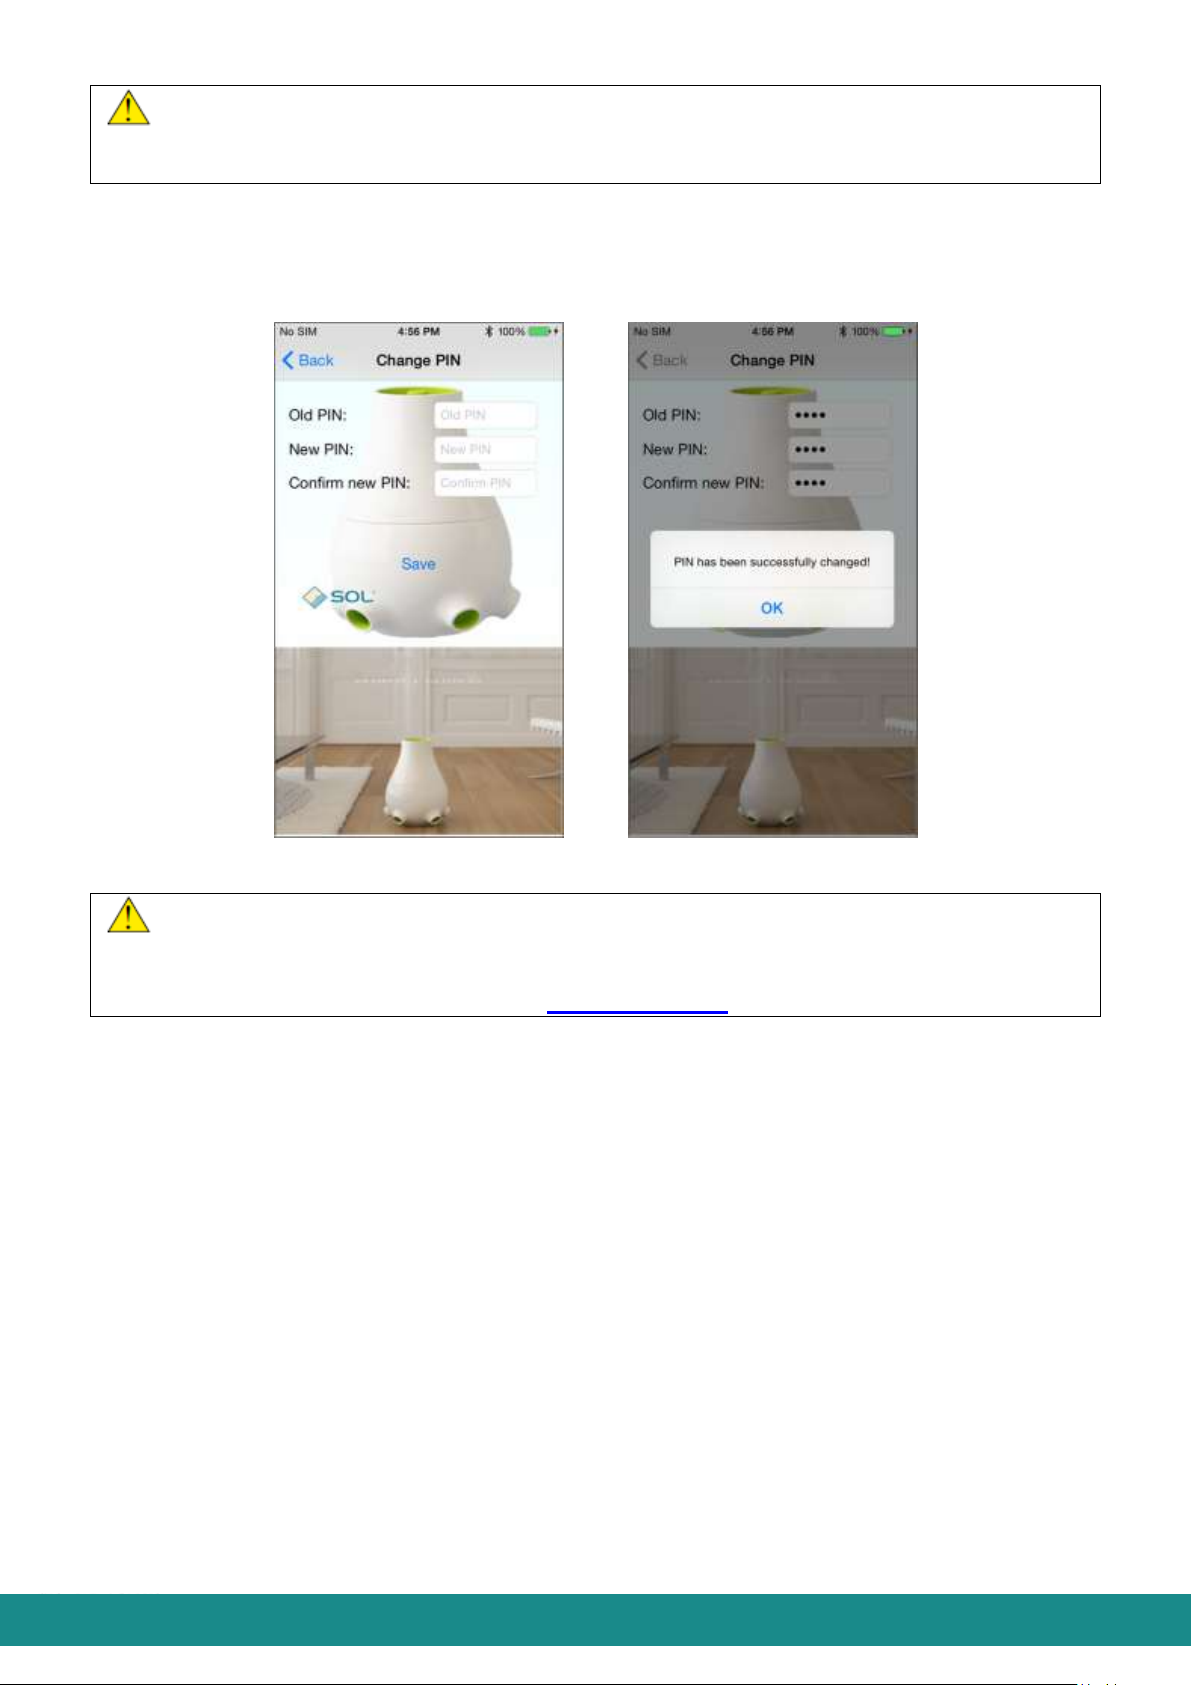
4.2.5.2.4 Change PIN password
The device requests a PIN password as described in Part 4.2.4.1 6). With the function
shown at Figure 21 you can change this PIN password:
Figure 21: User Interface, Changing PIN password
To change your PIN password, you must know the previous PIN password –therefore
we highly advise you to write it down. SOL-ONE has a PIN2 password for those cases when
the PIN password is forgotten or gets lost. You can receive your PIN2 password using the
serial number by making an application at www.soluxury.eu
4.2.5.2.5 Scenting
Choosing “Scenting by”function you can set the frequency of the running periods. Options
are from 5 up to 250 minutes. This time is the length of intervals between two scenting
periods. After setting the time period you prefer, touch „Save”.
4.2.5.2.6 Night lights dim
Depending on the environment of the device, the lights at nighttime can be bothersome (for
instance in bedrooms). Therefore by choosing the function “Night lights dim”you can set
the intensity of the lightingin the night-morning time period:
None: All lights are on during night time
Color: No RGB lighting during night time
Color & UV: Neither RGB lighting or UV indicator light during night time
All: All lights are turned off during night time
After setting the lighting to your preferences, touch „Save”
By touching „<” you can go back to the User Interface as shown at Figure 1.

Device Manual V3.2_iOS 17
4.2.5.3 Connections
By touching „Connections” you will be transferred to the screen as shown at Figure 22 and
it will show you the state of your connection:
Figure 22: State of connection
This Figure shows that the device „SOL 000000” is connected to the smart phone.
By touching „Disconnect” your smart phone will disconnect from your SOL-ONE
device.
By touching „Scan” the application will search for all the SOL devices within the
transmission distance of your smart phone. By choosing the ID of a SOL ONE device
from the list, you can connect to that.
By touching „<” you can go back to the User Interface as shown at Figure 1.
4.2.5.4 Known devices
By touching „Known devices” you will be transferred to the screen as shown below at
Figure 23, which will show you that your smart phone has been connected to the device
named „SOL Living room” with the serial number of „SOL000000” and Autoconnect
function has not been activated in this device.

Device Manual V3.2_iOS 18
Figure 23: User Interface
Known devices
If you choose a device from the list, you will be transferred to the screen as shown at Figure
24, and you will see the functions as shown below:
Figure 24: User Interface
Known devices
„Forget device” will delete this connection. If you want to delete this connection
the screen (as shown at Figure 25) will warn you about the disconnection of SOL-
ONE. By touching „OK” you will delete the connection from your list, by touching
„Cancel” you will go back to the screen shown at Figure 24.

Device Manual V3.2_iOS 19
Figure 25: User Interface
Warning of Disconnection
„Enable/Disable Autoconnect”: You will enable or disable Autoconnect with this
function.
By touching „Cancel” you will ususally go back to the previous screen.
4.2.6 HELP
By clicking on „Help” you can read this manual. After reading it, touch „<”and you will be
transferred to the screen as shown at Figure 1.
4.2.7 LOSING BLUETOOTH CONNECTION AND RECONNECTING
A connected SOL ONE and smart phone can lose Bluetooth connection if:
The device gets out of the transmission distance of your smart phone e.g. if you take
your smart phone out of the room where your SOL-ONE device is placed.,
The SOL-ONE device gets cut off (in case of blackouts or unplugging the adapter).
In these cases you will get the screen as shown at Figure 26:

Device Manual V3.2_iOS 20
Figure 26: Losing Bluetooth connection
In case you see the User Interface as shown at Figure 26 your smart phone will search for
SOL ONE devices within its transmission distance.
In case the connection can be rebuilt (the SOL ONE device gets back to the
transmission distance of your smart phone or it gets power again), your smart phone
will automatically reconnect in just a few seconds.
In case the connection can’t be rebuilt for the reasons described above, touching
„Manual scan” will allow your smart phone to search for another SOL ONE device
within its transmission distance.. In this case you will see the screen shown at Figure
12 and you can connect to the device chosen from the list as it is described in Part
4.2.4.2.2 .
Other manuals for SOL-ONE
1
Table of contents
Popular Air Cleaner manuals by other brands


Synexis
Synexis SPHERE quick start guide

Aerobiotix
Aerobiotix GermZone 100 user manual

ClimateRight
ClimateRight iAirQ450 owner's manual

Antop
Antop AP-C1 Series user manual

MODULE-AIR
MODULE-AIR AF-36 VT Series Operating instructions & parts manual

EdenPURE
EdenPURE 360 Super Climater Operation and warranty manual