SolarMate Secure Professional Plus User manual
SolarMate Secure Professional Plus
INSTRUCTION MANUAL
Model SMS003
GENERAL
Thank you for purchasing the SolarMate Secure professional Plus
motion activated security floodlight. It was made to provide many
years of service using environmentally friendly solar power.
BOX CONTENTS
1 x SolarMate Secure Professional Plus 48 LED Light and Motion Detector
1 x Solar Panel
1 x Wall Fixings Pack
1 x User Manual
FEATURES
• Uses only solar power.
• Can be installed anywhere as long as the solar panel can see the sky.
• Uses 48 individual white high luminance LEDs.
• Both the solar panel and light head are adjustable. The solar panel
can be adjusted horizontally through 360 degrees and tilted
backwards through 90 degrees. The light head can be adjusted
horizontally through 180 degrees and tilted forwards or backwards
through 120 degrees.
• Low voltage indication: the red indicator light will flicker when
accumulator voltage is below approx. 7V, which indicates the battery
voltage is deficient. When the accumulator voltage is below 6.1V,
the unit turned off automatically.
• Lithium battery controller possesses short-circuit / over-discharge /
overcharge protection function.
• There are three modes: ON, OFF & AUTO.
SPECIFICATION
1. 10V/2.5W single crystal silicon solar panel.
2. 7.4V 1800mAh (lithium battery)
3. Max continuous illumination time: 4hrs
4. Installation height: 1 to 3m
5. Light adjustment time: 10sec to 3min
6. Detection distance: 12m max (<24 Deg C)
7. Coverage: 180odetection angle
8. Light sensitivity: 10 to 2000 LUX
9. Working Temperature: –10 to +40oC
• Detection range: 12m
Solar Power Sensor Lamp Instruction
What’s Inside the Package
• 48 LED matrix light w/motion detector
• Solar charger board
• User Manual
Introduction
Specifications
• Coverage: 180º detection angle
(22 ºC) (adjustable)
• LED single power: 0.06W
• Matrix light: 48 super bright LEDs
• Rated load: 3.5W Max.
• Light-control: <10LUX
• Battery: 7.4V, 1800mAH lithium battery
• Solar charger board: 10VDC/2.5W Monocrystalline
(with 15' cable) ( Life: over 3 years )
• Continuous illumination time: (1800mAH) Up to 4 hours
• Time setting: Min. 10 seconds, Max. 3 minutes. (adjustable)
• LED lamp installation height: 1m to 3m.
• Working temperature: -10 ºC to +40 ºC
100V-240V Convert 9V
12V Convert 9V
Outdoor camping lighting
Charger
Car-mounted Charger
Note:Please purchase according to demand.
Note:Packaging items
Auto repair lighting
8X1X1X 8X
Φ6 Plastic expansion 4x30 Screw
LED
SENSOR LIGHT
Solar panels
10V/2.5W
Cord: 5M
208mm
100mm 94mm
360mm
126mm
50mm
177mm
188.5mm
152.mm
• Luminous flux: 125lm
Thank you for purchasing SOLAR POWERED WITH MOTION ACTIVATED 48 LED SECURITY
FLOOD LIGHT
With its effortless setup and lightweight design, the light conforms to all your lighting needs. It was made to
provide many years of service using environmentally friendly solar power.
44.50
26.50
6. Place solar board at a sunny location.5. Mount solar board with screws. Adjust the direction.
44.50
26.50
6. Place solar board at a sunny location.5. Mount solar board with screws. Adjust the direction.
44.50
26.50
6. Place solar board at a sunny location.5. Mount solar board with screws. Adjust the direction.
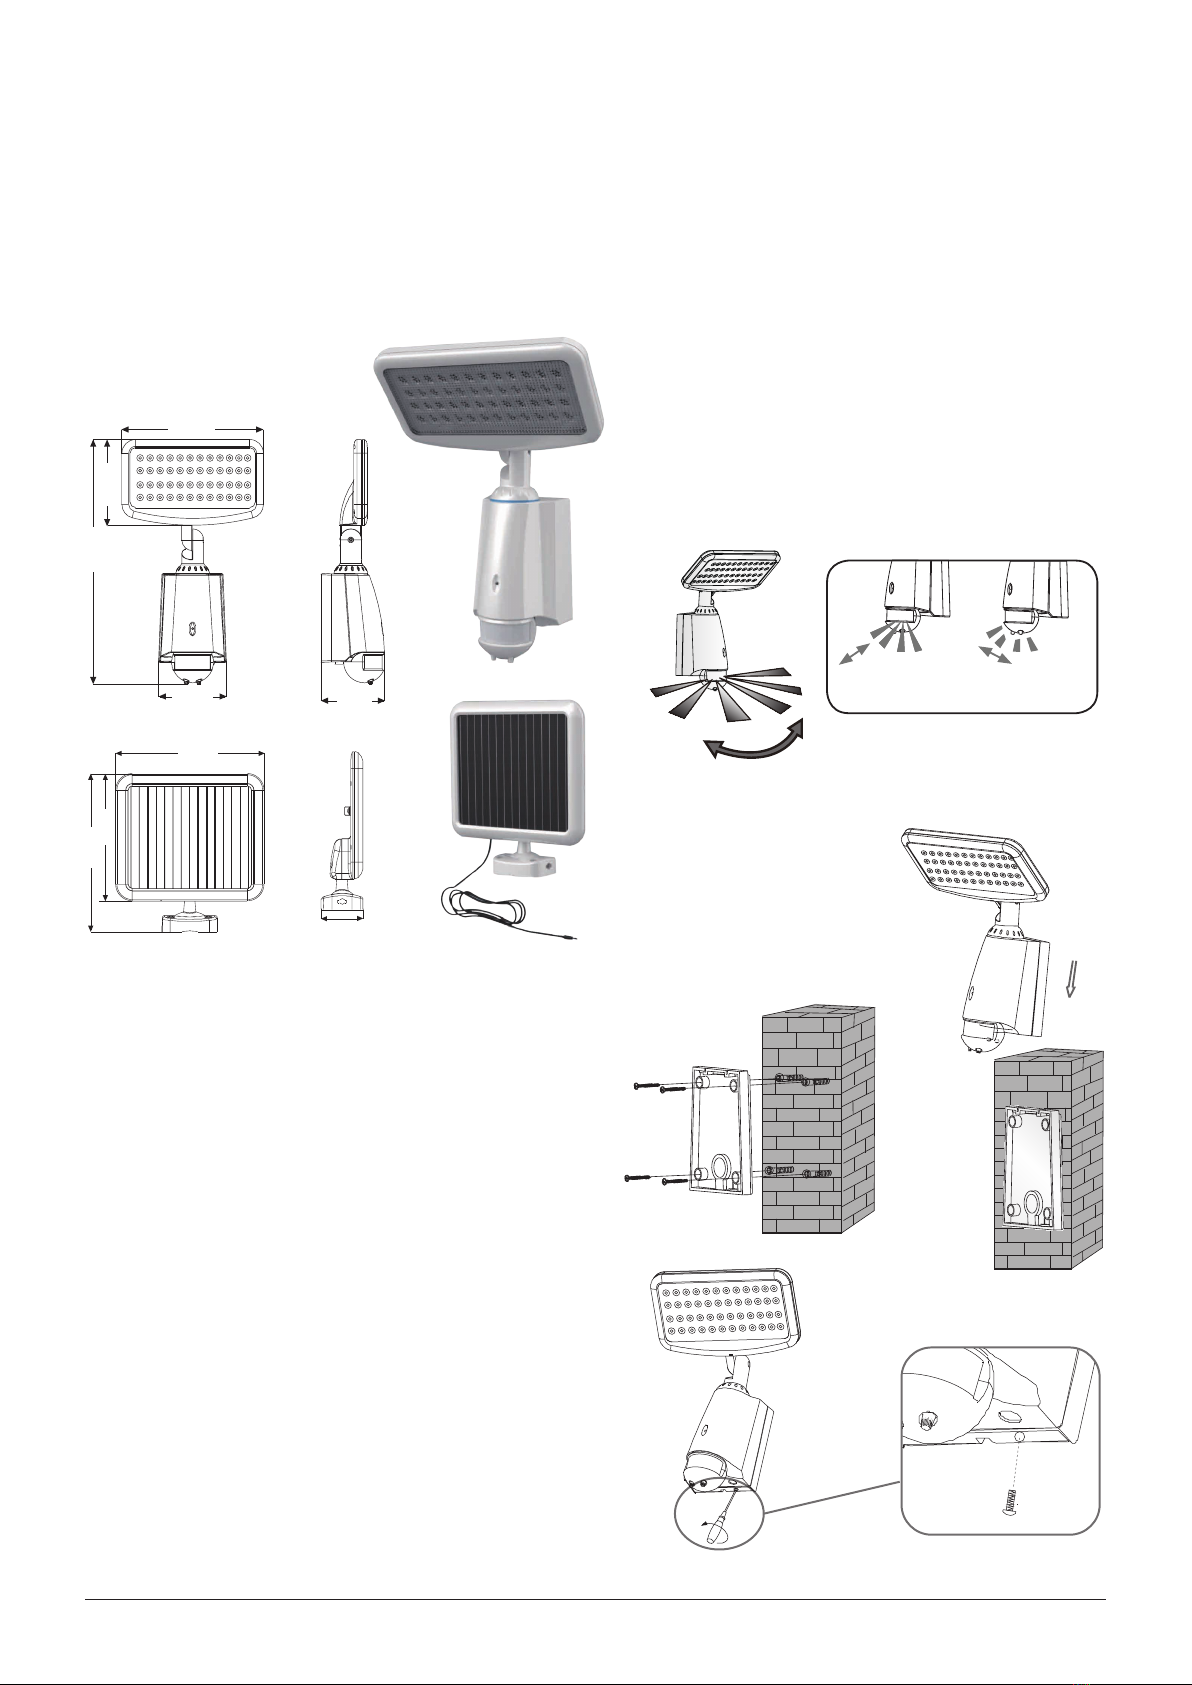
INSTALLATION GUIDELINES
1. GENERAL
(a) You should install the solar panel where sunshine is not
blocked during the majority of the day, for example away
from tall buildings and trees.
(b) Ensure light/PIR unit is mounted on to a solid object, for
example the side of a shed, the wall of a building. Bear in
mind that the 5m wire integral to the solar panel needs to be
plugged into the light unit.
(c) Ensure PIR is clear of moving or flapping objects as these may
cause false triggering.
(d) Avoid installing it near areas of significant temperature change
– e.g. air conditioning, central heating etc.
(e) The PIR is more sensitive to movement across as opposed to
movement towards or away from it. So when installing it, you
should select a position so that the expected movement will
be going across the sensor.
2. INSTALLATION
(a) Attach mounting plate to
wall using fixings supplied.
(Fig.1)
(b) Slide light unit into mounting
plate (Fig. 2) and secure using
supplied screw in the bottom
surface of the plate/light unit.
(Fig. 3)
180 DEGREE DETECTION ANGLE
MOVEMENT TOWARDS/AWAY
SENSITIVITY LOW
MOVEMENT ACROSS
SENSITIVITY HIGH
12 m
Quick Setup Procedure
Pencil Electric drill Hammer Screwdriver
Note:Please bring the following tools
Sensor Information
Correct moving orientation Detection angle
180°
Warning!
1. Please keep it away from the children.
2.This product can installed for outdoor, but we suggest
that against for the rain/storm & High lights.
Spectrogram
Fig.1 Fig. 2
Fig. 3

2. INSTALLATION(continued)
(c) Mount the solar panel in place with fixings supplied
and adjust direction (Fig. 4)
(d) Adjust the PIR motion sensor direction - it has a 90oangle of
adjustment horizontally and 15overtically. Sensitivity and light
delay time can be adjusted using the 2 dials on the bottom of the
motion sensor (Fig. 5).
PLEASE NOTE
Setting to maximum sensitivity could cause the light to be turned
on in error by blown leaves, a moving curtain or small animals, etc.
Experiment to find the bext setting.
(e) Adjust direction of light head, then insert the end of ther wire from
the solar panel into the socket underneath the light unit (Fig. 6)
9. Insert the wire plug from the solar board into the
bottom of the light.
Make sure the wire plug is completely connected.
8. Adjust the direction of light head.
7. Adjust the motion detector direction.
+45°
-45°
15°
It can be set at the range of 8second (counterclockwise rotation to the end) to
3minute(clockwise rotation to the end) .The timer will recount when the sensor
detect a moving signal before the end of the last time, so we advise that you’d
better set the time to minimum when you make the detection range testing or the
walking testing.
Note: The sensor need to wait 1secend to re-work after the light going off. Only
after the end of the time, the light will lighten again when detecting the signal.
+90°
-90°
-100°
+30°
This range refers to the radii of the circular region that appears on the ground
when the light is installed in the 2.5 m height. A minimum detection range (nearly
4 m in radii) rotating a counterclockwise rotation to the end. A maximum
detection range (nearly 15 m in radii) rotating a clockwise rotation to the end.
Operational Guide
1. Battery Installation
2. Testing Mode:
3. “OFF” Statues
4. “AUTO” Statues
Solar LED light, battery voltage 7.4V, 1800mAH, sensing angle> 150 º, in full lit, continuous working time> 4 hours.
The system will be in “power fail safeguard” model. No motion detecting function. Consumes <25UA.
I
Before testing, remove the screws in the back, then remove the back cover; connect the battery (1800mAH) with the
power connectors, the system will be started and the red LED indicate light on; the indication LED light will be off after
the system warming up.
ATTENTION:When use this product, please adjust the sensitivity to an appropriate position you
need, please do not adjust the sensitivity to maximum, to avoid the product does not work normally
caused by wrong motion.Because the sensitivity is too high easily detect the wrong motion by wind
blowing leaves & curtains, small animals, and the wrong motion by interference of power grid &
electrical equipment. All those lead the product does not work normally !
When the product does not work normally, please try to lower the sensitivity appropriately, and then
test it.
The system will accept the manual adjustment for “Delay Time” and “Sensi Tivity”.
“Delay time” can be adjusted from 10 seconds to 3 minutes.
“Sensi Tivity” can be adjusted to 15m(22°C).
The brightness of the LED lights: outside <10 LUX.
9. Insert the wire plug from the solar board into the
bottom of the light.
Make sure the wire plug is completely connected.
8. Adjust the direction of light head.
7. Adjust the motion detector direction.
+45°
-45°
15°
It can be set at the range of 8second (counterclockwise rotation to the end) to
3minute(clockwise rotation to the end) .The timer will recount when the sensor
detect a moving signal before the end of the last time, so we advise that you’d
better set the time to minimum when you make the detection range testing or the
walking testing.
Note: The sensor need to wait 1secend to re-work after the light going off. Only
after the end of the time, the light will lighten again when detecting the signal.
+90°
-90°
-100°
+30°
This range refers to the radii of the circular region that appears on the ground
when the light is installed in the 2.5 m height. A minimum detection range (nearly
4 m in radii) rotating a counterclockwise rotation to the end. A maximum
detection range (nearly 15 m in radii) rotating a clockwise rotation to the end.
Operational Guide
1. Battery Installation
2. Testing Mode:
3. “OFF” Statues
4. “AUTO” Statues
Solar LED light, battery voltage 7.4V, 1800mAH, sensing angle> 150 º, in full lit, continuous working time> 4 hours.
The system will be in “power fail safeguard” model. No motion detecting function. Consumes <25UA.
I
Before testing, remove the screws in the back, then remove the back cover; connect the battery (1800mAH) with the
power connectors, the system will be started and the red LED indicate light on; the indication LED light will be off after
the system warming up.
ATTENTION:
When use this product, please adjust the sensitivity to an appropriate position you
need, please do not adjust the sensitivity to maximum, to avoid the product does not work normally
caused by wrong motion.Because the sensitivity is too high easily detect the wrong motion by wind
blowing leaves & curtains, small animals, and the wrong motion by interference of power grid &
electrical equipment. All those lead the product does not work normally !
When the product does not work normally, please try to lower the sensitivity appropriately, and then
test it.
The system will accept the manual adjustment for “Delay Time” and “Sensi Tivity”.
“Delay time” can be adjusted from 10 seconds to 3 minutes.
“Sensi Tivity” can be adjusted to 15m(22°C).
The brightness of the LED lights: outside <10 LUX.
44.50
26.50
6. Place solar board at a sunny location.5. Mount solar board with screws. Adjust the direction.
44.50
26.50
6. Place solar board at a sunny location.5. Mount solar board with screws. Adjust the direction.
44.50
26.50
6. Place solar board at a sunny location.5. Mount solar board with screws. Adjust the direction.
BEFORE FIRST USE - IMPORTANT
(a) THE BATTERY WAS DISCONNECTED before leaving the factory.
You therefore need to remove the battery cover on the back of the
light unit and reconnect the male/female wiring sockets as shown
in Fig. 7 below. (If the light is not going to be used for an extended
period of time, please disconnect the battery.)
(b) Before first use, leave the light in the OFF mode for 24hrs to allow
the solar panel to fully charge the battery.
OPERATIONAL GUIDELINES
(a) If the switch is in the ON position, the light will be on permanently
(whilst battery power allows). If no motion is detected after 8
minutes, the level of brightness will be reduced by about a third.
If battery power is too low for the light to operate properly the unit
will turn off and the LED bulb on the front of the unit will blink. (This
also applies when the switch is in the AUTO position.)
(b) If the switch is in the OFF position, the light will be off permanently,
but the solar panel will continue to charge the battery.
(c) If the switch is in the AUTO position, the unit will activate according
to the settings selected on the SENSITIVITY & TIME DELAY dials.
• The SENSITIVITY dial determines the level of light required to
activate the light.
• The TIME DELAY dial can adjust the time the light stays on after
activating from 10 seconds to 3 minutes.
WALK TEST
Slide switch to AUTO mode. Move the TIME DELAY to to the minimum
and SENSITIVITY dial to maximum. Move across the front
of the PIR sensor. The signal will be detected and the light will come on.
Once the light comes on, remain still. The light should go o after 4 – 6
seconds.
Fig. 4
Fig. 5
Fig. 6
Solar Technology International Limited
Unit 6, Station drive, Bredon, Tewkesbury GL20 7HH
We want your photos and videos!
Here is your chance for you and your solar panel to be a star! Just
send in pics or videos of you and your solar panel in a great location and if selected
we will not only give you ever lasting recognition on our online favourite users
wall of fame but we will send you a Freeloader Sixer, 6000mAH solar power bank
worth £70 completely free!
Please send to hello@solartechnology.co.uk including your address details and
b est of luck!
Note – we cannot guarantee to publish every entry and only those selected by
our marketing department for publication will be awarded a Sixer. By providing
your images you automatically grant us the right to use these images or videos
howsoever we see t.
ISSUE 2020.1
Fig. 7
This manual suits for next models
1
Table of contents
Popular Lantern manuals by other brands

Nature Power
Nature Power 23107 instruction manual

Time Gaurd
Time Gaurd SLB44 Installation & operating instructions
 operating instructions")
CEAG
CEAG COOPER 71011 (CG-S) operating instructions

BEGA
BEGA 33 388 Instructions for use

Dale Tiffany
Dale Tiffany GB11065 Assembly instructions

Gainsborough
Gainsborough K526 Assembly instructions/Instructions for use


