Solcon SI-DCB User manual

lnstruction
Manual
Ver. 0822
––

2
Table of Contents
Page
Subject
3
Brake selection
4
Installation Notes
5
Mode of operation
6-8
Wiring and operation
9
Potentiometer settings and Start up procedure
10
Fuse Selection Table
11-12
Dimensions
13
Technical Specification
14
Ordering Information
* Read this manual carefully before operating the equipment and follow its instructions
* Installation, operation, and maintenance should be in strict accordance with this manual, national
codes and good practice. Installation or operation not performed in strict accordance with these
instructions will void manufacturer's warranty.
* Disconnect all power inputs before servicing the SI-DCB and/or the motor.
* After installation, check and verify that no parts (bolts, washers, etc) have fallen into the power
Section (IP00).
ATTENTION
1. This product was designed and tested for compliance with IEC947-4-2 for class A equipment.
2. The SI-DCB brakes are designed to meet UL requirements
3. Use of the product in domestic environments may cause radio interference, in which case the user
may be required to employ additional mitigation methods.
4. Utilization category is AC-53a or AC53b. Form1.
5. For further information see Technical Specification
WARNING
* Internal components and P.C.B's are at mains potential when the SI-DCB is connected
to mains.
This voltage is extremely dangerous and may cause death or severe injury if contacted.
* When the SI-DCB is connected to mains, even if operation signal is disconnected full
voltage may appear on SI-DCB output.
* Unit must be grounded to ensure correct operation, safety and to prevent damage.
* Check that Power Factor capacitors are not connected to the output side of the SI-DCB.

Brake Selection
3
General
The SI-DCB - Solid State Motor Brake provides fast,
smooth, frictionless braking of three-phase squirrel-cage
motors by injecting controlled DC current to the motor
windings, after Mains contactor opened. This induces a
stationary magnetic field, which exerts a brakingtorqueon
the rotor.
Stopping time can be similar to the time it takes to reach
full speed on a Direct-On-Line starting.
Adjustable Braking Torque and Braking Time enable
perfect matching of the brake to the driven load.
Automatic sensing System turns the brake off
automatically when the motor comes to a full stop. This
minimizes the motor heating.
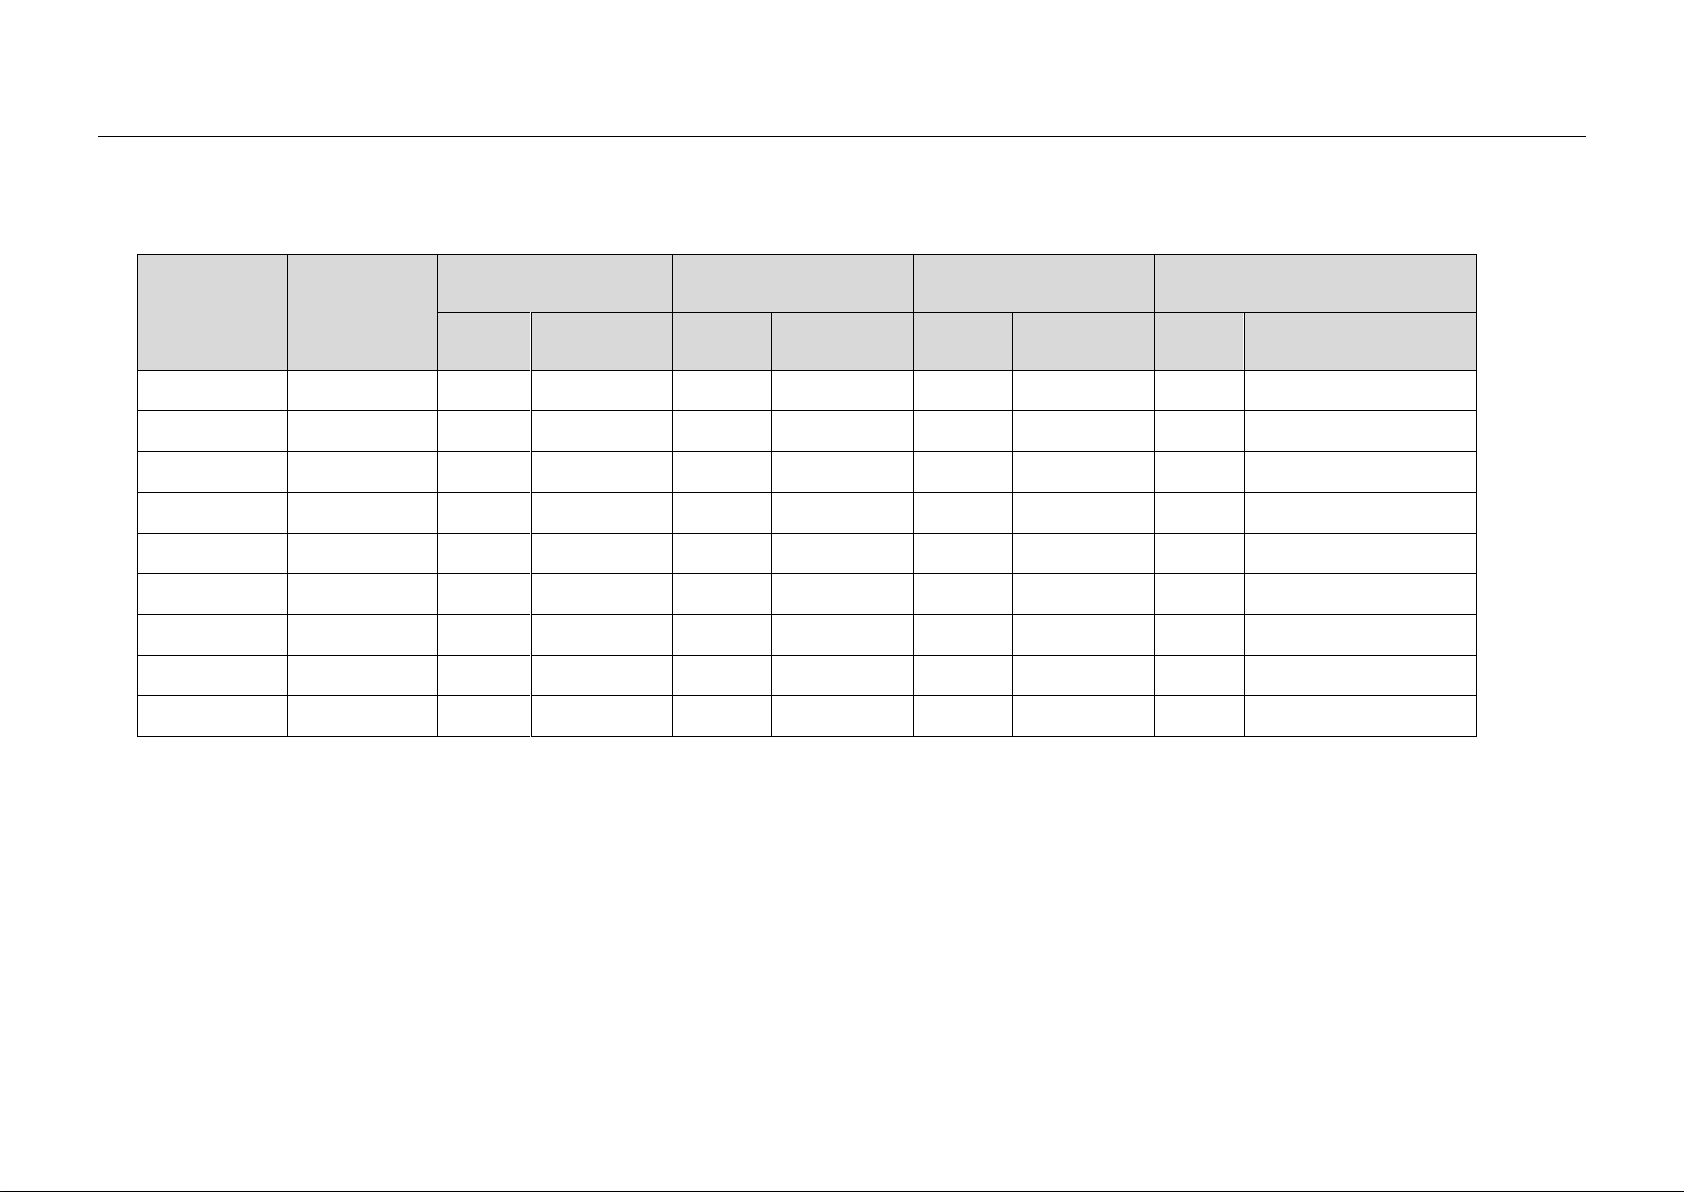
Brakes ratings and Frame sizes
Max Motor
FLA (Amp)
Brake Type
FLC
Frame
Size
Case
material
10
SI-DCB 10
SB0
PC/ABS
17
SI-DCB 17
SB1
Aluminum
31
SI-DCB 31
58
SI-DCB 58
105
SI-DCB 105
SB2
Metal
210
SI-DCB 210
310
SI-DCB 310
SB3
390
SI-DCB 390
460
SI-DCB 460
Dimensions (mm)
Size
Width
Height
Depth
SB0
45
75
105
SB1
65
190
114
SB2
154
280
160
SB3
224
384
222
Select the brake according to the following criteria:
Motor Current & starting conditions
•Motor's Full Load Ampere (FLA) - as indicated
on its nameplate (even if the motor is not fully
loaded).
•The SI-DCB is designed for a duty cycle of 10%
or less; e.g. 10 sec. operation, 90 sec. rest.
Duty Cycle - the ratio between operating time
and
total cycle time (rest time + Braking time).
Braking time
Duty Cycle = ------------------------------- x 100 (%)
Rest time + Braking time
Note:
If a higher duty cycle is required select a higher SI-DCB
type to allow enough brake time current.
Mains Voltage (line to line)
Thyristor's PIV rating, internal circuitry and insulation
determines six voltage levels: Each brake is factory set
for one of the following levels according to the Ordering
Information.
Voltage
Tolerance
230 V
+10 -15 %
400 V
+10 -15 %
440 V
+10 -15 %
480 V
+10 -15 %
600 V
+10 -15 %
690 V (210A-460A)
+10 -15 %
Each brake is factory set for one of the above levels and
suitable for 50 or for 60 Hz (±5%).
Options (see Ordering Information)
For extended braking time - consult factory and provide
the following information:
•Ambient temperature.
•Actual stopping current.
•Actual stopping time.
•Time interval between starts
•Load characteristics
Centrifuge
RPM
Stopping Time
t
Solbrake
Wood Saw

Installation Notes
4
Prior to Installation
Check that Motor's Full Load Ampere (FLA) is lower than
or equal to SI-DCB Full Load Current (FLC) and verify
that Mains voltage and frequency are as indicated on the
SI-DCB label.
Mounting
* The SI-DCB must be mounted vertically, allow
space above and below the unit for sufficient airflow.
* It is recommended to mount the SI-DCB directly on the
rear metal plate for better heat dissipation.
* Do not mount the SI-DCB near heat sources.
* Protect the SI-DCB from dust and corrosive
atmosphere.
Temp. Range and Heat Dissipation
The SI-DCB is rated to operate over a temperaturerange of
-10C (14F) to +50C (122F).
Relative non-condensed humidity inside the enclosure
should not exceed 93%.
The average heat dissipation of the SI-DCBdependsonthe
Braking Torque setting and on the duty cycle.
Heating inside the enclosure can be reduced through the
use of additional ventilation.
Note: The heat generated in the motor during braking is
similar to the heat generated during starting. Therefore,
high setting of the Braking Torque and/ora highdutycycle
may require an external cooling fan for the motor. It is
recommended to use temperature sensor in the motor
which will allow restarting only after the motor
temperature has reduced to an allowed level.
Short Circuit Protection
The SI-DCB must be protected against short circuit by
fast-acting fuses. Recommended I2 t values in page 9.
Transient Protection
Line transient voltages can cause malfunctioning of the
brake and damage to the SCRs.
When high transients are expected, an external protection
should be used, (consult factory).
Wiring
Connections to L1, L2, U, V should be done with full size
power cables. Connections to terminals 1-6 and W are
control wires size.
Do not connect two SI-DCB brakes in parallel as they are
not synchronized and will be damaged.
Mechanical and electrical interlock between Mains
contactor C1and braking contactor Cbr must be installed to
prevent both contactors from being closed simultaneously.
SI-DCB Wiring
The SI-DCB (10-17) is meant for installation on a Din-
Rail. See options list for other Din-Rail ratings.
U
V
W
L
1
L
2
1
2
3
4
5
6
Power Factor Capacitors
Power factor correction capacitors must not be installedon
the load side of the SI-DCB. When required, capacitors
should be installed on the SI-DCB line side.
Notes:
1. The SI-DCB uses Mains power to produce the
braking torque. Therefore, a power failure or
disconnection will disable the DC braking and the
motor will coast to a stop without braking.
2. When required to stop a motor during a power
outage, an electro-mechanical brake must be used.
3. The SI-DCB cannot be used for continuous holding
of loads, after motor had stopped. An electro-
mechanical brake should be used for holding atstop
position.
Warning
Wrong connections of SI-DCB line and load sides
will cause damage to the brake and motor.

Mode of Operation
5
Stop signal opens motor contactor
C1that in turn initiates the closing of
brake contacts Cbr.
The Thyristor is switched on and
fire (to inject DC current to the
motor) after time delay, to induce
the braking current.
The torque, which is a function of
the DC current, can be controlled
by the firing angle of the Thyristor.
Note: there is a time delay between
opening of one contactor and
closing the other one to reduce the
EMF. The time delay correlate to
the size of the motor.
Braking Time
Braking time depends on the inertia, friction of the load,
speed, and braking current. The required braking time is
best established by practical experience.
The SI-DCB offers two operating modes, Automatic and
Manual. Selection between the modes is done by an
internal dip switch.
Dip sw. Operation Mode
On Manual
Off Automatic
It is recommended to use the Automatic mode (factory
default setting) to reduce the braking time and minimize
motor heating.
Automatic operation
DC injection duration is
automatically controlled
by the SI-DCB.
Injection ceases when
Motor has come to a
complete stop.
Manual operation
DC injection duration is
according to the Braking
Time setting on the front
panel.
Notes:
1. Motor heating during braking is similar to heating
during Direct Online starting. Therefore, always adjust
for the shortest DC injection time duration.
2. In general, for improved braking process to be in effect,
it is recommended to apply some minimal inertia on
the motor shaft.
The SI-DCB incorporates the following built-in time
delays:
t
1
DC Injection
Brake Contactor
Motor Contactor
1 - 2 Open
t
2
t
3
t
4
t
5
1 - 2 Closed
Power ON
Motor
Running
Braking
Process
Start
Stop
Where:
t1- Time delay between opening of motor's contactor C1
and closing of brake contactor Cbr, allowing motor's
back EMF to diminish (see table below).
t2- Time delay of 0.05 sec between closing of brake
contactor Cbr and initiation of DC current, to ensure
that brake contactor does not switch DC current,
enabling the use of regular AC contactor.
t3- In Auto Mode –Enabling of DC current injection.
In Manual Mode - time of DC current injection.
Range: 1-10 sec.
t4- Time delay between end of DC current injection and
opening of brake contactor Cbr to ensure that the
contactor does not switch DC current, enabling the
use of regular AC contactor (see table below).
t5- Time delay of 0.2 sec. between opening of brake
contactor Cbr and enabling motor’s restart.
Approximate Time Delays (sec).
SI-DCB
10
17
58
105
210
390
t1
0.2
0.3
0.6
1.1
1.7
2.5
t4
0.2
0.2
0.3
0.8
1.2
1.9
Torque at standstill
When required to maintain theDCbraking currentafterthe
motor has come to a complete stop, set Auto/Man Dip
Switch to On (Manual operation). Set Braking Time to a
longer time than it takes the motor to come to a complete
stop.
Note - DC Injection after motor has come to a complete
stop may cause excessive heating of boththemotorandthe
brake.
Sec.
10
1
DC Injection
Motor Stopped
Braking contactor Closed
Restart Enable
Sec.
10
1
DC Injection
Motor Stopped
Braking contactor
Closed
Restart Enable
M

Wiring & Operation
6
SI-DCB with Direct on Line Starter
Motor contactor C1(with one N.O + two N.C contacts).
* Contact C1 - Holding N.O contact of contactor C1
* Contact C1 - auxiliary N.C contact of contactor C1,
initiates the braking process.
* Contact C1 - auxiliary N.C contact of motor contactor
acts as an interlock preventing operation of brake
contactor as long as motor contactor is closed.
Brake contactor Cbr(with one N.C contacts).
* Contact Cbr - auxiliary N.C contact of contactor Cbr,
acts as an interlock preventing operation of motor
contactor as long as brake contactor is closed.
Note:
It is recommended to electro mechanically interlock
contactors C1and Cbr.
SI-DCB contacts
* Ca contact (SI-DCB terminals 3-4), contact closeswhen
Mains voltage is connected to SI-DCB terminals and
terminal 1-2 are open.
* Cb contact (SI-DCB terminals 5-6), closes upon stop
signal and contact terminals 1-2 closes after time delay
t1.
Notes
* Motor contactor C1cannot be operated when Mains
voltage is not connected to terminals L1and L2 (internal
contact Ca in SI-DCB, controlling motor contactor,
closes after Mains voltage is connected and terminal 1-2
are open.
* When operating in Manual mode, DC injection will stop
after time delay t3as set on the Braking Time
potentiometer.
Operation
Upon start signal, as Ca is closed, motor contactor C1
closes, motor will operate and contact C1-1 opens.
Upon stop signal, motor contactor C1opens, contact C1-1
closes and initiates the braking process.
Contact Ca opens, preventing motor contactor operation,
and after time delay t1 contact Cbcloses, closing the brake
contactor Cbr.
The yellow LED on SI-DCB front panel will light up
indicating that brake contactor is closed.
After time delay of approx. 0.05 sec. DC current will be
injected to motors' winding.
The yellow LED on SI-DCB front panel will light up
indicating that braking current is now injected to the
motor.
The DC injection will automatically cease when motor
comes to a complete stop (when Automatic mode is
selected) and the yellow LED turns off.
Contact Ca closes after time delay t5, permitting motor
restarting.

Wiring & Operation
7
Emergency Brake
A dedicated Emergency Stop button, with
two contacts initiates braking.
When Stop contact is opened, contactor C1opens,
the SI-DCB is not initiated.
When Emergency Button is pressed, the Emergency
Stop closes and initiates the braking process.
When Emergency Stop contact is opened, C1
contactor opens and the SI-DCB is operated,
initiating the braking process.
Forward/Reverse
Cbr - SI-DCB Contactor.
Cf - Forward Contactor
Cr - Reversing Contactor
Mechanically Interlocked Contactors.
Braking process is initiated
when Contactors Cf or Cr open.
Star-Delta
Cbr - SI-DCB Contactor.
Cs - Star Contactor
Cd - Delta Contactor
T1, T2 - Timer Relays
Braking process is initiated
when Contactors Cd,Cs & Cl will
open. Hence, a mechanical
interlock between Cbr and Cl
is recommended.

Wiring & Operation
8
Star-Delta Forward / Reverse
Cf - Forward Contactor
Cr - Reversing Contactor
Cs - Star Contactor
Cd - Delta Contactor
Cl - Line Contactor
T1, T2 - Timer Relays
Braking process is initiated
when Contactors Cd, Cs, Cf & Cr will be
open. Hence, an electrical interlock
between Cbr and Cf & Cr
is recommended.

Potentiometer Setting Start-Up Procedure
9
Braking torque
Determines the value of DC current the SI-DCB injects to
the motor. The SI-DCB can produce a braking current of
up to four times motor's nominal current.
A too high setting may cause a fast stop and high
mechanical shock. A too low setting may result in
prolonged time until motor stops.
Braking Time
* For Automatic Time-out - The setting on the front
panel determines the period of time during which the
braking contactor is closed. DC current ceases
automatically when the motor stops (Factory
default internal Dip Switch setting).
* For Manual Time-out - The setting on the front panel
determines the period of time during which
DC current is injected to motor windings, regardless of
when the motor stops (can be modified with the
internal
Dip Switch).
LED Display
The Green LED indicates that power supply is connected
to the SI-DCB (L1, L2).
The Yellow LED indicates that contactor Cbr is closed.
Motor restart is disabled when this LED is lit.
The yellow LED indicates that DCcurrentisbeinginjected
in the motor windings.
During start-up the dip switch should be in the Offposition
for Automatic Time-Out.
1. Set Braking Torque to 5
2. Set Braking Time to 10
3. Start motor and wait until it reaches full speed.
4. Stop motor and check the braking procedure.
a If braking has ceased and motor is still turning,
increase braking Torque setting and try again.
b If motor has stopped and the Yellow LED remains
on, decrease Braking Time setting until the Yellow
LED turns off shortly after the yellow LED has
turned off.
Note: Set Braking Time potentiometer t3to a slightly
longer time than the time required for motor to come to a
complete stop, even if the brake operates in an Automatic
mode. This is required for two reasons:
1. Ensuring that even if the automatic time-out
circuit did not sense that motor had stopped,
the DC injection will cease shortly after motor
stopped preventing excessive heating.
2. During time delay t3, braking contactor
remains closed even if the Automatic Time-
Out circuit has stopped the DC current.
Measuring the Braking Current
Approximate measurement of the braking current can be
made with a true RMS ammeter.
Trouble Shooting
1. Disconnect Mains voltage and check that contacts 3-4
and 5-6 are open.
2. Connect power to L1and L2. The green LED (On)
should light up.
3. Check that contact between terminals 3-4 is closed.
4. Check that contact between terminals 5-6 is open.
5. Start the motor. Motor contactor should close. If it
doesn't, check connection to contactor.
6. Press Stop button; motor contactor should open and
brake contactor should close after a short time delay.
Simultaneously the Braking Time and DC injection
LEDs should be lit. If LEDs do not light up, check that
auxiliary contact of Mains contactor connectedbetween
control terminals 1-2 is closed.
BrakingTorque
2 10Sec.
110
BrakingTime(Sec.)
On
Braking
DCInjectionOn
Dip Sw. S1.2 = Not in use
Off = Automatic
1 2
On = Manual
Dip Sw. S1.1=Auto/Man.
Solbrake, Main PCB
Fuse Selection Table(400V)
10
FUSE SELECTION (recommended values for mains supply of 400V)
RVS-DX
Max.
Thyristor I2t
(A2Sec)
BUSSMAN
GEC ALSTOM
SIBA
FERRAZ –SHAWMUT
(IEC Style 690/700V)
Rated
(A)
P/N
Rated
(A)
P/N
Rated
(A)
P/N
Rated
(A)
P/N
SI-DCB 10
400
30
FWP 30B
32
B210612
32
URD 000-32
SI-DCB 17
5,000
50
FWP 50B
63
B210615
63
6.6URD30D11A0063
SI-DCB 31
12,000
125
FWP 125A
100
X320063
100
6.6URD30D11A0100
SI-DCB 58
15,000
150
FWP 150A
125
X320065
125
6.6URD30D11A0125
SI-DCB 105
60,000
250
FWP 250A
200
D320071
250
SQB1-250
250
6.6URD30D11A0250
SI-DCB 210
200,000
500
FWP 500A
450
D320485
450
SQB1-450
450
6.6URD30D11A0450
SI-DCB 310
600,000
700
FWP 700A
630
H320489
630
SQB1-630
630
6.6URD31D11A0630
SI-DCB 390
700,000
700
FWP 700A
800
T320591
800
SQB1-800
800
6.6URD31D11A0800
SI-DCB 460
1,200,000
1000
FWP 1000A
1000
W320593
900
SQB2-900
1000
6.6URD32D11A1000
Notes: 1. The above table is for maximum stop current of 400 % of FLC, maximum time of 30 sec and rated voltage of 400 V (see note 3 for exception).
2. Rating may change with different external conditions such as ambient temperature, forced cooling etc. Refer to fuse manufacturer catalogs to confirm correct values.
3. Ferraz ratings are simulated for 4xIn, 4 times per hour with a 10 sec. stop time for each stop.

Dimensions
11
SI-DCB 10A
SI-DCB 17-58A
U
V
W
L
1
L
2
1
2
3
4
5
6
75
105
90
105

Dimensions
12
SI-DCB 105-210A
SI-DCB 310-460A
160
280
263
L1
L2
U
V
W
M6
12
17
12
20
12
77
U
L
1
U
L
1
18
18
384
W
L
2
224
222
W
V
L
2
63.4
V

Technical Specification
13
Environment
Supply voltage
Two phase, line to line. 220-600VAC
(690VAC for 210A –460A)
+10% -15%
Frequency
50 / 60 Hz
Load
Three-Phase, Three-Wire, Squirrel
Cage Induction Motor
Duty cycle
10% max.
10 sec. operation, 90 sec. rest
Degree of protection
IP 20 up to 58A (IP00 up to 460A)
Altitude
1000 m above sea level
Adjustments
Braking current
1-10 for 0 - 4 times FLC
Braking time
2-10 sec.
Optionally 1-30 sec.
Protection
Automatic stopped motor sensor
Switches off the DC injection automatically when motor has come to a
complete stop.
Indications
Indication lights (LEDs)
ON - Green
Illuminates when power is connected
to SI-DCB on L1 and L2.
Cbr closed –Yellow
Illuminates when contactor Cbr is
closed.
DC Injection ON - Yellow
Illuminates when DC current is being
injected to the motor windings.
Temperatures
Operating
-10° to 50°C
Storage
-20° to 70°C
Relative humidity
93 % - non condensed

Ordering Information
14
SI-DCB 31 –400 –0 –S
Brake FLC
Mains voltage
Options
Front panel
(1) SI-DCB FLC: 10, 17, 31, 58, 105, 210, 310, 390 Amp
(2) Mains voltage Specify For
50/60Hz 230 230 Vac
+10% -15% 400 400 Vac
440 440 Vac
480 480 Vac
600 600 Vac
(3) Required options Specify For
0 No options.
E Consult Factory
8 Harsh environment treatment (factory supplied)
(4) Front panel Specify For
S Standard
(1)
(2)
(3)
(4)
This manual suits for next models
9
Table of contents
Other Solcon Power Supply manuals


