SOLZAIMA Eco 12 Compact User manual

Compact Pellet
Instruction Manual
English
Models
Compacta Eco 12 Compact
Compacta Eco 18 Compact
Compacta Eco 24 Compact
Be sure to read these instructions carefully before installing, using and servicing the
unit. The product is supplied with this instruction manual.
Mod.1027-B
Thank you for purchasing a SOLZAIMA equipment.
Please read this Manual carefully and keep it for future reference.
* All products meet the requirements of the Construction Products Regulation (Reg.
UE nº305/2011), being approved with the CE mark of conformity;
* The compact pellet are built to EN 14785:2008 standards;
* SOLZAIMA accepts no responsibility for any damage to the equipment when it is
installed by unqualified personnel;
* SOLZAIMA accepts no liability for any damage to the equipment when the rules
for installation and use set out in this Manual are not followed;
* All local regulations, including the so-called national and European standards,
must be respected when installing, operating and maintaining the equipment;
* Whenever you need assistance you should contact the supplier or installer of your
equipment. You must provide the serial number of your Compact which can be
found on the identification plate on the back of the equipment and on the label
attached to the plastic cover of this manual;
* Technical assistance should be carried out by your installer or solution provider,
except in special cases after assessment by the installer or technician in charge of
assistance, who will contact SOLZAIMA if deemed necessary;
* If you need more information about the electronics applied in the SOLZAIMA
equipment you can read the following QR Codes.
Columbus Electronics Not applicable Columbus Electronics
Technical support contacts:
www.solzaima.pt
apoio.client[email protected]
Address: Rua da Cova da Areia (E. M. 605), 695;
3750-071 Aguada de Cima
Águeda - Portugal

Índice
1. Solzaima.............................................................................................................1
2. Package Content..................................................................................................2
2.1. Unpacking the unit .........................................................................................2
3. Safety precautions .......................................................................................3
3.1. For your safety, we recommend that:................................................................3
4. Advice in case of a chimeny fire (including the equipment)........................................5
5. Technical Specifications ........................................................................................6
6. Compact pellet installation ....................................................................................9
6.1. Installation requirements ................................................................................9
6.2. Installation of ducts and Smoke exhaustion systems.........................................10
6.3. Installation without chimney ..........................................................................11
6.4. Chimney installation ..................................................................................... 14
7. Hydraulic installation ..........................................................................................16
7.1. Operating mode for radiators/inertia tank........................................................16
8. Fuel .................................................................................................................17
9. Compact pellet use ............................................................................................18
10. Remote Control .................................................................................................20
11. Alarm / Failure / Recommendation List .........................................................37
12. Columbus Electronics .........................................................................................39
13. List Alarms / malfunctions / recommendations –Columbus Electronics ..................... 62
14. Operating the unit..............................................................................................65
14.1. Starting-up the unit ................................................................................65
14.2. Stop......................................................................................................65
14.3. Turning off the unit .................................................................................65
15. Instructions for removing the side covers..............................................................66
15.1. Removing the side covers ........................................................................66
15.2. Pellet hopper lid......................................................................................66
15.3. Replenishing the pellet tank .....................................................................66
16. Installation and operation with external control (chronothermostat) –not included in
compacts ..................................................................................................................... 67
16.1. Instruction four mounting the external control unit .....................................69
17. Maintenance .............................................................................................. 71
17.1. Daily Maintenance ..................................................................................71
17.2. Weekly maintenance ............................................................................... 72
17.3. Additional cleaning..................................................................................75
18. Maintenance plan and record............................................................................... 78

19. Etiqueta guia de manutenção .......................................................................82
20. Installation Schemes ..........................................................................................83
21. Electrical Diagram of the Compact unit .................................................................87
21.1. Electrical Diagram –not applicable to Columbus Electronics .........................87
21.2. Electrical Diagram –Applicable to Columbus Electronics ..............................88
22. Hydraulic Pumps ................................................................................................89
22.1. Pump UPM3 with Hybrid 15-70 130 mm ....................................................89
22.2. Bomba Wilo 15-130/7-50 ........................................................................91
23. End of life of a compact pellet..............................................................................99
24. Sustainability ....................................................................................................99
25. Glossary ......................................................................................................... 100
26. Warranty ........................................................................................................ 102
27. Annexes ......................................................................................................... 111
27.1. Timer weekly programming (not applicable to Columbus Electronics) .......... 111
27.2. Flow Chart ........................................................................................... 112
28. Declaration of Performance ............................................................................... 115


1
1. Solzaima
Solzaima's vision has always been clean, renewable and more economical energy.
For this reason, for over 45 years we have been dedicated to the manufacture of
biomass heating equipment and solutions.
As a result of the persistence and unconditional support of its network of partners,
Solzaima is today the leader in the production of biomass heating, the best
example of which are the water central heating stoves and its range of pellet stoves
and compacts.
Every year we equip more than 20,000 homes with biomass heating solutions. A
sign that consumers are paying attention to more ecological and more economical
solutions.
Solzaima has ISO9001:2015 Quality certification and ISO14001:2015
Environmental certification.
2
2. Package Content
The equipment is shipped from the Solzaima facility with the following contents:
- Compacta Eco, of power 12 kW, 18 kW or 24 kW;
- Key for steam trap;
- Power cable.
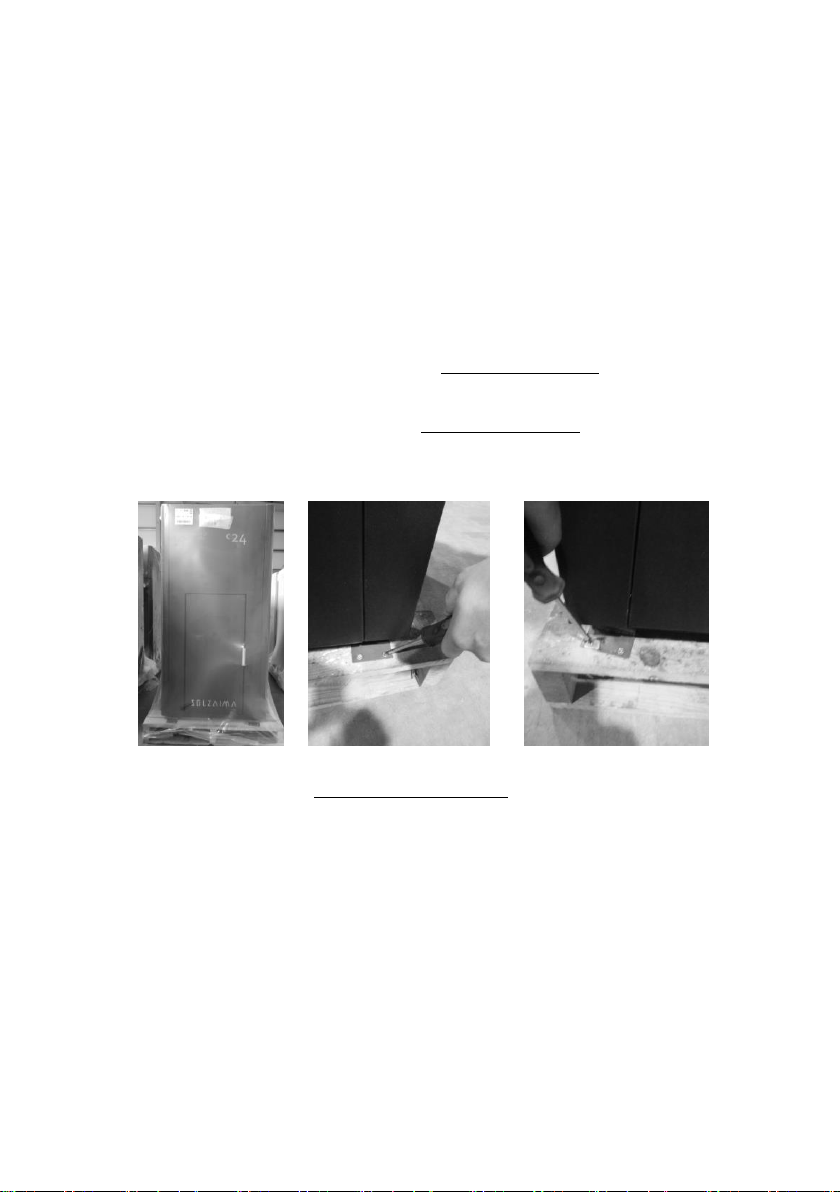
2.1. Unpacking the unit
Para proceder ao desembalamento do equipamento, dever-se-á proceder como
exemplificado nas seguintes fotos. Em primeiro lugar, deverá ser retirado o saco
retráctil que envolve o equipamento (Figure 1 - Unpacking the compact
-a). Em seguida, deverão ser desapertadas as quatro peças que seguram o
equipamento à palete de madeira (Figure 1 - Unpacking the compact
-b e c).
a) b) c)
Figure 1 - Unpacking the compact

3
3. Safety precautions
Solzaima will not assume any responsibility if the precautions, warnings and
operating standards of the equipment are not respected.
The equipment manufactured by Solzaima is simple to operate and special attention
has been given to its components in order to protect the user and the installer
against possible accidents.
The installation must be done only by authorized persons, who must deliver to the
buyer a declaration of conformity of the installation, and who will be totally
responsible for the final installation, and consequently, for the good functioning of
the product.
This equipment must be intended for the use for which it was expressly
manufactured. All contractual or extra-contractual liability of the manufacturer is
excluded if it causes injury to persons, animals or things, due to installation errors,
maintenance errors or improper use.
After you have removed the packaging, make sure that the contents are complete
and undamaged. If the contents of the packaging do not correspond to those
indicated in point 1, contact the dealer from whom you bought the device.
All the components that make up the equipment guarantee its operability and
energy efficiency and must be replaced with original parts by an authorized service
center.
The maintenance of the equipment must be performed at least once a year, for this
you should contact your specialized installer.
This instruction manual is an integral part of the product. Make sure you are always
near the device.
3.1. For your safety, we recommend that:
•The compact pellet is a biomass heating unit. Be sure to carefully read and
understand the information contained in this book, before handling or operating the
unit;
•Make sure the hydraulic circuit is correctly assembled and connected to the
water supply system before turning on the compact pellet;
•The compact is not intended for use by children or persons with a physical,
sensory or mental handicap, unexperienced or unaware of its proper use,
unsupervised or not instructed concerning the use of the unit;

4
•Do not touch the compact when barefoot or any part of your body is wet or
humid;
•Do not tamper with any safety or adjustment features of the unit without the
manufacturer's authorisation;
•Do not cover or reduce the size of the aeration vents existing near the
installation area;
•The compact pellet needs air circulation for proper combustion, so possible air
tightness of the location or any existing air extraction sources in the room may
prevent the unit’s proper operation;
•The existence of aeration vents is a requisite for proper combustion;
•Do not leave the packing materials near children;
•During the unit's normal operation do not attempt to open the compact's door;
•Avoid direct contact with parts of the unit that overheat during operation;
•Check the fume duct for blockages before turning on the unit after a long period
of inactivity;
•This compact pellet is intended for residential use in a protected environment.
The unit might get turned off by any safety systems installed in the household. If
this occurs, contact the technical assistance. Under no circumstances should you
disarm the safety systems;
•The compact pellet is a biomass heating unit equipped with a fume exhaustion
system powered by an electric exhauster. The occurrence of any power failure
during its use may prevent the fume exhaustion thus causing the room to be filled
with smoke. For this reason, you should have a natural fume exhaustion system,
like a chimney, installed;
•REDPOD offers you an optional safety system which allows the compact unit to
be connected to a UPS to allow that during any power failure the fume exhaustion
system will still operate until complete exhaustion of all compact fumes;
•If you intend to use the compact unit unsupervised or while you are away from
home, you should use the above safety system for total safety during any power
failure;
•During operation, NEVER turn off the compact pellet by unplugging the power
cord from the wall socket. The fume exhaustion system on the compact pellet is
power-operated so disconnecting the power plug will prevent the exhaustion of
combustion fumes;

5
•Before performing any maintenance or assistance to your unit, disconnect it
from the power mains. Before performing any of these operations, allow the unit to
cool down completely (if previously operating);
•Never touch the interior of the compact when connected to the power mains;
••For this compact, the maximum setting for the water temperature that can
be specified by the user (water set-point temperature) is 80°C. If a temperature of
90ºC is reached, the compact automatically turns off causing the corresponding
alarm to go off.
4. Advice in case of a chimeny fire (including the
equipment)
•Put the fire out without endangering your life;
•If you cannot put out the fire within one minute, call the fire department;
•Close the doors and windows or the room where the fire occurred;
•Turn off the electricity and gas before you leave home;
•Once outside your home, provide information that will help put out the fire, such
as: location of the fire and materials that are burning.

6
5. Technical Specifications
Features
SZM Eco
C 12
SZM Eco
C 18
SZM Eco
C 24
Un
Weight
1210
1301
1301
mm
Height
620
666
666
mm
Depth
700
740
740
mm
Fume discharge pipe diameter
100
100
100
mm
Reservoir capacity
42
72
72
kg
Maximum heating capacity
295
409
534
m³
Maximum overall thermal power
(air/hydro)
11,5
16,6
22,2
kW
Minimum termal power (air/hydro)
3,8
5,1
6,7
kW
Minimum fuel consumption
1,1
1,4
1,7
kg/h
Maximum fuel consumption
3,0
4,2
5,4
kg/h
Rated electrical current
43
86
86
W
Electric power at start-up (<10 min.)
406
434
434
W
Rated voltage
230
230
230
V
Rated frequency
50
50
50
Hz
Thermal yield at rated termal power
92
91,5
91
%
Thermal yield at reduced termal power
95
95
95
%
Combustion gas flow (máx)
44
56,4
70
g/s
Combustion gas flow (min)
21
27
34
g/s
Max. Gas temperature
108
119
131
ºC
CO emissions at nominal thermal power
0,0136
0,0159
0,0184
%
CO emissions at reduced termal power
0,0256
0,0300
0,0343
%
Draught in the chimney
12
12
12
Pa
Compact’s water volume
19
22
22
L
Fume extractor noise emission
49,1
49,1
49,1
dB(A)
Table 1 - Technical specifications
The tests were performed using wood pellets with a heating capacity of 4.9 kWh/kg. The above
information was obtained during product homologation tests performed by independent
laboratories accredited for pellet unit tests.

7
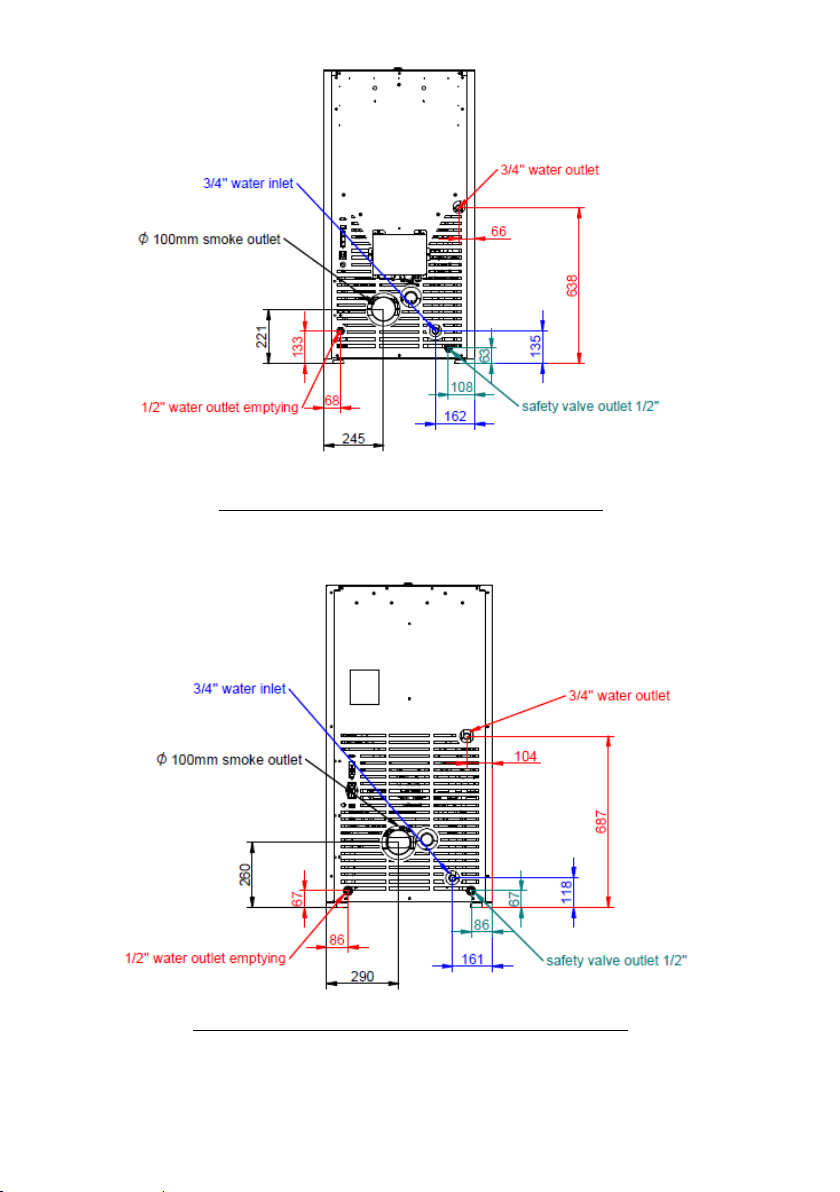
Front Side Rear Top
Figure 2 –Compact pellet Compacta Eco 12 dimensions
Front Side Rear Top
Figure 3 –Compact pellet Compacta Eco 18 dimensions
Front Side Rear Top
Figure 4 –Compact pellet Compacta Eco 24 dimensions
8
Figure 5 - Hydraulic connections for the Compacta Eco 12 compact
Figure 6 - Hydraulic connections for the Compacta Eco 18 and 24 compacts
9
6. Compact pellet installation
Before starting the installation, perform the following actions:
•Check immediately upon receipt that the delivered product is complete and in
good condition. Any defects must be reported before installing the appliance.
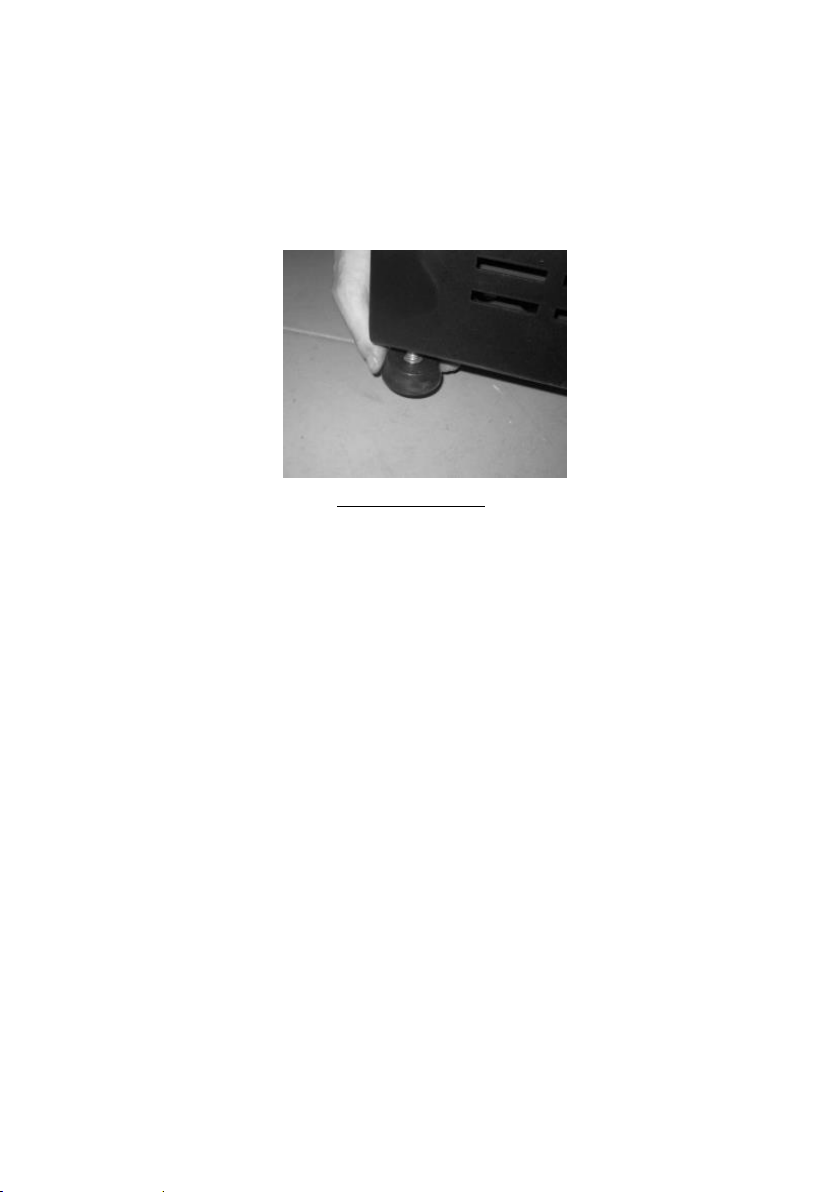
•The compact has four height-adjustable feet at its base, allowing a simple
adjustment on uneven floors.
Figure 7 - Adjustable Feet
•Connect a 100 mm diameter pipe in compacts between the flue gas outlet
and a flue for exhausting fumes to the outside of the building (e.g. chimney) -
check diagrams in Section 6.3.
•If a pipe is used for combustion air intake from outside, it must not be longer
than 60 cm horizontally or contain disturbances (e.g. bends).
•Carry out hydraulic installation (see point 20).
•Connect the 230VAC supply cable to an earthed electrical socket.
•The machine is equipped with a chrono-thermostat on the control panel. As
an option, a conventional external programmer (not included) can be used to
automatically set the device's operating periods.
6.1. Installation requirements
The minimum distances of the pellet stove from particularly flammable surfaces are
shown in Figure 8.
On top of the pellet stove, a minimum distance of 100 cm from the ceiling of the
room must be maintained, especially if the ceiling contains flammable material. The
base of the compact must not be made of combustible material, (e.g. carpeting), so
there must always be adequate protection.

10
a) b)
Figure 8 - Minimum distances from all surfaces: a) top view of the equipment installation; b) side view of the
equipment installation
WARNING!
Keep combustible and flammable materials at a safe distance.
6.2. Installation of ducts and Smoke exhaustion systems
•The construction of the gas exhaust pipe must be suitable for the purpose
according to the requirements of the site and in compliance with the regulations in
force.
•Important! A T-inspection with a tight-fitting lid must be inserted at the outlet of
the compact pellet exhaust pipe to allow for regular inspection or discharge of
heavy dust and condensate.
•As shown in Figure 8, the exhaust ducting should be made so that cleaning and
maintenance are ensured by inserting the inspection points.
•Under nominal operating conditions, the flue gas draft must give rise to a
depression of 12 Pa, measured 1 meter above the chimney neck.
•The compact must not share the chimney with other equipment.
•The pipes outside the place of use must be double-insulated stainless steel, with
an internal diameter of 100 mm.
•The smoke exhaust pipe, can generate condensation, in this case it is
advisable to establish adequate condensate collection systems.
11
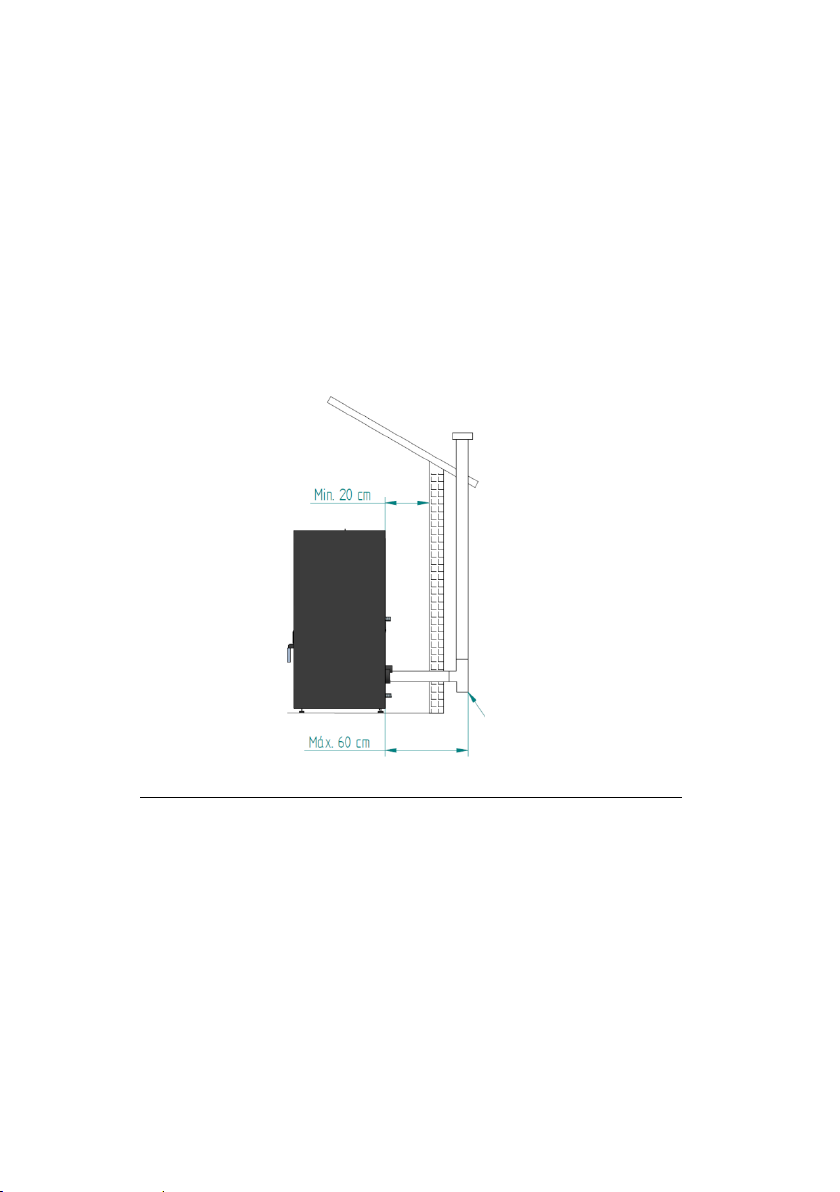
6.3. Installation without chimney
The installation of the pellet stove when there is no chimney must take place, as in
Figure 9, by bringing the smoke exhaust pipe (with a minimum internal diameter of
80 mm for the air version and 100 mm for the water version) directly outside and
above the roof.
Properly anchored double-walled insulated stainless steel pipes should be used to
prevent condensation phenomena.
Provide at the base of the pipe a T for periodic inspections and annual maintenance,
as exemplified in Figure 9.
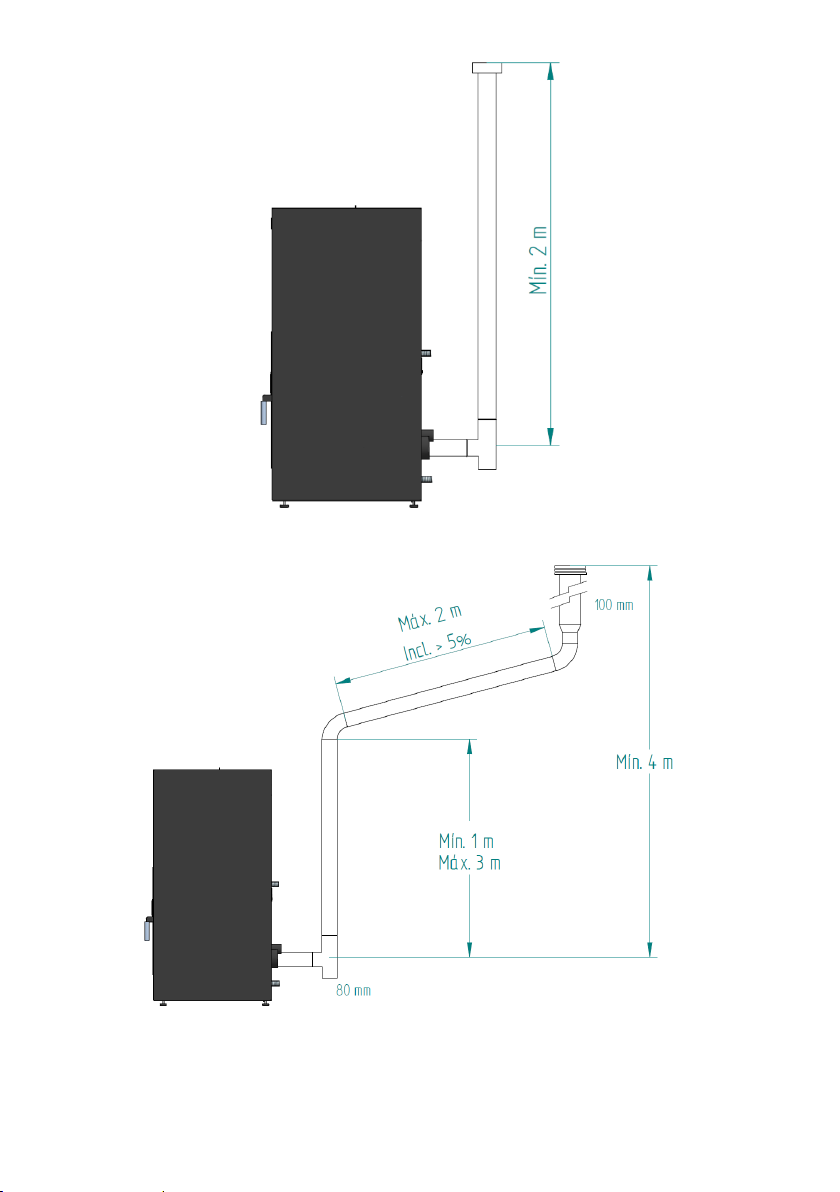
In Figure 10, the basic requirements for the installation of the compact chimney are
represented.
Figure 9 - Side view of the installation without chimney, with example of the inspection point
inspection
12
a)
b)
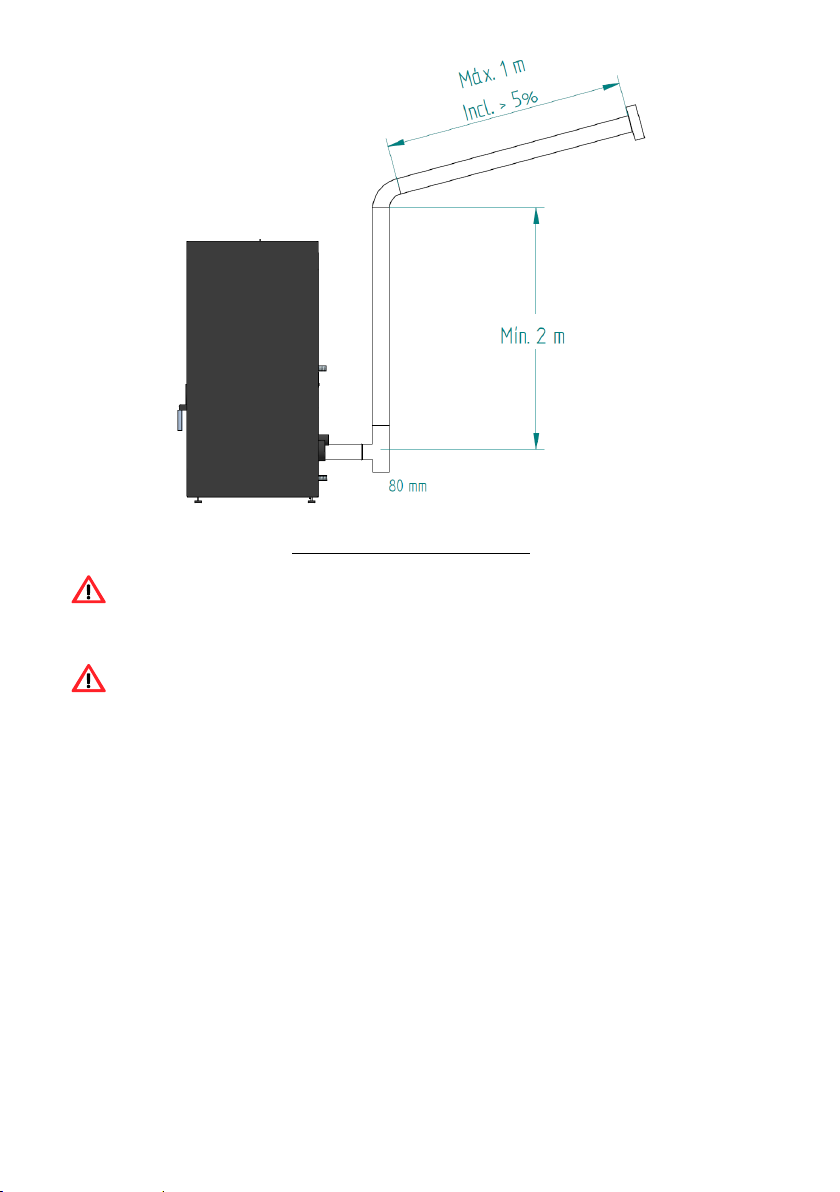
13
c)
Figure 10 - Examples of type installations
Failure to comply with these requirements will jeopardize the correct operation
of the compact. Comply fully with the indications on the diagrams.
The compacts operate with the combustion chamber in a depression, so it is
absolutely necessary to have a smoke evacuation duct that extracts the combustion
gases properly.
Smoke duct material: The pipes to be installed must be rigid, of stainless steel
with a minimum thickness of 0.5 mm, with joints for joining the different sections
and fittings.
Insulation: Smoke ducts must be double walled with insulation to ensure that the
smoke does not cool down during its journey to the outside, which would cause
inadequate draft and condensation that can damage the appliance.
Output "T”: Always use a "T" with registration at the compact outlet.

14
Antivento Terminal: An anti-vent terminal should always be installed to prevent
the return of fumes.
Chimney Depression: The figures illustrate three type layouts, with the
appropriate lengths and diameters. Any other type of installation must ensure that
a depression of 12 Pa (0.12 mbar) measured hot and at maximum power is
generated.
Ventilation: For the compact to work properly, the place where the appliance
is installed must have an air inlet with a minimum section of 100 cm2,
preferably near the back of the compact. The compact has a round tube
(50 mm) that can be connected to the outside of the house.
If there is an air extraction system in the home (kitchen extractor), it is necessary
to have a ventilation section that is larger and better sized than the various pieces
of equipment that extract air from the home.
Placing the compact in places where kitchen extractors or gas extractors are
installed may affect the proper operation of the compact. It is recommended that
the compact is switched off when these extractors are in operation.
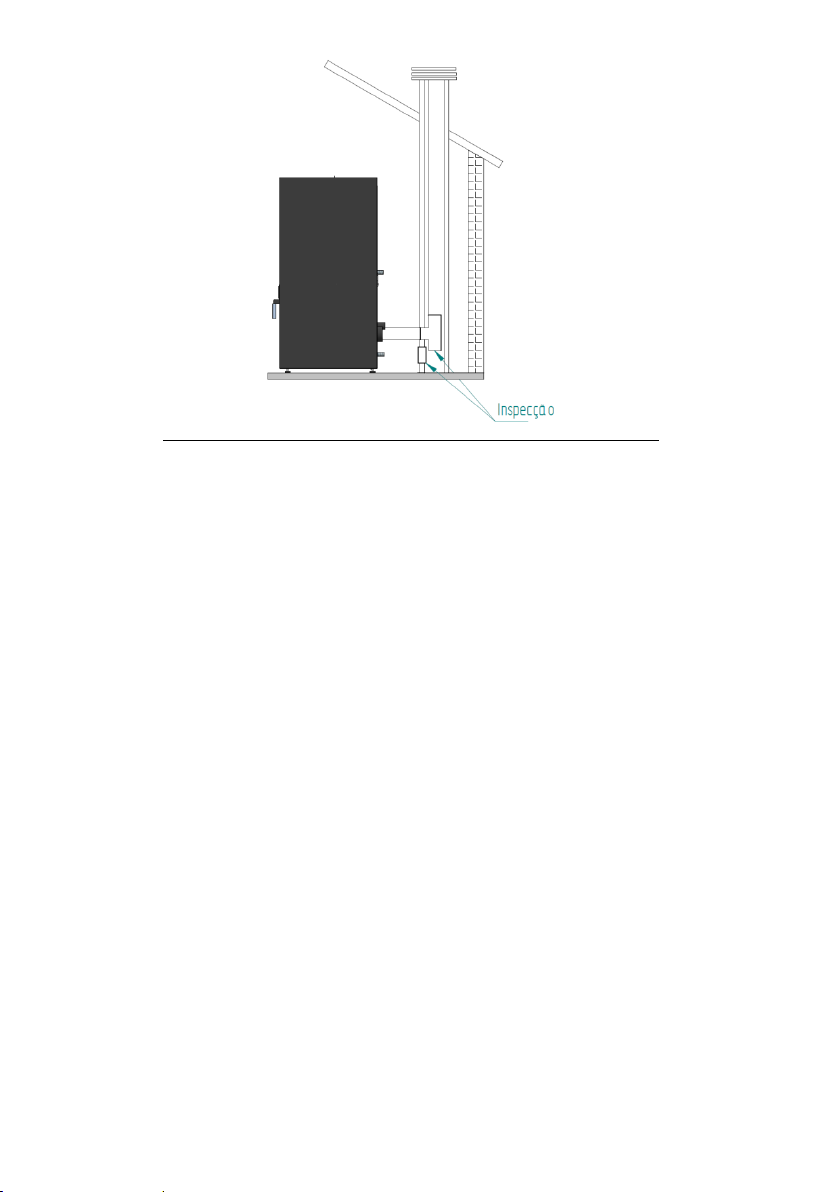
6.4. Chimney installation
As shown in Figure 11, the compact pellet installation brings the 100 mm diameter
flue pipe directly to the chimney. If the chimney is too large, it is recommended to
pipe the flue outlet with a minimum internal diameter pipe of 100 mm.
Provide at the base of the pipe a "T" for periodic inspections and annual
maintenance, as illustrated in Figure 11.
15
Figure 11- Side view of the chimney installation, with example of the inspection point
When atmospheric conditions are so adverse as to cause strong disturbance to the
compact's fumes draft (in particular very strong winds), it is advisable not to use
the compact.
If the equipment is not used for a long period of time, the user must ensure that
there is no blockage in the chimney pipes before lighting.
This manual suits for next models
2
Table of contents
Other SOLZAIMA Stove manuals


 owner's manual")


