Somatic Vision Alive iFeel Owner's manual

iFeel Sensor
USER GUIDE SUPPLEMENT
Choose Your iFeel Sensor
There are two versions of the iFeel Sensor: USB and Bluetooth.
Read the section of the user guide that matches your sensor.
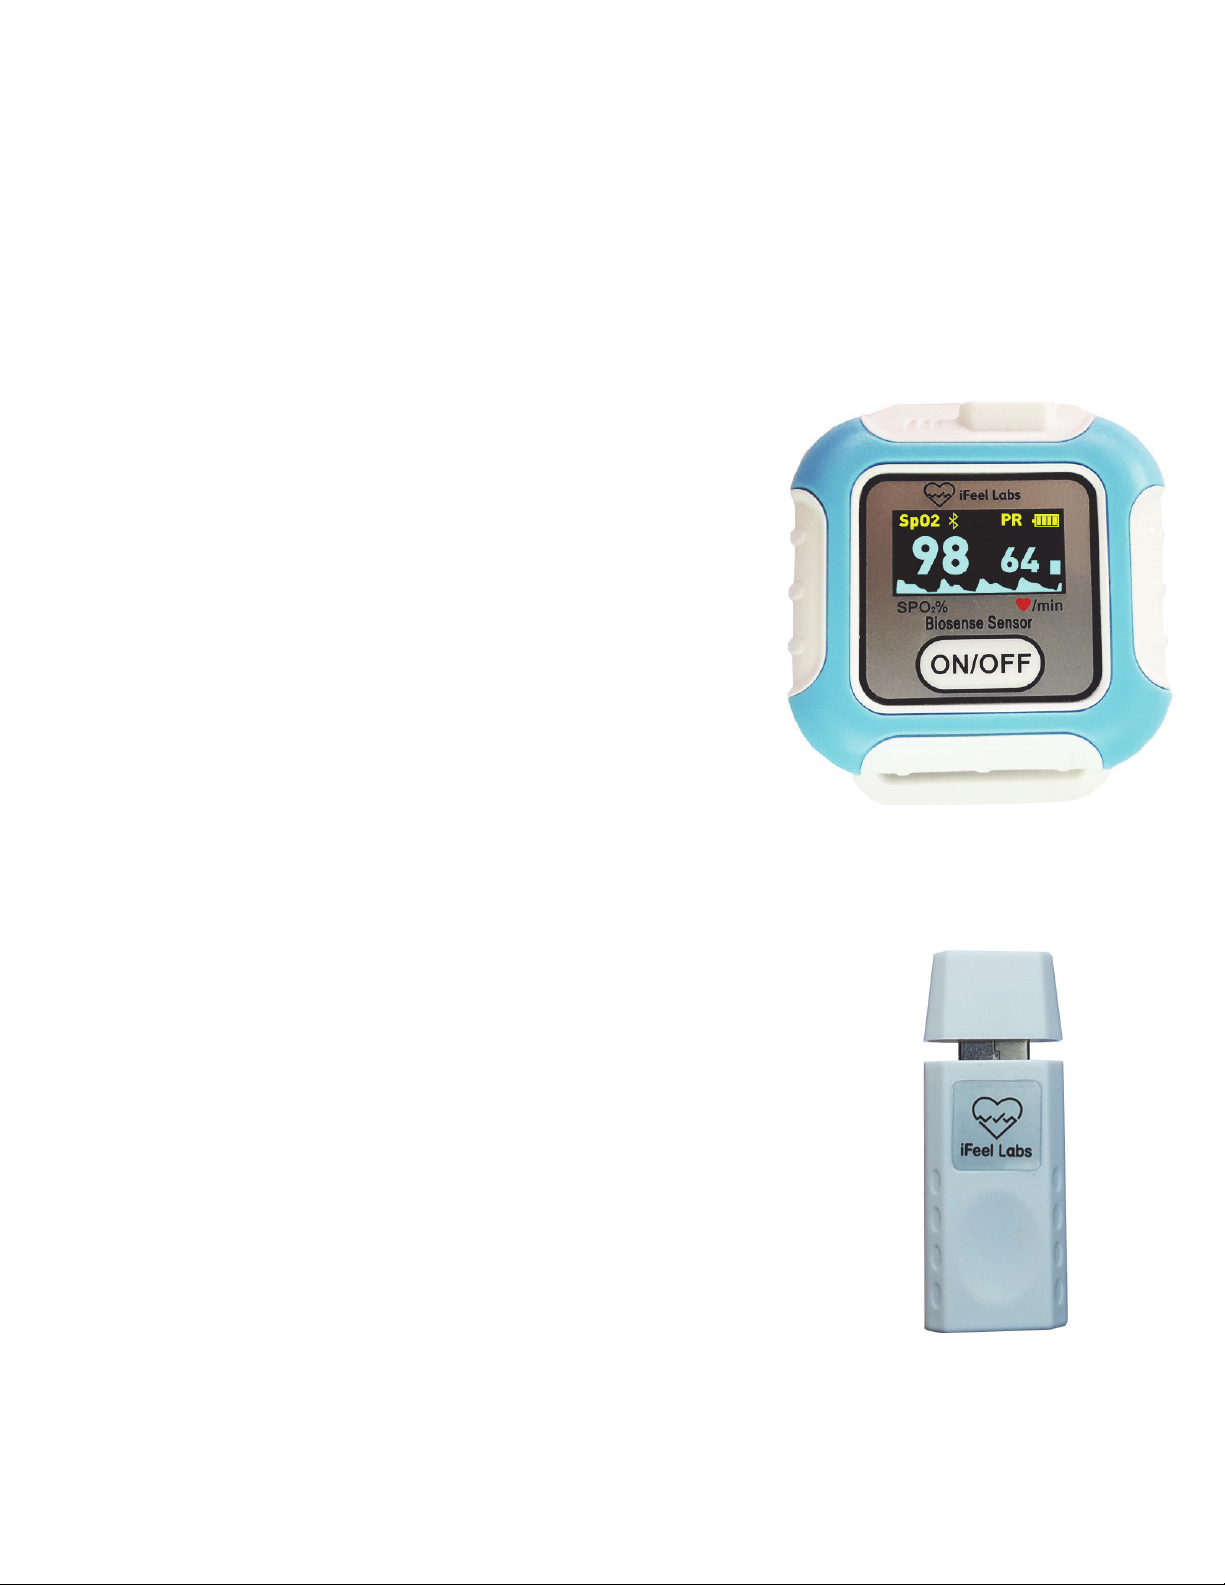
IFEEL BLUETOOTH SENSOR
If you have an iFeel Sensor with a rounded-square
display, you have the iFeel Bluetooth Sensor.
Please start reading from the iFeel Bluetooth Sensor section
on the 5th page.
IFEEL USB SENSOR
If you have an iFeel Sensor with a thin rectangular connector you
have the iFeel USB Sensor. Remove the cap to expose the USB
connection.
Please start reading on the next page to set up your iFeel USB
Sensor.
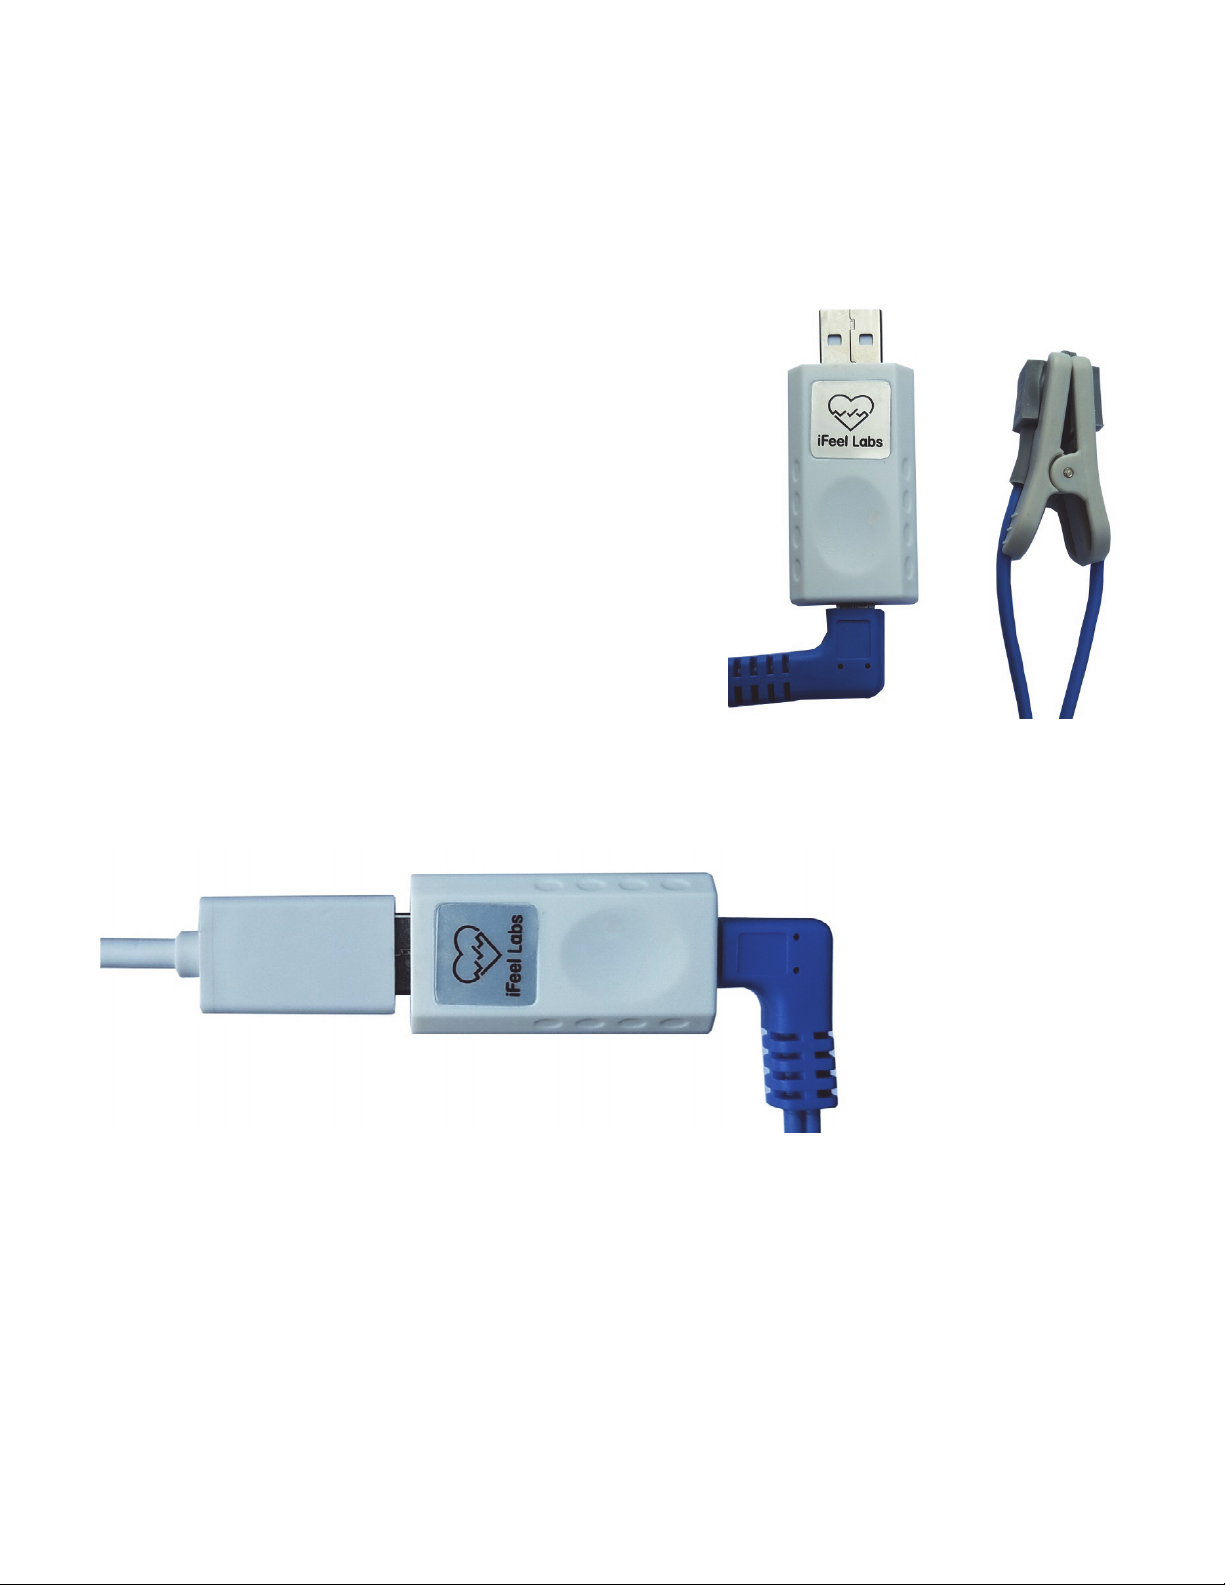
IFEEL USB SENSOR
The iFeel USB Sensor is a highly accurate heart rate sensor that measures heart rate from a finger or ear.
Depending on the package you purchased you may have a Clip Sensor (for your finger or ear) or a Soft Rubber Finger
Sensor.
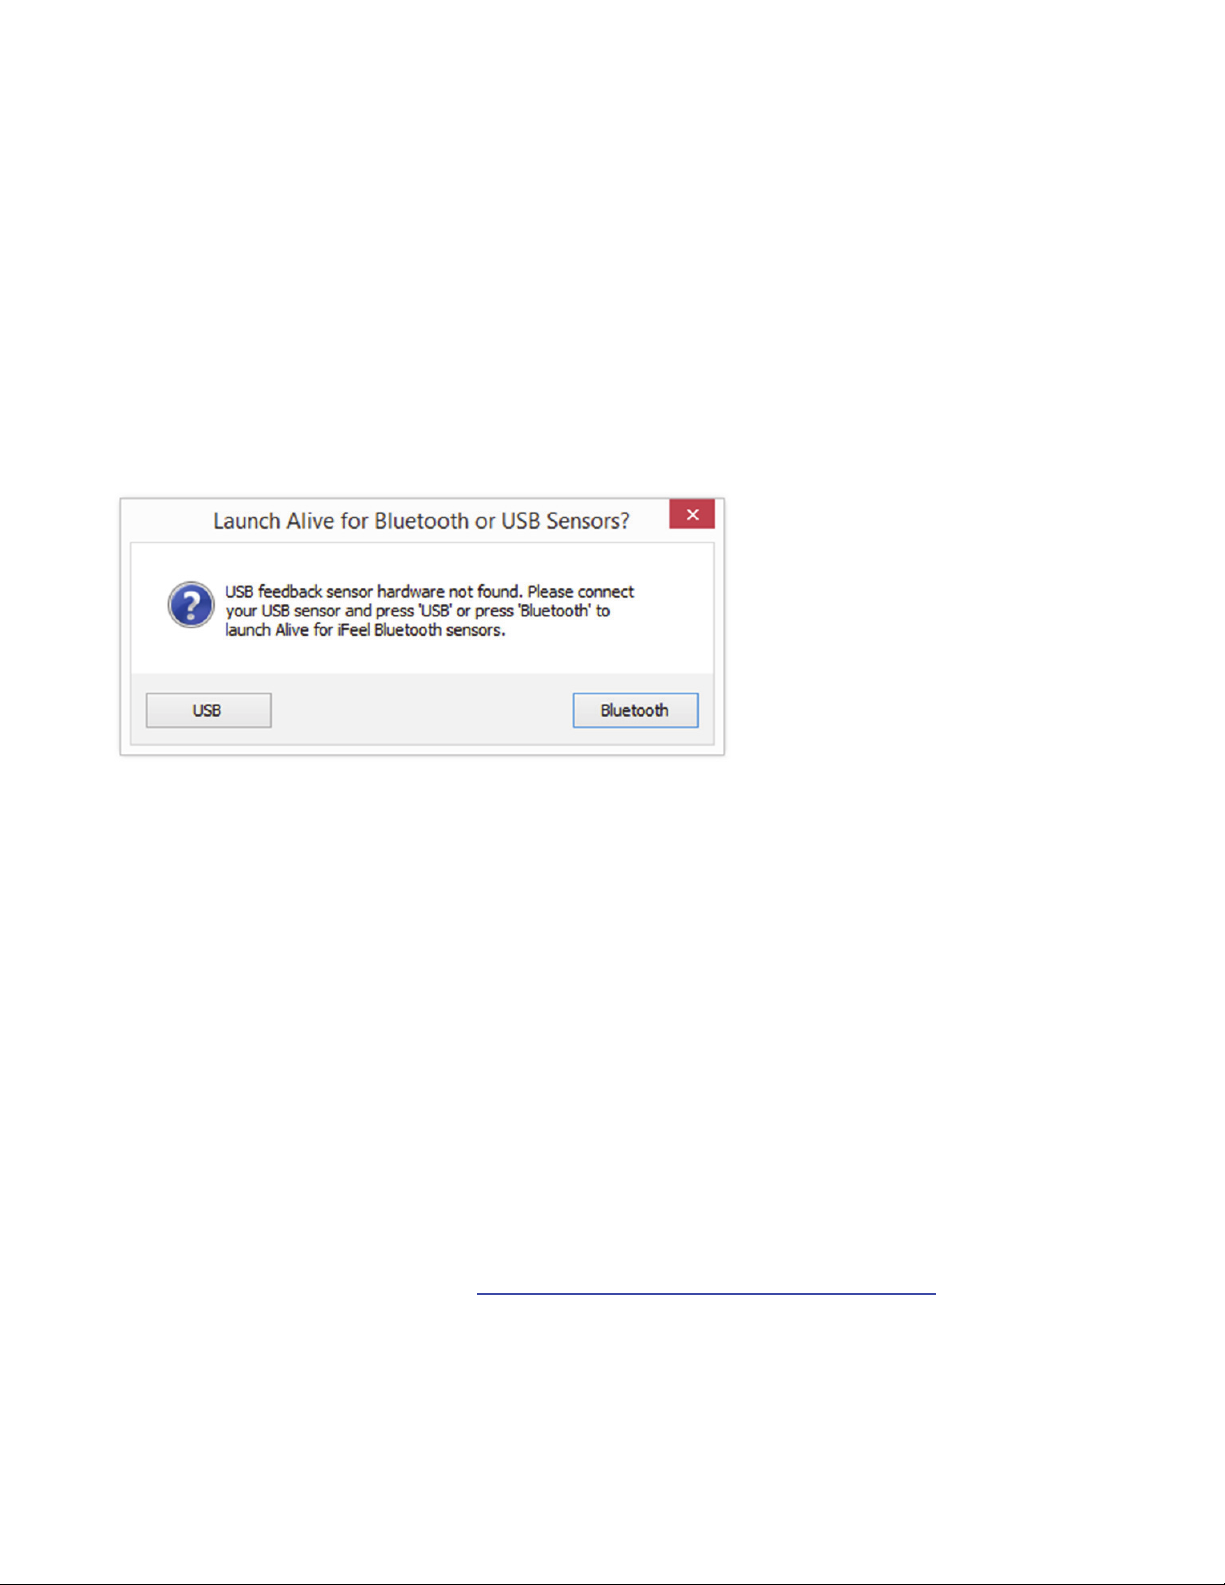
1) Attach the Clip Sensor or Finger Sensor to the thin
rectangular iFeel USB Sensor. If you have a
square watch-type connector with a display,
skip to the iFeel Bluetooth Sensor section.
2) Remove the cap on the rectangular iFeel USB
Sensor to expose the USB plug.
If you are using the Clip Sensor (shown to the right),
attach the small white shirt-clip to the blue cable, about
10 inches down from the end of the Clip Sensor. When
reading heart rate from your ear, attach the shirt-clip to
your shirt or jacket to hold the Clip Sensor up, so that
the Clip Sensor is not pulling down on your ear.
3) (Optional) Attach the long USB extension cord to the iFeel USB Sensor. The shorter
mini-USB converter is for use on Android devices.
4) Alive 2.6 or higher must be installed before you attach the iFeel USB Sensor to your computer!
Once Alive is installed, plug the iFeel USB Sensor into a USB port on your computer.
5) Place the heart rate sensor on your ear, or on the middle or index finger of your non-dominant
hand (your left hand if you are right-handed).
6) Open Alive and start training.

Clip Sensor Information
The Clip Sensor can be placed on your finger or ear. The ear is convenient but has some limitations.
1) If you are measuring heart rate from your ear, make sure to attach the white shirt-clip to hold the Clip Sensor up!
2) The signal is much stronger on the finger, so if you are getting movement errors move the clip to your
finger or use a Finger Sensor. The Clip Sensor works best when the red light is placed on top of your finger nail.
3) To measure SpO2 in Alive, use the Finger Sensor or place the Clip Sensor on your finger. SpO2 can only be
measured correctly from the finger (not the ear)!
4) If you are training BVP Amplitude you must place the Clip Sensor on your finger or use a Finger Sensor. BVP
Amplitude cannot be read from the ear.
iFeel USB Troubleshooting
I OWN ALIVE PIONEER WITH A GP8 AMP – HOW CAN I USE THE IFEEL SENSOR WITH THE GP8 AMP
From the Alive Main Menu open the Heart Rate Source dropdown and select BVP – iFeel Bluetooth.
FINDING THE IFEEL SENSOR COM PORT
When opening Alive, if you see a message Connecting to the iFeel Labs Sensor… your computer has not found
your iFeel Sensor. You may also see a dialog box that says Searching for your iFeel Labs Heart Rate Sensor which
also indicates your computer has not found your iFeel Sensor.
If you see a button Change iFeel COM Port click that button and Alive should now find your iFeel Sensor.
If you do not see this button open the Alive Main Menu, click Graph Training from the left-side buttons, then click
Play. You should now see the Searching for your iFeel Labs Heart Rate Sensor dialog. When you do, click Change
iFeel COM Port.
If this still doesn’t work, and you are using Windows, you may need to reinstall the iFeel USB Drivers. Please
download and run this Cypress Driver Installer:
http://www.somaticvision.com/downloads/public/CypressDriverInstaller_1.exe
THE HEART RATE LINE STAYS RED (OR MOSTLY RED) IN ALIVE
– OR – FEW OR NO BEATS ARE DETECTED
Place the iFeel Sensor so the red light is on top of your fingernail! The signal is stronger when the red light is on top
of your fingernail (there is another, infrared light shining from below). If the sensor doesn’t work when placed
with the red light on your fingernail can try rotating it so the red light is under your fingertip. Make sure the
sensor is not too loose or tight on your finger. Try both of your sensors to make sure the problem is not the
sensor.
If you are measuring heart rate from the ear, try moving the same clip sensor to your finger. You can also turn the
sensor around on your ear, or try different parts of your ear. You shouldn’t need to do this, but some users
have reported that placing a thin piece of paper or between the sensor and ear has improved the connection
if they were unable to get a good signal.

IFEEL BLUETOOTH SENSOR
The iFeel Bluetooth Sensor is a highly accurate heart rate sensor that measures heart rate from a finger or ear.
Your computer must have Bluetooth to use the iFeel Bluetooth Sensor.
1) Attach the Clip or Foam Sensor to the iFeel Sensor (“Biosense Sensor”). Place the
iFeel device on the table, your lap, or wear it as a wrist-watch.
2) Place the heart rate sensor on your ear, or on the middle or index finger of your non-dominant
hand (your left hand if you are right-handed).
3) Press the ON/OFF button to turn on the iFeel Sensor. To turn off the iFeel Sensor hold
the ON/OFF button for 5 seconds.
4) If the battery is low, remove the heart rate sensor and attach the charging cable.
For quick charging use a 1 Amp or higher wall charger. To view the battery
indicator, remove the charging cable and turn the sensor on.
5) A short press on the ON/OFF button will bring up the Settings screen.
On the Settings screen a short press moves to the next setting, a long
press changes the setting. To exit the Settings screen make short
presses on ON/OFF until you get to Exit, then do a long press to exit. The
Bluetooth setting must be set to On to connect with Android devices!
6) The finger sensor red light works best when directly on top of your finger nail.
The sensor can be oriented so the cord extends towards or away from
you. Adjust the velcro on the finger sensor so it is snug, but not very tight. The sensor
should be in constant contact with your finger with no gaps.
7) The iFeel Sensor displays SpO2 on the left side, and average heart rate on the right
side. SpO2 can only be measured correctly from the finger (not the ear)! If you wish to
measure or train SpO2 or average heart rate you can do this directly using the iFeel
Sensor’s built-in display.
8) Open Alive and press Bluetooth (or the Enter key on your keyboard). You must press
the Bluetooth button each time you open Alive to use with the iFeel Sensor. If you
own a GP8 sensor and have it attached Alive will load without this prompt.
9) Once Alive opens choose a user. If Alive opens to the main menu choose Graph
Training under Alive workshops and start a session. Once a session is running,
Alive will help you connect the iFeel Sensor to your computer’s Bluetooth.
Follow the steps explained in Alive or follow the Pairing the iFeel Sensor section
below.
10) For heart rate or smoothness training the Clip sensor can be placed on your finger
or ear. Please see the iFeel USB Section “Clip Sensor Information” if you want to
use the Clip Sensor on your ear! The signal is much stronger on the finger, so if you are
getting movement errors move the clip to your finger or use a finger sensor. For the
strongest, most movement tolerant signal, purchase an “Extra Adult Movement
Tolerant Finger Sensor” from http://www.somaticvision.com/iFeel/
11) Important note for BVP Amplitude training: If you are training BVP Amplitude you must
place the Clip sensor on your finger or use a finger sensor. BVP Amplitude cannot be
read from the ear.

iFeel Bluetooth Troubleshooting
IFEEL SENSOR NOT FOUND OR NOT CONNECTED
If your computer has never connected to this iFeel Sensor, follow the Pairing the iFeel Sensor and Finding the iFeel
Sensor COM Port sections below. You can watch a video tutorial at: https://youtu.be/aV8NM6Zl0Xw
If your iFeel Sensor is on but Alive does not find it, press and hold the ON/OFF button for 5 seconds to turn
your sensor off. Then turn your sensor on again.
Make sure Bluetooth is on in the iFeel Sensor settings screen! Turn your iFeel Sensor on, then tap the ON/OFF
button to enter the settings screen. If bluetooth shows off, then use short presses on the ON/OFF button to
highlight bluetooth: Off. Once bluetooth: Off is highlighted a long press on the ON/OFF button will change
bluetooth to On. You can then use one more short press on the ON/OFF button to highlight Exit, and a long
press to exit the settings screen.
If you have connected your iFeel Sensor to another nearby computer or device, please turn off or move that device to free
the iFeel Sensor to connect to this computer.
If this doesn't help you may need to open Bluetooth Settings to remove and pair the iFeel Sensor again.
If you open the Alive Main Menu and start a Graph Training session, Alive will scan for your iFeel Sensor and
give you further connection instructions.
MY COMPUTER DOESN’T HAVE BLUETOOTH
Somatic Vision does not provide support to help add Bluetooth adapters to computers without Bluetooth.
Please follow these steps and seek professional assistance if needed.
1) Purchase a Bluetooth USB Adapter (preferably one with good reviews from a major name brand).
There are many low quality Bluetooth adapters, and many come with poor or trial software. Avoid any
adapter that ships with or uses BlueSoleil. Adapters that use Broadcom drivers seem to work well.
2) We have tested the IOGEAR Bluetooth 4.0 USB Micro Adapter on Windows 7.
3) Regardless of which adapter you purchase, ignore the drivers sent with your adapter (on CD). Always
ignore the included CD and download the latest version of the drivers from the manufacturer’s website. Drivers
sent on CD can contain “bloatware” (as is the case with the IOGEAR’s drivers on CD) and are often
outdated. If you purchased the IOGEAR Bluetooth 4.0 version GPU521 the current download link for
the drivers is: https://www.iogear.com/product/GBU521/
4) Follow the instructions sent with the adapter to pair the iFeel Bluetooth Device. If two iFeel Bluetooth
devices are shown, pair the one that shows a picture of a headset, or says “headset.” The pairing instructions
that Alive (and this user guide) include don’t apply if you are using a separate Bluetooth adapter.
PAIRING THE IFEEL SENSOR
To Pair (in any version of Windows), first attach the iFeel Sensor to your finger or ear, then turn it on (it may turn off if not
attached to your finger or ear).
WINDOWS 8 AND ABOVE: Click the Start Menu button, type "bluetooth settings", then click Bluetooth Settings. In
Bluetooth Settings find the "iFeel Labs" device and click pair. If there are two iFeel Labs devices shown, pair the
one showing a headset.
WINDOWS 7: Click the Start Menu button, type "devices and printers", then click Devices and Printers. In
Devices and Printers click Add a device, find the "iFeel Labs" device and pair it. If there are two iFeel Labs
devices shown, pair the one showing a headset.
WINDOWS XP: Click Start, click Run, type bthprops.cpl, and then click OK. In Bluetooth Settings, click Add. In
the Add Bluetooth Device Wizard, click to select the My device is set up and ready to be found check box,
and then click Next. If there are two iFeel Labs devices shown, pair the one showing a headset.
IF YOU ARE USING A SEPARATE (NOT BUILT-IN) BLUETOOTH ADAPTER: Follow the instructions that come with the
adapter for pairing devices. If there are two iFeel Labs devices shown, pair the one showing a headset.
FINDING THE IFEEL SENSOR COM PORT (AFTER PAIRING)
After pairing, the iFeel Sensor is assigned two COM Ports. These COM Ports should not change during
normal use.
To find and save your COM Port, start a graph training, orientation, or workshop session in Alive. Alive will
scan COM Ports from 20 down to 3 looking for your iFeel device.
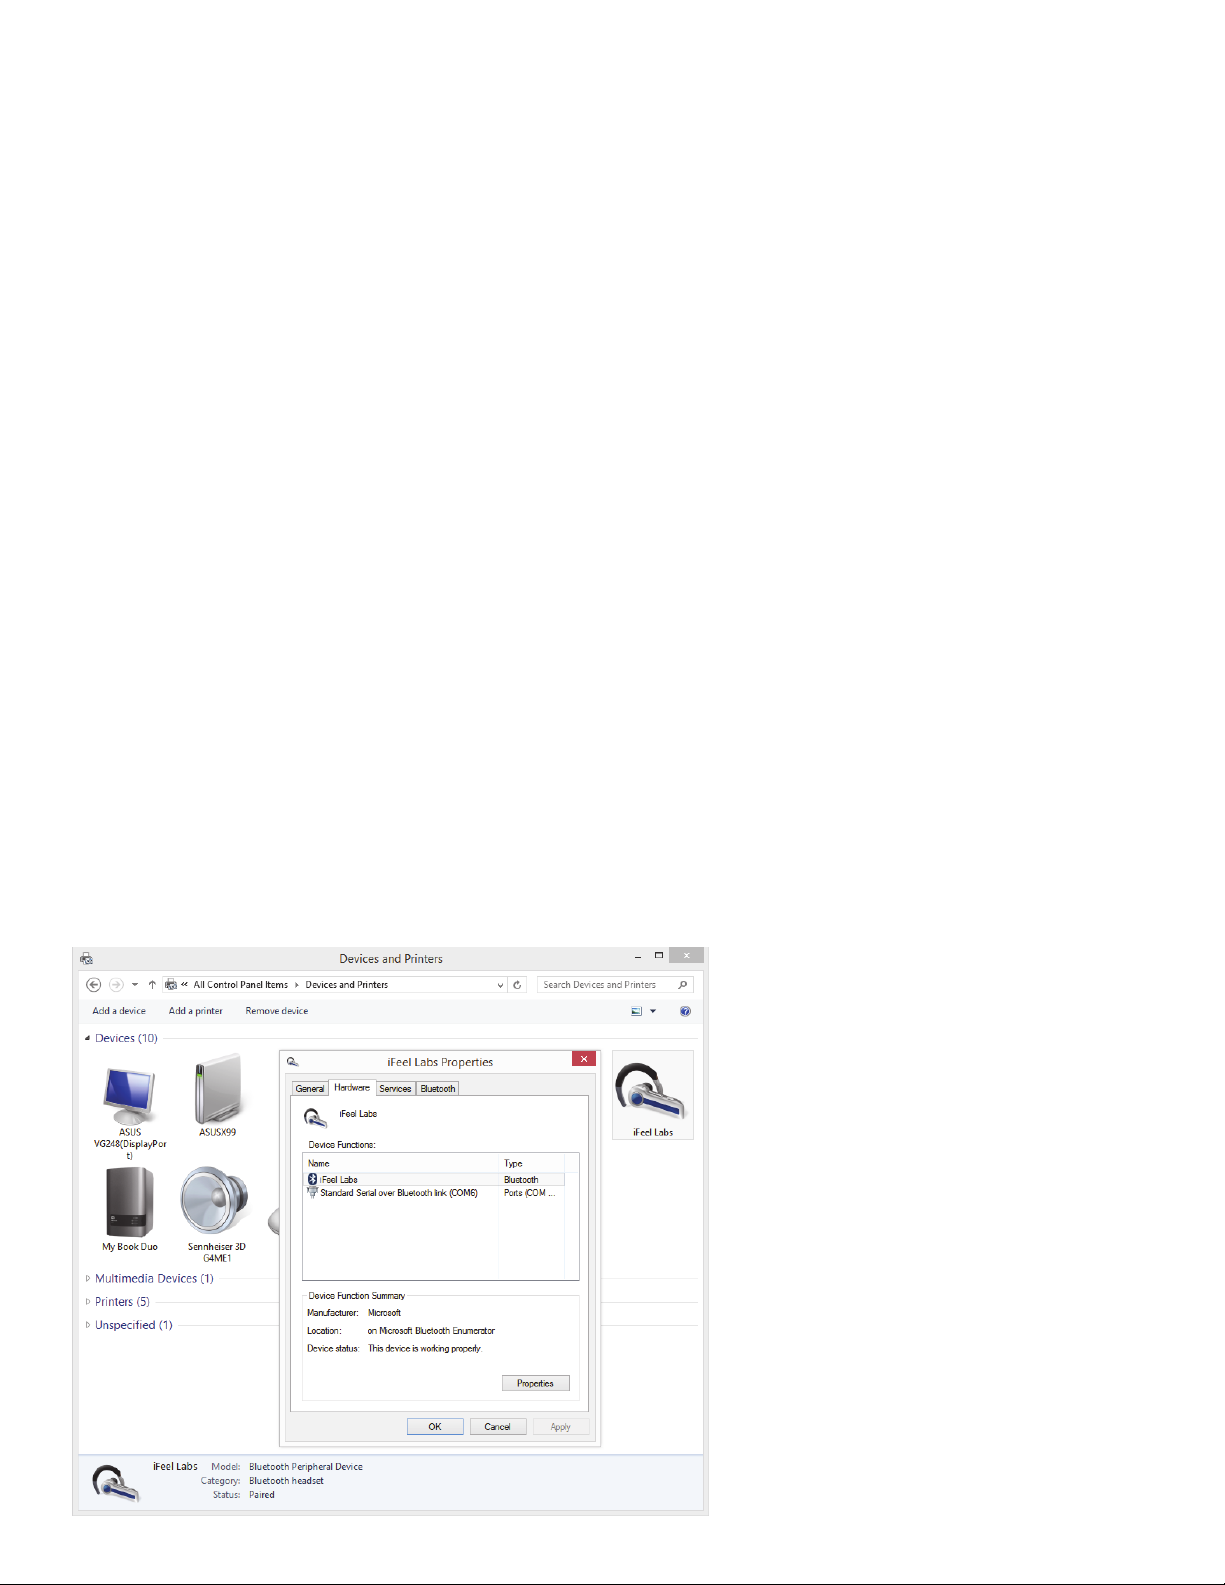
If Alive can’t find the COM Port you will need to manually enter it. To manually enter the COM Port number
you need to find out which COM Port the iFeel Labs device is using. Open Control Panel -> Devices and
Printers to find your iFeel Labs device. If you do not see the device, it may not have been correctly paired.
Right click the iFeel Labs device and click Properties. In the Hardware tab you will see the COM number. For
example, in the Devices and Printers image
here, in the iFeel Labs Properties window,
we see Standard Serial over Bluetooth link
(COM6) so the COM Port number is 6.
An alternate way to find the COM Port
number is by using Device Manager (click
Start, then type "device manager", then
click Device Manager). In Device Manager
click the triangle to expand Ports and find
Standard Serial over Bluetooth link. For
example, if you see "Standard Serial over
Bluetooth link (COM5)" and "Standard
Serial over Bluetooth link (COM6)", in Alive
click "Manual COM Port" then try "5" or
"6". If you can't find Ports, or "Standard
Serial over Bluetooth," try un-pairing and
re-pairing the iFeel Labs device.

THE IFEEL LABS DEVICE IS CONNECTED BUT IS SENDING BAD DATA
If you are able to connect to the iFeel device, but you get bad data please check the Port Settings for your
COM port. Open Device Manager (click Start, then type "device manager", then click Device Manager) then
double click the "Standard Serial over Bluetooth" port(s) that the iFeel device is using. Click on the Port
Settings tab and ensure the settings are Bits per second: 9600, Data bits: 8, Parity: None, Stop bits: 1, Flow
control: None. If you change Port Settings please write down the prior values in case you accidentally modify port
settings for a different device and need to revert the changes.
I OWN ALIVE PIONEER WITH A GP8 AMP – HOW CAN I USE THE IFEEL SENSOR WITH THE GP8 AMP
From the Alive Main Menu open the Heart Rate Source dropdown and select BVP – iFeel Bluetooth.
THE HEART RATE LINE STAYS RED (OR MOSTLY RED) IN ALIVE
– OR – FEW OR NO BEATS ARE DETECTED
Please first check your sensors, then check the Bluetooth connection and adapter.
CHECK SENSORS: Place the iFeel Sensor so the red light is on top of your fingernail! The signal is stronger when the red
light is on top of your fingernail (there is another, infrared light shining from below). If the sensor doesn’t work
when placed with the red light on your fingernail can try rotating it so the red light is under your fingertip.
Make sure the sensor is not too loose or tight on your finger. Try both of your sensors to make sure the
problem is not the sensor.
CHECK BLUETOOTH CONNECTION: Problems with the Bluetooth connection can result in a red heart rate line,
missing beats, or strange raw Blood Volume Pulse displays. Try restarting Alive and restarting the iFeel Sensor. If
restarting doesn’t help, you need to verify your COM settings:
1) Open Alive with the iFeel Sensor off. Run a graph training session. You will see Waiting for iFeel
heart rate sensor data on COM [x]. Write down that COM port number. Close Alive.
2) Open Device Manager (click Start, then type "device manager", then click Device Manager). In
Device Manager click the triangle to expand Ports and find Standard Serial over Bluetooth link.
You should see the COM port you wrote down in step 1. For example, if you wrote down 5 look for
"Standard Serial over Bluetooth link (COM5)".
3) Double click on the "Standard Serial over Bluetooth" port, click on the Port Settings tab and
ensure the settings are Bits per second: 9600, Data bits: 8, Parity: None, Stop bits: 1, Flow control:
None. You may need to also do this for the other Standard Serial over Bluetooth ports. If you
change Port Settings please write down the prior values in case you modify port settings for a
different device and need to revert the changes.
CHECK BLUETOOTH ADAPTER: If you have never had a good signal in Alive on this computer the Bluetooth
adapter may not be functioning correctly. See the My Computer Doesn’t Have Bluetooth section below.
MY IFEEL SENSOR SHOWS CHARGING EVEN AFTER I REMOVE IT FROM THE CHARGER
Take the USB charging cable and the iFeel Sensor and walk outside or into another room, away from your
Bluetooth computers, tablets, or phones. With the thin USB side of the charging cable not connected to any charger
plug the charging cable into the iFeel Sensor, wait one second, and then remove the charging cable from the
iFeel Sensor.

© 2014-2018 Somatic Vision Inc. Alive is a trademark of Somatic Vision
Inc. All rights reserved. Manufactured under license from Quantum Intech,
Inc. Quantum Intech and the Quantum Intech logo are trademarks of
Quantum Intech, Inc. in the U.S. and other countries. HeartMath and the
HeartMath logo are trademarks or registered trademarks of the Institute of
HeartMath in the U.S. and other countries. All other trademarks belong to
their respective owners. Coherence algorithms contained within this product
licensed from and © 1999-2010 Quantum Intech, Inc, with all rights
reserved, and are protected by the following patents in the US: 6,358,201;
7,117,032; 7,163,512; 7,462,151; and 8,066,637. Other patents include:
European Union 1156851; Canada 2,365,032; Australia 770323; China
ZL00807109.8; Hong Kong HK1042056; Japan 4410234; Korea 10-
0616370
Other Somatic Vision Accessories manuals

Popular Accessories manuals by other brands

Propel Trampolines
Propel Trampolines PowerBank+ Bluetooth instruction manual

Balluff
Balluff BES M30MH2-GNX10B-BT02-EXA user guide

EggTronic
EggTronic EINOVA LAPTOP POWER BANK user manual

TIS
TIS Air-Socket-S installation manual

PCB Piezotronics
PCB Piezotronics 353B01 Installation and operating manual

Creative
Creative 202 owner's manual


