SOMNI C3 User manual

1
VETERINARY ANAESTHETIC
VAPORISER OPERATIONS MANUAL
SOMNI C3
SOMNI PRODUCT MANUAL
2
TABLE OF CONTENTS
User Responsibility
Warnings and Cautions
Principles of Operation
Examination and
Preparation For Use
Installation
Operating Instructions
Filling Instructions
Funnel Fill
Draining Instructions
Funnel Fill
Filling Procedure
Key Filled
Operating Instructions
Key Filled
Specications
Warranty and Service
3
4
5
6
7
9
11
12
13
15
17
20

3
USER RESPONSIBILITY
The SOMNI C3 is a precision medical vaporiser designed for Veterinary
Use Only. This vaporiser was designed to mix the vapours of specied
liquid anaesthetic gas agents with anaesthetic delivery gases. The
vaporiser will continue to provide reliable performance only if the
manufacturer’s operating and maintenance instructions are followed.
The vaporiser, as with any mechanical medical device, requires periodic
preventative maintenance and calibration. Any components, which
become worn, distorted, or contaminated should be replaced by a
factory authorised service centre. A vaporiser that requires service
should not be used until it has been accurately tested and veried by a
factory authorised service centre. Field-testing of vaporiser output using
portable test equipment, while valuable, is not a substitute for factory
authorised preventative maintenance. Factory service and calibration is
recommended every two years, eld-testing is recommended annually at
minimum. The user assumes full responsibility and liability of any use of
the vaporiser.

4
WARNINGS AND CAUTIONS
• This vaporiser is intended for Veterinary Use Only
• Do not ll the vaporiser with any agent other than the one specied on the front
label. Vaporisers are specically designed dependent on agent type. Therefore, any
other agent used can prove to be dangerous to a patient.
• Do not use this vaporiser until it is mounted upright, vertical and out of operation
for a minimum of (1) hour aer initial lling to allow for proper initial wick
absorption. Failure to allow wicking absorption time may result with inaccurate
output at the selected dial setting.
• Do not carry vaporiser by control dial. Handle and transport vaporiser with care
by grasping the vaporiser rmly with two hands.
• Do not modify, tamper, or disassemble the vaporiser. There is a probable
danger of damaging the vaporiser and altering the calibration accuracy.
• Do not put vaporiser into any liquid, including water.
• Do not attempt to sterilise vaporiser.
• Do not drain anaesthetic agent into any container other than a properly
marked container.
• Do not tilt or tip vaporiser beyond a 45-degree angle while lled with liquid
agent. If unit is accidentally tipped on its side, please call the manufacturer
for specic instructions.
• Do not have vaporiser serviced by anyone other than a SOMNI authorised
service centre.
• Do not operate vaporiser prior to leak testing the anaesthetic equipment,
ensuring secure connections to prevent unnecessary anaesthetic exposure
• Turn the vaporiser OFF when not in use.
• It is recommended that the vaporiser is kept upright at all times aer installation.

5
PRINCIPLES OF OPERATION
VAPORISER SUMP AND VALVE ASSEMBLY
This anaesthetic vaporiser is comprised of a vaporising chamber and duct
system (located within the sump cover), rotary valve and concentration dial. The
concentration dial is connected to the rotary valve underneath. The rotary valve
contains ducts and a vapour control channel. With the concentration dial in the
o position, the rotary valve links the inlet and outlet of the vaporiser, allowing
carrier gas to pass through. When the concentration dial is turned on, the carrier
gas is split in two: one stream owing into the bypass and the other owing into
the vaporising chamber.
The vapourising chamber contains two concentric wicks that are in contact
with the liquid anaesthetic agent. The wicks ensure the vapour is maintained at
saturation of concentration in the gas that leaves the vaporising chamber. The
ow through the vaporising chamber is controlled by the concentration dial.
Temperature compensation occurs automatically utilising a bi-metallic
strip to keep the output of the vaporiser constant during conditions of
changing temperature.

6
EXAMINATION AND PREPARATION FOR USE
1. Examine shipping carton for signs of external damage.
2. Remove contents from carton and inspect for visible damage
such as dents or missing parts.
3. If damage or missing parts are discovered or suspected, notify
customer service immediately at 0800 0129101.
4. Check that control dial operates freely.
5. Conrm the drain valve is completely closed .
6. Remove the mounting hardware (vaporiser spacer and 3-6mm bolts with
washers) and drain tube (*not shown) from package.

7
INSTALLATION
The standard mounting system requires bolting of the vaporiser directly
to a rigid back bar of an anaesthetic gas machine. The vaporiser should
always be mounted between the gas ow-metering unit and the
breathing circuit-always upstream of any absorber or humidier.
Ensure that emergency oxygen supplies or oxygen ush enter the
gas circuits downstream of the vaporiser.
The SOMNI C3 is supplied with mounting hardware consisting
of a spacer and 3-6mm bolts. While supporting the weight of
the vaporiser, install the spacer between the vaporiser and the
mounting surface and secure the vaporiser using the mounting
bolts provided. Ensure the bolts are tightly secured, but be sure
not to over-tighten.
Connect the 23mm inlet and outlet adapters to the corresponding
outlets on the cagemount. Twist and rmly push on for a secure,
leak-free connection. It may be necessary to connect the 23mm
adapters prior to mounting the vaporiser.
Complete a 10 second pressure test to conrm a leak free
installation. Instructions on Page 10.
8
INSTALLATION
• The direction of gas ow must be from “inlet to outlet”
(i.e. from le to right) when viewing the vaporiser from
the front.
• Ensure the liquid (which may accumulate in the
breathing circuit or the CO2 absorber) can not enter
the vaporiser while:
The vaporiser is tted with standard 23mm inlet and
outlet taper connections.
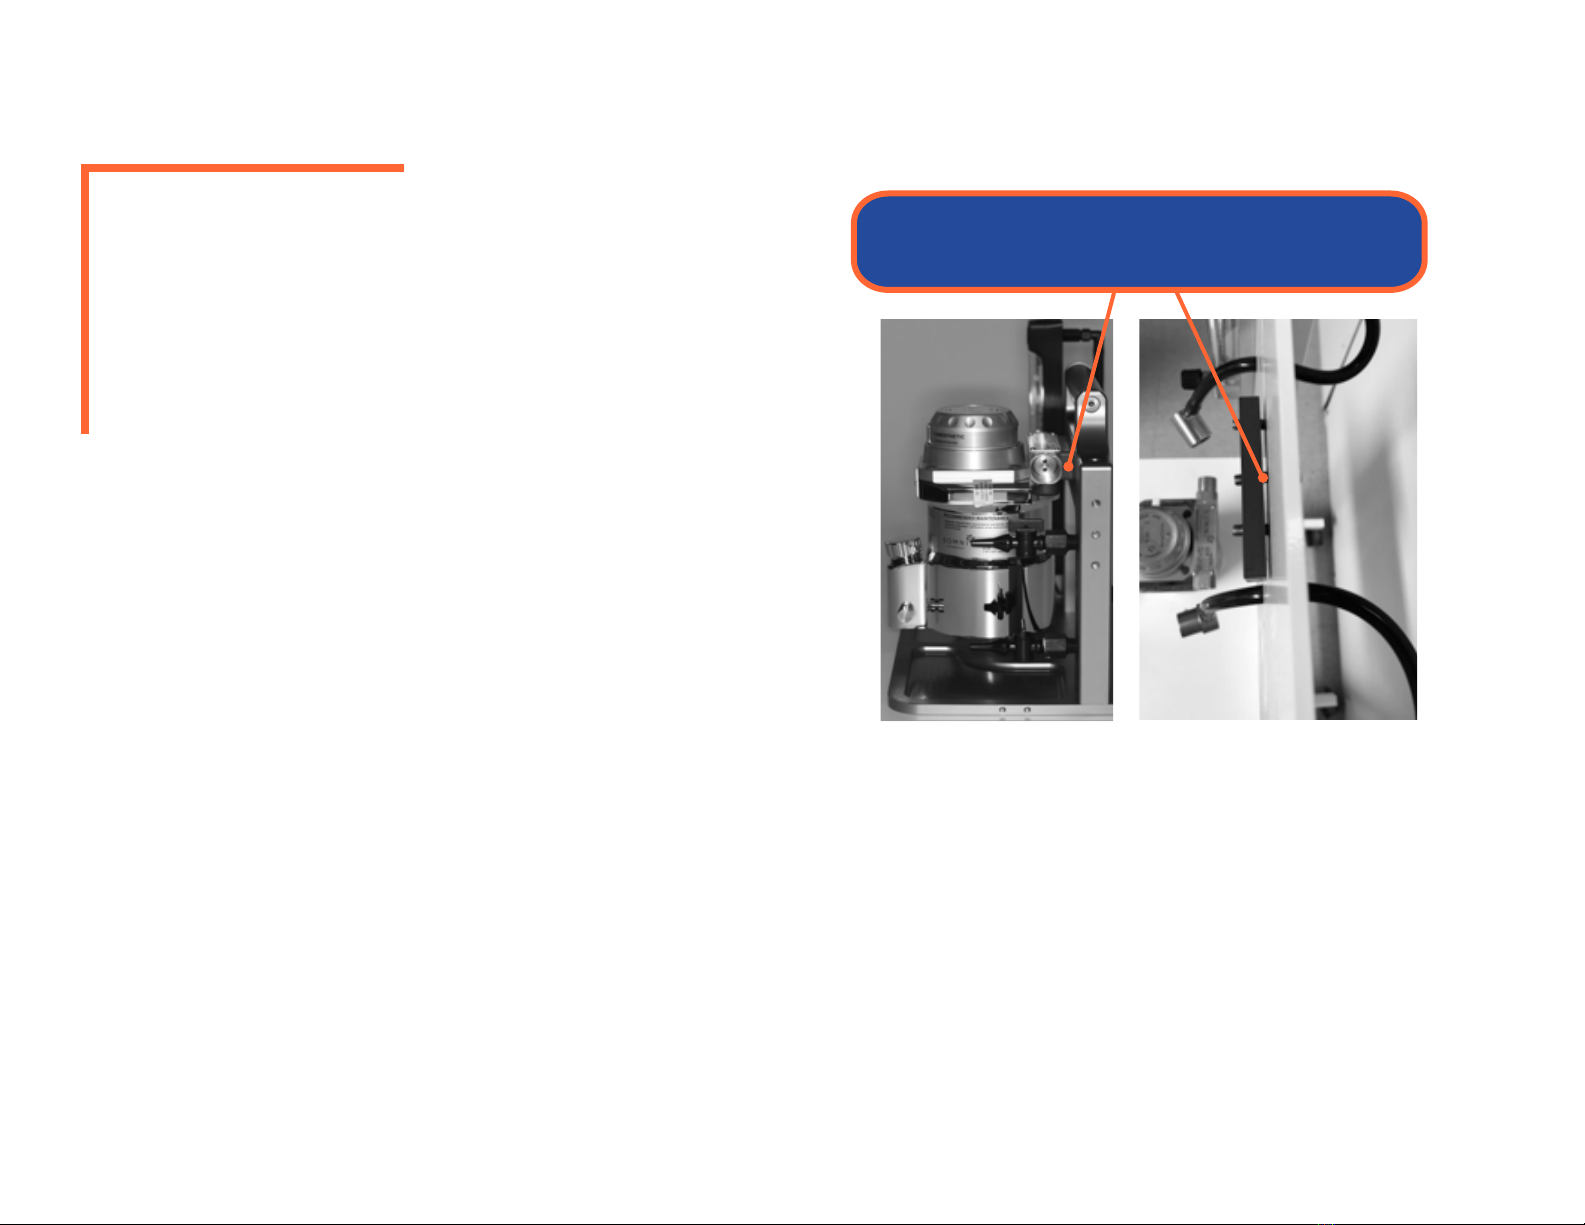
IMPORTANT! Vaporiser Spacer Placement
-in use
-during disassembly of the circuit
-when the machine is not in use

9
OPERATING INSTRUCTIONS
1. Observe all instructions and warnings on the vaporiser.
2. Fill only with agent indicated with vaporiser in OFF position.
3. Perform a leak test prior to rst use (See instructions
below- “10 Second Test”).
4. Depress locking button to turn dial from OFF position.
5. Turn dial counterclockwise to desired concentration.
6. Then turn control dial counter clockwise to desired concentration.
7. Turn vaporiser to “OFF” position when not in use.

10
10 SECOND PRESSURE TEST
Before each use, “leak test” the anaesthesia system and ensure the waste gases have a
patent way through the evacuation system.
www.somniscientific.com | info@somniscientific.com | 1-877-637-3625
WARNING:
Anaesthetic Vaporiser Is
Under Pressure
1
2
3
4
5
6
7
Wear safety goggles or safety glasses.
Please Follow this protocol for refilling vaporiser
Turn O2 supply primary switch to “OFF”.
With vaporiser in “ON” position (2% concentration), drain oxygen from
line by turning “ON” fresh gas switch to induction chamber (be sure to
have evac for the induction chamber “ON”.
When oxygen stops flowing (flow meter will drop to zero and O2
pressure gauge will drop to zero), turn induction chamber fresh gas
supply to the “OFF” position.
Fill vaporiser with liquid anaesthetic.
Turn vaporiser dial to “OFF” position.
Turn O2 supply primary switch to the “ON” position.
11
FILLING INSTRUCTIONS-FUNNEL FILL
DO NOT ll vaporiser with any agent other than the one specied
on the front label. Vaporisers are designed specically to their
respective agents. Any agent other than specied could prove to
be dangerous to a patient.
CAUTION:
1. Verify that vaporsier dial and delivery gas owmeter(s) are
in the “OFF” position.
2. Verify that anaesthetic agent is the same as labeled on front
of vaporiser.
3. Verify that the drain valve on the right side of the ll assembly
is closed by turning clockwise until nger tight.
4. Remove the funnel cap and pour agent slowly into opening.
Simultaneously, observe the agent level through the sight
glass. Note: If the vaporiser is dry, the level will fall slightly
as the wick absorbs the agent.
5. Replace cap by turning cap clockwise. Cap should be tight
to prevent leaks.
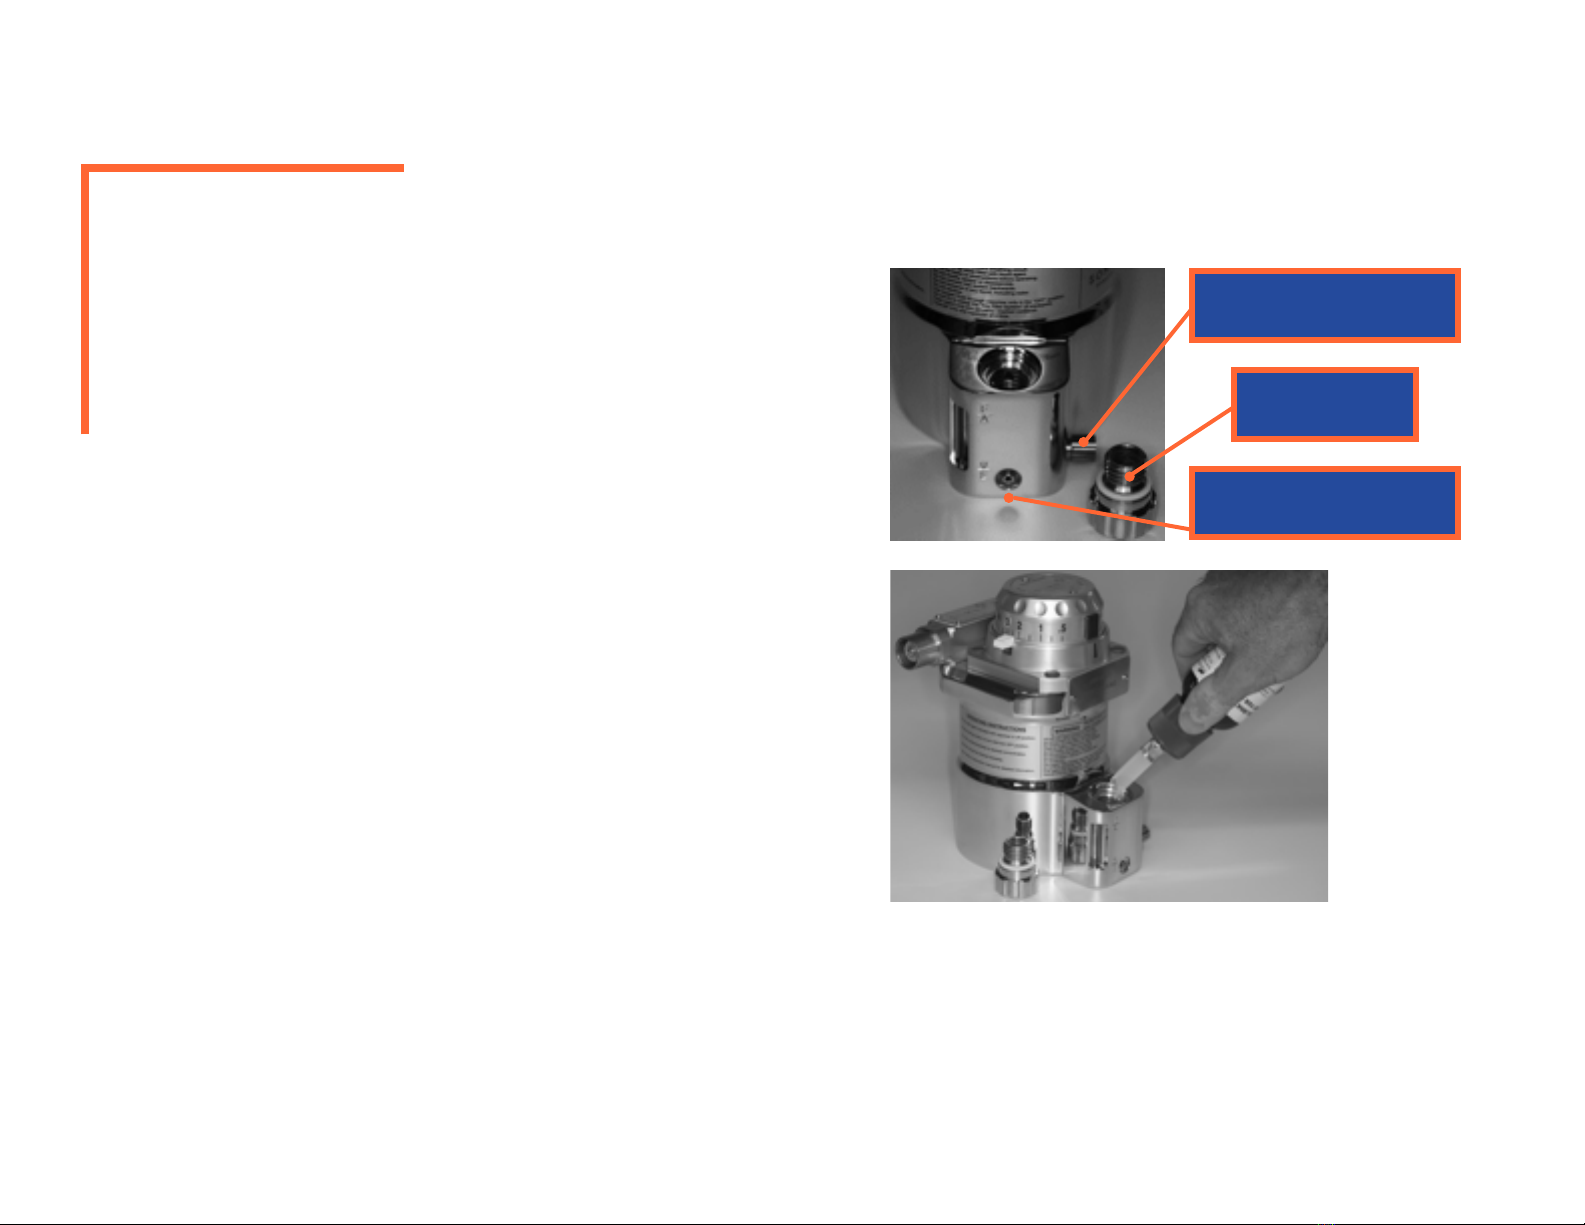
Drain Valve
Drain Port
Fill Cap
12
DRAINING INSTRUCTIONS-FUNNEL FILL
Liquid MUST be drained from the vaporiser into a properly labeled container.
CAUTION:
1. Attach small drain tube to the hole in the front of the vaporiser
ll assembly.
2. Hold an empty, properly labeled container under the tube.
3. Open the drain valve located on the right side of the ll assembly.
Aer all liquid is drained, close the valve nger tight to seal.
4. Discard used anaesthetic agent per proper protocol.

13
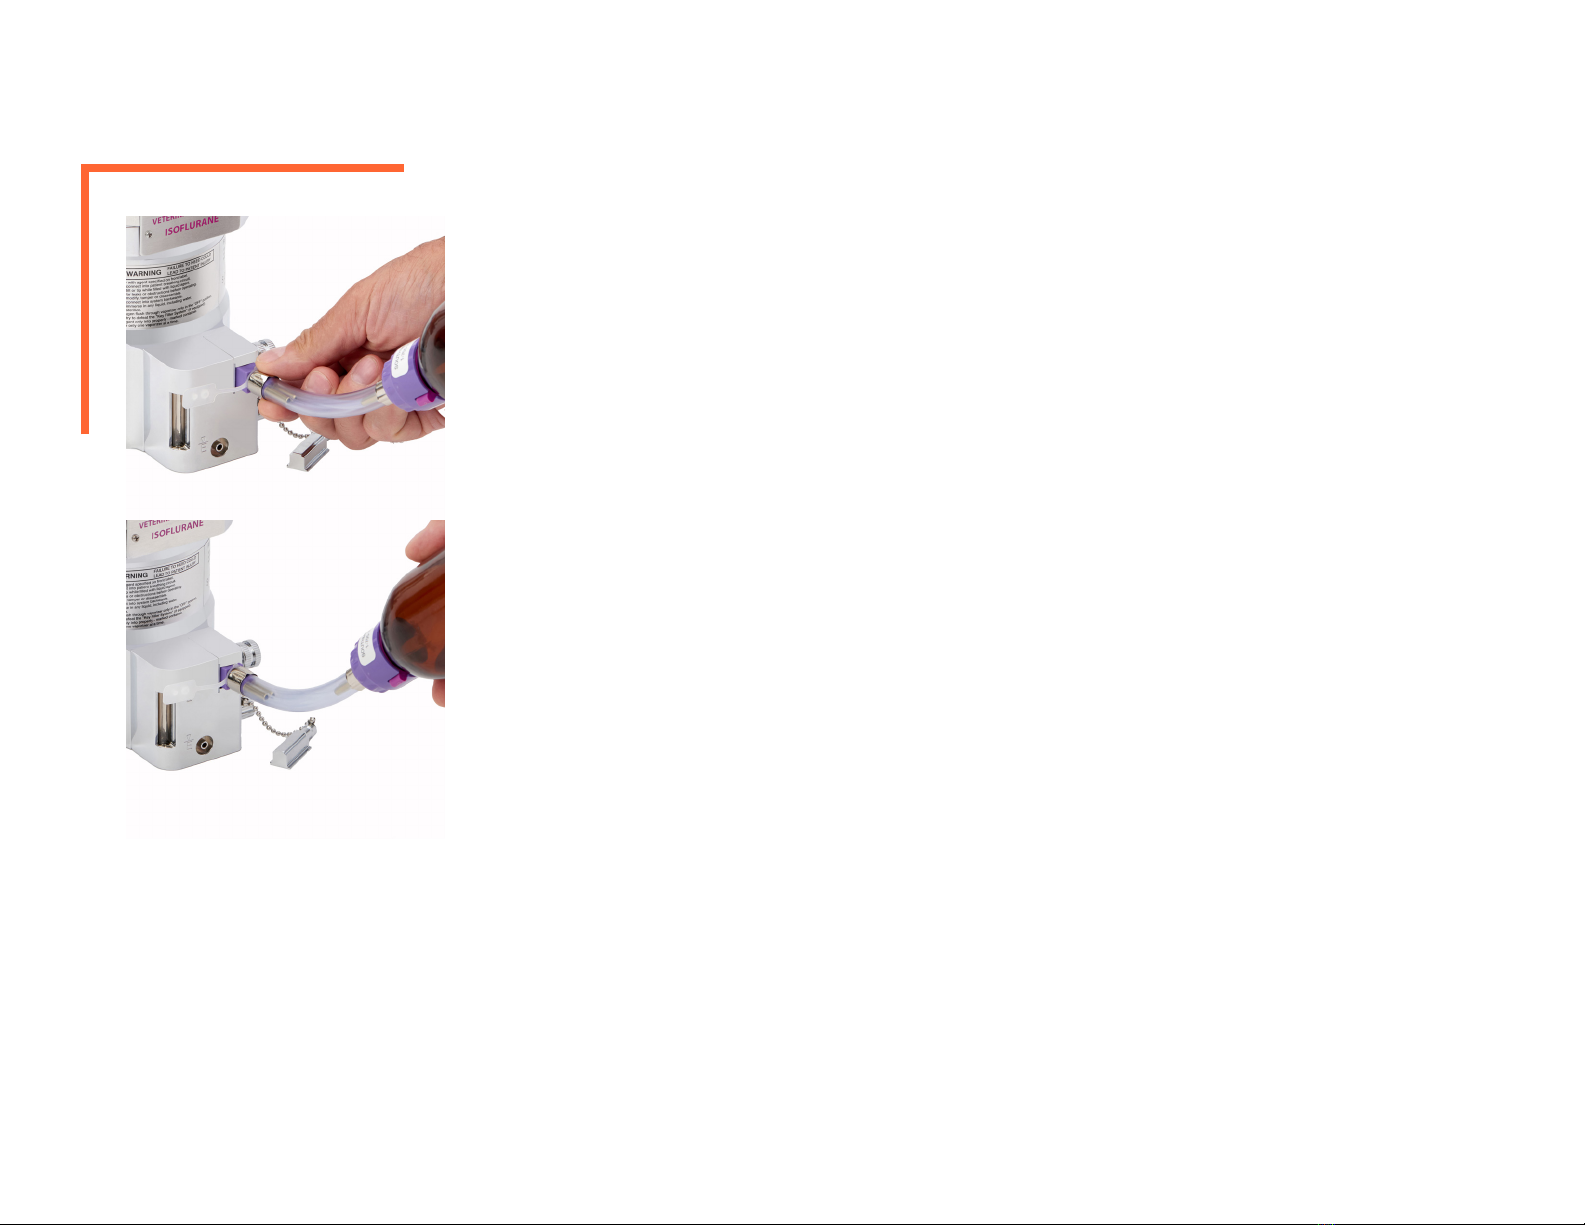
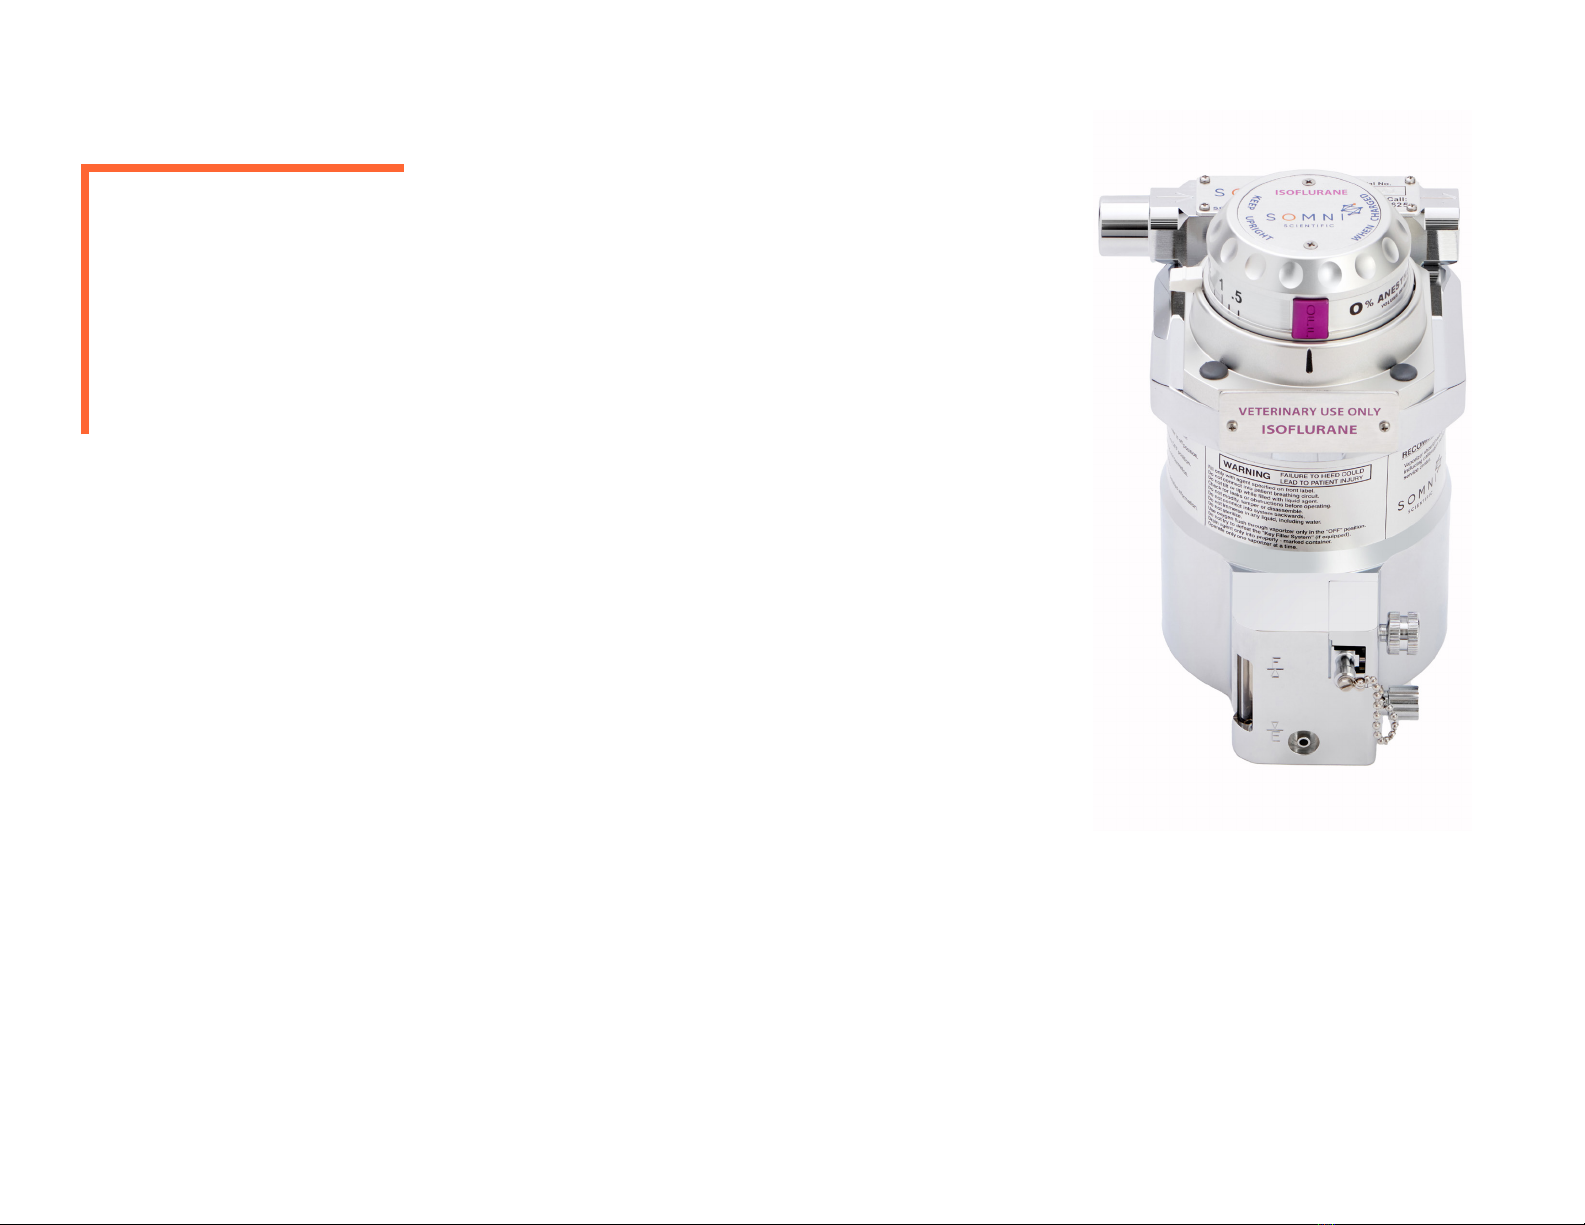
FILLING INSTRUCTIONS - KEY FILLED
CAUTION:
The vaporiser may be pressurised. Open the dial to
relieve internal pressure and then close. Unscrew
the top key retaining screw slowly when removing
the replica key plug on vaporisers tted with key
ll design.
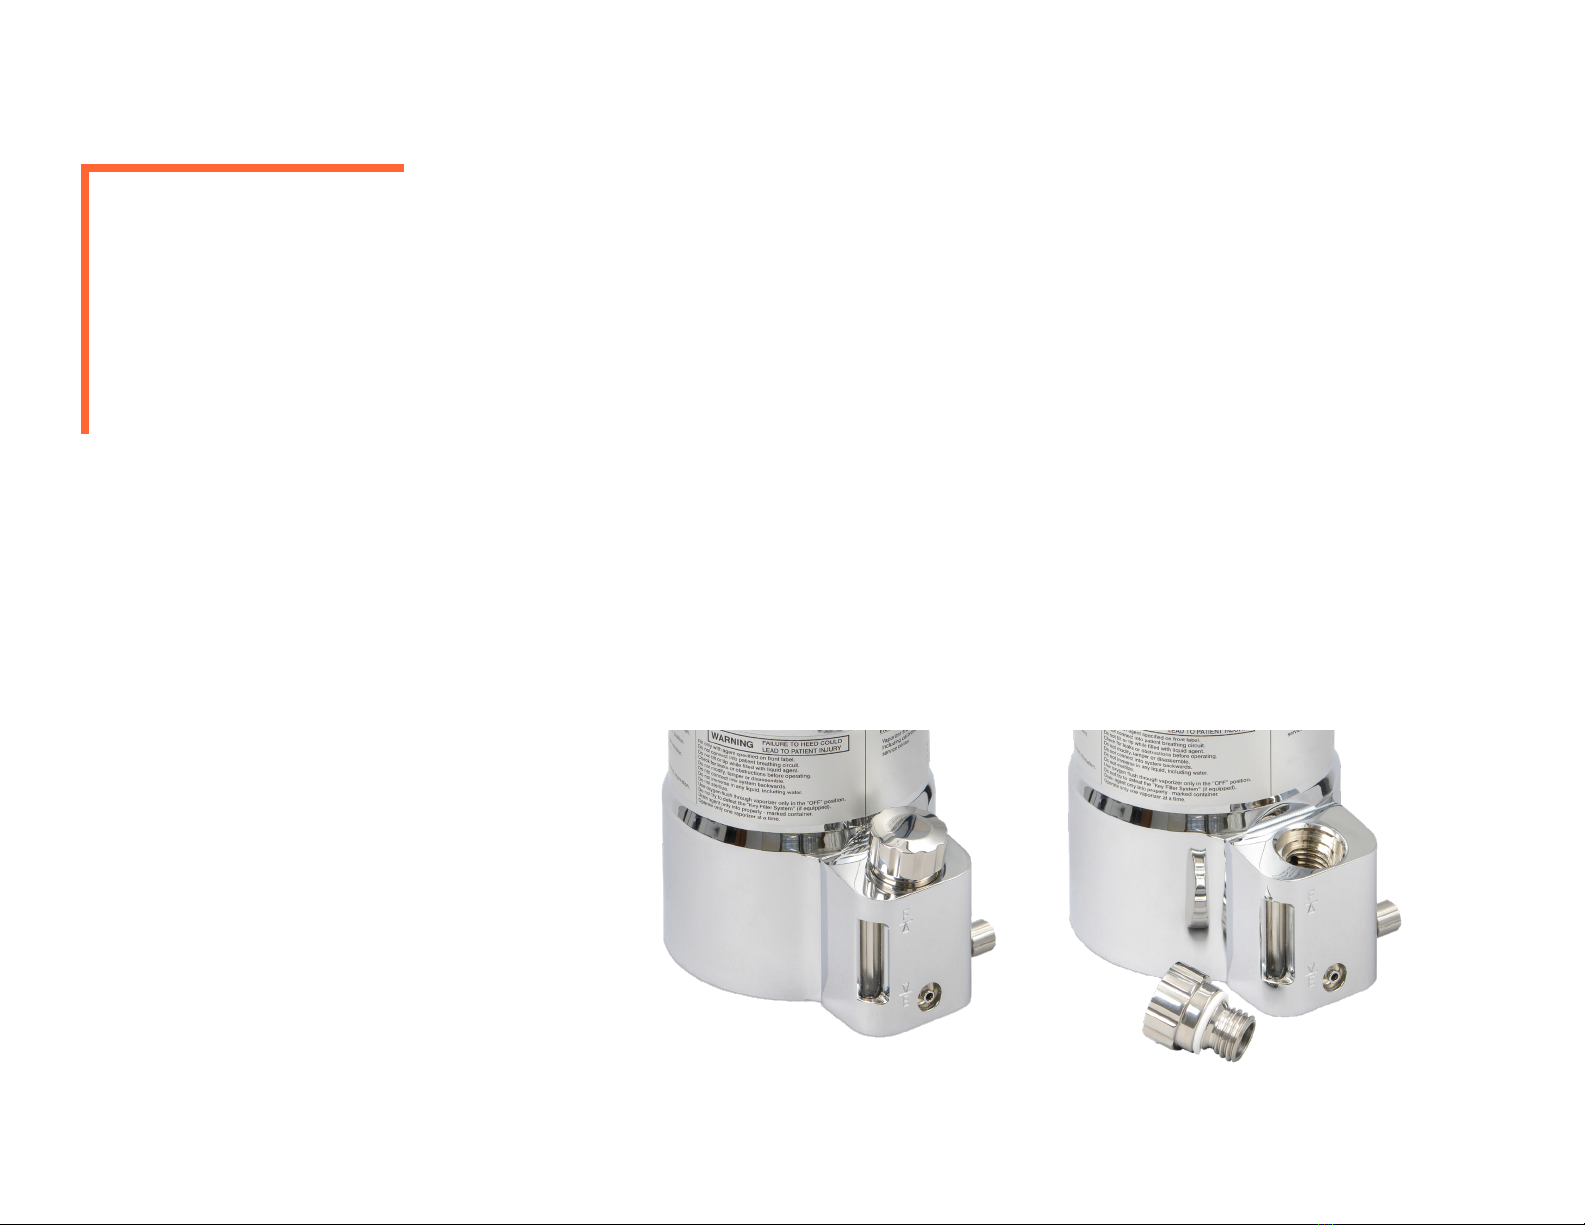
Drain Screw Valve
Replica Key Plug
Key Retaining Screw
Fill Socket
Sight Glass
Drain Nozzle
A. Remove the cap and seal from the anaesthetic bottle. Check
that the bottle is not damaged and attach the tted keyways of
the bottle adapter to the keys of the bottle collar. Screw them
together until fully secured and tightened. The bottle is now
ready to ll the vaporiser. Only the correct agent-keyll adapter
can be tted to the respected anaesthetic agent bottle.
B. Ensure that the vaporiser dial control is set to the “OFF” position.
Loosen the top key retaining screw on the ller assembly counter-
clockwise and withdraw the replica key plug.
C. Insert the keyll bottle adapter into the ll socket.
14
FILLING INSTRUCTIONS - KEY FILLED
Because the SOMNI C3 vaporiser sump can hold 125 ml capacity, there may be no excess agent.
If there is any excess liquid agent, allow this to escape from the ller socket completely, then
insert and fully tighten the replica key plug to prevent gas from escaping through the ller.
Note: If the vaporiser was dry before lling, the level will decrease as the wicks absorb the agent.
D. Aer insertion, tighten the key retaining screw clockwise to tighten and seal the keyll
adapter in the ller socket.
E. Raise the bottle above the level of the ll socket, avoiding kinking the adapter tube. The
agent should begin owing into the vaporiser from the anaesthetic bottle within a few
seconds. If this does not occur, remove the bottle and adapter from the vaporiser and
remove the adapter from the bottle. Carefully shake the adapter two or three times to clear
the tube, then repeat steps A through E.
F. When the vaporiser is lled to the maximum level mark in the sight glass, lower the bottle
below the level of the ller socket and wait for ve seconds to allow any agent in the adapter
to drain back into the bottle, then unscrew the top key retaining screw and remove the
adapter from the ll socket.
15
DRAINING INSTRUCTIONS - KEY FILLED
CAUTION:
DRAINING PROCEDURE:
Ensure the dial is in the “OFF” position, that the recovery bottle is below the drain
nozzle. The vaporiser may be pressurised, open and close the vaporiser to help
relieve internal pressure.
A. Remove cap from recovery bottle and position under the drain nozzle.
B. If needed, to allow air to vent, unscrew the top retaining screw and remove the replica key
plug from the ller socket.
C. Open the drain screw valve by turning knob counterclockwise to initiate the agent
draining process. Allow agent to pour into recovery bottle.
D. When draining has been successfully completed, close the drain screw valve by turning
the knob clockwise and insert replica key plug back into ller socket and secure.

16
ASSURING PERFORMANCE OF YOUR VAPORISER
To assure the continued performance of your vaporiser, the manufacturer
recommends full factory preventative maintenance be performed
every 2 years. Accurate and eicient anaesthetic gas delivery is a primary
consideration in patient care. Anaesthetic agent vapours are extremely
potent, and a very small error in concentration could be hazardous.
Preventative Maintenance Includes:
• Disassembly of the vaporiser
• Cleaning and inspection of all components
• Replacement of internal wick and seals
• Testing of thermostat and adjusting or replacing if needed
• Reassembly and leak test
• Calibration using industry standard laser refractometer
Preventative Maintenance Ensures:
o Worn components are replaced when necessary and
calibration is veried.
o Wicks are replaced to prevent the accumulation of contaminants
which can hinder anaesthetic vapourisation and interfere with eicient
anaesthetic gas delivery.
o Inspection and service can reveal accidental damage that could alter
performance and allows correction.
o Correction of vaporiser leaks and prevents the vaporiser from
contributing to unnecessary personnel exposure to waste anaesthetic
gas pollution.

17
Calibration
Vaporisers are calibrated at 21° C. The variation in output
with temperature, ow rate and duration of use is small, and
the variation in output when used with Intermittent Positive
Pressure Respiration is negligible.
Resistance to Gas Flow
5cm.wg at the “OFF” setting at 5 liter/min O2 at 22° C
Duration of Use
The rate of consumption of anaesthetic agent depends
primarily on ow rate and vapour output concentration. As
an approximate working gure, 1.0 ml of liquid anaesthetic is
required to provide 200 ml of vapour.
The rate of evapouration of anaesthetic agent may be used
(with caution) as an approximate method of checking that
the delivered output is not grossly in error. It may also be
used as a means of estimating how oen the vaporiser is
likely to need relling.
The approximate hourly consumption of anaesthetic agents
can be expressed as follows:
3 x % x F
Where % represents the setting of the vaporiser output
percentage, F represents the input ow rate in liter/min.
Example: If a vaporiser is set to deliver 2% at 6 liter/min total
input gas ow rate.
SPECIFICATIONS
Approximate rate of agent consumption = 3 x 2 x 6 = 36 ml/hour.
The above gures are approximate and intended for clinical
guidance only. Figures will vary depending on ow meter type
(and other varying factors). Results will be grossly in error if the
vaporiser drain port is not fully closed.
Liquid Capacity
Amount of anaesthetic agent to fully charge the vaporiser =125 ml.
Amount retained by Wick System = ml.
Weight and Dimensions
Weight 6.1kg / 13.5 lb
Height 181.6 mm / 7.15 in
Depth 134.6 mm / 5.35 in
Width 109.2 mm v/ 4.3 in
Capacity 125 ml
Wicking Capacity 50 ml
Some ventilators may impose higher, steady back pressures
(around 100 mmHG), producing more signicant depression of
the v/v percentage. Increased patient uptake of agent, along with
improved ventilation can oen mitigate these eects, eliminating
the need to compensate for increased back pressure at the
vaporiser.
High Back Pressures
Pressures in excess of 400 mmHg could conceivably occur during
procedures similar to bronchoscopy or because of occlusion of
downstream tubing and piping or for other reasons. These eects
on v/v percentage cannot be precisely predicted but the most likely
eects will be reductions in concentration (or small increases).

18
Back Pressure Fluctuating
Fluctuating backpressures may be imposed on the
vaporiser by downstream components and assisted
or controlled ventilation to the patient. This can
aect the vaporiser and increase the concentration by
intermittently altering the pressures, therefore altering
ow distribution within the vaporiser. The greatest
eects are observed in combinations of very low ow
rates and low dial settings, with large and rapid pressure
uctuations. These eects become progressively less
notable as the dial setting and ow rates increase,
causing the magnitude and rate of cycling pressure
uctuations to decrease.
In clinical use, vaporisers are considered unaected
by uctuating back pressures which occur frequently
in most typical, clinically encountered conditions
appertaining to human anaesthesia.
Carrier Gas Composition
Small eects can occur when the carrier gas
composition is changed (i.e., from Oxygen to air, or in a
Nitrous Oxide and Oxygen mixture). As a general rule,
variation of output with carrier gas compilation should
be considered of low clinical signicance, since the side
eects (if any) are typically less than 10% of the setting.
SPECIFICATIONS
In an instance where signicant changes do occur, the usual
eect is a slightly depressed output once nitrous oxide is
employed (compared to the output when oxygen is the carrier
gas).
Other Variables
Ambient temperature, input ow rate and duration can oen
aect delivered concentrations, particularly when vaporisers
are used at the clinical extremes of such variables.
The valve design and temperature compensation system of
the SOMNI C3 vaporisers work to reduce the eects to levels
considered not signicant by clinical standards.

19
SPECIFICATIONS
Temperature variation eects are typically negligible
at common dial setting and ambient temperature
combinations.
The vaporiser responds very slowly to change in ambient
temperate to prevent the valve from closing completely. As
an additional safety feature, the temperature sensitive valve
does not respond to temperatures below the approximate
range of 12-15° C.
Should the vaporiser temperature be lower than this, the
output can be expected to be lower than that indicated on
the dial.
At temperatures above the range shown on the performance
curves, the vaporiser output may be unpredictably high-
particularly if the temperature approaches the boiling point
of the anaesthetic agent.
To avoid any inaccuracies due to extreme temperatures, the
vaporiser should be allowed to reach a temperature within
the suggested range (of the performance curves) prior to use.
Pressure
Vaporisers are graduated in v/v percentage at 760 mm Hg.
Equation 1 D = % x 760
Where % is the nominal setting of the vaporiser.
It is generally accepted that the depth of anaesthesia depends on
the inspired partial pressure of agent and not the concentration by
volume of agent.
To obtain a consistent depth of anaesthesia when gross changes
of barometric pressure occur, it is necessary to change the v/v
percentage in inverse proportion to the barometric pressure.
The vaporiser automatically performs this action. For practical
and clinical purposes, the eects of barometric pressure can be
ignored.
The vaporiser automatically does this and for practical clinical
purposes the eects of the barometric pressure
can be ignored.
P

20
Limited Warranty
Somni Scientic warrants to the original purchaser that
the products, not including accessories, shall be free from
defects in materials and workmanship under normal use, if
maintained in accordance with our companies guidelines
and used according to its labeling, for the period specied
in the manual.
Warranty period is 5 years.
THIS LIMITED WARRANTY, IS IN LIEU OF AND EXCLUDES ALL
OTHER WARRANTIES WHETHER EXPRESSED OR IMPLIED,
BY OPERATION OF LAW OR OTHERWISE, INCLUDING
BUT NOT LIMITED TO, ANY IMPLIED WARRANTIES OF
MERCHANTABILITY OR FITNESS FOR A PARTICULAR
PURPOSE.
This warranty is void if the product has been altered,
misused, damaged by neglect or accident, tampered with,
not properly maintained, not installed in strict compliance
with applicable codes and ordinances, or repaired by
persons not authorised by Somni. This warranty does
not cover normal wear and tear and maintenance items
and specically excludes accessory items and any other
equipment used with the product.
WARRANTY AND SERVICE
Limitation of Remedies
The only obligation under this limited warranty is the repair or
replacement of the product. THIS IS THE EXCLUSIVE REMEDY. We
shall not be liable for and hereby disclaims any direct, incidental,
consequential or special damages or delays, including but not
limited to loss of use, downtime, lost business, revenues and
prots.
Warranty Procedure
To obtain warranty service, contact Somni Scientic
enquiries@somniscientic.com
(M) 07798 969805
(T) 0800 0129101
(D) 01872 248890
enquiries@somniscientic.com www.somniscientic.co.uk
Table of contents
Other SOMNI Vaporizer manuals

Popular Vaporizer manuals by other brands


Boundless
Boundless VEXIL user manual

Neta
Neta RUBI quick start guide

GRAVEDA
GRAVEDA GRASPRESSO ERIG DABTON V2 instruction manual

VapeOnly
VapeOnly PORTO PCC STARTER KIT manual

STORZ & BICKEL
STORZ & BICKEL Volcano Hybrid Instructions for use

Storz & Bickel GMBH
Storz & Bickel GMBH Crafty Instructions for use