Sonelco PCP1273 User manual

DESCRIPTION
FM stereo control / tuner, with 1 stereo channel and message receipt.
Infrared receiver, controlled by P4803 or P4804 remote control (optional).
Permits storing up to 30 stations with functions: message receipt, super-
bass, sleep, adjustment of bass, treble, balance and ideal sound.
GENERAL CHARACTERISTICS
CONTROL/BLUETOOTH RECEIVER/STEREO FM TUNER – PCP1273
DIRECT ACCESS FUNCTIONS ON CONTROL PCP1273
STATION STORING AND DELETING:
1 - AUTOSEARCH AND AUTOMATIC STATIONS STORING M1 TO
M30:
If you wish to store all the available mamories automatically, then
(IN OFF MODE):
Keep Scan key (9) pressed for several seconds
(with max. Sensibility preset)
The number of stored stations will depend on the reception
level of the installation
2 - SEARCH AND STORE OF STATIONS MANUALLY
If you wish to stere stations one by one, then (IN ON MODE):
Keep channel key (8) until the LED ON is switched off, then
press key (1) Vol+ to store in the following free memory.
Electronic ON / OFF switch.
ON /Sleep/ Sb luminous indicator, bicolour LED type.
Key depression luminous indication (Vol+, Vol- and SCAN)
52-step digital volume control with selected position memory.
Integrated audio processor.
Superbass.
SCAN function (change radio station of tuner or external device)
Selection of external music channel, internal tuner or BLUETOOTH
receiver, with light indicating selected audio source.
Voltage telecontrol.
External channel input (walkman).
Direct access to stations via control P4804.
Jumper for selection of mono output. For this type of installations
place the jumper M/S (10).
-
-
-
-
-
-
-
-
-
-
-
1 – Volume increase pushbutton. 2 – Volume decrease
pushbutton 3 – SCAN pushbutton. 4 - Tuner/Music/
BLUETOOTH channel change pushbutton. 5 - Tuner/
Music/BLUETOOTH channel luminous indicator.
6 – ON / SLEEP luminous indicator. 7 – ON / OFF /
SLEEP pushbutton. 8 – Jumper for selection of mono
output.
BLUETOOTH FUNCTIONS
When the control is switched on, LED (6) will light up in red and LED (5)
in blue; a noise will be heard in the speakers telling us that the control
has been activated and the BLUETOOTH visible. The control will then
go to the same position it was in when last turned off: Main Unit, Tuner
or Bluetooth.
Activate the BLUETOOTH on the device (telephone, tablet, laptop, etc.),
and search for new devices. The name, SONELCO, must appear. If the
device asks us for a password, enter code 1234.
Once the connection has been established, we can send all the audio
from our device to control PCP1273.
Every time we switch off the unit, the Bluetooth will disconnect.
SONELCO has an APP for mobile devices (Telephone, Tablet, iPad,…)
from which we can control all the parameters of control PCP1273. Change
channel, increase and decrease volume, memorise stations, frequency
and memory scan, access our music and even music on the Internet (You-
tube, Spotify,…).
When you quit the app, the control will be decoupled.
WORKING IN ON AND TUNER MODE:
1 - MEMORY SCAN:
With a short press on scan key (9), only the memories previously stored
will be selected. The led (6) will ash once.
2 - AUTOMATIC STATION SEARCH BY FREQUENCY SCAN:
With a long press of scan key (9), the tuner will continue on the dial until
a station is detected. The led ON (6) will turn off until the scan is nished.
With control on, we press key (4) to change channel (Main Unit/Tuner/
BLUETOOTH) until the LED indicator (5) lights up in Red, (FM).
3 MEMORY ERASING:
(IN ON AND TUNER MODE)
Long press of channel/tuner key (8) until led on (6) turns off,
secondly press key Vol+ (1) to store in the following
free memory.

These characteristics are merely for information purposes. The manufacturer reserves the right to introduce modifications without prior notification in order to improve the product PCP1272 26-07-10
ASSEMBLY RECOMMENDATIONS: All the modules of the “COMPACT” series can be placed on different types of flushmount boxes, for which we have several
types of front frames, which are supplied separately. For further details, see www.sonelco.com
INSTALLATION EXAMPLE
P3262
PC3110
P4715
PCP1273
CONNECTION
Before proceeding to make the connection make sure that the power
supply unit is off. Insert the control in the metal frame and make the
connection according to the following instructions:
TERMINALS:
0- SCAN – Only in AUX mode (output)
2- Input +16V power supply
3 - Output +16V after the switch
4- Ground
15 - Left channel audio input and power supply source telecontrol.
16 - Right channel audio input
7 - Message audio input
8 - Zone selection input. Connect with relative zone wire Zx
(in case of messages by zones)
9R - General call input.
L+ - Output for left speaker
R+ - Output for right speaker
- - Common ground for speakers
ANT - FM external antenna input
GND - Antenna ground
NOTE: The system must be wired up separately from the mains, accor-
ding to regulations
TECHNICAL CHARACTERISTICS
Power supply voltage: 16VDC
Maximum consumption: 420 mA
Standby consumption: 30 mA
Rated output power:1+1W RMS
Output impedance: 8 Ohm
Maximum output power: 1.5+1.5W RMS
Distortion < 1%
Maximum output current (Terminal 3): 1 A
Frequency response: 80Hz-21KHz (-3dB)
Signal/noise ratio: >87 dB
Input sensitivity (Terminals 15,16): 1.45 V
Crosstalk noise: 40 dB
TUNER
Antenna connector input: 75 Ohm
Reception frequency: 87.50 MHz – 108.00 MHz
Input sensitivity: 2 μV
Programmable search sensitivity: 4 different levels
THE BLUETOOTH
Bluetooth version: 3.0
Distance from Bluetooth: 8 m.
Password: 1234
PCP1273
PCP1273
P4715
P4715
INDEPENDENT SYSTEM
SYSTEM INTEGRATION WITH MOST AREAS
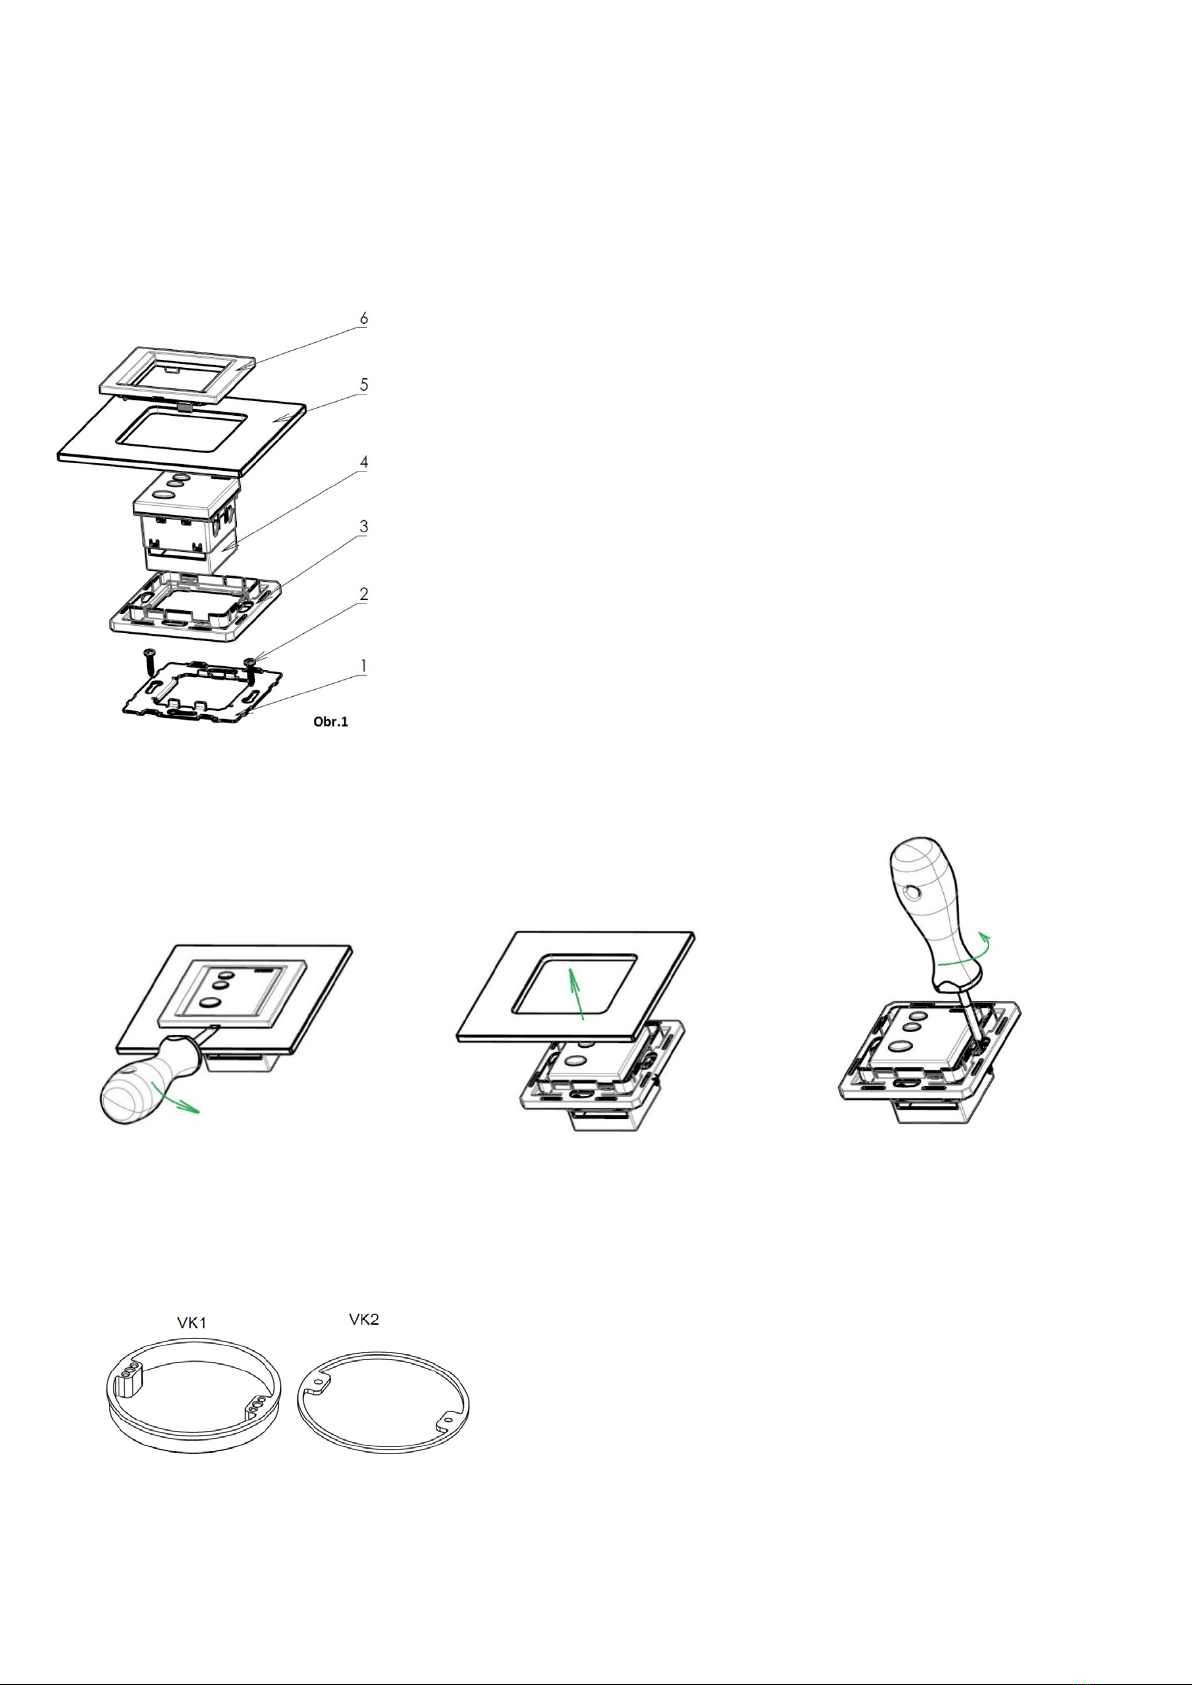
Instructions for installation of bluetooth
Safety during installation
The installation must be performed by a person properly qualified in electrical engineering. Before commencing
the installation, always disconnect mains voltage.
During installation of the bluetooth, the following conditions must be observed:
•The bluetooth mounting box must be placed flush with the plaster.
•In case of problems with a “sunk” mounting box, the VK1 or VK2
spacer (distance) rings must be used in order to prevent deformation of the
fittings when the screws are tightened.
•The switch is fastened in the mounting box though a sheet-metal
frame by means of two screws of 3 mm diameter (Fig.1,2).
•Position the frame correctly, see Fig. 2, lugs marked with arrows
•To install multiple fitting assemblies, it is necessary to use multiple
boxes with the spacing of centres of 71 mm.
•It is recommended to place the bluetooth in the mounting boxes at
the approximate depth of 40 mm.
•Plastic base segment, pos. 3, snap on the sheet metal frame
•In the bluetooth switch, pos. 4, strip insulation and connect the
wires according to the wiring diagram. Then insert the bluetooth unit in the
base segment, pos. 3, together with the sheet metal frame, pos. 2, until the
bluetooth is locked with the lugs positioned on the sides.
•Put the frame, pos. 5 (wood, metal, plastic, etc.) on the base segment, pos. 3
•Finally, fit the visible component - intermediate frame, pos. 6
Disassembly of bluetooth
•Use a flat screwdriver and slide the intermediate frame out carefully
•Then remove the frame
•Finally, remove the complete bluetooth device using the screwdriver.
The product contains no hazardous substances; after expiration of its service life, it must be handled in
conformity with the waste act in force or pertinent related regulations.
Other Sonelco Tuner manuals


