Sonictel T53W User manual

T53W TELEPHONE SET
USER GUIDE
Welcome to the Cloud! Thank you for choosing Sonictel as your
managed service provider. This manual will guide you through the
initial setup and teach you the basic functions of your new enterprise
phone system.

Pick up the handset
Enter the number, and then press the SEND soft key
With the handset on-hook, press
Enter the number, and then press the SEND soft key
With the headset connected, press to activate the headset mode
Enter the number, and then press the SEND soft key
PLACING A CALL
Using the handset:
1.
2.
Using the speakerphone:
1.
2.
Using the headset:
1.
2.
Note: During a call, you can alternate between the headset, hands-free speakerphone, and headset
modes by pressing the Headset key, the Speakerphone key, or by picking up the handset. Headset
mode requires a connected headset
Pick up the handset
Press
Press
ANSWERING A CALL
Using the handset:
1.
Using the speakerphone:
1.
Using the headset:
1.
Note: You can ignore an incoming call by pressing the REJECT soft key
Hang up on the handset or press the CANCEL soft key
Press or the CANCEL soft key
Press the CANCEL soft key
ENDING A CALL
Using the handset:
1.
Using the speakerphone:
1.
Using the headset:
1.
Press to enter the placed call list, press or to select the desired
entry, then press or the SEND soft key
Press twice when the phone is idle to dial out the last dialed number
REDIAL
1.
2.
BASIC CALL FEATURES

Press to mute the microphone during a call
Press again the un-mute the call
CALL MUTE & UN-MUTE
1.
2.
Press the HOLD soft key during an active call
If there is only one call on hold, press the RESUME soft key
If there is more than one call on hold, press or
Press an available PARK key during an active call
Press the PARK key associated with the parked call, the line key will be
denoted by a steady red LED
CALL HOLD & RESUME
Note: Only applicable when a call is active on your extension
To place a call on exclusive hold:
1.
To resume the call, do one of the following:
1.
2.
To place a call on company-wide hold = PARK
1.
To resume the call:
1.
Press the TRAN soft key during an active call. The call is placed on hold
Enter the number you want to transfer to
Press the BTRAN soft key
Press the TRAN soft key during an active call. The call is placed on hold
Enter the number you want to transfer to, press the SEND key
Press the TRAN soft key after consulting with the second party
Press the TRAN soft key during an active call. The call is placed on hold
Enter 7 followed by the mailbox number you want to transfer to
Press the TRAN soft key
CALL TRANSFER
You can transfer a call in the following ways:
Blind Transfer
1.
2.
3.
Attendant Transfer
1.
2.
3.
Transfer to Voicemail
1.
2.
3.
Enter the extension number, and then press the SEND soft key
Enter 99 followed by the extension number, and then press the SEND soft key
INTERCOM (HFAI - Hands-Free Over Intercom)
To perform a private intercom:
1.
To perform a direct announce intercom:
1.
Note: To intercom using handset/speakerphone/headset, refer to Placing a Call.

Press the MENU soft key when the phone is idle, and then select Features >
Call Forward
Select the desired forward type:
Always Forward - Incoming calls are forwarded unconditionally
Busy Forward - Incoming calls are forwarded when the phone is busy
No Answer Forward - Incoming calls are forwarded if not answered after
a period of time
Enter the number you want to forward to. For No Answer Forward,
press or to select the desired ring time to wait before forwarding
Press the SAVE soft key to accept the change
CALL FORWARD
To enable call forward:
1.
2.
a.
b.
c.
3.
4.
Press the CONF soft key during an active call. The call is placed on hold 2.
Enter the number of the second party, and then press the Send soft key 3.
Press the CONF soft key again when the second party answers. All parties
are now joined in the conference
Press the END CALL soft key to disconnect all parties
CALL CONFERENCE
1.
2.
3.
4.
Press the key OR dial Extension 5001
The default password for your mailbox is ____________.
Record your name when prompted
Record your greeting when prompted
Press 5 for options
Press 1 to change your password
Press the key OR dial Extension 5001
Press 1 to access your voicemail messages
VOICE MESSAGE
Configuring your voice mailbox:
1.
2.
3.
4.
5.
6.
To listen to voice messages:
1.
2.
Press the HISTORY soft key when the phone is idle, press or to scroll
through the list
Select an entry from the list, you can do the following:
Press the SEND soft key to place a call
Press the DELETE soft key to delete the entry from the list
CALL HISTORY
1.
2.
a.
b.

VOLUME ADJUSTMENT
Press the during a call to adjust the receiver volume of the
handset/ speakerphone/headset
Press when the phone is idle to adjust the ringer volume
Press the MENU soft key when the phone is idle, and then select Settings >
Basic Settings > Sound > Ring Tones
Press or to select the desired ringtone
Press the SAVE soft key to accept the change
RING TONES
1.
2.
3.
Press the DIRECTORY soft key when the handset is off the hook, and then
select the desired group
Press the ADD soft key to add a contact
Enter a unique contact name in the NAME field and contact numbers in the
corresponding fields
Press the ADD soft key to accept the change
Press the DIRECTORY soft key when the phone is idle, and then select the
desired group
Press or to select the desired contact, press the OPTION soft key
and then select DETAIL from the prompt list
Edit the contact information
Press the SAVE soft key to accept the change
Press the DIRECTORY soft key when the phone is idle, and then select the
desired group
Press or to select the desired contact, press the OPTION soft key
and then select DELETE from the prompt list
Press the OK soft key when the LCD screen prompts “Delete Selected Item?”
CONTACT DIRECTORY
To add a contact:
1.
2.
3.
4.
To edit a contact:
1.
2.
3.
4.
To delete a contact:
1.
2.
3.
Note: You can add contacts from the call history easily. For more information, refer to Call History.
+
-
+
-
Select DETAIL to view the detailed information about the entry
Select ADD TO CONTACT to add the entry to the local directory
Select ADD TO BLACKLIST to add the entry to the blacklist
Select DELETE ALL to delete all entries from the list
If you press the OPTION soft key, you can also do the following:
1.
2.
3.
4.
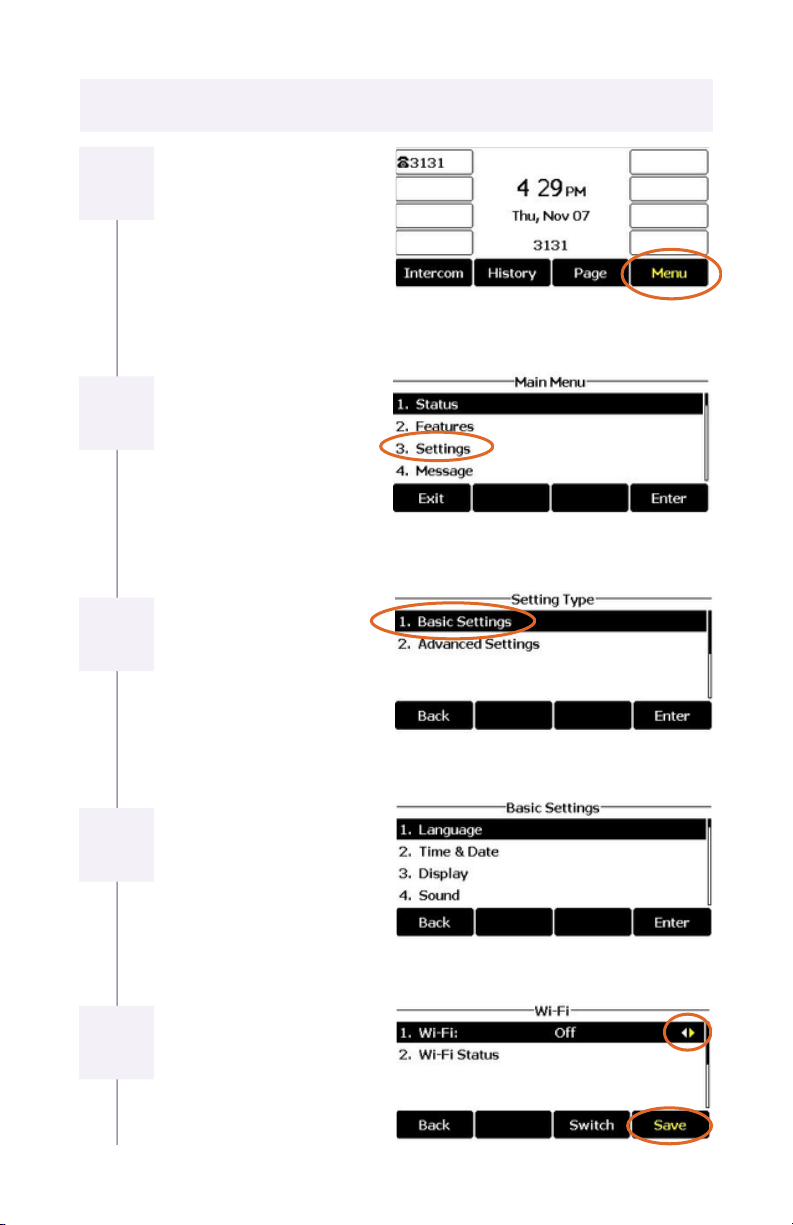
HOW TO CONNECT TO WIFI
Starting at the main
screen, press the “Menu”
soft key
From ”Main Menu” press
3 for “Settings”
From “Setting Type”
press 1 for “Basic
Settings”
From “Basic Settings”
press 8 for “Wi-Fi”
Turn on the Wi-Fi “On” if it
is off using “<” and “>”
located on either side of
the “OK” button. Then
click “Save”
2
1
3
4
5
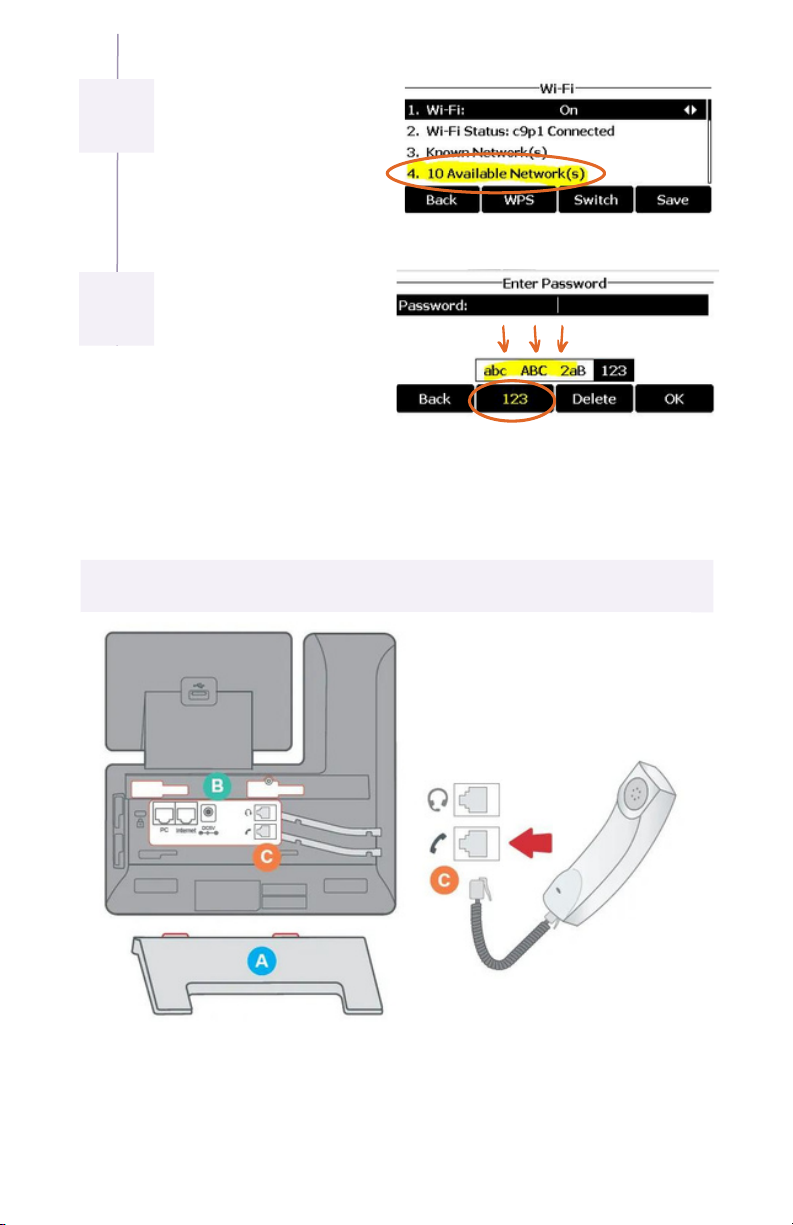
It will say scanning then
display this page. Press 4
for “Available Networks,”
and choose your Wi-Fi
network.
Now enter your Wi-Fi
password. The 2nd soft-
key below the screen
allows you to switch
between “abc, ABC, 2aB,
and 123” to make it
easier to enter your
password. Use “*” key to
get to special characters.
PHONE ASSEMBLY
Attach the phone stand to the body. Align the stand A with the slots B, and
slide up until you hear a click.
Connect the phone handset to the handset jack C using the coiled phone
cord.
1.
2.
6
7

Name
Extension
Mailbox
Mailbox Password
New Mailbox Password
General Mailbox
General Mailbox Password
Agent ID
To access the Sonictel portal, visit pbx.sonictel.io
Username
Password
If you need additional assistance after reading through this
user guide, please contact the Sonictel Support Team by:
PERSONAL INFORMATION
SONICTEL PORTAL INFORMATION
PHONE: 1.844.SONICTEL, Option 3
EMAIL: Open up a trouble ticket by sending an email
with an explanation of the issue that you’re having to
PORTAL: Open up a ticket at
https://help.sonictel.com/
Table of contents
Other Sonictel Telephone manuals


