SonicWALL CDP 6080 User manual

Getting Started Guide
SonicWALL Backup and Recovery Solutions
BACKUP & RECOVERY
CDP 6080 / CDP 6080B
™
DYNAMIC SECURITY FOR THE GLOBAL NETWORK

SonicWALL CDP 6080 / 6080B Getting Started Guide Page i
SonicWALL CDP 6080 / 6080B
Getting Started Guide
This Getting Started Guide contains installation procedures and
configuration guidelines for deploying a SonicWALL Continuous
Data Protection (CDP) appliance into an existing or new
network.
The SonicWALL CDP appliance backs up data as changes
occur or on a schedule. Data is backed up first to your local
SonicWALL CDP appliance, and then optionally to a secure
offsite location*. This real-time data protection provides the
most current file and system backup possible. By combining the
advantages of local disk-based backup (fast recovery) with
offsite backup, the SonicWALL CDP appliance is the first
solution to eliminate—not just mitigate—exposure to threats of
data loss.
Please read this entire Getting Started Guide before setting up
your SonicWALL CDP 6080.
Note: For more detailed technical documentation, refer to the
SonicWALL CDP Administrator’s Guide and the
SonicWALL CDP Agent User’s Guide at:
<http://www.sonicwall.com/us/Support.html>
*Offsite backup is offered as a subscription-based service.
Contents
This Getting Started Guide contains the following sections:
Pre-Configuration Tasks - page 1
Setting Up the SonicWALL CDP Appliance - page 9
Installing and Verifying SonicWALL CDP Agent - page 23
Support and Training Options - page 31
Product Safety and Regulatory Information - page 39
1
2
3
4
5

Page ii

SonicWALL CDP 6080 / 6080B Getting Started Guide Page 1
Pre-Configuration Tasks
In this Section:
This section describes the SonicWALL CDP appliance and related components, and provides a guide to the configuration information you
will need for initial setup. Review this section before setting up your SonicWALL CDP 6080 appliance.
•Checking CDP 6080 Package Contents - page 2
•Overview of the SonicWALL CDP Appliance - page 3
•Front Bezel Control Features - page 5
•Record Configuration Information - page 7
1

Page 2 Checking CDP 6080 Package Contents
Checking CDP 6080 Package Contents
Before setting up your SonicWALL CDP appliance, verify that your
package contains the following parts:
SonicWALL CDP 6080
Appliance
Getting Started Guide
Crossover Cable
Ethernet Cable
1
2
3
4
(2) Standard Power Cords*
Front Bezel Keys
Rack Mounting Kit
5
6
7
Any Items Missing?
If any items are missing from your package,
please contact SonicWALL support.
A listing of the most current support documents are available online
at: <http://www.sonicwall.com/us/Support.html>
*The included power cords are intended for use in North America only.
For European Union (EU) customers, a power cord is not included.
Getting Started Guide
SonicWALL Network Security Appliances
NETWORK SECURITYCDP 6080
1
3 4
2
7
5 6

SonicWALL CDP 6080 / 6080B Getting Started Guide Page 3
Overview of the SonicWALL CDP Appliance
Front Panel
• Pressing the reset button for several seconds will result in a reboot of the SonicWALL CDP appliance.
• Do not plug devices into any ports (other than those indicated) unless explicitly instructed to do so by a SonicWALL technical
support representative; doing so may void your warranty.
LED Indicators
Reset Button
Reboots the SonicWALL CDP appliance
Power Switch
Allows the SonicWALL CDP appliance
to be powered on or off
LCD Display
Provides access to basic system
information, settings, and features using
the D-Pad controls
Front Bezel Release
Allows access to drive bays under the
front bezel for addition/replacement of
hard disks (requires use of included key)
D-Pad Controls
Provides up, left, right, and down buttons to
navigate the LCD menu:
Up/Down: Navigate lists
Left: Cancel changes / return to previous
Right: Accept changes
Provides the following system status indications:
ALARM: Thermal or other alert condition*
ETH0/ETH1: Ethernet link (solid), activity (blinking)
HDD: Hard disk activity (blinking)
PWR: The appliance is powered (on/off)
*For a full list of alerts, refer to the SonicWALL LED Alerts technote document

Page 4 Overview of the SonicWALL CDP Appliance
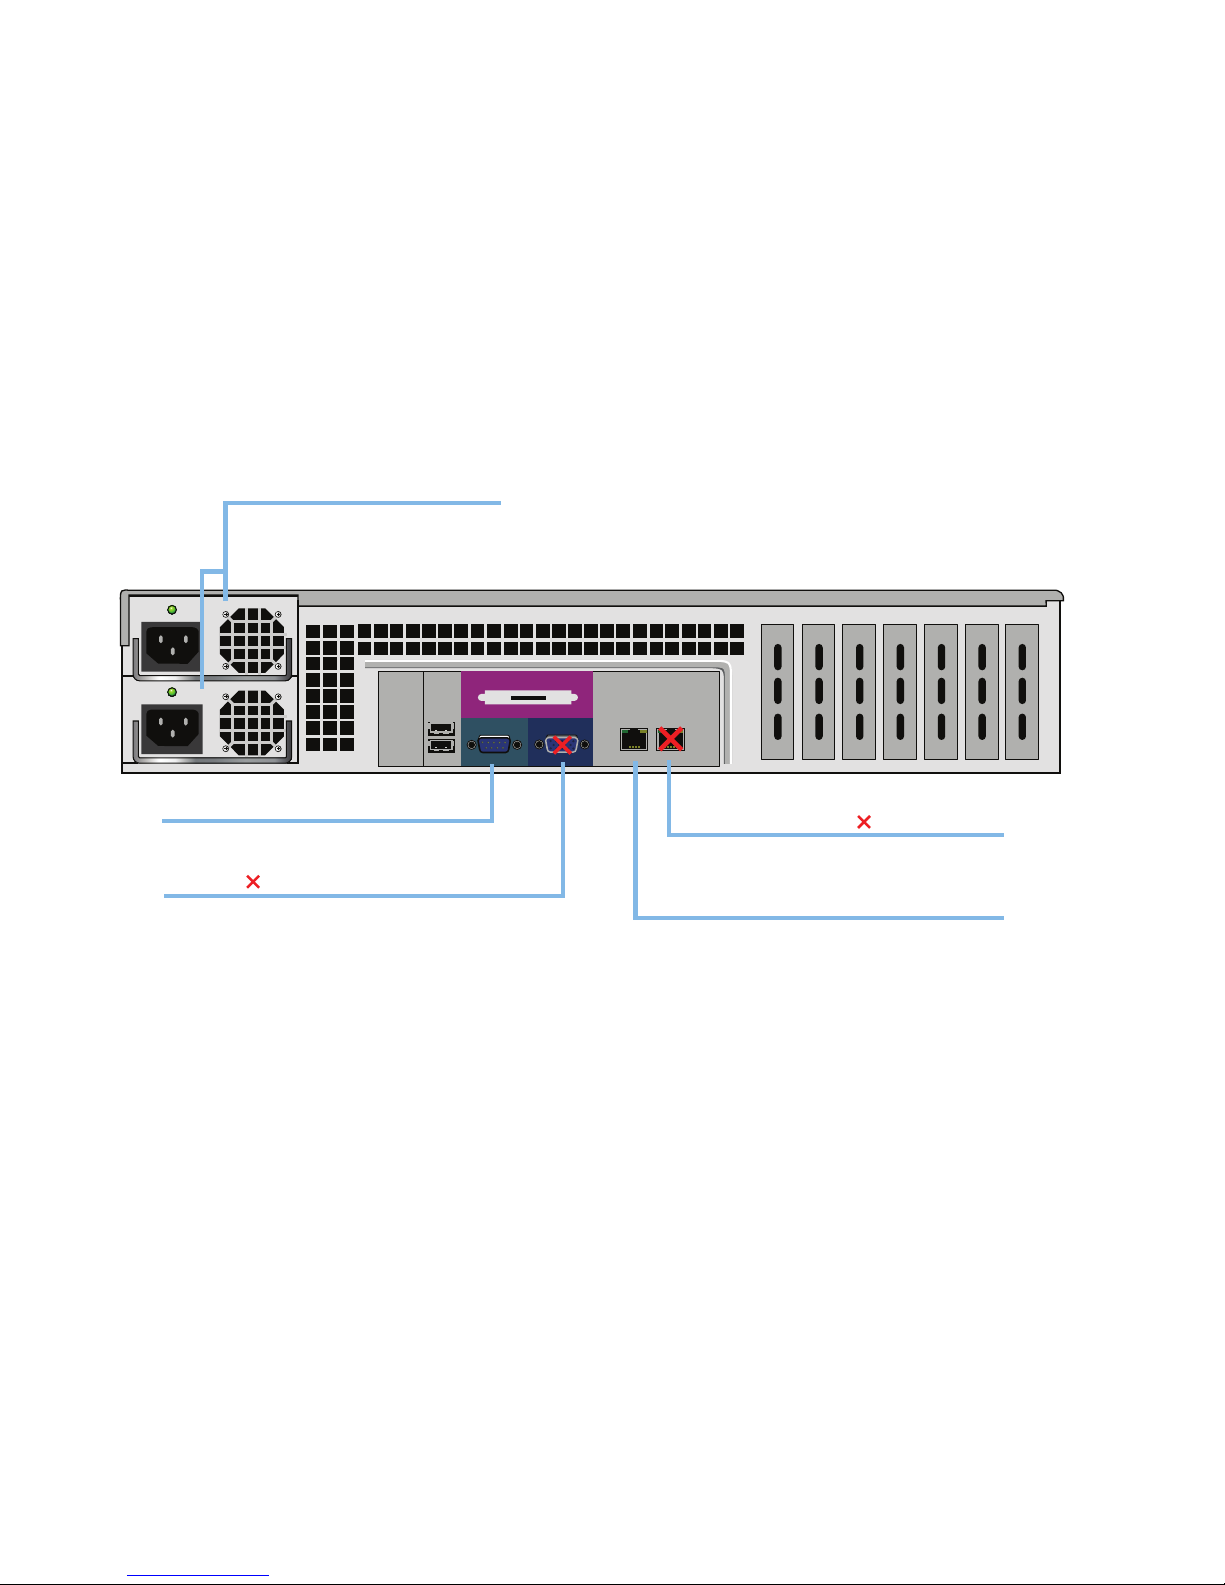
Rear Panel
Dual Power Supplies
Provides redundant power
connection using the supplied
power cables
Ethernet Port 1
Ethernet Port 0 (Management/LAN)
Not authorized for use
Provides configurable Gigabit-capable
Ethernet connection to your local network
Provides access to a command line interface
(CLI) with DB-9 CLI cable (not included)
Serial Port
Not authorized for use unless explicitly
instructed by a SonicWALL technical support
representative
VGA Port

SonicWALL CDP 6080 / 6080B Getting Started Guide Page 5
Front Bezel Control Features
The SonicWALL CDP appliance is equipped with a front panel
bezel interface that allows an administrator to customize certain
aspects of the appliance or simply monitor its status without
having to log into it through a separate terminal.
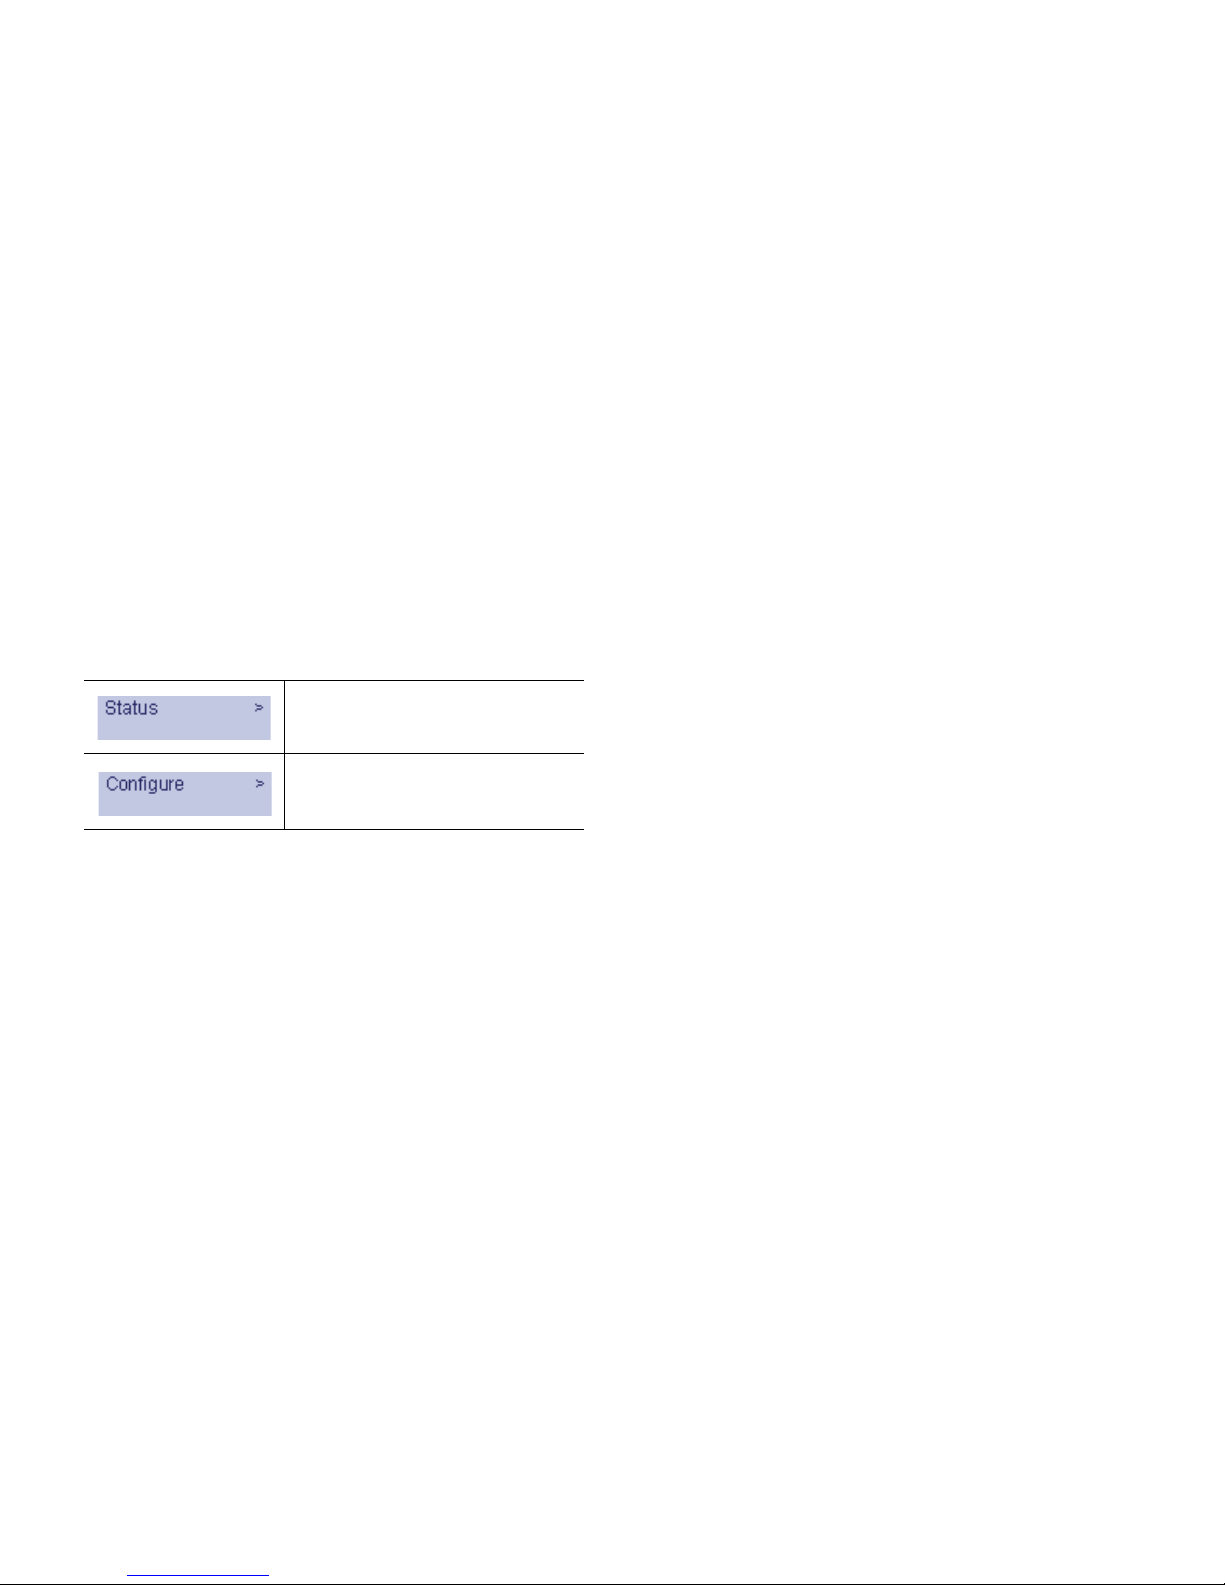
Main Menu
Upon booting, the LCD display initially shows the Main Menu.
The menu is made up of two options:
Use the Up and Down buttons to select the menu you wish to
enter. Click the Right button to enter it.
Status
The Status menu allows you to view specific aspects of the
appliance. Once selected, the LCD displays the Status List. This
list is navigated using the Up and Down buttons. Status options
include:
• Appliance name
• Software version
•Date
•Time
•Uptime
• Management URL
• Interface eth0 IP (default LAN)
• Interface eth0 subnet
Contains basic status values including
system resources, connections, and
port configuration values.
Allows configuration of basic LAN port
settings. Requires system PIN for
access, default: 76642.

Page 6 Front Bezel Control Features
Configure
The Configure Menu allows you to configure specific aspects of
the appliance. Once selected, the LCD displays a PIN request.
Note: The Default PIN is 76642. This number spells SONIC
on a phone keypad. The PIN number can be changed
from the System >Administration page.
All numbers are inputted using the 4 buttons. Select the
individual digit field using the Left and Right button and select
the desired number using the Up and Down button. Digits
increase incrementally from 0 to 9. Press the Right button to
confirm your PIN and enter the Configuration Menu.
The appliance allows the user to navigate in and out of the
Configuration Menu without having to re-enter the PIN.
However, once the appliance enters Screen-Saver Mode,
whether from the 6-second time out or from pressing the Left
button from the Main Menu, the PIN number must be re-entered
again to access the Configuration Menu.
After entering a new value for a setting in the configuration
menu, you are asked if you want to commit changes. Using the
4-way D-pad, press the Right button for yes or the Left button
for no.
If you choose yes, the screen notifies you that the settings are
updated.

SonicWALL CDP 6080 / 6080B Getting Started Guide Page 7
Record Configuration Information
Before continuing, record the following configuration information
for your reference:
Networking Information General Information
CDP IP Address:
_____________________
Select an available static IP
address for your SonicWALL
CDP appliance that is within the
range of your local subnet.
CDP Subnet Mask:
_____________________
Enter the subnet mask for the
local subnet where you are
installing your SonicWALL CDP
appliance.
Gateway IP Address:
_____________________
Record the IP address of your
network’s gateway device (such
as your perimeter firewall/router).
DNS Server 1:
_____________________
DNS Server 2 (optional):
_____________________
Record your DNS Server
information.
Server Name:
_____________________
Select a friendly name for your
SonicWALL CDP appliance
(maximum 32 characters).
Password:
_____________________
Select a password for your
SonicWALL CDP appliance
(default is password).
Serial Number:
_____________________
Record the serial number found
on the bottom of your SonicWALL
CDP appliance.
Authentication Code:
_____________________
Record the authentication code
found on the bottom of your
SonicWALL CDP appliance.
Registration Code:
_____________________
Record the registration code that
is generated in mysonicwall.com.
See Registering Your
SonicWALL CDP Appliance
on MySonicWALL - page 10.

Page 8 Record Configuration Information

SonicWALL CDP 6080 / 6080B Getting Started Guide Page 9
Setting Up the SonicWALL CDP Appliance
In this Section:
This section contains the following subsections:
•What You Need to Begin - page 10
•Registering Your SonicWALL CDP Appliance on MySonicWALL - page 10
•Powering On and Connecting to the Appliance - page 14
•Configuring a Static IP Address on Windows - page 15
•Configuring Appliance Settings - page 16
•Connecting the SonicWALL CDP Appliance to Your Network - page 20
•Activating Your SonicWALL CDP Appliance - page 21
2

Page 10 What You Need to Begin
What You Need to Begin
A computer that meets or exceeds the following requirements:
• Pentium III 450 MHZ processor
• 256 MB of RAM
• 40 MB of free disk space
• A broadband Internet connection (DSL, cable, T1, or other)
• A 10/100 Base-T Ethernet hub / router
• Microsoft Windows 7, Vista, XP, Server 2008, Server 2003*
*For the latest list of supported Windows operating systems and
service packs, refer to the SonicWALL CDP Release Notes and
the following webpage:
<http://www.sonicwall.com/us/products/
backup_and_recovery.html>
Registering Your SonicWALL CDP
Appliance on MySonicWALL
The SonicWALL CDP appliance must be registered on
MySonicWALL before first use. Perform the following steps to
register your SonicWALL CDP appliance:
1. Point your Web browser to www.mysonicwall.com.
The MySonicWALL login page is displayed.

SonicWALL CDP 6080 / 6080B Getting Started Guide Page 11
2. Enter your MySonicWALL account credentials in the
Username and Password fields and then click the Submit
button.
Note: You need a MySonicWALL account to register the
SonicWALL CDP 6080. You can create one by clicking
the Not a registered user? link.
3. On the MySonicWALL page, click My Products in the
navigation bar. Then, select Register Product.
4. Complete the fields as described in the table below:
Field Description
Serial Number Enter the serial number, found on
the bottom of your SonicWALL
CDP appliance.
Friendly Name Enter a descriptive name for your
SonicWALL CDP appliance.
Product Group Select a product group from the
drop-down menu. This product
group is a logical collection of
SonicWALL products that are
managed by a user group, defined
on MySonicWALL.
Authentication Code Enter your authentication code,
found on the bottom of your
SonicWALL CDP appliance (just
below the serial number).

Page 12 Registering Your SonicWALL CDP Appliance on MySonicWALL
5. Click the Submit button.
The message “Please select an offsite backup location”
displays:
6. In the Location drop-down menu, select an offsite data
backup location, either NORTH AMERICA - WEST or
Europe.
Alert: If you change the offsite data backup location, the data
that was saved in the previous location is lost.
7. Click the Submit button.
A confirmation message is displayed, such as “Are you
sure you would like to backup your data to NORTH
AMERICA - WEST? Please confirm by clicking Submit.”
8. Click the Submit button again.
The Service Management page is displayed.
Note: You will need the Registration Code during initial
configuration of your SonicWALL CDP.

SonicWALL CDP 6080 / 6080B Getting Started Guide Page 13
Activating Offsite Data Backup Service
The SonicWALL CDP Offsite Data Backup Service is an
optional offsite backup and recovery solution. Perform the
following steps to activate your Offsite Data Backup Service:
1. On the Service Management page in MySonicWALL, scroll
down to Applicable Services. If you do not have an Offsite
Data Backup Service activation key, click Buy Now or
contact your SonicWALL vendor.
If you have a license key, click Enter Key.
2. Type your key into the Activation Key field, select the I
have read and agreed to all of the terms and conditions
mentioned above checkbox, and then click Submit.
The activation status displays with the expiration date and
offsite capacity.
3. To access the SonicWALL Site-to-Site Backup service,
return to the Service Management page by clicking the
Friendly Name of your SonicWALL CDP appliance on the
My Products page.
4. To activate the SonicWALL Site-to-Site Backup service,
click Buy Now or Enter Key.
5. To enter an existing license key, use the same method as
described above for the Offsite Data Backup Service.
Note: Bare Metal Recovery and other services can also be
activated on the Service Management page. For
information about using Bare Metal Recovery, refer to
the SonicWALL Bare Metal Recovery Administrator’s
Guide, available on MySonicWALL or at:
http://www.sonicwall.com/us/Support.html

Page 14 Powering On and Connecting to the Appliance
Powering On and Connecting to the
Appliance
After registering your SonicWALL CDP appliance on
MySonicWALL, you are ready to turn on the appliance and
connect a computer to it for initial configuration.
1. Place the SonicWALL CDP appliance and your
management computer next to each other for the
initialization process.
2. Set the LAN IP address of your management computer to
a static IP address on the 192.168.168.0/24 subnet, such
as 192.168.168.50. For help with setting a static IP
address on your computer, refer to Configuring a Static IP
Address on Windows - page 15.
3. Using the supplied crossover cable (red), connect the LAN
port of computer to the LAN port on the back of your
SonicWALL CDP appliance.
4. Securely attach each provided power adaptor to a provided
power cord.
5. Connect the power adaptors to the back of the appliance,
and insert the plug ends into grounded 110/120V outlets.
For redundancy, plug the power adaptors into outlets on
different circuits.
6. If the appliance does not power up immediately, press the
power switch on the front to turn it on.
7. Open a Web browser on the computer and point it to:
http://192.168.168.169 (the default IP address of the
SonicWALL CDP appliance). The SonicWALL CDP login
screen displays.
Note: One or more security warnings may display while
connecting to the SonicWALL CDP Web management
interface. Continue to the website, and accept the
certificate if required, to login to the SonicWALL CDP
appliance.
Ethernet Port
(in the rear)
Management
Station

SonicWALL CDP 6080 / 6080B Getting Started Guide Page 15
8. Enter “admin” in the Name field and “password” in the
Password field, select your language from the Language
drop-down menu, and click the Login button.
Configuring a Static IP Address on Windows
Complete the following steps to configure your management
computer with a static IP address:
Windows 7
1. Open a My Computer window.
2. Type Network Connections into the location bar at the top
of the window and press Enter.
The window changes to the Control Panel > All Control
Panel Items > Network Connections folder.
3. In the Network Connections window, double-click Local
Area Connection.
4. If the Local Area Connection Status window opens, click
the Properties button.
5. In the Local Area Connection Properties window, select
Internet Protocol Version 4 (TCP/IPv4), and then click
the Properties button.
6. Select Use the following IP address and type an IP
address on the 192.168.168.0/24 subnet, such as
192.168.168.50, in the IP address field.
7. Type 255.255.255.0 in the Subnet Mask field.
8. Click OK in the Properties window.
9. Click Close in the Local Area Connection Properties
window for the settings to take effect.

Page 16 Configuring Appliance Settings
Windows XP
1. On the Windows Start menu, highlight Connect To and
then select Show All Connections to open the Network
Connections window.
If Connect To is not available, directly select Network
Connections, or select Control Panel and then double-
click Network Connections in the Control Panel window.
2. In the Network Connections window, double-click Local
Area Connection.
3. In the Local Area Connection Status window, click the
Properties button.
4. In the Local Area Connection Properties window, select
Internet Protocol (TCP/IP), and then click the Properties
button.
5. Select Use the following IP address and type an IP
address on the 192.168.168.0/24 subnet, such as
192.168.168.50, in the IP address field.
6. Type 255.255.255.0 in the Subnet Mask field.
7. Click OK in the Properties window.
8. Click Close or OK in the Local Area Connection Properties
window for the settings to take effect.
Configuring Appliance Settings
After registering your SonicWALL CDP on MySonicWALL and
connecting a management computer to it, you are ready to
configure the appliance for use on your network.
Changing the Password
1. On the System > Settings page, click the Password tab.
2. Type the desired password into the Password field, and
again into the Verify Password field, then click Apply.
Configuring Local Time Zone Settings
1. On the System > Settings page, click the Time tab.
2. Complete the fields as described in the table below, then
click Apply.
Field Description
Time (hh:mm:ss) Select the time in 24-hour format by
clicking the up or down arrows next to
each field (hours, minutes, seconds).
Date Select the date (month, day, year)
from the pop-up calendar.
Time Zone Select your local time zone from the
drop-down list.
Set Time
Automatically
using NTP
Select this checkbox to allow the time
to be set automatically using NTP.
Configure NTP servers on the NTP
tab.

SonicWALL CDP 6080 / 6080B Getting Started Guide Page 17
Configuring Mail Settings
Mail settings are required for the administrator to receive email
alerts. The Alerts tab already contains default alert settings.
1. On the System > Settings page, click the Mail tab.
2. Complete the fields as described in the table below:
3. Click Apply.
4. After the appliance is successfully connected to the LAN,
click Send Test Email to send a test email to the
configured Recipient Email Address
Note: You must complete the Network Configuration of the
appliance before logging back into the WebUI.
Configuring the Domain Name Server Address
You must configure the correct DNS address settings in order to
register and use your SonicWALL CDP appliance. The DNS
server must be able to resolve external Internet names.
For your records, enter the DNS server IP address below.
1. In the Web management interface, click Network in the
navigation pane, and then click Settings.
2. On the Name Server tab, click the Configure icon for the
DNS IP address.
Field Description
Server Type in the name or IP address of the mail
server; for example, mail.company.com.
Recipient
Email
Address
Type in the email address of the administrator
for the SonicWALL CDP appliance.
From Email
Address
Type in the email address to use as the sender
when alert emails are sent to the administrator;
for example, appliance_name@company.com.
From Email
Domain
Type in the domain used by the sender; for
example, localdomain or a regional domain.
Password Type in a password for the From Email
Address, if required by your mail server.
Verify
Password
Re-enter the password.
DNS Server IP address:
See Networking
Information - page 7
______.______.______.______
This manual suits for next models
1
Table of contents
Popular UPS manuals by other brands

Durante
Durante DM615N Series user manual

socomec
socomec NETYS RT Installation and operating manual

Floodstop
Floodstop FSAUPS Instructions and operating manual

CyberPower
CyberPower Paragon OL3000RMXL2U Specification sheet

Emerson
Emerson Liebert PowerSure PSP Series quick start guide

Toshiba
Toshiba 4200FA Series user manual

Liebert
Liebert EXM BDC user manual

Avaya
Avaya PW5115 500 RM Site Preparation, Installation And Operator's Manual

Online UPS Specialist
Online UPS Specialist OPP Series operating manual

Belkin
Belkin RACKMOUNT WHITE PAPER manual

Siqens
Siqens Ecoport 800 quick guide

Bicker Elektronik
Bicker Elektronik UPSI-B-2410 user manual