SONIQ M200-AU User manual

M200-AU
DAB+Audio System
MD110420-01
WelcomeContents
Introduction ...........................................................2
What is DAB+Digital Radio?..........................................2
Setting up..............................................................3
Backlit display.........................................................4
Using headphones.....................................................4
Your Soniq radio.......................................................5
Switch on..............................................................6
Telescopic aerial.......................................................6
Switch off..............................................................6
Adjusting the volume...................................................6
Changing DAB+stations...............................................7
Station sort.............................................................7
Scanning for DAB+stations............................................7
Storing a DAB+station preset.........................................8
Tune to a DAB+preset station.........................................8
DAB+display information..............................................9
Using the FM radio...................................................10
FM radio mode.......................................................10
Tuning to a FM station................................................10
Storing a FM station preset...........................................10
Tune to a FM preset station............................................11
FM station information................................................11
Using the alarm.......................................................12
Setting the alarm.....................................................12
Stop the alarm........................................................12
Turn off the alarm.....................................................13
Sleep timer...........................................................13
Turn off the sleep timer...............................................13
Reset to factory defaults..............................................14
Care and maintenance...............................................15
Technical specification...............................................16
Software version......................................................16
Introduction
Thank for purchasing Soniq DAB+ & FM stereo radio. With the characteristic
of quick and easy setup and information display, our product also has
the following features:
* Backlit inverse display
* 2 x 1.5 watt stereo speakers
* Wide choice of National and Local DAB+radio stations
* Selecting DAB+station by "Name" instead of "Frequency"
* 10 DAB+and 10 FM radio station presets
* Receiving FM radio with RDS information (where available)
* Clock with dual alarm
* Wake to buzzer, DAB+or FM radio
* Snooze and sleep timer
* Headphone socket
* Battery or mains power
What’s in the box?
1 x Soniq DAB+/FM Radio
1 x Mains adaptor
1 x User Manual
Warranty clause
1. Apparatus shall not be exposed to dripping or splashing and no
objects filled with liquids, such as vases, shall be placed on the
apparatus.
2. AC/DC adaptor is a disconnect device. The AC/DC adaptor
should not be obstructed OR should be easily accessed during
intended use.
What is DAB+Digital Radio?
DAB+means Digital Audio Broadcasting. The difference between a DAB+
radio and a conventional AM/FM radio is that broadcasts are transmitted
digitally, resulting in a high quality audio sound*, without any hiss, fading
or crackles.
Your DAB+radio will automatically scan and find all the available stations
for you. Each station name, together with other helpful broadcast
information is shown on the display; select the one that you would like to
listen to, and it’s very easy and quick to use.
* Please note that the sound quality is dependent on a strong signal
strength. Signal strength can vary from area to area.

34
Product set upProduct set up
Where to put your radio
It is important that you note and follow the tips on where the radio should
be situated.
* On a flat and stable surface
* Within 1.4 metres of a power socket (if using mains power)
* Where you can fully extend the telescopic aerial
* Away from bright sunlight or heat sources, such as a radiator
* Not in a humid or very damp place such as a bathroom
Setting up
Step 1: Connect the mains power lead into the socket on the back of the
radio (DC IN) and plug the power adaptor into the mains power wall
socket and switch on.
Step 2: Fully extend the radio aerial in a vertical postition to obtain the
maximum signal strength.
Step 3: Slide the power switch on the back of the radio to ON.
‘Welcome to Digital Radio’ will be displayed and your radio will
automatically scans for DAB+radio stations.
A progress bar will show the progress of the scan, and the number of
stations found will also be displayed.
When the scan ends, your radio will select the first available station
and begin to play. Stations are listed in numerical and then alphabetical
order by default.
Note: The DAB+radio station list is stored in the memory and the radio
will not scan for stations next time you switch it on.
Step 4: Inserting the batteries (optional). Before installing the batteries
(not included), please ensure that the DAB+Radio is unplugged from the
mains power supply.
On the bottom of the radio, push in the tab on the battery cover and pull
up to remove it. Insert 4 x 1.5V LR14C-size batteries, make sure that
note the ‘+’ and ‘-’ markings are in the correct way. Replace the battery
cover, making sure it ‘clicks’ shut.
If used continuously on battery power, your radio has an approximate
15 hours of working life when using good quality batteries. When the
battery power is low, an icon will appear in the top right of the display.
Please switch off the radio and replace the batteries.
Note: For battery operation, please disconnect the mains adaptor and
remove the mains power plug from the back of the radio.
* Only use the recommended batteries or those of the same equivalent
* Do not mix old and new batteries or batteries of different types.
* Batteries are to be inserted with the correct polarity.
* The supply terminals are not to be short-circuited.
* Remove the batteries from the radio if the radio will not be used for an
* Do not attempt to recharge non-rechargeable batteries.
* Dispose of old batteries carefully.
* Never throw batteries in a fire or attempt to open the outer casing.
* Batteries are harmful if swallowed, so keep away from young children.
Batteries(battery pack or batteries installed) shall not be exposed to
excessive heat such as sunshine, fire or the like.
CAUTION: Danger of explosion may occur if battery is incorrectly
replaced. Replace only with the same or equivalent type.
Backlit display
If no button being pressed for 10 seconds, the display backlight will dim.
Using headphones
You can connect headphones (not included) to your radio. The headphone
socket can be found on the back of the radio.
Note: Headphones need a 3.5mm stereo plug.
extended period of time.
type.
56
Using your DAB+ radioYour Soniq radio
Switch on
Slide the power switch to ‘On’, the display will switch on and ‘Welcome
to Digital Radio’ will be displayed. Your radio will automatically scans for
DAB+radio stations. A progress bar will show the progress of the scan
and the number of stations found will also be displayed.
When the scan ends, your radio will select the first available station
and begin to play. Stations are listed in numerical and then alphabetical
order by default.
Note: The DAB+radio station list is stored in the memory and so the
next time you switch your radio on, the station search does not take
place.
Your radio will return to the mode that was last used in (DAB+/FM). If
you were listening to a DAB+station before then this station will be
automatically selected.
Telescopic aerial
Make sure that the aerial is fully extended and adjusted (a vertical
position is recommended), to ensure the maximum signal strength and
the best possible sound quality.
Switch off
Press the ‘Power’ button on the top of the radio.
Slide the power switch on the back of the radio to ‘Off’ to completely
switch off the radio and display, this will also stop any batteries, if fitted,
from going flat.
Adjusting the volume
Press the ‘Vol.+’ to increase the volume and the ‘Vol.-’ to decrease the
volume. Press and hold the ‘Vol.+’ or ‘Vol.-’ to progressively increase or
decrease the volume.
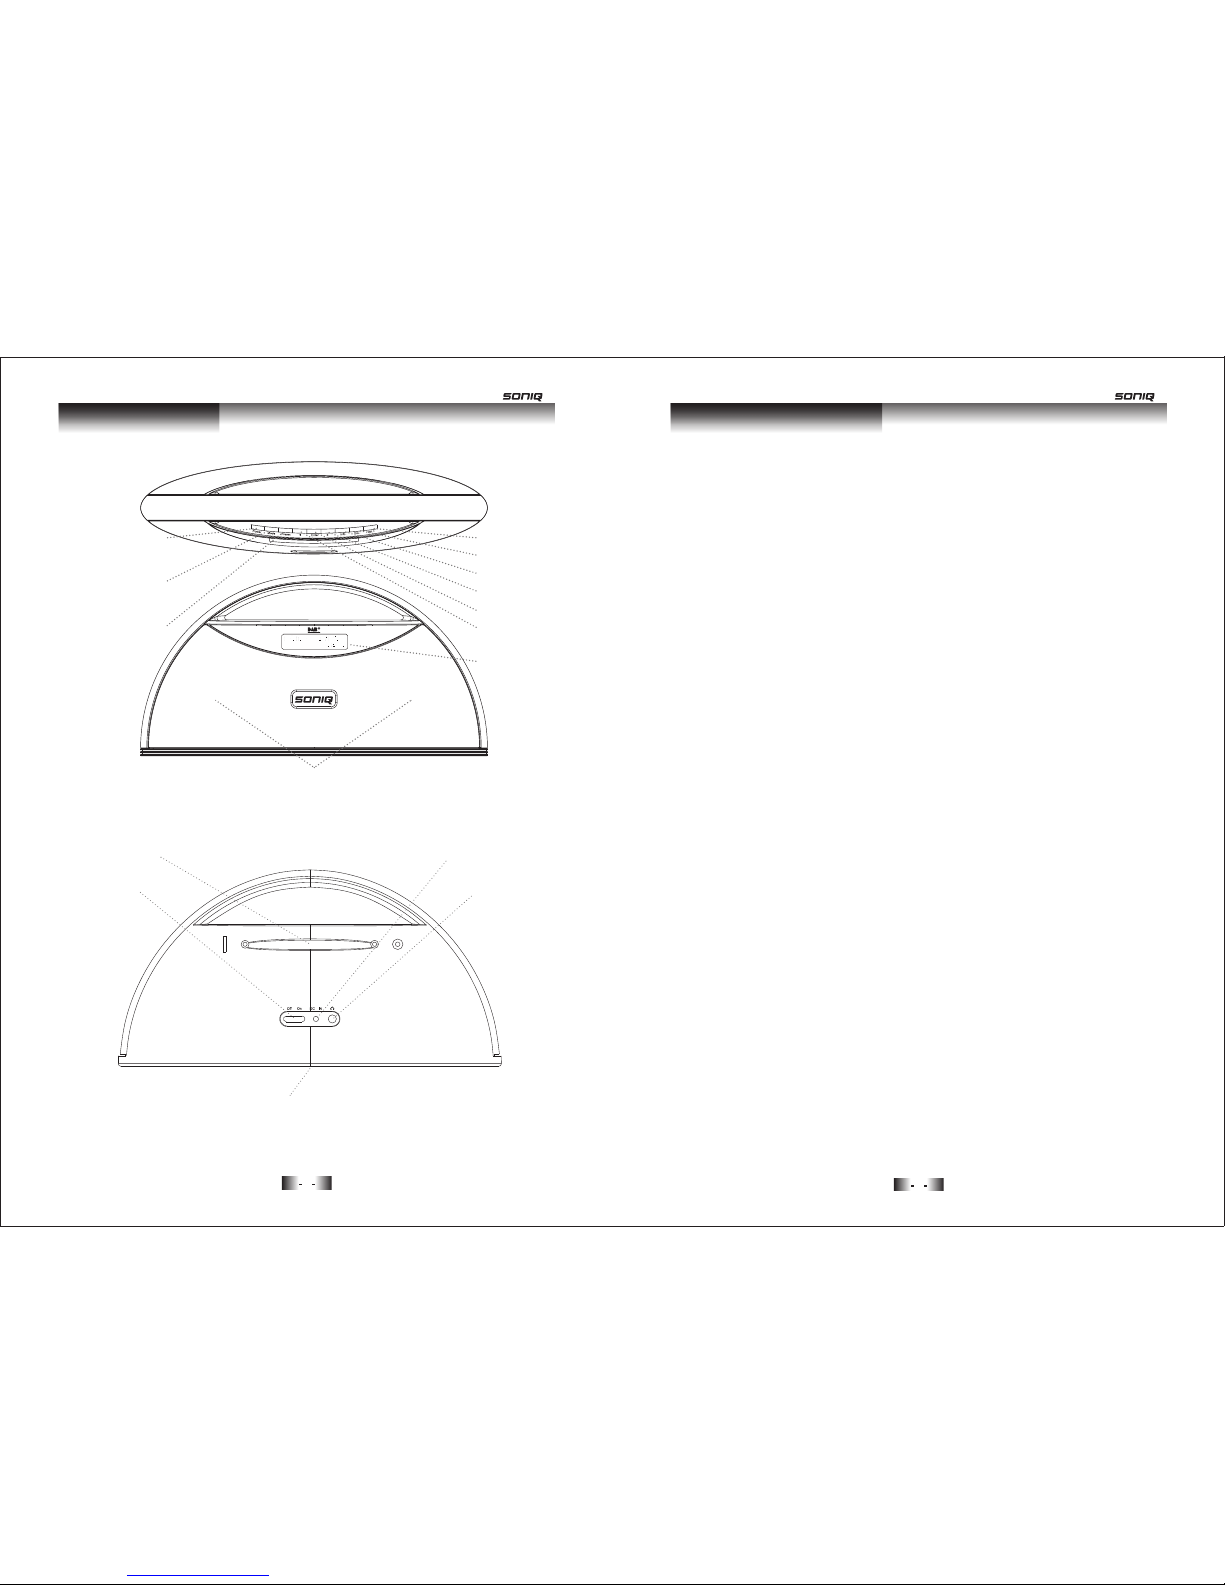
Backlit display
Power
Press and release to power on
Press and release to power off
DAB+/FM presets
Scroll down
Vol. -
Info.
Mode
Press to switch between
DAB+and FM modes
Stereo speakers
Telescopic aerial
Power on/off switch
Enter
Vol. +
Scroll up
Mains power socket
Headphone socket
Battery compartment (underneath)
Requires 4 x 1.5V C-size batteries (not supplied)
78
Using your DAB+radioUsing your DAB+radio
Changing DAB+stations
1. If the system is not set in DAB+mode, press the ‘Mode’ button to go
to DAB+mode.
2. Press the or key to scroll through the stations. The stations are
listed in numerical and then alphabetical order.
3. When the station that you would like to listen to is displayed, press the
‘Enter’ button. “Tuning...” will be displayed whilst your DAB+radio tunes
to your selected station.
Note: Press and hold the ‘Enter’ button to switch between ‘Auto Enter
On’ and ‘Auto Enter Off’. With Auto Enter setting to “On”, you can change
DAB+radio stations by just pressing the or buttons. With Auto Enter
setting to "Off", ‘Tuning...’ will be displayed whilst your DAB+radio tunes
to that radio station.
Station sort
This feature enables you to set the station order in Alphanumeric (Station
name), Ensemble (Station frequency) or Valid Station (current active
stations).
1. Press and hold the ‘Info’ button until ‘Station sort’ is displayed. Press
the ‘Enter’ button.
2. Press the or key to scroll through the options and press ‘Enter’ to
confirm.
Scanning for DAB+stations
With DAB+radio, additional stations and services regularly become
available, so it’s a good idea to carry out a manual scan every now and
then to make sure that you have the most up-to-date stations stored
within the memory of your radio. If you have moved your radio to another
location, eg: if you go on holiday, then it’s also a good idea to carry out
a manual scan.
1. If the system is not set in DAB+mode, press the ‘Mode’ button to go
to DAB+mode.
2. Press and hold the ‘Info’ button until ‘Station sort’ is displayed.
Press the ‘Info’ button again and ‘Auto Scan’ will be displayed.
3. Press the ‘Enter’ button to start a local search for stations. The
display will change to ‘Scan Services, Quick Scan’. A progress bar
will show the progress of the scan and the number of stations found
during the scan will also be displayed. A local scan takes approximately
10 seconds.
4. If you are using your DAB+radio outside of Australia, then press and
hold the ‘Enter’ button for 2 seconds (at Step 3) to begin a wider,
national and local scan (Full Scan). A national and local scan takes
minimum 1 minute.
Storing a DAB+station preset
Your radio can store up to 10 DAB+stations in its preset memories for
instant access to your favourite stations.
Note: When you store DAB+radio station presets, please do not
overwrite your FM station presets.
1. Tune your radio to the station that you want to preset (see changing
DAB+stations, page 7).
2. Press ‘Preset’. The bottom line of the display, showing the number
of the preset location, will flash.
3. Press the or button to scroll through the numbered preset
locations (1-10). Press and hold ‘Preset’ for 2 seconds to store the
station to a preset location. ‘PXX Saved’ where ‘XX’ is the number
of the preset location is displayed.
Note: If there is already an existing DAB+station stored under a preset,
it will be overwritten when you store a new station.
Tune to a DAB+preset station
In DAB+mode:
1. Press ‘Preset’ and use the or button to scroll through the station
presets. Briefly press ‘Preset’ when you select a station. The radio
will tune to that station and begin to play.
Note: If no DAB+station has been stored under the preset, the display
will revert to the previously selected station.
Table of contents


