SONIVATE MEDICAL SonicEye Dual-ArrayUltrasound System User manual

SONIVATE MEDICAL, INC.
SonicEye® Dual-Array
Ultrasound System
Model# SDA-001
Part Number: 18210

SonicEye® Dual-Array Ultrasound System
2
SonicEye® User Manual
Version 1.0
OPERATING DOCUMENTATION
Regulatory Requirement
This manual is a reference for the SonicEye® only. This manual is a reference for the SonicEye® software
release 1.0. (SonicEye® is a Registered Trademark and exclusive property of Sonivate Medical, Inc.)
Copyright ®Sonivate Medical, Inc. All Rights Reserved
SonicEye Dual-Array Ultrasound System is protected under numerous Patents and Patents Pending.
i SonicEye – CONFORMANCE STANDARDS
The SONIVATE product families are tested to meet all applicable requirements. Any changes to
accessories, peripheral units or any other part of the system must be approved by the manufacturer:
SONIVATE MEDICAL, INC. for SonicEye Dual-Array Ultrasound System. Ignoring this advice may
compromise the regulatory approvals obtained for the product.
This product complies with the regulatory requirement IEC60601-1, 3rd Edition for medical electrical
equipment; general requirements for basic safety and essential performance.
This product complies with IEC60601-2-37, Edition 2.1 2015 the Medical Electrical Equipment, Part 1;
General Requirements for Safety. This includes requirements for the safety of ultrasonic medical
diagnostic and monitoring equipment.
This product complies with IEC60601-1-2 Medical Electrical Equipment - part 1-2. Collateral standard:
Electromagnetic compatibility - Requirements and tests.
This product also complies with:
NEMA UD-2: 2004 acoustic output measurements
ISO10993-1 Biological evaluation of medical devices.
ISO 14971 application of risk management to medical devices.

SonicEye® Dual-Array Ultrasound System 3
SonicEye® User Manual Version 1.0 (continued)
ii SonicEye – COUNTRY SPECIFIC APPROVALS AND ENVIRONMENTAL
REQUIREMENTS
Country Specific Approvals:
United States of America
Environmental Requirements:
NOTE: Avoid exposing the unit to saline moisture.
Requirement Temperature:
Operational 0°C to 35°C (32°F to 95°F)
Nonoperational -35°C to 65°C (-29°F to 149°F)
Humidity 30% to 75% RH non-condensing
Operating non-condensing Air Pressure 700HPA to 1060HPA
iii SonicEye – TYPE BF APPLIED PART AND CLASS II EQUIPMENT
The SonicEye is an internally powered device, type BF APPLIED PART providing a specified degree
of protection against electric shock, with regard to allowable LEAKAGE CURRENT. This includes the
transducer array.
Normal mode Single fault condition
Patient leakage current will normally be between 100 micro Amps and 500 micro Amps.
Class II Equipment:
Type and degree of protection against electric shock:
• SonicEye is internally powered by its battery while operated during
scanning; it may also be used with the provided AC adapter.
• The AC adapter is Class II and a medical grade.
EQUIPMENT in which protection against electric shock does not rely on BASIC INSULATION only, but
in which additional safety precautions such as DOUBLE INSULATION or REINFORCED INSULATION are
provided, there being no provision for protective earthing or reliance upon installation conditions.
iv SonicEye - ORIGINAL DOCUMENTATION
• The original document was written in English.

SonicEye® Dual-Array Ultrasound System
4
Table of Contents
Chapter 1 - Introduction........................................................................................................ t6
General Description ..........................................................................................................................................6
Ultrasound Principles of Operation............................................................................................................6
Safety .....................................................................................................................................................................6
Indication for Use..............................................................................................................................................6
Contraindication ................................................................................................................................................ 7
Conventions Used in this Manual............................................................................................................... 7
WARNINGS............................................................................................................................................................8
Contact Information .........................................................................................................................................8
Chapter 2 - Preparing the SonicEye for Use............................................................................9
SonicEye Dual-Array Ultrasound System Package Contents.............................................................9
System Description ...........................................................................................................................................9
First Time Use ...................................................................................................................................................10
Cradle Assembly...............................................................................................................................................10
SonicEye Activation ........................................................................................................................................ 11
Graphical User Interface Overview...........................................................................................................12
Chapter 3 - Using SonicEye ................................................................................................... 15
Patient Data Entry:..........................................................................................................................................15
Scanning:.............................................................................................................................................................15
Scanning in Guided eFAST Exam Mode: ..................................................................................................18
Scanning in Manual Mode: .......................................................................................................................... 21
Chapter 4 - SonicEye GUI/App ............................................................................................... 26
Tablet Requirements ......................................................................................................................................26
SonicEye GUI Pre-Installed...........................................................................................................................26
Chapter 5 - SonicEye Maintenance........................................................................................ 27
System Care and Maintenance...................................................................................................................27
Inspecting the SonicEye Image Processor.............................................................................................27
Inspecting the Dual-Array probe before each use..............................................................................27
Cleaning and Disinfection............................................................................................................................27
SonicEye Limited Warranty..........................................................................................................................28
SonicEye Disposal............................................................................................................................................28
Troubleshooting ...............................................................................................................................................29

SonicEye® Dual-Array Ultrasound System 5
Table of Contents
Chapter 6 - Safety..................................................................................................................30
Introduction...................................................................................................................................................... 30
Owner Responsibility .................................................................................................................................... 30
Important Safety Considerations ............................................................................................................. 30
Electromagnetic Compatibility (EMC) Safety........................................................................................32
Medical Ultrasound Safety...........................................................................................................................33
Device Labels.....................................................................................................................................................33
Chapter 7 - Appendix......................................................................................................................................35
Acoustic Output Reporting Tables ............................................................................................................35
Measurement Uncertainties .......................................................................................................................35
Probe Temperature Data...............................................................................................................................37
Terms and Conditions....................................................................................................................................37

SonicEye® Dual-Array Ultrasound System
6
Chapter 1 - Introduction
CONTENTS:
General Description
Ultrasound Principles of Operation
Safety
Indications for Use
Contraindications
Conventions used in this Manual
Warnings
Contact Information
GENERAL DESCRIPTION
SonicEye® Dual-Array Ultrasound System employs an innovative and unique design that combines two
transducers (high frequency linear and low frequency phased arrays) into a single, finger-mounted
probe connected to an image processor. The system operates in B-Mode ONLY. The image processor
is connected to a tablet that contains an application that guides the user through the eFAST exam or
in Manual mode accommodates other applications such as IV-line placement, musculoskeletal (MSK),
nerve block, etc.
SonicEye is a battery operated, general purpose ultrasound imaging system. With the supplied, approved
charger, it can be used with 100-240 VAC and the charger may be used during patient scanning.
ULTRASOUND PRINCIPLES OF OPERATION
Ultrasound for medical applications can be traced back to the 1950’s with initial medical use by
John Wild and John Reid. Medical ultrasound images are created by an image processor through
the transmission and reception of high-frequency waves through a probe. These waves transmitted
through the body, producing an echo where density changes occur. The echoes return to the probe
where they are converted back into electrical signals. These echo signals are processed by the image
processor into a series of digital image signals and then displayed on a monitor.
SAFETY
Read and understand all instructions in the User’s Manual before attempting to use SonicEye. The
manual should be accessible at all times. Periodically review the procedures for operation and safety
precautions.
All information in Chapter 6 ‘Safety’ should be read and understood before operating SonicEye.
INDICATION FOR USE
The SonicEye ultrasound unit is intended for the following applications:
• Fetal • Cardiac adult and pediatric
• Abdominal • Pediatric
• Peripheral vessel • Musculoskeletal conventional and superficial
• Thoracic/pleural • Small parts (breast, thyroid, testes)
SonicEye® Dual-Array Ultrasound System 7
Chapter 1 - Introduction (continued)
CONTRAINDICATION
The SonicEye ultrasound unit is not intended for intracavity, intra-operative, or ophthalmic use or any
use causing the acoustic beam to pass through the eye.
CONVENTIONS USED IN THIS MANUAL
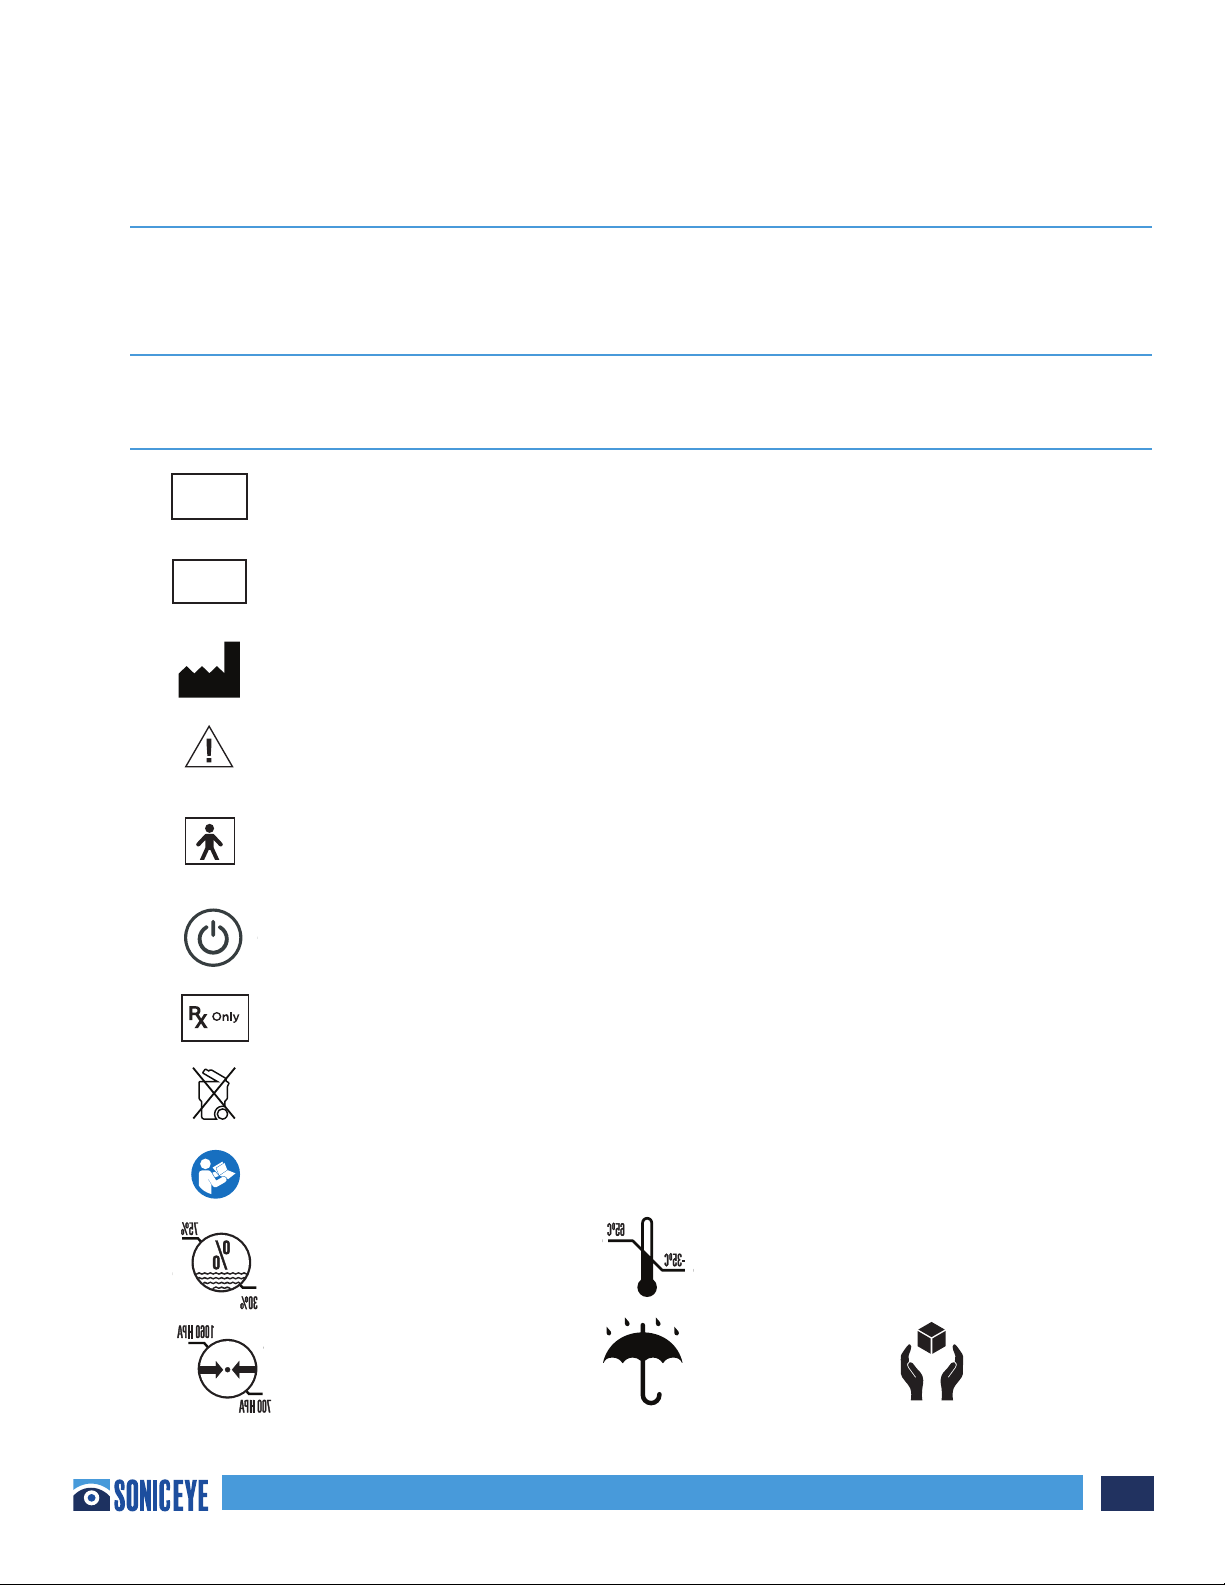
Symbols used on the SonicEye® system and associated packaging are defined here for user reference.
Symbol Definition
Designates the SonicEye® serial number assigned during manufacture.
Designates the SonicEye® Part or Reference Number assigned to the system –
image processor and probe.
Indicates the legal manufacturer
Caution, consult accompanying documents.
Type BF patient applied part (B=body, F=floating applied part) including
the transducer array
Power On/O Button
Prescription only - device restricted to use by or on the order of a physician
Not for general waste; see local disposal guidelines
Must Reach Manual
Relative Humidity Temperature
Pressure Keep Dry Fragile
Sonivate Medical, Inc.
4640 SW Macadam Avenue
Suite 200
Portland, OR 97239 USA
SonicEye® Dual-Array
Ultrasound System
40032_2
Input Power: 5VDC; 3 amps
Battery Power (Li Ion): 3.8 VDC; 3,000mAh
REF
P/N: 18210
Manufactured for Sonivate Medical, Inc.
By Valtronic Technologies (USA), Inc.
29200 Fountain Parkway
Solon, OH 44139
40033_2
YYYYMMXXX
SN
UDI
XXXXXXXXXXXXX
XXXXXXXXXXXXX
XXXXXXXXXXXXX
Sonivate Medical, Inc.
4640 SW Macadam Avenue
Suite 200
Portland, OR 97239 USA
SonicEye® Dual-Array
Ultrasound System
40032_2
Input Power: 5VDC; 3 amps
Battery Power (Li Ion): 3.8 VDC; 3,000mAh
REF
P/N: 18210
Sonivate Medical, Inc.
4640 SW Macadam Avenue
Suite 200
Portland, OR 97239 USA
SonicEye® Dual-Array
Ultrasound System
40032_2
Input Power: 5VDC; 3 amps
Battery Power (Li Ion): 3.8 VDC; 3,000mAh
REF
P/N: 18210
Sonivate Medical, Inc.
4640 SW Macadam Avenue
Suite 200
Portland, OR 97239 USA
SonicEye® Dual-Array
Ultrasound System
40032_2
Input Power: 5VDC; 3 amps
Battery Power (Li Ion): 3.8 VDC; 3,000mAh
REF
P/N: 18210
Sonivate Medical, Inc.
4640 SW Macadam Avenue
Suite 200
Portland, OR 97239 USA
SonicEye® Dual-Array
Ultrasound System
40032_2
Input Power: 5VDC; 3 amps
Battery Power (Li Ion): 3.8 VDC; 3,000mAh
REF
P/N: 18210
Sonivate Medical, Inc.
4640 SW Macadam Avenue
Suite 200
Portland, OR 97239 USA
SonicEye® Dual-Array
Ultrasound System
40032_2
Input Power: 5VDC; 3 amps
Battery Power (Li Ion): 3.8 VDC; 3,000mAh
REF
P/N: 18210
Sonivate Medical, Inc.
4640 SW Macadam Avenue
Suite 200
Portland, OR 97239 USA
SonicEye® Dual-Array
Ultrasound System
40032_2
Input Power: 5VDC; 3 amps
Battery Power (Li Ion): 3.8 VDC; 3,000mAh
REF
P/N: 18210
40035_2
SonicEye® Dual-Array
Ultrasound System
REF
P/N: 18210
Manufactured for Sonivate Medical, Inc.
By Valtronic Technologies (USA), Inc.
29200 Fountain Parkway
Solon, OH 44139
40035_2
SonicEye® Dual-Array
Ultrasound System
REF
P/N: 18210
Manufactured for Sonivate Medical, Inc.
By Valtronic Technologies (USA), Inc.
29200 Fountain Parkway
Solon, OH 44139
40035_2
SonicEye® Dual-Array
Ultrasound System
REF
P/N: 18210
Manufactured for Sonivate Medical, Inc.
By Valtronic Technologies (USA), Inc.
29200 Fountain Parkway
Solon, OH 44139
40035_2
SonicEye® Dual-Array
Ultrasound System
REF
P/N: 18210
Manufactured for Sonivate Medical, Inc.
By Valtronic Technologies (USA), Inc.
29200 Fountain Parkway
Solon, OH 44139
40035_2
SonicEye® Dual-Array
Ultrasound System
REF
P/N: 18210
Manufactured for Sonivate Medical, Inc.
By Valtronic Technologies (USA), Inc.
29200 Fountain Parkway
Solon, OH 44139

SonicEye® Dual-Array Ultrasound System
8
Chapter 1 - Introduction (continued)
CONVENTIONS USED IN THIS MANUAL (continued)
The following conventions are also used throughout this user guide:
• DANGER is used to indicate a specific hazard exists that, given inappropriate conditions or actions,
will cause severe or fatal personal injury with or without substantial property damage.
• WARNING is used to convey information to prevent injury or loss of life.
• CAUTION is used to convey information regarding special care to be exercised by the user for the
safe and eective use of the device.
CAUTION USA only:
United States law restricts this device to sale or use by, or on the order of a physician.
WARNINGS
To prevent damage of the equipment or injury to yourself or others, read the following safety warnings
before using the SonicEye.
• Handle SonicEye and its accessories with care. Do not subject SonicEye to mechanical shock or impact.
• Do not attempt to disassemble or alter any part of the unit including the probe, the battery, the
AC/DC adapter and accessories. Disassembly or modification may result in electrical shock.
• Stop using the unit if it emits smoke or noxious fumes. Failure to do so may result in electrical
shock or fire.
• Stop using the unit if the casing is damaged, including the probe. Failure to do so may result in
electrical shock.
• Do not use the AC/DC adapter if showing visible damage.
• Use only the supplied power accessories (battery and charger). Failure to do so may result in
electrical shock or fire or damage to unit.
• Do not immerse or expose the image processor to water.
• To reduce risk for electrical shock, do not plug or unplug the AC/DC adapter from mains socket
with wet hands.
• Avoid dropping or subjecting the unit to corrosive liquid. This could result in electrical shock, and
injury.
• Disconnect the image processor charger when not in use to avoid fire hazard.
• Keep the charger dry. Failure to observe this precaution may result in fire and electric shock
• Keep this unit out of reach of children.
CONTACT INFORMATION
When contacting Sonivate you will have to provide
Sonivate Medical, Inc.
4640 SW Macadam Ave., Suite 200
Portland, OR 97239
www.Sonivate.com
Sonivate Medical, Inc.
4640 SW Macadam Avenue
Suite 200
Portland, OR 97239 USA
SonicEye® Dual-Array
Ultrasound System
40032_2
Input Power: 5VDC; 3 amps
Battery Power (Li Ion): 3.8 VDC; 3,000mAh
REF
P/N: 18210
Manufactured for Sonivate Medical, Inc.
By Valtronic Technologies (USA), Inc.
29200 Fountain Parkway
Solon, OH 44139
40033_2
YYYYMMXXX
SN
UDI
XXXXXXXXXXXXX
XXXXXXXXXXXXX
XXXXXXXXXXXXX
SonicEye® Dual-Array Ultrasound System 9
Chapter 2 - Preparing the SonicEye for Use
CONTENTS:
Package Contents
System Description
First Time Use
SonicEye Activation
Graphical User Interface Overview
SonicEye DUAL-ARRAY ULTRASOUND SYSTEM PACKAGE CONTENTS
Make sure all items listed below are included in the package.
1. SonicEye Cradle
2. SonicEye Image Processor unit with Dual-Array probe
3. 1 USB cable
4. 1 charging adapter for SonicEye (Model GSM36B05-P1J)
5. Tablet (Model B01J67JHK), charger (Model AW018WR-0500300UH) and the SonicEye App preinstalled
a. SonicEye User and Reference Guide preinstalled on the tablet
b. ALARA Brochure preinstalled on the tablet
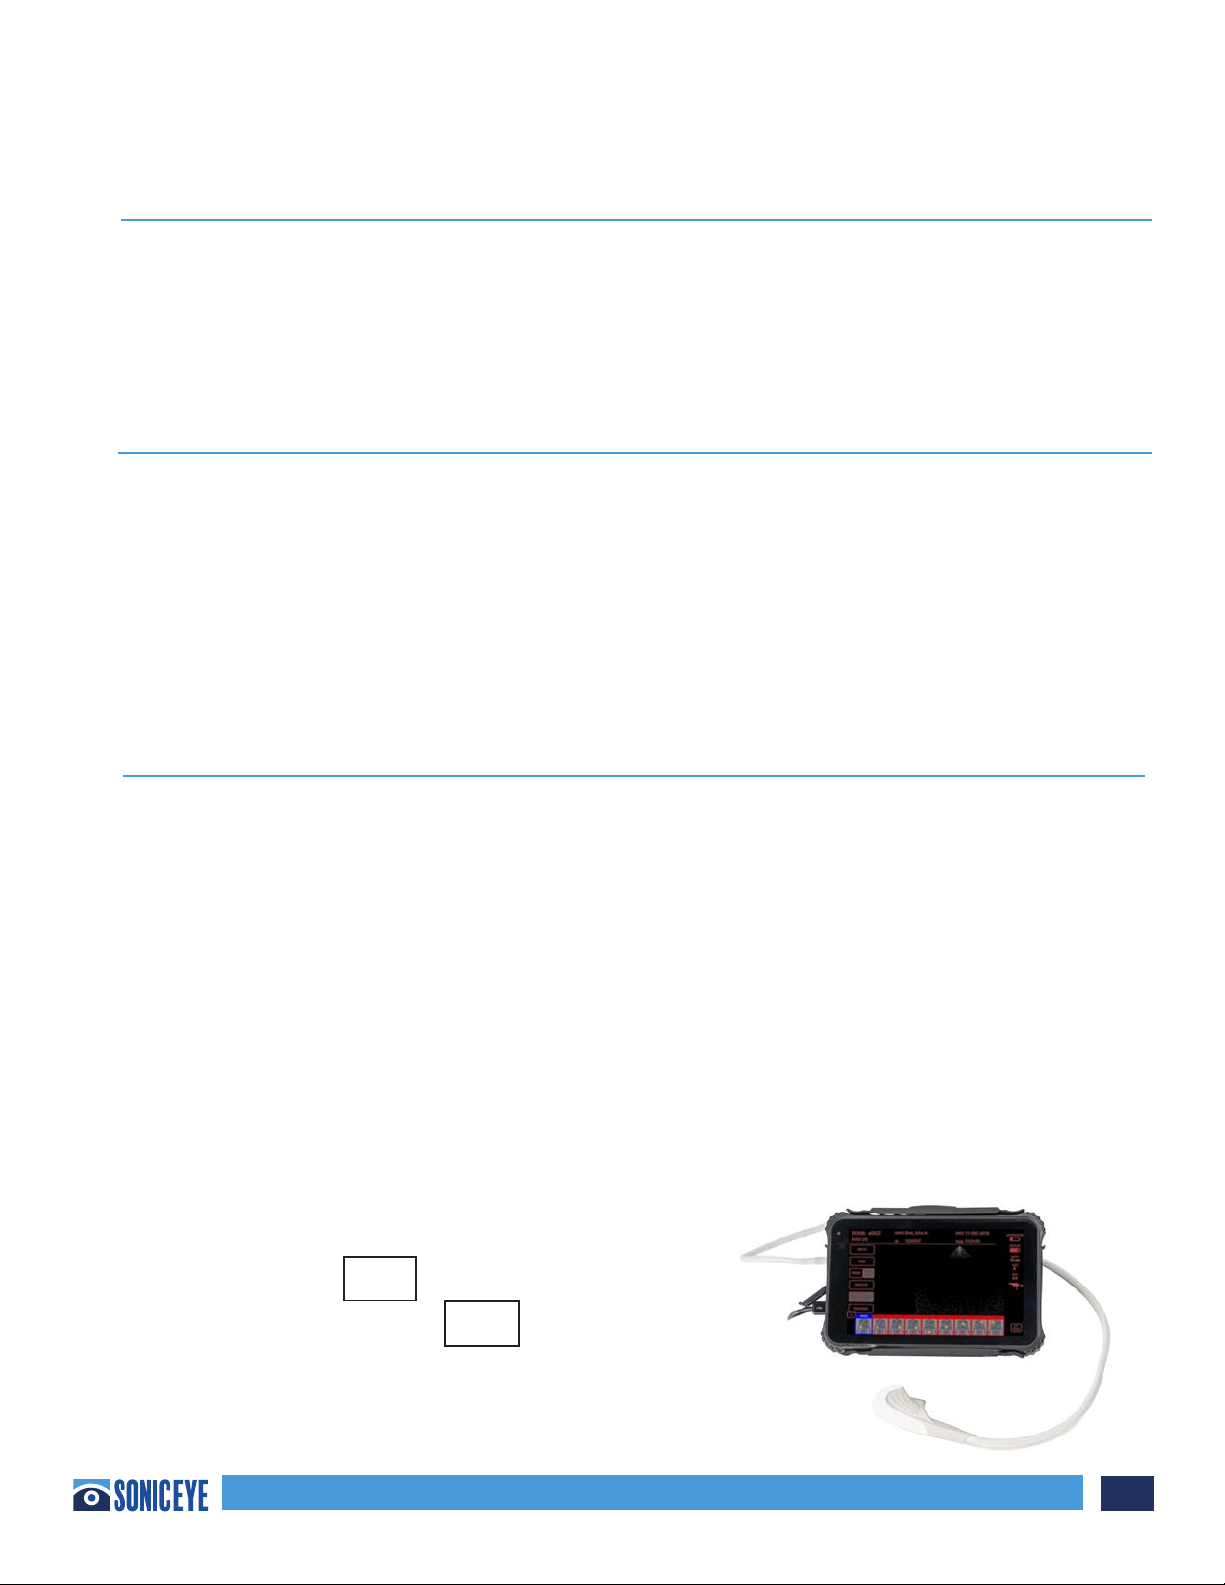
SYSTEM DESCRIPTION
System overview
The SonicEye device (Figure 2.1a):
1. SonicEye Cradle (storage and display accessory)
2. Image Processor (6.18” L x 4.17” W x 1.14” H) with Dual-Array Probe (2.50” L x 1.15” W x 1.25” H)
weight in total is less than 16 oz.
a. Image Processor charger
b. Two port covers for the data and power outlets when system is not in use
3. Operates in B-Mode only.
4. Approved Vanquisher 8-inch Industrial Rugged Tablet PC by Sinicvision Technologies (8” L x 5.8” W
x 0.7” H).
5. Vanquisher Tablet charger
6. One USB cable; one end is USB-A (larger) and one end is USB-C (smaller)
NOTE: SonicEye Dual-Array Ultrasound System has a
Reference Number or and each manufactured unit
has a unique Serial Number or More details can be
found in Chapter 6, Device Labels.
Sonivate Medical, Inc.
4640 SW Macadam Avenue
Suite 200
Portland, OR 97239 USA
SonicEye® Dual-Array
Ultrasound System
40032_2
Input Power: 5VDC; 3 amps
Battery Power (Li Ion): 3.8 VDC; 3,000mAh
REF
P/N: 18210
Manufactured for Sonivate Medical, Inc.
By Valtronic Technologies (USA), Inc.
29200 Fountain Parkway
Solon, OH 44139
40033_2
YYYYMMXXX
SN
UDI
XXXXXXXXXXXXX
XXXXXXXXXXXXX
XXXXXXXXXXXXX
SonicEye® Dual-Array Ultrasound System
10
Chapter 2 - Preparing the SonicEye for Use (continued)
REGISTRATION
Prior to charging the tablet and Image Processor go to www.Sonivate.com and register the product.
Go to “Registration” and follow the directions to input the Reference Number of the system,
the Serial Number along with other requested data.
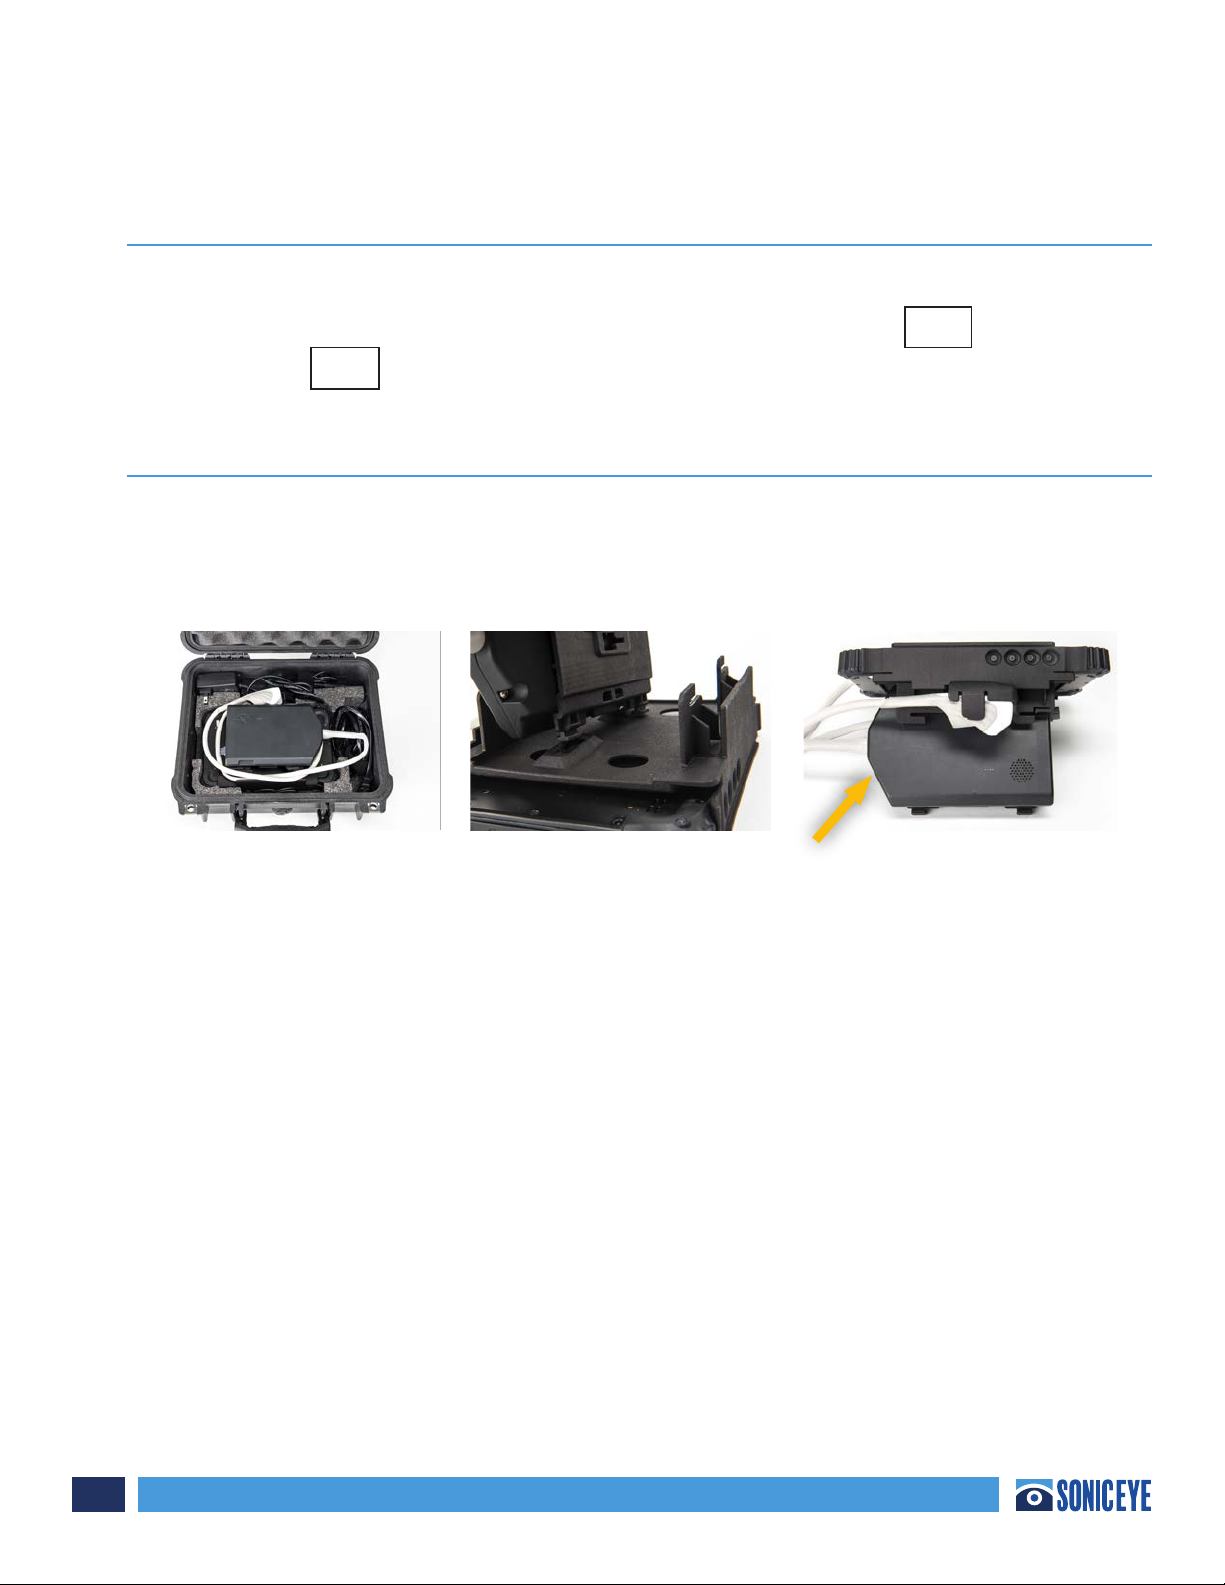
CRADLE ASSEMBLY
The SonicEye cradle holds the tablet and Image Processor in the shipping case (Figure 2.01). Detach
the Image Processor by sliding it out of the cradle and insert the handles into the slots (Figure 2.02)
on the tablet holder to form a kick stand (Figure 2.02). The fan exhaust should allow for proper
ventilation (Arrow).
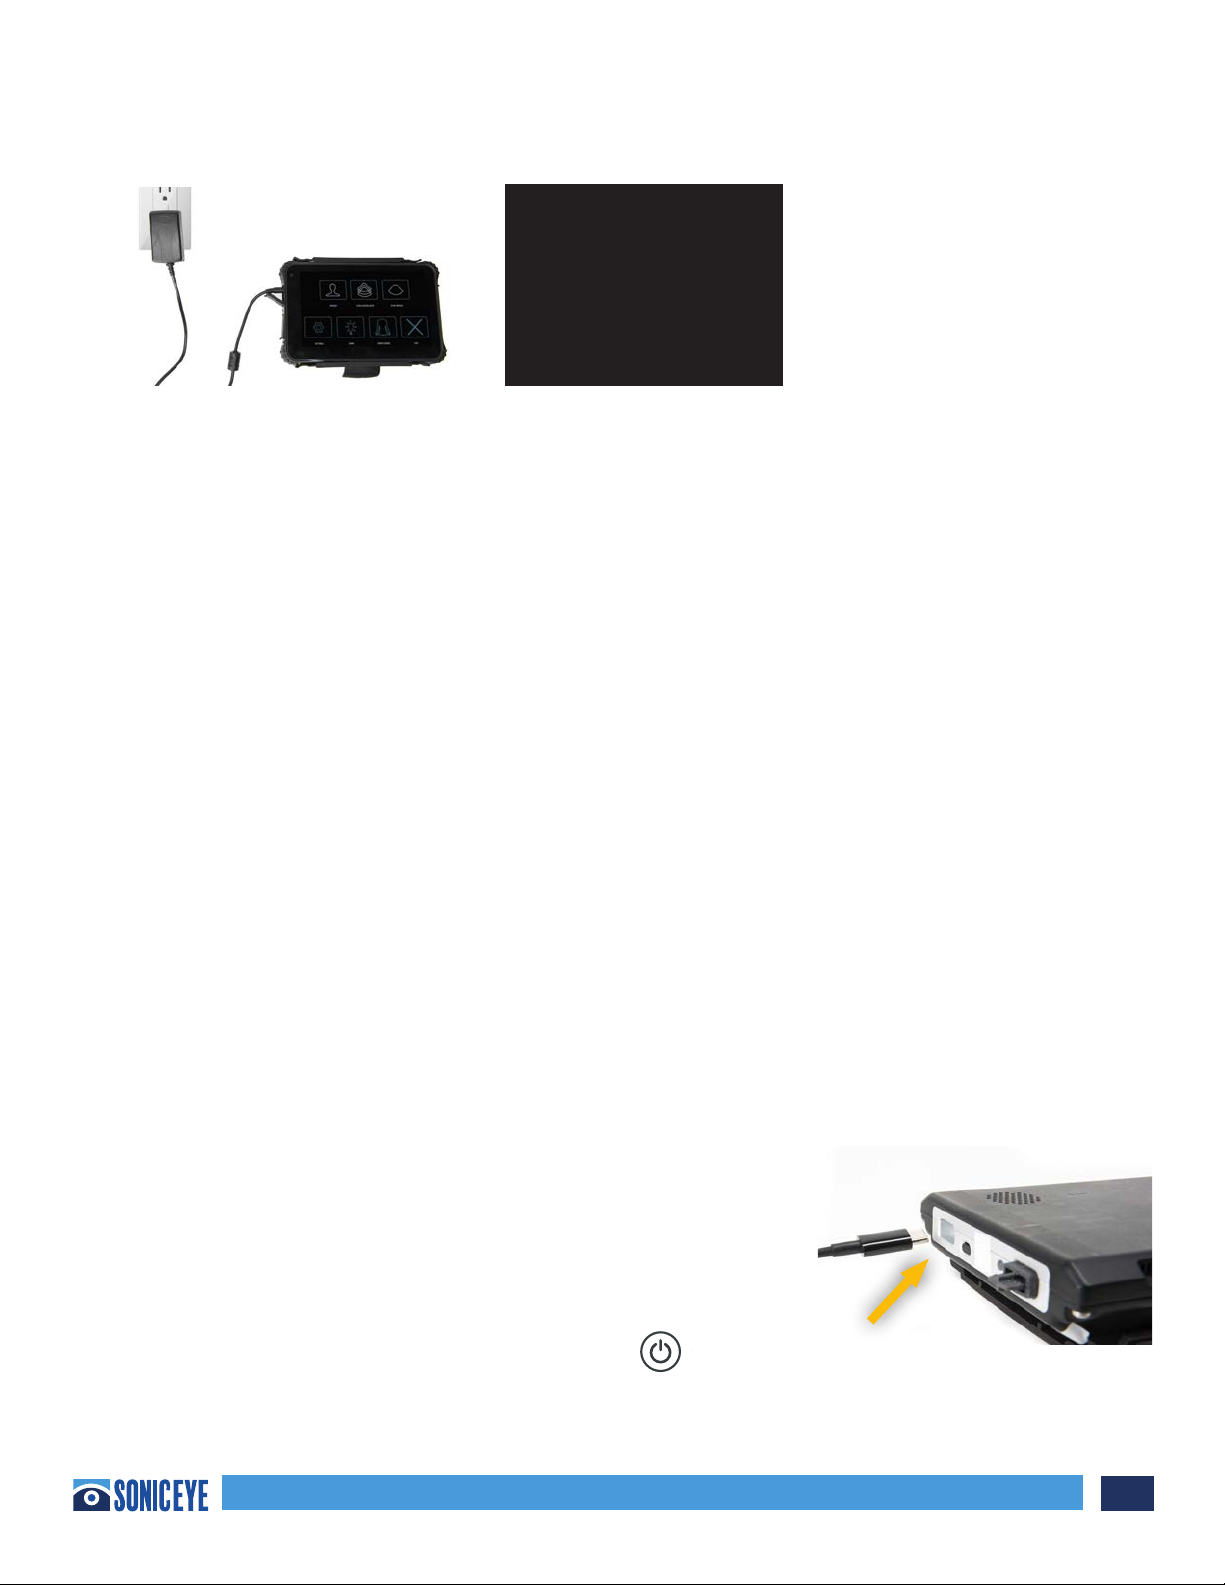
CHARGING THE SYSTEM
Charge the Tablet and Image Processor: The batteries are not fully charged at shipment. Plug the
Tablet adapter into an AC electrical outlet and then plug the BLACK colored adapter cord into the
tablet (Figure 2.1b). Plug the Image Processor adapter into an AC electrical outlet and then plug the
WHITE colored adapter cord into the Power Input for the Image Processor. Do not turn on either unit.
CAUTION Only use the AC/DC adapters supplied.
SonicEye AC/DC Adapter: Mean Well, Model GSM36B05-P1J, AC/DC Medical Adapter; Input: 100-240 VAC,
50-60 Hz, 0.9-0.45A; Output: 5Vdc, 4.5A, 22.5W Max (Smaller, USB-C, connector to be inserted into the
Power Input i.e. Figure 2.1c - to the Image Processor for charging). The Power input is adjacent to the
On/O light on the right side of the Image Processor.
Sonivate Medical, Inc.
4640 SW Macadam Avenue
Suite 200
Portland, OR 97239 USA
SonicEye® Dual-Array
Ultrasound System
40032_2
Input Power: 5VDC; 3 amps
Battery Power (Li Ion): 3.8 VDC; 3,000mAh
REF
P/N: 18210
Manufactured for Sonivate Medical, Inc.
By Valtronic Technologies (USA), Inc.
29200 Fountain Parkway
Solon, OH 44139
40033_2
YYYYMMXXX
SN
UDI
XXXXXXXXXXXXX
XXXXXXXXXXXXX
XXXXXXXXXXXXX
Figure 2.01 Figure 2.02 Figure 2.03
SonicEye® Dual-Array Ultrasound System 11
Chapter 2 - Preparing the SonicEye for Use (continued)
Tablet AC Adapter: Model AW018WR-0500300UH; Input: 100-240V, 50/60Hz, 0.5A; Output: 5V, 3A.
To achieve maximum charging capacity with your SonicEye Tablet and Image Processor batteries,
you should allow the battery to be fully charged and then fully discharged at least three times. The
unit can be used as normal during these cycles. Once these initial charging/discharging cycles are
performed, the following is applicable without reducing the life time of the battery:
• It is not necessary to completely discharge the battery before re-charging it.
• It is possible to stop charging the battery before it is fully charged, but the battery will then
be discharged more rapidly.
• It is possible to charge the battery several times each day, if needed.
Item Specification
• Charging time about 1.5 hour
• Capacity about 1 hour and 30 minutes active use*
• Lifetime At least 300 charges
* Assuming a new battery. Batteries generally degrade by aging and number of recharging cycles and
will have reduced capacity over time.
Once charged, the tablet and Image Processor can run o of their battery power or operate using the
chargers.
SONICEYE ACTIVATION
Once both the tablet and Image Processor are charged, SonicEye
is ready to be connected to the tablet. The USB connection will
transmit the data from the Image Processor to the tablet. The small,
USB-C, connection to be inserted into the Image Processor (left
side of Image Processor and adjacent to Power On button- Figure
2.1d); the larger end, USB-A, to be inserted into the tablet (located
adjacent to the charger input). After the two are connected, then
turn the tablet on by pushing the Power On button . Hold down
until red power
Figure 2.1b Figure 2.1c
Figure 2.1d

SonicEye® Dual-Array Ultrasound System
12
Chapter 2 - Preparing the SonicEye for Use (continued)
CRADLE ASSEMBLY
The SonicEye cradle holds the tablet and Image Processor in the shipping case (Figure 2.01). Detach
the Image Processor by sliding it out of the cradle and insert the handles into the slots (Figure 2.02)
on the tablet holder to form a kick stand (Figure 2.02). The fan exhaust should allow for proper
ventilation (Arrow).
CAUTION Once initialized, the system will ask for a Password. The initial Password is 1 2 3 4. The
Password should be modified in the tablet settings.
SonicEye AC/DC Adapter: Mean Well, Model GSM36B05-P1J, AC/DC Medical Adapter; Input: 100-240 VAC,
50-60 Hz, 0.9-0.45A; Output: 5Vdc, 4.5A, 22.5W Max (Smaller, USB-C, connector to be inserted into the
Power Input i.e. Figure 2.1c - to the Image Processor for charging). The Power input is adjacent to the
On/O light on the right side of the Image Processor.
The Image Processor is initialized by pushing the Power On icon. The power light will turn GREEN to
indicate it is on and then turn to RED to indicate the system is running o of the battery. Once the
tablet and Image Processor are initialized, DOUBLE TAP the SONICEYE ICON (Figure 2.2a). The system
will begin initiating the hardware (Figure 2.2b).
GRAPHICAL USER INTERFACE OVERVIEW
Once the system is initialized, the HOME SCREEN (Figure 2.3)
will appear. This is the Main Menu from which all activities are
accessed. ONE TAP any icon to open that section or “X” to Exit
or Log O from the system.
A more detailed description about each section’s operation is
contained in Chapter 3.
Figure 2.2a Figure 2.2b
Figure 2.3
SonicEye® Dual-Array Ultrasound System 13
Chapter 2 - Preparing the SonicEye for Use (continued)
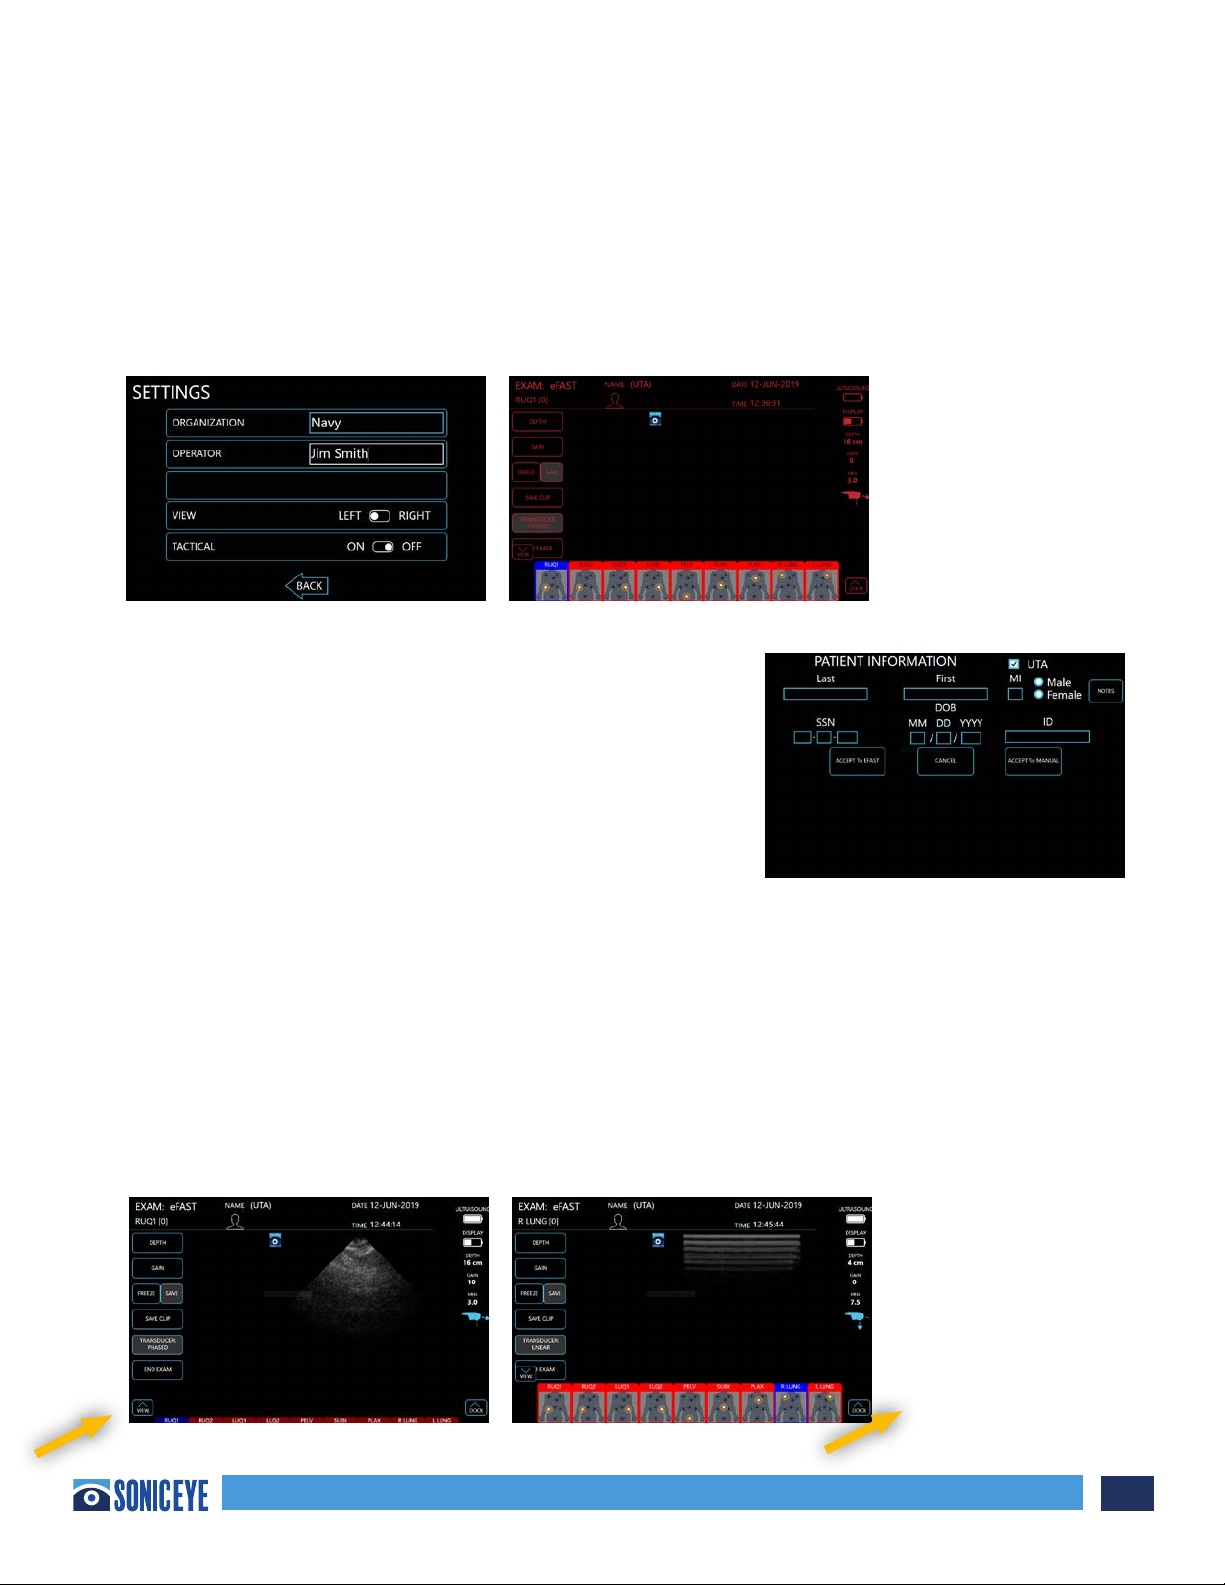
The Settings section (Figure 2.4a) is where SonicEye can be customized to each user. Enter the
Organization and User using a pop-up keyboard. The system will always operate in Landscape. The
User may adjust left or right handed, in Operation as well as being to set the system on “Tactical”
light mode (Figure 2.4b).
The system will start with the installed pre-set including: Starting View (Landscape), Operation (LEFT),
and Tactical (O). Changes need to be manually inputted.
The Patient section (Figure 2.5) is where the individual data
(Name, Male/Female, Social Security Number, Date of Birth,
ID and UTA – “Unable To Attain”) is recorded. This creates a
patient record containing those scans that were conducted
and saved for each patient. Observations can be included per
patient. See Chapter 3 for more detail.
When observations are desired to be added, ONE TAP the
NOTES icon and a pop-up menu will appear.
The Scan: eFAST section (Figure 2.6a & 2.6b) is the heart of the Sonivate system for the novice
ultrasound user. These screens guide one through the nine views of the eFAST exam, indicates
approximate location for the probe to be placed and pre-sets frequency, depth and brightness
depending upon the exam location. The guide is color coded: GREEN = Completed; BLUE = Being
Conducted; and RED = Incomplete/To be Done. Figure 2.6a shows a view (RUQ1) with the Phased Array
(views 1-7) and Figure 2.6b shows a view with the High Frequency Linear Array (8-9). For each view the
user can save up to four images or clips. ONE TAP the VIEW icon to raise or lower the eFAST placement
views. To advance to the next View, the Views must be in the raised position (Figure 2.6b). To access
Settings, Patient Records, etc. ONE TAP the DOCK icon (Figure 2.6b)
Figure 2.4a Figure 2.4b
Figure 2.5
Figure 2.6a Figure 2.6b

SonicEye® Dual-Array Ultrasound System
14
Chapter 2 - Preparing the SonicEye for Use (continued)
The Scan: Manual section (Figure 2.7 shown in Tactical View)
is for the more experienced user and it allows the freedom
to switch back and forth between the phased array and the
high frequency array with ONE TAP. It also provides up to nine
specific ultrasound scan views, each with one scan or clip saved.
For each scan view, a pop-up menu is available to identify the
scan type/location.
Learn section (Figure 2.8) is a refresher tutorial for the eFAST exam and an introduction to using the
SonicEye finger probe. No internet is needed to view either.
Image display on SonicEye is dependent of the ambient light, IF
POSSIBLE, avoid direct sun light on the display when scanning
and reviewing images.
ONE TAP “X” to Exit (Figure 2.9) the Home Screen to return to
the main tablet screen.
Then to exit the system ONE TAP the YES button or NO if EXIT
was tapped accidently (Figure 2.10)
THE SONICEYE IS READY FOR USE.
When SonicEye is not planned on being used for scanning within 10 minutes, it is recommended to
EXIT the system and return to the tablet home screen.
Figure 2.7
Figure 2.7
Figure 2.9
Figure 2.9
SonicEye® Dual-Array Ultrasound System 15
Chapter 3 - Using SonicEye
CONTENTS:
Patient Data Entry
Scanning
Guided eFAST exam
Manual Mode
Recall and Transfer of Stored Data
To Create a Report
Deletion of Data
Shut Down
PATIENT DATA ENTRY:
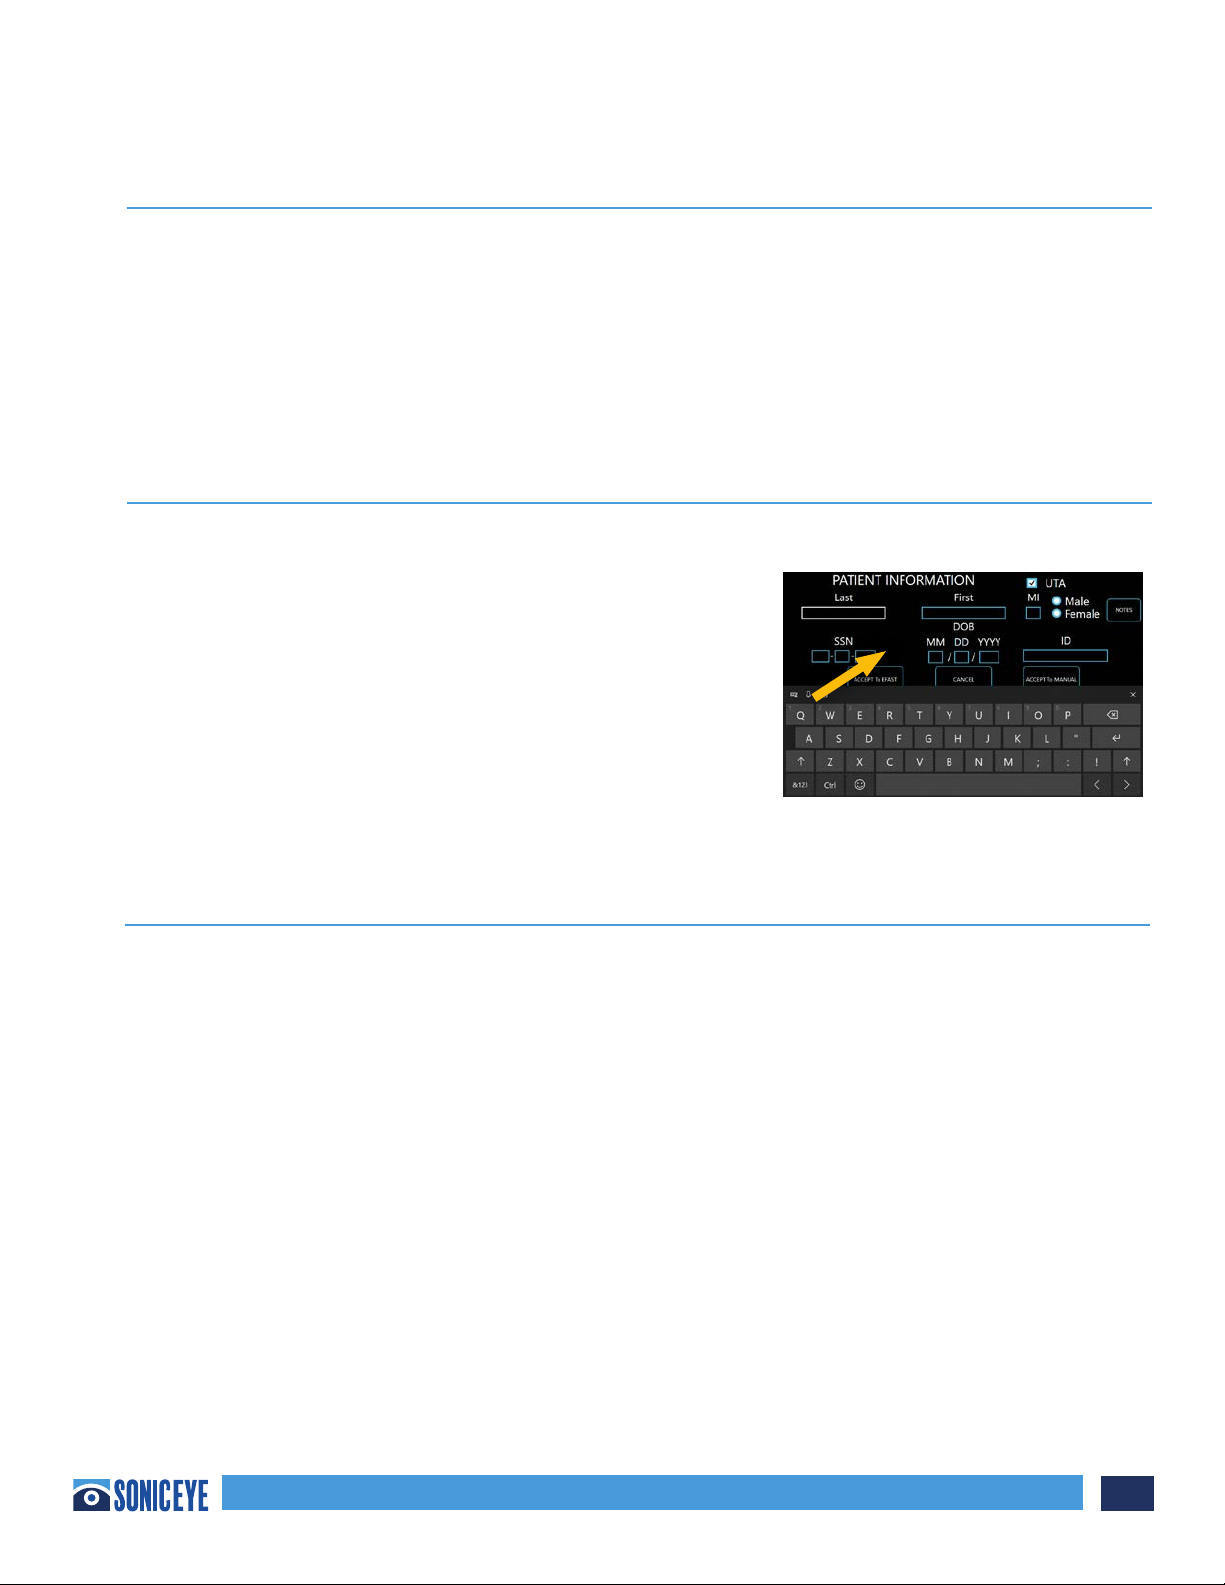
ONE TAP on the Patient ICON located on the HOME SCREEN. The Patient screen will appear. TOUCH the
location of the Patient’s Last Name and a key board will appear.
Touch each letter or number as needed. Move to the next
data field. NOT ALL OF THE DATA FIELDS NEED TO BE ENTERED.
If none of the information is available, the UTA button is the
default. Close the keyboard using the “X”. and then ONE TAP
“Accept eFAST”. Or “Accept Manual” and the system will go to
the desired exam. The Patient record is complete, and all saved
images will be assigned to this Patient or UTA by date and
time.. (Figure 3.1)
CAUTION When scanning several patients make sure to create
a new patient record for each.
SCANNING:
General Scanning Recommendations:
Before each use:
• Inspect the probe (see Inspecting the probe- Chapter 5).
CAUTION If any damage is found on the probe or its cable, DO NOT use SonicEye.
After each use:
• Inspect the probe (see Inspecting the probe – Chapter 5)
• Clean the probe (see Disinfection – Chapter 5).
Use of Gel:
To assure optimal transmission of energy between the patient and the probe, a conductive gel must
be applied on the probe lens.
WARNING Do not apply gel to the eyes. If there is gel contact to the eye, flush eye thoroughly with water.
The following gels have been tested to be compatible with the Dual-Array probe:
Aquasonics 100; Parker Laboratory, Inc.
Clear Image; Sonotech, Inc.
Figure 3.1

SonicEye® Dual-Array Ultrasound System
16
Chapter 3 - Using SonicEye (continued)
CAUTION Coupling gels should not contain the following ingredients as they are known to cause
probe damage:
• Methanol, ethanol, isopropanol, or any other alcohol-based product
• Mineral and Olive Oils
• Iodine
• Lotions including Aloe Vera, Lanoline, etc.
Other Considerations:
Like most high frequency computing devices, the electronic components of SonicEye will generate
some heat while operating normally and as intended. SonicEye is equipped with safety mechanisms
which will automatically reduce computing speed (frame rate), and ultimately shut down the device,
before any risk of overheating occurs.
SonicEye can be operated by battery or through its supplied chargers. The supplied adapter should
always have a 100-240 ACV plug nearby for connection or disconnection. There is no on/o switch for
the adapters, to completely disconnect them, they must be removed from the outlet.
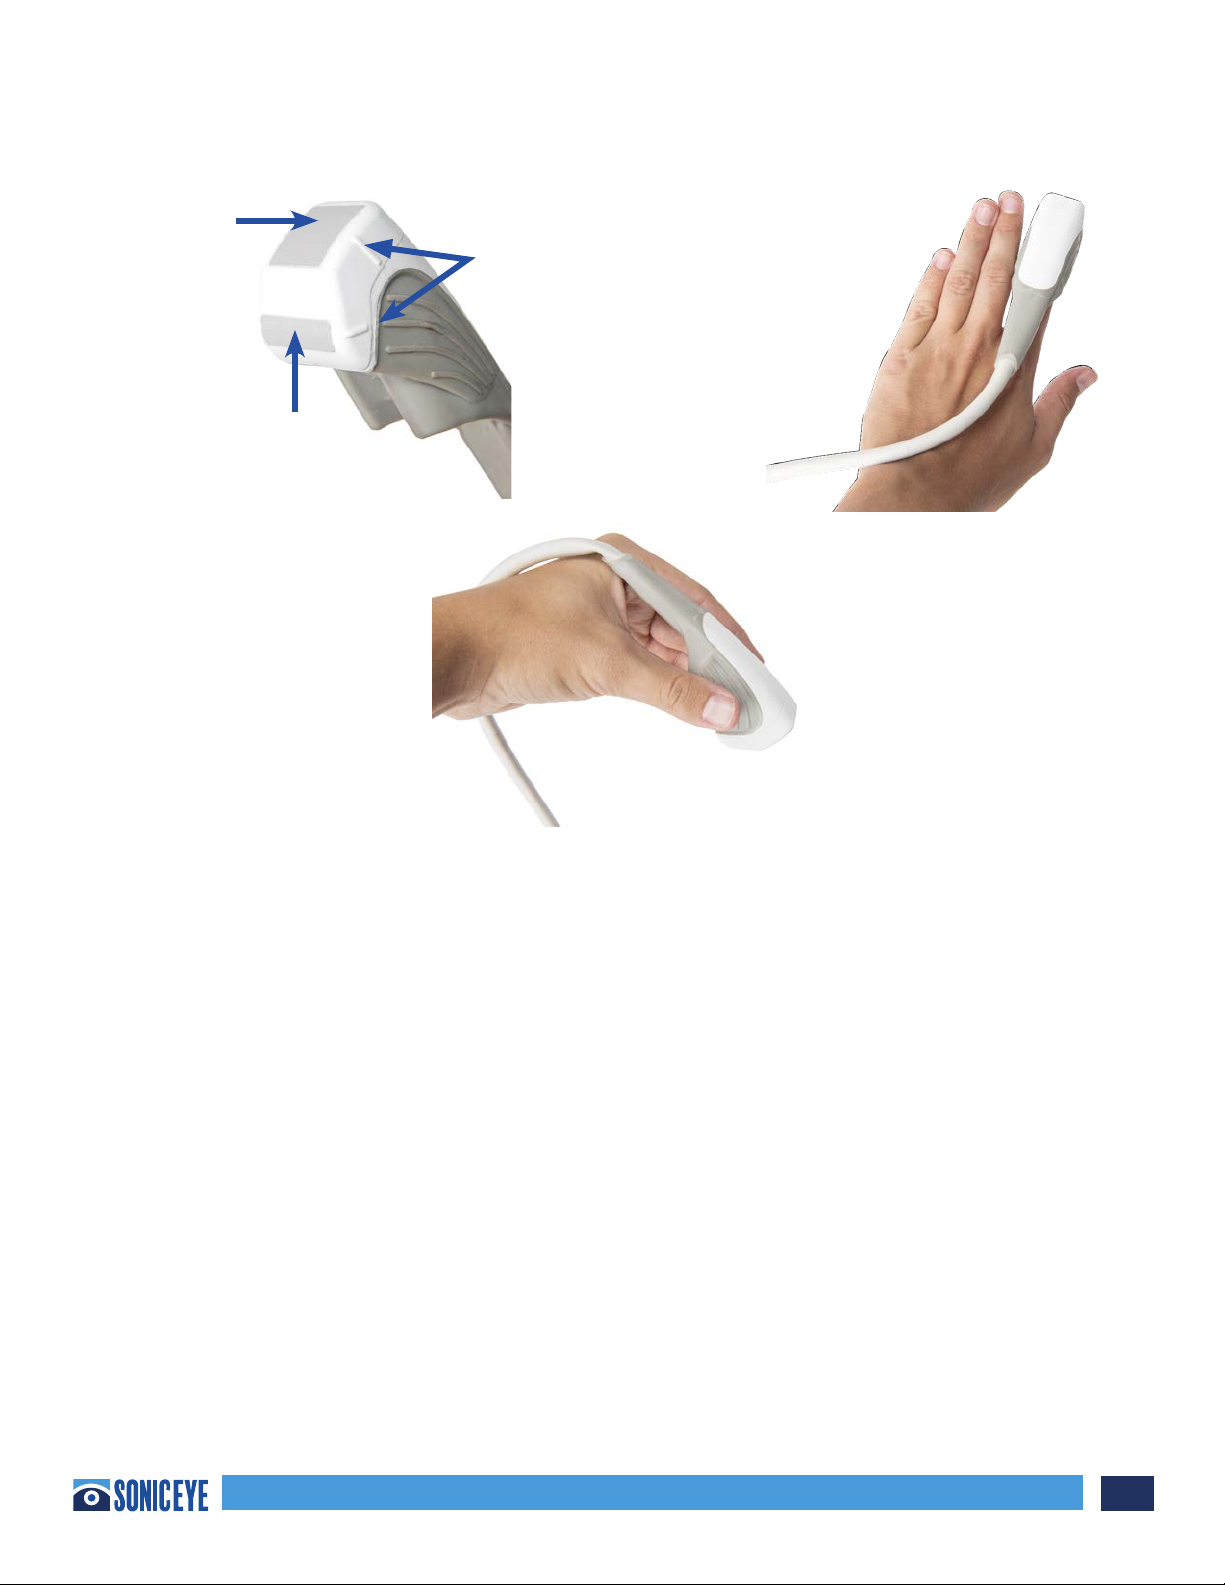
Probe Orientation:
The probe is provided with an orientation notch. This mark correlates to the first channel on the array
and is generally pointed in the direction of the head or right side of the patient.
Probe Orientation:
The probe is provided with an orientation notch for image position, one for each array. These marks
correlates to the icon on the screen during scans.
Probe Overview:
The Dual-Array Probe has two probes built into one. It contains both a low frequency phased
transducer array and a high frequency linear transducer array (Figure 3.2).
Low Frequency Phased Array: The phased array is located on the “fingertip” position of the dual-array.
The phased array is used for deep body scans and best suited to determine internal bleeding when
conducting the eFAST exam. It is designed to function at a low frequency (MHZ) and the ultrasound
wave is transmitted in a triangular shape.
High Frequency Linear Array (HFL): The high frequency linear array is located underneath the
“fingertip” position of the dual-array. The HFL array is used for near field scans and best suited to
determine pneumothorax (PTX) or collapsed lung when conducting the eFAST exam. Because of its
near field clarity, it is also suited for musculoskeletal (MSK) evaluations, biopsies, line placements, etc.
It is designed to function at a relative high frequency (MHZ) and the ultrasound wave is transmitted in
a rectangular shape.
e probe is ergonomically designed to be gripped like a traditional probe or stabilized using the nger
insert. e nger insert is elastomeric and will conform to 95% of nger diameters.
SonicEye® Dual-Array Ultrasound System 17
Chapter 3 - Using SonicEye (continued)):
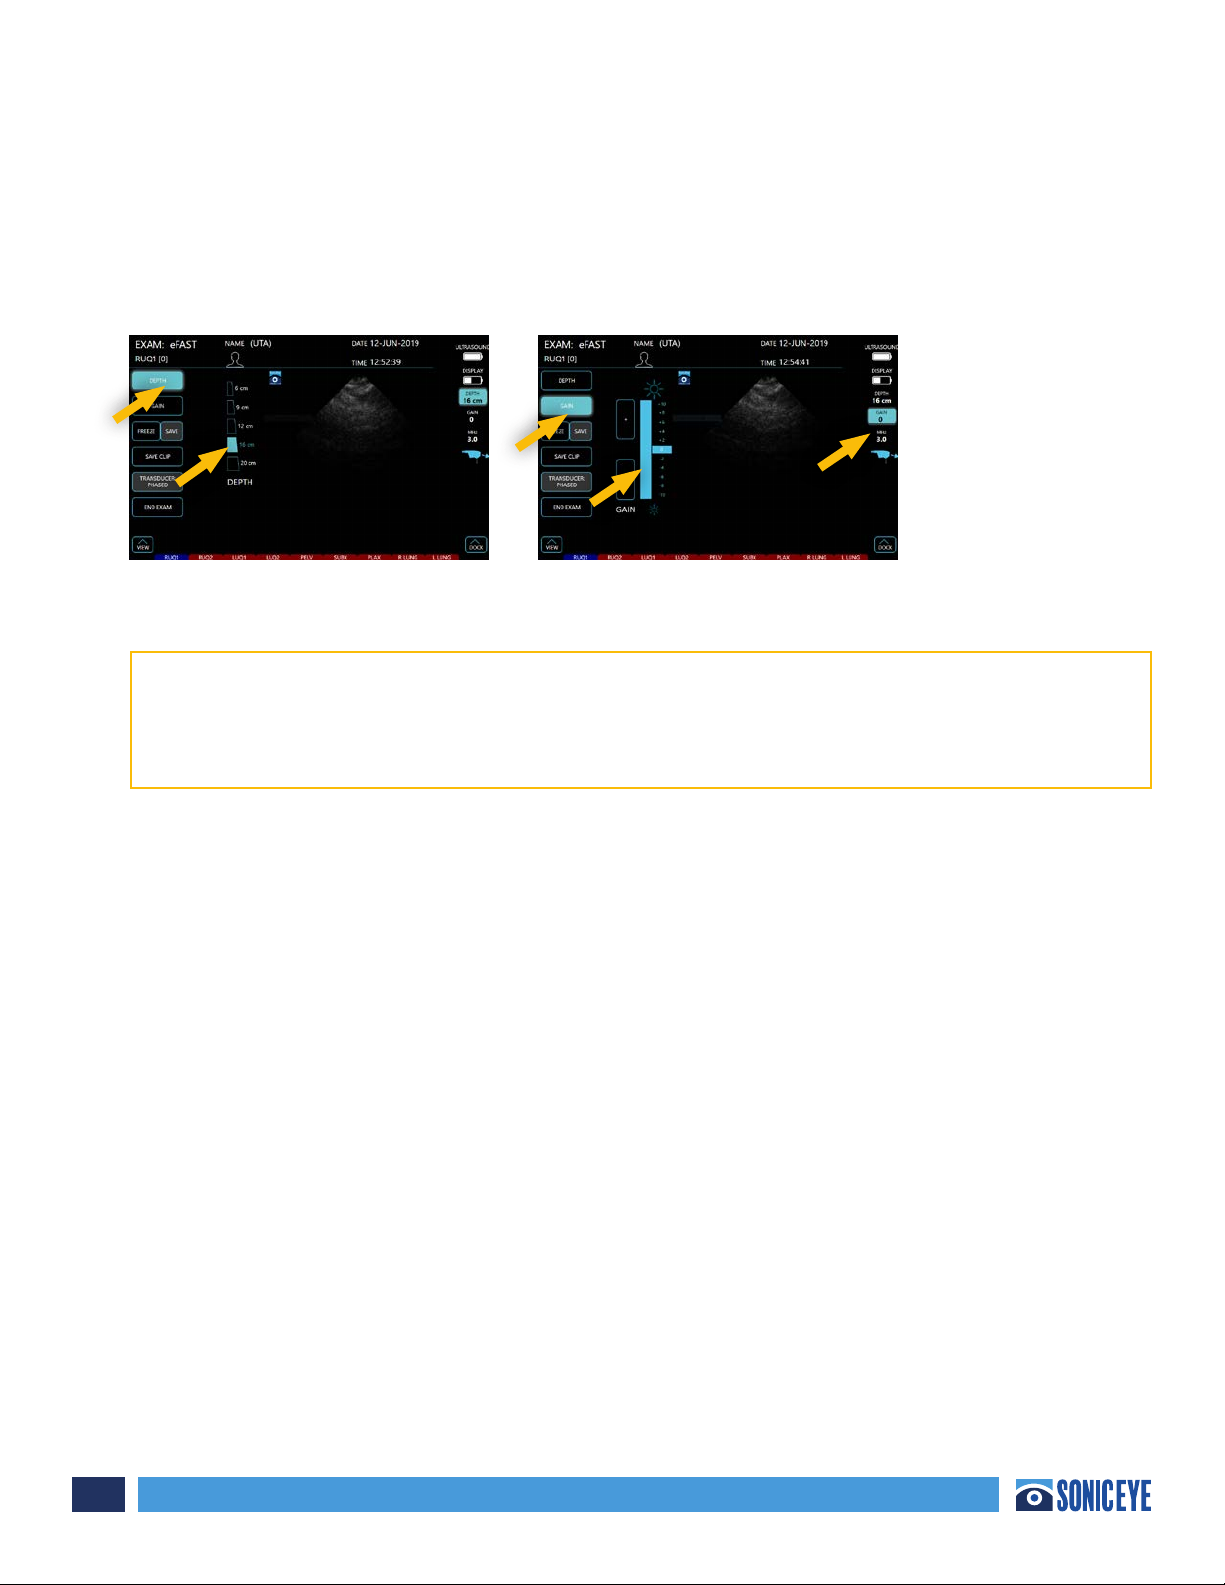
Pre-sets:
SonicEye comes with already established pre-sets for frequency, depth and contrast (brightness).
Only Depth and Contrast may be adjusted by the user within an eFAST exam. In Manual scanning, the
transducer can be selected by the user.
Array Type: During the eFAST exam the SonicEye system automatically pre-sets which array is in use
depending upon the exam location. For all internal bleeding exams (Views 1-7) the Phased Array will
be used. For PTX, the HFL will be used (Views 8-9). The Array in use is also shown on the Probe ICON
on the screen. Manual Mode will always begin with the Phased Array.
Frequency: The Phased or 90 sector Array is pre-set at 3.0 MHZ with a footprint of 18 mm X 18
mm and the High Frequency Linear Array is set at 7.5 MHZ with a footprint of 7 mm X 22 mm. The
frequencies are indicated on the operating screens during an exam (Figure 3.3a and b). THERE IS NO
FREQUENCY ADJUSTMENT.
Depth Default Setting and Adjustment: In eFAST Mode, depth is pre-set for the phased array at 16
cm (with the PLAX pre-set at 12 cm) and the HFL is pre-set at 4 cm. These can then be adjusted
accordingly by ONE TAP on the “Depth” button and then ONE TAP on the desired depth. (Figure 3.3a).
In Manual Mode, depth is pre-set for the phased array is at 12 cm and the HFL is pre-set at 4 cm.
Reference
Marks
High Frequency
Linear Array
Low Frequency
Linear Array
Stabilize with finger inserted in
elastomeric finger tip
or
Hold similar to
traditional probes
Figure 3.2
SonicEye® Dual-Array Ultrasound System
18
Chapter 3 - Using SonicEye (continued)
The Dual-Array Probe has two probes built into one. It contains both a low frequency phased Gain
Default Setting and Adjustment (Image Brightness/Contrast): Regardless of which mode the system
is in, gain is pre-set for both arrays at “0”. These can then be adjusted accordingly by ONE TAP on the
“Gain” button and then ONE TAP on the increase or decrease position. (Figure 3.3b)
BATTERY LEVEL INDICATORS:
There are two battery level indicators on both the eFAST and Manual screens in the upper right
corner. When the Image processor goes below 25% it will blink (Figure 3.3b). There is also a
battery level light on the Image Processor as well.
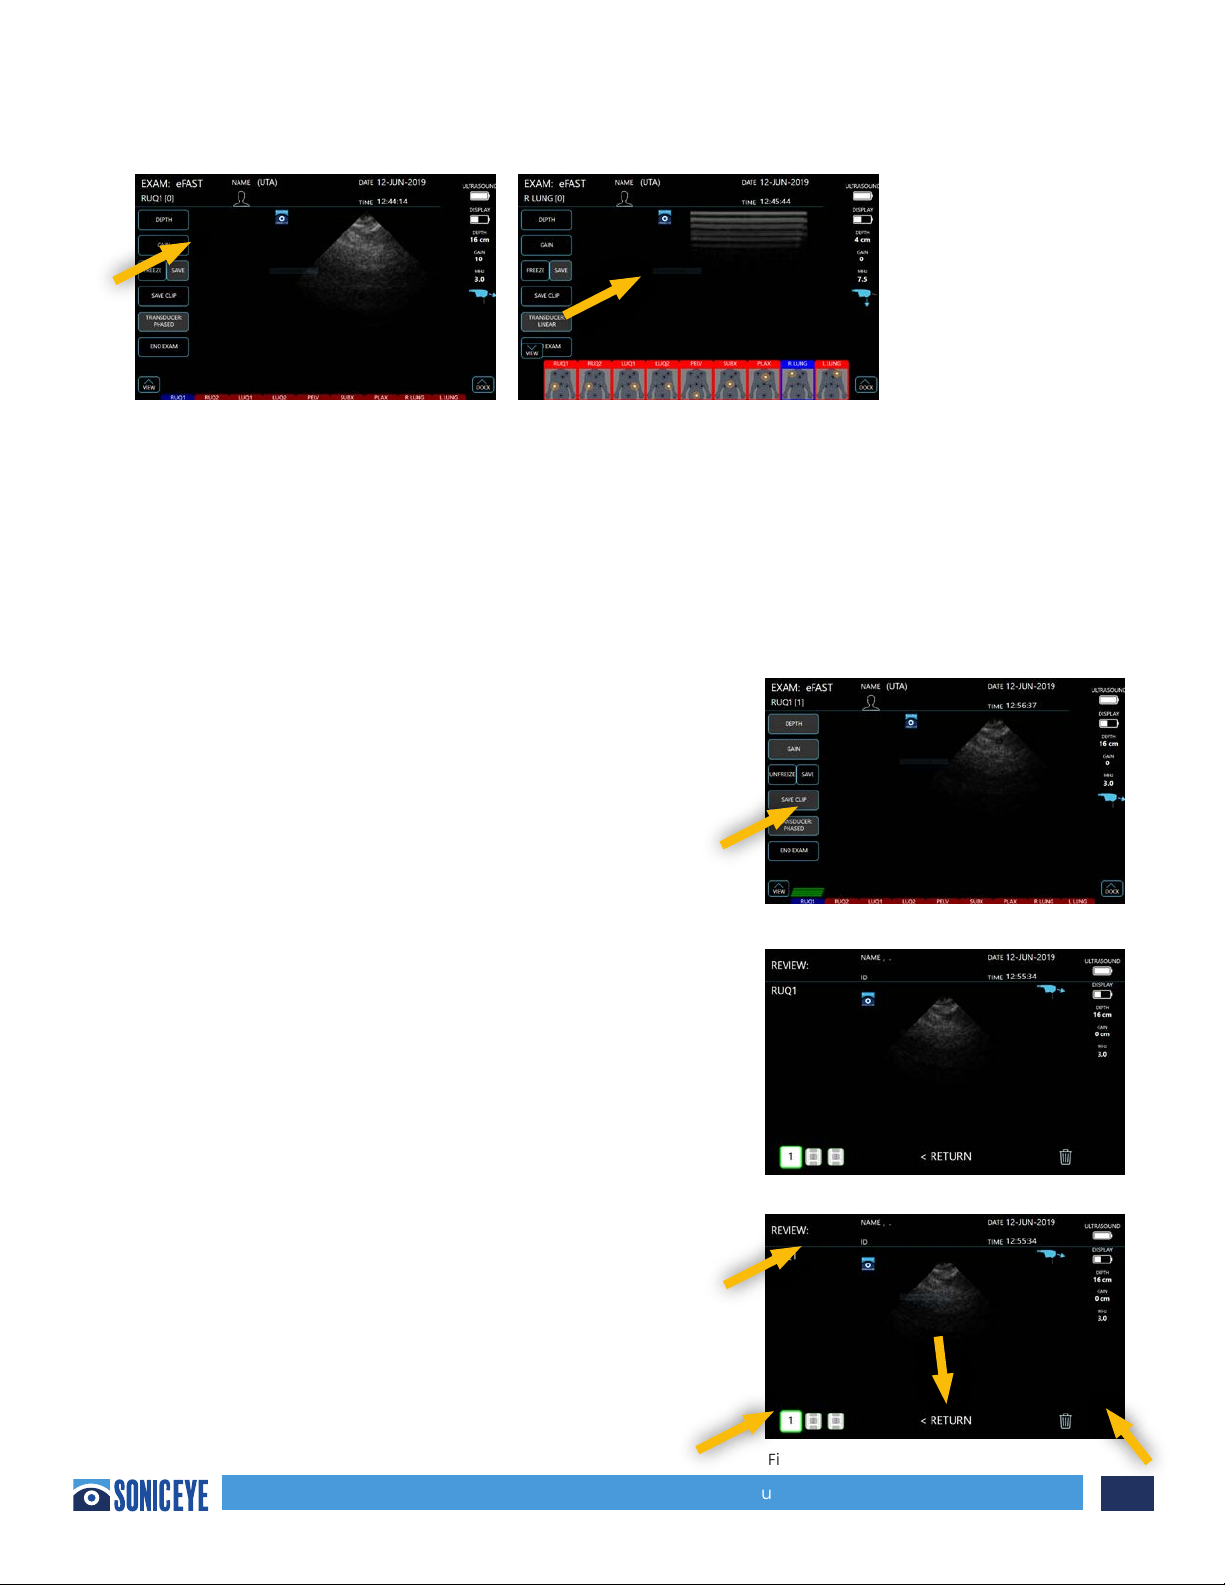
Scanning in Guided eFAST Exam Mode:
The guided eFAST exam interface option provides novice sonographers with an interactive graphical
display of the windows required to complete the eFAST exam. Upon selecting this mode, the machine
will default to the Phased Array probe, and the Right Upper Quadrant #1 (“RUQ1”) window will be
highlighted in BLUE (Figure 3.4a). The user can proceed with scanning the right upper quadrant or, if
desired, select the anatomical region which he/she prefers to scan first. The BLUE window represents
the current window in which the user is scanning. RED windows represent windows in which the
user has not saved images or clips. To advance to the next desired window, the user must select the
window to be scanned. Selecting the lung windows will automatically activate the HFL for scanning.
(Figure 3.4b). Observations can be added by ONE TAP to the Patient icon and returning to the Patient
Record (Figure 3.4a)
**Note 1 – RUQ1 and RUQ2 windows are included to prompt the user to ensure they are considering
the two primary potential spaces where free fluid to collect. These include the hepatorenal interface
(Morison’s Pouch) and the paracolic gutter (tip of liver, inferior pole of kidney)
**Note 2 – LUQ1 and LUQ2 windows are included to prompt the user to ensure they are considering the
two primary potential spaces where free fluid to collect. These include the splenorenal recess and
space between diaphragm and spleen.
Figure 3.3a Figure 3.3b
SonicEye® Dual-Array Ultrasound System 19
Chapter 3 - Using SonicEye (continued)):
Saving Images – Still images can only be saved after the image is frozen. To freeze an image while
scanning your target structure, ONE TAP the “Freeze” button. While the image is frozen, the user can
opt to “Unfreeze” the image and continue scanning, or ONE TAP to “Save” the image. Once an image
is saved in a window, that window will turn to GREEN (Figure 3.5) alerting the user that an image was
saved and that window has been completed. The number of images stored in each window will be
annotated at the top left of the window. A maximum of 4 still images can be saved in each window.
Saving CineLoops or “Clips” – While scanning, the user
can select the “Save Clip” tab. Once the “Save Clip” tab
is selected, the machine will then record the following 3
seconds of scanning and automatically store the clip in
the window in which you are scanning. The number of
video clips stored in each window will also be displayed
on the window. See Figure 3.6
Reviewing Images – The user may review the stored
images at any time during an exam. To do so, the user
can open the eFAST window bar, select which window’s
images is to be reviewed. The available images will pop
up and allow the user to select which image to review
(Figure 3.7).
Once an image is selected, it will be displayed on the
main screen (Figure 3.8). Users can opt to discard it
by ONE TAP the “trash” icon or select another image
within that window to review. When finished reviewing,
users may return to scanning by ONE TAP of the “return”
option.
Figure 3.4a Figure 3.4b
Figure 3.6
Figure 3.7
Figure 3.8
SonicEye® Dual-Array Ultrasound System
20
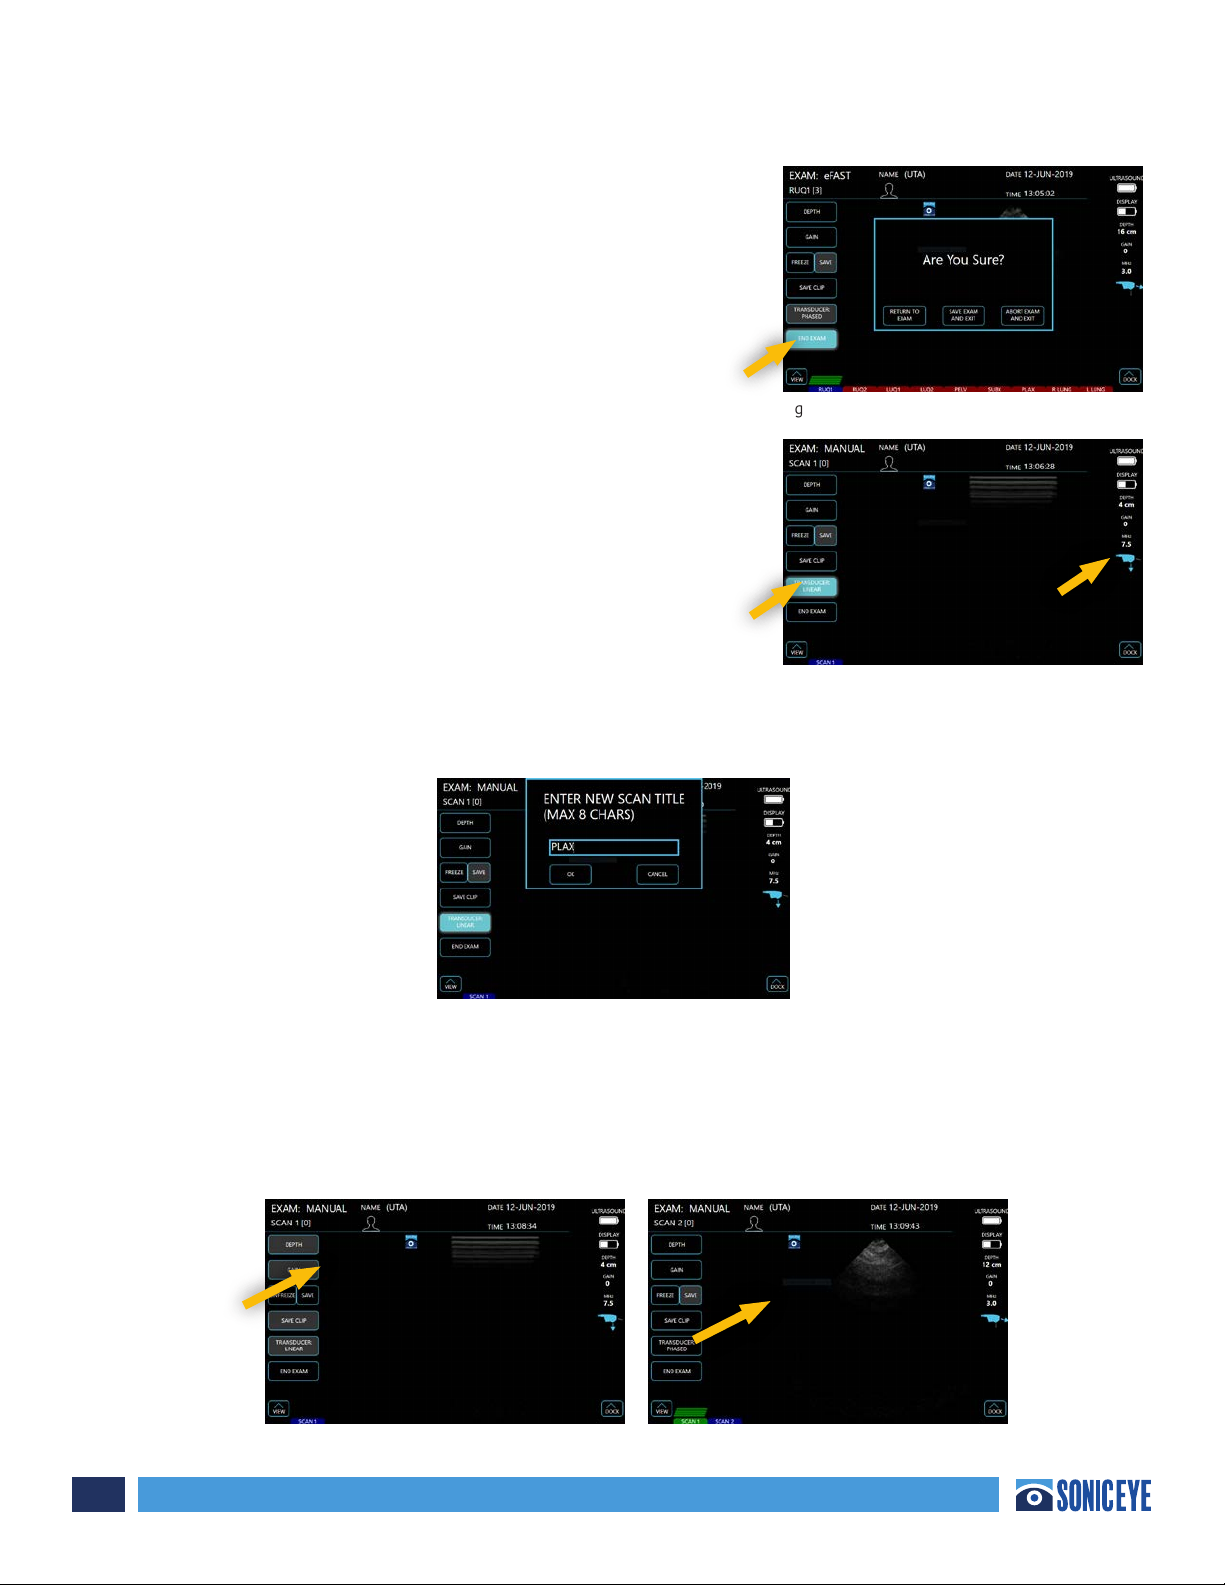
Chapter 3 - Using SonicEye (continued)
When the user has completed the exam, ONE TAP the “End
Exam” button. This will prompt a pop-up window that will
allow the user to confirm the exam is complete, and provide
options to continue the exam, save and exit, or abort the
exam and exit, which will result in the exam not being
saved. (Figure 3.9)
Scanning in Manual Mode:
Manual Mode option oers the user the flexibility to
perform exams at his/her own discretion. Depth and gain
can be modified in the same manner noted in “Scanning
Section” previously. The user can select which transducer is
active by ONE TAPPING the transducer tab (Figure 3.10). The
transducer that is currently active will be annotated by the
icon at the right of the image.
Labeling the Scan in Manual Mode – The title of each
window will default to “scan #” but can be renamed by
Taping the Scan Icon, which prompts a pop-up keyboard which allows the user to title each window as
desired (less than 8 characters). Figure 3.11. A maximum of 1 still images or clip can be saved in each
scan or view window.
Saving Images – Still images can only be saved after the image is frozen. To freeze an image while
scanning your target structure, ONE TAP the “Freeze” tab. While the image is frozen, the user can
opt to “Unfreeze” the image and continue scanning, or ONE TAP to “Save” the image. Once an image
is saved, it will be displayed at the bottom of the screen within a panel of windows. The number of
images stored in each window will be annotated at the top left of the window. (Figures 3.12a and
3.12b)
Figure 3.9
Figure 3.10
Figure 3.12a Figure 3.12b
Figure 3.11
This manual suits for next models
2
Table of contents
Popular Medical Equipment manuals by other brands

PercuVision
PercuVision DirectVision Technical reference manual

Orliman
Orliman 2010-S INSTRUCTIONS FOR USE AND PRESERVATION

baxter
baxter artis Operator's manual

Aulisa
Aulisa Guardian Angel GA2000 Series Instructions for use

LINET
LINET Multicare X Instructions for use and Technical description

Omron
Omron LD-60 user guide


