ab Aqua Medic mV-Computer User manual

1
Operation Manual
for the
mV Computer-Set
With the purchase of this digital measuring and regulating equipment you have selected a top
quality product. It has been specifically designed for aquaristic purposes.
With this unit, you can continuously measure and control the redox-potential of the water in your
aquarium.

2
1. Basics
he redox-potential or oxidation/reduction potential (ORP) is an electrical value which is a
parameter for the oxidation and reduction processes in the aquarium.
he redox-potential is of special interest in:
- Assessing the quality of sea water in aquariums. he ideal range is between 300 mV and 400
mV. If needed, the range can be increased by injecting Ozone into the protein skimmer. he
higher the value - the higher the percentage of oxidation, the „cleaner“ the water.
- he redox-potential is used in denitrifying filters to check the acidity. he ideal values are
between -300 mV and -100 mV.
- -In swimming pools the redox-potential can be used for sterilisation by regulating the amount
of chlorine added by maintaining +700 mV.
2. Features
AB Aqua Medic Computers are microprocessor controlled units. hey are safe, reliable and meet all
the requirements of professional measuring and regulating devices.
he AB Aqua Medic mV-Computer is supplied with a redox probe and standard solution. he
ozonizer ( not included) can be connected to the female side of the main power plug.
Technical Data
Micro-processor controlled
Power requirements 230 V/50 Hz
Output relay-controlled 5 A, 1000 W
Measurement range -1999 up to +1,999 mV
Adjustment range -1000 up to +1000 mV
Adjustments on/off
Hysteresis adjustable
Adjustment directions
adjustable
- upwards, with Ozone filtration mV-value may increase
- downwards by adding reducuing sustances
Redox probe Plastic shaft (Polysulfon), refillable
Data memory (power loss protection)

3
3. Description of the front panel
10
4. Installation
1. Connect to 230 V power source.
2. Connect the mV-probe.
he unit is now ready for programming
1. Digital display
2. Prog/Enter- Button
3. LED for High/Low- Display
4. Set-Button
5. LED for Output-Display
6. „+“ and „ -“ - button
7. High/Low- button
8. Hysteresis – adjustion
9. connection for Elektrode
10. connecting plug
mV Computer
Out
High
Low
Low
High Prog
3 4 5
QUA
D
QUA
D
1
2
3
4
5
6
7
8

4
5. Adjustment of the control direction
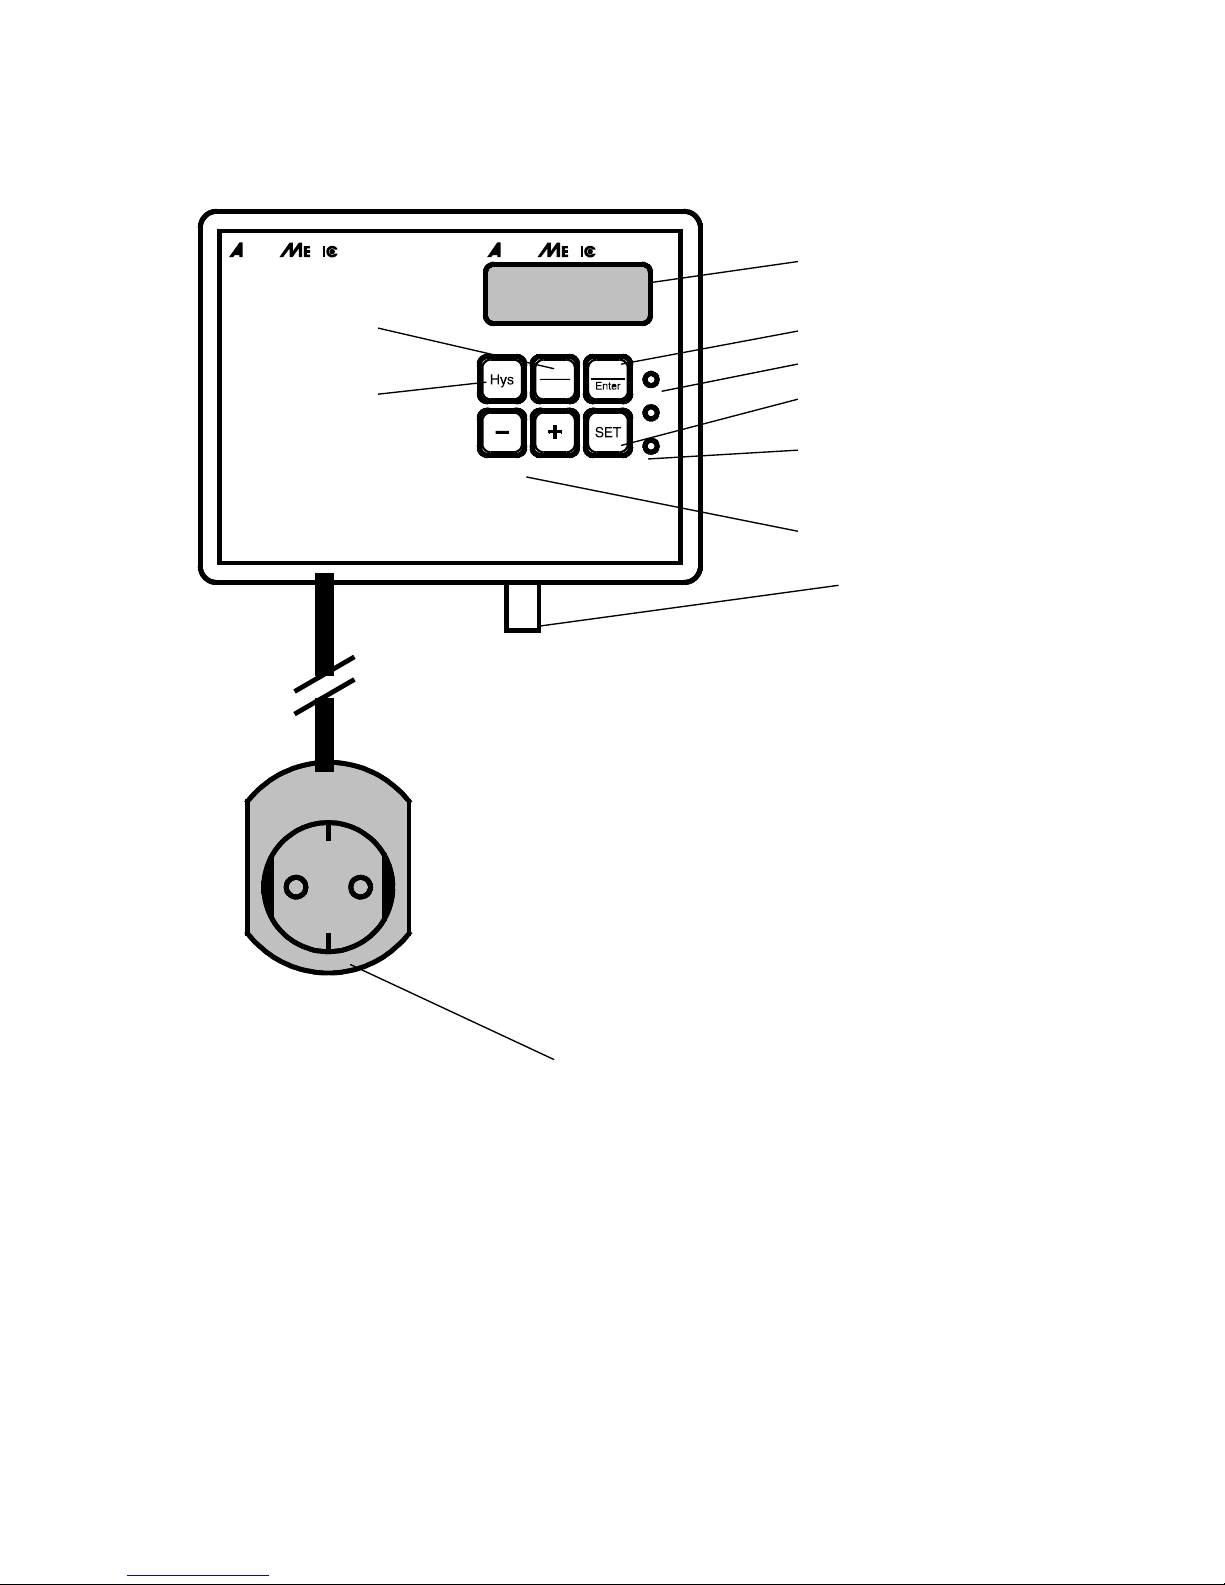
he status of the control direction is show ant the LEDs at the side(3):
Low – an adjusted minimum set point is controlled by the addition of an oxidising agent ( e.g.
ozone). he direction of control is upwards. his is the standard mode for control of the ORP with
Ozone in marine aquariums or for the control of a Nitratereductor with air or a dosing pump.
High – an adjusted maximum set point is controlled by the addition of an reducing agent. he
direction of control is downwards. o change the control mode between High and Low, press the
Prog/Enter and the High/Low button simultaneously. he actual mode is shown by the LEDs (3).
6. Adjusting the set point
o adjust the set point, press the Prog/Enter and the SE buttons simultaneously. he adjusted set
point is now shown on the display – flashing. It can be changed with the + and – buttons. By
pressing the Prog/Enter button again, the set-point is saved. and the display switches back to the
actual value.
he hysteresis should be between 5-10 mV. If it is too low, the computer will switch on and off in a
very short time. If it is too high, the accuracy will be bad.
7. Sensor calibration
he measurement of the redox-potential is an absolute measurement of voltage. he mV-
Computer does not need to be calibrated. Differences may be caused by the electrode. hey can be
checked with the included standard solution. If the differences are small ( 10 – 15 MV) the probe
can be still used. If the differences are higher, the probe must be cleaned, refilled or replaced.
For continuous measurement of the redox-potential, the probe must be securely placed 5 cm below
the surface of the water and the shaft has to be kept dry (we recommend the AB Aqua Mdeic
electrode holder).
he unit is now ready for use. As soon as the redox-potential value falls below or above the desired
adjusted value, the unit activates the power plug. his is indicated by the LED out (5)
8. Probe
he AB Aqua Medic probe is specifically designed to determine the redox-potential in fluid based
solubles. It can be used in the chemical industry, medical areas and in research labaratories.
8.1 Technical Data
Measurement range: 1,000 - +1,000 mV
Sample temperature: 5-60° C, short-term
Connection: BNC-plug
Material: Plastic shaft, Polysulfon, platinum tip
8.2 Measurement/Maintenance
During the measurement the platinum tip must be continuously submerged in the solution.
A new probe or one which has been dry for a longer period must lay in water for at least 24 hours.

5
. Set up for Control the ORP with an Ozoniser
MV- monitoring and control at the aquarium with an Ozoniser.
1. MV computer
2. Ozoniser
3. Membrane air pump
4. Connection plug
5. MV- Elektrode
6. Protein skimmer
7. Aquarium
he pH probe is placed in the aquarium at an dark and well circulated place. he ozoniser is
connected to the MV computer (connection plug, 4) and the set point is adjusted as described,
e.g. at 400 MV. he air is produced by a membrane air pump, pressed through the ozoniser and
directed into the protein skimmer. Here, the small bubbles produce the foam and remove the
organics with the aid of the ozone. If the desired ORP value in the aquarium is reached, the
ozoniser is switched off. ake care, that all the ozone is used in the protein skimmer and no
residual ozone escapes into the air or the water . It can be detected by its strong smell.
10. Malfunctions
- he unit indicates false values --> clean the probe.
- he redox-potential probes have a limited lifespan (1-3 years).
11. Warranty
Should any defect in material or workmanship be found within twentyfour months of the date of
purchase AB Aqua Medic GmbH undertakes to repair or, at our option, replace the defective part
free of charge – always provided the product has been installed correctly, is used for the purpose
that was intended by us, is used in accordance with the operating instructions and is returned to us
carriage paid. he warranty term is not applicable on the all consumable products.
Proof of Purchase is required by presentation of an original invoice or receipt indicating the dealer’s
name, the model number and date of purchase, or a Guarantee Card if appropriate. his warranty
may not apply if any model or production number has been altered, deleted or removed,
unauthorised persons or organisations have executed repairs, modifications or alterations, or
damage is caused by accident, misuse or neglect.
mV Com pute r
Out
High
Low
Low
High Prog
Luft
Air
1
23
4
567
Table of contents
Popular Medical Equipment manuals by other brands

Getinge
Getinge Arjohuntleigh Nimbus 3 Professional Instructions for use

Mettler Electronics
Mettler Electronics Sonicator 730 Maintenance manual

Pressalit Care
Pressalit Care R1100 Mounting instruction

Denas MS
Denas MS DENAS-T operating manual

bort medical
bort medical ActiveColor quick guide

AccuVein
AccuVein AV400 user manual