Sonosax MINIR82 User manual

PROFESSIONAL PORTABLE
MULTITRACK RECORDER
SONOSAX
MINIR82
USER INTERFACE
Firmware version 4.2
Audio equipment manufacturer
SONOSAX SAS S.A.
Ch. de la Naz 38
1052 Le Mont s/Lausanne
Switzerland
Tél: +41 21 651 0101
Fax: +41 21 651 0109
Web: www.sonosax.ch / www.sonosax.com
Edition: May 2012

SONOSAX MINIR82 - User interface V4.2 Page 2 de 32
TABLE OF CONTENT
1. INTRODUCTION ..................................................................................................................................................3
2. POWERING THE UNIT ........................................................................................................................................3
3. PRINCIPLE OF OPERATION ..............................................................................................................................4
3.1.1 ARCHITECTURE - AUDIO PATH......................................................................................................................... 5
3.2 RECORDER MODE..............................................................................................................................................6
3.3 PLAYER MODE....................................................................................................................................................7
3.3.1 Contextual menu in Player mode .......................................................................................................................... 9
3.4 ADJUSTING THE HEADPHONE LEVEL...........................................................................................................10
3.5 SOLO MONITORING .........................................................................................................................................10
4. CONTEXTUAL MENU........................................................................................................................................11
4.1 MONITORING.....................................................................................................................................................12
4.1.1 Saving the configurations [PRESET] .................................................................................................................. 12
4.2 LAST TAKE........................................................................................................................................................13
4.3 TAG LAST TAKE ...............................................................................................................................................13
4.4 UNIT STATUS ....................................................................................................................................................14
4.5 SETUP (CONFIGURATION'S MENUS) .............................................................................................................15
4.5.1 MENU's Tree Structure ....................................................................................................................................... 16
4.5.2 ROUTING SETTING........................................................................................................................................... 17
4.5.3 RECORD SETTINGS ......................................................................................................................................... 18
4.5.4 INPUTS SETTINGS............................................................................................................................................ 20
4.5.5 TIME CODE SETTINGS ..................................................................................................................................... 21
4.5.6 USER SETTINGS ............................................................................................................................................... 22
4.5.7 SYSTEM SETTINGS .......................................................................................................................................... 22
4.6 BROWSE FILES.................................................................................................................................................25
4.7 METADATA........................................................................................................................................................26
4.8 SWITCH OFF .....................................................................................................................................................27
5. MANAGING THE MINIR82................................................................................................................................28
5.1.1 Formatting the Hard Disk and CompactFlash card ............................................................................................. 28
5.1.2 Disk fragmentation .............................................................................................................................................. 28
5.1.3 USB 2.0 connection ............................................................................................................................................ 28
5.1.4 Alarms................................................................................................................................................................. 29
5.1.5 Errors handling.................................................................................................................................................... 29
5.1.6 Software up-date procedure................................................................................................................................ 30
6. APPENDIX..........................................................................................................................................................31
Example of a USER SETTING file ......................................................................................................................31
Organization on the HD and the CF Card ...........................................................................................................32

SONOSAX MINIR82 - User interface V4.2 Page 3 de 32
1. INTRODUCTION
This manual describes the user interface, the operating instructions and all functionalities related to the
Firmware version 4.2
2. POWERING THE UNIT
External PSU: use only the optional SONOSAX power supply.
Batteries: use only rechargeable NiMh batteries; standard dry cell batteries can not safely power the
MINIR82. Insert batteries as shown in the picture below.
External DC supply: The MINIR82 can also be supplied from an external suitable DC source from 5 to 9 V.
A 2-meter long cable with the DC plug is available, part number V980010. For use with high capacity 12V
battery, a 9V to 18V DC/DC converter is available.
Powering On
Press simultaneously the UP and DOWN keys to turn ON the MINIR82
A boot up screen is displayed for approx. 2 seconds and shows the following information:
•The remaining free available space on the hard disc and on the Compact Flash card
•A power indication of either the batteries or the external PSU by means of a bar graph
•Date and Time
•The firmware version

SONOSAX MINIR82 - User interface V4.2 Page 4 de 32
3. PRINCIPLE OF OPERATION
User Interface
Principle of operation
Status
The MINIR82 status is shown by means of the green or red "status" led's and the screen display. The
following status scenarios are possible:
•RECORD READY the Red LED is flashing, the MINIR82 is ready to start recording
•RECORDING the Red LED lights On steady, confirming that a recording is in progress.
•PLAYING the Green LED lights On steady, a take is being played
•PLAYER PAUSE the Green LED flashes, the Take being played is paused at current location.
•PLAYER STOP a Take is loaded ready to be played, no LED lights on nor flashes
Clipping LEDs
The "Left Channel" and "Right Channel" Led's shows two particular statuses that are either:
•Limiters: either the Left or the Right LED lights On independently when the Microphone Input signal
reaches a level of 2.5dB before clipping, thus activating the Limiter.
•Clipping: the Input signal is too high on the microphone A/D Converter, both Left and Right LED's
light On together
On screen Display and Keys
The main working page (Tracks Monitoring) displays the 8 Peak Meters.
The meter range starts at –72dBFs and goes up to 0dBFs in 1dB steps from –72dB up to –24dB
and in 0.5dB steps from –23.5dB up to 0dB.
A reference line at -9, -12, -18, or –20 dB can be displayed on screen (see configuration's menu)
The bottom line of the display shows the functions of the Keys. Conventionally, the UP and DOWN keys are
used to change the parameters, the Right key is used to "Select" and the Left Key to "Cancel".
A single Arrow symbol denotes that an action is achieved by briefly pushing the key.
A double Arrow symbol means that the key must be pushed longer to validate the action.
Display 10 lines x 17 characters
UP Key
RIGHT Key
DOWN Key
Light sensor
Right Channel LED
Left Channel LED
Red LED
LEFT Key
Green LED

SONOSAX MINIR82 - User interface V4.2 Page 5 de 32
3.1.1 ARCHITECTURE - AUDIO PATH
The MINIR82 offers12 physical Input channels, up to 8 of these input channels can be used at the same
time. These 8 input channels are configured per pair:
•1, 2: Microphone input or AES 1
•3, 4: Line input or AES 2
•5, 6: AES 3
•7, 8: AES 4
The routing Matrix allows routing and mixing any input channel to any of the 10 tracks. The first 8 tracks are
dedicated for the hard disc (HD) and the 2 additional tracks for the Compact Flash card (CF).
The Monitoring can be configured by the user to listen any combination of these 10 tracks. However, the
display shows only the meters of the 8 hard disk tracks
Channel 1
Channel 2
Channel 3
Channel 4
Channel 5
Channel 6
Channel 7
Channel 8
Mixer coeficients
Left
Line out config
Monitor config
Right
Bits per sample
HDD CF
Modulometers values
Monitor
Wave encoder
FAT32 / ATA layer
Mixer
Tracks
1 2 3 4 5 6 7 8 9 10
Modulo-
meters
Left
Right Line out

SONOSAX MINIR82 - User interface V4.2 Page 6 de 32
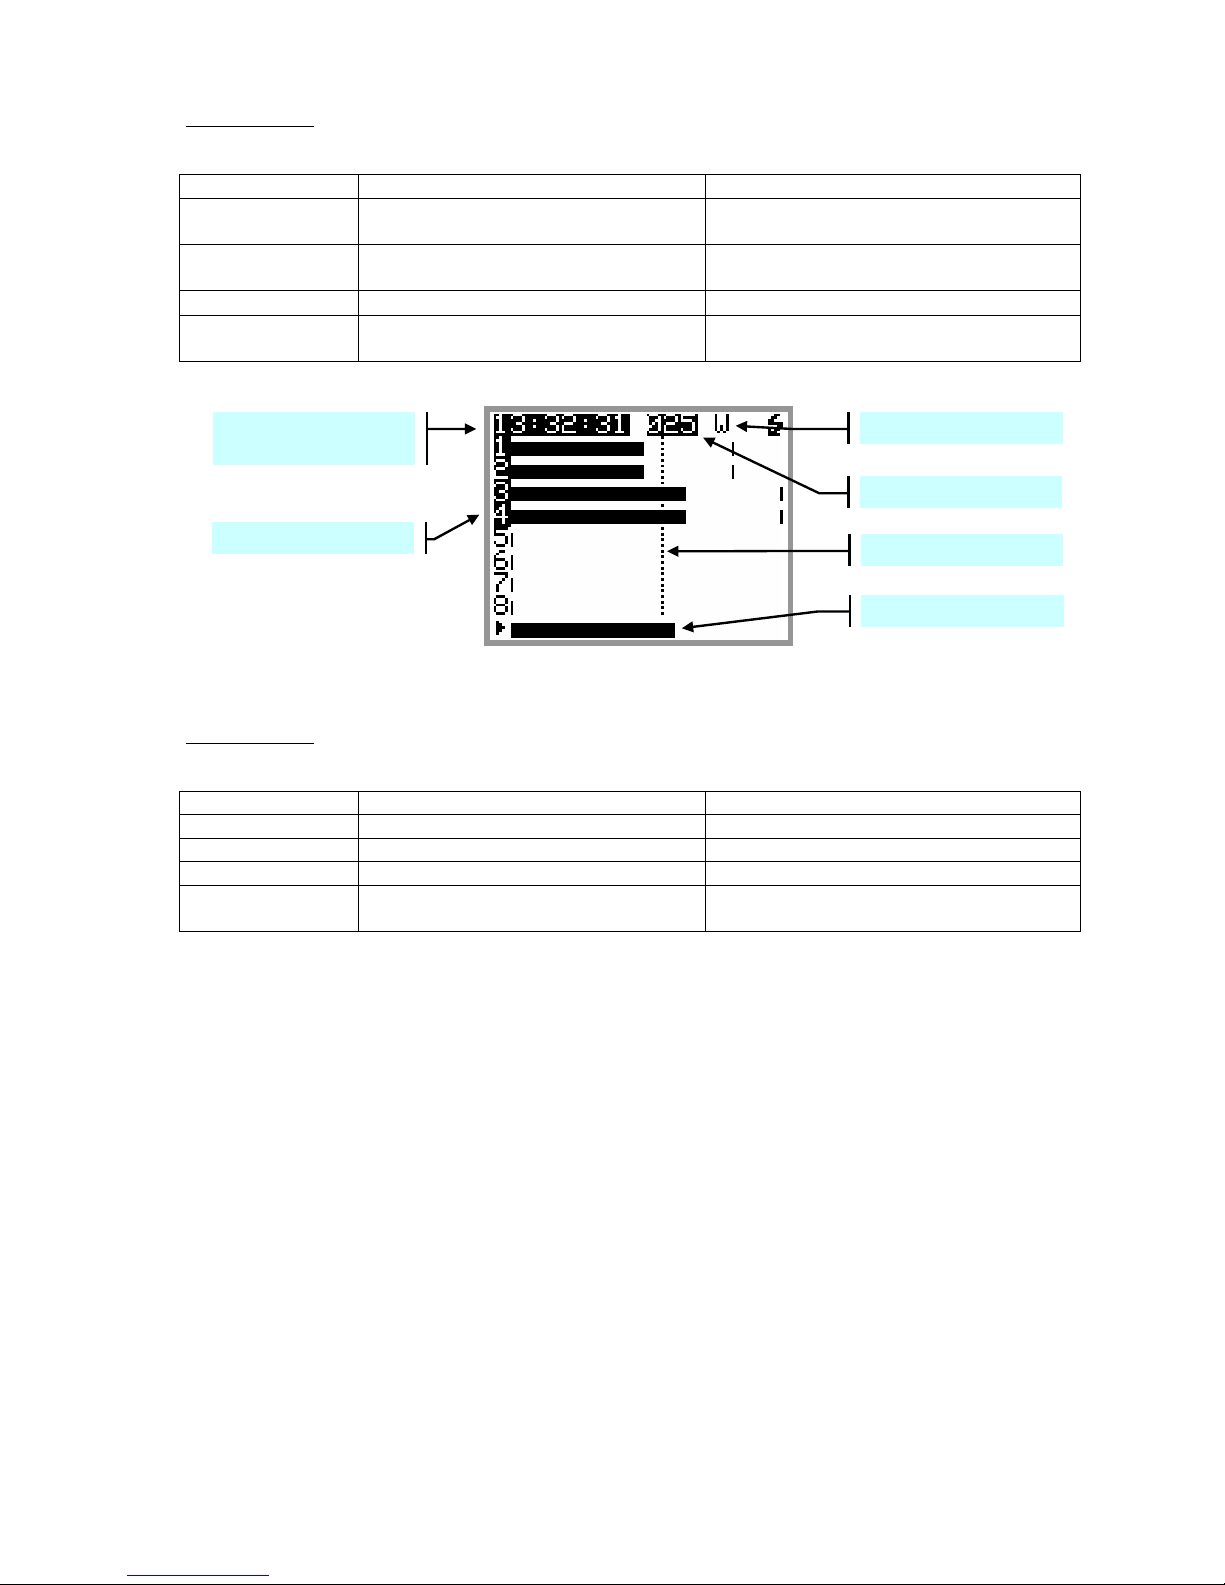
3.2 RECORDER MODE
The [TRACK MONITORING] page is the main page displayed by the MINIR82 while in Recorder mode. The
numbering from 1 to 8 is always displayed and corresponds to the tracks recorded on the hard disk. The
number of each active track (assigned in the matrix) appears in reverse video.
RECORD READY
Record Ready: the red led is flashing
Key Short pressure Long pressure
LEFT Reduce the volume by step of 1 dB Reduce the volume continuously
RIGHT Increase the volume by step of 1 dB Increase the volume continuously
UP Call the SOLO MONITORING page Call the main contextual menu
DOWN Start Recording
While Recording: the red led lights steady
Key Short pressure Long pressure
LEFT Reduce the volume by step of 1 dB Reduce the volume continuously
RIGHT Increase the volume by step of 1 dB Increase the volume continuously
UP Call the SOLO MONITORING page Call the main contextual menu
DOWN Add an INDEX** STOP Recording
** INDEX = New TAKE: pressing the DOWN key briefly while recording will create a new Take; the Take
number is automatically incremented by 1.
Peak Meters
TimeCode or Program
Time of the TAKE
Active Tracks (armed)
Inactive Tracks
Volume control -
Reference level
TAKE number
Action of the Keys
Indicates Battery charge or
external PSU
Volume control +

SONOSAX MINIR82 - User interface V4.2 Page 7 de 32
3.3 PLAYER MODE
When a TAKE is loaded either from the [LAST TAKE] menu or from the [BROWSE FILE] menu, the MINIR82
switches to PLAYER mode and automatically reconfigure the system with the same parameters as set
during the recording of that particular Take; Routing - Monitoring etc.
The main screen of the Player is very similar as this of the Recorder. Due to space limitation the bottom line
does not always displays the action of the Keys; posted information's depend on the status such as Playing -
Paused or Stopped; however calling additional functionalities such as the [SOLO MONITORING], the
[HEADPHONE VOLUME] or the [CONTEXTUAL MENU] is made as when in Recorder mode.
While Stopped: when the Player is stopped, a pressure to the Left or the Right key calls a new screen
allowing a quick search of previous or next takes stored in the same folder ( such as the folder of the current
working days). The [BROWSE FILE] menu must be used to load a Take stored in a different folder.
STOPPED
Key Short pressure Long pressure
LEFT Call the TAKE Selection Menu -----------------
RIGHT Call the TAKE Selection Menu -----------------
UP ---------- Call the contextual menu
DOWN Start Playing
Searching through the stored Takes does not load the Take in the Player until it is confirmed by pressing the
UP key [LOAD].
The first line displays in reverse video the Time Code or the Program Time and Take nr of the Take which is
loaded in the Player; all other information's posted on the screen are related to the previous or next Takes.
When the selection corresponds to the Take which is currently loaded in the Player, the FileTag, the Scene
name and the Take Nr are posted in reverse video.
TAKE SELECTION
Key Short pressure Long pressure
LEFT Scroll toward Previous Takes
RIGHT Scroll toward Next Takes
UP Load the Take in the Player
DOWN PLAY the currently loaded file
Recorded Tracks Reference Level
Call Next Takes
TAKE number
Tag ( Wild Track )
Call Previous Takes
TimeCode or Program
Time of the TAKE
FileTag
Scene name and Take N
r
Number of recorded tracks
Call Next Takes
TAKE number of the
currentl
y
loaded take
TimeCode or Program
Time of the loaded TAKE
Call Previous Takes
Creation Time
Duration of the Take
Load the Take in the Player
SONOSAX MINIR82 - User interface V4.2 Page 8 de 32
While Playing: the green Led lights steady, a progression bar is displayed at the bottom if the screen; the
left edge represents the beginning of the Take, the right edge represents the end of the Take.
Key Short pressure Long pressure
LEFT Reduce the headphone volume in
1dB steps
Reduce the volume continuously down to
minimum
RIGHT Increase the headphone volume in
1dB steps
Increase the volume continuously up to
maximum
UP Call [SOLO MONITORING] page Call the contextual menu
DOWN PAUSE at current location STOP playing, the cursor jump back to the
start of the take
PLAYING or PAUSED
While Paused: the green Led is flashing. The Left & Right Keys are used for searching within the loaded
Take in Fast Forward or Fast Rewind mode. The progression bar helps locating a specific position.
Key Short pressure Long pressure
LEFT ---------- Rewind at twice the play speed
RIGHT ---------- Forward at twice the play speed
UP ---------- Call the contextual menu
DOWN Start Playing Stop playing, the cursor jump back to the
start of the take
Recorded Tracks Reference Level
Progression bar
TAKE number
Tag ( Wild Track )
TimeCode or Program
Time of the TAKE

SONOSAX MINIR82 - User interface V4.2 Page 9 de 32
3.3.1 Contextual menu in Player mode
When the MINIR82 is in Player mode, the contextual menu differs from the main menu while in Recorder
mode and offers following sub-menus:
PLAYER STOPPED PLAYING or PAUSED
Key Short pressure Long pressure
LEFT Return to previous page ----------
RIGHT Enter the selected sub-menu ----------
UP Scroll the selection upward ----------
DOWN Scroll the selection downward ----------
EXIT PLAYER: exits Player mode and returns to main [TRACK MONITORING] screen in Recorder mode
MONITORING: change the monitoring configuration for the [PHONES] output. These changes affect only
the current playback and do not change the configuration of the Record mode
LAST TAKES: accesses the directory of the last Takes
UNIT STATUS: shows the configuration parameters of the take which is loaded in the player as they were
set during the recording of that take. See also [UNIT STATUS] in the next chapter.
BROWSE FILES: accesses to the browser to search and playback recorded takes, see specific chapter
DELETE TAKE: the audio file(s) of the take is moved to the [TRASH] bin of the media from which the take
was loaded in the player (either the Hard disk or the CF Card)
METADATA: display and edit the metadata of the loaded Take; see specific chapter
SWITCH OFF: turns OFF the unit.
SONOSAX MINIR82 - User interface V4.2 Page 10 de 32
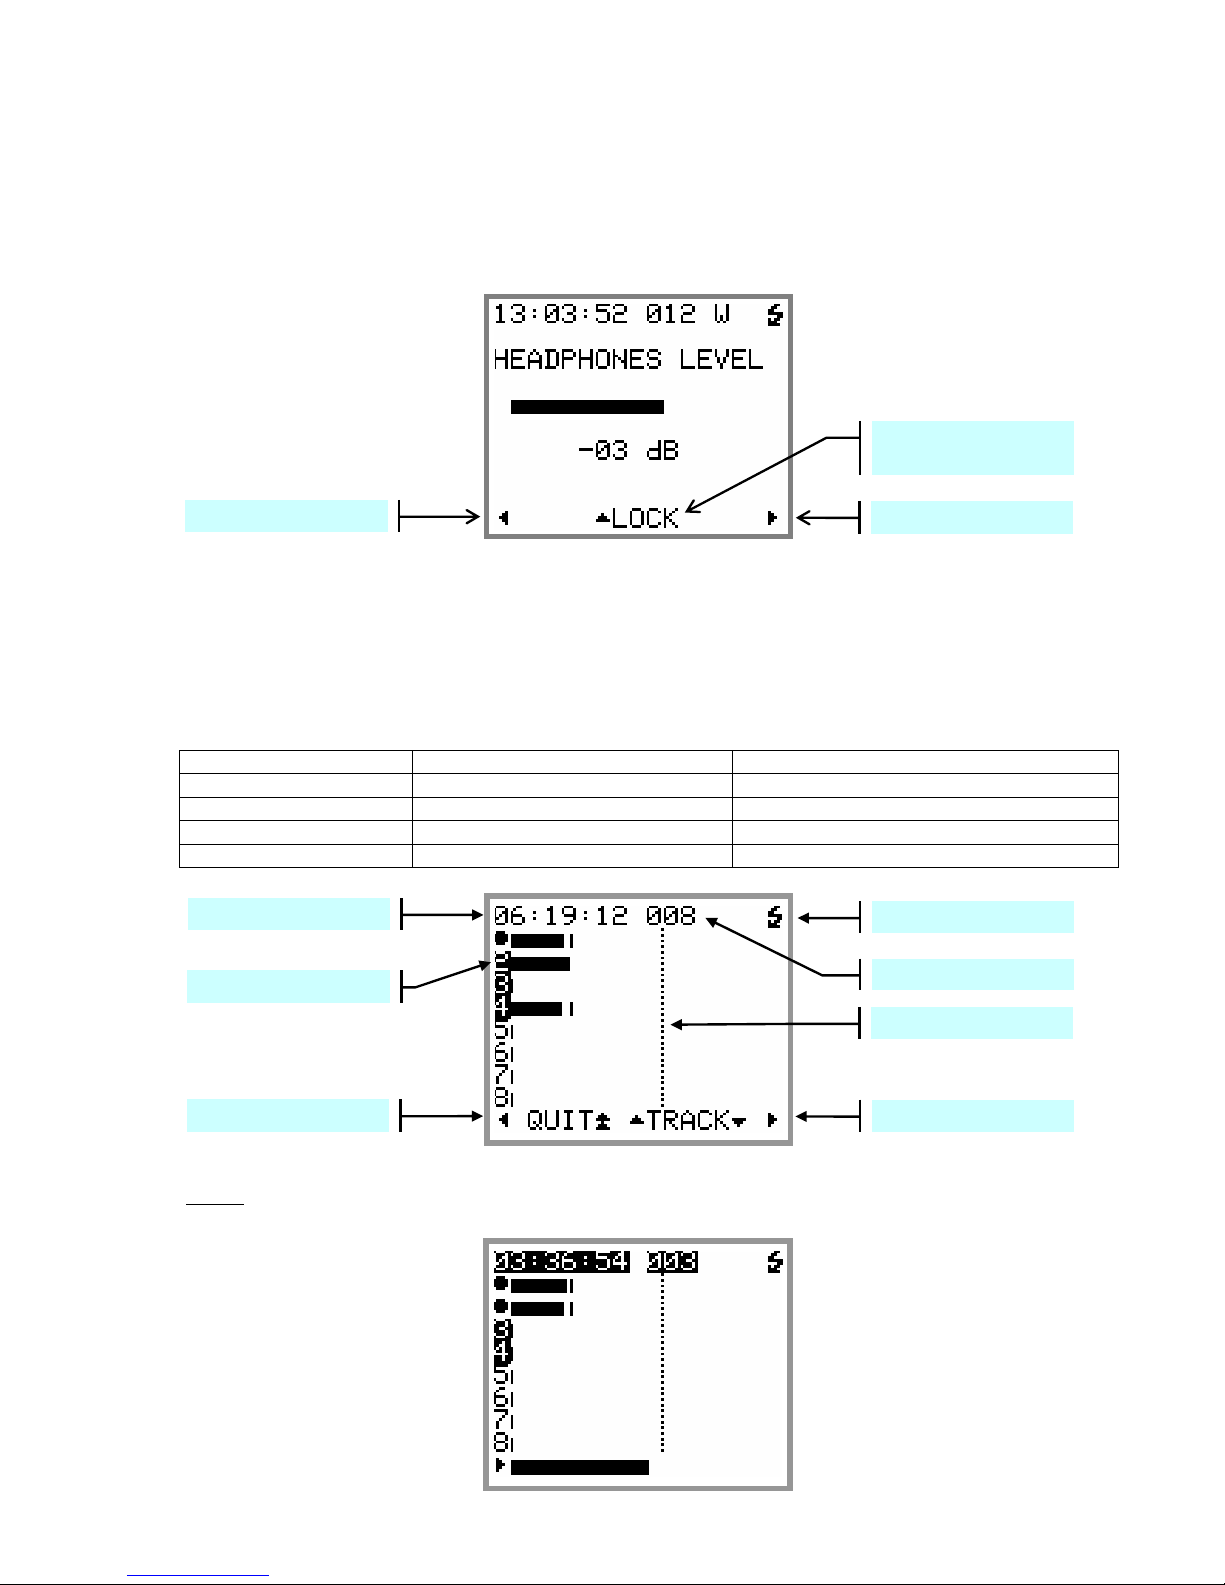
3.4 ADJUSTING THE HEADPHONE LEVEL
In Recorder mode or while Playing a Take, pressing the LEFT or RIGHT Key temporarily displays a screen
to show and adjust the headphone volume by means of a bar graph. The headphone volume is adjustable in
1 dB step from –30 dB to +18 dB.
While this screen is displayed, pressing the UP Key will lock the volume setting. Recall the screen and press
the UP Key again to unlock the volume setting.
3.5 SOLO MONITORING
The [SOLO MONITORING] page can only be accessed from the main [TRACK MONITORING] page while in
Recorder mode or while Playing a Take by briefly pressing the UP key, it allows listening to individual track
or pair of tracks.
The sequence of track's selection is: 1, 2, 1+2, 3, 4, 3+4, 5, 6, 5+6, 7, 8, 7+8.
Keys Short pressure Long pressure
LEFT Reduce the volume by step of 1 dB Reduce the volume continuously
RIGHT Increase the volume by step of 1 dB Increase the volume continuously
UP Select the previous track ---
DOWN Select the next track ---
NOTE: while Playing a Take, the bottom line shows a progression bar instead of the action of the
keys however the [SOLO MONITORING] page remain accessible by pushing the UP Key.
Volume control -Volume control +
Lock/Unlock the controls of
the Volume setting
Battery charge indicator
Volume control +
Reference level
TAKE number
Time Code (HH :MM :SS)
Track heard in SOLO
Volume control -

SONOSAX MINIR82 - User interface V4.2 Page 11 de 32
4. CONTEXTUAL MENU
The Contextual Menu is used to access to the sub-menus and configuration pages of the MINIR82.
It can be called only from the main [TRACKS MONITORING] by a long pressure on the UP key.
Keys Short pressure Long pressure
LEFT Return to previous page
RIGHT Select and enter the sub-menu
UP Scroll the selection upward
DOWN Scroll the selection downward
The available menus depend on the current "Status" of the MINIR82 as described below:
While Recording:
•MONITORING
•UNIT STATUS
•TAG LAST TAKE
While in Record Ready:
•MONITORING
•LAST TAKES
•TAG LAST TAKE
•UNIT STATUS
•SETUP
•BROWSE FILES
•METADATA
•SWITCH OFF
While Playing or in Pause:
•MONITORING
•UNIT STATUS
•DELETE TAKE
•METADATA
While in Stop:
•EXIT PLAYER
•MONITORING
•LAST TAKES
•UNIT STATUS
•BROWSE FILES
•DELETE TAKE
•METADATA
•SWITCH OFF

SONOSAX MINIR82 - User interface V4.2 Page 12 of 32
4.1 MONITORING
The [MONITORING] page is used to select, route and mix the 10 tracks of the MINIR82 to its headphone
output. The pair [A-B] represents the two tracks of the CF Card.
The monitoring is configured either by selecting a pair of tracks or by selecting each track individually by
moving the cursor. The selected field is shown in reversed video.
Pressing briefly on a key will move the cursor to select the field.
A long pressure on the RIGHT key scrolls the monitoring mode of the selected field.
Selection per pair Individual Sélection
OFF / MONO / STEREO -- / L / C / R /--
REV-STEREO / MS / OFF
Actions of the keys:
Keys Short pressure Long pressure
LEFT Move the selector to the left Keep the current configuration and return to the
main menu
RIGHT Move the selector to the right Select the monitoring mode
UP Move the selector to the upward
DOWN Move the selector to downward
4.1.1 Saving the configurations [PRESET]
Up to 4 different monitoring configurations can be stored and recalled at any time. Any configuration is
possible and is freely defined by the user.
To recall a configuration, select a [PRESET] 1 to 4
and press long on the RIGHT key
To store the displayed configuration; select any [STORE] 1 to 4
and press long on RIGHT key
NOTE: the active [PRESET] is posted in a black square. The black square disappears if the current
(displayed) configuration does not correspond to a stored [PRESET], or if the configuration is
modified.

SONOSAX MINIR82 - User interface V4.2 Page 13 de 32
4.2 LAST TAKE
The [LAST TAKES] page offers a quick access to the last recorded takes. The takes are displayed in reverse
order, the last recorded take being displayed on the top of the list
FILETAG
MEDIAHDorCF
SCENE NAME
TAKE NR
The first line displays the "FILETAG"; it is the unique identifier related to the audio file name.
Keys Short pressure Long pressure
LEFT Return to the main contextual menu
RIGHT Load the Take into the Player
UP Move the selector to the upward
DOWN Move the selector to downward
4.3 TAG LAST TAKE
This menu offers a quick access to tag the last recorder take either as False Start or to mark the audio file by
editing its Metadata. From the main contextual menu enter the [TAG LAST TAKES] sub-menu then choose
one of the following option and confirm the action with [SELECT] or cancel the action and return to the
previous menu by pressing [BACK]:
•FALSE START Tag the last recorded take as "False Start" and move the audio files to the
[TRASH] bin. The Take nr will be decremented by one so that the next take will
by tagged with the correct Take Nr. The audio file is notified with the suffix "F"
when browsing the [TRASH] directory.
•NO GOOD Tag the metadata of the last recorded take as "No Good", mostly used to warn
the post-production that the recorded audio is to be rejected although the video
take having the same take nr might be good.
The audio files remain in the current working day directory, the Take nr is kept
and the audio file is notified with the suffix "F" in the [BROWSE FILE] menu.
•CIRCLED Tag the metadata of the last recorded take as "Circle" to notify the post
production that the recorded audio files are to be choosen although the video
take having the same take nr might be rejected.
The audio files remain in the current working day directory, the take nr is kept
and the audio file is notified with the suffix "C" in the [BROWSE FILE] menu
•WILD TRACK Tag the metadata of the last recorded take as "Wild Track" to notify the post
production that the audio file are not related or not "In Sync" to a specific video
take, usually used for ambiances or atmo's.
The audio file is notified with the suffix "W" in the [BROWSE FILE] menu.
NOTE: selecting "Wild Track" while recording will keep the "Wild Track Tag"
active for the following takes; selecting this Tag while stopped affects the last
recorded take only.
SONOSAX MINIR82 - User interface V4.2 Page 14 de 32
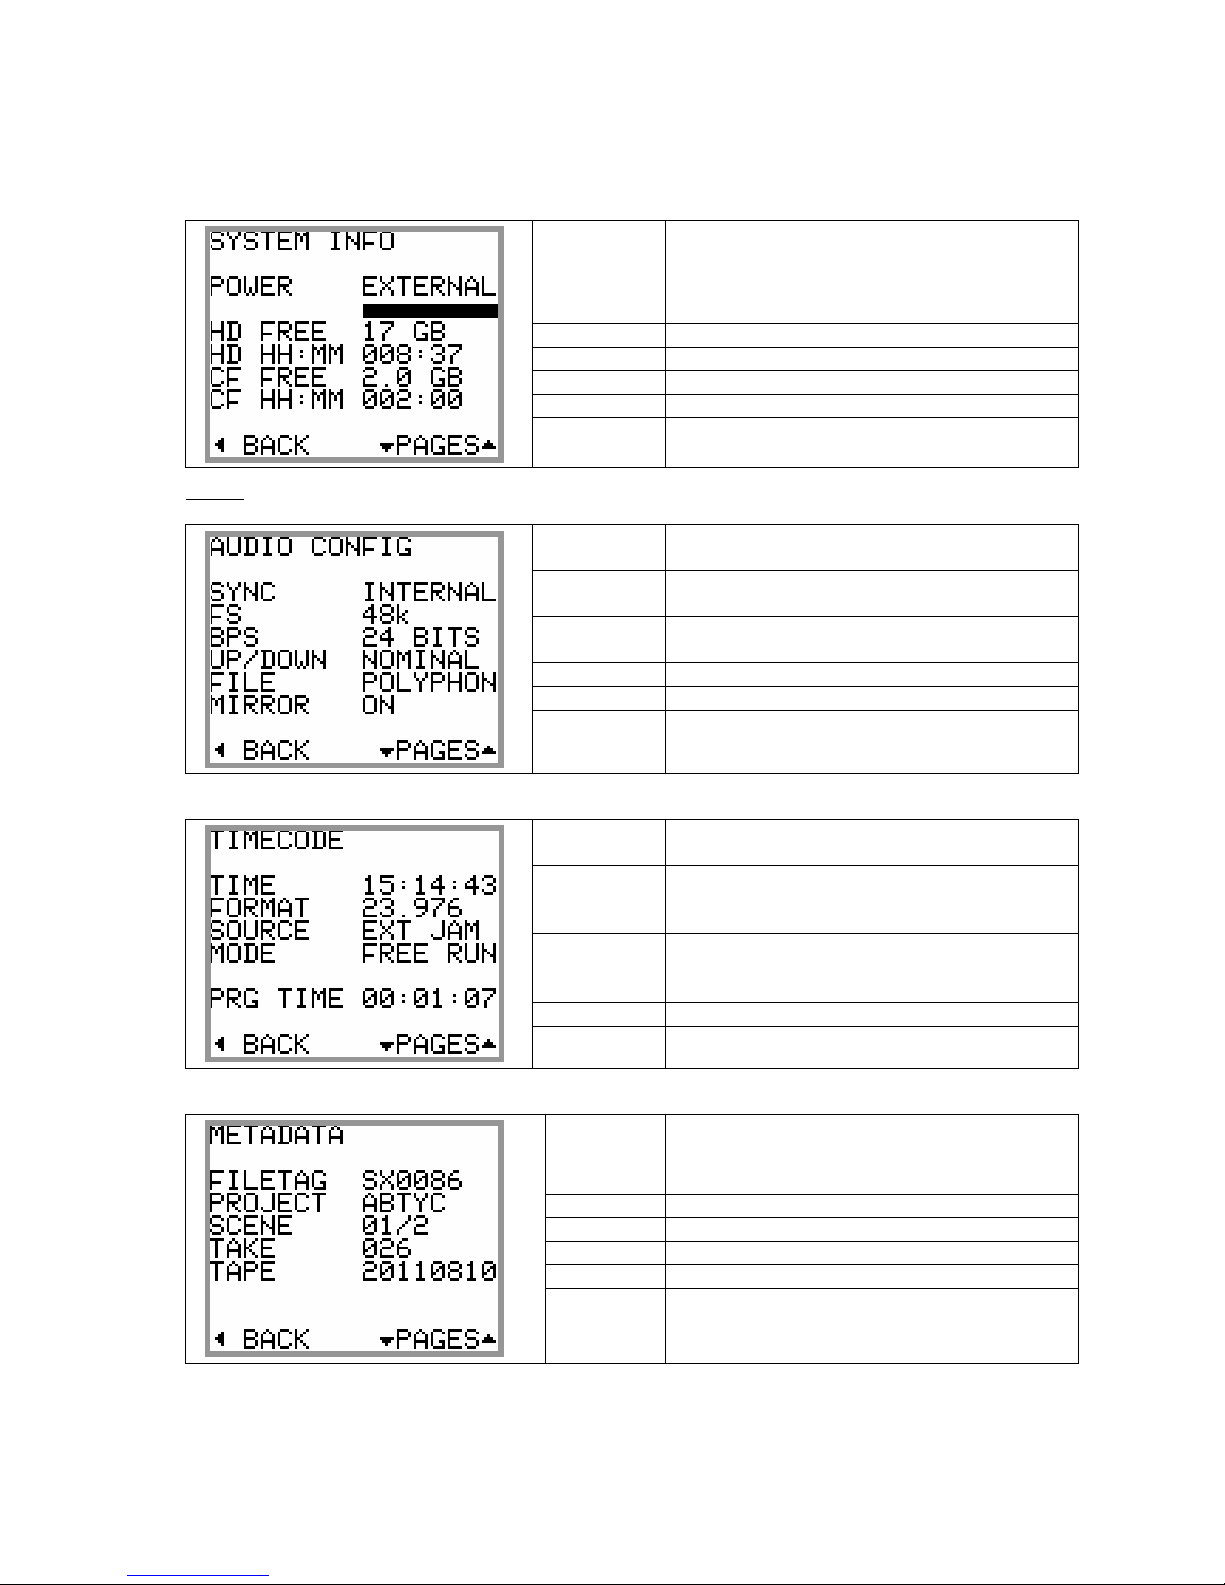
4.4 UNIT STATUS
This menu displays all the main current settings of the MINIR82, spread on 4 pages. Press the UP or DOWN
keys to scroll the pages; press LEFT key to return to the main contextual menu
POWER
Fuel gauge of the batteries in Volts and as bar-
graph; post EXTERNAL if powered from an
external power supply
HD FREE Remaining disk space on the hard disk
HD HH :MM Remaining recording time on the hard disk.
CF FREE Remaining disk space on the CF card
CF HH :MM Remaining recording time on the CF card
NOTE: the remaining recording time depends on the configuration such as sampling rate and nr of tracks
SYNC Audio synchronisation such as: AES, internal,
word clock or video.
FS Sampling frequency 44.1k, 48k, 88.2k, 96k,
176.4k, 192kHz.
BIT DEPTH Numbers of bits per sample (quantization): 24
bits, 16D bits (dithering), 16 bits.
UP/DOWN Nominal, NTSC Correction +/- 0,1% or C Mode
WAV FILE File Format: MONO, STEREO, POLYPHONIC
MIRROR Mirroring status on the CF Card: OFF, ON.
TIME Current value of the Time Code
(hours: minutes: seconds)
FORMAT Time Code format, generated or received:
23.976, 24, 25, 29.97ND, 29.97D, 30ND,
30D, AUTO, INTERNAL, UNKNOWN.
SOURCE Source of the time code signal:
EXT JAM SYNC, EXT NO JAM, INTERNAL,
INTERNAL OUTPUT.
MODE REC RUN, FREE RUN
ELAPSED Elapsed time from the beginning of the Take
FILETAG unique identifier (prefix of the file name)
PROJECT Project name
SCENE Scene name
TAKE Take number
TAPE Tape ID = Working day

SONOSAX MINIR82 - User interface V4.2 Page 15 de 32
4.5 SETUP (CONFIGURATION'S MENUS)
The [SETUP] menu contains "sub-menus" (or headings) sorted in a logical order; these sub-menu are used to
configure the MINIR82 as per user's requirements.
Scroll the sub-menu by pushing the UP or DOWN key; a scroll bar on the right side of the screen shows the
position in the list.
Press on the RIGHT key [SELECT] enter the sub-menu accessing the editable parameters.
Press on the LEFT key [BACK] returns to the previous menu.
Navigating in the menus is done as per the examples below
A menu with no parameter displays one heading per screen.
Thus, it scrolls the available sub-menus
A sub-menu with a displayed parameter is at the end of the menu tree,
it indicates the current value of the parameter that can be edited.
While in a menu with parameter, press the Right key to choose the
value of that parameter.
A menu with a list shows the available values of a parameters. The
selection is posted in reverse video
The text-editing menu.
The text to edit is displayed between brackets that show the limits of
the text size.
Two arrows indicate the selected character. Briefly press on LEFT or
RIGHT to select a character. Briefly press on UP or DOWN to scroll
the characters. Keep pressing to scroll the characters rapidly.
Pressing long on the RIGHT saves the text and return to the previous
page. Pressing long to the LEFT cancels the editing and return to the
previous menu.

SONOSAX MINIR82 - User interface V4.2 Page 16 de 32
4.5.1 MENU's Tree Structure
The greyed menus are those where parameters are visible.
Level 1 Level 2 Level 3 Changeable values
ROUTING TABLE Routing matrix
MIXING LEVEL NONE, ATT1.5, ATT3, ATT6
ROUTING
SETTINGS
MIRRORING OFF, ON
BIT PER SAMPLE 16 bits, 16 bits dither, 24 bits
SAMPLING FREQUENCY 44.1, 48, 88.2, 96, 176.4, 192 kHz
SAMPLING UP/DOWN Nominal, UP 0,1%, DOWN 0,1%,
C Mode
AUDIO SYNC MODE Internal, Word Clock In, Video In
FILE FORMAT Mono, Stereo, Polyphonic
RECORD
SETTINGS
PRE-RECORD TIME None, 1, 2, 5, 10, 20 seconds
MIC/LINE 1-2 MIC/LINE, AES
INPUT SOURCE LINE 3-4 LINE, AES
MIC/LINE 1 ON, OFF
MIC LOW FREQ CUT MIC/LINE 2 ON, OFF
INPUT
SETTINGS
LINE IN LEVEL +15, +6, 0, -10dBu
SOURCE
EXTERNAL JAM SYNC,
EXTERNAL NO JAM,
INTERNAL, OUTPUT
FORMAT 23.976, 24, 25, 29.97 ND,
29.97 D, 30N D, 30 D, AUTO
RUNNING MODE FREE RUN, RECORD RUN
SET MANUAL Editing of the TC value manually
TIMECODE
SETTINGS
SET FROM TIME Grab the time of the real time clock
USER
SETTINGS List available user setting Specific menu to create, recall, delete or overwrite user settings
HARD DRIVE Specific menu to format or mount the HD and empty the trash
CF CARD Specific menu to format or mount the CF and empty the trash
REFERENCE LEVEL None, -20dB, -18dB, -12dB, -9dB
MODULOMETERS HOLD
TIME None, 3 sec, 10 sec, 2 min, Infinite
TIME DISPLAY Time Code, Program Time,
Time Code RV, Program Time RV
AUTO POWER DOWN OFF, 5 min, 10 min, 15 min, 30 min
HEADPHONE REC
TONE OFF, ON
SYSTEM DATE Specific menu to edit the date of the Real Time Clock
SYSTEM TIME Specific menu to edit the time of the Real Time Clock
FILETAG Specific menu to edit the prefix of the FileTag ( 2 characters )
SYSTEM INFO Display main system information such as firmware version etc
SYSTEM
SETTINGS
FACTORY SETTINGS Resets all settings to factory
default values NO, YES
Explanation's of each menu is detailed in the following chapters.
NOTE: values mentioned in bold are the default values of the [FACTORY SETTINGS]

SONOSAX MINIR82 - User interface V4.2 Page 17 de 32
4.5.2 ROUTING SETTING
SETUP > ROUTING SETTINGS > ROUTING TABLE
The routing, or channel assignement to the tracks, is done by means of a specific matrix as shown below:
ROUTING MATRIX
The round dot assigns the inputs channels to the tracks. Any combination is possible, thus any input channel
can be routed to any track or to multiple tacks and multiple channels can be routed on the same track
(mixing).
The figure above shows a 1x1 routing between inputs and tracks 1 to 4. Inputs 5 and 6 are routed to tracks
7 and 8. In addition, input channels are also individually routed to the tracks of the CF card.
Keys Short pressure Long pressure
LEFT Move the selection cursor to the Left Return to the previous menu
RIGHT Move the selection cursor to the Right Activate/Deactivate the assignment
UP Move the selection cursor upward
DOWN Move the selection cursor downward
NOTES: The configuration is automatically saved when leaving this menu
The un-assigned Tracks (no dot on the crossing) are automatically desactivated.
SETUP > ROUTING SETTINGS > MIXING LEVEL
The [MIXING LEVEL] menu defines the attenuation to be applied to each channel when summing (mixing)
multiple input channels onto the same track; the attenuation is computed to avoid a digital clipping. Four
possibilities are offered and the choice depends on the phase coincidence of the sources.
•NONE no attenuation at all
•ATT1.5 mainly used if the sources have no phase coincidence
•ATT3 recommanded for phase coincident sources such as sereo or M/S microphone
•ATT6 only used if the sources are absolutaly in phase
The table below summarizes the exact attenuations computed and applied according to the number of input
channels assigned to the same track.
Number of input channels
assigned to the same track
NONE
[ in dB ]
ATT1.5
[ in dB ]
ATT3
[in dB ]
ATT6
[ in dB ]
1 0 0 0 0
2 0 1.8 3.3 6
3 0 2.5 5 10.1
4 0 3.3 6 12
5 0 3.3 7.2 14.5
6 0 4.1 7.2 14.5
7 0 4.1 8.5 18.1
8 0 5 8.5 18.1
H.D. Tracks
Input Channel
Routed cross point = active track
Selection cursor
CF Tracks
Assign / Un-assign the tracksSave and return to the
No cross point = inactive track
SONOSAX MINIR82 - User interface V4.2 Page 18 de 32
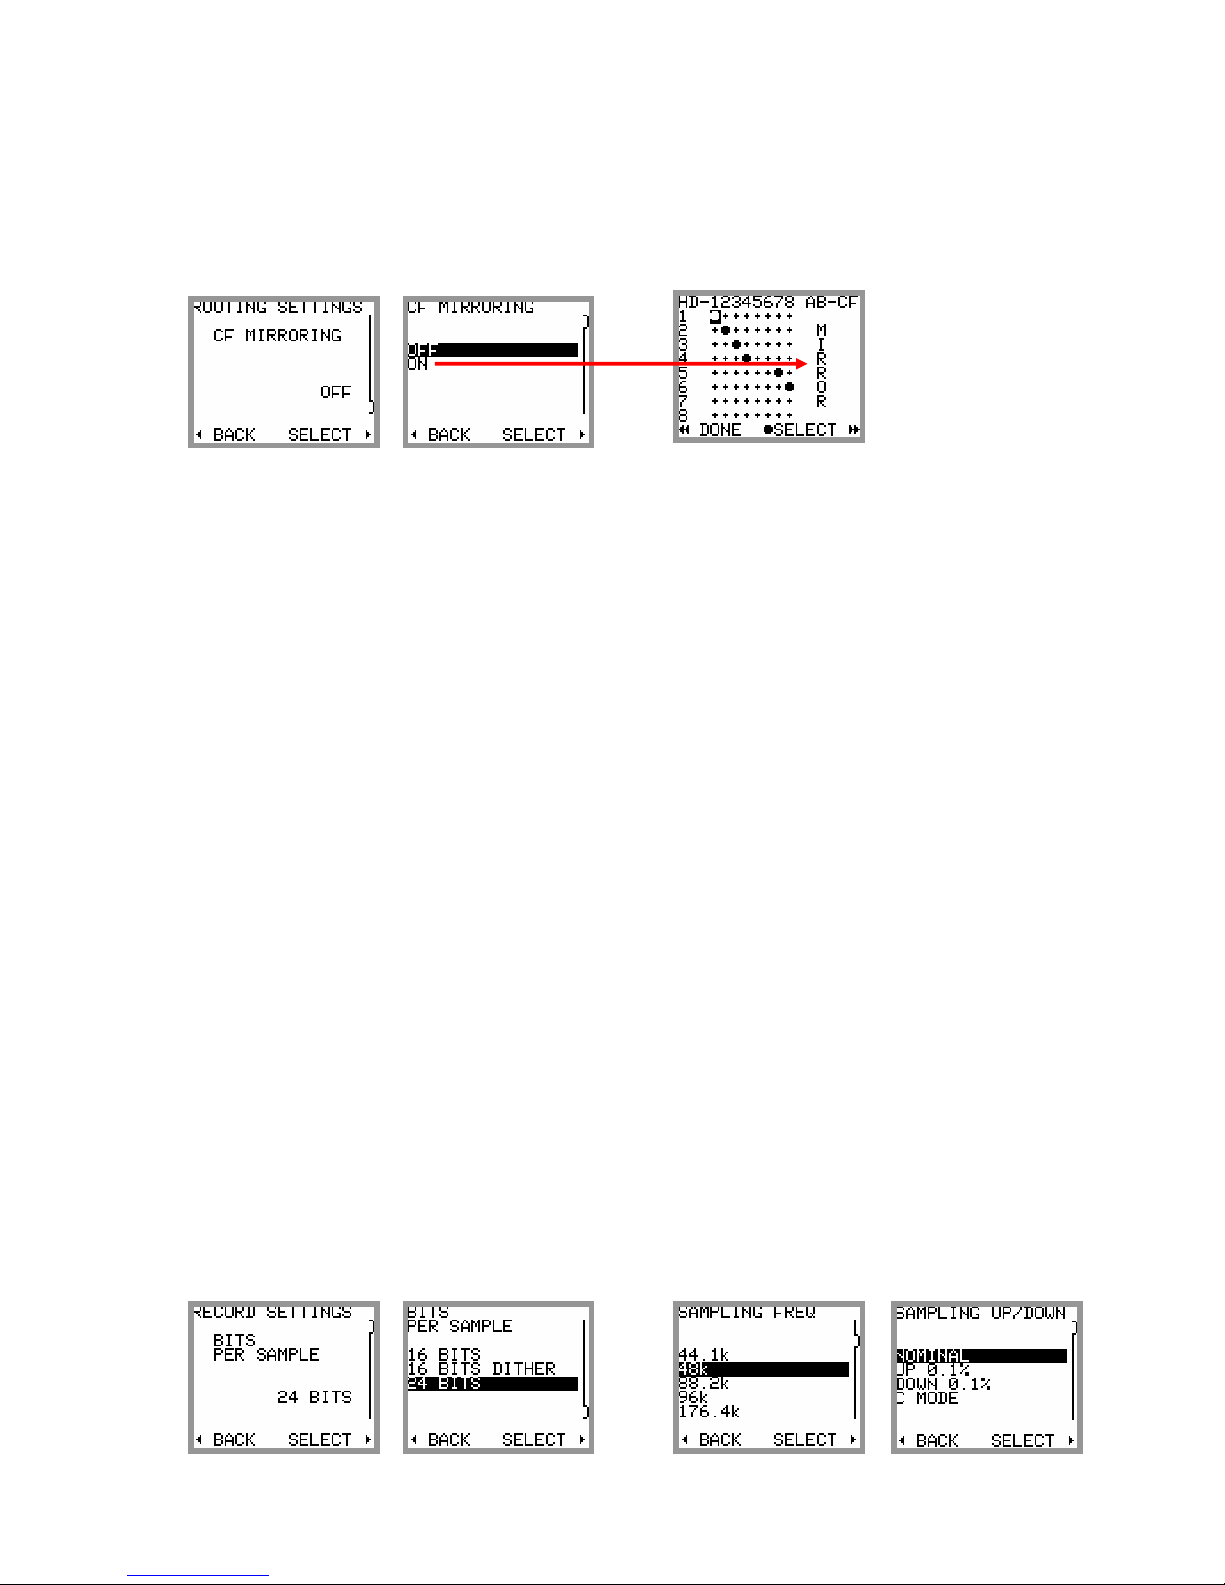
SETUP > ROUTING SETTINGS > MIRRORING
When the [MIRRORING] function is activated, the routing and the eventual mixing level of the input channels
onto the hard disk tracks is identically replicated on the Compact Flash card. The tracks are recorded
simultaneously on the hard drive and on the CF card providing that the performances of the CF card permits.
When the Mirroring is activated, the two tracks of the CF card no longer appear in the routing matrix and are
replaced by the word MIRROR.
NOTE 1: Several series of tests with CF cards offering good performances helped to validate the
recording of up to 8 channels at 96kHz/24bit. If the performances of the CF card does not
allow mirroring, an alarm "CF" will flash on the screen. The recording on the CF card will be
aborted but will continue on the HD.
NOTE 2: If the storage capacity of the CF card is reached during the recording, the CF card will stop
recording but the recording will continue on the hard disk.
4.5.3 RECORD SETTINGS
SETUP > RECORD SETTINGS > BIT PER SAMPLE
This menu sets the sample's quantization (number of bits per sample) stored in WAVE files. Although the
A/D converters of the MINIR82 exclusively convert in 24 bits mode, the DSP can re-quantize the recorded
samples by the following values:
•24 bits: original value as quantified by the A/D converter
•16 bits Dithering: reduction to 16bits per sample with triangular dithering
•16 bits: reduction by truncation of the original quantization
SETUP > RECORD SETTINGS > SAMPLING FREQUENCY
This menu sets the sampling frequency. Choices are: 44.1, 48, 88.2, 96, 176.4 and 192 kHz.
If an AES input is assigned, the MINIR82 will automatically lock on sampling frequency of the incoming AES
signal, thus the selected sampling frequency will be overwritten. The sampling frequency of the incoming
AES signal can be checked in the [UNIT STATUS].
SETUP > RECORD SETTINGS > SAMPLING UP / DOWN
The sampling frequency can be set either at its nominal value or pulled Up or Down for the NTSC world;
when the sampling Up or Down is chosen, the nominal sampling frequency is either increased respectively
decreased by 0,1% ( or one per thousand). The symbol " %+ " or " %- " is then displayed on the upper right
corner of the main screen.
C Mode is a special "compensated" mode faking the pull Up/Down; the recording is performed at nominal
sampling rate and the stamped value indicates 48000 which is the true number of samples per second;
however the Time Code is compensated (or cheated) so that the Time is stamped as if the digitization was
done at 48048 (the Time Stamp is computed by counting the number of samples since midnight)
SONOSAX MINIR82 - User interface V4.2 Page 19 de 32
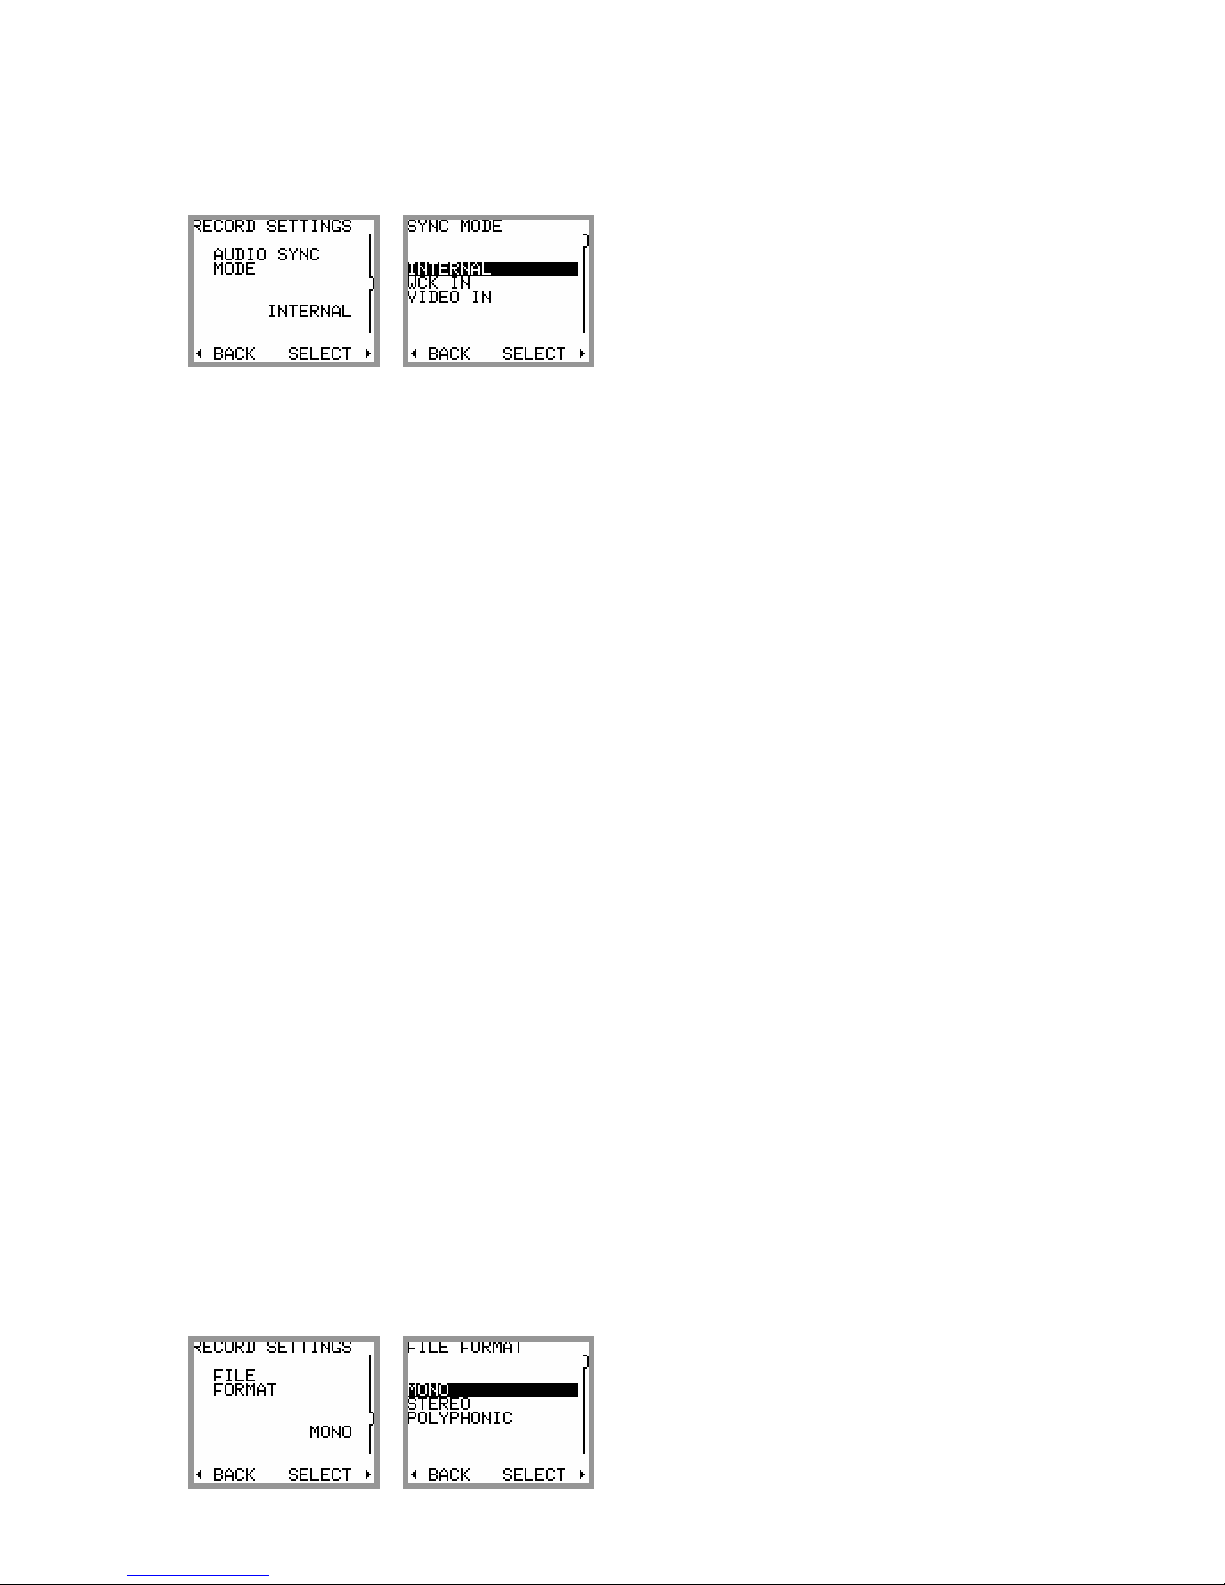
SETUP > RECORD SETTINGS > AUDIO SYNC MODE
Audio synchronization means locking the sampling frequency on a given signal, either internal or external.
The synchronization mode is shown in the Unit Status menu.
The different synchronization modes and the validity of the parameters are explained below:
INTERNAL
The MINIR82 locks on its internal clock generator, which generates all sampling frequencies (44.1, 48, 88.2,
96, 176.4 and 192 KHz). This generator is used only when no other clock is available.
•Sampling frequency: active
•Sampling up/down: active
•Bit per sample: active
Synchronisation on AES input:
The MINIR82 will automatically lock on the incoming AES clock of the channels 5-6
•Sampling frequency: inactive
•Sampling up/down: inactive
•Bit per sample: active
WCK IN
WCK IN must be selected to lock the MINIR82 on an external word clock applied to the SYNC IN connector.
This mode is overwritten when an input AES is routed.
•Sampling frequency: inactive
•Sampling up/down: inactive
•Bit per sample: active
VIDEO IN
VIDEO IN must be selected to lock the MINIR82 on an external clock derived from a video signal applied to
the SYNC IN connector. This mode accepts all video formats, including the bi and tri sync level systems.
This mode is overwritten when an input AES is routed.
•Sampling frequency: active
•Sampling up/down: inactive
•Bit per sample: active
SETUP > RECORD SETTINGS > FILE FORMAT
The recorded audio tracks can be stored in three different file formats:
•MONO
•STEREO
•POLYPHONIC
When MONO is selected, each track is recorded in a separate mono file.
When STEREO is selected, the system records each pair of tracks in a single stereo file. The pairs are
always 1+2, 3+4, 5+6 and 7+8.
If POLYPHONIC mode is selected, all active tracks are recorded in a single file. This mode requires to
enable the MIRRORING regardless of whether the Compact Flash card is present or not

SONOSAX MINIR82 - User interface V4.2 Page 20 de 32
SETUP > RECORD SETTINGS > PRE-RECORD TIME
The Pre-Record time can be set from zero up to 20 seconds. The selected value may not always be possible
due to the physical limitation of the built-in memory. The Pre-Record time depends on following factors:
•Number of Tracks being assigned
•Sampling frequency
•Sample Rate and Pull UP/ Pull DOWN correction
When the required pre-record time is not possible, the MINIR82 will perform on "best effort" basis to provide
with the maximum possible. The table below shows the maximum values of the pre-record time [seconds]:
16 bits Tracks count
fs 1 2 3 4 5 6 7 8 9 10
44100 20.0 20.0 20.0 20.0 20.0 20.0 20.0 20.0 18.5 16.6
48000 20.0 20.0 20.0 20.0 20.0 20.0 20.0 19.1 17.0 15.3
88200 20.0 20.0 20.0 20.0 16.6 13.9 11.9 10.4 9.2 8.3
96000 20.0 20.0 20.0 19.1 15.3 12.7 10.9 9.6 8.5 7.6
176400 20.0 20.0 13.9 10.4 8.3 6.9 5.9 5.2 4.6 4.2
192000 20.0 19.1 12.7 9.6 7.6 6.4 5.5 4.8 4.2 3.8
24 bits Tracks count
fs 1 2 3 4 5 6 7 8 9 10
44100 20.0 20.0 20.0 20.0 20.0 18.5 15.9 13.9 12.3 11.1
48000 20.0 20.0 20.0 20.0 20.0 17.0 14.6 12.7 11.3 10.2
88200 20.0 20.0 18.5 13.9 11.1 9.2 7.9 6.9 6.2 5.5
96000 20.0 20.0 17.0 12.7 10.2 8.5 7.3 6.4 5.7 5.1
176400 20.0 13.9 9.2 6.9 5.5 4.6 4.0 3.5 3.1 2.8
192000 20.0 12.7 8.5 6.4 5.1 4.2 3.6 3.2 2.8 2.5
In these tables, the Pull Up/Pull Down correction is not taken into account (negligible).
4.5.4 INPUTS SETTINGS
SETUP > INPUTS SETTINGS > INPUTS SOURCE
This menu is used to select which of the analogue or the digital source of channels 1-2 and 3-4 is assigned
to the routing matrix; the selection is always made for a per pair of channels
•Input channels 1 & 2: MIC/LINE 1 & 2 or AES 1
•Input channels 3 & 4: LINE 3 & 4 or AES 2
SETUP > INPUTS SETTINGS > MIC LOW FREQ CUT
When channels 1-2 are configured as MIC/LINE INPUT, a low-pass filter can be activated for each channel
individually by this menu.
Table of contents
Other Sonosax Recording Equipment manuals


