Connections/Connexions/Collegamenti/Zapojení/Bağlantılar
Connections Example/Connexions de l’exemple/Collegamenti per l’esempio/Příklad zapojení/Bağlantı Örnekleri
to a metal point of the car
First connect the black earth lead, then connect
the yellow and red power input leads.
à un endroit métallique de la voiture
Branchez d’abord le fil de masse noir et ensuite
les fils d’entrée d’alimentation jaune et rouge.
a un punto metallico dell’auto
Collegare prima il cavo di terra nero, quindi
collegare i cavi di ingresso alimentazione rosso e
nero.
na kovový bod na autě
Napřed zapojte černý kabel pro uzemění, potom
zapojte žlutý a červený vstupní konektor.
Otomobilin metal bir noktasına
İlk önce siyah toprak kablosunu bağlayınız,
ardından sarı ve kırmızı güç giriş kablosunu
bağlayınız.
to the +12 V power terminal which is
energized at all times
Be sure to connect the black earth lead to it
first.
à la borne +12V qui est alimentée en
permanence
Branchez d’abord le fil noir de liaison à la
masse.
al terminale di alimentazione +12V che è
sempre sotto tensione
Collegare ad esso il cavo di terra nero per
primo.
na konektor +12 V, který je stále napájen
proudem.
Přesvědčte se, abyste nejprve zapojili černý
kabel pro uzemění.
Her zaman çalışan +12 V güç terminaline
İlk önce siyah toprak kablosunu
bağladığınıza emin olunuz.
to the +12 V power terminal which is
energized in the accessory position of the
ignition key switch
Be sure to connect the black earth lead to it
first.
vers la borne + 12 V qui est alimentée
lorsque la clé de contact se trouve sur la
position accessoire
Branchez d’abord le fil noir de liaison à la
masse.
al terminale di alimentazione +12V sotto
tensione quando la chiavetta di accensione si
trova in posizione accessoria.
Collegare ad esso il cavo di terra nero per
primo.
na konektor +12 V, který je napájen proudem
po otočení klíčku pro zapalování.
Přesvědčte se, abyste nejprve zapojili černý
kabel pro uzemění.
Kontak anahtarı özel pozisyonda olduğunda
çalışan +12 V güç terminaline
İlk önce siyah toprak kablosunu
bağladığınıza emin olunuz.
to power aerial control lead or power supply lead
of aerial booster amplifier
<Note> If you do not use a power aerial or aerial
booster, it is not necessary to connect this lead.
vers le fil de commande de l’antenna électrique
ou le fil d’alimentation de l’amplificateur
d’antenne
<Remarque> S’il n’y a pas d’antenne électrique ni
d’amplificateur d’antenne, il n’est pas nécessaire
de raccorder ce fil.
al cavo di controllo dell’antenna elettrica o al
cavo di alimentazione dell’amplificatore di
antenna
<Nota>Se non si utilizza un’antenna elettrica né
un amplificatore di antenna, non è necessario
collegare questo cavo.
ke kabelu od elektrické antény nebo ke kabelu
od zesilovače elektrické antény
<Poznámka> Jestliže nepoužíváte ani elektrickou
anténu ani zesilovač, nemusite tento kabel
zapojovat.
Antenin kuvvetlendirici amplifikatörünün güç
anteni kontrol kablosuna veya güç destek
kablosuna
<Not> Eğer güç anteni veya anten
kuvvetlendiricisi kullanmıyorsanız, bu kabloyu
bağlamanıza gerek yoktur.
Attenzione
•Questo apparecchio è stato progettato per l’uso solo in
funzionamento a 12 V CC con massa negativa.
•Prima di eseguire i collegamenti, scollegare il terminale di
massa della batteria dell’auto per evitare cortocircuiti.
•Collegare i cavi di collegamento alimentazione rosso e giallo
solo dopo aver collegato tutti gli altri cavi.
•Assicurarsi di collegare il cavo rosso di collegamento
alimentazione al terminale di alimentazione 12 V positivo che
è sotto tensione quando la chiavetta di accensione è in
posizione accessoria.
•Portare tutti i cavi di massa a un punto di massa comune.
Bezpečnostní upozornění
•Tento přístroj je konstruován výhradně pro stejnosměrný
proud 12 V a negativní uzemění.
•Než začnete se zapojováním, odpojte záporný pól z
autobaterie, abyste předeπli vzniku zkratu.
•Žlutý a červený konektor zapojte teprve po ukončení vπech
ostatních zapojení.
•Přesvědčte se, abyste zapojili červený vstupní konektor do
pozitivního konektoru na 12 V, který je napájen proudem po
otočení klíčku pro zapalování.
•Vπechny dráty pro uzemění zapojte do společného bodu.
Dikkat
•Bu ünite yalnız 12V DC negatif topraklama işlemi için
tasarlanmıştır.
•Bağlantıları yapmadan önce kısa devreyi önlemek için
otomobil aküsünün toprak terminal bağlantısını kesiniz.
•Sarı ve kırmızı güç giriş kablolarını ancak tüm diğer kabloları
bağladıktan sonra bağlayınız.
•Kırmızı güç giriş kablosunu kontak anahtarı özel pozisyonda
olduğunda çalışan pozitif 12 V güç terminaline bağladığınıza
emin olunuz.
•Tüm toprak kablolarını ortak bir yere çekiniz.
Poznámky k zapojení ovládání antény
•
Drát pro ovládání antény (modrý) dodává
12V stejnosměrného proudu, když zapnete
přístroj.
•
S tímto přístrojem nemůžete používat
elektrickou anténu bez relé.
Kontrol kabloları ile ilgili notlar
•Güç anteni kontrol kablosu (mavi) üniteyi
açtığınızda 12 V DC güçle çalışır.
•Yayın kutusu olmayan bir güç anteni bu
ünite ile birlikte kullanılmaz.
Caution
•This unit is designed for negative ground 12 V DC operation
only.
•Before making connections, disconnect the ground terminal of
the car battery to avoid short circuits.
•Connect the yellow and red power input leads only after all
other leads have been connected.
•Be sure to connect the red power input lead to the positive
12 V power terminal which is energized when the ignition key
is in the accessory position.
•Run all ground wires to a common ground point.
Précautions
•Cet appareil est conçu pour fonctionner sur un courant continu
de 12 V avec masse négative.
•Avant d’effectuer les raccordements, débranchez la borne de
terre de la batterie du véhicule pour éviter tout court-circuit.
•Raccordez les fils jaune et rouge d’alimentation uniquement
après avoir réalisé toutes les autres connexions.
•Raccordez le fil d’alimentation rouge à la borne positive de 12
V qui est alimentée quand la clé de contact est sur la position
accessoire.
•Rassemblez tous les fils de terre en un point de masse
commun.
Notes on the control leads
•
The power antenna control lead (blue) supplies
12V DC when you turn on the unit.
•
A power antenna without relay box cannot be
used with this unit.
Remarques sur les fils de contrôle
•Le fil de contrôle de l’antenne électrique (bleu)
fournit du courant continu de 12 V lorsque
vous mettez l’appareil sous tension.
•Une antenne électrique sans boîtier de relais ne
peut pas être utilisée avec cet appareil.
Note sui cavi di controllo
•Il cavo di controllo dell’antenna automatica
(blu) fornisce corrente continua 12V quando si
accende il sintonizzatore.
•Non è possibile usare un’antenna automatica
senza la scatola a relè con questo apparecchio.
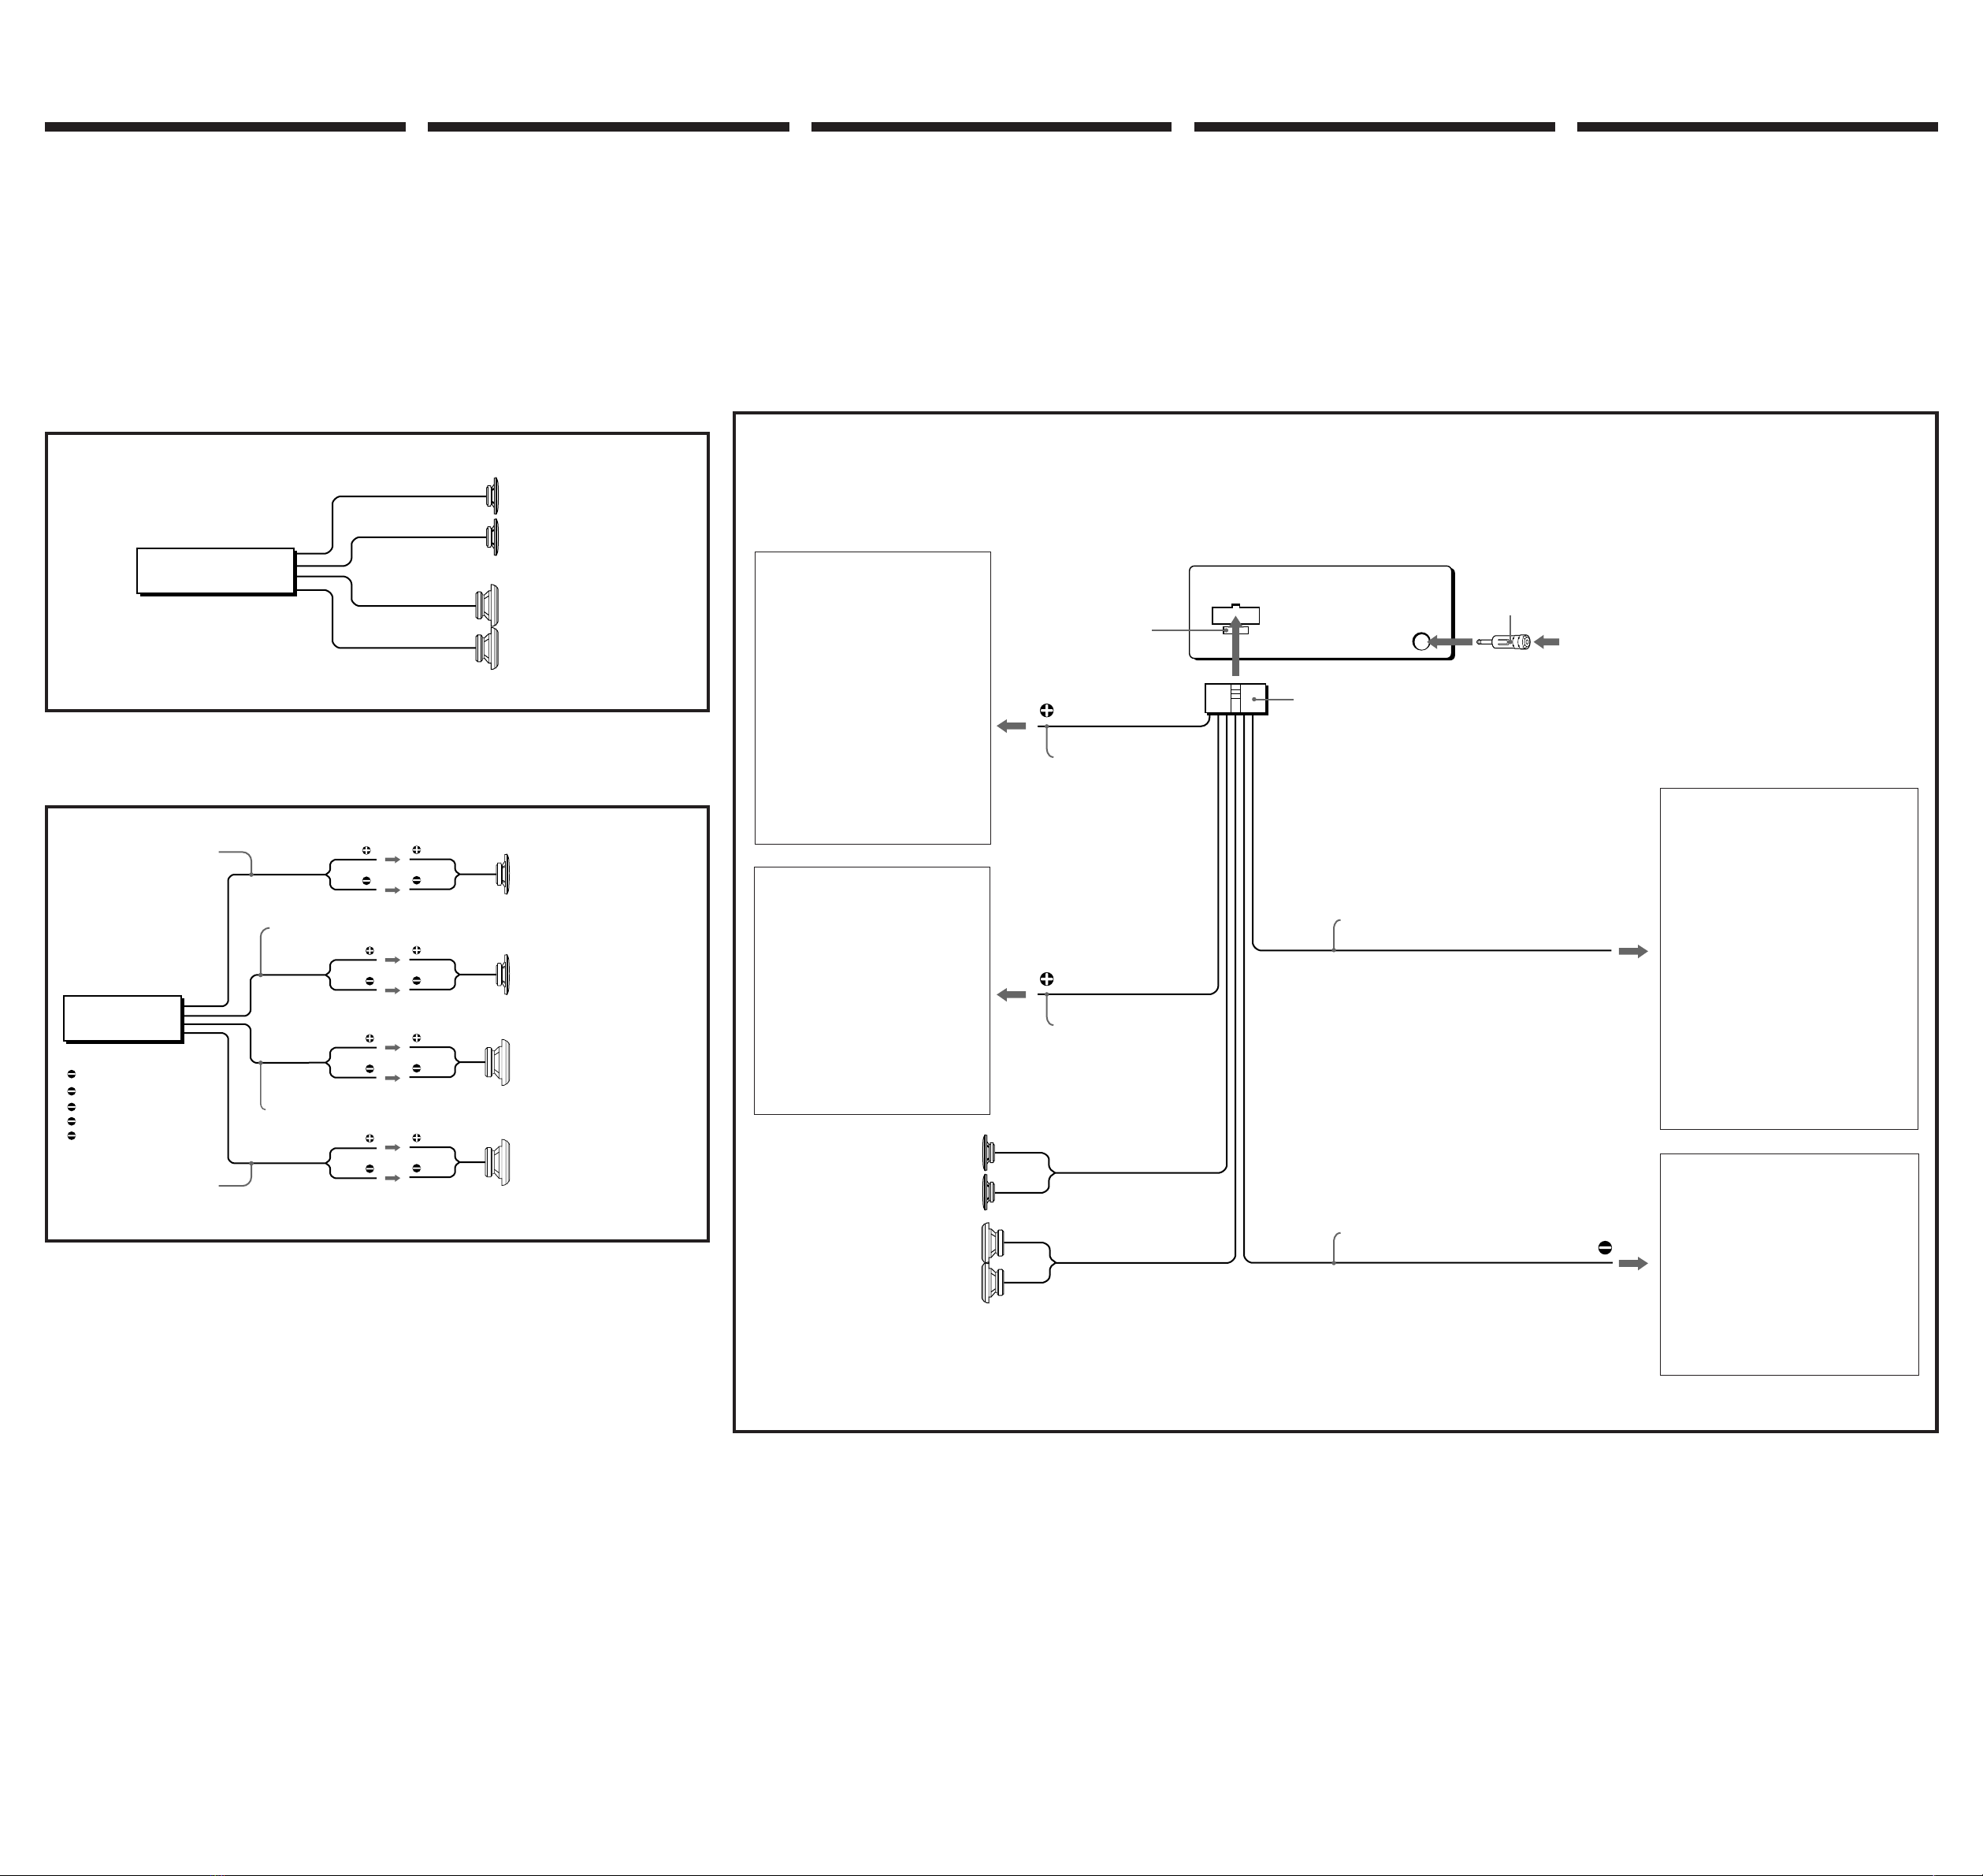
Connection Diagram/Schéma de connexions/Schema di collegamento/
Schéma zapojení/Bağlantı Şeması
XR-1800
Front speakers
Haut-parleurs avant
Diffusori anteriori
Přední reproduktory
Ön hoparlörler
Rear speakers
Haut-parleurs arrière
Diffusori posteriori
Zadní reproduktory
Arka hoparlörler
Speaker Connections/Connexion des haut-parleurs/Collegamento dei diffusori/
Zapojení reproduktorů/Hoparlör Bağlantıları
XR-1800
Purple
Mauve
Porpora
růžový
Mor
Gray
Gris
Grigio
πedý
Gri
Green
Vert
Verde
zelený
Yeşil
Left
Gauche
Sinistro
levý
Sol
Right
Droit
Destro
pravý
Sağ
Left
Gauche
Sinistro
levý
Sol
Right
Droit
Destro
pravý
Sağ
Front speakers
Haut-parleurs avant
Diffusori anteriori
Přední reproduktory
Ön hoparlörler
Rear speakers
Haut-parleurs arrière
Diffusori posteriori
Zadní reproduktory
Arka hoparlörler
White
Blanc
Bianco
bílý
Beyaz
:Striped cord
:Cordon rayé
:Cavo rigato
:proužkovaný kabel
:çizgili kablo
Notes on speaker connection
•Use speakers with an impedance of 4 to 8 ohms, and with adequate power handling capacities. Otherwise, the speakers may be damaged.
•Do not connect the terminals of the speaker system to the car chassis, and do not connect the terminals of the right speaker with those of the left speaker.
•Do not connect the speakers in parallel.
•
Do not connect any active speakers (with built-in amplifiers) to the speaker terminals of the unit. Doing so may damage the active speakers. There fore, be
sure to connect passive speakers to these terminals.
Remarques sur la connexion des haut-parleurs
•Utiliser des haut-parleurs avec une impédance de 4 à 8 ohms et qui peuvent supporter l’alimentation fournie sinon ils risquent d’être endommagés.
•Ne pas connecter les bornes du système de haut-parleur au châssis de la voiture et ne pas raccorder les bornes du haut-parleur droit aux bornes du
haut-parleur gauche.
•Ne pas essayer de connecter les haut-parleurs en parallèle.
•Ne pas connector d’enceintes acoustiques actives (avec amplificateurs intégrés) aux bornes d’enceintes de cet appareil pour éviter de les
endommager. Veiller à raccorder des enceintes passives.
Note sul collegamento dei diffusori
•Usare diffusori di impedenza compresa tra i 4 e gli 8 ohm e con capacità di potenza adeguata, altrimenti i diffusori possono venir danneggiati.
•Non collegare i terminali del sistema diffusori al telaio dell’ auto e non collegare i terminali del diffusore destro a quelli del diffusore sinistro.
•Non collegare i diffusori in parallelo.
•Non collegare diffusori attivi (con amplificatori incorporati) ai terminali diffusori dell’apparecchio, perché i diffusori attivi potrebbero venir
danneggiati. Collegare solo diffusori passivi a questi terminali.
Poznámky k zapojení reproduktorů
•
Používejte reproduktory a impedancí 4 až 8 ohmů a s odpovídajícími požadavky na proud. Jinak by mohlo dojít ke jejich po
π
kození.
•
Kontakty od reproduktorů nezapojujte na karoserii auta a konektory od pravého reproduktoru nespojujte s konektory od levého
reproduktoru.
•
Nezapojujte reproduktory paralelně.
•
Do zdířek pro reproduktory na tomto přístroji nezapojujte žádné aktivní reproduktory (se zabudovaným zesilovačem). Mohlo by tak
dojít k po
π
kození aktivních reproduktorů. Proto se přesvědčte, abyste na tento přístroj zapojili pasivní reproduktory.
Hoparlör bağlantı notları
•4 ile 8 ohm empedansa ve yeterli güç kapasitesine sahip hoparlörler kullanınız. Aksi takdirde hoparlörler zarar görebilir.
•Hoparlör sistemin terminallerini otomobilin şasisine bağlamayınız ve sağ hoparlörün terminallerini de diğer hoparlörün terminallerine
bağlamayınız.
•Hoparlörleri paralel olarak bağlamayınız.
•Ünitenin spiker terminallerine, çalışan başka bir hoparlör (amplifikatör takılı olan) takmayınız. Bu çalışan hoparlörlere zarar verebilir.
Bu yüzden bu terminallere taktığınız hoparlörlerin pasif olmasına dikkat ediniz.
XR-1800
5
Max, supply current 0.1 A
Courant maximum fourni: 0,1 A
Alimentazione massima fornita 0,1 A
max. proud 0.1 A
Azami cereyan desteği 0.1 A
ANT REM
Fuse (10 A)
Fusible (10 A)
Fusibile (10 A)
Pojistka (10 A)
Sigorta (10 A)
Red
Rouge
Rosso
červený
Kırmızı
Yellow
Jaune
Giallo
žlutý
Sarı
Blue
Bleu
Blu
modrý
Mavi
Front speakers
Haut-parleurs avant
Diffusori anteriori
Přední reproduktory
Ön hoparlörler
Rear speakers
Haut-parleurs arrière
Diffusori posteriori
Zadní reproduktory
Arka hoparlörler
Black
Noir
Nero
černý
Siyah
from a car antenna
depuis une antenne de voiture
da un’antenna per auto
od autoantény
Otomobil anteninden
7*
*Note for the aerial connecting
If your car aerial is an ISO (International
Organization for Standardization) type, use
the supplied adapter 7to connect it.
*Remarque sur le raccordement de
l’antenne
Si votre antenne de voiture est de type ISO
(organisation internationale de
normalisation), utilisez l’adaptateur fourni 7
pour la raccorder.
*Nota per il collegamento dell’antenna
Se la vostra antenna della macchina è di tipo
ISO (International Organization
Standardisation), utilizzare l’adattatore 7in
dotazione per collegarla.
*
Poznámka k zapojení antény
Jestliže máte autoanténu ISO
(International Organization for
Standardization - Mezinárodní organizace
pro standardizaci), použijte k zapojení
adaptér
7
z příslu
π
enství.
*Anten bağlantı notu
Otomobil anteniniz bir ISO (International
Organisation for Standardization) tipi ise
bağlantı için ünite ile verilen adaptörü 7
kullanınız.


