SONY XS-GTR1720_U [US,FR,ES] 4-154-938-11 (1) SONY XS-GTR1720_U [US,FR,ES] 4-154-938-11 (1)
Specifications
Speaker Coaxial 2-way:
Woofer 16.5 cm (6 5/8in) cone
type
Tweeter 2.5 cm (1 in) dome
type
Short-term maximum power*1320 W*2
Rated power 75 W*2
Rated impedance 4 Ω
Output sound pressure level 86±2 dB (1 W, 1 m)*2
Effective frequency range 50 – 22,000 Hz*2
Mass Approx. 1,100 g (2 lb 7 oz) per
speaker
Supplied accessories Parts for installation
Design and specifications are subject to change without notice.
*1“Short-term maximum power” may also be referred to as “Peak
Power”.
*2Testing Condition: IEC 06268-5 (2003-05)
Caractéristiques techniques
Haut-parleur Coaxial à 2 voies :
Haut-parleur de graves de
16,5 cm (6 5/8po) de type
conique
Haut-parleur d'aigus de 2,5 cm
(1 po) de type dôme
Puissance maximale à court terme*1
320 W*2
Puissance nominale 75 W*2
Impédance nominale 4 Ω
Niveau de pression acoustique de sortie
86±2 dB (1 W, 1 m)*2
Plage de fréquences efficace 50 – 22 000 Hz*2
Poids Environ 1 100 g (2 lb 7 oz) par
haut-parleur
Accessoires fournis Éléments d’installation
La conception et les caractéristiques techniques sont sujettes à
modification sans préavis.
*1La « Puissance maximale à court terme » peut aussi être
désignée sous le nom de « Puissance de crête ».
*2Condition d’essai: CEI 06268-5 (2003-05)
Precautions
Do not continuously use the speaker system beyond
the peak power handling capacity.
Keep recorded tapes, watches, and personal credit
cards using magnetic coding away from the speaker
system to protect them from damage caused by the
magnets in the speakers.
If you cannot find an appropriate mounting
location, consult your car dealer or your nearest
Sony dealer before mounting.
Précautions
Évitez de soumettre le système de haut-parleurs à
une utilisation continue au-delà de la puissance
crête admissible.
Gardez les bandes enregistrées, les montres et les
cartes de crédit utilisant un code magnétique à
l’écart du système de haut-parleurs pour éviter tout
dommage causé par les aimants des haut-parleurs.
Si vous ne pouvez pas trouver d’emplacement
adéquat pour installer l’appareil, consultez votre
revendeur Sony le plus proche.
4-154-938-11(1)
2-way Speaker
©2009 Sony Corporation Printed in Thailand
XS-GTR1720
Installation/Connections
Installation/Connexions
Instalación/Conexiones
Especificaciones
Altavoz Coaxial de 2 vías:
Graves 16,5 cm, tipo cónico
Agudos de 2,5 cm tipo cúpula
Potencia de pico máximo*1320 W*2
Potencia nominal 75 W*2
Impedancia nominal 4 Ω
Nivel de presión acústica de salida
86±2 dB (1 W, 1 m)*2
Rango de frecuencia efectivo 50 – 22.000 Hz*2
Peso Aprox. 1.100 g por altavoz
Accesorios suministrados Componentes para instalación
Diseño y especificaciones sujetos a cambio sin previo aviso.
*1“Potencia de pico máximo” también puede denominarse
“Potencia de pico”.
*2Condición de verificación: IEC 06268-5 (2003-05)
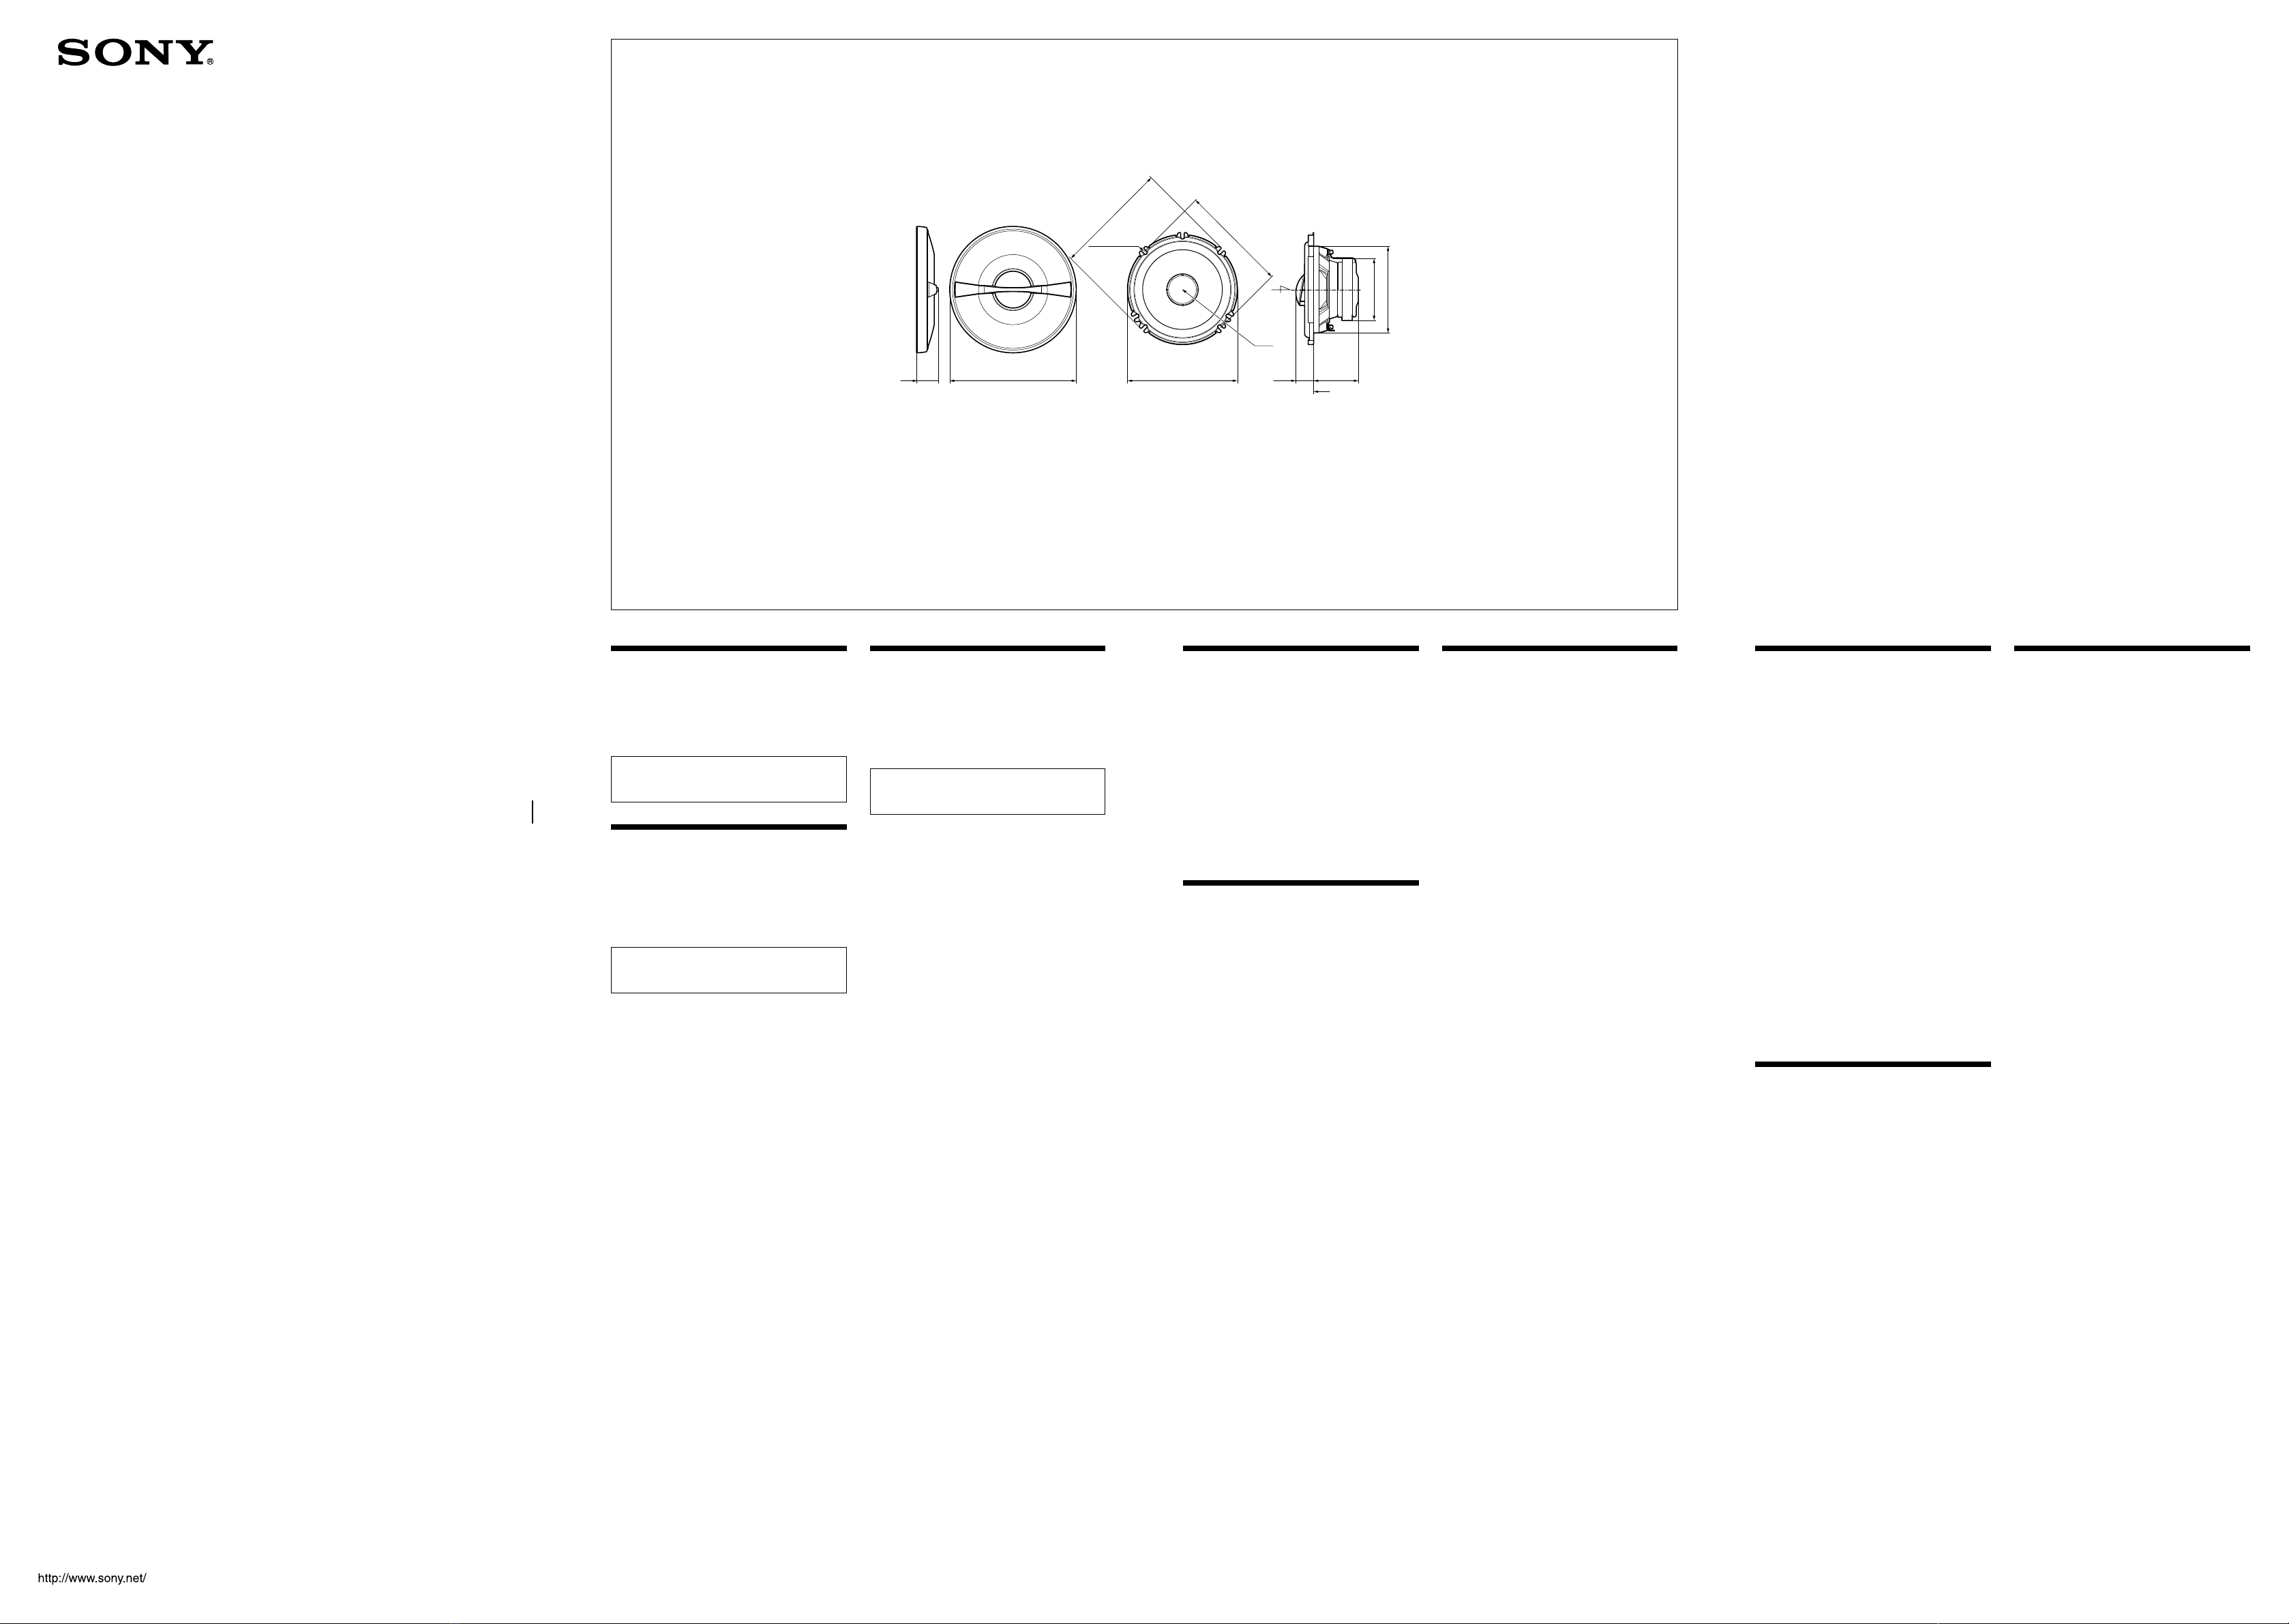
Dimensions
Dimensions
Dimensiones
Unit: mm (in)
Unité: mm (po)
Unidad: mm
Reference Point
Point de référence
Punto de referencia
Reference Plane
Plan de référence
Plano de referencia
Reference Axis
Axe de référence
Eje de referencia
Before mounting
A depth of at least 65 mm (2 5/8in) is required to
mount the woofer. Measure the depth of the area
where you are to mount the speaker, and ensure that
the speaker is not obstructing any other components
of the car. Keep the followings in mind when
choosing a mounting location:
Make sure that nothing is obstructing around the
mounting location of the door (front or rear) or the
rear tray where you are to mount the speaker.
A hole for mounting may already be cut out of the
inner panel of the door (front or rear). In this case,
you need to modify the board only.
If you are to mount this speaker system in the door
(front or rear), make sure that the speaker terminals,
frame or magnet do not interfere with any inner
parts, such as the window mechanism in the door
(when you open or close the window), etc.
Also make sure that the speaker grille does not
touch any inner fittings, such as the window cranks,
door handles, arm rests, door pockets, lamps or
seats etc.
If you are to mount this speaker system in the rear
tray, make sure that the speaker terminals, frame or
magnet do not touch any inner parts of the car, such
as the torsion bar springs (when you open or close
the trunk lid), etc.
Also make sure that the speaker grille does not
touch any inner fittings, such as seat belts, head
rests, center brake lights, inner covers of the rear
wipers, curtains or air purifiers, etc.
Avant le montage
Une profondeur d’au moins 65 mm (2 5/8po) est
nécessaire pour effectuer le montage encastré.
Mesurez la profondeur de l’emplacement où vous
souhaitez monter le haut-parleur et assurez-vous que
ce dernier ne gêne en rien les autres composants du
véhicule. Prenez les points suivants en considération
lors du choix de l’emplacement de montage:
Assurez-vous qu’aucun objet ne fait obstacle à
proximité de l’emplacement de montage sur la
portière (avant ou arrière) ou sur la plage arrière où
vous envisagez de monter le haut-parleur.
Il est possible qu’un trou ait déjà été découpé dans le
panneau intérieur de la portière (avant ou arrière)
ou de la plage arrière. Dans ce cas, il vous suffit de
modifier le panneau.
Si vous envisagez de monter ce système de haut-
parleurs sur la portière (avant ou arrière), assurez-
vous que les bornes, le cadre ou les aimants du haut-
parleur ne sont pas en contact avec des pièces
internes, telles que le mécanisme de la vitre de la
portière (lorsque vous ouvrez ou fermez la vitre),
etc.
Assurez-vous également que la grille du haut-
parleur n’entre pas en contact avec des éléments
internes, tels que les manivelles de lève-vitre, les
poignées de portières, les repose-bras, les vide-
poches, les lampes ou les sièges, etc.
Si vous envisagez de monter ce système de haut-
parleurs sur la plage arrière, assurez-vous que les
bornes, le cadre ou les aimants du haut-parleur
n’entrent pas en contact avec des pièces internes du
véhicule, telles que les ressorts à barre de torsion
(lorsque vous ouvrez ou fermez le coffre), etc.
Assurez-vous également que la grille du haut-
parleur n’entre pas en contact avec des éléments
internes, tels que ceintures de sécurité, appuis-tête,
feux de stop centraux, garnitures intérieures des
essuie-glaces arrière, rideaux ou filtres à air, etc.
Mounting / Montage / Montaje
ø 184 (71/4)
32
(15/16) ø 160 (63/8)
ø 126 (5)
ø 90 (35/8)
26
(11/16)65 (25/8)
5×10
(7/32×7/16)
166 (65/8)
ø 157 (61/4)
Antes del montaje
Para el montaje alineado, es necesaria una
profundidad mínima de 65 mm. Mida la profundidad
del lugar donde desea montar el altavoz y compruebe
que el altavoz no obstruya ningún componente del
automóvil. Antes de elegir el lugar de montaje, se debe
tener en cuenta lo siguiente:
Asegúrese de que no haya obstáculos en el lugar de
montaje de la puerta (frontal o posterior) ni en la
bandeja posterior donde desea instalar el altavoz.
Es posible que ya exista un orificio de montaje en el
panel interior de la puerta (frontal o posterior) o en
la bandeja posterior. En este caso, sólo debe
modificar el tablero.
Si desea montar este sistema de altavoces en la
puerta (frontal o posterior), asegúrese de que los
terminales del altavoz, el marco y el imán no
interfieren con los componentes interiores como,
por ejemplo, el mecanismo de la ventanilla de la
puerta (al abrir o cerrar la ventanilla), etc.
Asegúrese también de que la rejilla del altavoz no
está en contacto con accesorios interiores como, por
ejemplo, los picaportes de las ventanillas y puertas,
los reposabrazos, los compartimientos para guardar
objetos situados en las puertas, las luces o los
asientos, etc.
Si desea montar el sistema de altavoces en la
bandeja posterior, asegúrese de que los terminales
del altavoz, el marco y el imán no están en contacto
con los componentes interiores del automóvil como,
por ejemplo, los resortes de la barra de torsión
(cuando abra o cierre el portaequipajes), etc.
Asegúrese también de que la rejilla del altavoz no
está en contacto con accesorios interiores como, por
ejemplo, los cinturones de seguridad, los
reposacabezas, las luces de frenos centrales, las
cubiertas interiores de los limpiaparabrisas
posteriores, las cortinas o ambientadores, etc.
Precauciones
Procure no utilizar el sistema de altavoces en forma
continua con una potencia que sobrepase la
potencia admisible.
Mantenga alejados del sistema de altavoces las
cintas grabadas, relojes o tarjetas de crédito con
codificación magnética para evitar daños que
posiblemente causarían los imanes de los altavoces.
Si no encuentra un emplazamiento apropiado para
el montaje, consulte al distribuidor de su automóvil
o al distribuidor de Sony más próximo.


 User manual")


