I
E
English
C
D
Capstan
Capstanaxel
主動輪
Lever
Alavanca
控制桿
中文
Português
Recording from
Various Sound
Sources (see Fig. C)
(TCM-200DV only)
Recording with an
External Microphone
Connect a microphone to the MIC
jack.
There is a tactile dot beside the MIC jack.
Use a microphone of low
impedance (less than 3 kΩ) such as
the ECM-115 (not supplied).
When using a plug-in-power
system microphone, the power to
the microphone is supplied from
this unit.
Note
When recording with an external
microphone, the VOR system may not
work properly due to difference in
sensitivity .
Recording from Another
Equipment
Connect another equipment to the
MIC jack using the RK-G64HG
connecting cord (not supplied).
Playing a Tape (see
Fig. D)
1Insert a cassette with the side to
be played facing the cassette
holder.
2For TCM-200DV only:
Set REC TIME/PLAY MODE to
the same position as that used
for recording.
To playback commercially
available music tape, etc., select
NORMAL.
3Press NPLAY and then adjust
the volume.
The NPLAY button has a tactile
dot on it and the VOL control also
has a tactile dot beside it to show the
direction to turn up the volume.
4For TCM-200DV only:
Adjust the tape playback speed.
Turn SPEED CONTROL to:
SLOW (slow) to play back at a
slower speed.
Center position to play back at
normal speed.
FAST (fast) to play back at a
faster speed.
At the end of the tape, playback
stops and the unit turns off
automatically.
If you plug in headphones (not
supplied) to the EAR jack, you will
get monaural output from both left
and right channels.
To
Stop playback/
stop fast
forward or
rewind
Pause playback
Search forward
during
playback (CUE)
Search
backward
during
playback
(REVIEW)
Fast forward**
Rewind**
Start recording
during
playback
Eject a
cassette
* PAUSE .will also be
automatically released when
xSTOP is pressed (stop-pause-
release function).
** If you leave the unit after the tape
has been wound or rewound, the
batteries will be consumed rapidly.
Be sure to press xSTOP.
Note on REVIEW
Playback may not start automatically
even if you release
m REW/REVIEW at the end of the
tape. To start playback again, press
x STOP, then press N PLAY.
BAdditional
Information
Precautions
On power
•Operate the unit only on 3 V DC.
For AC operation, use the AC
power adaptor recommended for
the unit. Do not use any other
type. For battery operation, use
two R6 (size AA) batteries.
On the unit
•Do not leave the unit in a location
near heat sources, or in a place
subject to direct sunlight,
excessive dust or mechanical
shock.
•Should any solid object or liquid
fall into the unit, remove the
batteries or disconnect the AC
power adaptor, and have the unit
checked by qualified personnel
before operating it any further.
•Keep personal credit cards using
magnetic coding or spring-wound
watches, etc. away from the unit
to prevent possible damage from
the magnet used in the speaker.
•If the unit has not been used for a
long time, set it in the playback
mode to warm it up for a few
minutes before inserting a tape.
On tapes longer than 90
minutes
We do not recommend the use of
tapes longer than 90 minutes except
for a long continuous recording or
playback. They are very thin and
tend to be stretched easily. This
may cause malfunction of the unit
or sound deterioration.
If you have any questions or
problems concerning your unit,
please consult your nearest Sony
dealer.
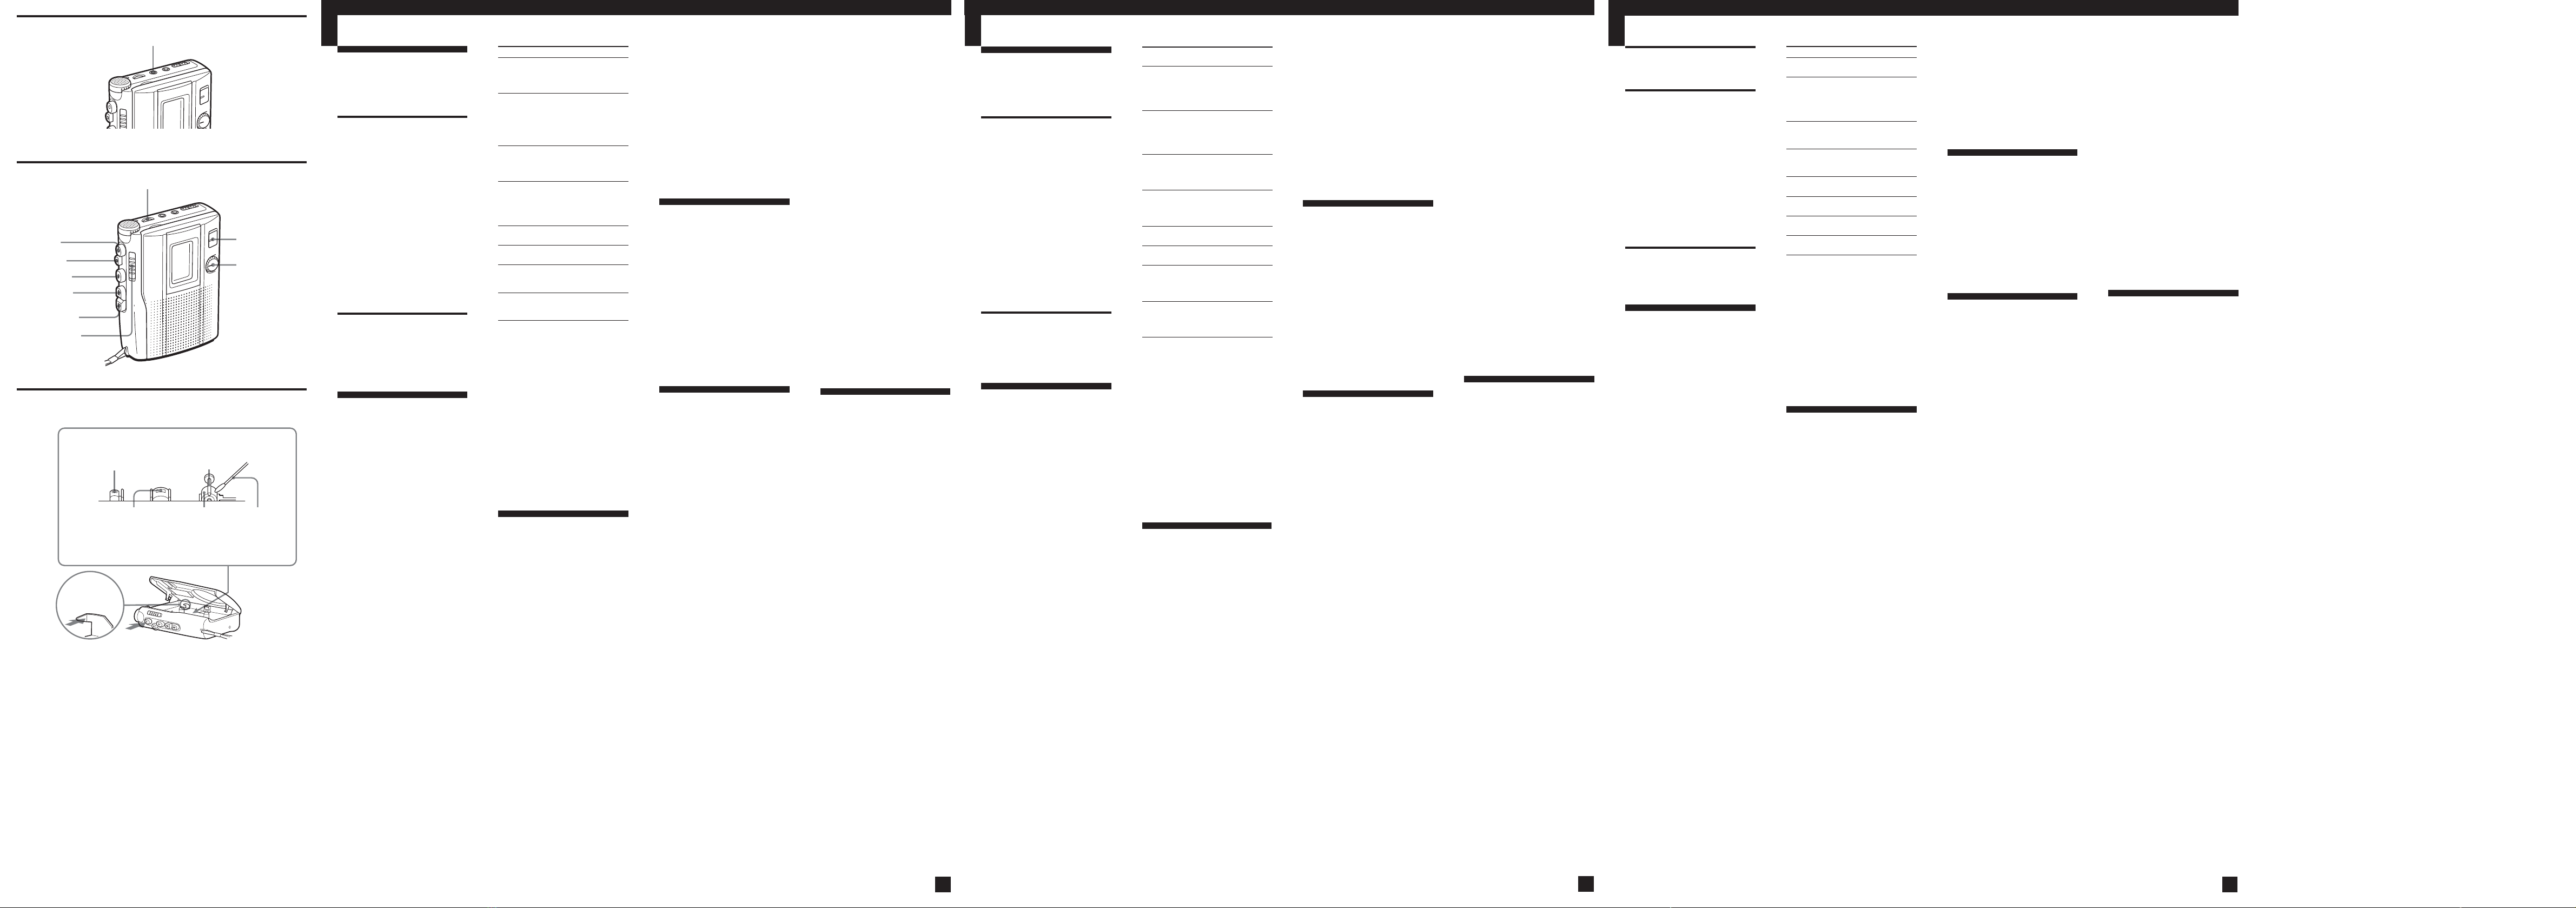
Maintenance
(see Fig. E)
To clean the tape heads and
path
Press zREC while pushing the
lever in the tape compartment.
Wipe the heads, pinch roller, and
the capstan with a cotton swab
moistened with alcohol after every
10 hours of use.
To clean the exterior
Use a soft cloth slightly moistened
in water. Do not use alcohol,
benzine or thinner.
Troubleshooting
Should any problem persist after
you have made these checks,
consult your nearest Sony dealer.
The unit does not operate.
•The batteries have been inserted
with incorrect polarity.
•The batteries are weak.
•PAUSE .is slid in the
direction of the arrow.
•The AC power adaptor is not
firmly connected.
•The unit will not run on dry
batteries if the AC power adaptor
is left plugged into the DC IN 3V
jack even though you disconnect
the AC power adaptor from the
power source (this does not apply
to TCM-150 for USA/Canada/
Europe).
You cannot press zREC.
•The tab on the tape has been
removed.
Recording cannot be made.
•Connection is made incorrectly.
•VOR has been set to the improper
position when VOR function
works (TCM-200DV only).
Recording is interrupted.
•VOR is set to H or L. When you
do not use VOR, set it to OFF
(TCM-200DV only).
Recording cannot be erased
completely.
•The erase head is contaminated.
•You are using a High-position
(TYPE II) or metal (TYPE IV) tape.
You cannot play the tape.
•The tape has reached the end.
Rewind the tape.
Press or slide
xSTOP
PAUSE .in the
direction of the
arrow
To release pause
playback, release
PAUSE .*.
Press and hold
MFF/CUE and
release it at the point
you want.
Press and hold
mREW/REVIEW
and release it at the
point you want.
MFF/CUE during
stop
mREW/REVIEW
during stop
zREC
Press xSTOP and
open the cassette
compartment lid.
No sound comes from the
speaker.
•The earphone is plugged in.
•The volume is turned down
completely.
The sound drops out or has with
excessive noise.
•The volume is turned down
completely.
•The batteries are weak.
•Use the unit away from
radiowave-emitting devices such
as cellular phones.
•The heads need cleaning. See
“Maintenance.”
•Direct placement of the cassette
tape on the speaker resulted in
magnetization and deteriorated
tonal quality.
• You are using a High-position
(TYPE II) or metal (TYPE IV) tape.
Tape speed is too fast or too slow
in Playback mode.
•Improper setting of the REC
TIME/PLAY MODE switch. Set it
to the same speed as that used for
recording (TCM-200DV only).
•SPEED CONTROL is set at a point
other than the center (TCM-
200DV only).
•The batteries are weak.
Specifications
Recording system
2-track 1 channel monaural
Tape speed
4.8 cm/s or 2.4 cm/s
Frequency range
250 - 6 300 Hz using nomal (TYPE
I) cassette (with REC TIME/PLAY
MODE switch* at “NORMAL”)
*TCM-200DV only
Speaker
Approx. 5.0 cm (2 in.) dia.
Power output
TCM-200DV: 350 mW (at 10 %
harmonic distortion)
TCM-150: 250 mW (at 10 %
harmonic distortion)
Input (TCM-200DV only)
Microphone input jack (minijack)
sensitivity 0.2 mV for 3 kΩor
lower impedance microphone
Output
Earphone jack (minijack) for 8 -
300 Ωearphone
Variable range of the tape speed
From approx. +30% to –15% (with
REC TIME/PLAY MODE switch*
at “NORMAL”)
*TCM-200DV only
Power requirements
•3V DC batteries R6 (AA) x 2
• External DC 3 V power sources
(except TCM-150 for USA/
Canada/Europe)
Dimensions (w/h/d) (incl. projecting
parts and controls)
Approx. 86.9 ×116.3 ×36.5 mm
(3 1/2×4 5/8×1 7/16 in.)
Mass (main unit only)
TCM-200DV :
Approx. 171 g (6.1 oz.)
TCM-150 :
Approx. 169 g (6.0 oz.)
Supplied accessories
Cassette tape C-90 (1) (TCM-150
for USA and Canada only)
Sony alkaline battery (2) (TCM-150
for USA and Canada only)
Design and specifications are subject
to change without notice.
Record/playback
head
Cabeça de gravação/
reprodução
錄音播放磁頭
Erase head
Cabeça de eliminaçao
擦去磁頭
Cotton swab
Bomullspinne
(tops)
棉棒
MIC (PLUG IN POWER)
zREC
VOL
SPEED CONTROL
(TCM-200DV only)
(Só no TCM-
200DV)
(TCM-200DV 為限)
REC TIME
/PLAY MODE
(TCM-200DV only)
(Só no TCM-
200DV)
(TCM-200DV 為限)
mREW/
REVIEW
xSTOP
NPLAY
PAUSE .
>FF/CUE
Pinch-roller
Roletes
壓輪
Gravar a partir de
várias fontes de som
(ver a Fig. C)
(Só no TCM-200DV)
Gravar com um
microfone exterior
Ligue um microfone à tomada MIC.
Existe um ponto táctil ao lado da tomada
MIC.
Utilize um microfone de baixa
impedância (menos de 3 kΩ), como
o ECM-115 (não fornecido).
Se estiver a utilizar um microfone
com o sistema ‘plug-in-power’, o
microfone recebe energia do
aparelho.
Nota
Quando se utiliza um microfone
exterior para gravar, o sistema VOR
pode não funcionar correctamente
devido à diferença de sensibilidade.
Gravar com outro
equipamento
Ligue outro equipamento à tomada
MIC utilizando o cabo de ligação
RK-G64HG (não fornecido).
Reprodução de
cassetes (ver a Fig. D)
1Introduza uma cassete com o
lado que pretende reproduzir
virado para o compartimento
de cassetes.
2Só no TCM-200DV:
Coloque REC TIME/PLAY
MODE na posição que utilizou
para a gravação.
Para reproduzir uma cassete de
música à venda no mercado,
etc., seleccione NORMAL.
3Carregue em NPLAY e
depois ajuste o volume.
O botão NPLAY tem um ponto
táctil e ao lado do controlo VOL
também existe um ponto táctil para
ajudá-lo a regular o volume.
4Só no TCM-200DV:
Regule a velocidade de
reprodução da cassete.
Rode SPEED CONTROL para:
SLOW (lenta) para efectuar a
reprodução a uma velocidade
lenta.
A posição central para efectuar
a reprodução à velocidade
normal.
FAST (rápida) para efectuar a
reprodução a uma velocidade
rápida.
A reprodução pára no final da
cassete e o gravador desliga-se
automaticamente.
Se ligar os auscultadores (não
fornecidos) à tomada EAR, obtém a
saída mono a partir dos canais
esquerdo e direito.
*Ao carregar em xSTOP desactiva
também automaticamente a tecla
PAUSE .(função de libertação
stop-pause).
** Se deixar o aparelho ligado depois
da cassete ter sido rebobinada, as
pilhas gastam-se rapidamente. Não
se esqueça de carregar na tecla
xSTOP.
Nota acerca de REVIEW
A reprodução pode não começar
automaticamente, mesmo que liberte
mREW/REVIEW no fim da fita.
Para voltar a reproduzir, carregue em
xSTOP e depois em NPLAY.
B
Informações adicionais
Precauções
Corrente eléctrica
•Este aparelho só funciona com
corrente de 3 V CC. Para
funcionar com CA, utilize o
transformador de corrente CA
recomendado para este aparelho.
Não utilize nenhum outro tipo.
Para funcionar com pilhas,
introduza duas pilhas R6
(tamanho AA).
Aparelho
•Não coloque o aparelho perto de
fontes de calor, em locais sujeitos
à incidência directa dos raios
solares, poeiras ou a choques
mecânicos.
•Se cair um objecto ou um líquido
dentro do aparelho, retire as
pilhas ou desligue o
transformador de corrente CA e
mande-o reparar por pessoal
qualificado antes de voltar a
utilizá-lo.
•Mantenha os cartões de crédito
com códigos magnéticos, os
relógios de corda, etc. longe do
aparelho de modo a evitar
possíveis danos provocados pelo
íman do altifalante.
•Se o gravador já não é utilizado
há muito tempo, coloque-o em
modo de reprodução e deixe-o
aquecer durante alguns minutos
antes de introduzir a cassete.
Sobre as cassetes com uma
duração superior a 90 minutos
Não recomendamos a utilização de
cassetes com uma duração superior
a 90 minutos, excepto durante
gravações ou reproduções muito
longas. A fita destas cassetes é
muito fina e estica com grande
facilidade. Isto pode provocar uma
avaria no aparelho ou a diminuição
da qualidade do som.
Se surgirem dúvidas ou problemas
relacionados com o aparelho, consulte
o agente Sony mais próximo.
Manutenção (ver a
Fig. E)
Para limpar as cabeças da
cassete e respectivos acessórios
Carregue em zREC enquanto
carrega no botão do compartimento
de cassetes.
Limpe as cabeças, o rolete de
compressão e o cabrestante com um
cotonete embebido em álcool sempre
que atingir as 10 horas de utilização.
Para limpar a caixa
Utilize um pano macio ligeiramente
humedecido em água. Não utilize
álcool, benzina nem diluente.
Resolução de problemas
Se algum problema persistir depois
de pôr em prática estas verificações,
entre em contacto com o agente
Sony mais próximo.
O aparelho não funciona.
•As pilhas foram colocadas com a
polaridade incorrecta.
•As pilhas estão fracas.
•PAUSE .foi empurrado na
direcção da seta.
•Otransformador de corrente CA
não está bem ligado.
•Oaparelho não funciona com
pilhas secas se desligar o
transformador de CA da fonte de
alimentação mas o deixar ligado à
tomada DC IN 3V (isto não se
aplica ao modelo TCM-150 para
os EUA/Canadá/Europa).
Não se consegue carregar em
zREC.
•Apatilha da cassete foi retirada.
Não se consegue gravar.
•Aligação está incorrecta.
•VOR está colocado numa posição
não compatível com o
funcionamento da função VOR
(Só no TCM-200DV).
A gravação é interrompida.
•VOR está na posição H ou L. Se
não pretende utilizar VOR,
ajuste-o para a posição OFF (Só no
TCM-200DV).
Não se consegue apagar a
gravação completamente.
•Acabeça de eliminação está suja.
•Está a utilizar uma cassete High-
position (TYPE II) ou de metal
(TYPE IV).
Não consegue reproduzir a cassete.
•Acassete chegou ao fim.
Rebobine-a.
Não se ouve som do altifalante.
•Oauricular está ligado.
•Ovolume está no mínimo.
O som diminui ou está com muito
ruído.
•Ovolume está no mínimo.
•As pilhas estão fracas.
•
Utilize o aparelho, mantendo-o
afastado de dispositivos emissores
de ondas de rádio, como telemóveis.
•Épreciso limpar as cabeças.
Consulte “Manutenção”.
•Colocou a cassete directamente
sobre o altifalante, provocando a
magnetização e a diminuição da
qualidade do som.
• Está a utilizar uma cassete High-
position (TYPE II) ou de metal
(TYPE IV).
A velocidade da fita é demasiado
rápida ou lenta no modo de
reprodução.
•Oselector REC TIME/PLAY
MODE está numa posição errada.
Coloque-o na posição
correspondente à velocidade
utilizada para a gravação (Só no
TCM-200DV).
•SPEED CONTROL não está
colocado na posição central (Só no
TCM-200DV).
•As pilhas estão fracas.
Especificações
Sistema de gravação
2 faixas, 1 canal mono
Velocidade da fita
4,8 cm/s ou 2,4 cm/s
Gama de frequência
250 - 6 300 Hz utilizando uma
cassete normal (TYPE I) (com o
selector REC TIME/PLAY MODE*
na posição “NORMAL”)
*Só no TCM-200DV
Altifalante
Aprox. 5,0 cm de diâmetro
Potência de saída
TCM-200DV: 350 mW (a 10 % de
distorção harmónica)
TCM-150: 250 mW (a 10 % de
distorção harmónica)
Entrada (Só no TCM-200DV)
Tomada de entrada de microfone
(minitomada) com sensibilidade
de 0,2 mV para microfones de 3 kΩ
ou de baixa impedância.
Saída
Tomada de auricular (minitomada)
para auricular de 8 - 300 Ω
Intervalo variável da velocidade da
cassete
Entre +30% e –15% (com o selector
REC TIME/PLAY MODE* na
posição “NORMAL”)
*Só no TCM-200DV
Condições de alimentação
necessárias
•Pilhas R6 (AA) 3 V CC ×2
•Fontes de alimentação externas
CC 3 V (excepto no modelo
TCM-150 para os EUA/Canadá/
Europa)
Dimensões (l/a/p) (incl. peças e
controlos salientes)
Aprox. 86,9 ×116,3 ×36,5 mm
Peso (somente aparelho principal)
TCM-200DV : Aprox. 171 g
TCM-150 : Aprox. 169 g
Acessórios fornecidos
Cassete com C-90 (1) (modelo TCM-
150 só para os EUA e Canadá)
Pilhas alcalinas da Sony (2) (modelo
TCM-150 só para os EUA e Canadá)
O design e as especificações estão
sujeitos a alterações sem aviso prévio.
Para
Parar a
reprodução/
parar o avanço
rápido ou a
rebobinagem
Fazer uma
pausa na
reprodução
Pesquisar para
a frente durante
a reprodução
(CUE)
Pesquisar para
trás durante a
reprodução
(REVIEW)
Avançar
rapidamente**
Rebobinar**
Começar a
gravar
durante a
reprodução
Ejectar uma
cassete
Carregue ou faça
deslizar
xSTOP
PAUSE .na
direcção da seta
Para retomar a
reprodução, liberte a
tecla PAUSE .*.
continuamente em
MFF/CUE e depois
solte-a no ponto
pretendido
continuamente em
mREW/REVIEW e
depois solte-a no
ponto pretendido
MFF/CUE durante
a paragem
mREW/REVIEW
durante a paragem
zREC
Carregue em xSTOP
e abra a tampa do
compartimento de
cassetes.
從各種不同聲源錄音
(參看圖 C)
(TCM-200DV 為限)
使用外部麥克風錄音
將麥克風連接到 MIC 插孔。
在 MIC(麥克風)插孔旁邊有一觸感點。
請使用較低阻抗(3 kΩ以下)
的麥克風,例如 ECM-115(無附帶)
等。
當使用插入式電源系統麥克風
時,給麥克風的電源是由本機提供
的。
註
當使用外接麥克風錄音時,VOR 系統可
能不能發揮適當的作用。因為所用麥克
風的靈敏度各不相同。
從其他設備錄音
請用 RK-G64HG 連接導線(無附
帶)將其他設備接插到 MIC 插孔。
播放磁帶(參看圖 D)
1裝入磁帶讓要播放面朝磁帶座方
向。
2用於 TCM-200DV 為限:
將 REC TIME/PLAY MODE 設定於和
錄音所用相同的位置。
要播放巿售錄音帶等時,請選擇
NORMAL(正常)。
3按 N PLAY,然後調整音量。
N
PLAY 按鈕上有一觸感點,VOL
控制器旁邊也有一觸感點表示能直
接轉大音量。
4用於 TCM-200DV 為限:
調整磁帶速度。
將 SPEED CONTROL(速度控制)
轉到:
SLOW(慢)以較慢速度播放。
中央位置以便常速播放。
FAST(快)以較快速度播放。
當磁帶播到終端時,即停止播放
而機器將自動地關掉電源。
若將頭戴耳機(另售)插入 EAR
插孔,您將從左、右聲道獲得單聲道
音。
要
停止播放停止
快前繞或繞回
暫停播放
播放中向前搜索
(CUE)
播放中向後搜索
(REVIEW)
快前繞**
繞回**
播放中,開始錄
音
排出磁帶
*當按 x STOP 時,PAUSE . 也將自
動地釋放(停止–暫停–釋放功
能)。
** 如果磁帶已經繞完或回繞完而機器仍
被放置著時,電池將消耗得很快。故
一定要按 x STOP。
REVIEW(檢閱)須知
在磁帶末端,即使釋放了 m REW/
REVIEW 播放仍然可能不會自動地開
始。要再開始播放時,請按 x STOP,
然後按 N PLAY。
B
附加資訊
使用前須注意
電源須知
•限使用 DC 3 V 電源操作機器。使用
AC 電源操作時,須用適用於機器的
AC 電源轉接器。請勿使用其他型式
的轉接器。用電池操作時,請用兩
個 R6(AA,3 號)電池。
機器須知
•不要讓機器靠近熱源,可直接照射
到陽光,多塵,潮濕或可受到機械
衝擊的地方放置。
•萬一有任何雜物或液體掉入機器內
時,即取出電池或拔下 AC 電源轉
接器,然後找持有資格的人檢查過
以後才可以再接電源使用。
•用磁碼的個人信用卡等或用發條的
手錶等應遠離機器放置以免被揚聲
器所用磁鐵損壞。
•曾經長時間沒用的機器,在裝插磁
帶使用以前,請呈放音模式溫機幾
分鐘之後才操作使用。
90 分以上長的磁帶須知
除非要作長時間的連續錄音或播
放,否則最好不採用長 90 分以上的
磁帶。因為這種磁帶極薄,很容易拉
伸變形而可能引起機器故障或聲音變
質。
凡對您的機器抱有任何疑問時,
即請洽詢附近的 Sony 銷售店。
維護(參看圖 E)
要清潔磁頭和磁帶通道時
按著磁帶室中操作桿,同時按
z REC。
每使用過 10 個小時之後,即請
用棉棒蘸濕酒精擦拭磁頭,壓輪,和
主動輪。
清潔機器外殼
用軟布蘸濕清水擦拭之。請勿使
用酒精,汽油或稀釋劑清潔。
故障排除
用下列各項檢察過後而仍不能解
決問題時,請洽詢附近的 Sony 銷售
店。
機器不操作。
•電池裝錯了極性。
•電池電力變弱了。
•PAUSE . 被滑向箭頭所指方向。
•AC 電源轉接器沒有接插穩固。
•如果AC電源轉接器仍然保留接插在
DC IN 3V 插孔,則即使已將 AC
電源轉接器從電源插座上拔下了也
還是不能用乾電池操作機器的(這
不適用於美國加拿大歐洲用的
TCM-150)。
按不下 z REC。
•磁帶上的小翼已被折除。
不能錄音。
•沒連接正確。
•VOR 功能起作用時,VOR 設定的位
置不妥當(TCM-200DV 為限)。
錄音呈間歇狀態。
•VOR 設定於 H 或 L。不用 VOR 時,
請把它設定於 OFF。(TCM-200DV 為
限)
錄音時不能完全擦除舊錄音。
•擦除磁頭髒了。
•使用高位 (TYPE Ⅱ) 或金屬 (TYPE
Ⅳ) 磁帶。
不能播放磁帶。
•磁帶已到達終端。請繞回磁帶。
請按或滑動
x STOP
PAUSE . 沿箭頭
所指方向
要解除暫停放音模式
時,請釋放
PAUSE .*。
按住 M FF/CUE 而
在所要播放點上釋放
之。
按住 m REW/
REVIEW而在所要播放
點上釋放之。
停止中,按 M FF/
CUE
停止中,按
m REW/REVIEW
z REC
按 x STOP 並打開
磁帶室蓋。
揚聲器沒聲音。
•連接著耳機。
•音量被轉到最小。
跳音或噪音過大。
•音量被轉到最小。
•電池電力變弱了。
•請遠離行動電話等無線電波發射裝
置處使用本機。
•磁頭必須清潔。參看“維護”。
•直接將磁帶放在揚聲器上會引起磁
化和音質劣化。
•用了高位 (TYPE Ⅱ) 或金屬 (TYPE
Ⅳ)磁帶。
在播放模式中,磁帶速度設定得太快
或太慢。
•REC TIME/PLAY MODE 開關設定得不
適當。請把它設定於錄音時用的相
同的速度。(TCM-200DV 為限)
•SPEED CONTROL 不是設定在中央位
置(TCM-200DV 為限)。
•電池電力變弱了。
規格
錄音系統
2 軌跡 1 聲道單聲道
磁帶速度
4.8 cm秒或 2.4 cm秒
頻率範圍
250 - 6 300 Hz,使用標準 (TYPE Ⅰ)
磁帶(REC TIME/PLAY MODE 開關*設
定於“NORMAL”(正常))
*TCM-200DV 為限
揚聲器
大約 5.0 cm 直徑
功率輸出
TCM-200DV: 350 mW(10% 諧波失真
時)
TCM-150: 250 mW(10% 諧波失真
時)
輸入端子(TCM-200DV 為限)
麥克風輸入插孔(小型插孔)靈敏度
0.2 mV,用於 3 kΩ以下阻抗的麥克
風
輸出端子
8 - 300Ω耳機用的耳機插孔(小型
插孔)
磁帶速度的可變範圍
從 +30% 到 -15%(REC TIME/PLAY
MODE 開關*設定於“NORMAL”(正
常))
*TCM-200DV 為限
電源
•3 V DC 電池 R6(AA,3 號)× 2
•外部 DC 3 V 電源(美國加拿
大歐洲用的 TCM-150 除外)
尺寸(寬高縱深)(含突出部分和
控制器)
大約 86.9 × 116.3 × 36.5 mm
質量(主機為限)
TCM-200DV:大約 171 g
TCM-150:大約 169 g
隨機附件
磁帶 C-90 (1)(美國和加拿大用
TCM-150 為限)
Sony 鹼性電池 (2)(美國和加拿大
用的 TCM-150 為限)
設計和規格有所變更時,恕不另行奉
告。


