SONY RDR-VX521 QSG US 2-672-436-11(1) AK68-00992A
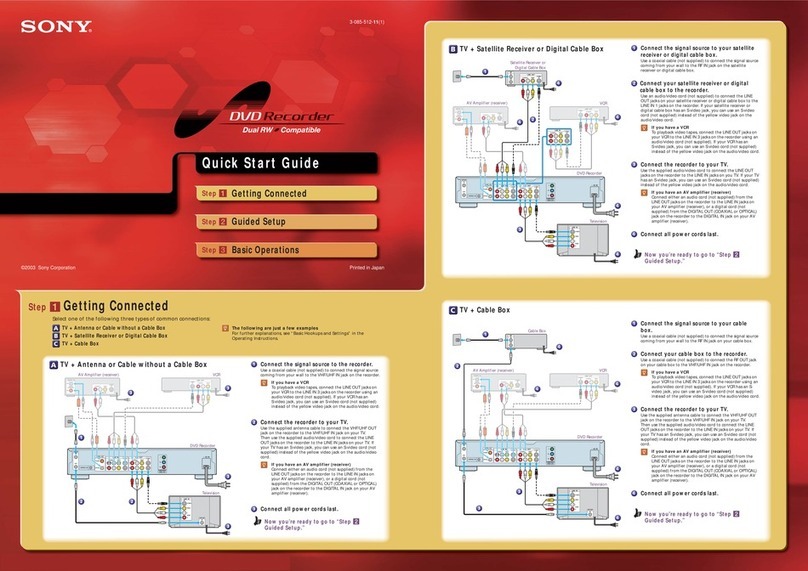
The following explains how to record
a current TV program. For instructions
on how to set the timer, see the timer
recording sections in the Operating
Instructions.
1 Press DVD to record to a DVD
disc.
Or, press VIDEO to record to a
VHS tape.
2 Press CH+/– to select a
channel.
The channel number appears in the
front panel display.
If you are not using the Set Top Box
controller:
• If you connected your cable box or
satellite receiver to the Line 1 input of
the VCR-DVD recorder, press INPUT
SELECT until “LINE1” appears in
the front panel display. Then select a
channel on your cable box or satellite
receiver.
• If you connected your cable box to the
VCR-DVD recorder’s antenna input
jack, select channel 3 or 4, whichever
channel is used to receive the signal
from the cable box. Then select a
channel on your cable box.
Playback the
Recorded DVD Disc
1 Press DVD to operate the DVD
recorder.
2 Press TITLE LIST.
The Title List menu appears.
3 Press / to select the title you
want to play and press ENTER.
The sub-menu appears.
4 Press / to select “Play” and
press ENTER.
Playback starts from the beginning of the
title.
Playback the
Recorded VHS Tape
1 Press VIDEO to operate the VCR.
2 Press / to find the point
you want to start playback.
For further explanations, see “VCR
Playback” in the Operating Instructions.
3 Press PLAY.
Playback starts.
Insert a DVD Disc
1 Press DVD to operate the DVD
recorder.
2 Press OPEN/CLOSE and
place a recordable DVD on the
disc tray.
3 Press OPEN/CLOSE again
to close the disc tray.
Wait until “LOAD” disappears from the
front panel display.
See “Quick Guide to Disc Types” in the
Operating Instructions for more details
about the differences between disc
types.
The Easy Setup display automatically appears on your TV screen when you turn
on your recorder for the first time. Follow the steps below to make the minimum
number of basic adjustments to use the recorder.
If you make a mistake, press RETURN.
3 Press REC MODE repeatedly to
select the recording mode.
When recording to a DVD disc:
HQ, HSP, SP, LSP, ESP, LP, EP, or SLP
HQ offers the best quality picture, but with
the shortest recording time. Recording time
increases with each successive mode, but
the picture quality gradually deteriorates.
When recording to a VHS tape:
SP or EP
EP (Extended Play) provides recording time
three times as long as SP (Standard Play).
However, SP produces better picture and
audio quality.
4 Press REC.
The recorder starts recording. To stop
recording, press STOP.
1/4
Title List(Original)
Ch 23
May/02/2006
08:00 PM
10:10 AM
No. Title Length Edit
01 >
02 >
03 >
04 >
Ch 23 01:29:03
Ch 66 00:31:23
Ch 95 01:59:00
Ch 97 00:58:56
ENTER SYSTEM
MENU
Move Enter Return Exit
1/4
Title List (Original)
Ch 23
May/02/2006
08:00 PM
10:10 AM
No. Title Length Edit
01 >
02 >
03 >
04 >
Ch 23 01:29:03
Ch 66 00:31:23
Ch 95 01:59:00
Ch 97 00:58:56
ENTER SYSTEM
MENU
Move Enter Return Exit
Play
Title Erase
Chapter Erase
Protect
Title Name
A-B Erase
Divide Title
Insert a VHS Tape
1 Press VIDEO to operate the
VCR.
2 Insert a tape with its safety tab
in place.
Record a TV Program
112233
445566
778899
00
REC
MODE
OPEN/
CLOSE
CH/
TRACKING
INPUT
SELECT
DISPLAY
TITLE
LIST
ENTER
REC
ENTER
DVDDVD
VIDEOVIDEO
RETURN
Label side facing up
/ (on/standby)
SYSTEM MENU
8b Press M/m to select
whether or not
you have a cable
connection, and press
ENTER.
If you have cable, select “Cable.”
If not, select “Antenna.”
9b The Tuner Preset
function starts
searching for all
receivable channels.
This may take a couple
of minutes.
Initial setting necessary to operate the
DVD recorder will be made.
You can change them later using setup.
Easy Setup
ENTER
SYSTEM
MENU
Enter Return Exit
Start
6 Press M/m to select “Manual” and
press ENTER.
Press M/m to set the month and press ,.
Set the day, year, hour, minutes, and AM/PM
in the same way. Then press ENTER.
7 Press M/m to select whether or
not you want to use the Set Top
Box control function, then press
ENTER.
8a Press the number buttons to
enter the brand code of your
cable box or satellite receiver.
Then select “OK” and press
ENTER.
Find the brand code of your
cable box or satellite receiver
in the “Cable Box/Satellite Receiver Brand
Code” list of the Operating Instructions.
9a Press M/m to select the cable
box/satellite receiver output
channel, then press ENTER.
If you connected your cable box or satellite
receiver to the VCR-DVD recorder’s audio/
video input, select the “Line” number you
connected to. If you connected to the
VCR-DVD recorder’s antenna input, select
the “Ch (channel)” used to receive the signal
from the cable box.
10 Press M/m to select the type
of TV you have, then press
ENTER.
If you have a wide-screen TV, select “16:9.”
If you have a standard TV, select either “4:3
Letter Box”(shrink to fit) or “4:3 Pan Scan”
(stretch to fit). This will determine how "wide-
screen" images are displayed on your TV.
11 Press / to select the type of
Dolby Digital signal you want
to send to your AV amplifier
(receiver), then press ENTER.
If your AV amplifier (receiver) has a Dolby
Digital decoder, select “Dolby Digital.” If not,
select “D-PCM.”
12 Press / to select the type of
DTS signal you want to send
to your AV amplifier (receiver),
then press ENTER.
If your AV amplifier has a DTS decoder,
select “On.” If not, select “Off.”
13 When “Finish” appears, press
ENTER to complete Easy
Setup.
Test your
Set Top Box
controller
If you connected a Set Top Box
controller, do the following:
1 Turn on the recorder and
the cable box/satellite
receiver.
2 Point the remote at the
recorder (not at the cable
box/satellite receiver).
3 Press CH+/- and confirm
that the channel changes
on the cable box/satellite
receiver window.
If the recorder does not control
your cable box or satellite receiver,
see “If you cannot get the recorder
to control your cable box/satellite
receiver” at the end of “Step 7: Easy
Setup” in the Operating Instructions.
1 Turn on your TV and any other
connected equipment such as
your cable box or satellite receiver.
2 Press I/1 on the VCR-DVD
recorder.
3 Switch the input selector on
your TV so that the signal from
the recorder appears on your TV
screen.
If “Initial setting necessary to operate the
DVD recorder will be made. You can change
them later using setup.” does not appear on
your TV screen, select “Easy Setup” from
“Setup” in the System Menu.
4 Press ENTER.
5 Press M/m to select a language for
the on-screen display, then press
ENTER.
Select a method for setting the clock.
If you select "Auto", this recorder will look
for a time signal when you turn it off.
Auto
Manual
Easy Setup
ENTER
SYSTEM
MENU
Move Enter Return Exit
Yes
No
Easy Setup
Do you want to control
your set top box with this recorder?
(Changes to the current setting will
erase all timer settings.)
ENTER
SYSTEM
MENU
Move Enter Return Exit
10:10 AM
Easy Setup
Cancel
Enter the brand code of
your set top box.
ENTER
SYSTEM
MENU
Move Enter Return Exit
10:10 AM
OK
Line1
Line2
Ch3
Ch4
Easy Setup
Select input line or
Set Top Box's output channel.
ENTER
SYSTEM
MENU
Move Enter Return Exit
10:10 AM
Select your TV screen type.
Easy Setup 10:10 AM
16 : 9
4 : 3 Letter Box
4 : 3 Pan Scan
ENTER
SYSTEM
MENU
Move Enter Return Exit
Easy Setup
Searching for receivable Channels. 25
Please wait.
10:10 AM
SYSTEM
MENU
Return Exit
Select the way in which you will receive
channels.
Antenna
Cable
Easy Setup 10:10 AM
ENTER
SYSTEM
MENU
Move Enter Return Exit
Select the screen language.
English
Français
Español
Easy Setup
ENTER
SYSTEM
MENU
Move Enter Return Exit
Easy Setup is finished.
Finish
Easy Setup 10:10 AM
ENTER
SYSTEM
MENU
Move Enter Return Exit
Dolby Digital
Easy Setup 10:10 AM
D-PCM
Dolby Digital
ENTER
SYSTEM
MENU
Move Enter Return Exit
DTS
Easy Setup 10:10 AM
On
Off
ENTER
SYSTEM
MENU
Move Enter Return Exit
///ENTER
Press ENTER to
make a selection
Number buttons
Dub
From VHS Tape
to DVD
1 Insert a recordable disc.
2 Insert a source tape.
3 Cue the tape at the start
point, and press < VIDEO.
From DVD to
VHS Tape
1 Insert a recordable tape.
2 Insert a source disc.
3 Select a title on the disc,
and press DVD ,.
Before dubbing, select the
recording mode and make the
necessary audio settings. For
details, see the dubbing section
in the Operating Instructions.

