Sony MDR-RF415RK User manual

ES
Wireless Stereo
Headphone System
3-228-914-14(1)
Sony Corporation © 2001 Printed in Korea
MDR-RF415RK
Operating Instructions
Manual de instrucciones
Istruzioni per l’uso
Manual de instruções
IT
PT
GB

2GB
WARNING
To prevent fire or shock hazard, do not
expose the unit to rain or moisture.
To avoid electrical shock, do not open the
cabinet. Refer servicing to qualified
personnel only.
This equipment complies with the essential
requirements of the Directive 1999/5/EC Radio
and Telecommunications Terminal Equipment
Directive.
This product is intended to be used in the
following country:
Italy
Welcome!
Thank you for purchasing the Sony
MDR-RF415RK Wireless Stereo Headphone
System. Before operating the unit, please read
this manual thoroughly and retain it for future
reference.
Some features are:
•Wireless system that allows you to listen to a
program free from the restriction of a cord
•High fidelity sound reproduction
•Acompact transmitter with an AC power
adaptor (supplied) enables simple charging of
the headphone battery. Just by placing the
headphones on the transmitter, headphone
battery can be charged.
•Comfortable Supra-aural headphones with self
adjusting head band
•Automatic ON/OFF function on headphones
to preserve battery power

3GB
Notes on receiving
performance
The system for this equipment utilizes very high
frequency signals in the 400 MHz band so the
receiving performance may deteriorate due to the
surroundings. The following examples illustrate
conditions that may reduce the possible receiving
range or cause interference with reception.
•Inside a building with walls containing steel
beams.
•Area with many steel file cabinets, etc.
•Area with many electrical appliances capable
of generating electromagnetic noise.
•Transmitter is placed on a metal instrument.
•Area facing a roadway.
•Noise or interfering signals exist in the
surroundings due to radio transceivers in
trucks, etc.
•Noise or interfering signals exist in the
surroundings owing to wireless
communication systems installed along
roadways.
Table of contents
Getting started
Unpacking ............................................... 4
Setting up the transmitter ..................... 4
Charging the headphone battery ......... 6
Operating the system
Listening to a program .......................... 7
The effective areas of the transmitter .. 9
Replacing the ear pads .......................... 9
Additional information
Precautions ............................................ 10
Troubleshooting ................................... 10
Specifications ........................................ 11
GB

4GB
DC IN 9V
OFF ON
FILTERNOISE
123
CHANNEL
RBAL
AUDIO IN
NGetting started
Unpacking
Check that you have the following items:
• The headphones
• The transmitter
•AC power adaptor
•Unimatch plug adaptor (stereo mini jack y
stereo phone plug)
• Connecting cord (phono plugs ystereo mini
plug), 1 m
Setting up the
transmitter
1Connect the transmitter to audio/video
equipment. Select one of the hookups
below depending on the jack type:
ATo connect to a headphones jack
Transmitter
Left channel
(white)
Right channel
(red)
Unimatch plug
adaptor
(supplied)
CD Walkman,
MD Walkman,
WALKMAN*,
VCR, etc.
to headphones
jack (stereo
mini jack)
Connecting cord
(supplied)
to AUDIO IN
A jacks
to headphones
jack (stereo
phone jack)
*WALKMAN is a registered trademark of Sony
Corporation.

5GB
CTo connect to TV, etc.
If noise occurs when the transmitter is
connected to your TV or VCR, set the
NOISE FILTER switch to ON.
Notes
•If you connect the transmitter to LINE OUT or
REC OUT jack of an audio reproducer such as an
MD player or CD player, do not set the NOISE
FILTER switch to ON. Otherwise, the volume will
be limited.
•The NOISE FILTER switch is active only in the
case of the connection shown in diagram Aon
page 4 and C. In diagram B, the switch has no
effect.
•When the transmitter is placed on or near a TV, it
may pick up a noise.
In such case, place the transmitter away from the
TV.
DC IN 9V
OFF ON
FILTERNOISE
123
CHANNEL
RBAL
AUDIO IN
BTo connect to LINE OUT or REC OUT
jacks
Transmitter
to AUDIO IN
B jack
Connecting cord
(supplied)
Right channel
(red)
Left channel
(white)
to LINE OUT or REC
OUT jacks
Stereo system, VCR,
etc.
DC IN 9V
OFF ON
FILTERNOISE
123
CHANNEL
RBAL
AUDIO IN
TV, etc.
to stereo mini jack
to AUDIO IN
A jacks
Right channel
(red) Left channel
(white)
Connecting cord
(supplied)
continue to next page
Transmitter

6GB
Charging the
headphone battery
Using the headphones for the first time
When you use the headphones for the first time,
charge the battery in the following manner.
1Connect the transmitter to a power
source.
Place the headphone on the transmitter such that
the charging pins on the transmitter engage the
charging contacts on the bottom of the right-hand
housing.
The charge indicator on the transmitter will light
in green to indicate that the battery is being
charged.
2Connect the transmitter to an AC outlet
using the supplied AC power adaptor.
Notes
•Use only the supplied AC power adaptor. Do not use
any other AC power adaptor.
Polarity of the plug
•Keep the AC power adaptor cord as far away from the
transmitter as possible. If the cord is positioned near
the transmitter, noise may occur.
•When you connect the transmitter directly to a
monaural earphone jack, the audio signal will not be
output through the right channel. In such a case, use
the separately sold PC-236HG plug adaptor.
•If the connected equipment has the AVLS (Automatic
Volume Limiter System) function, be sure to turn the
function off when using the transmitter. Otherwise,
you will have to turn up the volume of the
headphones, and that may cause noise.
to an AC outlet
To DC IN
9 V jack
AC power adaptor
(supplied)
Transmitter
Continued

7GB
NOperating the system
Listening to a program
1First turn on the audio/video
equipment and start playing.
2Remove the headphones from the
transmitter.
The transmitter’s power indicator will
light in red.
3Select the radio frequency with the
CHANNEL selector switch.
123
CHANNEL
To recharge the headphone battery after
use
Since little electric current is used for charging,
there is no need to worry about overcharging.
Charging and using hours
*at 1 kHz, 1 mW + 1 mW output
** The hours required to fully charge empty batteries
Approx. charging
hours
1
24**
Approx. using time*
55 minutes
23 hours
continue to next page

8GB
4When you put on the headphones the
headphone power turns on
automatically.
5Turn up the volume to a moderate level
with the VOL control, then tune the
headphones in to the frequency of the
transmitter with the TUNING control
until you can hear the audio signal
loud and clear.
Try the above steps 3 and 5 until the
receiving performance becomes better.
TUNING
control
VOL control
Sending RF signals from the Transmitter
The transmitter starts sending the RF signals
automatically, when it detects audio signals from
the equipment connected.
If it does not detect an audio signal for more than
approximately four minutes, the transmitter will
stop sending RF signals, and the power indicator
turns off.
When the transmitter receives an audio signal
again, it starts sending the RF signals, and the
power indicator will light in red again.
If the audio signal is very weak, the transmitter
does not send RF signals. If the transmitter is
connected to a headphone jack, make sure the
volume of the equipment connected is set to 5 – 6
or higher.
You may not hear the beginning of the sound
from the headphones until the transmitter starts
sending the RF signals after detecting an audio
signal.
Auto power on/off function
When you remove the headphones from your
head, the power turns off automatically. Do not
allow the self adjusting band to be pulled up,
otherwise the headphones will be switched on.
The power turns on.
Note
If a hissing noise is heard, move closer to the
transmitter.
Continued

9GB
Replacing the ear pads
When the ear pads become dirty or damaged,
you can get replacements from your Sony dealer.
Replace them as illustrated below.
1Remove the old ear pad by pulling it
out of the groove on the housing.
2Place the new ear pad on the driver
unit and insert the edge of the pad into
the groove as illustrated.
Make sure that the entire edge of the ear pad is
securely inserted into the groove.
The effective areas of
the transmitter
The optimum distance is up to approximately
100 m without the system picking up some
interference. However, the distance may vary
according to the surroundings and environment.
If the system picks up some noise while using it
within the above mentioned distance, reduce the
distance between the transmitter unit and the
headphones, or select the other channel.
Notes
•When you use the headphones inside the effective
areas of the transmitter, the transmitter can be placed
in any direction from the listener.
• Even within the signal reception area, there are some
spots (dead spot) where the RF signal can not be
received. This characteristics is inherent to RF signals,
and does not indicate malfunction. By slightly moving
the transmitter, location of the dead spot can be
changed.

10GB
NAdditional information
Precautions
•When the transmitter is not to be used for a
long period of time, disconnect the AC power
adaptor from the AC outlet holding the plug.
Do not pull on the cord.
•Do not leave the wireless stereo headphone
system in a location subject to direct sunlight,
heat or moisture.
Notes on headphones
Preventing hearing damage
Avoid using headphones at high volume.
Hearing experts advise against continuous, loud
and extended play. If you experience a ringing in
your ears, reduce the volume or discontinue use.
Caring for others
Keep the volume at a moderate level. This will
allow you to hear outside sounds and to be
considerate to the people around you.
If you have any questions or problems
concerning the system that are not covered in this
manual, please consult the nearest Sony dealer.
Be sure to bring the headphones and the
transmitter to the Sony dealer when requiring
repair work.
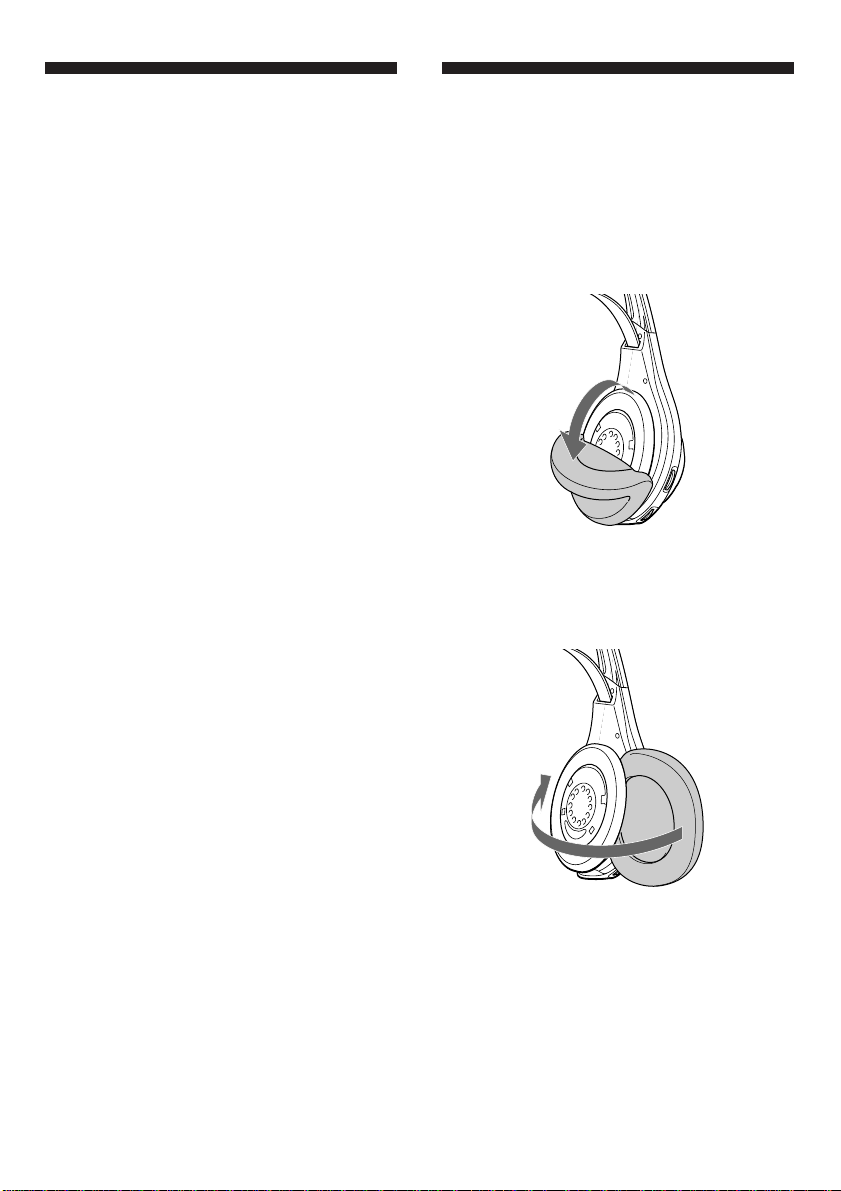
Disposing of the headphones
Be sure to remove the built-in rechargeable
batteries from the headphones before you
dispose of the headphones.
First remove the left headphone’s ear pad.
You will see six screws. Remove the six
screws and open the housing.
Problem
No sound/
Muffled
sound
Solution
Check the connection of the audio/
video equipment or the AC power
adaptor.
Check that the audio/video
equipment is turned on.
Turn up the volume on the connected
audio/video equipment, if the
transmitter is connected to the
headphones jack.
Change the radio frequency with the
CHANNEL selector on the
transmitter, then tune the headphones
with the TUNING control.
The mute function is activated.
Use the headphones near the
transmitter.
The headphones’ POWER indicator
light is weak or turned off.
•Charge the built-in rechargeable
battery or if the POWER indicator is
still off after charging the built-
in rechargeable battery, take the
headphones to a Sony dealer for
replacement of the rechargeable
battery.
If you connect the transmitter to the
LINE OUT or REC OUT jack of an
audio reproducer, make sure that the
NOISE FILTER switch is set to OFF.
Make sure that the NOISE FILTER
switch is set to either ON or OFF (If
the switch gets stuck between ON and
OFF, the sound will be cut off).
Troubleshooting

11GB
Specifications
General
Carrier frequency
433.5 – 434.5 MHz
Channel Ch1, Ch2, Ch3
Modulation FM stereo
Frequency response
20 – 20,000 Hz
Transmitter TMR-RF415R
Power source DC 9 V: supplied AC power
adaptor
Audio input phono jacks/stereo mini jack
Dimensions Approx. 150 mm dia ×108 mm
(6 ×4 1/3in.) (w/h)
Mass Approx. 190 g (6.7 oz.)
Headphones MDR-RF415R
Power source DC 2.4 V: Built-in rechargeable
battery
Mass Approx. 240 g (8.5 oz.) incl.
built-in rechargeable battery
Built-in Ni-Cd rechargeable battery
Model name NC-AA
Voltage 1.2 V
Capacity 700 mAh
Optional accessory
Plug adaptor PC-236HG (stereo mini jack y
monaural mini plug)
Design and specifications are subject to change without
notice.
Problem
Distortion
Loud
background
noise
Solution
If the transmitter is connected to the
headphones jack, turn down the
volume of the connected audio/video
equipment.
Change the radio frequency with the
CHANNEL selector on the
transmitter.
The headphones’ POWER indicator
light is weak or turned off.
•Charge the built-in rechargeable
battery or if the POWER indicator is
still off after charging the built-in
rechargeable battery, take the
headphones to a Sony dealer for
replacement of the rechargeable
battery.
If you connect the transmitter to LINE
OUT or REC OUT jack of an audio
reproducer, make sure that the NOISE
FILTER switch is set to OFF.
Move closer to the transmitter. As
you move away from the transmitter,
more noise is likely to be heard.
If the transmitter is connected to the
headphones jack, turn up the volume
of the connected audio/video
equipment.
Change the radio frequency with the
CHANNEL selector on the
transmitter, then tune the headphones
with the TUNING control.
The headphones’ POWER indicator
light is weak or turned off.
•Charge the built-in rechargeable
battery or if the POWER indicator is
still off after charging the built-in
rechargeable battery, take the
headphones to a Sony dealer for
replacement of the rechargeable
battery.
If you connect the transmitter to the
LINE OUT or REC OUT jack of an
audio reproducer, make sure that the
NOISE FILTER switch is set to OFF.
Move the AC power adaptor cord
away from the transmitter.

2ES
ADVERTENCIA
Para evitar incendios o el riesgo de
electrocución, no exponga la unidad a la
lluvia ni a la humedad.
Para evitar descargas eléctricas, no abra
la unidad. En caso de avería, solicite los
servicios de personal cualificado.
Este equipo cumple los requisitos esenciales de la
Directiva 1999/5/CE sobre equipos terminales
de telecomunicaciones y radio.
Este producto está destinado a utilizarse en el
siguiente país:
Italia
¡Bienvenido!
Muchas gracias por la adquisición del sistema de
auriculares estéreo inalámbrico
MDR-RF415RK Sony. Antes de utilizar el
sistema, lea detenidamente este manual y
consérvelo para futuras referencias.
Algunas de las características son:
•Sistema inalámbrico que le permitirá escuchar
un programa sin verse restringido por un cable
•Reproducción de sonido de alta fidelidad
•Transmisor compacto con adaptador de
alimentación de CA (suministrado) que
permite la carga fácil de la batería de los
auriculares. Al colocar simplemente los
auriculares sobre el transmisor se iniciará la
carga.
•Auriculares Supra-aurales cómodos con casco
autoajustable
•Función de conexión/desconexión de la
alimentación de los auriculares para conservar
la energía de las baterías o pilas

3ES
Notas sobre el
rendimiento de
recepción
El sistema para este equipo utiliza señales de
frecuencia muy alta de la banda de 400 MHz,
motivo por el que el rendimiento de la recepción
puede deteriorarse debido al medio ambiente.
En los ejemplos siguientes se indican las
condiciones que pueden reducir el alcance de la
recepción o causar interferencias en ella.
•Dentro de un edificio con paredes que
contengan vigas de acero.
•Área con muchos armarios archivadores de
acero, etc.
•Área con muchos aparatos eléctricos capaces
de generar ruido electromagnético.
•Transmisor colocado sobre un instrumento
metálico.
•Área encarada hacia carreteras.
•Ruido o señales de interferencia en los
alrededores debido a transceptores de radio de
camiones, etc.
•Ruido o señales de interferencia en los
alrededores debido a sistemas inalámbricos de
comunicaciones instalados a lo largo de
carreteras.
Índice
Preparativos
Desembalaje ............................................ 4
Preparación del transmisor................... 4
Carga de la batería de los
auriculares ........................................ 6
Utilización del sistema
Escucha de un programa....................... 7
Áreas efectivas del transmisor ............. 9
Reemplazo de las almohadillas de
auriculares ........................................ 9
Información adicional
Precauciones.......................................... 10
Solución de problemas ........................ 10
Especificaciones .................................... 11
ES

4ES
DC IN 9V
OFF ON
FILTERNOISE
123
CHANNEL
RBAL
AUDIO IN
NPreparativos
Desembalaje
Compruebe si ha recibido lo siguiente:
• Auriculares
• Transmisor
•Adaptador de alimentación de CA
•Adaptador de clavijas universal (minitoma
estéreo yclavija de entrada de línea estéreo)
•Cable conector (clavijas fono yminiclavija
estéreo), 1 m
Preparación del
transmisor
1Conecte el transmisor al equipo de
audio/vídeo. Seleccione una de las
conexiones siguientes dependiendo del
tipo de toma.
AConexión a una toma para auriculares
*WALKMAN es una marca registrada de Sony
Corporation.
Transmisor
Canal izquierdo
(blanca)
Canal
derecho (roja)
Adaptador
de clavijas
universal
(suministrado)
CD Walkman, MD
Walkman,
WALKMAN*,
videograbadora, etc.
a la toma para
auriculares
(minitoma estéreo)
Cable conector
(suministrado)
a las tomas
AUDIO IN A
a la toma para
auriculares (toma
de entrada de
línea estéreo)

5ES
CConexión a un televisor, etc.
Si se produce ruido al conectar el
transmisor a su televisor o
videograbadora, ponga el interruptor
NOISE FILTER en ON.
Notas
•Si ha conectado el transmisor a la toma LINE OUT
o REC OUT de un reproductor de audio, de
minidiscos o de discos compactos, no ponga el
interruptor NOISE FILTER en ON. De lo
contrario, el volumen se limitaría.
•El interruptor NOISE FILTER solamente estará
activo en el cado de la conexión mostrada en el
diagrama Ade la página 4 y C. En el diagrama
B, el interruptor no tendrá efecto.
•Si el transmisor esté colocado cerca de un
televisor, puede captar ruido.
En tal caso, colóquelo alejado del televisor.
DC IN 9V
OFF ON
FILTERNOISE
123
CHANNEL
RBAL
AUDIO IN
BConexión a las tomas LINE OUT o REC
OUT
Transmisor
a la toma
AUDIO IN B
Cable conector
(suministrado)
Canal derecho
(roja)
Canal izquierdo
(blanca)
a las tomas LINE OUT
o REC OUT
Sistema estéreo,
videograbadora, etc.
DC IN 9V
OFF ON
FILTERNOISE
123
CHANNEL
RBAL
AUDIO IN
Televisor,
etc.
a la minitoma
estéreo
Transmisor
a las tomas
AUDIO IN A
Canal derecho
(roja) Canal izquierdo
(blanca)
Cable conector
(suministrado)
Continúa en la página siguiente

6ES
Carga de la batería de
los auriculares
Utilización de los auriculares por primera
vez
Antes de utilizar por primera vez los auriculares,
cargue la batería de la forma siguiente.
1Conecte el transmisor a una fuente de
alimentación.
Coloque los auriculares en el transmisor de
forma que los contactos de carga del transmisor
queden en contacto con los de la parte inferior de
caja de la parte derecha.
El indicador de carga del transmisor se
encenderá en verde para indicar que la batería
está cargándose.
2Conecte el transmisor a un
tomacorriente de CA utilizando el
adaptador de alimentación de CA
suministrado.
Notas
•Utilice solamente el adaptador de alimentación de CA
suministrado. No utilice ningún otro tipo de
adaptador de alimentación de CA.
Polaridad de la clavija
•Mantenga el cable del adaptador de alimentación de
CA lo más alejado posible del transmisor. Si coloca el
cable cerca del transmisor, puede producirse ruido.
•Cuando haya conectado el transmisor directamente a
una toma monoaural para auriculares, la señal de
audio no saldrá a través del canal derecho. En tal
caso, utilice un adaptador de clavija PC-236HG
vendido aparte.
•Si el equipo conectado posee la función de sistema
limitador automático de volumen (AVLS), cerciórese
de desactivarla cuando utilice el transmisor. De lo
contrario, tendría que aumentar el volumen de los
auriculares, y esto podría causar ruido.
a un tomacorriente
de CA
a la toma
DC IN 9 V
Adaptador de alimentación
de CA (suministrado)
Transmisor
continuación

7ES
NUtilización del sistema
Escucha de un programa
1En primer lugar, conecte la
alimentación del equipo de audio/
vídeo e inicie la reproducción.
2Tome los auriculares del transmisor. El
indicador de alimentación del
transmisor se encenderá en rojo.
3Seleccione la frecuencia de
radiodifusión con el selector
CHANNEL.
123
CHANNEL
Continúa en la página siguiente
Horas aprox.
de carga
1
24**
Tiempo aprox. de
utilización*
55 minutos
23 horas
Para recargar la batería de los auriculares
después de haberla utilizado
Como para la carga se utiliza una corriente
eléctrica muy pequeña, no tendrá que
preocuparse por la sobrecarga.
Horas de carga y tiempo de utilización
*con salida de 1 kHz, 1 mW + 1 mW
** Horas requeridas para cargar completamente baterías
descargadas

8ES
4Cuando se coloque los auriculares, la
alimentación se conectará
automáticamente.
5Aumente el volumen hasta un nivel
moderado con el control VOL, y
después sintonice los auriculares a la
frecuencia del transmisor con el control
TUNING hasta que oiga claramente la
señal de radiodifusión.
Pruebe los pasos 3 y 5 hasta obtener la
mejor recepción posible.
Control
TUNING
Control VOL
Transmisión de señales de RF desde el
transmisor
El transmisor comenzará a transmitir
automáticamente señales de RF cuando detecte
señales de audio procedentes del equipo de
audio.
Si no detecta una señal de audio durante más de
aproximadamente cuatro minutos, el transmisor
dejará de transmitir señales de RF, y el indicador
de alimentación se apagará.
Cuando el transmisor vuelva a recibir una señal
de audio, comenzará a transmitir señales de RF, y
el indicador de alimentación se volverá a
encender en rojo.
Si la señal de audio es muy débil, el transmisor
no emitirá señales de RF. Si el transmisor está
conectado a una toma para auriculares, cerciórese
de que el volumen del equipo conectado esté
ajustado a 5-6 o un nivel superior.
Es posible que usted no oiga el comienzo del
sonido a través de los auriculares hasta que el
transmisor comience a transmitir señales de RF
después de haber detectado una señal de audio.
Función de conexión/desconexión
automática de la alimentación
Cuando se quite los auriculares, su alimentación
se desconectará automáticamente. No tire de la
banda autoajustable hacia arriba, ya que de lo
contrario se conectaría la alimentación de los
mismos.
La alimentación se conectará.
Nota
Si oye ruido de siseo, acérquese al transmisor.
continuación

9ES
Reemplazo de las
almohadillas de
auriculares
Cuando las almohadillas se ensucien o dañen,
adquiera otras en su proveedor Sony.
Reemplácelas como se muestra en la ilustración
siguiente.
1Extraiga la almohadilla vieja sacándola
de la ranura del auricular.
2Coloque la nueva almohadilla en el
auricular e inserte el borde de la misma
en la ranura, como se muestra en la
ilustración.
Cerciórese de que todo el borde de la almohadilla
haya quedado insertado con seguridad en la
ranura.
Áreas efectivas del
transmisor
La distancia óptima es de aproximadamente 100
metros sin que el sistema capte interferencias.
Sin embargo, la distancia puede variar de
acuerdo con las condiciones ambientales. Si el
sistema capta ruido cuando lo esté utilizando
dentro de la distancia mencionada, reduzca la
distancia entre el transmisor y los auriculares, o
seleccione otro canal.
Notas
•Cuando utilice los auriculares dentro del área efectiva
del transmisor, éste podrá colocarse en cualquier
dirección con respecto al oyente.
•Incluso dentro del área de recepción de señales,
pueden existir algunos puntos (muertos) en los que no
se reciba la señal de RF. Esta característica es
inherente a las señales de RF, y no indica mal
funcionamiento. Moviendo ligeramente el transmisor
podrá cambiar la ubicación del punto muerto.

10ES
NInformación adicional
Precauciones
•Cuando no vaya a utilizar el transmisor
durante mucho tiempo, desconecte el
adaptador de CA del tomacorriente de CA
sujetando el enchufe. No tire del cable.
•No deje el sistema de auriculares estéreo
inalámbrico en un lugar sometido a la luz solar
directa, al calor, ni a la humedad.
Notas sobre los auriculares
Cuidado de sus oídos
Evite utilizar los auriculares a gran volumen. Los
expertos en oídos aconsejan no utilizar los
auriculares para escuchar continuamente a gran
volumen. Si experimenta un silbido en sus oídos,
reduzca el volumen o deje de utilizar los
auriculares.
Respeto a los demás
Mantenga el volumen a un nivel moderado. Esto
le permitirá escuchar los sonidos del exterior y no
molestar a quienes se encuentren a su alrededor.
Si tiene alguna pregunta o problema en relación
con este sistema que el manual no pueda
resolver, póngase en contacto con su proveedor
Sony.
Cuando los auriculares o el transmisor necesiten
reparación, lleve ambos a su proveedor Sony.
Forma de deshacerse de los auriculares
Asegúrese de extraer las baterías recargables
incorporadas de los auriculares antes de
deshacerse de éstos.
Primero retire la almohadilla del auricular
izquierdo. Verá seis tornillos. Extraiga los seis
tornillos y abra el alojamiento.
Problema
Carencia de
sonido/
sonido
amortiguado
Solución
Compruebe la conexión del equipo de
audio/vídeo o del adaptador de
alimentación de CA.
Compruebe si la alimentación del
equipo de audio/vídeo está
conectada.
Si el transmisor está conectado a la
toma para auriculares de un equipo
de audio/vídeo, aumente el volumen
del mismo.
Elija la radiofrecuencia con el selector
CHANNEL del transmisor, y después
sintonice los auriculares con el control
TUNING.
La función de silenciamiento está
activada.
Utilice los auriculares cerca del
transmisor.
El indicador POWER de los
auriculares está iluminado débilmente
o apagado.
•Cargue la batería incorporada, o si
el indicador POWER permanece
apagado después de haberla
cargado, lleve los auriculares a su
proveedor Sony para que le
reemplace la batería.
Si ha conectado el transmisor a la
toma LINE OUT o REC OUT de un
reproductor de audio, cerciórese de
que el interruptor NOISE FILTER esté
en OFF.
Cerciórese de que el selector NOISE
FILTER esté en ON u OFF (si el
selector se queda entre ON y OFF, el
sonido se cortará).
Solución de problemas
Table of contents
Languages:
Other Sony Headphones manuals

Sony
Sony MDR-NC600D User guide

Sony
Sony MDR-NC20 User manual

Sony
Sony MDR-EX35LP User manual

Sony
Sony MDR-MA500 User manual

Sony
Sony MDR-PQ6/RED User manual

Sony
Sony MDR-ZX110 User manual

Sony
Sony MDR-EX40LP/VLT User manual

Sony
Sony MDR-Q68LW User manual

Sony
Sony XBA-N1AP User manual

Sony
Sony MDR-1RBT Reference guide

Sony
Sony Walkman MDR-NWBT10 User manual

Sony
Sony MDR-G74SL User manual

Sony
Sony MDR-222KD Operating instructions

Sony
Sony DR-EX12iP/WHI Owner's manual

Sony
Sony MDR-XB300 User manual

Sony
Sony MDR-Z1000 User manual

Sony
Sony MDR-EX10LP/VLT User manual

Sony
Sony MDR-AS40EX User manual

Sony
Sony MDR-RF4000K User manual

Sony
Sony MDR-1RBT User manual