EnglishDeutsch
 logo
Brands
  1. Home
  2. •
  3. Brands
  4. •
  5. Sony
  6. •
  7. Home Theater System
  8. •
  9. Sony BDV-EF200 User manual

Sony BDV-EF200 User manual

Other manuals for BDV-EF200

2

Other Sony Home Theater System manuals

Sony HT-6800DP - Dvd Home Theater User manual

Sony

Sony HT-6800DP - Dvd Home Theater User manual

Sony 4-130-031-11(3) User manual

Sony

Sony 4-130-031-11(3) User manual

Sony DAV-FX100W - Wireless Dvd Dream System User manual

Sony

Sony DAV-FX100W - Wireless Dvd Dream System User manual

Sony BDV-E980 User manual

Sony

Sony BDV-E980 User manual

Sony DAV-DZ340 User manual

Sony

Sony DAV-DZ340 User manual

Sony DAV X1 - Platinum DVD Dream Home Theater... User manual

Sony

Sony DAV X1 - Platinum DVD Dream Home Theater... User manual

Sony HT-RT5 User guide

Sony

Sony HT-RT5 User guide

Sony HT-6800DP - Dvd Home Theater User manual

Sony

Sony HT-6800DP - Dvd Home Theater User manual

Sony HT-CT150 User manual

Sony

Sony HT-CT150 User manual

Sony HT-DDW795 User manual

Sony

Sony HT-DDW795 User manual

Sony BDV-IS1000 User manual

Sony

Sony BDV-IS1000 User manual

Sony DAV-FX500 - Dvd Dream System User manual

Sony

Sony DAV-FX500 - Dvd Dream System User manual

Sony HTP-32SS Instruction manual

Sony

Sony HTP-32SS Instruction manual

Sony BDV-T10 - Blu-ray Disc™ / Dvd Home Theater... User manual

Sony

Sony BDV-T10 - Blu-ray Disc™ / Dvd Home Theater... User manual

Sony HT-DDW880 User manual

Sony

Sony HT-DDW880 User manual

Sony BDV-N8100W  Guide User manual

Sony

Sony BDV-N8100W Guide User manual

Sony DAV-FX10 - Dvd Dream System User manual

Sony

Sony DAV-FX10 - Dvd Dream System User manual

Sony HT-DDW740 User manual

Sony

Sony HT-DDW740 User manual

Sony HT-7100DH User manual

Sony

Sony HT-7100DH User manual

Sony BRAVIA DAV-HDX465 User manual

Sony

Sony BRAVIA DAV-HDX465 User manual

Sony BDV-N890W User manual

Sony

Sony BDV-N890W User manual

Sony DAV-S800 User manual

Sony

Sony DAV-S800 User manual

Sony HT-CT260 User manual

Sony

Sony HT-CT260 User manual

Sony DAV-TZ100 User manual

Sony

Sony DAV-TZ100 User manual

Popular Home Theater System manuals by other brands

Samsung HT-ES4200K user manual

Samsung

Samsung HT-ES4200K user manual

Harman Kardon HS 100 owner's manual

Harman Kardon

Harman Kardon HS 100 owner's manual

Samsung HT-P10 instruction manual

Samsung

Samsung HT-P10 instruction manual

Philips HTS5131 User manaul

Philips

Philips HTS5131 User manaul

Goodmans GDVD19SWS user manual

Goodmans

Goodmans GDVD19SWS user manual

Moxi media center user guide

Moxi

Moxi media center user guide

Samsung HT-EM35 user manual

Samsung

Samsung HT-EM35 user manual

LG HE903PAW manual

LG

LG HE903PAW manual

Bose SoundTouch 520 owner's guide

Bose

Bose SoundTouch 520 owner's guide

Manta GK-500 user manual

Manta

Manta GK-500 user manual

Sharp SBW800 user manual

Sharp

Sharp SBW800 user manual

Philips HTS3541 user manual

Philips

Philips HTS3541 user manual

LG LHT799 specification

LG

LG LHT799 specification

Samsung HT-TWZ415 user manual

Samsung

Samsung HT-TWZ415 user manual

Loewe REFERENCE 52 SL FHD+ 200 NMP Service manual

Loewe

Loewe REFERENCE 52 SL FHD+ 200 NMP Service manual

Samsung AH68-02166R user manual

Samsung

Samsung AH68-02166R user manual

RCA 600-Watt owner's manual

RCA

RCA 600-Watt owner's manual

Samsung HT-DS630T instruction manual

Samsung

Samsung HT-DS630T instruction manual

https://manuals.online logo
https://manuals.online logoBrands
  • About & Mission
  • Contact us
  • Privacy Policy
  • Terms and Conditions

Copyright 2026 Manuals.Online. All Rights Reserved.

Speaker Installation Guide
Guide d’installation des enceintes
Guía de instalación de los altavoces
Guida all’installazione dei diffusori
Montageanleitung für Lautsprecher
Installatiegids voor de luidspreker
Podręcznik instalacji głośników
4-272-128-11(1)
BDV-EF200
©2011 Sony Corporation Printed in Malaysia
(1)
English
Caution
Contact a screw shop or installer regarding the wall material or screws to be used.
Use screws that are suitable for the wall material and strength. As a plaster board wall is especially fragile,
attach the screws securely to a beam and fasten them to the wall. Install the speakers on a vertical and flat
wall where reinforcement is applied.
Sony is not responsible for accidents or damage caused by improper installation, insufficient wall
strength or improper screw installation, natural calamity, etc.
1
Prepare screws (not supplied) that are suitable for the hole on the back of each speaker.
2 Fasten the screws to the wall.
Leave a space of about 8 mm to 10 mm between the wall and the head of the screw.
3 Hang the speakers on the screws.
Installing speakers on a wall
Installation des enceintes au mur
Instalación de los altavoces en una pared
1
2 3
5 mm
10 mm
Hole on the back of the speaker
Orifice situé au dos de l’enceinte
Orificio de la parte posterior del altavoz
30 mm
4 mm
8 mm to 10 mm
8 mm à 10 mm
de 8 mm a 10 mm
Français
Avertissement
Adressez-vous à un quincaillier ou à un installateur pour connaître le matériau du mur ou les vis à
utiliser.
Utilisez des vis adaptées au matériau et à la résistance du mur. Comme les plaques de plâtre sont
particulièrement fragiles, fixez fermement les vis à une poutre et fixez-les au mur. Installez les enceintes
sur une paroi verticale et plane à un endroit où se trouve un renforcement.
Sony ne peut être tenu responsable de tout accident ou dégât entraîné par une installation incorrecte, une
résistance insuffisante du mur, une mauvaise fixation des vis, une catastrophe naturelle, etc.
1 Préparez des vis (non fournies) adaptées à l’orifice situé au dos de chaque enceinte.
2 Fixez les vis au mur.
Laissez un espace de 8 mm à 10 mm environ entre le mur et la tête de la vis.
3 Accrochez les enceintes aux vis.
Español
Precaución
Consulte con una tienda especializada en tornillos o con un instalador acerca del material de pared o de
los tornillos que se deben utilizar.
Utilice tornillos adecuados para el material y la resistencia de la pared. Dado que una pared de yeso es
especialmente frágil, acople los tornillos firmemente a una viga y fíjelos en la pared. Instale los altavoces
en una pared vertical y lisa que esté reforzada.
Sony no se responsabiliza de ningún accidente o daño causado por una instalación inadecuada, una
pared de poca resistencia, una instalación incorrecta de los tornillos, una catástrofe natural, etc.
1 Prepare unos tornillos (no suministrados) que sean adecuados para el orificio
situado en la parte posterior de cada altavoz.
2 Fije los tornillos en la pared.
Deje un espacio de 8 mm a 10 mm aproximadamente entre la pared y la cabeza del tornillo.
3 Cuelgue los altavoces de los tornillos.
Italiano
Attenzione
Rivolgersi a una ferramenta o a un installatore per informazioni sul tipo di materiale della parete e sul
tipo di viti da utilizzare.
Usare viti adatte al tipo di materiale della parete e alla sua robustezza. Nel caso di una parete di
cartongesso, materiale particolarmente fragile, fissare saldamente le viti a una trave, quindi alla parete.
Installare i diffusori su una parete verticale, piatta e rinforzata.
Sony declina qualsiasi responsabilità per eventuali incidenti o danneggiamenti causati da installazioni
non corrette, pareti non sufficientemente robuste o installazioni delle viti non corrette, calamità naturali,
ecc.
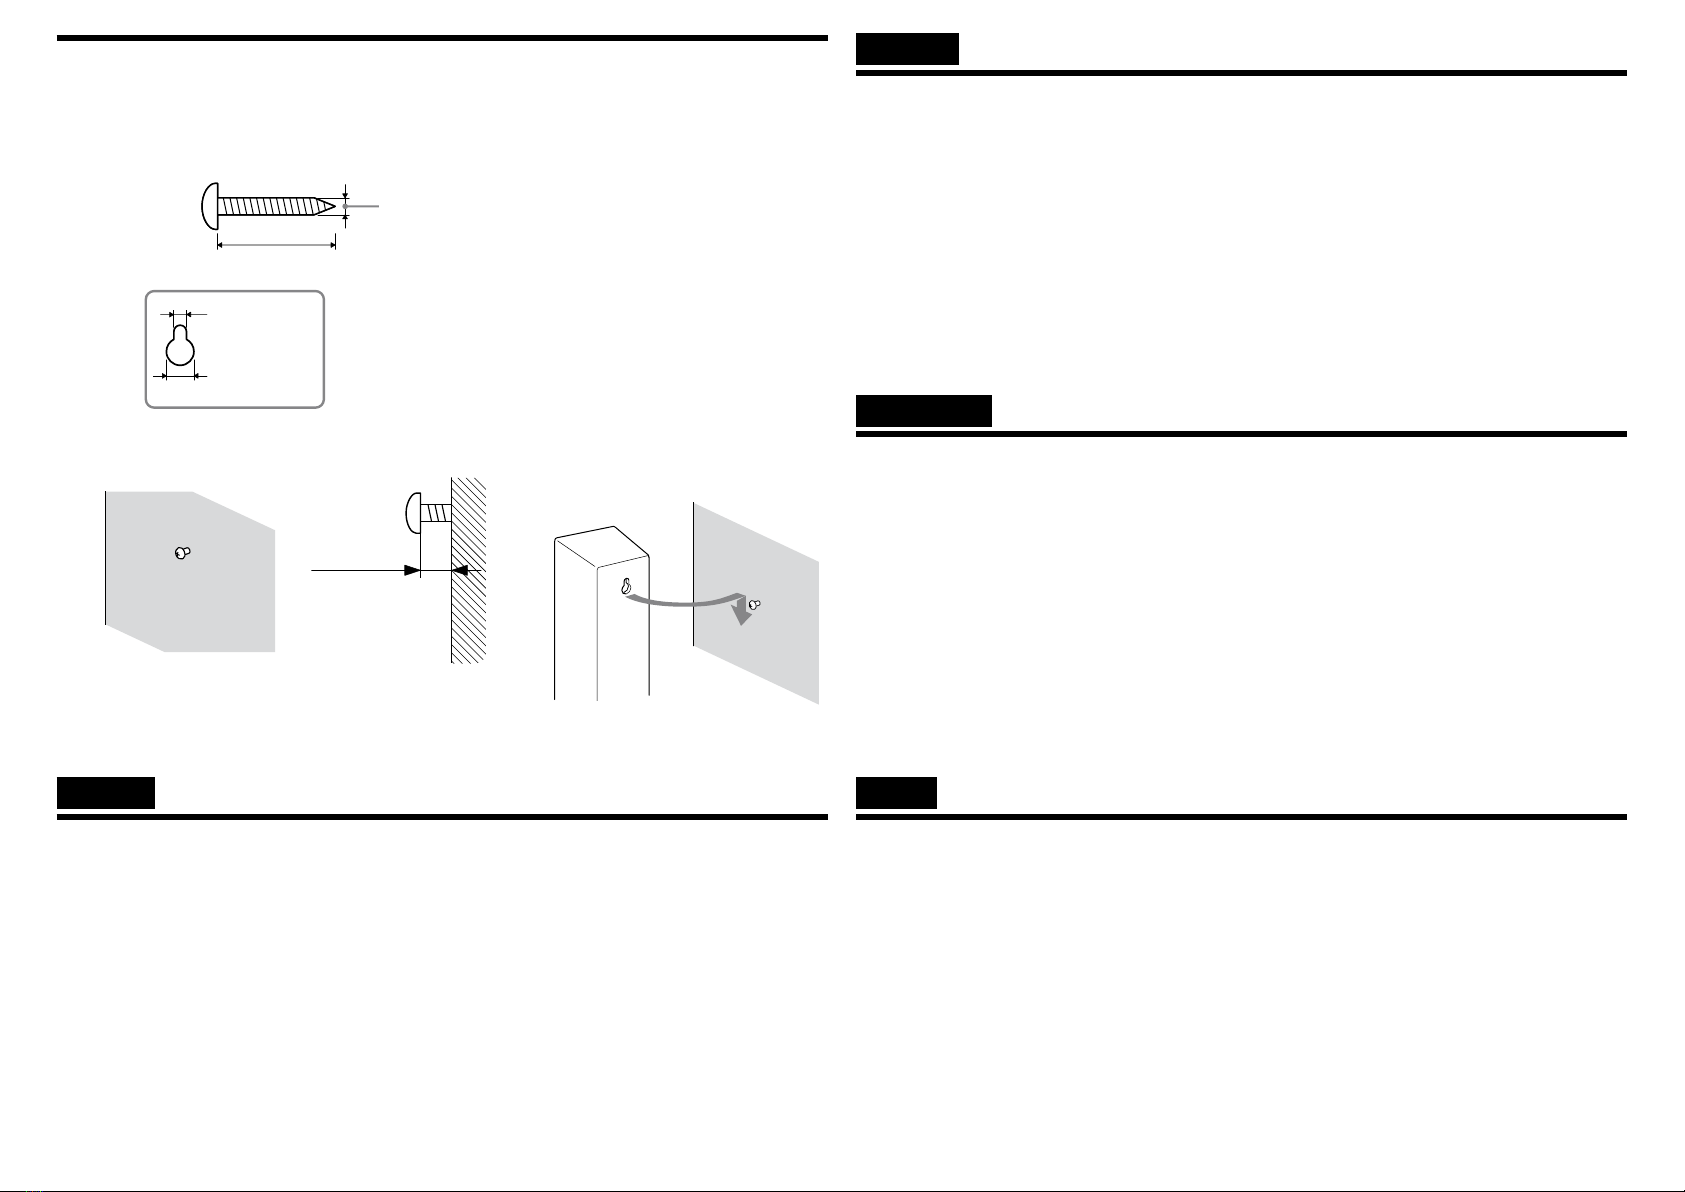
1 Preparare delle viti (non in dotazione) adatte ai fori che si trovano nella parte
posteriore di ciascun diffusore.
2 Fissare le viti alla parete.
Lasciare uno spazio di circa 8 mm - 10 mm tra la parete e la testa della vite.
3 Agganciare i diffusori alle viti.
Deutsch
Vorsicht
Wenden Sie sich bei Fragen bezüglich des Wandmaterials oder geeigneter Schrauben an einen Fachmann.
Verwenden Sie Schrauben, die für das Material der Wand und die Wandstärke geeignet sind. Wände aus
Gipskarton sind nicht sehr stabil. Drehen Sie die Schrauben zur Befestigung in einen Holzträger.
Montieren Sie die Lautsprecher an einer senkrechten und ebenen Wand, die ausreichend verstärkt ist.
Sony haftet nicht für Unfälle oder Schäden, die durch unsachgemäße Montage, unzureichende
Wandstärke, schlechte Schraubenverankerung, Naturkatastrophen usw. entstehen.
1 Beschaffen Sie Schrauben (nicht mitgeliefert), die sich für die Bohrung an der
Rückseite der einzelnen Lautsprecher eignen.
2 Drehen Sie die Schrauben in die Wand.
Lassen Sie zwischen der Wand und dem Schraubenkopf etwa 8 mm bis 10 mm Platz.
3 Hängen Sie die Lautsprecher an den Schrauben auf.
Nederlands
Opgelet
Contacteer een ijzerhandel of installateur voor meer informatie omtrent het muurmateriaal of de
schroeven die u dient te gebruiken.
Gebruik schroeven die geschikt zijn voor het materiaal en de stevigheid van de muur. Aangezien een
muur in gipsplaat erg zwak is, draait u de schroeven het best in een balk om de luidsprekers te bevestigen.
Bevestig de luidsprekers op een verticale, vlakke en verstevigde muur.
Sony is niet aansprakelijk voor ongevallen noch schade ten gevolge van een ondeskundige montage, een
onvoldoende sterke muur, verkeerd aangebrachte schroeven, natuurrampen enz.
1 Neem schroeven (niet bijgeleverd) die geschikt zijn voor de opening aan de
achterkant van elke luidspreker.
2 Bevestig de schroeven in de muur.
Laat een ruimte over van ongeveer 8 mm tot 10 mm tussen de muur en de kop van de schroef.
3 Hang de luidsprekers op aan de schroeven.
Installazione dei diffusori a parete
Montage der Lautsprecher an der Wand
De luidsprekers aan een muur bevestigen
Instalowanie głośników na ścianie
1
2 3
da 8 mm a 10 mm
8 mm bis 10 mm
8 mm tot 10 mm
8 mm do 10 mm
5 mm
10 mm
Foro nella parte posteriore del diffusore
Bohrung an der Rückseite des
Lautsprechers
Opening aan de achterkant van de
luidspreker
Otwór w tylnej części głośnika
30 mm
4 mm
Polski
Ostrzeżenie
Jeśli masz wątpliwości co do rodzaju wkrętów lub materiału, z którego wykonana jest ściana, skontaktuj
się ze sprzedawcą wkrętów lub instalatorem.
Używaj wkrętów odpowiednich do materiału i wytrzymałości ściany. Ponieważ ściana gipsowa jest
wyjątkowo delikatna, najpierw przytwierdź wkręty do deski, a następnie do ściany. Głośniki należy
instalować na płaskich, pionowych i zbrojonych ścianach.
Firma Sony nie ponosi odpowiedzialności za wypadki lub uszkodzenia spowodowane niewłaściwą
instalacją, niewystarczającą wytrzymałością ścian lub nieprawidłowym wkręceniem wkrętów, klęskami
żywiołowymi itd.
1 Przygotuj wkręty (nie wchodzą w skład zestawu) odpowiadające średnicą otworom
w tylnej części każdego z głośników.
2 Zamocuj wkręty w ścianie.
Pozostaw ok. 8 mm do 10 mm odstępu między ścianą i główką wkrętu.
3 Zawieś głośniki na wkrętach.