manuals.online logo
Brands
  1. Home
  2. •
  3. Brands
  4. •
  5. Sony
  6. •
  7. Home Theater System
  8. •
  9. Sony BDV-IT1000ES Instruction Manual

Sony BDV-IT1000ES Instruction Manual

BDV-IT1000ES 4-109-711-11(1)
-
4-109-711-11(1)
©2008 Sony Corporation Printed in Malaysia
BDV-IT1000ES (1)

Basic connections
These instructions are for basic connections.
For more information, see the Operating
Instructions.
English
Supplied items for assembling
the speakers
Front left speaker (L) (1, white label)
Front right speaker (R) (1, red label)
Surround left speaker (L) (1, blue label)
Surround right speaker (R) (1, gray label)
Center speaker (1, green label)
Desktop stands (4)
Baffle covers (short) (3)
Baffle covers (long) (2)
Grills (5)
 Speaker cords (
5, white/red/blue/gray/green
)
 Foot pads (for center speaker) (Thick) (2)
 Foot pads (for center speaker) (Thin) (2)
Note
Unpack the speakers, being careful not to touch the
speaker units.
Keep speakers away from one another. Speakers are
magnetically attracted, may hit each other, and cause
damage.
Keep magnetic objects such as watches, magnetic
card, etc., away from the speakers.
Notes on using the speakers
When moving the speakers, keep one hand under
the desktop stand and hold both sides of the speaker
().
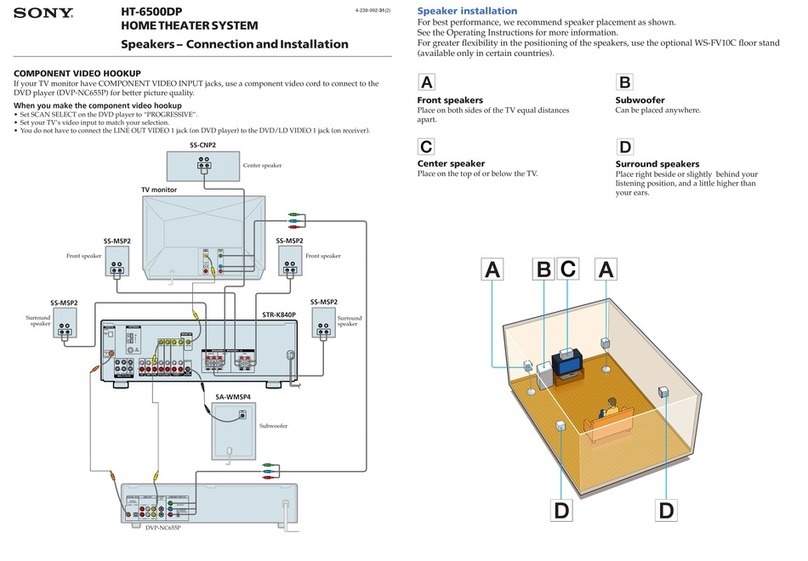
When using the speakers, avoid the following. These
actions may damage the speaker.
Toppling the speaker.
Shaking the speaker.
Swinging the speaker.
Pushing on the speaker.
Hitting the speaker.











Spread a cloth on the floor to avoid damaging the
floor when you assemble the speakers.

When assembling, take care not to touch the speaker
unit ().
Be sure to use the speakers with their grilles
attached.
Do not push on a grille that is attached, as it may
cause damage to the speaker unit.
Assembling the speakers
Before connecting the speakers, assemble the
speakers.
Assembling front and surround
speakers
1 Thread the speaker cord () through the
hole on the bottom of the desktop stand ().
2 Remove the screw from the speaker (,,
,).
The removed screw is used when attaching the
desktop stand. Be sure not to lose the screw.
3 Connect the speaker cords ()to the speaker
(,,,).
The connector and color tube of the speaker cords
are the same color as the label of the jacks to be
connected.
Use the speaker cords as follows:

Front left speaker (L): White

Front right speaker (R): Red

Surround left speaker (L): Blue

Surround right speaker (R): Gray
Be sure to match the speaker cords to the
appropriate terminals on the speakers: the speaker
cord with the color tube to , and the speaker
cord without the color tube to . Do not catch
the speaker cord insulation in the speaker
terminals.








Insert the speaker cords into the speaker terminal
of the speaker as far as they will go. Ensure that
the cords are secure by gently pulling on them one
at a time.
Tip
When removing the speaker cord from the
speaker terminal, pull out the speaker cord while
pressing the white button on the speaker terminal
with a tool such as a flathead screwdriver.
4 Attach the speaker (,,,) to the
desktop stand ().
Be careful with the orientation of the desktop
stand and speaker. Secure the speaker with the
screw removed in Step 2.
Tip
The curved edge of the stand and the slot on the
bottom of the desktop stand should face to the
rear.
5 Take up slack in the speaker cord ()by
pulling from the bottom of the desktop stand
()and secure the speaker cord by running
it through the slot.
6 Attach the baffle cover (,)to the speaker
(,,,).
Use the baffle cover (short) for the front speaker,
baffle cover (long) for the surround speaker.
7 Attach the grille ()to the speaker (,,
,).
Be careful with the orientation of the grille. The
“SONY” logo should be at the bottom of the grille.
Assembling Center speaker
1 Remove the cover from the speaker ().
Pry up the cover by inserting a thin, flat object
into the slit in the cover. To replace the cover, see
Step 3. Be sure not to lose the cover.
2 Connect the speaker cords () to the speaker
().
Use the speaker cords (green). Be sure to match
the speaker cords to the appropriate terminals on
the speakers: the speaker cord with the color tube
to , and the speaker cord without the color tube
to . Do not catch the speaker cord insulation in
the speaker terminals.
3 Secure the speaker cord ()by running it
through the slot, then attach the cover to the
speaker ().
4 Attach the baffle cover (short) ()to the
speaker ().
Use the baffle cover (short).
5 Attach the grille ()to the speaker ().
Be careful with the orientation of the grille. The
“SONY” logo should be at the left side of the
grille.
6 Attach the foot pads (thick (), thin ()) to
the bottom of the speaker ().
Attach the foot pads (thick) () to the front of
the speaker, and the foot pads (thin) () to the
rear so that the speaker tilts up when installed on
a TV stand, etc.
-

Français
Eléments fournis pour
l’assemblage des enceintes
Enceinte avant gauche (L) (1, étiquette
blanche)
Enceinte avant droite (R) (1, étiquette
rouge)
Enceinte gauche surround (L) (1, étiquette
bleue)
Enceinte droite surround (R) (1, étiquette
grise)
Enceinte centrale (1, étiquette verte)
Socles de bureau (4)
Caches d’enceinte (courts) (3)
Caches d’enceinte (longs) (2)
Grilles (5)
 Cordons d’enceinte (5, blanc/rouge/bleu/
gris/vert)
 Tampons (pour l’enceinte centrale) (épais)
(2)
 Tampons (pour l’enceinte centrale) (fins) (2)
Remarque
Déballez les enceintes en veillant à ne pas toucher les
haut-parleurs.
Eloignez les enceintes les unes des autres. En effet,
elles subissent une attirance magnétique et risquent
de se heurter, provoquant ainsi des dégâts.
Eloignez les objets magnétiques, tels que les montres,
les cartes magnétiques, etc., des enceintes.
Remarques sur l’utilisation des
enceintes

Lorsque vous déplacez les enceintes, laissez une
main sous le socle de bureau et maintenez-la de part
et d’autre ().




Lorsque vous utilisez les enceintes, évitez d’effectuer
les actions suivantes. Sinon, vous risquez de les
endommager.
Renverser l’enceinte.
Secouer l’enceinte.
Faire pivoter l’enceinte.
Appuyer sur l’enceinte.
Heurter l’enceinte.

Recouvrez le sol d’un linge pour éviter de
l’endommager lors de l’assemblage des enceintes.

Lors de l’assemblage, veillez à ne pas toucher le haut-
parleur ().

Veillez à utiliser les enceintes avec les grilles fixées.

N’appuyez pas sur une grille fixée, car vous
risqueriez d’endommager le haut-parleur.
Assemblage des enceintes
Avant de raccorder les enceintes, assemblez-les.
Assemblage des enceintes avant et
surround
1 Faites passer le cordon d’enceinte () à
travers l’orifice situé sur le dessous du socle
de bureau ().
2 Retirez la vis de l’enceinte (,,,).
La vis retirée sert à xer le socle de bureau. Veillez
à ne pas perdre la vis.
3 Raccordez les cordons d’enceinte () à
l’enceinte (,,,).
Le connecteur et le tube coloré des cordons
d’enceinte sont de la même couleur que l’étiquette
des prises à raccorder.
Utilisez les cordons d’enceinte comme suit :

Enceinte avant gauche (L) : Blanc

Enceinte avant droite (R) : Rouge

Enceinte gauche surround (L) : Bleu














Enceinte droite surround (R) : Gris
Veillez à faire correspondre les cordons d’enceinte
aux bornes appropriées des enceintes : le cordon
d’enceinte doté du tube coloré correspond à et
le cordon d’enceinte dépourvu de tube coloré
correspond à . Ne coincez pas l’isolant du
cordon d’enceinte dans les bornes d’enceinte.
Insérez à fond les cordons d’enceinte dans la borne
d’enceinte de l’enceinte. Vérifiez que les cordons
sont correctement fixés en tirant délicatement sur
chacun.
Conseil
Lorsque vous retirez le cordon d’enceinte de la
borne d’enceinte, extrayez-le en appuyant sur le
bouton blanc situé sur la borne d’enceinte avec un
outil, tel qu’un tournevis à tête plate.
4 Fixez l’enceinte (,,,) au socle de
bureau ().
Soyez attentif à l’orientation du socle de bureau et
de l’enceinte. Fixez l’enceinte à l’aide de la vis
retirée à l’étape 2.
Conseil
Le bord recourbé du socle et la fente située sur le
dessous du socle de bureau doivent être orientés
vers l’arrière.
5 Tendez le cordon d’enceinte () en le tirant
depuis le dessous du socle de bureau () et
fixez le cordon d’enceinte en le plaçant dans
la fente.
6 Fixez le cache d’enceinte (,) à l’enceinte
(,,,).
Utilisez le cache d’enceinte (court) de l’enceinte
avant et le cache d’enceinte (long) de l’enceinte
surround.
7 Fixez la grille () à l’enceinte (,,,).
Soyez attentif à l’orientation de la grille. Le logo
« SONY » doit se trouver sur le dessous de la
grille.
Assemblage de l’enceinte centrale
1 Retirez le couvercle de l’enceinte ().
Retirez le couvercle en insérant un objet fin et plat
dans la fente de celui-ci. Pour remettre le
couvercle en place, reportez-vous à l’étape 3.
Veillez à ne pas perdre le couvercle.
2 Raccordez les cordons d’enceinte () à
l’enceinte ().
Utilisez les cordons d’enceinte (verts). Veillez à
faire correspondre les cordons d’enceinte aux
bornes appropriées des enceintes : le cordon
d’enceinte doté du tube coloré correspond à et
le cordon d’enceinte dépourvu de tube coloré
correspond à . Ne coincez pas l’isolant du
cordon d’enceinte dans les bornes d’enceinte.
3 Fixez le cordon d’enceinte () en le plaçant
dans la fente, puis fixez le couvercle à
l’enceinte ().
4 Raccordez le cache d’enceinte (court) () à
l’enceinte ().
Utilisez le cache d’enceinte (court).
5 Fixez la grille () à l’enceinte ().
Soyez attentif à l’orientation de la grille. Le logo
« SONY » doit se trouver du côté gauche de la
grille.
6 Fixez les tampons (épais (), fins ()) sur le
dessous de l’enceinte ().
Fixez les tampons (épais) () à l’avant de
l’enceinte et les tampons (fins) () à l’arrière afin
que l’enceinte soit inclinée vers le haut lors de son
installation sur un meuble TV, etc.
Check the polarity on the label and its color.
Vérifiez la polarité indiquée sur l’étiquette et sa couleur.
Connector
Connecteur
Color tube
Tube coloré


3
Bottom of the desktop stand
Dessous du socle de bureau


1
Screw
Vis


2

 
7
5

Adjust the length of the cord.
Réglez la longueur du cordon.
 
Screw
Vis
 
4
Cover
Couvercle
Slit
Fente

1
Slot
Fente
Cover
Couvercle

3


5


4
Fully-assembled illustration
Illustration de l’assemblage complet
6


“” mark
Repère « »


White
Blanc
Red
Rouge
Blue
Bleu
Gray
Gris


Green
Vert
Fully-assembled illustration
Illustration de l’assemblage complet
 





Ex. Front speaker
Ex. : Enceinte avant
Speaker unit
Haut-parleur


6
Color tube (green)
Tube coloré (vert)
Connector (green)
Connecteur (vert)
2

Check the polarity on the label and its color.
Vérifiez la polarité indiquée sur l’étiquette et sa couleur.
Slot
Fente

Bottom of the desktop stand
Dessous du socle de bureau






Raccordements de base
Ces instructions concernent les raccordements de
base.
Pour obtenir davantage d’informations, consultez le
Mode d’emploi.
BDV-IT1000ES 4-109-711-11(1)

Do not lean or hang on the speaker, as the speaker
may fall down.
Do not bend, twist, or fold the speaker grille.
Do not insert an object (especially metal) into a hole
on the front part of the speaker.
Avoid placing the speakers close to a CRT-based TV.
It may cause color irregularity.
When using the optional stand, we recommend that
the speakers are installed on a flat and firm floor
(not on a thick pile carpet, for example). The
speakers may topple over if installed on an inclined
or soft floor.
Tip
When you change the positions of the speakers, Sony
recommends that you change the settings. For
details, see "Calibrating the Appropriate Settings
Automatically" and "Setting the speakers" of the
Operating Instructions.
For effective placement of the subwoofer, refer to the
Operating Instructions.
Connecting the system
Be sure to disconnect the AC power cords (mains
leads) of all components from their wall outlets
(mains) before making connections.
To enjoy high quality digital pictures and sound,
we recommend connecting your TV and other
components with HDMI cables (, not supplied).
For details on connecting the system without
HDMI cables, refer to the Operating Instructions.







English
Positioning the System
For the best possible surround sound, all the
speakers other than the subwoofer should be placed
at the same distance from the listening position
().
Front left speaker (L)
Front right speaker (R)
Surround left speaker (L)
Surround right speaker (R)
Center speaker
Subwoofer
Unit
Surround amplifier
Note
Avoid placing obstructions around the speaker.
After installing the speakers, arrange the speaker
cords so as not to topple the speakers by catching the
speaker cords with your foot.
Avoid placing the center speaker on the TV.
Do not set the speakers in an inclined position.
Avoid placing the speakers in locations that are:
Extremely hot or cold
Dusty or dirty
Very humid
Subject to vibrations
Subject to direct sunlight
Use caution when placing the speakers and/or
speaker stands attached to the speakers on a specially
treated (waxed, oiled, polished, etc.) floor, as staining
or discoloration may result.
Do not use any type of abrasive pad, scouring
powder, or solvent such as alcohol or benzine.













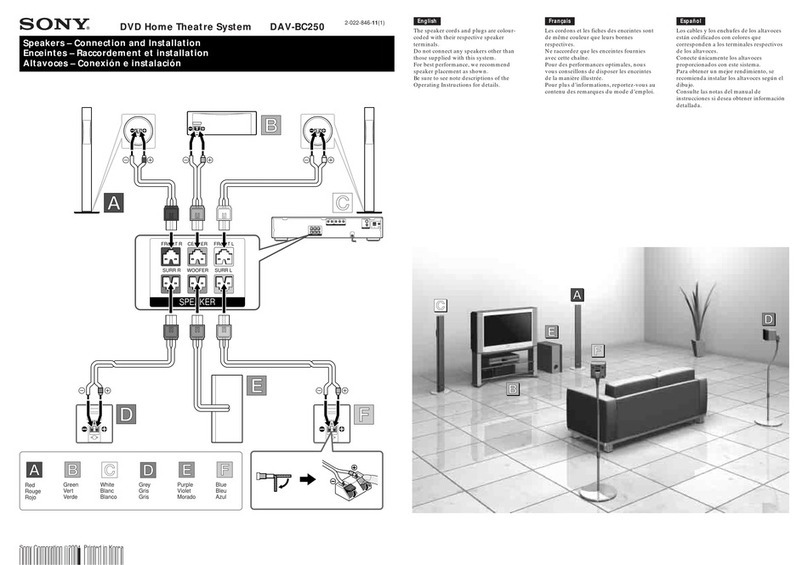
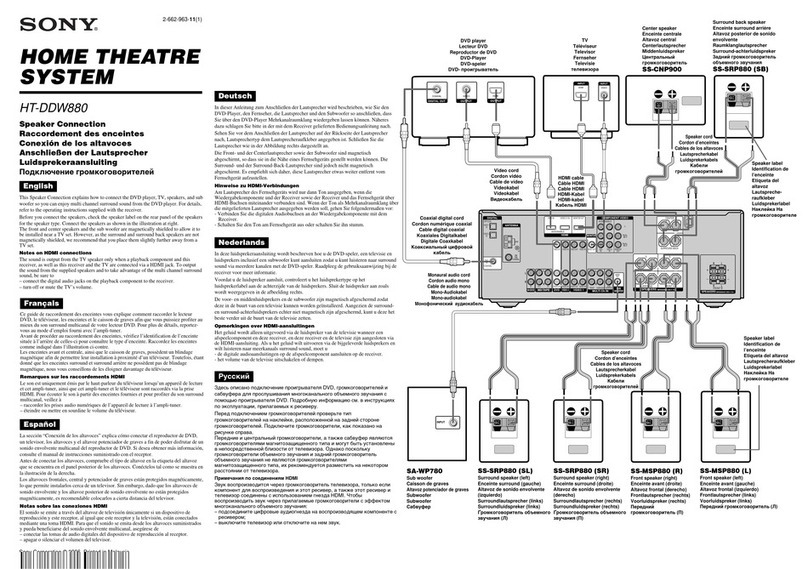
1 Connect the speakers (, , , , ).
Insert the speaker connectors of the front and
center speakers into the respective FRONT L,
FRONT R, and CENTER jacks on the unit. Insert
the speaker connectors of the surround speakers
into the respective SPEAKER L and SPEAKER R
jacks on the surround amplifier ().
2 Connect the subwoofer ().
When connecting the speaker cords () to the
subwoofer, use the speaker cords (purple). Be sure
to match the speaker cords to the appropriate
terminals on the speakers: the speaker cord with
the color tube to , and the speaker cord without
the color tube to . Do not catch the speaker cord
insulation in the speaker terminals.
Insert the speaker connector of the subwoofer into
the WOOFER jack on the unit.
3 Insert the wireless transceivers ().
Sound transmission from the unit to a surround
amplifier is enabled after inserting the wireless
transceivers into the unit and the surround
amplifier.
Set up the wireless transceiver before using it.
For details on setting up the wireless transceiver,
refer to the Operating Instructions.
4 Connect the TV.
Connect an HDMI cable (, not supplied) to the
HDMI IN jack of the TV and HDMI OUT jack of
the unit.
5 Connect other components.
Connect an HDMI cable (, not supplied) to the
HDMI OUT jacks of other components (Set-top
box/digital satellite receiver, or PLAYSTATION®3,
etc.) and HDMI IN 1 or 2 jack of the unit.
6 Connect the FM wire antenna (aerial) () and
AM loop antenna (aerial) ().
Connect the FM wire antenna (aerial) and AM
loop antenna (aerial) to the ANTENNA jacks on
unit.
7 Connect the AC power cords (mains leads)
last.
To connect other sources
You can connect external memory, a DMPORT
adapter, and a network to the system. For details,
refer to the Operating Instructions.
COAXIAL
OPTICAL
COAXIAL75
FM
AM
ANTENNA
DIGITAL
HDMI
DMPORT
TV
SAT/CABLE IN
VIDEO OUT IR REMOTE
LAN(100)
EXTERNAL
SPEAKER
SAT/CABLE
COMPONENT VIDEO OUT
COMPONENT VIDEO IN
A.CAL
MIC
SAT/CABLETV
IN 1 IN 2 OUT
IN
EZW-
RT10
700mA MAX
ECM-AC2
AUDIO IN
OUT IN
AUDIO
VIDEO
(BD/DVD
Y
Y
P
B
/
P
B
/ C
B
P
R
/ C
R
C
B
P
R
/
C
R
ONLY)
LR
LR
DC5V
DC5V 500mA MAX
S-VIDEOVIDEO
FRONT
RFRONT
LCENTER WOOFER
HDMI OUT
HDMI IN
R
SURROUND SELECTOR
S-AIR ID
EZW-RT
10
SPEAKER
SURROUND
PAIRING
C
B
A
SURROUND
BACK
L



6


1
3






3


1
2
4
5





7













Optional item for connecting the system
Eléments en option pour le raccordement du système
Supplied items for connecting the system
Eléments fournis pour le raccordement du système
Set-top box/digital satellite receiver,
or PLAYSTATION®3, etc.
Décodeur/récepteur satellite
numérique, PLAYSTATION®3, etc.
TV
Téléviseur
AC power cord (mains lead)
Cordon d’alimentation
To a wall outlet (mains)
Vers une prise murale
or
ou
7
AC power cord (mains lead)
Cordon d’alimentation
To a wall outlet (mains)
Vers une prise murale
Français
Positionnement du système
Pour optimiser le son surround, toutes les enceintes,
hormis le caisson de graves, doivent être à la même
distance de la position d’écoute ().
Enceinte avant gauche (L)
Enceinte avant droite (R)
Enceinte gauche surround (L)
Enceinte droite surround (R)
Enceinte centrale
Caisson de graves
Appareil
Amplificateur surround
Remarque
Evitez tout obstacle autour de l’enceinte.
Une fois les enceintes installées, organisez les
cordons d’enceinte afin qu’ils ne fassent pas basculer
les enceintes si vous trébuchez sur ceux-ci.
Evitez de placer l’enceinte centrale sur le téléviseur.
N’installez pas les enceintes en position inclinée.
Evitez d’installer les enceintes dans des endroits :
très chauds ou très froids ;
sales ou poussiéreux ;
très humides ;
soumis à des vibrations ;
soumis aux rayons directs du soleil.
Faites attention lors de la mise en place des enceintes
et/ou des supports d’enceinte fixés aux enceintes si le
plancher est traité (ciré, encaustiqué, poli, etc.), car
cela peut provoquer une décoloration ou des taches.
N’utilisez pas de tampons abrasifs, de poudre à
récurer ou de solvant tel que l’alcool ou la benzine.
Ne vous appuyez pas contre les enceintes et ne vous
accrochez pas à celles-ci, car elles risqueraient alors
de tomber.
Ne pliez ou ne tordez pas la grille d’enceinte.














N’insérez aucun objet (particulièrement un objet
métallique) dans un orifice de la partie avant de
l’enceinte.
Evitez de placer les enceintes à proximité d’un
téléviseur à tube cathodique. Cela pourrait entraîner
des irrégularités au niveau des couleurs.
Lorsque vous utilisez le support en option, nous vous
recommandons d’installer les enceintes sur un sol
plat et dur (et non sur un tapis épais, par exemple).
Si vous installez les enceintes sur une surface inclinée
ou molle, elles risquent de basculer.
Conseil
Sony conseille d’adapter ces réglages lorsque vous
modifiez la position des enceintes. Pour plus
d’informations, reportez-vous aux sections
« Etalonnage automatique des réglages corrects » et
« Réglage des enceintes » du Mode d’emploi.
Pour une installation efficace du caisson de graves,
reportez-vous au Mode d’emploi.
Raccordement du système
Veillez à débrancher les cordons d’alimentation de
tous les composants de leur prise murale avant de
procéder aux raccordements.
Pour profiter d’un son et d’une image numériques
de haute qualité, il est recommandé de raccorder
votre téléviseur aux autres composants à l’aide de
câbles HDMI (, non fourni).
Pour plus d ’informations sur le raccordement du
système sans câble HDMI, reportez-vous au Mode
d ’emploi.





1 Raccordez les enceintes (, , , , ).
Insérez les connecteurs d’enceinte des enceintes
avant et centrale dans les prises FRONT L,
FRONT R et CENTER de l’appareil. Insérez les
connecteurs d’enceinte des enceintes surround
dans les prises SPEAKER L et SPEAKER R
respectives de l’amplificateur surround ().
2 Raccordez le caisson de graves ().
Lors du raccordement des cordons d’enceinte ()
au caisson de graves, utilisez les cordons d’enceinte
(violets). Veillez à faire correspondre les cordons
d’enceinte aux bornes appropriées des enceintes :
le cordon d’enceinte doté du tube coloré
correspond à et le cordon d’enceinte dépourvu
de tube coloré correspond à . Ne coincez pas
l’isolant du cordon d’enceinte dans les bornes
d’enceinte.
Insérez le connecteur d’enceinte du caisson de
graves dans la prise WOOFER de l’appareil.
3 Insérez les deux émetteurs-récepteurs sans
fil ().
La transmission du son de l’appareil à
l’amplificateur surround est activée une fois les
émetteurs-récepteurs sans fil insérés dans
l’appareil et l’amplificateur surround sans fil.
Configurez l’émetteur-récepteur sans fil avant de
l’utiliser.
Pour plus d’informations sur la configuration de
l’émetteur-récepteur sans fil, reportez-vous au
Mode d’emploi.
4 Raccordez le téléviseur.
Raccordez un câble HDMI (, non fourni) à la
prise HDMI IN du téléviseur et à la prise HDMI
OUT de l’appareil.
5 Raccordez les autres composants.
Raccordez un câble HDMI (, non fourni) aux
prises HDMI OUT des autres composants
(décodeur/récepteur satellite numérique,
PLAYSTATION®3, etc.) et à la prise HDMI IN 1
ou 2 de l’appareil.
6 Raccordez le fil d’antenne FM () à l’antenne
cadre AM ().
Raccordez le fil d’antenne FM et l’antenne cadre
AM aux prises ANTENNA de l’appareil.
7 Branchez les cordons d’alimentation en
dernier.
Pour raccorder d’autres sources
Vous pouvez connecter une mémoire externe, un
adaptateur DMPORT et un réseau au système. Pour
plus d’informations, reportez-vous au Mode
d’emploi.

Other manuals for BDV-IT1000ES

2

Other Sony Home Theater System manuals

Sony HT-S20R User manual

Sony

Sony HT-S20R User manual

Sony HT-DDW750 User manual

Sony

Sony HT-DDW750 User manual

Sony DAV-FR10W - Dvd Dream System Owner's manual

Sony

Sony DAV-FR10W - Dvd Dream System Owner's manual

Sony HT-CT500 User manual

Sony

Sony HT-CT500 User manual

Sony HT-CT660 User manual

Sony

Sony HT-CT660 User manual

Sony BRAVIA DAV-DZ175 User manual

Sony

Sony BRAVIA DAV-DZ175 User manual

Sony BDV-E500W User manual

Sony

Sony BDV-E500W User manual

Sony HT-DDW860 Instruction manual

Sony

Sony HT-DDW860 Instruction manual

Sony DAV-HDX277WC - Bravia Theater System User manual

Sony

Sony DAV-HDX277WC - Bravia Theater System User manual

Sony 4-165-489-11(1) User manual

Sony

Sony 4-165-489-11(1) User manual

Sony HT-SS380 User manual

Sony

Sony HT-SS380 User manual

Sony BDV-N9900SH User manual

Sony

Sony BDV-N9900SH User manual

Sony DAV-TZ140 Installation and operating instructions

Sony

Sony DAV-TZ140 Installation and operating instructions

Sony SA-VA100 User manual

Sony

Sony SA-VA100 User manual

Sony HTSS1000P. Instruction manual

Sony

Sony HTSS1000P. Instruction manual

Sony BDV-E880 User manual

Sony

Sony BDV-E880 User manual

Sony SS-FRF3H User manual

Sony

Sony SS-FRF3H User manual

Sony BDV-N590 User manual

Sony

Sony BDV-N590 User manual

Sony BDV-N7100WL User manual

Sony

Sony BDV-N7100WL User manual

Sony DAV-X1V - 5 Disc 2.1 Channel Platinum Dvd Dream... User manual

Sony

Sony DAV-X1V - 5 Disc 2.1 Channel Platinum Dvd Dream... User manual

Sony HT-DDW960 Instruction manual

Sony

Sony HT-DDW960 Instruction manual

Sony BRAVIA DAV-HDX500 Quick start guide

Sony

Sony BRAVIA DAV-HDX500 Quick start guide

Sony 3-291-730-21(1) User manual

Sony

Sony 3-291-730-21(1) User manual

Sony HT-XT100 User guide

Sony

Sony HT-XT100 User guide

Popular Home Theater System manuals by other brands

Philips HTD5580/51 user manual

Philips

Philips HTD5580/51 user manual

Panasonic SC-HT280 operating instructions

Panasonic

Panasonic SC-HT280 operating instructions

Sharp HT-DD5000 quick start guide

Sharp

Sharp HT-DD5000 quick start guide

Denon DHT-484XP Specification sheet

Denon

Denon DHT-484XP Specification sheet

LG BH4430P Simple manual

LG

LG BH4430P Simple manual

Akai DV-R6000DSS Service manual

Akai

Akai DV-R6000DSS Service manual

RED REDUNDEAD Operation guide

RED

RED REDUNDEAD Operation guide

Philips MCD149 Specifications

Philips

Philips MCD149 Specifications

Samsung HT-DL200 instruction manual

Samsung

Samsung HT-DL200 instruction manual

Panasonic SC-HT870 Service manual

Panasonic

Panasonic SC-HT870 Service manual

Onkyo HT-S3505 quick start guide

Onkyo

Onkyo HT-S3505 quick start guide

LG HB954SA-AP manual

LG

LG HB954SA-AP manual

LG HT306PD owner's manual

LG

LG HT306PD owner's manual

LG SH86TM-S owner's manual

LG

LG SH86TM-S owner's manual

Philips HTS3375X/78 Service manual

Philips

Philips HTS3375X/78 Service manual

Samsung HT-C7200 user manual

Samsung

Samsung HT-C7200 user manual

JVC QP-D7AL Service manual

JVC

JVC QP-D7AL Service manual

Teac HTIB500 user manual

Teac

Teac HTIB500 user manual

manuals.online logo
manuals.online logoBrands
  • About & Mission
  • Contact us
  • Privacy Policy
  • Terms and Conditions

Copyright 2025 Manuals.Online. All Rights Reserved.