manuals.online logo
Brands
  1. Home
  2. •
  3. Brands
  4. •
  5. Sony
  6. •
  7. Marine Audio
  8. •
  9. Sony XS-GS1621 User manual

Sony XS-GS1621 User manual

Other Sony Marine Audio manuals

Sony XS-GT1028F Installation instructions manual

Sony

Sony XS-GT1028F Installation instructions manual

Sony XS-6029 User manual

Sony

Sony XS-6029 User manual

Sony MEX-M72BT User manual

Sony

Sony MEX-M72BT User manual

Sony XS-F6920 User manual

Sony

Sony XS-F6920 User manual

Sony CDXM60UI - Marine CD Receiver MP3/WMA/AAC... User manual

Sony

Sony CDXM60UI - Marine CD Receiver MP3/WMA/AAC... User manual

Sony XS-A1026 Product guide

Sony

Sony XS-A1026 Product guide

Sony XS-F1025 User manual

Sony

Sony XS-F1025 User manual

Sony CDX-H905IP User manual

Sony

Sony CDX-H905IP User manual

Sony XS-HF137 Product guide

Sony

Sony XS-HF137 Product guide

Sony DSX-M80 Reference guide

Sony

Sony DSX-M80 Reference guide

Sony XS-A1024 Product guide

Sony

Sony XS-A1024 Product guide

Sony XS-F1323 User manual

Sony

Sony XS-F1323 User manual

Sony XS-GT1328F Installation instructions manual

Sony

Sony XS-GT1328F Installation instructions manual

Sony CXS-GT2113 User manual

Sony

Sony CXS-GT2113 User manual

Sony CDXM60UI - Marine CD Receiver MP3/WMA/AAC... User manual

Sony

Sony CDXM60UI - Marine CD Receiver MP3/WMA/AAC... User manual

Sony XS-GT1627A User manual

Sony

Sony XS-GT1627A User manual

Sony XS-HF137 Product guide

Sony

Sony XS-HF137 Product guide

Sony XS-F1320SL User manual

Sony

Sony XS-F1320SL User manual

Sony XS-W6921 User manual

Sony

Sony XS-W6921 User manual

Sony DSX-M80 User manual

Sony

Sony DSX-M80 User manual

Sony CDX-M20 User manual

Sony

Sony CDX-M20 User manual

Sony XS-HA1327 Product guide

Sony

Sony XS-HA1327 Product guide

Sony XS-A1726 Product guide

Sony

Sony XS-A1726 Product guide

Sony XS-GS6921 User manual

Sony

Sony XS-GS6921 User manual

Popular Marine Audio manuals by other brands

ASA Electronics MSR180 owner's manual

ASA Electronics

ASA Electronics MSR180 owner's manual

ETS STWI5-2 instructions

ETS

ETS STWI5-2 instructions

Fusion MS-RA205 User & installation manual

Fusion

Fusion MS-RA205 User & installation manual

Boss Audio Systems MR1560DI user manual

Boss Audio Systems

Boss Audio Systems MR1560DI user manual

Infinity Infinitesimal Series Technical manual

Infinity

Infinity Infinitesimal Series Technical manual

Teledyne SeaBat UI user manual

Teledyne

Teledyne SeaBat UI user manual

Logitech CU0019 Complete Setup Guide

Logitech

Logitech CU0019 Complete Setup Guide

JBL JBLMR18.3 troubleshooting guide

JBL

JBL JBLMR18.3 troubleshooting guide

Clarion APX490M Brochure & specs

Clarion

Clarion APX490M Brochure & specs

Dual AMB500W Installation & owner's manual

Dual

Dual AMB500W Installation & owner's manual

Nady Audio M-Cab MC-15 Features, instructions & technical data

Nady Audio

Nady Audio M-Cab MC-15 Features, instructions & technical data

jetvision.de R820T2 quick start guide

jetvision.de

jetvision.de R820T2 quick start guide

poly-planar ME-50 Specifications

poly-planar

poly-planar ME-50 Specifications

Roswell MC Aquatone 6.5 HLCD installation instructions

Roswell

Roswell MC Aquatone 6.5 HLCD installation instructions

Optimus 40-115 manual

Optimus

Optimus 40-115 manual

Marine Audio MA110 Quick reference guide

Marine Audio

Marine Audio MA110 Quick reference guide

Clarion M606 Owner's manual & installation manual

Clarion

Clarion M606 Owner's manual & installation manual

Fusion MS-AV650 owner's manual

Fusion

Fusion MS-AV650 owner's manual

manuals.online logo
manuals.online logoBrands
  • About & Mission
  • Contact us
  • Privacy Policy
  • Terms and Conditions

Copyright 2025 Manuals.Online. All Rights Reserved.

SONY.
4-538-096-11(1) .
586698
2
way
Speaker
2-nonocHbllll
A111HaMII1K
2-cMyrosllllll
AlllHaMiK
2
6afbiTTbl
.Ql!1H8Ml!1K
Instructions
Mode d'emploi
Instrucciones
Montageanleitung
lnstruktioner
Gebruiksaanwijzing
Instruc;oes
lstruzioni per l'uso
lnstrukcja obstugi
lnstructiuni
111
HCTPYKU.I/1111
•
IHCTPYKU.i'i
•
~ffl-=fffit
{tffl
i5l
S}j
u~l
lA,
J_a.,J
lj~
~
lnstruksi
~.:t
,
9)
11itl1'i
GJf-31\,1
Arahan
At-§-
AJ~A~
©2014 Sony Corporation Printed in China
Dimensions
Dimensions
Dimensiones
Abmessungen
Dimensioner
Afmetingen
Dimensoes
Dimensioni
Wymiary
Dimensiuni
Pa3Mepbl
P03Miplll
R'!
R'!
Dimensi
'IJUl~
Ukuran
~~~'*
?
~
ll)
cxi
·-
~
ISl
31.6
(1
1
/4)
-
~
-
~
~
r
~
\
.{~
~
·-·
~
-
~
i
-G
0
Reference Point
Point
de
reference
Punto de referencia
Bezugspunkt
Referenspunkt
Referentiepunt
Ponto
de
Referencia
Punto di riferime
nto
Punkt odniesienia
Punct de referinta
OnopHaR
TOYKa
OnopHa
TO
YKa
·
~
I&
~~!Ia
Titik Referensi
~~fl'Hii~
Titik Rujukan
7
]
~
"';l
-·-
~~
,-
\
e
Reference Plane
Plan
de
referen
ce
Plano
de
referencia
Bezugsebene
Referensplan
Referentievlak
Plano
de
Referencia
Piano
di
riferimento
Plaszczyzna odniesienia
Plan
de
referinta
OnopHaR
nnO
C
KOCTb
OnopHa
nnOL!.\liiHa
·~ilii
~~ilii
~1),1~
~jA~
Bidang Referensi
"
~
s::;u
lU
!l
l~!l~
Satah Rujukan
7
]
~
~
Unit:
mm
{in)
Unite:
mm
(po)
Unidad: mm
Einheit: mm
Enhet:
mm
Eenheid:
mm
Unidade: mm
Unita:
mm
Jednostka: mm
Unitate:
mm
EAIIIHI/11..\bl:
MM
0A111HI!1L\i:
MM
fi1.il::
mm
~1.il::
mm
~:o.J..o>~l
j..c~:J..o>lj
Satuan:
mm
'IJ'Ill~:
IJIJ.
Unit:
mm
~~:mm
//
IU
0
90
(3
5
/s
)
e
Reference Axis
Axe de reference
Eje
de
referencia
Be
zugsachse
Referensaxel
Referentieas
,..,
Eixo
de
Referencia
Asse
di
riferimento
05
odniesienia
Axa
de
re
ferint
a
OnopHaR
OCb
OnopHa si
cb
·~ill
~~$111
~l),l
;y..o
~.>A
J.9""'
Poros Referensi
"
~
Uflll!ll~!l~
Pak
si Rujukan
7
]
~
~
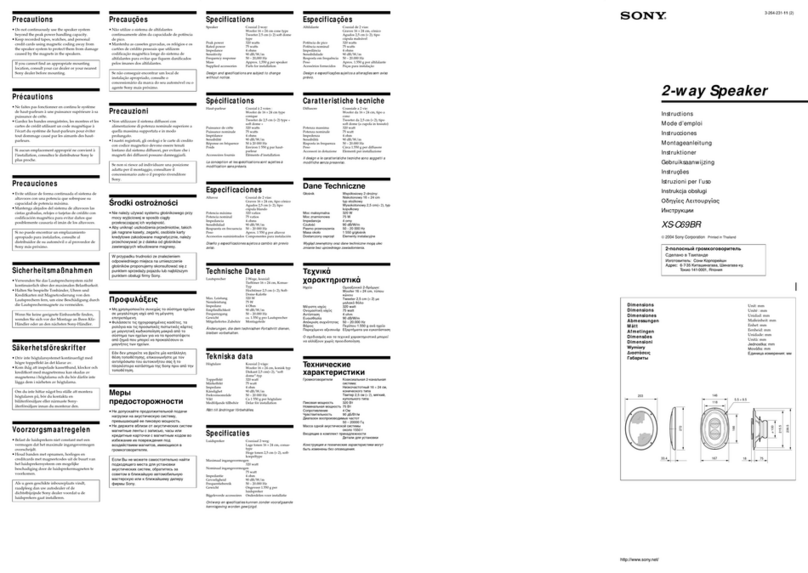
Specifications
Speaker Coaxial 2 way:
Woofer
16.5
em
(6
5
/a
in) cone type
Tweeter 2.5
em
(1
in)
dome type
Short-term maximum power*1
Rated power
CEA
2031
RMS
Power
Rated impedance
Output sound pressure level
320 W*
2
75
W*2
110
w
4Q
88+2 dB
(1
W,
1m)*2
Effective frequency range
35
-30,000 Hz*
2
Mass
Woofer: Approx.
1,160
g
Supplied accessories
{2
lb 9 oz) per speaker
Parts
for
installation
Design and specifications are subject
to
change
without
notice.
*
111
5hort-term maximum power" may also be referred
to
as
II
Peak
Power".
*
2
Testing Condition:
IEC
60268-5 (2003-05)
Notice
for
customers:
the
following
information
is
only
applicable
to
equipment
sold
in
countries
applying
EU
directives
Manufacturer: Sony Corporation,
1-7-1
Kanan
Minato-ku Tokyo, 108-0075Japan
For
EU
product compliance: Sony Deutschland GmbH,
Hedelfinger Strasse
61,
70327 Stuttgart, Germany
Avis a
l'intention
des clients : les
informations
suivantes
s'appliquent
uniquement
aux
appareils
vendus
dans des pays
qui
appliquent
les directives
de
I'Union Europeenne
Fabricant: Sony Corporation,
1-7-1
Kanan Minato-ku
Tokyo,108-0075Japon
Pour
toute
question relative a
Ia
conformite des
produits dans I'UE: Sony Deutschland GmbH,
Hedelfinger Strasse
61,
70327 Stuttgart, Allemagne
Aviso para los clientes: Ia
informacion
siguiente
resulta
de
aplicaci6n solo a los
equipos
comercializados en palses afectados
por
las
directivas
de
Ia
UE
Fabricante: Sony Corporation,
1-7-1
Kanan Minato-ku
Tokyo, 108-0075Jap6n
Para
Ia
conformidad del producto en
Ia
UE:
Sony
Deutschland GmbH, Hedelfinger Strasse 61,70327
Stuttgart, Alemania
Precautions
•
Do
not continuously use the speaker system
beyond the peak power handling capacity.
•
Keep
recorded tapes, watches, and personal
credit cards using magnetic coding away
from the speaker system
to
protect them
from damage caused by the magnets in the
speakers.
• Please note the following when installing the
units; otherwise malfunction
and/or
deterioration in sound quality may result.
-Do
nottouch the diaphragms
and/or
speaker cones by hand or with tools.
-
Do
not
put
yourfingers through the holes
of
the frame.
-Do
not
drop foreign objects in the units.
If
you cannot find
an
appropriate mounting
location, consult your car dealer oryour
nearest Sony dealer before mounting.
Mounting
I
Montage
I
Montaje
I
Montage
I
Montering
I
Montage
I
Montagem
I
Montaggio
I
MontaZ
I
Montaj
I
MoHTa>K
I
BcraHoaneHHJII
cal
3{~
13C~
ll;--·?;Jill;-·
a;
I
Pemasangan
I
fl11~Vl~~
I
Pemasangan
I
~~
Before
mounting
A depth
of
at least 56.5
mm
(2
1
/4
in)
is
required
to
mount
the woofer. Measure the depth
of
the area where you are
to
mount
the speaker,
and ensure
that
the speaker is
not
obstructing
any other components
of
the
car.
Keep
the
followings in mind when choosing a mounting
location:
• Make sure that nothing
is
obstructing
around the mounting location
of
the
door
(front or rear) where you are
to
mount
the
speaker.
• A hole for mounting may already be cut
out
of
the inner panel
of
the
door
(front or rear).
In
this
case,
you need
to
modifythe board
only.
•
If
you are
to
mount
this speaker system
in
the door (front or rear), make sure that the
speaker terminals, frame or magnet do
not
interfere with any inner parts, such
as
the
window
mechanism in the
door
(when you
open or close the window), etc.
Also make sure that the speaker grille does
not
touch any inner fittings, such
as
the
window
cranks,
door
handles, arm rests,
door
pockets, lamps or seats etc.
•
If
you are
to
mount
this speaker system in
the rear tray, make sure that the speaker
terminals, frame or magnet do
not
touch any
inner parts
of
the
car,
such
as
the torsion bar
springs (when you open or close the trunk
lid), etc.
Also make sure
that
the speaker grille does
not
touch any inner fittings, such
as
seat
belts, head rests, center brake lights, inner
covers
of
the rear wipers, curtains or air
purifiers, etc.
lnnan
du
monterar
For
en
jamn och slat montering kravs
ett
djup
pa
minst 56,5 mm. Mat
ut
djupet dar du tanker
montera hogtalaren och
se
till
att
den inte
kommer i vagen for nagra andra komponenter
i bilen. Tank
pa
foljande nar du valjer
monteringsplats:
•
Se
till
att
det
inte finns nagra hinder
pa
dorren (framre eller bakre) runt den plats dar
du tanker montera hogtalaren.
• Ivissa fall finns det redan
ett
hal forberett for
hogtalare i dorrens (framre eller bakre)
innerpanel. I
sa
fall behover du bara
se
till att
urtaget passar hogtalaren.
• Om du tanker montera det har
hogtalarsystemet i dorren (framdorr eller
bakdorr), maste du
se
till
att
hogtalarterminalerna, ramen och magneten
inte kommer i vagen for nagra delar inne i
dorren, t.ex. fonstermekanismen (nar du
oppnar eller Stanger fonstret) eller liknande.
Se
ocksa till
att
inte hogtalargallret kommer i
vagen for nagra delar av inredningen, t.ex.
fonstervevar, dorrhandtag, armstod,
dorrfickor, lampor, saten eller liknande.
• Om du tanker montera hogtalarsystemet i
hatthyllan ser du till
att
hogtalarterminalerna, ramen eller magneten
inte kommer i vagen
for
underliggande
mekanismer, t.ex. bakluckans
torsionsfjadring (nar du oppnar eller Stanger
bakluckan).
Kontrollera ocksa
att
du inte placerar
hogtalaren
sa
att hogtalargallret kommer i
vagen for bilbalten, huvudstod, det mittersta
bromsljuset, bakrutans vindrutetorkare,
gardiner, luftrenare eller liknande.
Przed
rozpocz~ciem
montazu
Do
montaiu
gtosnika niskotonowego
wymagana jest
gt~bokosc
co
najmniej
56,5 mm. W miejscu, w kt6rym
rna
zostac
zamontowany gtosnik,
naleiy
zmierzyc
gt~bokosc
i upewnic
si~,
ie
gtosnik nie
b~dzie
przeszkadzat w dziataniu innych element6w
wyposaienia samochodu. Wybierajqc miejsce
montaiu,
naleiy
pami~tac
o
nast~pujqcych
czynnikach:
•
Naleiy
si~
upewniC,
ie
nie
rna
iadnych
przeszk6d wok6t miejsca
montaiu
w
drzwiach (przednich lub tylnych), w kt6rych
rna
zostac zainstalowany gtosnik.
• Otwory
montaiowe
w panelu
wewn~trznym
drzwi (przednich lub tylnych) lub w tylnej
p6tce mogq
jui
bye
wyci~te.
W takim
wypadku
naleiy
tylko zmodyfikowac
ptyt~.
•
Jesli
zestaw gtosnikowy
rna
zostac
zainstalowany w drzwiach (przednich lub
tylnych),
naleiy
si~
upewnic,
ie
zaciski
gtosnik6w, obudowa ani magnes nie kolidujq
z
iadnymi
elementami
wewn~trznymi,
takimi jak mechanizm otwierania okna w
drzwiach (podczas otwierania lub zamykania
okna) itp.
Naleiy
takie
upewnic
si~,
ie
siatka gtosnika
nie dotyka
iadnych
cz~sci
wewn~trznych,
takich jak korby do opuszczania szyb, klamki
drzwi, podtokietniki, kieszenie w drzwiach,
lampy lub siedzenia itp.
•
Jesli
zestaw gtosnikowy
rna
zostac
zamontowany w tylnej p6tce,
naleiy
si~
upewnic,
ie
zaciski gtosnika, obudowa ani
magnes nie dotykajq innych
wewn~trznych
cz~sci
pojazdu, takich jak
spr~iyny
pokrywy
bagainika (podczas otwierania lub
..,..,.,.,,
..
u,l,..,.ni..,.
h..,.,....,..;nil,""''
i+n
Parts
listI
Liste
des
pieces
I
Lista
de
componentes
I
Teileliste
I
Lista
over
medfoljande delarI OnderdelenlijstI
Lista
de
pe~as
I
Elenco
dei
componenti
I
Spis
cz~sci
I
Lista
componentelor
I
KoMnneKTYIOIL\Me
AeTanM
I
CnMcoK
AeTanel1
I
•1~-
~~~I
fflH~~
I
~I
aJl§
I
0~
~
/Daftar
suku
cadang
I
'ilf.Jfll'i~'I-Hhu
I
Senarai
bahagian

I
••
~-
® ®
(x2)
(x
2)
'
l!l4
(x
8)
(x
2)
Mounting
from
the
car
interior
I
Montage
depuis
l'interieur
de
l'habitacle
I
Montaje
desde
el
interior
del
autom6vil/
Montage
vom
Wageninneren
a
us
I
Montering inifran bilkupen /lnstalleren
in
het
interieur
van
de
auto
I
Montag
em
pelo
interior
do
veiculo
I
Montaggio all'interno dell'
auto
I
Montarea
din interiorul vehiculului
I
Montaz
z
wn~trza
pojazdu
I
MoHTa>K
B
canoHe
aBTOM06MnSI/
BCTaHoaneHHSI
B
canoHi
aBTOMo6inR/
~)~~rg~~
I
J-.A)~$~~~
I
o)'!-..JI
Ji.-1.)
0-.o
~_;JI/
~_931
Ji--b
jl
~I
Memasang
dari interior
mobil/
~~~~~~>n'r~multrnmu~
I
Pemasangan
daripada
dalaman
kereta
I
j·~
LH¥011
~~
DOOR
(FRONT
/REAR)
I
PORTIERE
(AVANT
I
ARRIERE)
I
PUERTA
(DELANTERA/POSTERIOR)
I
TOR
(VORN/HINTEN)
I
DORR
(FRAMRE/
BAKRE)
I
PORTIER
(VOOR/ACHTER)
I
PORTA
(DA
FRENTE/DE
TRAS)
I
PORTIERA
(ANTERIORE·POSTERIORE)
I
DRZWI
(PRZEDNIE/
TYLNE)
I
U~A
(FAJAISPATE)
I
ABEPb
(nEPEAHSISI/3AAHSISI)
I
ABEPUSITA
ABTOM061nSI
(nEPEAHI/3AAHI)
I
!l!r~
(
iruilii/~~ilii)
I
.$fl
(iru/J§)
I
(~1/l:r'"Lo~l)
y~l
/(yM./-*l
y;.)
I
PINTU
(DEPAN/BELAKANG)
I
th-::1!)
("H"1/"H~")
I
PINTU
(DEPAN/BELAKANG)
I
~<W~/~~)
1
Mark
the
4
bolt
holes
and
make
them
3.2
mm
(5
h ,
in)
in
diameter.
Marquez
les
4 orifices
des
boulons
et
percez
des
trous
de
3,2
mm
(
5
h>po)
de
diametre.
M
arque
los
orificios
de
l
os
4
pernos
y h
agalos
de
3,2
mm
de
diametro.
Markieren
Sie
die
4
Schraubenlocher
und
bohren
Sie Loc
her
mit
3,2
mm
Durchmesser.
Markera
de
4 skruvha
len
och
gar
dem
3,2
mm
i
diameter.
M
arkeer
de
4
schroefga
ten
en
boor
gaten
met
een
diameter
van 3,2
mm.
Marque
o sftio
dos
furos
para
os
4 parafusos.
Fac;a
os
furos
com
3,2
mm
de
diametro.
Contrassegnare
i 4
fori
dei
bulloni
e praticare
fori
di
3,2
mm
di
diametro.
Za
z
na
cz 4
otwory
na
wkr~ty
o
srednicy
3,2
mm.
Marcati
gaurile
pentru
cele 4
~uruburi
~i
gauriti
cu
un
diam
etru
de
3,2
mm
Pa3MeTbTe
111
npocsepn1!1Te 4
oTsepcTI/1~
An~
Bli1HTOB
.
,D,1!1aMeTp
oTsepcTII1Vi
: 3,2
MM
.
no
3Ha4Te
Ta
npocs
epAn
iTb
4
OTBOpi11
An~
rBI!1HTiB
AiaMeTpOM 3,2
MM.
IJt:ll 4 ®IU:tti'L.
:M!il~
3.2
1!111
1[1m
mL.
i!iiit:ll
4 1-tt:tti'L.
#ts~
3.2
1!111
Ei:~~:HL.
·\"""
3.
2
~
4\k-l
~
,:,..,
.,fl~
u6d
4
d..o)l&.
.>.;~
~
.J.;JJT
JO
j..o
.J.=.
3.2
fo
"-!
IJ
U.
.;T
,
..c,J
Y.
c....)(&.
IJ
~
t
i
J~
4
Tandai
41ubang
baut
dan
buatlah
berdiameter
3,2
mm.
rilllu~~lll11li~l4l
~lmJut~l~11l'ilni'uFheyu6n~N
3
.2
IJIJ.
Tandakan
4
lubang
bolt
dan
jadikan
lubang-lubang
itu
berdiameter
3.2
mm.
47H~
tiE.~~~
H.AI3·~
~~01
3.2
mmn
£1£.
~~~
ll2t!AI.2.
.
Door
panel
Panneau
de
Ia
portiere
Panel
de
Ia
puerta
TUrverkleidung
Dorrpanel
Deurpaneel
Paine!
da
porta
Pannello
della
portiera
Panel
dr
z
wi
Panoul
u~ii
naHenb
ABep1!1
naHenb
ABepi..ISH
m&
m&
UJO
JjlJ
Panel
pintu
· •
!!~
~!h:O!
Panel
pint
u
@llll'iil
lil129 (5
1
/s)
~
Unit:
mm
(in)
Unite:
mm
(po)
Un
idad: mm
Einheit:
mm
Enhet:
mm
Eenheid:
mm
Unidade: mm
Unita:
mm
Jednostka: mm
Unitate: mm
EAI!IHI!Il..\bl:
MM
0AI!IHI!Il.li:
MM
¥ill:
lTJl1
~Ul:lTJll
~
:o..~<>~l
;...
~
:..~<>1.9
Satuan:
mm
'11\.11~
:
1J1J.
Unit:
mm
'i!:-¥]:
mm
2
3
4
Remove the grille net.
Retirez
Ia
grille de protection.
Extraiga
Ia
red de
Ia
rejilla.
Nehmen
Sie
die Gittermaske a
b.
Har tar du bart skyddsnatet.
Verwijder de roosterafdekking.
Retire a rede
da
grelha.
Togliere
Ia
griglia di protezione.
Zdejmij
oslon~
glosnika.
Scoateti grila de
proteqie.
CH>lMme
pewerKy.
3HiMiTb
pewiTKy.
IIXT.flllfl&ti!J.
IIXT.fllfljj~.
-""UI.K,..:.t_>;l
.J.,!JI>.>!IJ~4
Lepaskan jaring grille.
~fl~~1mflmh
h-t~flfln
Keluarkan jaring geriji.
.:z.'ij
•jj.'§..~
::<Jj?j%}AJ.AJ~.
Standard
connection
I
Raccordement
standard
I
Conexi6n
estandar
I
Standardverbindung
I
Standardanslutning
I
Standaardaansluiting
I
Liga~ao
padrao
I
Collegamento
standard
I
Po!qczenie
standardowe
I
Conectare standard
I
CraHAaprHoe
coeA,HeH,e
I
CraHAaprHe
niAK1110YeHH~
I lf.iJil!i I
~)iii!i
I
<ri,AJI
J,.-a,-!1
I
>JI.llt..-1
JL..ll
I
Koneksi
standar
I
nmiV0'10UUUU1"'!1U
I
Sambungan
biasa
I
.H.~
\!!~
Speaker cord (not supplied) I Cordon de haut·parleur (non fourni) I
Cable
de altavoz (no suministrado) I Lautsprecherkabel (nicht
C
mitgeliefert) I Hogtalarkabel (medfoljer
ej)
I Luidsprekerkabel (niet
~\:.~~!111-•·
·
...
.....
·.
bijgeleverd)
I
Cabo
do altifalante (nao fornecido)
I
Cavo
del diffusore
··::.,___(non
in dotazione)
I
Przew6d gtosnikowy (nie zalqczony)
I
Cablu de
I
}~17:1.1+.•-•:::::
::
:::.·:
.
~~
difuzor (nu este furnizat)
I
WHyp
An~
rpoMKorosop,ren~
(He
0
·.;;;
np"naraerc~)
I
WHyp
An" A,HaMiKa
(He
norraYaETbC~
s
KOMnneKTi)
I
h
!IW!UUl
0"~J!fil)ll1.ij!&i5~H!
!*l!fili!)l<.;>.,._,<>'-'-lo-llcll..l
::-:_:
(.:......,;
....,.._..)
.S~
('-0-'
I Kabel speaker (tidak tersedia) I
:X::·
0'1oo1lw•
<1li1.1'1i•m1M'>
1
Kord
pembesar
suara
(tidak dibekalkan)
I
:::::-
~nm
.n.=
(IIDH!il
'g!!';;;'";;;
?'"?'''
''
l/
~
Power amplifier, etc.
Amplificateur
de
puissance, etc.
Amplificador
de
potencia
, etc.
Endverstarker usw.
Effektforstarkare
osv
Eindversterker,
enzovoort
Amplificador
de
potencia, etc.
Amplificatore
di
potenza,
ecc.
Wzmacniacz
mocy
itp
.
Amplificator
de
putere
, etc.
Yc~.m1Te!1b
MO~HOCTVI
VI
T.n.
niACVI!11083'-I
nOTY>KHOCTi
TOL!..IO
ll.Jlf!lilt:;i;:H~
ll.Jlf!lilt:;i;:H~
.tJ
I •
.UlhJI~
.od-,JJ-!o.;.;.;S~,_Q:)
Power amplifier,
lain-lain.
l'I11
11VfmJJ.J
tJi;~1VlVV
f,
g~"l
Amplifier
kuasa, dll.
lili-1~~~-
Speaker cord (not supplied) I Cordon de haut·parleur(non fourni) I
Cable
de altavoz (no suministrado) I Lautsprecherkabel (nicht mitgeliefert) I
Hogtalarkabel (medfoljer
ej)
I
Luidsprekerkabel (niet bijgeleverd)
I
Cabo
do altifalante (nao fornecido) I
Cavo
del diffusore (non
in
dotazione) I
Przew6d g!osnikowy (nie za!qczony) I
Cablu
de difuzor (nu este furnizat) I
WHyp
AnR
rpoMKorosop"ren~
(He
np"naraercR)
I
WHyp
AnR
A"HaMiKa
(He
nocra4aHbCR s
KOMnneKri)
lliW!Ufli
(*lii!N)
I
!1jjli<5-l'f!i
(*J!fiJi!)
I(_;>_,._,<)
4<lo-JI
cll..l
(.:......,;
....,.._..)
,S~
~I
Kabel
speaker (tidak tersedia)
I
0'1oo
1
l"'
(1u1.1'1i'•u11M')
1
Kord
pembesar
suara
(tidak dibekalkan)
I
~lilT!
.n.=
(IIDH8l
5
Press
and insert
the
edges
of
the
grille net.
Poussez
et
inserez les bards de
Ia
grille de protection.
Presione e inserte los extremos de
Ia
red de
Ia
rejilla.
Setzen
Sie
die Kante
der
Gittermaske richtig an und
drucken
Sie
sie hinein.
Tryck och passa in skyddsnatetets kanter.
Druk de randen van de roosterafdekking naar binnen.
Pressione e insira
as
bordas da rede da grelha.
Premere ed inserire i bordi della griglia di protezione.
Wt6i
i docisnij brzegi ostony gtosnika.
Apasati
~i
introduceti marginile grilei de
proteqie.
HaAaBIIITe
Ha
peweTKY,
l.4T06bl
ee
Kpas:l
BOWJllll
Bna3.
Bcraere pewiTKy,
HaTIIICHYBWIII
Ha
KpaL
~•:~tt!!m
A~*lllln
~••
o
~ffi:tHmA~~~~itltlo
-~~j-9
~Lo....JI
~
~~~
k..OI
.¥
~JI-9
.9
o~l~
JW
IJ
~
~
\5~
d.!J,$
Tekan dan masukkan sisi-sisi jaring grille.
~
~
fl~'YfHllJ01J~'W'UV1J'UV~~hfl'H)1J~ill
'W~!'Ul
11.J
Tekan dan masukkan
tepi-tepi
jaring
geriji.
.::Z.~
~1.!§..~
7}AJ-At2l
~
~E-l1J"
0
J%}-1J-"1_2_.
How
to
remove the grille net.
Comment retirer
Ia
grille de
protection.
CHfiTIIle
peweTKIII.
3HfiTTfl
pewiTKI/1.
1Zo1iiln
""F
~~fd!J
o
1Zo1iiln""F~miP1J
o
C6mo extraer
Ia
red de
Ia
rejilla.
So
nehmen
Sie
die Gittermaske ab.
Sa
har tar du
bort
skyddsnatet.
Zo
verwijdert u de roosterafdekking.
Como retirar a rede da grelha.
Come togliere
Ia
griglia di protezione.
Jak
zdjqc
oston~
gtosnika.
Cum
se
scoate grila de protectie.
ds.UI~tJJ~
-~~~~~Y.O~
Cara
melepaskan jaring grille.
ii
tlfl~
~-hfl'Hl1.Hll
1
VN
Bagaimana mengeluarkan jaring geriji.
.::z.
~
~1.!§..
fil17-l
l:)J-
~
.
CD
@
f
~
Connections
I
Connexions
I
Conexiones
I
Anschluss
I Anslutningar I Aansluitingen I
Liga~oes
I
Collegamenti
I
PotiiCZenia
I
Conexiuni
I
noACOeAIIIHeHMe
I
niAKJUO'IeHHR
I
~Jmilti
I
~.:mam
I
J:..o~l
.:.~I
u~i...:UII
Sambungan
I
nTtllim'l1tJ
I
Sambungan
12:!
~
HI/LOW separate connection I Raccordement separe HI/LOW I Conexi6n HI/LOW
independiente
I Separate HI/LOW
-V
erbindung
I HI/LOW-separat
anslutning I Onafhankelijke HI/LOW-aansluiting I
Liga~ao
separada HI/LOW I Collegamento separate HI/LOW I Oddzielne
pol~czenie
HI/LOW I
Conectare separata HI/LOW I Pa3AeflbHOe
naAKnt04eH~e
HI/LOW I OKpeMe
niAKnt04eHHO
HI/LOW I
HI
/LOW
!IITI:il!i
I
HI
/LOW
~TI:i!!i
I
HI/LOW
~1/;;,Jlall
ul»_,;!l~
~~
J,.o,:ll
I HI/LOW
.,;l.>.q-
Jl..ll
I Koneksi terpisah HI/LOW I m1oio01u•un
HI/LOW
I Sambungan berasingan HI/LOW I
HI/LOW
'II%.
!!Hl
Release
both
cables I Debranchez les deux cables I Suelte
ambos
cables I Beide
Kabellosen
I
Frigor
b~da
kablarna I Koppel beide kabels los I Liberte ambos os cabos I Staccare i
due
cavi I
Zwolnij oba
przewody
I Deconectati ambele cabluri I
OrcoeA~H~re
o6a Ka6eno I
BiA'<AHa~re
o6~ABa
Ka6eni I
fi!llllil!IJ
••
I
f4:1tPii~EI!!m;
I
~I.:,..
J5
_,-.~I
.;.,_;5
>l)b
J,IS
,,
.>'>I
Lepaskan kedua kabel I
~aon1m•ni'
a>f•n••••n
I Tanggalkan kedua-dua kabel
I~
~OIW
SIXI
Terminal
for
low
frequency
(Black) I
Borne des basses frequences (Nair) I
Terminal
de
baja frecuencia (Negro) I
Anschluss
fur
tiefe Frequenzen (Schwarz) I
Terminal
for
l~g
frekvens (svart)
I
Aansluiting
voor
lage frequenties (Zwart) I
Terminal para baixas frequencias (Prete) I
Morsetto
per bassa frequenza (Nero) I
Zacisk
przewodu
ma!ej
cz~stotliwosci
(Czarny) I Barna frecvente joase (negru) I
Pa3beM
H~3<•x
4acror
(YepHbl~)
I
Po3'<M
All"
H~3bK~x
4acror
(YopH~~)
I
11UIIllir (JAf'!.)t
ilt!llilWf' (Mlf'!.)/
(>,_.I)
~I
ul»_,;}l
-$-'-<.
'-"IOJI
J,.o,:ll
J_,b
I
(ol,-)
""'~
v-->15.,9
.,;1_,
J4>_,;
I
Ujung
terminal
untuk
frekuensi rendah
(Hitam)
1.ff
1fiDt
hwi'um11J~ih
(ivi1)
I
Pangkalan bagi frekuensi rendah
(Hitam)
/lti'\'111*§
!:!~(~~~)
Terminal
for
high
frequency (White) I
Borne des hautes frequences (Blanc) I
Terminal
de
alta frecuencia (Blanco) I
Anschluss fOr hohe Frequenzen (Weil3) I
Terminal
fbr
hog frekvens (vit)
I
Aansluiting
voor
hoge
frequenties (Wit)
I
Terminal para altas frequencias (Branco)
I Morsetto per alta frequenza (Bianco) I
Zacisk przewodu
duiej
cz~stotliwoSci
(Bialy) I Barna frecvente
inalte
(alb) I
Pa3beM
BblCOKVJX
YaCToT
(6enbn~)
I
Po3'E:M
AJls:l
BVJCOKVJX
YaCTOT
{6im1VI)
I
iWS~llif'
(Sf'!.)/
iti!llillif' (Sf'!.)/
(~i)
;;,Jt.!l ul»_,;ll
.S-'-<.
'-"IOJI
J,.o,-11
J_,b
I
(_.,.;....)
~4
v-->15
_,>
.,;1_,
J4>_,;
I Ujung
terminal
untuk
frekuensi
tinggi
(Putih) I
,r,~miw.i'um11JfiH-1
(itJ11)
I
Pangkalan bagifrekuensi
tinggi
(Putih) I
::i!'\'111*§
EtXI(!J~)
= @
Speaker
cord
(not supplied) I
-
---
""(5)
""'""··
Cordon
de
haut-parleur(non fourni) I
.:::==----
~
-~Cable
de altavoz (no suministrado) I
::
·""'~
''"''''':.·.
':\ Lautsprecherkabel (nicht mitgeliefert) I
:.:~
....
·./
@ =
'',:;:
Hogtalarkabel (medfoljer ej)
I
/.~
Luidsprekerkabel (niet bijgeleverd) I
\\·:.,
::·/i
Cabo
do altifalante (nao fornecido) I
·:::.
:X::·
Cava
del diffusore (non
in
dotazione)I
·::':\
:.':'/
Przew6d glosnikowy(nie zalqczony) I
(
Spoerdaokenrdceorhda(unt
0
-ptasr
0
1epuprli(endo)n/
'our·n::':)'i/\~~
~~'-'-·-·.--
·,·,·
-·-·
.-.-.
-.
,,/Y
~~~~
:~i:~~~K~r~=~~e"~~;~z(~~
1
,.
_,,,:;;i~~~!?cc-·
np•naraerco) I
WHyp
AJlR_
A•HaMiKa
(He
Cable
de altavoz (no suministrado) 1
··-:-
. .-..
,.;.;:,::--·
nocra4a£TbCO
B
KOMnneKTI)
I
Lautsprecherkabel (nicht mitgeliefert)
1
·-::::s"··
::?;:-·
liVi!ilUl
(*Pll~)
I
Hogtalarkabel (medfoljer ej) I
''>;._
:/
!iiifift~tl
(*~~)I
Luidsprekerkabel (niet bijgeleverd) I \-.
.-;.'
(.,;_,.
-"")
'-ol.-11
cll...f
Cabo
do
altifalante (nao fornecido)
I
'.·:-.
.-:;.'
(c:...,.;
...,.._.)
_,s-.w,
~
1
Cava
del diffusore (non
in
dotazione)
I
'(\'.
·/':
Kabel
speaker ltidak tersedia)
I
Przew6d glosnikowy (nie zalqczony) I \.
.'·,
i1i
nmhhn
(1ll1>~'••"'1>l')
I
Cablu
de
difuzor(nu este furnizat) I
~
Kord
pembesar
suara
(tidak dibekalkan) I
WHyp
AJlR
rpaMKaroaop•reno
(He
~IIJ;>f
31E
(IIDI§)
np•naraerco)
I
WHyp
AJlR
A•HaMiKa
(He
noaa4aHbCSl
B KOMnlleKTi)
I
••w••
'*PliPill
1
!iiifiil~tl
(*i!ll~)
I
(.,;
.,. ""')
'-ol.-11
cll...f
(
c:...,.;...,....),l'~~/
~~~.~~,~~~~m~~~Me;sedial
1
Kord
pembesar
suara
(tidak dibekalkan) I
~llj;>f
3lE
('IIDI§)
Power amplifier, etc.
Amplificateur
de
puissance, etc.
Amplificador
de
paten
cia, etc.
Endverstarker usw.
Effektforstarkare osv
Eindversterker, enzovoort
Amplificador
de
patencia, etc.
Amplificatore di potenza, ecc.
Wzmacniacz
mocy
itp.
Amplificator de putere, etc.
YCVJ.n&.1T€11b
MOW.HOCH1
l4
T.n.
niACl411toBa4
nDTY)KHOCTi
TOW,O
Jl.Jlf!lilt'*'i!~
Jl.Jlf!lilt'*'H~
&I,:Uihll~
.o_&.
,_;.Y.
ox.S
~_,.a:;
Power amplifier, lain-lain.
YI111161UfJ1JtJih•htJIEJO{
~ll'l
Amplifier
kuasa, dll.
111'-li!~g.
Basic
connection
I
Raccordement
de
base
I
Conexi6n
basica
1
Grundlegende
Anschlusse
I
Grundlaggande
anslutni
ng
I
Basisaansluiti
ng
I
Ligac;ao basica
I
Co
ll
egamento
base
I
P
olq
czenie
podstawowe
I
Conectare
de
baza
I
OcHOBHOe
nOAKJli04eHV!e
I
OCHOBHe
niAKllto4eHH51
I
a:i$;ilti
I
•*iiti
I
4--l.
.},/1
J:.:>,.,l
I"'=''
'
JL.a:i
l
I
Koneksi
dasar
I
n1
1
ti
~
Wl!J
!Hh~
~1[J
I
Sambunga
n asas
I
71~
era
Car
audio
Auto
radio
Sistema
de
audio
de
autom6vil
Autostereoanlage
Bilstereo
Audiosysteem
voor
auto
Radio
do
autom6vel
Auto
radio
:~J!
:r:,s
+
.,
*2
--------------------------------------------------'
Samochowy
zestaw
audio
Sistemul
audio
al
vehiculului
AsroCTepeocVICTeMa
ABTOCTepeOCVICTeMa
~!!!fiW
~.$fiPiO.J
Audio
mobil
OJ~4._,.,t.;..~j~
~
~..
-.,:;,.,
*3
••
_j~'=
1,~
+
______)
LOW
HI
J
+-------J
• Q
..,.
;
lft1
~
~lffVHII'IHW'U
11
Audio
kereta
:1
•
.2.1:1.2.
*'
Rear
right
speaker
*
1
Haut-parleur arriere
droit
*'
Altavoz posterior derecho
*' Rechter Hecklautsprecher
*
1
Hoger bakhogtalare
*
1
Luidspreker rechts
achteraan
*'
Coluna traseira direita
*
1
Diffusore posteriore destro
*'
Glosnik
tylny
prawy
*
1
Difuzor dreapta spate
.,
npaBbllii
3aAHI-Ilii
Al-!HaMI-!
K
*
1
3aAHi
lii
npael-!tli
Al-!HaMiK
*':5"~•••u
.,
:5"16-~J!IH
~I
4.;AWI
~L.-Ji
'*
~
C....IJ
IS
~
~'*
*
1
Speaker kanan belakang
.,
i
h
l~
~
-.~
a-~
'1111
*
1
Pembesar suara kanan
de
pan
*
'
.2.@~
i!.IOl
~!liT!
*
2
Front
right
speaker
*
2
Haut-parleur
avant
dro
it
*
2
Altavoz frontal derecho
*
2
Rechter Frontlautsprecher
*
2
Hogerfronthogtalare
-
*
2
Luidspreker rechts vooraan
*
2
Coluna dianteira direi
ta
*
2
Diffusore anteriore destro
*
2
Giosnik przedni prawy
*'
Difuzordreapta fata
*
2
npaebl
lii
nepeAHI-Ilii
Al-IHaMI-IK
*'
nepeAHilii npael-!lii
Al-IHaMiK
*'
:5"ili1•••u
*
2
:5"frl.~J!I'iH
~14.:-
L.I,ii
~1
2
*
,J..;.
C....
IJ
IS~~
2
*
*'Speaker kanan depan
*'
ii11
~~-.~11'1'111
1
*
2
Pembesar suara kanan
belakang
•2
.2.~
~~5
~!liT!
*
3
Rear left speaker
*
3
Haut-parleur arriere gauche
*
3
Altavoz posterior izquier
do
*
3
Linker
Hec
klautsprecher
*
3
Vanster bakhogtalare
*
3
Lu
idspreker links achteraan
*
3
Co
l
una traseira esquerda
*
3
Diffusore posteriore sinistro
*
3
Glosnik
tylny
lewy
*
3
Difuzorstanga spate
*
3
nesb
l
lii
3aAHI-Ilii
AVIHaMI-!K
*
3
3aAHilii niel-llii
Al-IHaMiK
•3<£~Jt•••n
•
3
<£J6.~Jf~U
o;..r-:fl
4.;AWI
~L.-J
I
3
*
~~IS~~
3*
*
3
Speaker kiri depan
*
3
Li
1
1
~~-.~a-~'li
1!J
*
3
Pembesarsuara kiri
de
pan
*
3
!!~
i!.IOl
~:U:ITI
*
4
F
ront
left
speak
er
*
4
Haut-parleur
ava
nt gauche
*
4
Altavoz front
al
izquier
do
*
4
Linker Frontlautsprecher
*
4
Va
nsterfronthogtalare
*
4
Luidspreker links
voo
r
aa
n
*'
Co
l
una dianteira esquerda
*
4
Diffusore anteriore sinistro
*
4
Giosnik przedni lewy
••Difuzor stanga fata
••neebuii nepeA
HVI
lii
AV!HaMVIK
••
nepeAHilii nisl-l
lii
Al-I
H
aM
iK
·
•<£WJ•••u
••;£fiJ.~JfiU
IS..r-:f
l
4.:-L.
I,II
~L.-Ji
•
*
,J..;.~.s~~·
·
••
speak
er
kiri belakang
*
4
ii11V
H">IIl'
1
'Ji
1!J
*
4
Pembesar suara
ki
ri belakang
••
!!~
~~~
~:U:ITI
(R)
(L)