Sony CBK-WA01 User manual

Wi-Fi Adapter
Operating Instructions
Before operating the unit, please read this manual thoroughly
and retain it for future reference.
CBK-WA01
4-181-312-12 (1)
© 2010 Sony Corporation

NOTICE TO USERS
Documentation © 2010, 2011 Sony Corporation
All rights reserved. This manual or the software described
herein, in whole or in part, may not be reproduced,
translated or reduced to any machine readable form
without prior written approval from Sony Corporation.
SONY CORPORATION PROVIDES NO WARRANTY
WITH REGARD TO THIS MANUAL, THE
SOFTWARE OR OTHER INFORMATION
CONTAINED HEREIN AND HEREBY EXPRESSLY
DISCLAIMS ANY IMPLIED WARRANTIES OF
MERCHANTABILITY OR FITNESS FOR ANY
PARTICULAR PURPOSE WITH REGARD TO THIS
MANUAL, THE SOFTWARE OR SUCH OTHER
INFORMATION. IN NO EVENT SHALL SONY
CORPORATION BE LIABLE FOR ANY
INCIDENTAL, CONSEQUENTIAL OR SPECIAL
DAMAGES, WHETHER BASED ON TORT,
CONTRACT, OR OTHERWISE, ARISING OUT OF OR
IN CONNECTION WITH THIS MANUAL, THE
SOFTWARE OR OTHER INFORMATION
CONTAINED HEREIN OR THE USE THEREOF.
Sony Corporation reserves the right to make any
modification to this manual or the information contained
herein at any time without notice.
The software described herein may also be governed by
the terms of a separate user license agreement.

Table of Contents 3
Table of Contents
Overview...........................................................................................4
Features ................................................................................................. 4
Example Uses ........................................................................................ 5
Configuring Your Camcorder to Enable Wi-Fi Connections .......6
Making a Wi-Fi Connection to Your Computer (Ad hoc Mode) ...7
Settings on the Computer ...................................................................... 7
Starting a Connection ............................................................................ 8
Using a Wireless LAN Access Point (Infrastructure Mode).......11
Setting up the Wireless LAN Access Point......................................... 11
Find and Connect to a Wireless LAN from Your Camcorder............. 11
Connecting via WPS ........................................................................... 11
Using the Web Menu (For PDW-700/F800 Only) .........................12
Displaying the Web Menu................................................................... 12
Pages in the Web Menu....................................................................... 12
Starting a Wi-Fi Connection................................................................ 13
Performing IEEE 802.1x Authentication ............................................ 14
Using Sony Planning Metadata Add-in........................................15
Displaying Planning Metadata ............................................................ 15
Sony Planning Metadata Operation Screen......................................... 15
Creating Planning Metadata ................................................................ 16
Saving Planning Metadata to a Desired Location ............................... 18
Loading Planning Metadata from a Specified Location...................... 18
Emailing Planning Metadata ............................................................... 18
Transferring Planning Metadata to a Camcorder ................................ 19
Troubleshooting ............................................................................21

4Overview
Overview
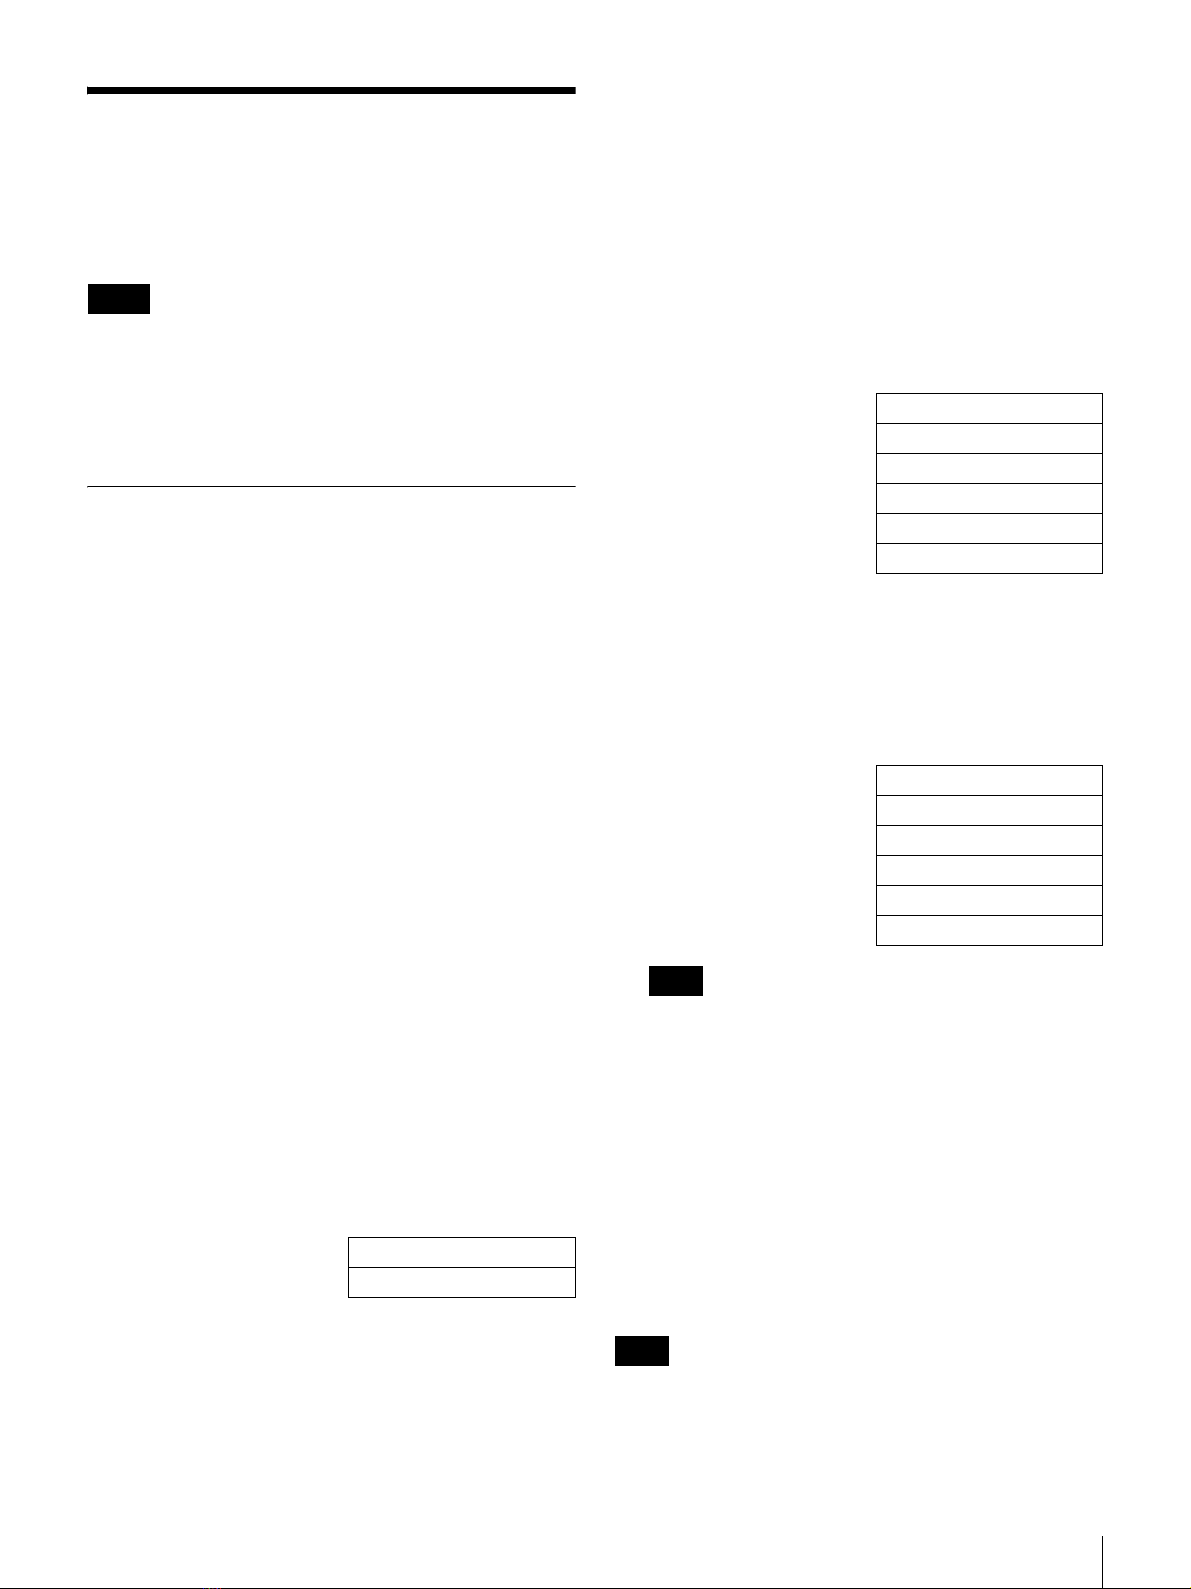
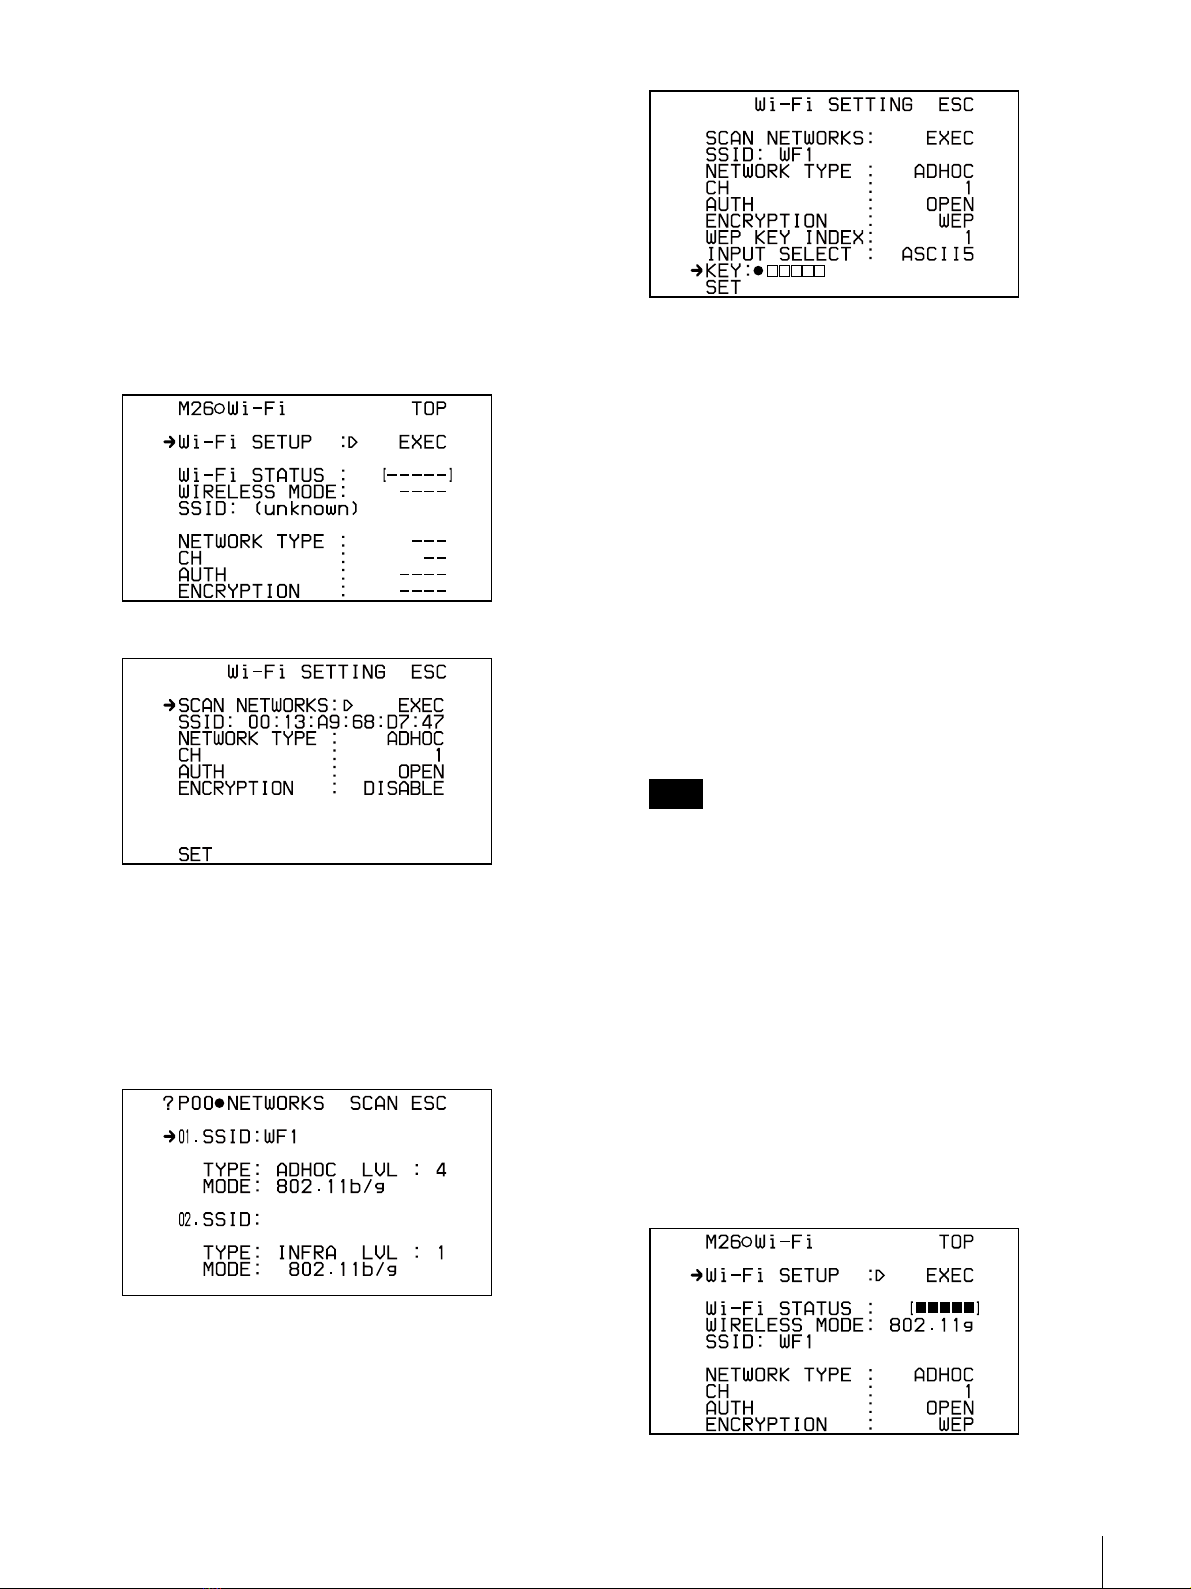
The CBK-WA01 Wi-Fi Adapter is a wireless LAN adapter
for connecting a PDW-700/F800 1) Professional Disc
Camcorder and a PMW-500 2)/350 3)/320 4) Solid-State
Memory Camcorder (called “camcorder” in this
document) to a computer or mobile device via Wi-Fi.
1) Firmware version 1.6 or later
2) Firmware version 1.1 or later
3) Firmware version 1.3 or later
4) Firmware version 1.2 or later
Features
Supports 3 wireless LAN standards
This adapter supports the general-purpose IEEE802.11b/g/
n wireless standard, which can be used worldwide.
Connect to computers in ad hoc mode
When a wireless LAN access point is not available (for
example, when you are shooting outdoors), you can make
a peer-to-peer Wi-Fi connection between your computer
and camcorder. When you make a Wi-Fi connection
between your computer and camcorder, you can send files
including clips from your camcorder to your computer,
and edit them at the shooting location. You can also use the
supplied Sony Planning Metadata Add-in application to
create planning metadata on your computer, send them to
your camcorder, and set the names of files to record.
The ability to connect your computer and camcorder
wirelessly gives you the freedom to choose where to set up
and move your camcorder.
Connect to a LAN infrastructure mode
You can make Wi-Fi connections between a computer and
multiple camcorders via a wireless LAN access point.
This enables you to send planning metadata to multiple
camcorders at the same time, and manage multiple
camcorders centrally from a single computer.
Sony Planning Metadata Add-in (supplied)
Installing the included Sony Planning Metadata Add-in on
your computer enables you to do the following.
• Create planning metadata using the tasks feature of
Microsoft Outlook1), and send them to your camcorder
to pre-set the names of files to save.
• Send planning metadata created using Sony Planning
Metadata Add-in to a computer at the shooting location
as an email attachment.
• Send planning metadata created using Sony Planning
Metadata Add-in directly via a network connection to a
camcorder connected via Wi-Fi.
• Save planning metadata created using Sony Planning
Metadata Add-in on your computer’s hard disk or to
other media.
• Import planning metadata created on other computers.
You can also use planning metadata to rename XDCAM-
compatible shot marks. (When you assign the Shot Mark
function to the camcorder’s ASSIGN switch, you can
create shot marks during recording or playback, at any
location and with the name you choose.)
Below are the system requirements for Sony Planning
Metadata Add-in.
OS: Microsoft Windows XP, Microsoft Windows Vista,
or Microsoft Windows 7 1)
Application: Microsoft Office 2003, Microsoft Office
2007, or Microsoft Office 2010 (32-bit) 1)
1) Microsoft, Microsoft Outlook, Windows, Windows Vista, and Windows 7
are registered trademarks of Microsoft Corporation in the United States
and other countries.
Live Logging
The Live Logging feature is available when you connect
your camcorder and computer via Wi-Fi. The Live
Logging feature sends audio and video proxy data to your
computer and logs it while you are shooting.
The following actions can be performed on data being
logged.
• View the proxy AV data of the camcorder’s E-E video or
video being shot.
• Add or change metadata (title and comment) while
shooting.
• Enter the title and comment of the clip being shot.
• Set an appropriate essence mark for each scene being
shot.
You can send newly created, added or changed metadata
and clip lists from your computer to your camcorder, and
write it back to the original media.
When view mode is selected on your camcorder, you can
exchange metadata between your computer and camcorder
and transfer proxy AV data to the camcorder. When live
mode is selected, only metadata exchange is available.
Note

5
Overview
Example Uses
The figure below shows an example use of a camcorder
with a CBK-WA01 installed.
Camcorder
Connecting in ad hoc mode
Shooting location
Broadcasting station/
control center
Smart phone
CBK-WA01
Computer
Connecting in LAN infrastructure mode
Send/receive email
Camcorder + CBK-WA01
Access point
Computer (Sony Planning
Metadata Add-in is installed)
Internet
Broadcasting
station
Computer (Sony
Planning Metadata
Add-in is installed)

6Configuring Your Camcorder to Enable Wi-Fi Connections
Configuring Your
Camcorder to Enable
Wi-Fi Connections
• Check the firmware version of your camcorder to make
sure that the camcorder supports the Wi-Fi adapter.
For details, contact your Sony dealer or a Sony service
representative.
• In order to use the Wi-Fi connection feature, you must
have an installation key. If an installation key has not
been entered, then the Wi-Fi items will not appear in the
setup menu.
• The procedure below illustrates the use of the PDW-700.
For procedures for using other camcorders to make Wi-
Fi connections, refer to the OPEARTION MANUAL or
Operating Instructions supplied with each camcorder.
For details about the menu operations of the PDW-700,
refer to the OPEARTION MANUAL supplied with the
PDW-700.
If the PDW-700 is connected to the computer via a LAN
cable, you can use the Web menu to perform steps 2
onward (see page 12).
1
Make the following settings on the 007 POWER
SAVE page of the OPERATION menu.
ETHERNET/USB : ENABL
Wi-Fi : ENABL
2
Select NETWORK SETUP: EXEC on the M23
NETWORK 1 page of the MAINTENANCE menu,
and press the MENU knob.
The NETWORK SETTING page appears.
3
On the NETWORK SETTING page, set DHCP to
“DISABLE” and change the value of IP ADDRESS as
required.
The default IP address is “192.168.1.10”.
4
Select “SET”, and press the MENU knob to return to
the M23 NETWORK 1 page.
5
Clear the menu display.
Notes

7
Making a Wi-Fi Connection to Your Computer (Ad hoc Mode)
Making a Wi-Fi
Connection to Your
Computer (Ad hoc Mode)
• Make sure that your computer is capable of making a
wireless connection.
• IEEE802.11n connections are not available while in ad
hoc mode.
• Use WEP as the data encryption method.
Settings on the Computer
The following settings are required.
• Create a network that will be used to connect to the
camcorder.
• Set the IP address corresponding to the IP address of the
camcorder.
The examples below illustrate the creation of a network
named “WF1” using Windows XP and Windows Vista.
For Windows XP
1
Click [Control Panel] >[Network Connections].
The [Network Connections] window opens.
2
Right click [Wireless Network Connection], and click
[Properties].
The [Wireless Network Connection Properties] dialog
opens.
3
Click to check [Internet Protocol (TCP/IP)] in the
[General] tab, and click [Properties].
The [Internet Protocol (TCP/IP) Properties] dialog
opens.
4
Click [Use the following IP address], and make the
following settings.
For xxx, enter the same value with the IP address
assigned to the camcorder.
For yyy, select a value which is not used for the IP
address assigned to the camcorder.
5
Click [OK] to close the dialog.
6
Click [Advanced...] under [Preferred networks] in the
[Wireless Networks] tab to open the [Advanced]
dialog. Select [Computer-to-computer (ad hoc)
networks only], then click [Close] to close the dialog.
7
Click [Add] under [Preferred networks] in the
[Wireless Networks] tab.
The [Wireless Networks Properties] dialog opens.
8
Click to uncheck [The key is provided for me
automatically], and make the following settings.
Set [Network key] to string of 5 or 13 ASCII
characters, or of 10 or 26 hexadecimal digits.
In this example, set the network name to “WF1”, and
the network key to “12345”.
Example settings
Windows Vista computers support connection with
the WEP key index fixed to 1. If you use both
Windows Vista computers and Windows XP
computers, be sure to set [Key index] to 1.
9
Click [OK] to close the [Wireless Networks
Properties] dialog.
[WF1 (Automatic)] appears in the [Preferred
networks] list in the [Wireless Network Connection
Properties] dialog.
10
Click [OK] to close the dialog.
When you are not making a Wi-Fi connection to your
camcorder, configure your computer to obtain an IP
address automatically (in step 4, select “Obtain an IP
Notes
IP address: 192.168.xxx.yyy
Subnet mask: 255.255.255.0
Network name (SSID): Any name
Network Authentication: Open
Data encryption: WEP
Network key:
Confirm network key:
Key index (advanced): 1
Network name (SSID): WF1
Network Authentication: Open
Data encryption: WEP
Network key: 12345
Confirm network key: 12345
Key index (advanced): 1
Note
Note

8Making a Wi-Fi Connection to Your Computer (Ad hoc Mode)
address automatically”), and in step 6, select “Any
available network (access point preferred)”.
For Windows Vista
To create a network
1
Click [Start] > [Control Panel] to open the [Control
Panel] window.
2
Click [View network status and tasks] under [Network
and Internet] to open the [Network and Sharing
Center] window.
3
Click [Set up a connection or network] under [Tasks]
to open the [Set up a connection or network] dialog.
4
Click [Set up a wireless ad hoc (computer-to-
computer) network], and click [Next].
5
Click [Next].
6
Make the following settings.
Set [Security key/Passphrase] to any string of 5 or 13
ASCII characters, or of 10 or 26 hexadecimal digits.
In this example, set the network name to “WF1”, and
the security key to “12345”.
Example settings
7
Check [Save this network], and click [Next].
8
Confirm that WF1 set up is complete, and click
[Close].
The [Set up a connection or network] dialog closes.
To set an IP address
1
In the [Network and Sharing Center] window, click
[Manage network connections] under [Tasks]. The
[Network Connections] window opens.
2
Right click the [Wireless Network Connection] icon,
and click [Properties] on the pop-up menu.
The [Wireless Network Connection Properties] dialog
opens.
3
Click [Internet Protocol Version 4 (TCP/IPv4)] in the
[Network] tab, and then click [Properties].
The [Internet Protocol Version 4 (TCP/IPv4)
Properties] dialog opens.
4
Click [Use the following IP address], and make the
following settings.
For xxx, enter the same value with the IP address
assigned to the camcorder.
For yyy, select a value which is not used for the IP
address assigned to the camcorder.
5
Click [OK] to close the dialog.
6
Click [Close] to close the [Wireless Network
Connection Properties] dialog.
When you are not making a Wi-Fi connection to your
camcorder, configure your computer to obtain an IP
address automatically (in step 4, select “Obtain an IP
address automatically”).
Starting a Connection
Connect your computer and camcorder using the “WF1”
network you created in “Settings on the Computer” (page
7).
The procedure below illustrates the use of the PDW-700.
For procedures for using other camcorders to make Wi-Fi
connections, refer to the OPEARTION MANUAL or
Operating Instructions supplied with each camcorder.
For details about the menu operations of the PDW-700,
refer to the OPEARTION MANUAL supplied with the
PDW-700.
If the PDW-700 is connected to the computer by Ethernet,
you can use the Web menu to perform steps 2on (see page
13).
1
The computer initiates a connection.
For Windows XP
Right click [Wireless Network Connection] in the
[Network Connections] window, and click [View
Available Wireless Networks]. Click “WF1” in the
Network name: Any name
Security type: WEP
Security key/Passphrase: *****
Network name: WF1
Security type: WEP
Security key/Passphrase: 12345
IP address: 192.168.xxx.yyy
Subnet mask: 255.255.255.0
Note
Note

9
Making a Wi-Fi Connection to Your Computer (Ad hoc Mode)
[Wireless Network Connection] dialog, and then click
[Connect].
For Windows Vista
In the [Network and Sharing Center] window, click
[Connect to a network] under [Tasks]. Click [WF1] in
the [Connect to a network] dialog, and then click
[Connect].
2
On your camcorder, select Wi-Fi SETUP: EXEC on
the M26 Wi-Fi page of the MAINTENANCE menu,
and press the MENU knob.
The Wi-Fi SETTING page appears.
3
Select SCAN NETWORKS: EXEC, and press the
MENU knob.
The NETWORKS page appears, and the camcorder
starts scanning for a network connection.
When the network (WF1) is detected, the following
page appears.
4
Select WF1, and press the MENU knob to return to the
Wi-Fi SETTING page.
If the network is not found
On the NETWORKS page, select ESC and press the
MENU knob to display the Wi-Fi SETTING page.
Make the following settings to specify the network to
connect to.
SSID (network name) : WF1
NETWORK TYPE (connection mode) : ADHOC
CH (channel) : 1
AUTH (network authentication) : OPEN
ENCRYPTION (data encryption) : WEP
WEP KEY INDEX : 1
INPUT SELECT (network (security)
key input format) : ASCII5
Here, the key is set to “12345”, so select ASCII5.
For a 13-letter ASCII string : ASCII13
For a 10-digit hexadecimal string : HEX10
For a 26-digit hexadecimal string : HEX26
Windows Vista computers support connection with
the WEP key index fixed to 1. If you use both
Windows Vista computers and Windows XP
computers, set the WEP KEY INDEX to 1.
5
Set the KEY to the network (security) key set on your
computer, and press the MENU knob.
In this example, set the security key to “12345”.
KEY: 12345
6
Select SET, and press the MENU knob.
The camcorder initiates the connection while
redisplaying the M26 Wi-Fi page.
If the connection to the computer is complete, then the
display will appear as follows.
Note

10 Making a Wi-Fi Connection to Your Computer (Ad hoc Mode)
When the menu display is cleared, the Wi-Fi status
indication which shows the wireless connection is
successful appears on the upper right on the LCD
monitor (four squares and “11g” (or “11b”)).
The Wi-Fi status indication changes in accordance
with the wireless connection status of the camcorder
(see the next section “Wi-Fi status indication”).
The computer may become disconnected during steps
3to 5. If this happens, start over from step 1, and
reopen the connection.
Wi-Fi status indication
The Wi-Fi status indication on the LCD monitor screen
changes as follows, in accordance with the wireless
connection status of the camcorder.
To terminate the connection
For Windows XP
Right click [Wireless Network Connection] in the
[Network Connections] window, and click [View
Available Wireless Networks]. Click “WF1” in the
[Wireless Network Connection] dialog, and then click
[Disconnect].
For Windows Vista
In the [Network and Sharing Center] window, click
[Connect to a network] under [Tasks]. Click [WF1] in the
[Connect to a network] dialog, and then click
[Disconnect].
To revert to the default settings (reset)
If you have trouble making a connection, or you want to
start over, you can reset your Wi-Fi connection settings to
their defaults.
1
Select NET CFG RESET: EXEC on the M24
NETWORK 2 page of the MAINTENANCE menu,
and press the MENU knob.
The message “RESET DATA OK?” appears.
2
If you want to reset the configuration, select “YES”
and press the MENU knob. If you want to cancel the
reset, select “NO” and press the MENU knob.
If the reset is executed, “COMPLETE” appears.
The camcorder attempts to connect to the network
using a MAC address as the SSID.
Note
Status Indication Wireless connection status
1 None This adapter is not in operation.
2Wireless LAN is not connected.
3Flashing Wireless LAN connection is being
made.
4Solid Wireless LAN connection is complete.
: Reception level
11n/11g/11b: Wireless LAN protocol
Wi-Fi status indication
xx
xx
Camcorder’s MAC address

11
Using a Wireless LAN Access Point (Infrastructure Mode)
Using a Wireless LAN
Access Point
(Infrastructure Mode)
To connect your camcorder to a LAN via a wireless LAN
access point, find the LAN to connect to on the
camcorder’s menu, or perform Wi-Fi Protected Setup
(WPS).
To perform IEEE 802.1x authentication
Use the Web menu to connect to a LAN with IEEE 802.1x
authentication configured (see page 14).
The procedure above illustrates the use of the PDW-700.
For procedures for using other camcorders to make Wi-Fi
connections, refer to the OPEARTION MANUAL or
Operating Instructions supplied with each camcorder.
Setting up the Wireless LAN Access
Point
The following settings are required.
For details about setting up the wireless LAN access point,
see the manual of the wireless LAN access point.
Find and Connect to a Wireless LAN
from Your Camcorder
Perform steps 2onward in “Starting a Connection” (page
8), but instead of selecting the connection network (WF1),
set the wireless LAN (WF_net), enter the network key you
configured for your access point, and make the connection.
If the camcorder is connected to the computer via a LAN
cable, you can use the Web menu to find the access point
(see page 13).
Connecting via WPS
• Make sure that your access point supports WPS.
• The procedure below illustrates the use of the PDW-700.
The menu numbers may be different for other camcorder
models.
For details about the menu operations of the PDW-700,
refer to the OPEARTION MANUAL supplied with the
PDW-700.
See your access point’s manual for details about operating
your access point.
To select WPS mode
Set WPS MODE on the M25 WPS page of the
MAINTENANCE menu.
To use push method: ONE PUSH
To enter a PIN code: PIN CODE
If you select “PIN CODE”, the camcorder’s PIN code
appears.
To use push method
1
Select WPS START: EXEC, and then press the
MENU knob.
“EXECUTE OK?” appears.
2
Select “YES”, and then press the MENU knob, and
perform WPS on the access point.
Note
Item Setting
Network ID (SSID) Example: WF_net
Encryption method Example: WEP
Network key Set to a string of 5 or 13 ASCII
characters or a string of 10 or 26
hexadecimal digits.
Notes
PIN code

12 Using the Web Menu (For PDW-700/F800 Only)
When the connection is complete, the WPS STATUS
display changes to “OK”.
To enter a PIN code
1
Enter the PIN code displayed when you selected “PIN
CODE” on the access point.
2
Select WPS START: EXEC, and then press the
MENU knob.
The P00 ACCESS PNT page appears, and the
camcorder starts scanning for an access point.
3
When access points are detected, select the network to
connect.
When the connection is complete, the WPS STATUS
display changes to “OK”.
Using the Web Menu (For
PDW-700/F800 Only)
If the camcorder is connected to the computer by Ethernet
(for PDW-700/F800 only), you can use the Web menu to
make a Wi-Fi connection between your camcorder and
computer.
See your camcorder’s operation manual for details about
Ethernet connection.
Displaying the Web Menu
1
Connect the camcorder to the computer via a LAN
cable.
2
Launch a web browse on the computer, and navigate to
“http://<camcorder’s IP address>/”.
Example: when the IP address is “192.168.1.10”
Type “http://192.168.1.10/” in the address bar.
If the connection is complete, a dialog appears asking
you to enter the user name and password.
3
Fill in the [User name] and [Password] boxes, and
click [OK].
Pages in the Web Menu
Use the Network page and Wi-Fi page for Wi-Fi
connection.
Network page
Click Maintenance >Network in the Web menu to display
the Network page.
You can check or change the camcorder’s IP address on
the Network page.
Use name: admin
Password: Type the model name in
lower-case letters.

13
Using the Web Menu (For PDW-700/F800 Only)
Click [Execute] when you changed the IP address.
Wi-Fi page
Click Maintenance >Wi-Fi in the Web menu to display the
Wi-Fi page.
Wi-Fi Status area
Shows the wireless connection status.
Wi-Fi Settings area
You can confirm or change the current settings for a Wi-Fi
connection, and start a connection.
Windows Vista computers support connection with the
WEP key fixed to 1. Enter the Wep key in the [WEP Key
1] box.
Starting a Wi-Fi Connection
1
Display the Wi-Fi page.
2
Make sure that [Wi-Fi Enable] is set to [Enable] in the
Wi-Fi Status area.
If it is set to [Disable], change the setting to [Enable]
from the camcorder’s menu (see page 6).
3
To connect to your computer in ad hoc mode, begin the
connection from the computer (see page 8).
To connect to a wireless LAN, go on to step 4.
4
Click [Search] next to the SSID field in the Wi-Fi
Settings area.
The Wireless Networks list appears.
5
Click the SSID to connect to (network name or
network ID of wireless LAN), and then click [OK].
If the desired SSID is not found
Click [Rescan] to perform the scan again. If it is still
not found, click [Back] to return to the Wi-Fi page (see
the next section “To configure a connection”).
6
Enter the network key in the WEP key field, click
[Execute], and then [Reconnect].
Item Setting operations
SSID Enter the name of the network to
connect.
Search Search for the network to connect.
Type Select the Wi-Fi connection mode.
Infra: Infrastructure mode
Adhoc: Ad hoc mode
Channel Select the channel used for
connection.
When [Type] is [Infra]: auto
(display only)
When [Type] is [Adhoc]: 1ch to
11ch
Authentication Select the encryption type.
Data Encryption Select [WEP] to use WEP, and
select [Disable] not to use WEP.
Input select Depending on the setting of [WEP
Key], select ASCII or HEX
(hexadecimal digits), and the
number of characters (digits).
WEP Key 1 to 4 Enter the WEP key (network key).
Note
Item Setting operations

14 Using the Web Menu (For PDW-700/F800 Only)
When the connection completes, the connection status
will appear in the Wi-Fi Status area.
To configure a connection
If the desired SSID does not appear on the Wireless
Networks list, enter the SSID and settings (see page 9),
then click [Execute] and then [Reconnect].
Performing IEEE 802.1x
Authentication
Set [802.1X Enable] to [Enable] on the Wi-Fi page in order
to perform IEEE 802.1x authentication.
The authentication settings area appears.
Consult with your network administrator for details about
the authentication settings.
Authentication settings area

15
Using Sony Planning Metadata Add-in
Using Sony Planning
Metadata Add-in
This section describes how to use the included Sony
Planning Metadata Add-in to create and send planning
metadata.
• Configure Microsoft Outlook to send and receive email.
• Make the following settings on the 028 FILE NAMING
page of the OPERATION menu.
NAMING FORM: FREE
AUTO NAMING: PLAN
The procedure above illustrates the use of the PDW-700.
For procedures for other camcorders, refer to the
OPEARTION MANUAL or Operating Instructions
supplied with each camcorder.
See the CBK-WA01 Mounting Instructions for installation
instructions and system requirements.
Displaying Planning Metadata
When you start Microsoft Outlook on the computer on
which you installed Sony Planning Metadata Add-in, a
[Sony Planning Metadata] folder is added to the [Tasks]
window.
Click the [Sony Planning Metadata] folder to display the
Sony Planning Metadata operation screen (see page 15)
appears.
To use the [Sony Planning Metadata] folder for
the first time
When you start Microsoft Outlook after installing Sony
Planning Metadata Add-in, the message in the figure
below appears.
Perform the procedure below to set the working format to
“IPM.Task.Planning Task”.
1
Right click on the [Sony Planning Metadata] folder,
and then click [Properties] to open the [Sony Planning
Metadata Properties] dialog.
2
Select [IPM.Task.Planning Task] in the [When
posting to this folder, use:] list, and then click [OK].
Sony Planning Metadata Operation Screen
The figure below shows an example operation screen of
Sony Planning Metadata.
Notes

16 Using Sony Planning Metadata Add-in
Creating Planning Metadata
1
Double click [Click here to add a new Task] to open
the [IPM.Task.Planning Task] window.
[Planning Data] is selected in the [IPM.Task.Planning
Task] tab.
Filename: Type the filename of the material to record.
When a disc camcorder is used, up to 50 bytes of
Loading planning metadata (see page 18)
Saving planning metadata (see page 18)
Sending planning metadata as email attachments (see page 18)
Transferring planning metadata to a camcorder (see page 19)
Registering camcorders as transfer destination (see page 19)
Displaying information about Sony Planning Metadata Add-in
[Sony Planning Metadata] folder
Double click to open the [IPM.Task.Planning Task] window (see page 16)

17
Using Sony Planning Metadata Add-in
characters or about 16 Japanese characters can be
entered. When a memory camcorder is used, up to
44 bytes of characters or about 14 Japanese
characters can be entered.
You can use non-English characters in the
filename. If you only want to allow English
filenames to be entered, display the [ASCII
Filename] field of the user-defined field group.
Created: The date that the creation of the planning
metadata began is entered.
Send To: Enter the email address to send the planning
metadata to.
Instructions: You can enter any notes here (the notes
can be up to 2048 ASCII characters, or about 682
Japanese characters). You can use non-English
characters.
When sending an email, the text entered here is
used as the body of the email.
2
Click the [Save & Close] button to close the window.
Planning metadata is created and displayed, reflecting
the information you entered in step 1.
To set shot marks 1 and 2
Click [Shot Marks] in the [IPM.Task.Planning Task] tab of
the [IPM.Task.Planning Task] window.
Enter the names of the scenes (Home run or Hit, for
example) you want to set in the shot mark in the
[ShotMark1] and [ShotMark2] fields.
See “To display all fields” on the following page for
information about setting shot mark 0 and shot marks 3 to
9.
To display all fields
1
Click [All Fields] in the [IPM.Task.Planning Task] tab
of the [IPM.Task.Planning Task] window.
2
Select [IPM.Task.Planning Task] in the [Select from:]
list.
Available fields for the IPM.Task.Planning Task
format appear.
By default, [Filename] (name of planning metadata
file), [Send To] (recipient of the planning metadata),
and shot marks 0 to 9 can be set.
To use all shot marks (0 to 9), use the numeric keys of
a USB keyboard.
To display user-defined fields
In step 2of “To display all fields”, select [User-defined
fields in folder].
You can select the [ASCII Filename] field, [Assignment
Id] field, [MediaName] field, and others.
ASCII Filename: ASCII file name of the material to
record (in alphameric characters).
Assignment Id: Unique ID assigned to planning metadata
automatically when it is issued (by Export, Send, or
Save to XDCAM commands).
You can set an original ID under your control instead
of using an ID assigned automatically.
If you fill in the [Assignment Id] field, automatic ID
assignment is not performed.
MediaName: You can set the volume label for the disc by
adding a [MediaName] field and entering a value
(available when a disc camcorder is used). When you
send planning metadata to the camcorder and record a
clip, the volume label that you entered will be
reflected.
If a volume label has already been set for the disc, then
your setting will not be reflected.
Using functions of Microsoft Outlook, you can add user-
defined fields such as [ASCII Filename], [Assignment Id],
or [MediaName] to the IPM.Task.Planning Task group.
Note
Note

18 Using Sony Planning Metadata Add-in
To add an original field
Using functions of Microsoft Outlook, you can create and
add original fields.
1
Display all fields, select a group in the [Select from:]
list, and click [New…].
The [New Field] dialog appears.
2
Enter the field name to add in the [Name] box (the
name can be up to 64 ASCII characters, or about 21
Japanese characters).
A maximum of 128 bytes of text can be entered in the
[Value] field. This is equal to 128 ASCII characters. If
you are using Japanese, this equates to about 42
characters.
Select [Text] in the [Type] and [Format] lists.
3
Click [OK] to close the dialog.
To edit planning metadata
After you have created planning metadata, you can edit it
by double clicking on the planning metadata’s [Filename]
field to open the [IPM.Task.Planning Task] window.
Saving Planning Metadata to a
Desired Location
You can use Export function to save your planning
metadata to a separate location as an XML file.
1
Click on the [Filename] field of the planning metadata
you wish to save, and click [Export] on the menu bar.
The [Save As] dialog appears.
2
Specify the save location and file name, then click
[Save].
If you specified USB memory as the save location
You can save your planning metadata to USB memory,
and then load it directly into your camcorder. Save the
planning metadata in the /General/Sony/Planning
directory.
Changing the save name will not change the filename of
the planning metadata. The name that appears in the
[Filename] field is the file name set for the clip.
Loading Planning Metadata from a
Specified Location
You can use the Import feature to load planning metadata
that you have previously saved on your system.
1
Click [Import] on the menu bar.
The [Open] dialog appears.
2
Select the planning metadata you wish to load, and
then click [Open].
When you import a file, the [Send To] and [Assign ID]
settings are not reloaded. Set them again if necessary.
Emailing Planning Metadata
You can use the Send feature to send and receive planning
metadata between computers as email attachments.
1
Enter an email address in the [Send To] field of the
planning metadata you wish to send.
2
Click on the [Filename] field of the planning metadata
you wish to send, and click [Send] on the menu bar.
The [Send] dialog appears, and sending begins.
The dialog will close automatically after the email has
been sent.
If sending fails
A message will appear to inform you of this fact. Click
[Close] to close the dialog.
To send planning metadata to a camcorder
using a Web page
You can use a Web page to send planning metadata to a
camcorder from a computer that has received the planning
metadata as an email attachment.
This function will not be available if the disc camcorder’s
Live Logging function is set to “View”. Change the Live
Logging setting to “Live” or “Off”. This function is also
not available in Picture Cache mode, or when viewing
thumbnails.
When your computer and camcorder are connected, you
can also save planning metadata to /General/Sony/
Planning.
Note
Note
Note
Note

19
Using Sony Planning Metadata Add-in
1
Save the planning metadata as an XML file to a desired
location on the computer that received it.
2
Connect the receiving computer and camcorder via
Wi-Fi.
3
Launch a web browser on the receiving computer, and
navigate to “http://IP address of camcorder/
mobile.htm”.
Example: if the IP address is “192.168.1.10”
Type “http://192.168.1.10/mobile.htm” in the address
bar.
If the connection is complete, a page will appear
asking you to enter the user name and password.
4
Fill in the [User name] and [Password] boxes, and
click [OK].
The [Planning Metadata] page appears.
5
Click [Browse…] to open the [Choose File] dialog.
6
Select the planning metadata file (XML) you saved in
step 1, and then click [Open].
The path of the selected file appears in the [File to
send] field.
7
Click [Execute].
The planning metadata is sent to the camcorder, and
stored in the /General/Sony/Planning directory.
[OK] will appear in the [Status] field when sending is
complete.
Transferring Planning Metadata to a
Camcorder
You can use the Save to XDCAM feature to send planning
metadata from your computer to your camcorder.
First, register the IP address, username, and password of
the camcorder to transfer the file to.
When your computer and camcorder are connected, you
can also save planning metadata to /General/Sony/
Planning.
To register a transfer destination
1
From the menu bar, click [Settings] to open the
[Settings] dialog.
2
Enter the IP address, username, and password of the
connection camcorder in the [Address], [Username],
and [Password] fields of [Camera1].
3
Enter the IP addresses, usernames, and passwords of
other camcorders (or cameras) in the [Address],
[Username], and [Password] fields of [Camera2] and
[Camera3] as needed.
4
Select the checkboxes of the camcorders to transfer to
(multiple selections possible).
You can change the settings for [Name] fields
(Camera1, Camera2, and Camera3).
5
Click [OK] to close the dialog.
To transfer planning metadata
1
Connect the receiving computer and camcorder via
Wi-Fi.
User name: admin
Password: Type the model name in
lower-case letters.
Example [Planning Metadata] page
(when a disc camcorder is used)
Note

20 Using Sony Planning Metadata Add-in
To transfer planning metadata to multiple camcorders,
create a network between the computer and
camcorders via an access point. (Build a LAN for the
computer and camcorders.)
2
Click on the [Filename] field of the planning metadata
you wish to transfer, and click [Save to XDCAM] on
the menu bar.
The [Save To XDCAM] dialog appears, and the
transfer begins.
The dialog will close automatically when the transfer
is complete and the planning metadata is loaded on the
camcorder.
If the transfer fails
A message will appear to inform you of this fact. Click
[Close] to close the dialog.
Note
Other manuals for CBK-WA01
1
Table of contents
Other Sony Modem manuals