Operations
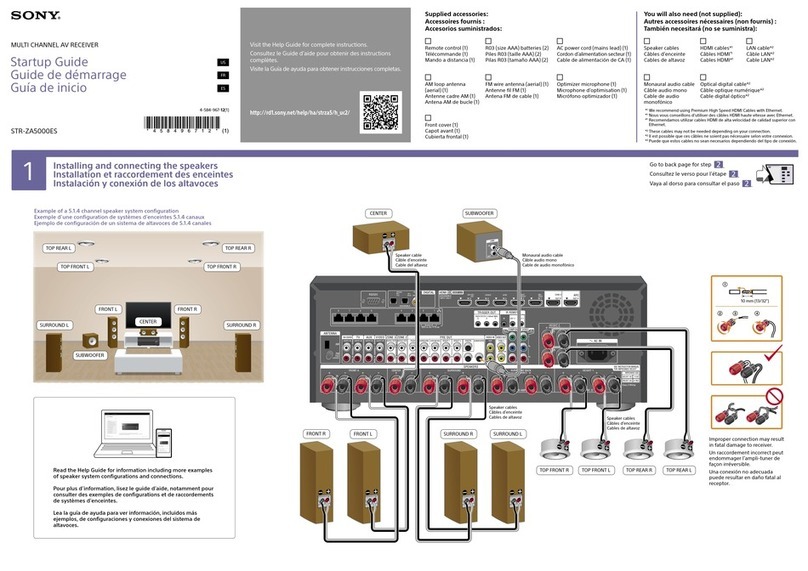
Remote commander
Preparing the remote commander
Before using the remote commander for the first time, remove the insulation film.
Replacing the lithium battery of the remote commander
Under normal conditions, the battery will last approximately 1 year. (The service life may be shorter, depending on the
conditions of use.)When the battery becomes weak, the range of the remote commander becomes shorter. Replace the
battery with a new CR2025 lithium battery. Use of any other battery may present a risk of fire or explosion.
+ side up
Notes on the lithium battery
Keep the lithium battery out of the reach of children. Should the battery be swallowed, immediately consult a doctor.
Wipe the battery with a dry cloth to assure a good contact.
Be sure to observe the correct polarity when installing the battery.
Do not hold the battery with metallic tweezers, otherwise a short-circuit may occur.
WARNING
Battery may explode if mistreated.
Do not recharge, disassemble, or dispose of in fire.
Location and function of controls/terminals
To use the remote, point it at the remote sensor.
Remote commander
RETURN button
Press to return to the previous screen of the One-Seg
TV menu.
///(Cursor)/ENTER buttons
Press to move the cursor and apply a setting.
Press /to change the channel.
Number buttons
Press to receive the desired channel.
Press to enter your password.
CLEAR button
Press to exit from the One-Seg TV menu.
MENU button
Press to open the One-Seg TV menu.
Remote sensor
Power on indicator
Turns on when the unit is powered.
Enjoying One-Seg TV
The first time you do this, you need to make a channel list. For details on making a channel list, see “Searching for and
storing channels” below.
1 Switch the input selector on your monitor or Multimedia AV Receiver so that the signal from the unit
appears on the monitor.
2 Press MENU on the remote commander.
The One-Seg TV menu appears.
3 Press /on the remote commander to select “Channel List,” then press ENTER.
The channel list appears.
4 Press /on the remote commander to select the desired channel, then press ENTER to confirm your
selection.
Searching for and storing channels
You can search for channels and store a list of them.
1 Switch the input selector on your monitor or Multimedia AV Receiver so that the signal from the unit
appears on the monitor.
2 Press MENU on the remote commander.
The One-Seg TV menu appears.
3 Press /on the remote commander to select “Re-Search,” then press ENTER.
The unit starts searching for and storing stations into the channel list.
If a channel list already exists, it will be updated.
Select “Yes” to update the channel list.
When the searching and storing of stations is completed, the following display appears.
4 Press /on the remote commander and select “OK,”then press ENTER.
The channel list appears.
If the signal of a channel is unstable
The following display appears.
Press /on the remote commander and select “Retry” to attempt to receive the same channel’s signal again.
Otherwise, select “CH.List” to choose another channel.
To stop searching
Press ENTER while searching.
Controls and indications for One-Seg TV
When pressing ENTER, the following display appears for a brief period of time.
Signal level of the current channel Closed-caption setting
Name of the current channel Sound setting
Displaying the program guide
1 Switch the input selector on your monitor or Multimedia AV Receiver so that the signal from the unit
appears on the monitor.
2 Press MENU on the remote commander.
The One-Seg TV menu appears.
3 Press /on the remote commander to select “EPG,” then press ENTER.
The program guide appears.
To return to the One-Seg TV menu, press RETURN. Press MENU or RETURN again to close the One-Seg menu.
Notes
This function is available only for digital signals.
This function may work only in certain regions.
Switching the soundtrack
You can switch the sound of a multiplex TV program.
The options are indicated below.
“Main”: Outputs main channel sound.
“Sub”: Outputs sub-channel sound.
“Main + Sub”: Outputs both main and sub-channel sound.
1 Switch the input selector on your monitor or Multimedia AV Receiver so that the signal from the unit
appears on the monitor.
2 Press MENU on the remote commander.
The One-Seg TV menu appears.
3 Press /on the remote commander to select “Sound,” then press ENTER.
The sound menu appears.
4 Press /on the remote commander to select the desired option, then press ENTER.
“Saved!” appears, and the setting is complete.
Displaying closed captions
1 Switch the input selector on your monitor or Multimedia AV Receiver so that the signal from the unit
appears on the monitor.
2 Press MENU on the remote commander.
The One-Seg TV menu appears.
3 Press /on the remote commander to select “Closed Caption,” then press ENTER.
The closed-caption menu appears.
4 Press /on the remote commander to select “On,”then press ENTER.
“Saved!” appears and the setting is complete.
Deactivating the closed captions
Press /on the remote commander to select “Closed Caption,” and set it to “Off.”
Selecting the aspect ratio
You can change the screen aspect ratio.
The options are indicated below.
“Normal”: Picture with 4:3 aspect ratio (regular picture).
“Wide”: Picture with 4:3 aspect ratio enlarged to the left and right edges of the screen, with overflowing parts of the top
and bottom cut off to fill the screen.
1 Switch the input selector on your monitor or Multimedia AV Receiver so that the signal from the unit
appears on the monitor.
2 Press MENU on the remote commander.
The One-Seg TV menu appears.
3 Press /on the remote commander to select “Display,” then press ENTER.
The display setting menu appears.
4 Press /on the remote commander to select the desired size, then press ENTER.
“Saved!” appears and the setting is complete.
Changing the password for One-Seg TV parental control
1 Switch the input selector on your monitor or Multimedia AV Receiver so that the signal from the unit
appears on the monitor.
2 Press MENU on the remote commander.
The One-Seg TV menu appears.
3 Press /on the remote commander to select “Settings,” then press ENTER.
The One-Seg TV settings menu appears.
4 Press /on the remote commander to select “TV Password Set.”
5 Press the number buttons on the remote commander to enter your password, then press ENTER.
Enter “0000” for the default password.
6 Press the number buttons on the remote commander to enter the new password, then press ENTER.
7 Press the number buttons on the remote commander to verify the new password, then press ENTER.
“Password Changed.” appears and the password is changed.
To return to the One-Seg TV menu, press RETURN. Press MENU or RETURN again to close the One-Seg menu.
Adjusting setup items for One-Seg TV
The setup items for One-Seg TV can be configured in “Settings.”
1 Switch the input selector on your monitor or Multimedia AV Receiver so that the signal from the unit
appears on the monitor.
2 Press MENU on the remote commander.
The One-Seg TV menu appears.
3 Press /on the remote commander to select “Settings,” then press ENTER.
The One-Seg TV settings menu appears.
4 Press /on the remote commander to select the desired item.
5 Press /on the remote commander to select the desired setting, then press ENTER.
* A message appears and the setting is complete.
* For “TV Parental Rating” setting, enter the password after step 5.
The items in the TV setting menu are as follows:
“Language”
Selects the language for the One-Seg TV menu.
“TV Parental Rating”
Selects the parental rating: “Off,” under 10, 12, 14, 16, or 18 years old. Enter your password to complete the setting.
“TV Password Set” (see above)
“SW Version”
Shows the ISDB software version information.
“Default”
Returns the unit to the default setting.
To return to the One-Seg TV menu, press RETURN. Press MENU or RETURN again to close the One-Seg menu.
Troubleshooting
The following checklist will help you remedy problems you may encounter with your unit.
Before going through the checklist below, check the connection and operating procedures.If the problem is not solved,
visit the following support site.
Support site
http://esupport.sony.com/BR/
General
No power is being supplied to the unit.
Check the connection or fuse.
If the fuse blows, check the power connection and replace the fuse. When replacing the fuse, be sure to use one matching
the amperage rating stated on the original fuse. If the fuse blows again after replacement, there may be an internal
malfunction. In such a case, consult your nearest Sony dealer.
Fuse (0.5 A)
Note
When replacing the fuse, make sure that the terminal of the fuse holder does not touch the chassis. If it touches the chassis, the fuse of the car may blow.
Stored stations are erased.
The fuse has blown.
The leads are not connected correctly.
The One-Seg TV menu language differs.
Select the desired language in “Language” of the setup items.
Picture
There is no picture/picture noise occurs.
A connection has not been made correctly.
Check the connection to the connected equipment, and set the input selector of the equipment to the source
corresponding to this unit.
Installation is not correct.
Install the unit at an angle of less than 30° in a sturdy part of the car.
The parking brake cord (light green) is not connected to the parking brake switch cord, or the parking brake is not
applied.
The picture does not fit in the screen.
The aspect ratio is fixed on the DVD.
Sound
There is no sound/sound skips/sound crackles.
A connection has not been made correctly.
Check the connection to the connected equipment, and set the input selector of the equipment to the source
corresponding to this unit.
Sound is noisy.
Keep cords and cables away from each other.
One-Seg TV playback
You cannot receive any channels, or no channels appear after a search.
Check the One-Seg TV antenna (aerial) connection.
The One-Seg TV is locked to one channel.
Select “Re-Search” to add receivable channels that have not been stored.
You cannot receive or select any channels.
Select “Re-Search” to add receivable channels that have not been stored.
A channel does not display correctly after you select it.
Check for any damage to the antenna (aerial) or a bad connection.
You forgot the password for parental control.
Return the unit to the default settings in “Default” of the setup items. “0000” is the default password.
Error messages
Fail to Play Channel Retry?
The signal of the channel being received is weak.
Select “Retry” to attempt to receive the same channel’s signal again. Otherwise, select “CH.List” to choose another
channel.
Existing Channel list will be deleted. Continue?
A channel list already exists.
Select “Yes” to update the channel list.
Password does not match.
The input password for the One-Seg TV parental lock is incorrect.
Restricted broadcast. Would you like to watch?
The selected channel is locked via the parental lock.
If these solutions do not help improve the situation, consult your nearest Sony dealer.
Specifications
Channel Range: UHF 14 ch - 69 ch
Power requirements: 12 V DC car battery (negative ground (earth))
Dimensions: Approx. 115 mm × 25 mm × 67 mm (w/h/d)
Mass: Approx. 150 g
Design and specifications are subject to change without notice.

